white paper
WINDOWS AZURE
SQL DATA SYNC
white paper
INTRODUCTION
One of the most important aspects of cloud adoption with companies that
depend on data integration is the ability to synchronize cloud data resources
stored in SQL Database instances with on-premise databases. SQL Data Sync is
a Windows Azure service that provides synchronization capabilities by copying
and synchronizing SQL Database instances and local SQL Server databases.
This white paper introduces you to SQL Data Sync and walks you through an
example on how to setup a topology that keeps a local database synchronized
with a SQL Database instance.
ABOUT THE AUTHOR
Herve Roggero, Windows Azure MVP, is the founder of
Blue Syntax Consulting, a company specialized in cloud
computing products and services.
Herve’s experience includes software development,
architecture, database administration, and senior
management with both global corporations and startup
companies. Herve holds multiple certifications, including
a MCDBA, MCSE, MCSD. He also holds a MBA from
Indiana University.
Herve is the co-author of PRO SQL Azure, PRO SQL
Database for Windows Azure and PRO SQL Server 2012
Practices from Apress.
white paper
INTRODUCTION TO SQL DATA SYNC
SQL Data Sync is a technology that allows you to disseminate data changes across multiple SQL Database instances and SQL Server databases. You can use SQL Data Sync to synchronize two or more SQL Database instances for example, or synchronize a few SQL Database instances with one or more SQL Server databases running in your network.
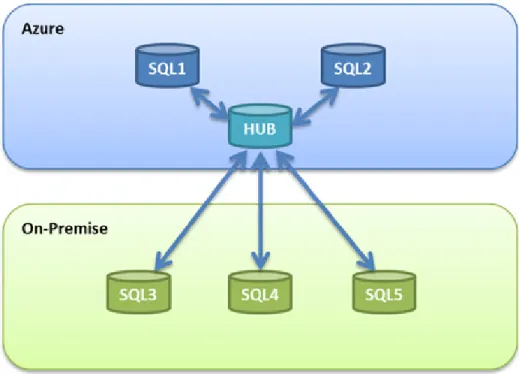
SQL Data Sync uses a Hub and Spoke architecture as shown in Figure 1. One of the databases is marked as the Hub, and all the other databases synchronize their data with the Hub. The Hub must be a SQL Database instance.
You could in theory use SQL Data Sync to synchronize two or more SQL Server databases and simply use a SQL Database instance as the Hub. This might be useful if you have geographically dispersed SQL Server databases and you cannot use existing data replication technologies. However, for the most part SQL Data Sync is used to synchronize SQL Database instances with other instances, or with local SQL Server databases. Each data synchronization topology is called a Sync Group.
Before diving into the configuration details of SQL Data Sync, let’s review a few
important settings that drive the overall synchronization behavior:
Frequency: The frequency setting determines how often the
synchronization runs. The lowest value for this setting is 5 minutes. So at best, the data will be delayed by 5 minutes across your databases.
Conflict Resolution: The conflict resolution allows you to specify a winner
in case a conflict exists between a database and the Hub database. The winner will either be the Client or the Hub. See the Conflict Resolution
section later in this white paper for more details.
Figure 1 - SQL Data Sync Hub and Spoke Architecture
Sync Direction: When you add a database to the Sync group, you specify
the direction of the sync. By default, the sync is bi-directional. You can also sync to the Hub, or sync from the Hub.
Additional table synchronization options are available:
Tables Columns: You can filter the columns being synchronized by
selecting the columns you want to include.
Data Filters: You can filter the data being synchronized by applying
white paper
PREPARING YOUR DATABASES FOR
THE STEP-BY-STEP EXAMPLE
In order to follow the step-by-step configuration example provided next, you
will need to create a database in SQL Database and another one on a local SQL Server database.
To create the cloud database, open a query window using SQL Server
Management Studio 2008 R2 or higher, and connect to master in SQL Database. Then, run the following command to create an empty database:
CREATE DATABASE MyCloudDB
Once the cloud database is created, connect to a local SQL Server database and create another empty database:
CREATE DATABASE MyTestDB
Both databases are empty at this time. Connect to each database, and run the following command:
CREATE TABLE [users] (
userId int IDENTITY(1,1) PRIMARY KEY,
firstName nvarchar(50), lastname nvarchar(50), active bit NOT NULL,
lastUpdatedOn DATETIME DEFAULT(GETUTCDATE()))
Once the table has been created in both environments, let’s seed the SQL Server database with a few records. These records will automatically be synchronized at the completion of our sync setup.
INSERT INTO users VALUES (‘Rose’, ‘Mary’, 1, DEFAULT) INSERT INTO users VALUES (‘Jim’, ‘Nastic’, 1, DEFAULT) INSERT INTO users VALUES (‘Stan’, ‘Lesteele’, 1, DEFAULT) INSERT INTO users VALUES (‘Rose’, ‘Beef’, 1, DEFAULT)
SETTING UP SQL DATA SYNC WITH
SQL DATABASE AND SQL SERVER
The following steps will show you how to create a simple data sync topology
from start to finish. In order to follow the steps provided below, you will need to create a database in SQL Database with a specific schema and another
one in your local SQL Server database; see the previous section (Preparing Your Databases for the Step-By-Step Example) for details on the pre-requisite. Once your databases have been created, you are ready to proceed with the
configuration steps provided in this section.
PROVISION A SYNC SERVER
First, you need to provision a Sync Server. Go to the Windows Azure
management portal (http://windows.azure.com) and select Data Sync on the left bar. A list of existing subscriptions will become visible; click on your subscription. If you have not yet created a Sync Server, create a server by clicking on the “Provision SQL Data Sync Preview Server” panel in the center of your screen. A Terms of Use popup screen will become visible; once you check “I agree…” click Next, select the subscription from the list and click Next, choose which data center will host the data sync server and click Finish.
white paper
CREATE A SYNC GROUP
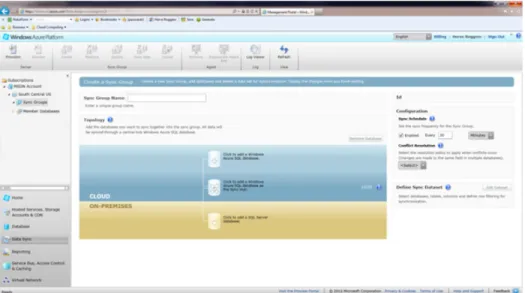
After you provisioned a Sync Server, select Create from the Sync Group menu. Enter a sync group name (I chose testsync in my example), and specify
configuration options as shown in Figure 2. For testing purposes, select
5 minutes for the Sync Schedule and choose Client Wins for the Conflict
Resolution.
ADD A SQL SERVER DATABASE
Let’s add our SQL Server database to the sync group. Click on the plus sign in the ON-PREMISES panel to add a SQL Server database. The “Add a SQL Server Database to the Sync Group” window will come up as shown in Figure 3. Select
the Add a new SQL Server database option, and choose Sync to the Hub for
the Sync Direction, then click next.
Figure 2 - Create a new Sync Group
The next screen allows you to choose from a list of databases if you already have
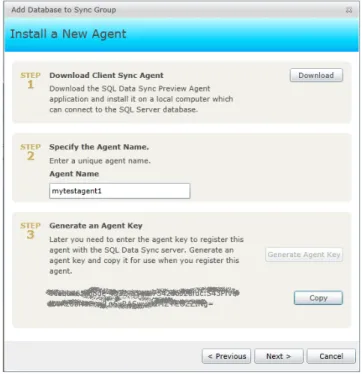
a client agent deployed. Because this is the first time through, select Install a
new Agent and click next (see Figure 4).
Figure 3 - Add a SQL Server Database to the Sync Group
white paper
Once you have obtained the agent key, click on the Copy button to copy this key in memory. You will need this key to register the agent with this sync group. Before clicking next, we will add the agent key to the client agent.
In the next screen, you will be able to find a link to download the agent, and
select it once installed. Click the Download button and follow the instructions on how to install the cloud agent. You can follow the steps under the Configuring
the SQL Data Sync Agent section later for details on how to install the agent.
Once completed, enter the unique agent name in Step 2 (I named mine
mytestagent1) and click on Generate Agent Key. This window will then show
you an agent key as shown in Figure 6.
Figure 5 - Install a New Agent
white paper
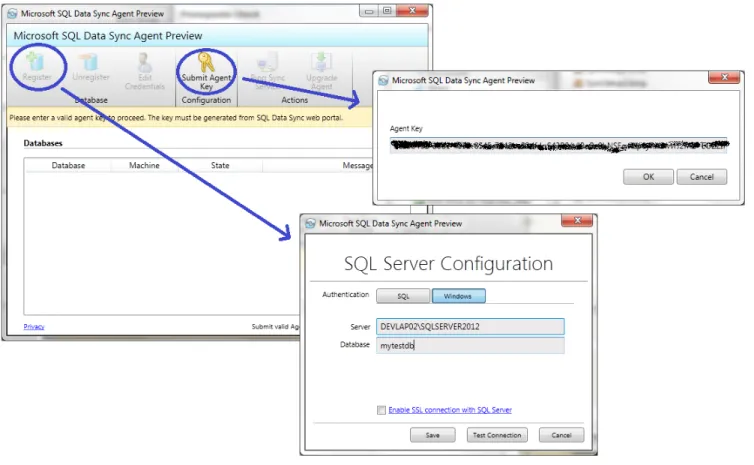
On your local machine, configure the agent by adding the Agent Key, and by adding a SQL Server database to the list of registered databases. Enter mytestdb as the database name.
white paper
Now that the client agent has been registered with the agent key, and a SQL Server database was added in the agent, go back to the Windows Azure portal (Figure 6), and click next. A new window will be displayed in which you can list the available databases from the agent by clicking on Get Database List, as shown in Figure 8. Select the database and click on Finish. The Sync Group is now aware of your SQL Server database and the client agent communicates with the Sync Server. Next, we will add the SQL Database Hub database.
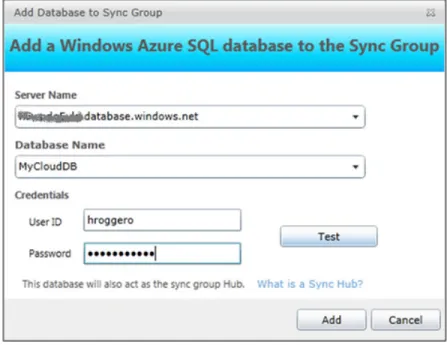
ADD A SQL DATABASE HUB
Click on the Add a Windows Azure SQL Database Hub icon in the CLOUD section (see Figure 2) to open a new popup window called Add a Windows Azure SQL Database to the Sync Group, as shown in Figure 9. Specify the server name, the database name (MyCloudDB) and your login credentials. Click Add. Next, we will
define a data set to synchronize.
DEFINE A DATA SET
Last but not least, let’s define a data set that will define which tables and columns will be synchronized. For our testing purposes, we will also define a filter so you can see the behavior of SQL Data Sync when filters are defined. In Figure 2, you can see a Define Sync Data Set area that was disabled; however now that we have a hub defined, you can click on Edit Data Set and a new window will pop up called Define Data Set for Synchronization.
Figure 8 - Available SQL Server Databases
white paper
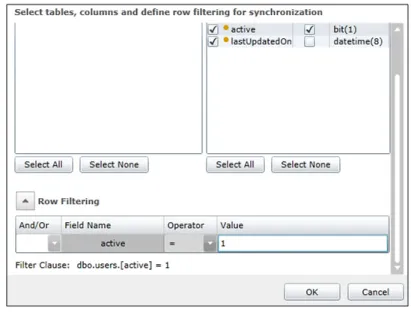
Select users from the list of tables, and select all the columns for
synchronization (see Figure 10). Click on the filter checkbox next to the Active column to add a filter. The bottom section of the window will change and you
will see a new row under Row Filtering. You may need to scroll down in that window to see the Row Filtering area.
Enter 1 for the filter value (see Figure 11) then click OK. This filter indicates that
records for which the Active column is 1 will be synchronized. You should know
however that once a filter has been defined on a column, the column cannot be removed from the Sync Data Set and the filter cannot be changed either. Click
OK.
When the window closes, the synchronization process starts and copies the records previously created in SQL Server into your SQL Database instance. Because we have very few records, this will take just a few seconds.
Figure 10 - Define Data Set
white paper
INSTALLING THE SQL DATA SYNC AGENT
This section shows you how to install the client agent necessary to synchronize a local SQL Server database to a SQL Database instance. Before installing the agent, you may need to install the following pre-requisites:
»
Microsoft System CLR Types for Microsoft SQL Server 2012 (x86)
»
Microsoft SQL Server 2012 Shared Management Objects (x86)
The above pre-requisites are part of the Microsoft SQL Server 2012 Feature Pack and can be downloaded directly from Microsoft’s download center: http://www. microsoft.com/en-us/download/details.aspx?id=29065.
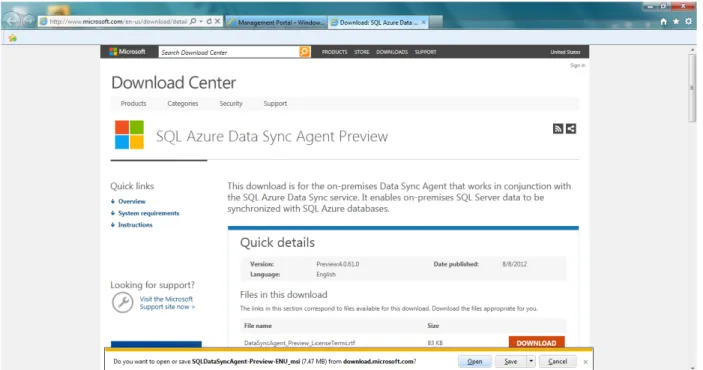
To access the SQL Data Sync download page, you can click on the Download button found on the Windows Azure portal when installing a new agent (see Figure 5) or go to the Microsoft download center and search for SQL Azure Data Sync Agent Preview (see Figure 12). Click on the download link on this page and select Open (if you are running Internet Explorer). This will start the installation wizard.
white paper
TESTING OUR CONFIGURATION
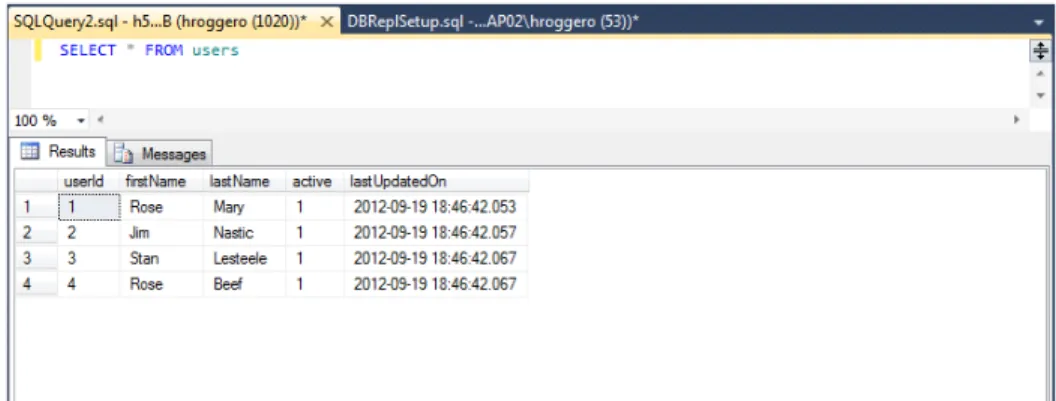
To verify that the synchronization is completed successfully, connect to your SQL Database instance with SQL Server Management Studio and execute the select statement below. You should see a result similar to Figure 13.
SELECT * FROM users
As you can see, all the records came through because all have the Active column set to 1. Let’s add a record to our SQL Server database and see if it comes through as well. Run the following command on the SQL Server database, and observe the new record in the Hub within a few minutes:
INSERT INTO users VALUES (‘Andy’, ‘Man’, 1, DEFAULT)
If you were to delete one of those records in SQL Server, it would be removed from the Hub as well. However, if you update a record’s Active column to 0, then delete it from your SQL Server database, it would not be deleted from the Hub because its Active column was 0 at the time of the delete operation. Let’s try this:
»
Update a record in your SQL Server database and set the active column
to 0
UPDATE users SET Active = 0 WHERE userId = 1
»
Delete userid = 1 from the SQL Server database
DELETE FROM users WHERE userId = 1
»
Wait a few minutes, and observe that userId 1 is still visible in the Hub
You can leverage this behavior in cases where you have multiple changes
taking place over time, but you only want to synchronize the final outcome. For
example, let’s assume our users table contains a list of leads as well as users, and you don’t want the leads to be synchronized to the SQL Database instance until they become actual users of the system. You could use the Active column to indicate that a 0 is a lead, and a 1 is an actual user, and achieve the desired outcome.
white paper
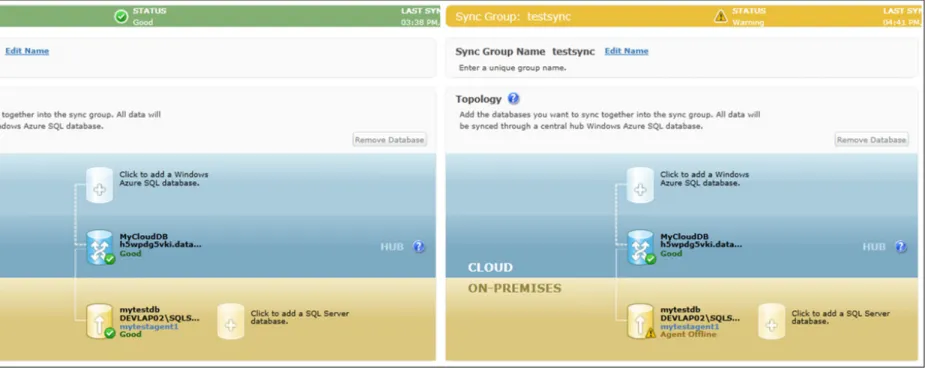
MONITORING THE SYNC STATUS
You can easily monitor the sync status by logging into the Windows Azure portal and clicking on the Sync Group previously created. As you can see in Figure 14, the
interface changes when the sync is working and when a failure occurs. In this example, the error is an unreachable agent (agent offline).
You can also access the sync log through the Log Viewer (click on Log Viewed on the top menu of your Windows Azure portal) to see the synchronization results (see
Figure 15) and filter the log by date, agent name and more.
white paper
CONFLICT RESOLUTION
A conflict happens when the same record has been changed in two or more databases during the same sync period. Regardless of the sync conflict
resolution used, only one of the changes will be accepted and the others will be discarded; changes are not merged.
Two conflict resolutions are possible with SQL Data Sync: Client Wins and
Hub Wins. When you select Client Wins, the last update sent to the Hub by a database gets eventually synchronized across all the other databases. When you
select Hub Wins, the first update sent to the Hub by a database gets eventually
synchronized across all the other databases, and all the other updates to the same record are discarded. The order in which databases are synchronized
dictates the final outcome, and the conflict resolution method tells us if the first
or the last synchronization wins.
In this release, the order in which the databases are synchronized cannot be changed, and can vary from one sync period to the next. As a result, the end
state of a conflict resolution is non-deterministic.
CURRENT LIMITATIONS
There are a few limitations with the current release of SQL Data Sync. Here are a few of them:
»
A database cannot belong to more than 5 sync groups
»
No more than 100 tables can belong to the same sync group
»
Table names, columns names and schemas cannot be more than 50
characters
»
You must use SQL Server 2005 SP2 or higher
»
You must install the Sync agent on Windows 2008, Windows Vista or
Windows 7
»
Some data types are not supported, including bigint, money, small
money, UDT, XML data types, timestamp, hierarchyid and more
»
SQL Data Sync does not support SQL Database Federations
»
SQL Data Sync does not make transactional consistent copies of the
data
»
SQL Data Sync does not sync schemas; it only synchronizes the data
For a list of limitations and more information, visit the SQL Data Sync section on MSDN: http://msdn.microsoft.com/en-us/library/windowsazure/hh456371.aspx
white paper
Idera is headquartered in Houston, TX with offices in London
and Melbourne.
WEB www.idera.com
TWITTER www.twitter.com/Idera_Software FACEBOOK www.facebook.com/IderaSoftware LINKEDIN www.linkedin.com/groups?gid=2662613 US EMEA APAC MEXICO BRAZIL
+1 713 523 4433
877 GO IDERA (464 3372) +44 (0) 1753 218410 +61 1300 307 211 +52 (55) 8421 6770 +55 (11) 3230 7938
ABOUT IDERA
Idera provides tools for Microsoft SQL Server,
SharePoint and PowerShell management and
administration. Our products provide solutions
for performance monitoring, backup and recovery,
security and auditing, and PowerShell scripting.
Headquartered in Houston, Texas, Idera is a
Microsoft Gold Partner and has over 5,000
customers worldwide.
For more information, or to download a free
14-day full-functional evaluation copy of any of Idera’s
tools for SQL Server, SharePoint or PowerShell,
please visit
http://www.idera.com/
.
CONCLUSION
Windows Azure offers a unique synchronization technology called SQL Data Sync, allowing multiple databases (SQL Database and SQL Server) to stay synchronized with support for bi-directional changes. This white paper introduced you to the basics of SQL Data Sync and walked you through the steps necessary to synchronize a SQL Database instance with a local SQL Server database.
The SQL Data Sync technology is currently available as a Preview and can change before it is released in production. Although some features may change, and certain limitations may be lifted, I encourage you to evaluate this technology if you haven’t done so already. If you have deployed a database in the cloud already, SQL Data Sync may be well suited for your loosely connected database systems.
IDERA SOLUTIONS FOR WINDOWS AZURE SQL DATABASE
Idera offers a free tool for fast, reliable backup and restore for Windows Azure SQL