Gplus Adapter 8.0
For Microsoft Dynamics CRM
The information contained herein is proprietary and confidential and cannot be disclosed or duplicated without the prior written consent of Genesys Telecommunications Laboratories, Inc.
Copyright © 2009-2012 Genesys Telecommunications Laboratories, Inc. All rights reserved. About Genesys
Genesys is the world's leading provider of customer service and contact software - with more than 4,000 customers in 80 countries. Drawing on its more than 20 years of customer service innovation and experience, Genesys is uniquely positioned to help companies bring their people, insights and customer channels together to effectively drive today's customer conversation. Genesys software directs more than 100 million interactions every day, maximizing the value of customer engagement and differentiating the experience by driving personalization and multi-channel customer service - and extending customer service across the enterprise to optimize processes and the performance of
customer-facing employees. Go to
Each product has its own documentation for online viewing at the Genesys Technical Support website or on the Documentation Library DVD, which is available from Genesys upon request. For more information, contact your sales representative.
Notice
Although reasonable effort is made to ensure that the information in this document is complete and accurate at the time of release, Genesys Telecommunications Laboratories, Inc. cannot assume responsibility for any existing errors. Changes and/or corrections to the information contained in this document may be incorporated in future versions. Your Responsibility for Your System’s Security
You are responsible for the security of your system. Product administration to prevent unauthorized use is your responsibility. Your system administrator should read all documents provided with this product to fully understand the features available that reduce your risk of incurring charges for unlicensed use of Genesys products.
Trademarks
Genesys and the Genesys logo are registered trademarks of Genesys Telecommunications Laboratories, Inc. All other company names and logos may be trademarks or registered trademarks of their respective holders. © 2012 Genesys Telecommunications Laboratories, Inc. All rights reserved.
The Crystal monospace font is used by permission of Software Renovation Corporation,
www.SoftwareRenovation.com. Technical Support from VARs
If you have purchased support from a value-added reseller (VAR), please contact the VAR for technical support. Ordering and Licensing Information
Complete information on ordering and licensing Genesys products can be found in t Released by: Genesys Telecommunications Laboratories, Inc.
For Microsoft Dynamics CRM — Manual Deployment Guide 3
Table of Contents
Preface ... 7
Intended Audience ... 7
Chapter Summaries ... 8
Document Conventions ... 8
Document Version Number ... 8
Monospace ... 9
Correction of Errors in Screen Captures ... 9
Use of Square Brackets ... 9
Use of Angle Brackets ... 10
Related Resources ... 10
Genesys Resources ... 10
Microsoft Resources ... 10
Contacting Genesys Technical Support ... 11
Making Comments on This Document ... 11
Chapter 1
About the Gplus Adapter ... 13
Feature Overview ... 13
Key Features ... 14
Integration with Genesys Configuration Environment ... 16
Architectural Overview ... 16
Chapter 2
System Requirements ... 19
Compatibility Overview ... 19
Other Compatibility Considerations ... 20
Software Requirements ... 20
Genesys Applications ... 20
Hardware Requirements ... 21
Switch Support ... 21
Security ... 21
Chapter 3
Installing the Adapter ... 23
Prerequisites ... 23
4 Gplus Adapter 8.0
Microsoft .NET Framework 3.5 SP1 ... 24
Installing and Configuring main.aspx ... 24
Creating the Application Template ... 26
Creating and Configuring the Application... 26
Creating and Configuring Media Types ... 27
Creating and Configuring User Access ... 27
Configuring a User Switch Password ... 29
Installing the G
plus
Adapter... 30
Deploy Application Files ... 31
Modify Web.config File ... 31
Modify the Aspnet.config File ... 34
Installing G
plus
Adapter on an IIS 7.0 Web Server ... 35
Create an Application Pool ... 35
Creating a Web Site Application ... 40
Uninstalling the G
plus
Adapter ... 44
Chapter 4
Configuring the Adapter ... 45
Configuring the G
plus
Adapter ... 45
Connections Tab ... 45
Options Tab ... 46
Implementing the Softphone.htm Option ... 46
Customizing a softphone-config section ... 47
Chapter 5
Configuring Microsoft Dynamics CRM ... 49
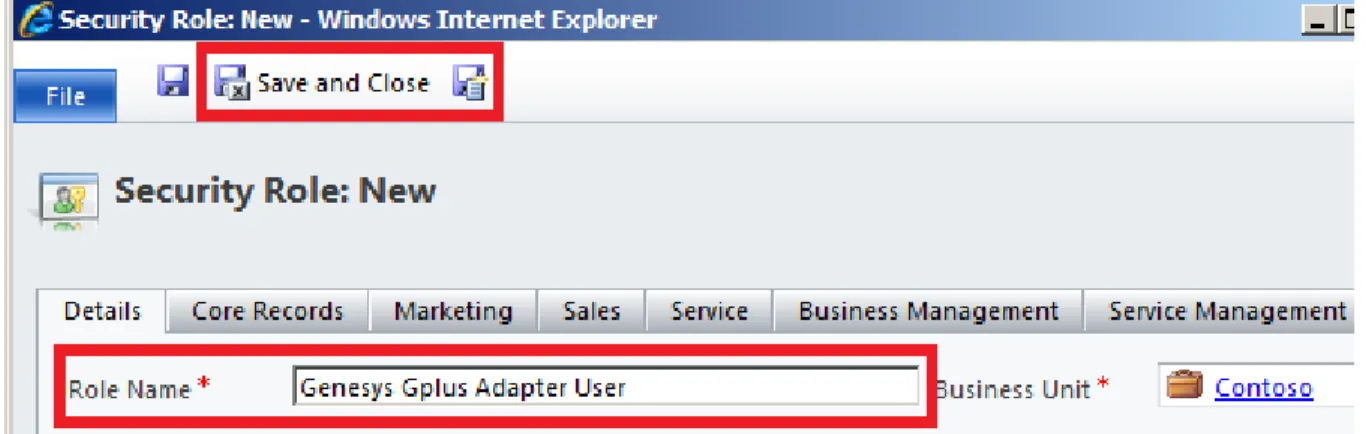
Creating the G
plus
Adapter Security Role ... 49
Assigning the G
plus
Adapter Security Role ... 50
Chapter 6
Common Configuration ... 53
CTI-to-CRM Attribute Mapping ... 53
Data Mapping Options ... 56
Data Functions ... 58
CTI-to-CRM Mapping Recommendations and
Considerations ... 59
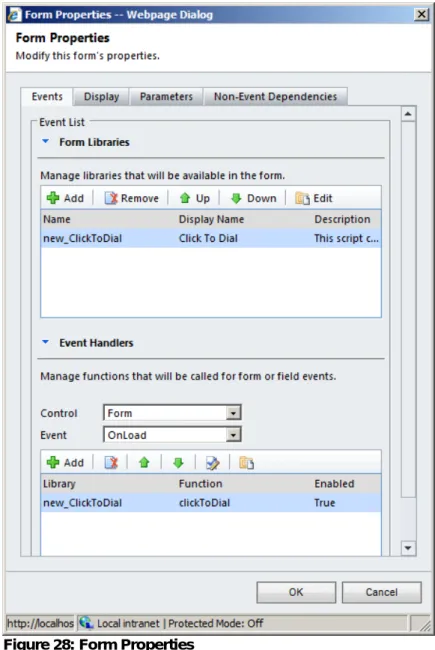
Adding Click to Dial Functionality ... 59
Changing the MS Entity Form Screen Pop ... 64
Configuring Screen Pops ... 66
Voice Interactions ... 66
Outbound Records ... 66
Open Media ... 67
For Microsoft Dynamics CRM — Manual Deployment Guide 5
Overriding Screen Pops ... 68
Modifying Not Ready Reasons ... 68
Chapter 7
Outbound Synchronization ... 71
Synchronization Workflow ... 71
Synchronization Prerequisites ... 73
Configuring Outbound Synchronization ... 75
Creating a Synchronization Task ... 75
Configuring a CRM Queue Mapping ... 76
Starting the Synchronization Process ... 79
Campaign Activity ... 79
Quick Campaign ... 81
Campaign ... 82
Chapter 8
Accessing the Gplus Adapter ... 83
Starting the G
plus
Adapter ... 83
For Microsoft Dynamics CRM — Manual Deployment Guide 7
Preface
Welcome to the Gplus Adapterfor Microsoft Dynamics CRM Manual Deployment Guide. This guide lists system requirements for, and describes how to manually
install and configure the Gplus Adapter.
This chapter provides an overview of this document, identifies the primary audience, introduces document conventions, and lists related reference information:
• Intended Audience • Chapter Summaries • Document Conventions • Related Resources •
• Contacting Genesys Technical Support Making Comments on This Document
The Gplus Adapter for Microsoft Dynamics CRM introduces Genesys Interaction
Management capabilities and contact center functionality to the Microsoft CRM system. This pre-packaged integration with MS CRM is designed for voice and multimedia support, and provides screen pop, agent state controls, and call control functionality. The Gplus Adapter consists of a single or multiple server components
which is fully integrated with the Microsoft Dynamics CRM application. Media features and/or functionality are accessible from within the CRM application.
Intended Audience
This guide is primarily intended for system administrators or other individuals who install, configure, and maintain the Gplus Adapter 8.0 for Microsoft Dynamics CRM.
The guide assumes that you have a basic understanding of:
• Computer-telephony integration (CTI) concepts, processes, terminology, and applications.
• Network design and operation.
• Your own network configurations. You should also be familiar with:
Chapter 1: Preface Chapter Summaries
8 Gplus Adapter 8.0
• Genesys Framework
• Genesys Enterprise Routing
• Genesys Multi Media
• Microsoft Dynamics CRM 2011
• IIS 7.0 Administration
Chapter Summaries
In addition to this preface, this guide contains these additional chapters and appendixes:
• “Preface” beginning on page 7, introduces standard principles and conventions related to this document.
• Chapter 1, “About the Gplus Adapter” beginning on page 13, introduces concepts and terminology for this product, discusses key features of the Gplus Adapter, and describes the
architecture of the Gplus Adapter and how it works with other Genesys products and
Microsoft Dynamics CRM 2011.
• Chapter 2, “System Requirements” beginning on page 19, describes the minimum system and software requirements for installing and using this product.
• Chapter 3, “Installing the Gplus Adapter” beginning on page 23, provides installation
instructions for this product.
• Chapter 4, “Configuring the Gplus Adapter” beginning on page 45, describes configuration tasks for the Adapter.
• Chapter 5, “Configuring Microsoft Dynamics CRM” beginning on page 49, describes configuration tasks for the CRM.
• Chapter 6, “Common Configuration” beginning on page 53, describes common configuration tasks for system administrators using the Gplus Adapter.
• Chapter 7, “Outbound Synchronization” beginning on page 71, describes the outbound synchronization process supported by the Gplus Adapter.
• Chapter 8, “Accessing the Gplus Adapter”, beginning on page 83, describes the process to
start and access the Gplus Adapter.
Document Conventions
This document uses some stylistic and typographical conventions with which you might want to familiarize yourself.
Document Version Number
A document version number appears at the bottom of the inside front cover of this guide. Version numbers change as new information is added to this guide.
Here is a sample version number:
72gp_dep_msCRM_04-2006_v7.2.001.00
You will need this number when you are talking with Genesys Technical Support about this product.
Chapter 1: Preface Document Conventions
For Microsoft Dynamics CRM — Manual Deployment Guide 9
Type Styles
Italic
In this document italic is used: • When a term is being defined.
Example
• A customary and usual practice is one that is widely accepted and used within a
particular industry or profession.
• For emphasis. For example, “Do not use this value for this option.”
• For variables, for example, x +1 = 7 where x stands for . . .
Monospace
A monospace font, which is shown in the following examples, is used for:
• All programming identifiers and GUI elements. This convention includes the names of
directories, files, folders, paths, scripts, dialog boxes, options, fields, text and list boxes, all buttons including radio buttons, check boxes, commands, tabs, CTI events, and error messages; the values of options; logical arguments and command syntax; and code samples.
Examples
• Select the Show variables on screen check box.
• Click the Summation button.
• On the Properties dialog box, enter the value for the host server in your
environment.
• In the Operand text box, enter your formula.
• Click OK to exit the Properties dialog box.
• The following table presents the complete set of error messages T-Server distributes in EventError events.
• If you select true for the inbound-bsns-calls option, all established inbound
calls on a local agent are considered business calls.
• For any text the user must manually enter during a configuration or installation procedure: Example
• Enter exit at the command line.
Correction of Errors in Screen Captures
Screen captures taken from the product GUI (graphical user interface) and used in this document may sometimes contain a minor spelling, capitalization, or grammatical error. The text
accompanying and explaining the screen captures corrects such errors.
Use of Square Brackets
In any logical arguments, commands, and programming syntax presented in this document, square brackets are used to indicate that a particular parametric value is optional. That is, the value is not required to resolve a command, argument, or programming syntax. The
customer/user decides whether to supply a value and what that value is. Here is a sample: smcp_server -host [/flags]
Chapter 1: Preface Related Resources
10 Gplus Adapter 8.0
Use of Angle Brackets
Angle brackets are used to indicate that a value in a logical argument, command, or programming syntax is required, but that the user must supply the data for the value. Because the value is specific to an individual enterprise—for example, DNs or port numbers—the program cannot predict (that is, program in) what the value is. Here is a sample:
smcp_server -host <confighost>
Related Resources
Genesys Resources
Consult these additional Genesys resources as necessary:
• The Gplus Adapter 8.0 for Microsoft Dynamics CRM User’s Guide, which provides
step-by-step instructions for performing common contact center tasks using the Gplus Adapter.
• The Genesys Technical Publications Glossary, which ships on the Genesys Documentation
Library CD and which provides a comprehensive list of the Genesys and CTI terminology and acronyms used in this document.
• The Release Notes and Product Advisories for this product, which are available on the Genesys Technical Support website at
Information on supported hardware and third-party software is available on the Genesys Technical Support website in the following documents:
• Genesys Supported Operating Systems and Databases • Genesys Supported Media Interfaces
Genesys product documentation is available on the:
• Genesys Technical Support website at http://genesyslab.com/support.
• Genesys Documentation Library CD, which you can order by email from Genesys Order Management at
Microsoft Resources
Microsoft provides extensive documentation for the Microsoft CRM product, both on the installation media and within the Microsoft CRM Help system.
Documentation for the Microsoft CRM product is available in Adobe Acrobat format (.pdf) and in Microsoft Word format (.doc) on the Microsoft CRM Documentation CD.
The Microsoft CRM Getting Started Guide is also available within the Microsoft CRM Help
system.
Chapter 1: Preface Contacting Genesys Technical Support
For Microsoft Dynamics CRM — Manual Deployment Guide 11
Contacting Genesys Technical Support
If you have purchased support directly from Genesys, contact Genesys Technical
Support at the regional numbers below.
Note:
The following contact information was correct at time of publication. For the
most up-to-date contact information, see the
Support website. Before contacting technical support, refer to the
Genesys Technical Support Contact Information
Region
Telephone
North America and
Latin America
+888-369-5555 (toll-free)
+506-674-6767
Europe, Middle East, and Africa
+44-(0)-1276-45-7002
Asia Pacific
+61-7-3368-6868
Malaysia
1-800-814-472 (toll-free)
+61-7-3368-6868
India
000-800-100-7136 (toll-free)
+61-7-3368-6868 (International)
Japan
+81-3-6361-8950
Making Comments on This Document
If you especially like or dislike anything about this document, please feel free to email your comments t You can comment on what you regard as specific errors or omissions, and on the accuracy, organization, subject matter, or completeness of this document. Please limit your comments to the information in this document only and to the way in which the information is presented. Speak to Genesys Technical Support if you have suggestions about the product itself. When you send us comments, you grant Genesys a nonexclusive right to use or distribute your comments in any way it believes appropriate, without incurring any obligation to you.
Chapter 1: Preface Making Comments on This Document
For Microsoft Dynamics CRM — Manual Deployment Guide 13
Chapter
1
About the Gplus Adapter
This release of the Gplus Adapter for Microsoft Dynamics CRM is intended for
customers running Microsoft Dynamics CRM 2011 who also want to enable voice telephony and/or multimedia interactions in their enterprise applications.
The information in this chapter is divided among the following topics:
• Feature Overview • Architectural Overview
Feature Overview
The Gplus Adapter 8.0 for Microsoft Dynamics CRM provides Microsoft CRM users with contact
center capabilities supported by the Genesys Framework and Multi Media layers.
• Supports Microsoft Dynamics CRM 2011. Microsoft Dynamics CRM 4.0 is not supported by Gplus Adapter 8.0!
• Supports Microsoft Internet Explorer version 8 or higher only. Internet web browsers such as Chrome, Firefox, Opera, etc or versions of Internet Explorer lower than 8 are not supported!
• Provides presence/availability information to a Microsoft CRM user so the user can indicate readiness to process contact center interactions.
A user can change availability status in the contact center using the Gplus
Adapter, and can specify a reason for a status change (break, lunch, after call work, and so on).
• Allows a Microsoft CRM user to control phone and multimedia interactions in the contact center.
A user can dial a phone number related to a Microsoft CRM account, contact, or lead, and can answer and hang-up a phone call.
Chapter 1: About the Gplus Adapter Feature Overview
14 Gplus Adapter 8.0
A user can manage a Preview, Push Preview, Predictive or Progressive campaign record related to a Microsoft CRM account, contact or lead.
• Provides screen pop and seamless call/data transfers.
When a customer calls from a phone number recorded in the MS CRM database for this customer, the Gplus Adapter finds customer information and displays the
name of the customer and reference to the appropriate MS CRM information to the agent in a popup window.
• Provides quick ‘Click to Dial’ functionality
From any Microsoft CRM entity form, which contains a phone number field, agents can click a single button to initiate an outbound call to an associated phone number.
• Allows simultaneous interaction management.
Agents can manage several interactions at the same time to improve productivity and responsiveness to customers.
• Provides Microsoft CRM media routing capability.
Microsoft CRM interactions arriving in a properly-configured public queue are submitted to the CIM Platform for routing to an appropriate agent.
• Allows screen pop to custom forms.
Business data associated with an incoming call can be delivered to a custom form implemented within Microsoft CRM by the customer or a systems integrator.
• Provides outbound synchronization capabilities
Microsoft CRM data is synchronized with Genesys Outbound Contact Server (OCS) campaign data to produce OCS calling lists that contain CRM information.
• Provides an enhanced telephony softphone menu bar, which provides call control
functionality and web user interface communications allowing agents to switch between open Microsoft CRM interactions.
Key Features
The Gplus Adapter 8.0 for Microsoft Dynamics CRM enables the following key features.
Agent State Controls
• The agent is automatically connected and logged into the Genesys CIM environment by signing into Gplus Adapter.
Chapter 1: About the Gplus Adapter Feature Overview
For Microsoft Dynamics CRM — Manual Deployment Guide 15
• The agent can change status between Ready, Not Ready, Login and Logout and can select a
reason code for Not Ready status, provided that the system administrator has configured
these reason codes in Genesys Configuration Manager (CME).
• The agent can manage their agent state across all media types within their assigned place, as well as manage their state on an individual media type within their place.
• The agent can perform after call work.
• The agent can log out of Genesys without signing out from Microsoft CRM application.
Telephony Functions
• Answer a call
• Make a call
• Place a call on hold and retrieve a held call
• Hang up a call
• Initiate a One-Step or a Two-Step transfer
• Initiate a One-Step or a Two-Step conference call
• Send DTMF tones
• Handle multiple interactions simultaneously
Outbound Functions
• Reject record
• Reschedule record (Campaign or Personal)
• Cancel record or record chain
• Mark record or record chain as Do Not Call
• Dial record
• View chained records
• View custom data associated with record
• Mark record as done
• Assign disposition code to record
Media Routing
• Incoming Microsoft CRM interactions arriving in the configured queue are routed to a particular agent, who receives a screen pop and can elect to accept or reject the interaction. Upon acceptance, the email is placed in the agent’s private queue.
• Agents with the appropriate Gplus Adapter role authorization do not need to retrieve incoming
multimedia interactions manually from the configured inbound queue.
Data Synchronization
• Microsoft CRM data can be included in Genesys OCS calling list content.
• Administration can map specific CRM entity information to specific Genesys outbound fields and pass CRM data to users as part of an Genesys outbound campaign.
Screen Pop and Seamless Call/Data Transfer
Chapter 1: About the Gplus Adapter Architectural Overview
16 Gplus Adapter 8.0
A popup window for incoming interactions provides information about the call
initiator (Account, Contact, Lead, or MS CRM user), if incoming call data can be associated with an existing MS CRM record.
• Display of regarding objects.
Integration with Genesys Configuration Environment
The Server component of the Gplus Adapter is represented as a Third Party Application in the
Genesys Configuration environment. System administrators are able to configure its behavior using Genesys Configuration Manager. The configuration options of the Gplus Adapter include
options pertaining to GUI appearance, screen pop capabilities and CTI-to-CRM attribute
mapping. The Adapter also retrieves information from the Genesys Configuration environment in regard to agent profiles, place settings and not ready reasons. Refer to Configuring the Gplus Adapter on page 45 for details on setting configuration options through the Configuration
Manager.
Note: There is no synchronization of agent data between the Gplus Adapter 8.0 for
Microsoft Dynamics CRM and the Genesys Configuration environment.
Architectural Overview
A high-level architecture of the Gplus Adapter 8.0 for Microsoft Dynamics CRM is depicted in the following
Chapter 1: About the Gplus Adapter Architectural Overview
For Microsoft Dynamics CRM — Manual Deployment Guide 17
Genesys CIM Platform – Genesys G
plus
Adapter
The Gplus Adapter communicates with the Genesys environment through the Genesys Platform SDK
libraries; specifically version 8.0 of the Platform SDKs for .NET. Through these libraries the Adapter communicates with three Genesys components: T-Server, Interaction Server and Configuration Server. A connection to the TServer is required for processing voice interactions. An Interaction Server connection is required if the Adapter is configured to screen pop non-voice CRM activities, and communication with the Configuration Server is necessary to retrieve configuration data.
Genesys G
plus
Adapter – Agent Workstation
The Genesys Gplus Adapter communicates with the Microsoft CRM client on the agent workstation
through standard HTTP protocol. The Adapter issues events for processing on the client through an event tunnel, and the client issues requests back to the Adapter on a separate thread. The types of events sent to the client by the Gplus Adapter include events to update softphone controls to reflect call state and
display URL events to perform screen pops of specific MS entity forms. All requests issued by the client to the Adapter are related to softphonefunctionality. This is the communication channel through which the client makes phone requests such as answer a call, initiate a transfer, or send DTMF tones.
Genesys Gplus Adapter – Microsoft CRM Application
The Gplus Adapter does not communicate directly with the Microsoft CRM application. The Adapter
issues all of its requests to the CRM through Web Services, and all such requests are one directional. The Microsoft CRM application does not issue any type of request and/or event to the Adapter. The types
Chapter 1: About the Gplus Adapter Architectural Overview
18 Gplus Adapter 8.0
of requests found in this communication channel include entity creation and metadata requests. For example, the Gplus Adapter will request metadata from the CRM on initialization in order to validate
configuration values outlined in the Genesys CME.
Microsoft CRM Application – Agent Workstation
The communication channel between the Microsoft CRM application and the agent workstation is a channel that existed prior to the implementation of the Gplus Adapter. The Adapter does not impact this
existing communication in any way. In fact the Microsoft CRM application has no knowledge of the existence of the Gplus Adapter. The Adapter never communicates directly with the CRM application. The
Gplus Adapter is built in isolation and as a result any communication that passes between the CRM and
For Microsoft Dynamics CRM — Manual Deployment Guide 19
Chapter
2
System Requirements
This chapter outlines the minimum software and hardware requirements for the Genesys Gplus Adapter 8.0 for Microsoft Dynamics CRM.
The information in this chapter is divided among the following topics:
• Compatibility Overview • Software Requirements • Hardware Requirements • Security
Compatibility Overview
The Genesys Gplus Adapter’s function depends upon the following items:
• Switch type / T-Server
• Operating System
• Genesys Framework
• Genesys Multi Media
• Genesys Outbound Contact Server
• Microsoft CRM version
• Database
Information on supported hardware and third-party software is available on the Genesys Technical Support website in the following documents:
• Genesys Supported Operating Systems and Databases • Genesys Supported Media Interfaces
Chapter 2: System Requirements Software Requirements
20 Gplus Adapter 8.0
Other Compatibility Considerations
This release of the Gplus Adapter 8.0 for Microsoft Dynamics CRM works with Genesys
Framework 7.6/8.0 and Genesys Outbound Contact Server (OCS) 7.6/8.0. Carefully consider constraints pertaining to switch type, T-Server, OCS configuration and operating system for both the Gplus Adapter and the Genesys applications.
The ability of the Gplus Adapter to control multimedia interactions is dependent on a separate
Adapter component called the Gplus Adapter for Microsoft Dynamics CRM E-mail and Activity
Routing Server. Review appropriate documentation to identify any additional requirements for this component.
Review the system requirements before installing the Gplus Adapter.
Software Requirements
The Gplus Adapter used in conjunction with Microsoft Dynamics CRM 2011 requires the following
software:
• Microsoft Windows 2008 Server with IIS 7.0 Web Server
• Microsoft CRM Version 2011 Professional or Enterprise Edition
• Microsoft Internet Explorer web browser; version 8.0 or higher is required!
• Network communications protocol TCP/IP
• OS network services
• Software listed under “Genesys Applications” below
Note: The Gplus Adapter 8.0 provides support to Update Rollup 4 of Microsoft Dynamics
CRM 2011.
Genesys Applications
• Genesys Framework (Configuration Layer) version 7.6/8.0 or higher
• T-Server version 7.6/8.0 or higher
• Enterprise Routing 7.6/8.0 or higher (optional, used for developing and processing routing strategies)
• Genesys Outbound Server 7.6/8.0 or higher (optional, used for processing Outbound interactions)
• Genesys Interaction Server 7.6/8.0 or higher (optional, used for processing multimedia interactions)
• See also the Genesys Hardware Sizing Guide.
Note: For best performance, install the Genesys applications on different machines. For
Chapter 2: System Requirements Hardware Requirements
For Microsoft Dynamics CRM — Manual Deployment Guide 21
Hardware Requirements
The hardware requirements for the Gplus Adapter are as follows:
• Computer/Processor: Dual 700 MHz or higher Intel Pentium (Xeon PIII) or compatible CPU minimum. Recommended is Dual 1.8 GHz Pentium (Xeon P4).
• Memory: 1024 megabytes (MB) of RAM.
• Hard disk: 8-gigabyte available hard disk space.
• CD drive
• Network card: 10/100 megabit.
• Video card: Video graphics adapter that is capable of 256 colors and 800 x 600 pixels. Client systems expected to operate the Microsoft CRM browser component should meet the minimum requirements for Microsoft .NET Framework 3.5 SP1 as follows:
• Computer/Processor: 400 MHz or higher Intel Pentium-class or compatible CPU.
• Memory: 96 megabytes (MB) of RAM minimum.
• Hard disk: Up to 500 MB of hard disk space may required,.
• Display: 800 x 600 or higher-resolution display with 256 colors.
• Input Device: Microsoft mouse or compatible pointing device.
Note: Genesys Framework and Genesys Multi Media impose their own hardware
requirements. Refer to appropriate Genesys documentation for these hardware requirements.
Switch Support
This release of the Gplus Adapter for Microsoft Dynamics CRM only works with a subset of the
Genesys-supported switches. Information on Genesys-supported switches is available on the Genesys Technical Support website in the following document:
•
Genesys Supported Media InterfaceSecurity
The Gplus Adapter for Microsoft Dynamics CRM consists of a single user interface (UI):
• Web browser–based user interface (WebUI). This is essentially an ASP.NET application that requires Internet Explorer 8 or higher.
The interface supports Windows Integrated authentication. The Gplus Adapter and Microsoft
Chapter 2: System Requirements Security
Chapter
3
Installing the Adapter
This chapter describes how to install the Gplus Adapter for Microsoft Dynamics
CRM.
The information in this chapter is divided among the following topics:
• Prerequisites
• Installing and Configuring main.aspx • Creating the Application Template • Creating and Configuring the Application • Creating and Configuring Media Types • Creating and Configuring User Access • Configuring a User Switch Password • Installing the Gplus Adapter
• Uninstalling the Gplus Adapter
Prerequisites
Before you install the Gplus Adapter, you must be sure that the following components are already
installed. On a Server:
• Microsoft Dynamics CRM Version 2011 Professional or Enterprise Edition with minimum IIS Web Server 7.0
On every Client workstation:
• Microsoft .NET Framework 3.5 SP1
• Clients accessing CRM 2011 require Internet Explorer 8.0 or higher
The Gplus Adapter 8.0 and Microsoft Dynamics CRM must be deployed in separate web domains.
Chapter 3: Installing the Adapter Installing and Configuring main.aspx
24 Gplus Adapter 8.0
Note: Be sure that the system has adequate free hard disk space for system and
application logs before you install the Adapter.
Microsoft Dynamics CRM 2011
Refer to the Microsoft documentation for instructions on installing and implementing Microsoft Dynamics CRM 2011. Documentation for the Microsoft CRM product is available in Adobe Acrobat format (.pdf) and in Microsoft Word format (.doc) on the Microsoft CRM Documentation CD.
Note: The Microsoft CRM Server should be up and running before you attempt to install
the Gplus Adapter software. Open Microsoft CRM in a web browser to make sure
that the Server is running properly.
Microsoft .NET Framework 3.5 SP1
Microsoft .NET Framework 3.5 Service Pack 1 is available through the Microsoft Download Center and Windows Update website.
Note: If you don’t see the .NET Framework 3.5 SP1 in the available updates list, this
component may already be installed on your system.
Installing and Configuring main.aspx
The main.aspx file included in the installation CD must be deployed to the correct server location and modified to reflect the configuration of the Gplus Adapter. The following steps outline the deployment and
configuration process:
1. Create a temporary directory on the server hosting the Microsoft Dynamics CRM application, such as C:\Temp.
2. In the directory created in the previous step, extract the contents of the
GplusAdapterMsCrm.WebRoot.zip file.
3. Copy the main.aspx file, located in the MsCrm Deployment Files directory, to the following
directory on the server where the Microsoft Dynamics CRM is deployed:
Chapter 3: Installing the Adapter Installing and Configuring main.aspx
For Microsoft Dynamics CRM — Manual Deployment Guide 25
4. Open the main.aspx file in an appropriate editor and replace the [ToBeChanged: Gplus Adapter URL here] text with the appropriate Gplus Adapter URL. The Gplus Adapter and
Microsoft Dynamics CRM must be deployed in separate web domains and web sites in order for the Adapter to function correctly.
Below is an example of the main.aspx file with modified URLs and where the Gplus Adapter
and Microsoft CRM are deployed on different servers. server1 is the name of the server
where Microsoft Dynamics CRM 2011 has been deployed. <html>
<head>
<script type="text/javascript"
src="http://server1.mycompany.com:8080/resources/MsCrmBootstrapLoader.js"></script >
<script type="text/javascript">
MsCrmBootstrapLoader.load("http://server1.mycompany.com:8080"); </script>
</head>
<body style="border: 0px; margin: 0px; overflow: auto">
<iframe id="cimBoot" frameborder="0" style="width: 100%; height: 100%"></iframe> </body>
</html>
5. Download the URL Rewrite Module 2.0 extension from the following web site:
6. Install the URL Rewrite Module on the server that is hosting the Microsoft Dynamics CRM. 7. On the server hosting the Microsoft Dynamics CRM, edit the web.config file to include the
outboundRules section that is highlighted in red text in the XML show below. The
web.config file is located in the C:\Program Files\Microsoft Dynamics CRM\CRMWeb
directory. <system.webServer> <rewrite> <rules> ... </rules> ... <outboundRules>
<rule name="remove xframe">
<match serverVariable="RESPONSE_X_Frame_Options" pattern=".*" />
<conditions />
<action type="Rewrite" value="" /> </rule>
</outboundRules> ...
</rewrite>
Chapter 3: Installing the Adapter Creating the Application Template
26 Gplus Adapter 8.0
Creating the Application Template
Create an Application Template in the Genesys Configuration Manager and create and configure an Application object before you install the Adapter.
Note: Creating the Application Template and creating/configuring an Application
object at this point facilitates installation of the Gplus Adapter and helps you
avoid unexpected deployment problems.
Create the Application Template as follows:
1. Open Configuration Manager and select Environment > Application Templates.
2. Right-click Application Templates. From the shortcut menu that opens, select New > Application Template.
3. In the New Application Template dialog box, complete the following parameters
accordingly.
Name: Gplus_Adapter_MsCRM
Type: Third Party Application
Version: 8.0.000
4. Select the Options tab.
5. Select Import from Configuration File option and navigate to the Gplus_Adapter_MsCrm.tpl file included as part of the installation package .zip file.
6. Click OK to complete the Application Template object setup.
Creating and Configuring the Application
After you have created the template as described in the previous section, create and configure the new Application object as follows:
1. In Configuration Manager, select Environment > Applications.
2. Right-click either the Applications folder or the subfolder where you want to create your Application object.
3. From the shortcut menu that opens, select New > Application.
4. In the Open dialog box, locate the template created above and double click on it.
5. In the General tab of the Properties dialog box, change the default Application object
name (if desired).
6. Under the Connections tab add the following Genesys components based on the required
media and/or feature support: Inbound Voice:
• TServer(s) with which the Gplus Adapter will communicate
Chapter 3: Installing the Adapter Creating and Configuring Media Types
For Microsoft Dynamics CRM — Manual Deployment Guide 27
• Interaction Server Statistics Display:
• Stat Server
Note: For performance reasons, it is strongly recommended that the Gplus Adapter be
allocated its own instance of the Genesys Stat Server
7. Under the Options tab, open the crm section.
8. Set the values for the options discovery-service-url and organization-name accordingly. Refer
to Chapter 5: Configuring the Adapter for option definitions.
9. Once these values have been entered, click OK to complete the Application object setup.
Creating and Configuring Media Types
In order for the Gplus Adapter to differentiate between Genesys open-media interactions and
Microsoft CRM activities of similar type, CRM interactions must adhere to a specific format. The following instructions outline the steps required to create and configure media types for the Gplus
Adapter.
Note: The following steps are only applicable to non-voice Microsoft CRM activities. Voice
interactions, either as part of a voice-only or a multi-media environment, do not require a specialized media type in the Genesys Configuration environment.
1. In Configuration Manager, select Resources> Business Attributes > Media Type > Attribute Values.
2. Right-click on the Attribute Values sub folder.
3. Select New > Business Attribute Value. The Business Attribute dialog box appears.
4. In the Name field enter the value mscrm- <media type> (e.g. mscrm-email, mscrm-fax,
mscrm-task)
5. In the Display Name field enter any value to represent the specific attribute (e.g. MsCRM Email)
6. In the Description field enter the value mscrm- <media type>
7. Select OK button to save changes
Repeat steps 3–6 for each type of Microsoft CRM activity that is to be processed by the Gplus
Adapter.
Creating and Configuring User Access
The Gplus Adapter application created in the previous section is configured as a Third Party Application. This type of application allows multiple instances of the Gplus Adapter for
Chapter 3: Installing the Adapter Creating and Configuring User Access
28 Gplus Adapter 8.0
Microsoft Dynamics CRM to utilize the same application in the CME. To operate in Third Party mode, complete the additional configuration outlined below.
1. In Configuration Manager, select Resources > Persons.
2. Right-click on Persons node and select New > Person as highlighted in Figure 1 below.
Figure 1 : Creating a new Person
3. Configure the Person profile with the minimum parameters (as shown in Figure 2 below).
Figure 2: Configuring Person profile
• Employee ID
• User Name
• Password (optional) 4. Uncheck IsAgent checkbox.
Chapter 3: Installing the Adapter Configuring a User Switch Password
For Microsoft Dynamics CRM — Manual Deployment Guide 29
5. Select the Member Of tab and click the Add button.
6. Select the SYSTEM access group and click OK.
7. Click OK again to complete the add new user process.
Note: It is strongly recommended that you configure a separate system user (i.e. Person)
to represent each Gplus Adapter server application running in a cluster.
Configuring a User Switch Password
Note: Setting a user's switch password is not required for the Gplus Adapter to operate
correctly, but this can be implemented to prevent errors from occurring.
Depending on how the network is configured where the Gplus Adapter is deployed there is the
possibility that the password of the Agent in the CME may not be the same as the agent's password on network switches. The password of the agent can be set at the switch level to ensure there are no login issues. Setting the password is not required for the Gplus Adapter
installation to function correctly, it is an optional setting.
To set an agent's login configuration at the switch level perform the following steps: 1. In Configuration Manager, select Resources > Switches then expand the list of
configuration options for the switch.
2. Right-click on the Agent Logins node and select New > Agent Login as highlighted in Figure 3 below.
Chapter 3: Installing the Adapter Installing the Gplus Adapter
30 Gplus Adapter 8.0
3. In the New Agent Login windows Code field enter the Place the agent will sign in to.
4. Select the Advanced tab and in the password fields, uncheck the Use Override check box
and enter the password for the switch, as shown in Figure 4 below.
Figure 4: Creating a switch Agent Login profile
5. Click the OK button.
Installing the G
plus
Adapter
Note the following items before you install the Gplus Adapter.
• To install the Gplus Adapter, you must be logged on with Domain Administrator and Local
Administrator privileges.
• The Gplus Adapter can be installed on the same server or a different server where the
Microsoft CRM 2011 application has been installed.
• Genesys does not recommend installation of its components via a Microsoft Remote Desktop connection. The installation should be performed locally.
Chapter 3: Installing the Adapter Installing the Gplus Adapter
For Microsoft Dynamics CRM — Manual Deployment Guide 31
Deploy Application Files
Specific application files must be installed on the server hosting the Gplus Adapter. Complete the
following steps to deploy these files.
1. Create an appropriate installation directory on the server for the Gplus Adapter. The
directory must contain a sub directory called WebRoot. For example: C:\Program Files\Gplus Adapter for Microsoft CRM\WebRoot
2. In the directory created in the previous step, extract contents of
GplusAdapterMsCrm.WebRoot.zip file.
Note: GplusAdapterMsCrm.WebRoot.zip is part of the installation CD provided by
Genesys.
On completion of the extraction process the directory structure should be:
<installation directory>\WebRoot\
bin\
Global.asax
Gplus_Adapter_MsCrm.tpl Web.config
Modify Web.config File
The Web.config file contains many Gplus Adapter configuration settings. The default values for
most of the settings are acceptable. There are however two sections which must be modified before starting the Adapter.
App Settings
App Settings identify pertinent information regarding the Genesys Configuration Manager Environment (CME) and the Gplus Adapter application created in the CME, as was completed in
the steps outlined on page 26.
To modify the app settings complete the following steps.
1. Open the <Gplus Adapter installation directory>\WebRoot directory.
2. Edit the Web.config file in an appropriate text editor.
3. Locate the tag <appSettings>.
4. Replace the placeholder value keys (located from the opening <appSettings> tag to the
closing </appSettings> tag) with keys that represent the configuration of the environment where the Gplus Adapter is being deployed. The keys to be replaced are highlighted in red text below and further information about the keys listed in the table below.
Chapter 3: Installing the Adapter Installing the Gplus Adapter
32 Gplus Adapter 8.0
<appSettings>
<add key="AilFactory.ConfigServerHost" value="[ToBeChanged: AilFactory. ConfigServerHost]" />
<add key="AilFactory.ConfigServerPort" value="[ToBeChanged: AilFactory. ConfigServerPort]" />
<add key="AilFactory.BackupConfigServerHost" value="<backup Config Server host>" />
<add key="AilFactory.BackupConfigServerPort" value="<backup Config Server port>" />
<add key="AilFactory.ApplicationName" value="[ToBeChanged: AilFactory. ApplicationName]" />
<add key="AilFactory.UserName" value="[ToBeChanged: AilFactory.UserName]"/>
<add key="AilFactory.UserPassword" value="[ToBeChanged:AilFactory. UserPassword]" />
</appSettings>
Key Placeholder Value Key Description
[ToBeChanged: AilFactory.ConfigServerHost] Identifies the host name of the server running the primary Configuration Server. [ToBeChanged: AilFactory.ConfigServerPort] Identifies the port associated with the primary Configuration Server. <backup Config Server host> Identifies the host name of the server running the backup Configuration Server (optional). <backup Config Server port> Identifies the port associated with the backup Configuration Server (optional).
[ToBeChanged: AilFactory.ApplicationName] The name of the G
plus Adapter application
as specified in section Creating and Configuring the Application on page 26. [ToBeChanged: AilFactory.UserName] The username of the Person profile created in section Creating and Configuring User
Access on page 27.
[ToBeChanged: AilFactory.UserPassword] The password of the Person profile created in section Creating and Configuring User Access on page 27.
On completion the appSettings section of the Web.config file should appear similar to the text
snippet below.
<appSettings>
<add key="AilFactory.ConfigServerHost" value="gen75" /> <add key="AilFactory.ConfigServerPort" value="2020" /> <add key="AilFactory.BackupConfigServerHost" value="" /> <add key="AilFactory.BackupConfigServerPort" value="" />
<add key="AilFactory.ApplicationName" value="Gplus_Adapter_MsCrm" /> <add key="AilFactory.UserName" value="gplus_adapter_mscrm_user" /> <add key="AilFactory.UserPassword" value="helloworld" />
</appSettings>
Chapter 3: Installing the Adapter Installing the Gplus Adapter
For Microsoft Dynamics CRM — Manual Deployment Guide 33
Log File Settings
The Web.config file identifies the location of all log files created by the Gplus Adapter. There is
no default directory for Adapter logging, therefore it is the responsibility of the administrator installing the Adapter to properly create the necessary directories. Failure to create such directories will effectively deactivate all Gplus Adapter logging!
To change the log path, complete the following steps.
1. Create a logging directory structure on the Gplus Adapter server.
e.g. C:\Logs\Gplus_Adapter_Microsoft_CRM
2. Open the <Gplus Adapter installation directory>\WebRoot directory.
3. Edit the Web.config file in an appropriate text editor.
4. Locate the tag <RollingFileAppender>.
5. Change the file value parameter associated with RollingFileAppender from its default
setting to the directory structure created in Step 1, as is illustrated below.
Default Setting:
<appender name="RollingFileAppender" type="log4net.Appender.RollingFileAppender"> <file value="[ToBeChanged: Log.Directory]" />
<appendToFile value="true" /> <maxSizeRollBackups value="2" /> <maximumFileSize value="10MB" />
<layout type="log4net.Layout.PatternLayout">
<conversionPattern value="%date [%thread] %-5level %logger [%property{NDC}] - %message%newline" />
</layout>
<threshold value="INFO"/> </appender>
Modified Setting Example:
<appender name="RollingFileAppender" type="log4net.Appender.RollingFileAppender"> <file value="C:\Logs\GplusAdapter\GplusForMicrosoftCrm.log"/>
<appendToFile value="true"/> <maxSizeRollBackups value="2"/> <maximumFileSize value="10MB"/>
<layout type="log4net.Layout.PatternLayout">
<conversionPattern value="%date [%thread] %-5level %logger [%property{NDC}] - %message%newline" />
</layout>
<threshold value="INFO"/> </appender>
6. Locate the tag <GzipAppender>.
7. Change the param argument Folder value from its default setting to the directory
structure created in Step 1, as illustrated below.
Default Settings:
<appender name="GzipAppender" type="Aria.Util.GzipAppender, Aria.Util"> <param name="SplitMode" value="None" />
<param name="Folder" value="[ToBeChanged: “Log.Directory”]" />
Chapter 3: Installing the Adapter Installing the Gplus Adapter
34 Gplus Adapter 8.0
<param name="Suffix" value="-" />
<param name="MaxFileAgeInDays" value="14" /> <param name="Extension" value=".log.gz" /> <layout type="log4net.Layout.PatternLayout">
<conversionPattern value="%date [%thread] %-5level %logger [%property{NDC}] - %message%newline" />
</layout> </appender>
Modified Setting Example:
<appender name="GzipAppender" type="Aria.Util.GzipAppender, Aria.Util"> <param name="SplitMode" value="None" />
<param name="Folder" value="C:\Logs\GplusAdapter\" />
<param name="Prefix" value="Gplus-" /> <param name="Suffix" value="-" />
<param name="MaxFileAgeInDays" value="14" /> <param name="Extension" value=".log.gz" /> <layout type="log4net.Layout.PatternLayout">
<conversionPattern value="%date [%thread] %-5level %logger [%property{NDC}] - %message%newline" />
</layout> </appender>
8. Save changes to Web.config
9. Close the Web.config file
Modify the Aspnet.config File
IIS 7.0 limits the number of active requests to 12 requests per CPU in the system by default. All additional requests that exceed such limits are placed in a queue for processing. In order to efficiently operate, the Gplus Adapter requires an increase to the request limits. To modify
request limits in IIS 7.0 complete the following steps.
1. Navigate to the Microsoft.NET Aspnet.config file on the Gplus Adapter server.
(e.g. C:\WINDOWS\Microsoft.NET\Framework\v2.0.50727)
2. Open the Aspnet.config file in an appropriate text editor.
3. Add the following parameters to the file, as highlighted below. <?xml version="1.0" encoding="UTF-8" ?>
<configuration> <runtime>
<legacyUnhandledExceptionPolicy enabled="false" /> <legacyImpersonationPolicy enabled="true"/>
<alwaysFlowImpersonationPolicy enabled="false"/> <SymbolReadingPolicy enabled="1" />
</runtime>
<system.web>
<applicationPool maxConcurrentRequestsPerCPU="5000" maxConcurrentThreadsPerCPU="0" requestQueueLimit="5000" />
</system.web>
Chapter 3: Installing the Adapter Installing the Gplus Adapter
For Microsoft Dynamics CRM — Manual Deployment Guide 35
4. Save changes to the Aspnet.config file.
The final step involved in the installation of the Gplus Adapter 8.0 for Microsoft Dynamics CRM is
to install and configure the Adapter on IIS 7.0.
Installing Gplus Adapter on an IIS 7.0 Web Server
Use the following instructions to configure an application pool and web site on IIS 7.0 web server for Gplus Adapter 8.0. This version of the Gplus Adapter must be installed on an IIS 7.0 Web Server, IIS 6.0 is not supported by Gplus Adapter 8.0.
Note: The following instructions describe a typical installation process for IIS 7.0. Steps
outlined below may vary depending on Windows and IIS configuration.
Create an Application Pool
To create a new application pool complete the following steps:
1. Click on the Windows Start button, select Administrative Tools and then select Internet Information Services (IIS) Manager.
2. Expand the Gplus Adapter application pool will be created and select Application Pools. 3. Right-click Applications Pools, select Add Application Pool... (seeFigure 5below)
Figure 5: Adding an Application Pool
4. The Add Application Pool dialog box will appear. Complete the parameters as follows, as highlighted in Figure 6below.
Chapter 3: Installing the Adapter Installing the Gplus Adapter
36 Gplus Adapter 8.0
a. Set Name property to GenesysGplusAdapterForMsCrm.
b. Set the .NET Framework version parameter to .NET Framework v2.0.50727.
c. Set the Managed pipeline mode to Integrated.
d. Check the option Start application pool immediately.
Figure 6: Setting application pool name
5. Select the OK button to save the application pool and close the Add Application Pool dialog
box. A new application pool with the name GenesysGplusAdapterForMsCrm is added
automatically to the list of existing application pools.
6. Select the newly created GenesysGplusAdapterForMsCrm application pool, right-click and
Chapter 3: Installing the Adapter Installing the Gplus Adapter
For Microsoft Dynamics CRM — Manual Deployment Guide 37
Figure 7: Setting recycling options
The Edit Application Pool Recycling Settings dialog box appears.
7. Complete the recycling parameter as follows: (See Figure 8 on the following page) a. Uncheck Regular time intervals (in minutes).
b. Check the Specific time(s) option and specify an appropriate time to recycle
connections. Enter a time that reflects a period of no, or relatively low, call activity as the recycling process results in the restart of the Gplus Adapter 8.0 for Microsoft
Chapter 3: Installing the Adapter Installing the Gplus Adapter
38 Gplus Adapter 8.0
Figure 8: Setting recycling parameters
8. Select the Next button.
9. Select the Finish button to close the Edit Application Pool Recycling Settings dialog box.
10. Right-click the GenesysGplusAdapterForMsCrm application pool, select the Advanced Settings… option (as highlighted in Figure 9 on the following page). The Advanced Settings
Chapter 3: Installing the Adapter Installing the Gplus Adapter
For Microsoft Dynamics CRM — Manual Deployment Guide 39
Figure 9: Configuring advanced settings
11. Select the Identity property under the Process Model section. (as shown in Figure 10
below).
Figure 10: Setting Identity option
Chapter 3: Installing the Adapter Installing the Gplus Adapter
40 Gplus Adapter 8.0
12. Select Custom Account option, followed by Set… button. The Set Credentials dialog box
appears, as shown below.
Figure 11: Setting credentials
13. Enter the domain\username and password of a user who possesses administrative privileges for the Microsoft CRM 2011 application.
14. Select OK button to close Set Credentials dialog box.
15. Select OK button to close Application Pool Identity dialog box.
16. Set Idle Time-out (minutes), located under the Process Model section, to a value of 0.
17. Set Load User Profile, located under the Process Model section, to False.
18. Select OK button to close Advanced Settings dialog box.
Creating a Web Site Application
To create a new application on an IIS 7.0 web server, complete the following steps:
1. Click on t he Windows Start but ton, Administrative T ools and s elect Internet I nformation Services (IIS) Manager.
2. Expand the tree for the server where the Gplus Adapter application pool will be created and select Sites. All c onfigured s ites a ppear i n t he ad jacent pa nel, as s hown in Figure 12
Chapter 3: Installing the Adapter Installing the Gplus Adapter
For Microsoft Dynamics CRM — Manual Deployment Guide 41
Figure 12: Viewing associated sites
3. Right-click on Sites then select Add Web Site... (See Figure 13) The Add Web Site
dialog box will appear.
Figure 13: Adding a new web site
4. In the Site name box, type GenesysGplusAdapter, as shown below in Figure 14.
5. Using the Select… button select the application pool that was created in the Create an
Application Pool section of this document.
6. Set the Physical path: parameter to the location where the application files are deployed.
Chapter 3: Installing the Adapter Installing the Gplus Adapter
42 Gplus Adapter 8.0
Figure 14: Configuring the application
7. Fill in the appropriate network information in the Binding section and select the OK button to
close Add Web Site dialog window. The new web site is created in Sites.
8. Select the GenesysGplusAdapterweb site and open the Authentication option,
Chapter 3: Installing the Adapter Installing the Gplus Adapter
For Microsoft Dynamics CRM — Manual Deployment Guide 43
Figure 15: Setting authentication
9. Disable all authentication modes except Windows Authentication and ensure that the Windows Authentication mode is set to Enabled, as highlighted below.
Figure 16: Enabling Windows Authentication
10. Highlight the GenesysGplusAdapter web site again and select theError Pagesoption,
which is located in the HTTP Features category.
11. On Error Pages list highlight Status Code 500 on the list. Right-click and select Edit Feature Settings, or select the Edit Feature Settings... option from the adjacent Actions panel. The Edit Error Pages Settings dialog box appears.
Chapter 3: Installing the Adapter Uninstalling the Gplus Adapter
44 Gplus Adapter 8.0
For additional information on enabling custom errors in IIS 7.0, refer to
http://blogs.msdn.com/b/rakkimk/archive/2007/05/25/iis7-how-to-enable-the- detailed-error-messages-for-the-website-while-browsed-from-for-the-client-browsers.aspx
The installation of the Gplus Adapter for Microsoft Dynamics CRM in an IIS 7.0 web server
environment is complete. Refer to Chapter 9: Accessing the Gplus Adapter for instructions on
how to access the Adapter.
Uninstalling the G
plus
Adapter
To completely uninstall the Gplus Adapter components previously installed:
1. Delete the folder and files created in the Deploy Application Files section on page 31.
2. Stop and delete the website created in Creating a Web Site Application section of the
document.
3. Stop and delete the Application Pool created in the Create an Application Pool section of the
document.
Note: Existing log files are not deleted by the uninstall process. Such files must be
For Microsoft Dynamics CRM — Manual Deployment Guide 45
Chapter
4
Configuring the Adapter
This chapter describes the configuration options available with the Gplus Adapter
8.0 for Microsoft Dynamics CRM. in the Genesys Configuration Manager. It includes the following sections:
• Configuring the Gplus Adapter
• Implementing the Softphone.htm Option
Configuring the G
plus
Adapter
This section describes configuration options available for the Gplus Adapter 8.0 for Microsoft Dynamics
CRM. To view and/or change these options, access the Genesys Configuration Manager and open the Gplus Adapter application as was created during the installation process, or launch the Configuration
Editor and modify the options for the proper Gplus Adapter application located under the Environment
node.
The subsections below describe individual tabs in the Properties dialog box.
Connections Tab
Add the following Genesys components to the Connections tab based on the required media/feature support:
Inbound Voice:
TServer(s) component
Multi Media and/or Push Preview Outbound Media:
Chapter 4: Configuring the Adapter Implementing the Softphone.htm Option
46 Gplus Adapter 8.0
Statistics Display:
Stat Server
Note: For performance reasons, it is strongly recommended that the Gplus Adapter
be allocated its own instance of the Genesys Stat Server.
Note: All servers must be properly configured and running before configuring the
Adapter.
Options Tab
All options listed under the Options tab of the Gplus Adapter application are also found under
the Options section of the Configuration Editor. Administration can manage the options from
either the editor, which is the recommended approach, or through the Genesys CME. All option names and values are case sensitive and any changes to the Options section will take effect
after agents resigns into the Adapter. For a description of each option, refer to Chapter 3: General Options of the Gplus Adapter 8.0 for Microsoft Dynamics CRM Configuration Editor Guide.
Implementing the Softphone.htm Option
The Softphone.htm option is an option that can be applied to pop-url options configured under the screen-pop-url, screenpop-new-entity and screenpop-openmedia sections of the Configuration Editor. Using Softphone.htm allows administrators to add softphone controls to any of the configured URL as part of
thesesections.
To implement the Softphone.htm option, complete the following steps.
1. Navigate to, and select, the Gplus Adapter application from the menu of the Configuration
Editor.
2. Expand Options node from the second panel of the editor, and select the appropriate screen-pop section.
3. Change the pop-url value to reference a Softphone.htm page. The value must adhere to
specific conditions.
The value must start with Softphone.htm?url= The value must be URL encoded
URL Value Encoded Value
: %3A ? %3F = %3D & %26