User Guide
Module 4: Managing Your Account
Module 4 provides information on how to manage your COMPASS account. The guide contains the following information:
How to set up your Test Center.
How to add staff with rights to manage your system at both the Campus and Test Center levels.
How to buy units online and how to monitor your unit usage.
Contents
Topic Page
Part I Administrator’s Roles and Rights 2
Part II Managing Your Campus Account 3
Part III Managing Your Test Centers 14
Part IV Managing Your Units 21
Part I Administrator’s Roles and Rights
The following are the two types of Administrators and the rights associated with each role.
Campus Administrators: Responsible for setting up the overall rules and procedures for a Campus and all of the associated Test Centers. They can set up Test Centers both on and off-campus (i.e., at local high schools).
Test Center Administrators: Associated with a specific Test Center owned by the Campus.
The following table shows the tasks that the Campus and Test Center Administrators have the right to perform in managing a Campus or Test Center.
Site Management Rights* Campus Level Test Center Level
Edit site contact information
Create/edit/delete staff members
Run unit usage report
Purchase or transfer units
Create Test Centers
Activate remote testing
Part II Managing Your Campus Account
Complete the following to review, add, or edit existing Campus information.
NOTE: The amount of information displayed is based on the user rights assigned to you.
Step Action
1 Locate the Welcome email sent from ACT that contains the following information:
COMPASS URL (www.compass.act.org) NOTE: Bookmark the URL.
Staff ID
Initial password: You will be prompted to change your password after logging in the first time.
2 Log into COMPASS. Type the Staff ID and password. Click Login!
Result: The COMPASS/ESL screen displays with the SESSIONS tab opened.
3 Click the SITES tab.
NOTE: The SITES tab does not display if the staff member does not have administrative rights to at least one of the functions on the tab.
4 Review the information on the SITES tab for accuracy.
Step Action
5 Click Edit to view or edit the Campus information.
Result: The Campus setup screen displays. 6 View your license expiration date.
Step Action
7 View or edit the following three sections in the Contact Information area:
Campus Coordinator: example shown below
Technical Support Coordinator Bill-to Institution
IMPORTANT: Ensure email addresses are kept current, as ACT sends email messages to COMPASS users.
8 View or edit the lowest number of units in the First and Second notification fields in the Low-Unit Notifications section.
Result: The system sends the Campus Coordinator a low-unit email notification when the unit number falls below the entered amounts.
9 Click OK.
Complete the following to add a new staff member to a Campus.
Step Action
1 Log into COMPASS. Type the Staff ID and password. Click Login!
Result: The COMPASS/ESL screen displays with the SESSIONS tab opened.
2 Click the SITES tab.
NOTE: The SITES tab does not display if the staff member does not have administrative rights to at least one of the functions on the tab. 3 Click the Staff button for your Campus.
Result: The Staff at Your Campus screen displays. 4 Click New.
Result: The New Staff Member screen displays.
5 Type the staff member’s name and contact information in the fields at the top of the form.
Step Action
6 To assign the staff member’s rights, select one of the following options:
Assign a role with the rights preselected by clicking Admin or Advisor.
Result: Your selection displays in the Role field and the rights are preselected for that role.
NOTE: You can customize the role by selecting or deselecting the checkboxes of the rights you wish to assign or remove.
Select the checkboxes for the rights that you want to assign.
7 Click OK to save the selections and return to the Staff screen or click
Cancel to exit the screen without adding a staff member. Click Back to Sites to return to the SITES tab.
NOTE: For a further explanation of the rights, see the Appendix, COMPASS User Rights and Roles.
Complete the following to edit Campus staff member information.
Step Action
1 Log into COMPASS. Type the Staff ID and password. Click Login!
Result: The COMPASS/ESL screen displays with the SESSIONS tab opened.
2 Click the SITES tab.
NOTE: The SITES tab does not display if the staff member does not have administrative rights to at least one of the functions on the tab. 3 Click the Staff button for your Campus.
Result: The Staff at Your Campus screen displays.
4 Click the Edit button by the staff name to edit the information.
Result: The person’s staff information displays.
5 Change the name and contact information at the top of the screen, if desired.
6 Change the rights or assign a different role to the staff member.
To change the rights, select or deselect the checkboxes of the rights listed.
To assign a different role, click Admin or Advisor.
Result: Your selection appears in the Role field and the rights are preselected for that role.
NOTE: You can customize the role by selecting or deselecting the checkboxes of the rights you wish to assign or remove. 7 Click OK to save the changes and return to the Staff screen or click
Cancel to exit the screen without editing a staff member. Click Back to Sites to return to the SITES tab.
Complete the following to delete a staff member from a Campus.
Step Action
1 Log into COMPASS. Type the Staff ID and password. Click Login!
Result: The COMPASS/ESL screen displays with the SESSIONS tab open.
2 Click the SITES tab.
NOTE: The SITES tab does not display if the staff member does not have administrative rights to at least one of the functions on the tab. 3 Click the Staff button for your Campus.
Result: The Staff at Your Campus screen displays.
4 Click the Delete button by the staff name to delete the member.
Result: The Delete Confirmation screen displays.
5 Click Delete to remove the person or Cancel to stop the deletion and return to the Staff screen. Click Back to Sites to return to the SITES tab.
Complete the following to add a Test Center to your Campus.
Test Centers can be added to your Campus, allowing students to be able to take the test at locations other than your primary Test Center. The centers can include off-campus locations (i.e., high schools), outreach facilities or on-campus locations in different buildings and departments.
Step Action
1 Log into COMPASS. Type the Staff ID and password. Click Login!
Result: The COMPASS/ESL screen displays with the SESSIONS tab opened.
2 Click the SITES tab.
NOTE: The SITES tab does not display if the staff member does not have administrative rights to at least one of the functions on the tab. 3 Click New Test Center.
Result: The New Test Center screen displays.
Step Action
5 Type the contact information in the Test Center Coordinator and Technical Support Coordinator sections.
NOTE: Ensure the email addresses are kept current, as ACT sends email messages to COMPASS users.
Step Action
6 Complete the Test Center Status section.
Click Inactive for Test Centers that only administer tests at intervals.
Click Active for Test Centers that administer tests continually throughout the year.
Local Testing – Local Testing is always selected. Local Testing refers to testing that is performed at any of the Test Centers associated with your Campus. This includes both on-campus locations (your primary Test Center and any Test Centers you add that can be located in different departments or buildings) and off-campus locations (high schools, outreach centers, etc.).
Remote Testing – Enable Remote Testing only at the primary Test Center located on your Campus, if you administer COMPASS tests to local students who live too far from the institutions that they plan to attend to make testing at their Campuses feasible. (Preview sites are not eligible for remote testing.)
IMPORTANT: Do not select Remote Testing when adding secondary Test Centers to your Campus. Secondary Test Centers are sites that are located either off-campus in high schools and outreach centers or on-campus in other buildings and departments.
Step Action
7 Type the number of reports to print for each student in the Report Copies
box.
NOTE: The system prints one report per student by default.
8 SSR Location
If the Test Center is not connected to your Campus network (such as at a high school or at another off-campus testing facility) do the following:
Leave the Directory Location for SSR field blank and
Do not use Test Packages that include the automatic generation of an SSR file. Otherwise, the test results store by default on the C:/drive of the testing workstation and can be viewed by students using that workstation.
Part III Managing Your Test Centers
Complete the following to review, add, or edit existing Test Center information.
NOTE: The amount of information displayed is based on the user rights assigned to you
Step Action
1 Log into COMPASS. Type the Staff ID and password. Click Login!
Result: The COMPASS/ESL screen displays with the SESSIONS tab open. 2 Click the SITES tab.
NOTE: The SITES tab does not display if the staff member does not have administrative rights to at least one of the functions on the tab. 3 Click Edit to view or edit the Test Center information.
Result: The Test Center setup screen displays.
4 Review or edit the information. Click OK.
Complete the following to add a new staff member to a Test Center.
Step Action
1 Log into COMPASS. Type the Staff ID and password. Click Login!
Result: The COMPASS/ESL screen displays with the SESSIONS tab opened.
2 Click the SITES tab.
NOTE: The SITES tab does not display if the staff member does not have administrative rights to at least one of the functions on the tab. 3 Click the Staff button for the Test Center you want to add staff to.
Result: The Test Center Staff Name screen displays. 4 Click New.
Result: The New Staff Member screen displays.
5 Type the staff member’s name and contact information in the fields at the top of the form.
Step Action
6 To assign the staff member’s rights, select one of the following options:
Assign a role with the rights preselected by clicking Admin or Proctor.
Result: Your selection displays in the Role field and the rights are preselected for that role.
NOTE: You can customize the role by selecting or deselecting the checkboxes of the rights you wish to assign or remove.
Select the checkboxes for the rights that you want to assign.
7 Click OK to save the selections and return to the Staff screen or click
Cancel to exit the screen without adding a staff member. Click Back to Sites to return to the SITES tab.
NOTE: For a further explanation of the rights, see the Appendix, COMPASS User Rights and Roles.
Complete the following to edit Test Center staff information.
Step Action
1 Log into COMPASS. Type the Staff ID and password. Click Login!
Result: The COMPASS/ESL screen displays with the SESSIONS tab opened.
2 Click the SITES tab.
NOTE: The SITES tab does not display if the staff member does not have administrative rights to at least one of the functions on the tab. 3 Click the Staff button for the Test Center you want to edit.
Result: The Test Center Staff screen displays.
4 Click the Edit button by the staff name to edit the information.
Result: The person’s staff information displays.
5 Change the name and contact information at the top of the screen, if desired.
6 Change the rights or assign a different role to the staff member.
To change the rights, select or deselect the checkboxes of the rights listed.
To assign a different role, click Admin or Proctor.
Result: Your selection appears in the Role field and the rights are preselected for that role.
NOTE: You can customize the role by selecting or deselecting the checkboxes of the rights you wish to assign or remove. 7 Click OK to save the selections and return to the Staff screen or click
Cancel to exit the screen without editing a staff member. Click Back to Sites to return to the SITES tab.
Complete the following to delete a Test Center staff member. IMPORTANT: Staff deletions are permanent.
Step Action
1 Log into COMPASS. Type the Staff ID and password. Click Login!
Result: The COMPASS/ESL screen displays with the SESSIONS tab opened.
2 Click the SITES tab.
NOTE: The SITES tab does not display if the staff member does not have administrative rights to at least one of the functions on the tab. 3 Click the Staff button for the Test Center you want to delete a staff
member from.
Result: The Test Center staff screen displays.
4 Click the Delete button by the staff name to delete the member.
Result: The Delete Confirmation screen displays.
5 Click Delete to remove the person or Cancel to stop the deletion and return to the Staff screen. Click Back to Sites to return to the SITES tab.
Complete the following to activate Remote Testing at the Primary Test Center.
Enable Remote Testing only at the primary Test Center located on your Campus, if you will administer COMPASS tests to local students who live too far from the institutions that they plan to attend to make testing at their Campuses feasible.
IMPORTANT: Do not select Remote Testing when adding secondary Test Centers to your Campus. Secondary Test Centers are sites that are located either off-campus in high schools and outreach centers or on-campus in other buildings and
departments.
Step Action
1 Log into COMPASS. Type the Staff ID and password. Click Login!
Result: The COMPASS/ESL screen displays with the SESSIONS tab opened.
2 Click the SITES tab.
NOTE: The SITES tab does not display if the staff member does not have administrative rights to at least one of the functions on the tab. 3 Click Edit for the desired Test Center.
Step Action
4 Scroll down to the Test Center Status section. Select the Remote
testing checkbox. (Preview sites are not eligible for remote testing.) 5 Populate the fields (test cost, payment method, hours, contact
information, and additional instructions). Click OK.
Part IV Managing Your Testing Units
Complete the following to view the number of units your Campus has in its account to administer tests.
Step Action
1 Log into COMPASS. Type the Staff ID and password. Click Login!
Result: The COMPASS/ESL screen displays with the SESSIONS tab opened.
2 Click the SITES tab.
Result: The site information displays. The number is shaded red when it is time to purchase additional units.
Low-Unit Notification:
Set the Low-Unit Notification level to the lowest number of units. The system sends the Campus Coordinator a low-unit email notification when the unit number falls below the entered amounts. The email allows adequate time for your institution to complete the purchasing process.
IMPORTANT: If there are no units or an insufficient quantity of units available for testing, students are not able to take the tests.
To change the Low-Unit Notification amount, see Part II Managing Your Campus Account, Page 5, Step 8.
Complete the following to view your Campus Unit usage.
Step Action
1 Log into COMPASS. Type the Staff ID and password. Click Login!
Result: The COMPASS/ESL screen displays with the SESSIONS tab opened.
2 Click the SITES tab.
NOTE: The SITES tab does not display if the staff member does not have administrative rights to at least one of the functions on the tab. 3 Click Unit usage.
Step Action
4 Select the option(s) to display the desired data:
Date Range: Specify the dates to include by clicking the drop-downs.
Test Centers: Select the checkbox(s) of the Test Centers to view their usage.
Demographics: Select the checkbox to display the unit usage for the demographics for your entire Campus. This includes the testing done at your Test Centers and at remote sites on behalf of your college.
Test Types: Click Total of all test types to combine the usage for both Local and Remote Testing or click Local Tests or Remote Tests
Step Action
5 Click View Unit Usage to display the data.
Result: The COMPASS/ESL Internet Unit Usage screendisplays.
Select from the following options:
Print – Click and select the printer output options.
Save – Click and specify the location to save the report file.
CloseWindow – Click the link to return to the Unit Usage Viewing Options screen.
6 Repeat the procedure to generate a new report or click Back to Sites to return to the SITES tab.
Complete the following to buy units.
Each test administered or student record created uses units. Each test can cost a different number of units based on how the test was set up. Your Campus is charged based on the number of units it uses.
Licensed Campuses must have an ample supply of units for the Test Center(s) so testing is not
disrupted.
Units are charged as follows:
Description # of Units
Demographics items (student record creation) .4 unit
Assessments 1.0 unit
Diagnostics 1.0 unit
COMPASS e-Write/ESL e-Write 3.5 units
Retest/Post-test administration of previously used test (except COMPASS e-Write or ESL e-Write)
.5 unit
IMPORTANT:
Each Campus must purchase its own units.
You can not transfer units between Campuses.
Pricing:
For orders placed within the U.S the Standard Unit Pricing list shows U.S. prices effective through August 31, 2010 and is for reference only.
For orders placed outside the U.S use the pricing and method of payment on the COMPASS International Order Form.
Complete the following to buy units.
Step Action
1 Log into COMPASS. Type the Staff ID and password. Click Login!
Result: The COMPASS/ESL screen displays with the SESSIONS tab opened.
2 Click the SITES tab.
NOTE: The SITES tab does not display if the staff member does not have administrative rights to at least one of the functions on the tab.
Step Action
3 Click Buy Units.
Result: The Buy Units screen displays.
4 Type the number of units you want to buy for each item.
Step Action
5 Verify the contact and address information is correct in the Bill-to Institution section. Edit, if necessary.
6 (Optional) If you have a purchase order number you would like to use to attach to your Units request, enter the information in the Payment Method section.
7 Click Place Order to complete the transaction or click Cancel to stop the action and return to the SITES tab.
Complete the following to transfer units.
NOTE: This option applies to customers who are using COMPASS/ESL 3.2.x for Windows and want to transfer the Windows units to the COMPASS Internet Version.
IMPORTANT:
You can not transfer Internet units back to the Windows version.
You can not transfer units between Campuses.
Step Action
1 Log into COMPASS. Type the Staff ID and password. Click Login!
Result: The COMPASS/ESL screen displays with the SESSIONS tab opened. 2 Click the SITES tab.
NOTE: The SITES tab does not display if the staff member does not have administrative rights to at least one of the functions on the tab. 3 Click Transfer Units.
4 Review the three options. Click OK to make a selection or click Cancel to return to the SITES tab.
Part V Appendix
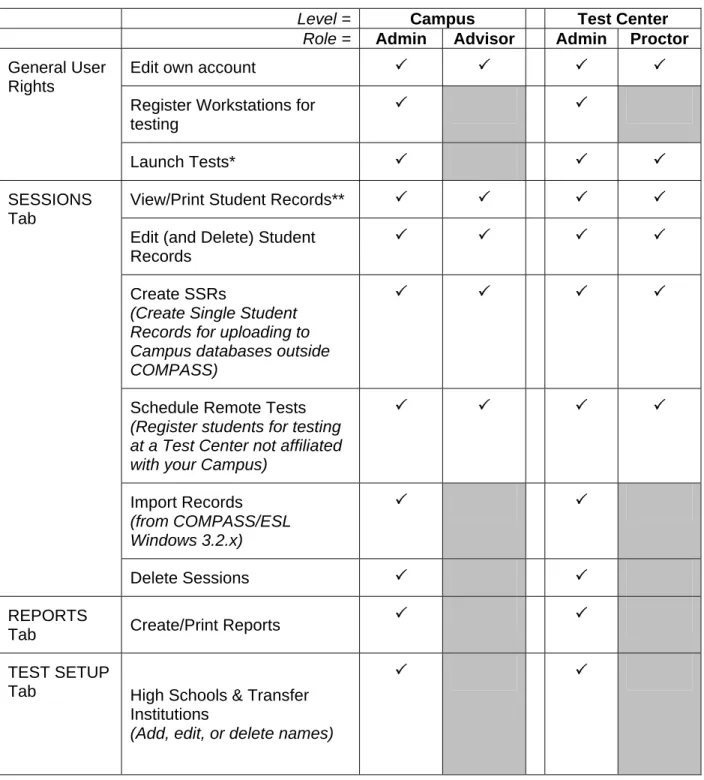
COMPASS User Rights and Roles
The following table shows the COMPASS roles and the rights assigned to each role by default.
NOTE: Staff members only have access to the tabs where they have been assigned administrative functions.
Level = Campus Test Center
Role = Admin Advisor Admin Proctor
Edit own account
Register Workstations for testing
General User Rights
Launch Tests*
View/Print Student Records**
Edit (and Delete) Student Records
Create SSRs
(Create Single Student Records for uploading to Campus databases outside COMPASS)
Schedule Remote Tests
(Register students for testing at a Test Center not affiliated with your Campus)
Import Records (from COMPASS/ESL Windows 3.2.x) SESSIONS Tab
Delete Sessions
REPORTS
Tab Create/Print Reports
TEST SETUP
Tab High Schools & Transfer Institutions
(Add, edit, or delete names)
Level = Campus Test Center
Role = Admin Advisor Admin Proctor
Campus Resources
(Modify and/or select resources and contact
information; also, add, edit, or delete a site-specific, local Campus resource)
Bulletin Boards
e-Write Setup
(Modify the e-Write test setup for both COMPASS and ESL)
Majors & Major Groups
(Add, edit, delete)
Local Demographic Items
(Add, edit, or delete local, site-specific items)
Local Measures
(Add, edit, or delete the local, site-specific scoring
measures)
Placement & Diagnostic Messages
(Add, edit, or delete the messages that students receive based on their test scores)
Test Packages***
Import Test Setup
(from COMPASS/ESL Windows version 3.2.x)
Edit Site Contact Information
Create/Edit/Delete Staff Members
SITES Tab
Level = Campus Test Center
Role = Admin Advisor Admin Proctor
From all Test Centers in the System
From all Test Centers associated with a single Campus
Access to Student Records
From one Test Center only
* If Launch Tests is allowed, staff members can access Find a student's Registration Number
on the Test Launcher tab.
** If View/Print Student Records is allowed, staff members can access Find a student's Registration Number on the SESSIONS tab.
*** Restrictions on editing test packages:
Administrator Type
Editing Rights
Campus Can edit any test packages created by their Campuses, assuming they have been given rights to do this task.
May not edit any test packages created by the system, even if they have rights to create or modify test packages. However, they can duplicate a test package and edit the duplicated version.
Test Center Can edit any test packages created by their Test Centers, assuming they have been given rights to do this task.
May not edit any test packages created by the system or Campus, even if they have rights to create or modify test packages.
However, they can duplicate a test package and edit the duplicated version.
Examining the SITES Tab
The SITES tab allows users to review, add, or edit site information based on the user rights assigned to them. The following are the options available on the tab.