Simon 3 Installation Manual
Corporation. All rights reserved.
This document may not be copied in whole or in part or otherwise reproduced without prior written consent from UTC Fire & Security except where specifically permitted under US and international copyright law.
Document number: 466-1873-01 REV F (October 31, 2012 8:59 AM).
Disclaimer The information in this document is subject to change without notice. UTC Fire & Security assumes no responsibility for inaccuracies or omissions and specifically disclaims any liabilities, losses, or risks, personal or otherwise, incurred as a consequence, directly or indirectly, of the use or application of any of the contents of this document. For the latest documentation, contact your local supplier or visit us online at www.utcfireandsecurity.com. This publication may contain examples of screen captures and reports used in daily
operations. Examples may include fictitious names of individuals and companies. Any similarity to names and addresses of actual businesses or persons is entirely coincidental.
Trademarks and patents
Simon product and logo are trademarks of UTC Fire & Security.
Other trade names used in this document may be trademarks or registered trademarks of the manufacturers or vendors of the respective products.
Intended use Use this product only for the purpose it was designed for; refer to the data sheet and user documentation. For the latest product information, contact your local supplier or visit us online at www.utcfireandsecurity.com.
Manufacturer UTC Fire & Security Americas Corporation, Inc. 1275 Red Fox Rd., Arden Hills, MN 55112-6943, USA
FCC compliance This equipment has been tested and found to comply with the limits for a Class B digital device, pursuant to part 15 of the FCC rules. These limits are designed to provide reasonable protection against harmful interference when the equipment is operated in a residential environment. This equipment generates, uses, and can radiate radio frequency energy and, if not installed and used in accordance with the instruction manual, may cause harmful
interference to radio communications.
Changes or modifications not expressly approved by the party responsible for compliance could void the user’s authority to operate the equipment.
FCC ID: B4Z-787E-SIMON
Part 68. This equipment complies with Part 68 of the FCC rules and the requirements adopted by ACTA. A label on this equipment contains a product identifier in the format US:AAAEQ##TXXXX. You must provide this number to the telephone company upon request.
FCC registration number: B4ZUSA-27621-A L-E REN: 0.2B
The plug and jack used to connect this equipment to the premises wiring and telephone network comply with the applicable FCC Part 68 rules and requirements adopted by ACTA. A compliant telephone cord and modular plug is provided with this product. It is designed to be connected to a compatible modular jack that is also compliant. See the installation
response to an incoming call.
In most cases, the sum of all device RENs should not exceed five (5.0). To be certain of the number of devices that may be connected to a line, as determined by the total RENs, contact your local telephone company.
For products approved after July 23, 2001, the REN is part of the identifier with the format US:AAAEQ##TXXXX. The digits represented by ## are the REN without a decimal point. (For example, 03 is a REN of 0.3). For earlier products, the REN is separately shown on the label. Alarm dialing equipment must be able to seize the telephone line and place a call in an emergency situation even if other equipment (telephone, answering system, computer modem, etc.) already has the telephone line in use. To do so, alarm dialing equipment must be properly connected to an RJ31X jack that is electrically in series and ahead of all other equipment attached to the same telephone line. If you have any questions concerning these instructions, consult your local telephone company or a qualified installer about installing an RJ31X jack and alarm dialing equipment for you.
If this equipment causes harm to the telephone network, the telephone company may temporarily disconnect your service. The telephone company may notify you in advance, but when advance notice isn’t practical, they will notify you as soon as possible and advise you of your right to file a complaint with the FCC.
The telephone company may make changes in their facilities, equipment, operations, or procedures that could affect the operation of the equipment. If they do, they will notify you in advance so you can make the modifications to maintain uninterrupted service.
If your home has specially wired alarm equipment connected to the telephone line, ensure the installation of this equipment does not disable your alarm equipment. If you have questions about what will disable alarm equipment, consult your telephone company or a qualified installer.
This equipment may not be used on coin service provided by the telephone company. Connection to party line service is subject to state tariffs. Contact the state publi c utility commission, public service commission, or corporation commission for information.
If you experience trouble with this equipment, please contact the company that installed the equipment for service and repair information. If the equipment is causing harm to the telephone network, the telephone company may ask you to disconnect the equipment until the problem is resolved.
Contact information www.utcfireandsecurity.com or www.interlogix.com
Customer support www.interlogix.com/customer-support
Canada notice
The Canadian Department of Communications label identifies certified equipm ent. This certification means that the equipment meets certain telecommunications network protective, operational, and safety requirements. The department does not guarantee the equipment will operate to the user’s satisfaction.
Before installing this equipment, users should ensure that it is permissible to be connected to the facilities of the local
telecommunications company. The equipment must also be installed using an acceptable method of connection. In some cases, the company’s inside wiring associated with a single-line individual service may be extended by means of a certified connector assembly (telephone extension cord). The customer should be aware that compliance with the above conditions may not prevent degradatio n of service in some situations.
Repairs to certified equipment should be made by an authorized Canadian maintenance facility designated by the supplier. Any repairs or alterations made by the user to this equipment, or equipment malfunctions, may give the telecommunications company ca use to
Caution: Do not make connections yourself. Contact the appropriate electrician or electric inspection authority.
The Load Number (LN) assigned to each terminal device denotes the percentage of the total load to be connected to a telephone loop which is used by the device, to prevent overloading. The termination on a loop may consist of any combination of devices subject only to the requirement that the total of the LNs of all the devices does not exceed 100. Load Number:.1 The term “IC:” before the
certification/registration number only signifies that the Industry Canada technical specifications were met. IC: 867A 787SIMON
“AVIS: -L ´étiquette du ministère des Communications du Canada identifie le matériel homologué. Cette étiquette certifie que le matér iel est conforme a certaines normes de protection, d ´ exploitation et de sécurité des réseaux de télécommunications. Le ministère n ´ assure toutefois pas que le matériel fonctionnera a la satisfaction de l ´ utilisateur.
Avant d ´ installer ce matériel, l ´ utilisateur doit s ´ assurer qu´ il est permis de le raccorder aux installations de l ´ enterprise locale de télécommunication. Le matériel doit également etre installé en suivant une méthod acceptée de raccordement. Dans certains cas , les fils intérieurs de l´ enterprise utilisés pour un service individuel a ligne unique peuvent etre prolongés au moyen d´ un dispositif homologué de raccordement (cordon prolongateur téléphonique interne). L ´ abonné ne doit pas oublier qu ´ il est possible que la conformité aux conditions énoncées ci-dessus n ´ empechent pas le dégradation du service dans certaines situations. Actuellement, les enterprises de télécommunication ne permettent pas que l ´ on raccorde leur matériel a des jacks d ´ abonné, sauf dans les ca s précis prévus pas les tarrifs particuliers de ces enterprises.
Les réparations de matériel homologué doivent etre effectuées pas un centre d ´ entretien canadien autorisé désigné par le fo urnisseur. La compagne de télécommunications peut demander a l ´ utilisateur de débra ncher un appareil a la suite de réparations ou de
modifications effectuées par l ´ utilisateur ou a cause de mauvais fonctionnement.
Pour sa propre protection, l ´ utilisateur doit s ´ assurer que tous les fils de mise a la terre de la source d ´ énergie électrique, des lignes téléphoniques et des canalisations d ´´ eau métalliques, s ´ il y en a, sont raccordés ensemble. Cette précaution est particu lièrement importante dans les régions rurales.
Avertissment. - L ´ utilisateur ne doit pas tenter de faire ces raccordements lui-meme; il doit avoir recours a un service d ´ inspection des installations électriques, ou a electricien, selon le cas”.
Une note explicative sur les indices de charge (voir 1.6) et leur emploi, a l ´ intention des utilisateurs du mat ériel terminal, doit etre incluse dans l ´ information qui accompagne le materiel homologué. La note pourrait etre rédigée selon le modèle suivant:
“L ´ indice de charge (IC) assigné a chaque dispositif terminal indique, pour éviter toute surcharge, le po urcentage de la charge totale qui peut etre raccordée a un circuit téléphonique bouclé utilisé par ce dispositif. La terminaison du circuit bouclé peut etr e constituée de n ´ import somme des indices de charge de l ´ ensemble des dispositifs ne dépasse pas 100.”
Content
Preface ii
Chapter 1 Introduction 1
Product overview 2
Planning the installation 6
Chapter 2 Installation 15
Installing the system 16 Mounting the panel 16
Connecting hardwired devices 18 Wiring a phone line to the panel 22 Wiring the power transformer 24 Installing X10 modules 26
Chapter 3 Programming 29
Program mode 30 Numbered options 36
Programming system access codes 70
Chapter 4 Testing the system 73
Control panel 74 Sensor testing 75
Phone communication 78 Voice event notification 82 RF thermostat operation 82 Personal help button 83 X10 operation 83
Chapter 5 Troubleshooting and support 85
Troubleshooting 86
Appendix A System configuration and emergency planning 89
System configuration 90 Quick reference table 101 Emergency planning 102
Preface
This is the Simon 3 Installation Manual for models 60-875, 600-1012, and 60-910 (not investigated for use by UL). This document includes an overview of the product and detailed instructions explaining:
• how to install; and
• how to program your system.
There is also information describing how to contact technical support if you have questions or concerns.
To use this document effectively, you should have the following minimum qualifications:
• a basic knowledge of intrusion systems; and
• a basic knowledge of electrical wiring and low-voltage electrical connections. Read these instructions and all other documentation entirely before installing or operating this product. The most current versions of this and related
documentation may be found on our website. Refer to Online resources on page 80 for instructions on accessing our online publication library.
Note: A qualified service person, complying with all applicable codes, should perform all required hardware installation.
Safety terms and symbols
These terms may appear in this manual:Caution: Cautions identify conditions or practices that may result in damage to the equipment or other property.
WARNING: Warnings identify conditions or practices that could result in equipment damage or serious personal injury.
Chapter 1
Introduction
This chapter provides a product overview, including UL requirements, system components, and planning information.
In this chapter:
Content
Product overview 2
Special installation requirements 2 SIA system requirements 4
Planning the installation 6 Standard panel 6 System overview 6
Product overview
This manual provides information for planning, installing, programming, and testing this security system. When necessary, this manual refers you to other documentation included with compatible devices.
Planning sheets are included for you to record sensor locations and software programming settings.
This security system can be used as a fire warning system, an intrusion alarm system, an emergency notification system, or any combination of the three.
Special installation requirements
Some installations may require configurations dictated by city/state codes,
insurance, or Underwriter’s Laboratories (UL). This section describes the various component and configuration listings.
UL listed installations
This section describes the requirements for UL listed installations.
Basic system
Control Panel - 60-875-95R (basic panel) 60-875-01-95R (with *2-way voice) 60-875-10-3 (with *transmitter) 60-875-11-3 (with *2-way voice and *transmitter) 600-1012 (Broadband Ready)
Backup Battery - 6V 1.2 AH (34-025) (Portalac model # PE6V1.2)
Transformer - Standard Class II 9 VAC, 700 mA Power Transformer (22-109-ITI) or Class II 9 VAC, 700 mA Line Carrier Power Transformer (22-129-(22-109-ITI). Obtained through UTC Fire & Security Alternate transformer for UL installation: MG Electronics Model MGT925, 9 VAC, 25 VA UTC Fire & Security Part 22-155. Hardwired Siren - (13-046)
* Not investigated for use by UL.
Household Burglary Alarm System Unit (UL 1023)
Basic system, plus:
• Hardwired magnetic contact (13-068 or 13-071) or wireless Learn Mode door/window sensor (60-670).
• Option 01: Panel piezo beeps set to on.
• Option 10: Entry delay set to 45 seconds or less. • Option 11: Exit delay set to 60 seconds or less.
• Option 19: RF timeout set to less than 24 hours. • Option 29: Control panel alarms turned on. • Option 38: Autoarm set to on.
• Option 39: Siren timeout set to 4 minutes or more. • Option 40: 7 set to on.
• Option 50: RF jam detect set to on.
• Option 53: Hardwired siren supervision set to on if Option 29 is set to off. • Option 59: Exit extension set to off.
• Option 67: Quick exit set to off.
Household Fire Warning System (UL 985)
Basic system, plus:
• Wireless Smoke Sensor 60-848-95 learned into sensor group 26 • Option 01: Panel Piezo Beeps turned on
• Option 29: Control Panel Alarms set to on
• Option 39: Siren Timeout set to 4 minutes or more • Option 40: Trouble Beeps set to on
• Option 50: RF Jam Detect set to on
• Option 53: Hardwired Siren Supervision set to on if Option 29: Control Panel Alarms is set to off
• Option 85: Smoke Supervision must be set to on
UL 1023 & 985 24-Hour Backup
For 24-hour backup, the total current draw for all connected devices is limited to 25mA (during normal standby conditions) using a 1.2 AH battery.
UL 1635 Digital Alarm Communicator System
Same as UL 1023 & 985, plus:
• Option 12: Phone 1 Reports set to 0 or 1 • Option 16: Auto Phone Test set to 001
• Option 19: RF Timeout set to less than 4 hours • Option 24: AC Power Failure Report set to on • Option 25: CPU Low Battery Report set to on • Option 26: Fail to Communicate set to on
• Option 50: RF Jam Detect set to on
• Option 10 and 17: Entry Delay plus the Dialer Delay must not exceed 60 seconds
Note: These option settings are in addition to UL 1023 and 985 and are required only if the system is set up for Central station reporting.
SIA system requirements
SIA system requirements are the same as those described for a UL listed basic system. Plus if multiple annunciation is required, use Hardwired Siren part no.13-046.
UL requirements take priority over SIA requirements.
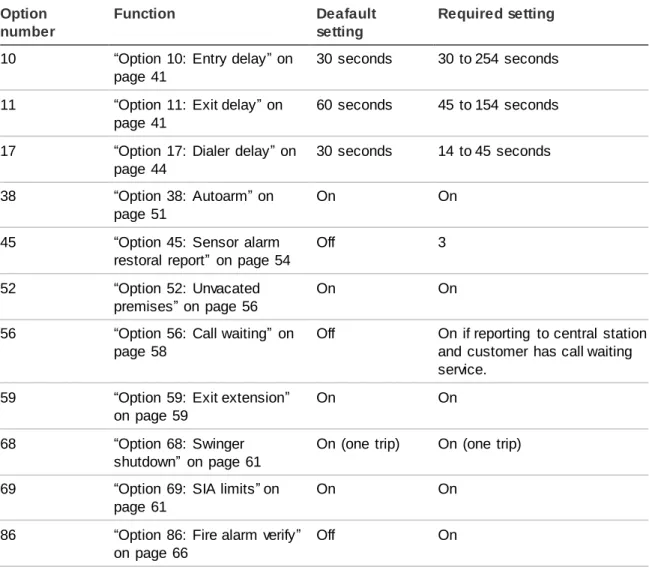
Table 1 below describes programming requirements to meet ANSI-SIA CP-01.
Table 1: ANSI-SIA programming requirements Option
number
Function Deafault
setting
Required setting
10 “Option 10: Entry delay” on page 41
30 seconds 30 to 254 seconds 11 “Option 11: Exit delay” on
page 41
60 seconds 45 to 154 seconds 17 “Option 17: Dialer delay” on
page 44
30 seconds 14 to 45 seconds 38 “Option 38: Autoarm” on
page 51
On On
45 “Option 45: Sensor alarm restoral report” on page 54
Off 3
52 “Option 52: Unvacated premises” on page 56
On On 56 “Option 56: Call waiting” on
page 58
Off On if reporting to central station and customer has call waiting service.
59 “Option 59: Exit extension” on page 59
On On
68 “Option 68: Swinger shutdown” on page 61
On (one trip) On (one trip) 69 “Option 69: SIA limits” on
page 61
On On
86 “Option 86: Fire alarm verify” on page 66
Option number
Function Deafault
setting
Required setting
N/A Duress/panic code Disabled Disabled
N/A Cross zoning Disabled Enabled for PIRs
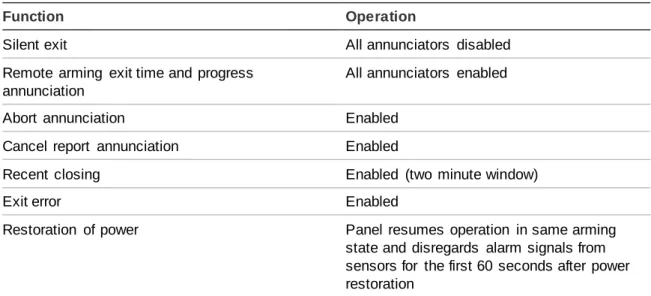
Table 2 below describes non-programmable (hard coded) system operation as required to meet ANSI-SIA CP-01 and is provided only for your reference.
Table 2: System operation required for ANSI-SIA
Function Operation
Silent exit All annunciators disabled Remote arming exit time and progress
annunciation
All annunciators enabled Abort annunciation Enabled
Cancel report annunciation Enabled
Recent closing Enabled (two minute window)
Exit error Enabled
Restoration of power Panel resumes operation in same arming state and disregards alarm signals from sensors for the first 60 seconds after power restoration
Central station reporting
The communication path between the panel and the receivers can be either DACT or internet. One is not a backup for the other.
The panel has been tested with the following central station receivers using SIA and Contact ID reporting formats:
• Radionics D6600 Central Station Receiver
• Sur-Gard Central Station Receiver with models SG-DRL2A and SG-CPM2 • CS5000 Digital Alarm Communicator Receiver
• Osborne-Hoffman (OH2000E) Network Receiver
Note: Before beginning installation, installers must verify compatibility with the following central station receivers.
UL Canada listed installations
This section describes the requirements for CUL (UL Canada) Listed installations.
Canadian Standards CSA Certified Accessories
Basic system as described for “UL 1023 Listed Installations” plus:
• Hardwired Magnetic Contact (13-068 or 13-071) or Wireless Learn Mode Door/Window Sensor (60-670)
• Option 39: Siren Timeout set to 5 minutes or more
Residential Fire Warning System Control Unit (ULC-S545-M89) Basic system as described for “UL 985 Listed Installations” plus: • Wireless Smoke Sensor 60-848-95 learned into sensor group 26 • Option 39: Siren Timeout set to 5 minutes or more
• For 24-hour backup, the total current draw for all connected devices is limited to 33 mA (during normal standby conditions) using a 1.2 AH battery.
California State Fire Marshall listed installations
Applied for.
Planning the installation
This section describes system capabilities to help you get familiar with the system. System configuration on page 82 provides planning sheets with tables that let you record the hardware and programming configuration of the system. Fill in all necessary information ahead of time to help prepare for system
installation.
Standard panel
The following describes the basic panel (out-of-box) hardware capabilities. Power - Input for an AC step-down, plug-in style transformer.
2 siren outputs/zone inputs - Terminals for connecting hardwired sirens or normally closed (NC) loop switch circuits.
Phone line connection - Allows panel to communicate with central monitoring station, voice event notification and/or pagers.
System overview
This section gives an overview of the components that make up the system (control panel and system devices). Before installation, plan your system layout and programming using the worksheets in “System configuration” on page 90.
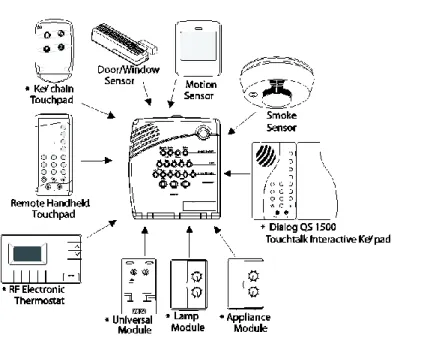
System components
The security system has three types of components: the control panel, devices that report to the panel and devices that respond to commands from the panel (Figure 1 below). (* Not investigated for use by UL.).
Figure 1: System components
Control panel
The control panel is the main processing unit for all system functions. It receives and responds to signals from wireless sensors and wireless touchpads
throughout the premises. For monitored systems, the panel can be connected to the premises phone line for central monitoring station, pager, and/or voice event notification reporting.
Two panel models are available. One has an onboard 2-way voice microphone, the other does not. The Interrogator 200 audio verification module can be added to either panel.
Note: An optional Braille Kit (60-915) is available for visually impaired users. User interface
When the panel cover is closed, the panel buttons operate the security system. The user operates the panel by pressing panel buttons or by using a touchpad. Refer to the User Manual for complete operation instructions.
When the panel cover is open, the buttons program the security system. The panel can be programmed onsite by the installer or user, or from offsite using
ToolBox® software. See the ToolBox manual and ToolBox online help for offsite programming instructions.
ToolBox has not been investigated by UL and should not be used to program panels in UL listed systems.
Panel tamper
If the panel cover is opened while the system is armed, an intrusion alarm occurs. When the system status button is subsequently pressed, the panel says System Access Alarm.
System devices
The system can monitor up to 24 sensors and may use any of the following: Door/window sensor (60-670)
For intrusion protection, install Door/Window sensors on all ground-floor doors and windows. At a minimum, install them in the following locations:
• All easily accessible exterior doors and windows. • Interior doors leading into the garage.
• Doors to areas containing valuables such as cabinets and closets. Indoor motion sensor (60-639)
Indoor motion sensors are ideal whenever it is not practical to install door/window sensors on every opening. Identify areas where an intruder is likely to walk
through. Large areas in an open floor plan, downstairs family rooms, and hallways are typical locations for indoor motion sensors. For installations with pets, use the SAW Pet Immune PIR (60-807).
Outdoor motion sensor (60-639)
Use outdoor motion sensors to detect motion in a protected outdoor area. Detected motion in this protected area can sound chimes or turn on outside lights. Do not use outdoor motion sensors for intrusion protection. Freeze sensor* (60-742)
Freeze sensors detect low temperature conditions which may indicate a furnace failure. The sensor contains a bimetallic thermal switch connected to the built-in transmitter. The sensor transmits an alarm signal to the panel when the
surrounding temperature drops to about 41°F (5°C). When the temperature rises to 50°F (10°C), the sensor transmits a restore signal.
Water sensor* (60-744)
Water sensors detect a water leak/rising water. The detector is connected to the sensor by an 8-foot (2.4-meter) cable. Water that reaches both detector contact points activates the sensor, causing it to transmit an alarm signal.
Smoke sensor (60-848-95)
Smoke sensors provide fire protection by causing an alarm to sound throughout the house. You can add smoke sensors near sleeping areas and on every floor of the house. Avoid areas that could have some smoke or exhaust such as attics, kitchens, above fireplaces, dusty locations, garages, and areas with temperature extremes. In these areas you may want to install Rate-of-Rise sensors to detect extreme temperature changes. See “Emergency Planning” and the instructions packaged with the smoke sensor for complete placement information.
Carbon monoxide (CO) alarm* (60-652-95)
The Learn Mode™ CO alarm alerts users to hazardous levels of carbon
monoxide gas. If dangerous concentrations of gas are present, the red indicator light comes on, the internal siren goes off, and an alarm is transmitted to the panel. The panel sounds its own alarm and reports to the central station. Keyfob* (60-659)
The keyfob lets you turn the system on and off from right outside the home or activate a panic alarm if there is an emergency. If you have X10 Lamp Modules, you can use key-fobs to turn all system controlled lights on and off.
ELM (encrypted learn mode) keyfob* (60-832)
The ELM (Encrypted Learn Mode™) 2-button keyfob is an alkaline battery-powered, wireless touchpad that allows users to arm and disarm their system, and activate a police or auxiliary panic alarm. Random encrypted signal transmissions provide high security to help prevent signal copying.
Note: The ELM keyfob is only compatible with Simon® 3 panels version 3.3 and later.
Remote handheld touchpad (60-671)
The remote handheld touchpad lets you turn the system on and off while in the home, turn system controlled lights on and off (all or individual lights), or activate a panic alarm if there is a non-medical emergency.
Dialog QS1500 touchtalk interactive keypad* (60-924-01-3)
The wall-mounted wireless Dialog QS1500 Touchtalk interactive keypad
combines a conventional Learn Mode™ touchpad with an RF receiver, speech chip, and voice amplification circuit.
Dialog RF electronic thermostat* (60-909-95)
The Dialog RF Electronic Thermostat provides a money saving and convenient way to monitor and control temperatures. The thermostat uses low and high temperature limits to save energy. Temperature limits set on the thermostat
determine when the heat or air conditioning turns on. There can be only one RF Thermostat per system.
Water-resistant personal help button* (60-906-95)
The water-resistant personal help button is a wireless device used for activating police, medical or auxiliary alarms through your system. When the help button is pressed, the light mounted under the cover will blink and an alarm signal is transmitted.
X10 modules*
When the panel is powered using the line carrier power transformer, the system can work with any of the following modules:
• X10 lamp module (13-403) • X10 appliance module (13-402)
• X10 power horn/remote siren module (13-398) • X10 universal module (13-399)
Note: Use of X10 modules has not been investigated by UL. Interrogator 200 audio verification module* (60-787)
The audio verification module (AVM) gives the central station operator the ability to hear what’s happening at the premises during an alarm and to speak directly to the system user. The operator can then determine how serious an alarm is, find out what kind of help is needed, and dispatch the appropriate assistance. Only one AVM may be installed per panel.
Ethernet interface module (60-938)
The Ethernet interface module is designed to provide an additional reporting method for Simon panels. The module reports events to the
premisesconnect.com web site and up to two Osborne-Hoffman (OH2000E) network receivers.
Premisesconnect.com is used by:
• Installers - to aid in installation and maintenance of security systems. • Dealers - to simplify customer and account management.
• First responders - to identify where and how to respond.
• Customers - to receive event notifications and to control their security system. Dialog™ telephone interface module (DTIM) (60-879-95R)
The DTIM is a battery operated communication link between the security system control panel and the central monitoring station. The DTIM receives radio signals from the panel, then uses the phone line to report security system events to the central station.
Note: The DTIM doesn’t support AVM, remote access or any call back from the central station. It is for reporting purposes only.
* Not investigated for use by UL.
Planning sensor types and locations
The first step to an easy and successful installation is to decide what areas or items to protect, which lights or appliances to operate, and the best location for the panel, touchpad, sensors, and sirens.
Metal objects, mirrors, and metallic wallpaper can block signals sent by the wireless sensors. Make sure there are no metal objects in the way when installing the system.
Use the planning tables in “System configuration” on page 90 to determine the appropriate sensor type for the sensors you will be adding. You’ll need to understand the application for each sensor. For example, keyfobs are typically programmed as sensor group 01 (Portable panic), used to send an intrusion alarm to a central monitoring station. This sensor type is instant intrusion, it does not require restoral or supervisory communication with the panel and it is active in 4 arming levels (disarm, arm doors & windows, arm motion sensors, and arm doors/windows and motions sensors).
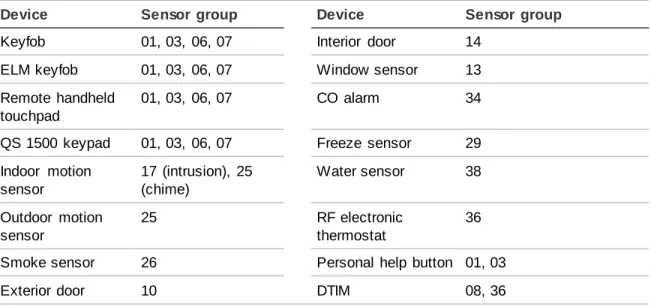
Table 3 below shows devices and recommended sensor groups.
Table 3: Recommended sensor groups
Device Sensor group Device Sensor group
Keyfob 01, 03, 06, 07 Interior door 14 ELM keyfob 01, 03, 06, 07 Window sensor 13 Remote handheld
touchpad
01, 03, 06, 07 CO alarm 34 QS 1500 keypad 01, 03, 06, 07 Freeze sensor 29 Indoor motion sensor 17 (intrusion), 25 (chime) Water sensor 38 Outdoor motion sensor 25 RF electronic thermostat 36 Smoke sensor 26 Personal help button 01, 03 Exterior door 10 DTIM 08, 36
Control panel
Locate the panel where alarm sounds can be heard and is easily accessible for operation. Do not install the panel near a window or door where it can be reached easily by an intruder.
Remote handheld touchpad
Locate Remote Handheld Touchpads where they will be convenient and offer quick access to the user.
QS1500 keypad
Locate QS1500 Keypads where they will be convenient and offer quick access to the user. When mounted, they must be within 600 feet (183 meters) of the control panel.
Keyfob
Keyfobs attach to the owner’s key ring or can be conveniently carried.
Dialog telephone interface module
Mount the DTIM within 100 feet (30 meters) of the panel, but no closer than 10 feet (3 meters) to another DTIM or the panel.
X10 modules
The system can control up to 8 individual unit numbers on Lamp, Wall switch, Appliance, and Universal Modules.
House code and unit numbers
Each device (lamp, appliance, etc.) controlled by the panel must have an identification setting. The modules use two dials to set identification codes: one with letters A through P and one with numbers 1 through 16.
The lettered dial sets the house code, which enables the system to differentiate this home from other homes in the area. Set all modules (except the remote siren) and the panel to the same house code.
The numbered dial sets the unit number, which identifies and lets you control a specific device. Each device must have a unique unit number (1-8) to be individually controlled. For example, lights and appliances operated from a Remote Handheld Touchpad or operated by a sensor; or lights programmed to go on during the entry/exit delay or at scheduled times.
All Lamp Modules with the same house code will turn on or flash as a group during an alarm or when operating the “Light” button on a key-fob.
Note: When unit numbers 9-16 are used for lamp modules, they can only be controlled by an all on or all off command. A lamp will flash to the arming level if its unit number is set to 10. A lamp set to unit number 10 will flash once if the panel is disarmed, twice if doors & windows are armed, etc. The remote siren can be set to any unit number to hear alarm sounds. Set it to unit number 9 to also hear arming level beeps, status beeps, and trouble beeps. Do not use a lamp module to control appliances. Use an appliance module, since the wattage rating on Lamp Modules is less than on Appliance Modules.
Manually controlling lights
Lights with even unit numbers (2, 4, 6, 8) can be controlled from either the panel, Remote Handheld Touchpad or QS1500 Keypad. Lights with odd unit numbers (1, 3, 5,7) can only be controlled from a Remote Handheld Touchpad or QS1500 Keypad.
To fill out the home control planning table, do the following:
1. Set the house code on all modules (except the remote siren) to the same letter.
2. Set the Remote Siren house code to the next alphabetical letter. For example, if you chose house code B in step 1 above, set the remote siren house code to C.
3. Set the module unit numbers.
4. List the location of the lamp or appliance in the Location column.
5. Write the location of each lamp module on an adhesive note and label the module.
6. Decide if the device should be activated by sensors, entry/exit delay time, or a combination. An example of sensor activation is using a motion sensor to turn on a light. Record the information in the appropriate columns.
Note: The house code instructions that come with the power-horn siren won’t work with this panel. Follow the house code instructions given here.
Use Table 4 below and Table 5 on page 14 to help you plan X10 module installations.
If you are using a universal module to operate a device, make sure to assign a unique unit number to this module, choosing from 1 to 8.
Table 4: X10 house code assignments
X10 device Settings
Lamp, appliance, universal
Set all modules to the same house code (A to O) except the remote sirens.
X10 device Settings
Remote sirens House code must be set to the next higher alphabetical letter.
Table 5: X10 unit number assignments Unit
number
Result
1 to 8 Used for sensor-activated, time-activated, and entry/exit delay lights. • Sensor activated lights are enabled and disabled by pres sing the Lights
Sensor Activated button on the panel.
• Time activated lights are enabled and disabled by pressing the Lights Time Activated button on the panel.
• If using the universal module to operate a device, be sure to assign a unique unit number.
• The Star button on the keyfob activates the universal module controlled device or turns on special lights if programmed.
9 Used for remote siren or light control.
• For remote sire use, sirens with this setting sound alarms, arming level beeps, status beeps, and trouble beeps.
• For light control, lamp modules with this setting are controlled by an all on or all off command.
10 Used for remote siren or light control.
• For remote siren use, sirens with this setting only sound alarms.
• For light control, lamps will flash according to selected arming level and are controlled by an all on or all off command.
Chapter 2
Installation
This chapter provides an information on how to install the panel and system components.
In this chapter:
Content
Installing the system 16
Opening the panel cover and chassis 16 Mounting the panel 16
Connecting hardwired devices 18 AC terminals 18
HWIN1, HWIN2, and DCOUT terminals 19 Wiring interior sirens 19
Wiring exterior sirens 20 Wiring hardwired contacts 21 Wiring a phone line to the panel 22
Full line seizure 22 No line seizure 24
Wiring the power transformer 24 Powering up the panel 25 Applying AC power 26 Installing X10 modules 26
Installing the system
This section describes how to open the panel for mounting, mount the panel, connect sirens, hardwired contacts, and the AC power transformer.
Materials needed
• Pencil
• Phillips and flathead screwdrivers
Opening the panel cover and chassis
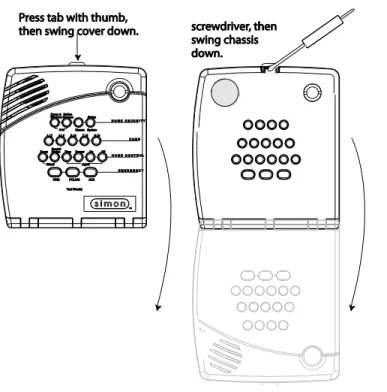
Tabs at the top of the panel secure and release the front cover and the chassis. The plastic hinges on the panel bottom allow the cover and chassis to swing down and out of the way (Figure 2 below).
Note: If Option 40 (trouble beeps) is on, the panel will sound six trouble beeps every minute the panel cover is open.
Figure 2: Opening the cover
Mounting the panel
Wall mounted panel
The panel must be securely mounted to the wall using the four screws supplied to prevent accidental movement and to protect the consumer from the system wiring and terminals.
To wall mount the panel, do the following: 1. Choose a panel location.
2. Run all necessary power, phone, siren, and hardwired contact wires to the desired panel location.
3. Hold the panel against the wall and mark the mounting hole locations (Figure 3 below) with a pencil.
4. Insert wall anchors into holes where studs are not present. 5. Install all screws and tighten gently.
When choosing the AC outlet location for the AC power transformer, make sure the outlet is not controlled by a switch or that it is not part of a ground fault interrupt circuit (GFIC).
Figure 3: Wall-mount mounting holes
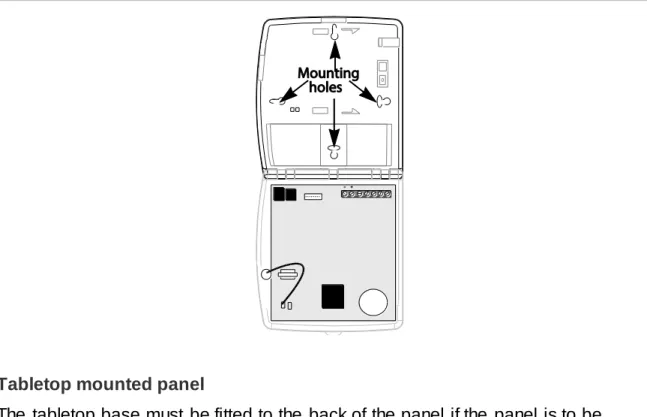
Tabletop mounted panel
The tabletop base must be fitted to the back of the panel if the panel is to be used on a table or bench.
To mount the panel using a tabletop base, do the following: 1. Select a suitable location near power and phone line.
2. Run all necessary wires from the panel through the openings in the tabletop base.
3. Place the panel back on the tabletop base until the top and bottom panel mounting holes line up with the mounting holes on the tabletop base (Figure 4 below).
4. Secure the panel to the tabletop base with the screws provided. 5. Ensure the cables are neat and will not create a tripping hazard.
Note: A tabletop mounted application is only recommended when the panel requires the power and telephone cable as the only hardwired connections. Use the wall mounted position in all other applications.
Figure 4: Tabletop mounting holes
Connecting hardwired devices
The panel has seven screw terminals located on the upper-right corner of the circuit board (see Figure 3 on page 15) for connecting AC power, sirens and/or hardwired detectors.
Note: Program sensors and devices before you install them.
AC terminals
These terminals are used for connecting a Class II 9 VAC, 700 mA AC power transformer. For systems with no X10 modules, use transformer part no. 22-109-ITI. For systems with X10 modules, use transformer part no. 22-129-22-109-ITI.
HWIN1, HWIN2, and DCOUT terminals
These terminals are dual purpose and can be used for either siren or hardwired detector connections. Options 96 and 97 control how the output on HWIN1 and HWIN2 will function.
Sirens
From the factory, these terminals are set up for siren operation with HWIN1 handling interior sirens (status and alarm sounds), HWIN2 handling exterior sirens (alarm sounds only), and DCOUT providing the positive (+) voltage. With Option 53: Hardwired Siren Supervision turned on, sirens connected to HWIN1 and HWIN2 are supervised and require a 4.7 kohm resistor in the circuit. If either of these terminals is not used with Option 53 on, you must connect a 4.7 kohm resistor between the unused terminal and DCOUT.
Note: The total current available from the DCOUT terminal is 250 mA (50 mA with the Ethernet interface module installed) at up to 122°F (50°C).
Hardwired Detectors
To set up HWIN1 and/or HWIN2 for hardwired detectors, make the required connections as described under “Wiring Hardwired Contacts,” then proceed to Programming on page 17 to add (learn) them into panel memory.
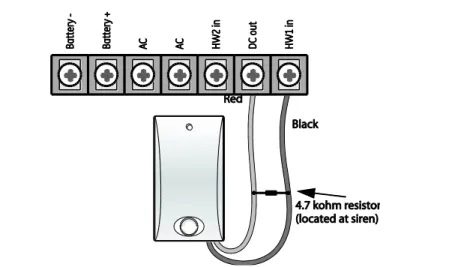
Wiring interior sirens
Panel terminal HWIN1 can be used for connecting interior sirens and activates for status and alarm sounds.
For circuit supervision, which allows the panel to detect if the siren wire is cut (open), “Option 53: Hardwired siren supervision” on page 57 must be turned on and interior sirens must be wired with a resistor in the circuit.
LD105 hardwired interior siren
Connect the LD105 hardwired interior siren (13-374) to the panel using a 4.7 kohm resistor (included with siren) as shown in Figure 5 on page 20. The resistor must be connected across the siren wires as close to the siren as possible. Do not install the resistor at the panel terminals. This does not provide supervision of the wire.
Figure 5: Hardwire interior siren with supervision
Note: If you are installing only an interior siren and no exterior siren and Option 53 is on, you must connect a 4.7 kohm resistor between the HWIN1 and DCOUT terminals in addition to the resistor between HWIN2 and siren and Option 53 is on, you must connect a 4.7 kohm resistor between the HWIN2 and DCOUT terminals in addition to the resistor between HWIN1 and DCOUT.
Wiring exterior sirens
Panel terminal HWIN2 can be used for connecting exterior sirens and activates when intrusion and fire alarms occur. Exterior sirens can be wired with or without a resistor in the circuit for supervision. For circuit supervision which allows the panel to detect if the siren wire is cut (open), “Option 53: Hardwired siren supervision” on page 57 must be turned on.
Hardwired exterior siren with supervision
Connect the hardwired exterior siren (13-046) to the panel using a 4.7 kohm resistor (included with siren) as shown in Figure 6 on page 21. The resistor must be connected across the siren wires as close to the siren as possible. Do not install the resistor at the panel terminals. This does not provide supervision of the wire.
Figure 6: Hardwire exterior siren with supervision
Note: If you are installing only an exterior siren and no interior siren and Option 53 is on, you must connect a 4.7 kohm resistor between the HWIN1 and DCOUT terminals in addition to the resistor between HWIN2 and DCOUT shown in
Figure 6 above.
Hardwired exterior siren without supervision
With Option 53 turned off, connect the Hardwired Exterior Siren (13-046) to the panel without a resistor as shown in Figure 7 below.
Figure 7: Hardwire exterior siren without supervision
Wiring hardwired contacts
You can connect hardwired reed switches (normally closed loop only) to HWIN1 and/or HWIN2, if either terminal is not being utilized for a hardwired siren. Other types of hardwired detectors should not be used.
The total resistance of the wire loop must not exceed 3 ohms. This allows you to use up to 200 feet (61 meters) of 2-conductor, 22-gauge stranded wire.
Connect hardwired reed switches to the panel using a 47 kohm resistor as shown in Figure 8 below. The resistor must be connected at the last switch in the circuit. Do not install the resistor at the panel terminals. This does not provide
supervision of the wire.
Figure 8: Normally closed hardwire reed switches
Wiring a phone line to the panel
You can connect a phone line to the panel for systems monitored by a central monitoring station and/or systems that notify users by a digital pager or voice event notification.
Basically, there are two methods for connecting the panel to a phone line; full line seizure and no line seizure.
Full line seizure
This method requires that the panel be wired ahead (or in front) of all other phones, answering machines, computers, or other devices on the phone line. This allows the panel to take over (seize) the phone line, even if another device on the line is in use.
An RJ-31X (CA-38A) jack should be installed when wiring for full line seizure. This lets the user quickly and easily disconnect the panel from the phone line in case the panel disables the phone line due to a malfunction.
Note: For UL Listed systems, the RJ31X jack must be mounted within 5 feet (1.5meters) of the panel.
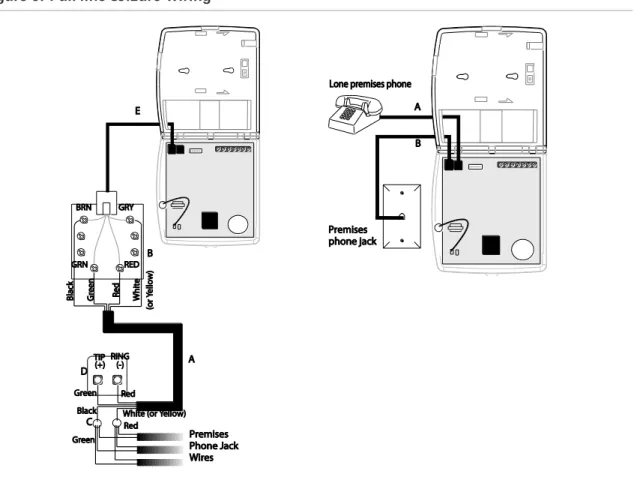
Full line seizure wiring with an RJ31X
For full-line seizure with an RJ31X, see Figure 9 on page 24 and do the following:
1. Run a 4-conductor cable from the TELCO block to the RJ-31X (A). 2. Connect the 4-conductor cable wires to the RJ-31X (B).
3. Disconnect the Green and Red premises phone jack wires from the TELCO block and splice them to the 4-conductor cable Black and White (or Yellow) wires (C). Use weatherproof wire connectors for these splices.
4. Connect the 4-conductor cable Green and Red wires to the TELCO block TIP (+)and Red to RING (-) posts (D).
5. Connect the phone cord included with the panel to the RJ31X and the panel LINEIN jack (E).
Note: For UL listed systems, the RJ31X jack must be mounted within 5 ft. (1.5 m) of the panel.
Full line seizure with one premises phone
If a single phone is all that exists on the premises, full line seizure can be accomplished without an RJ-31X.
For full seizure with a premises phone, see Figure 9 on page 24 and do the following:
1. Disconnect the phone from the premises phone jack and plug it into the panel PHONE jack (A). This jack is disconnected automatically whenever the panel reports.
2. Connect the phone cord included with the panel to the panel LINE IN jack and the premises phone jack (B).
Note: If the customer ever adds a phone or other phone device to another phone jack, full line seizure no longer exists. Inform the customer to contact you if they want to add a phone or other device so that you can rewire for full line seizure by adding an RJ-31X.
Figure 9: Full line seizure wiring
No line seizure
This method is typically used where DSL (digital subscriber line) service exists. DSL allows multiple devices on a single phone line to be used simultaneously. Connecting the panel LINE IN jack to an available phone jack on the premises is all that is required. An in-line filter may be required to ensure panel reporting is successful. Connecting the panel to a standard phone (voice) line in this manner should be avoided. Other devices in use at the same time the panel is using the line can prevent reports from going through.
Note: For UL installations, installer needs to verify line seizure.
Wiring the power transformer
Connect the power transformer to the panel AC terminals as shown in Figure 10 on page 25.
Figure 10: Power transformer wiring
Powering up the panel
When applying power to the panel connect the battery first, then plug in the AC power transformer. This sequence prevents a battery fault condition.
Installing the panel backup battery
To install the panel backup battery, do the following:
1. Remove the cover from the battery compartment (Figure 11 below). 2. Connect the red and black battery leads (included with panel) to the panel
terminals and then to the battery.
3. Place the battery in the compartment, running the wires through the openings in the top and bottom of the compartment.
Figure 11: Installing the backup battery
Figure 12: Battery installed
Caution: Tighten the screws to the battery compartment securely. Failure to do so could result in damage to the panel board when the cover and chassis are closed.
Applying AC power
Make sure the outlet is not controlled by a switch and that it is not part of a ground fault interrupt circuit (GFIC).
To apply AC power, do the following:
1. Remove the center screw from the outlet cover plate and hold the cover plate in place.
WARNING: Use extreme caution when securing the transformer to a metal outlet cover. You could receive a serious shock if a metal cover drops down onto the prongs of the plug while you are securing the transformer and outlet cover to the outlet box.
2. Plug the transformer into the lower receptacle of the outlet so that the hole in the transformer tab lines up with the outlet cover screw hole. The panel voice should announce Hello, system XX is OK.
3. Insert the cover plate screw through the transformer tab and the outlet cover plate. Tighten the screw firmly.
Installing X10 modules
1. Set the unit code dial to a unit number different from all other X10 modules (between 1 and 8).
2. Set the house code for the installation. 3. Plug the module into a wall outlet. 4. Plug the lamp/appliance into the module.
Caution: Do not plug appliances or lamps with 300-watt or larger bulbs into lamp modules.
To install universal modules, do the following:
1. Set the unit code dial to a unit number different from all other X10 modules (between 1 and 8).
2. Set the house code for the installation.
3. Set the module switches to momentary and relay only.
4. Connect the module terminals to the desired device terminals. 5. Plug the universal module into a wall outlet.
Note: See Light and appliances control to program a keyfob to activate a universal module controlled device.
Chapter 3
Programming
This chapter provides information on programming your system. In this chapter:
Content
Program mode 30
Reset memory to the factory defaults 30 Set the clock 31
Adding (learning) sensors 31 X10 module operation 34 Ethernet interface module 36 Numbered options 36
Program mode
There are two codes you can use to enter program mode.
Utility Access Code 1 (Dealer Code) - Depending upon how Option 54 is set, the default utility access code is 654321, 54321, 4321 (factory default), or 321. This code can be used for all programming.
Utility Access Code 2 (Installer Code) - Depending upon how Option 54 is set, the default access code is 654321, 54321, 4321 (factory default), or 321. This code is limited to changing all but the following: Utility Access Code 1, Options 4, 5, 6, 8, 9, 12, 13, 54, and 69.
To enter program mode, do the following: 1. Open the panel cover.
2. Enter Utility Access Code 1 or 2 using the numbered keys.
The panel is now in program mode. Follow the programming arrows on the panel label. The system prompts you through programming steps with beeps and voice messages.
Caution: Do not power down the panel while in programming mode or all programming will be lost. The panel stores programmed information only when you exit program mode (close the cover and leave closed for at least five seconds).
Program the panel in this order: 1. Set the panel clock.
2. Add (learn) sensors.
3. Set house code and light and appliance controls (entry/exit activated lights, sensor activated lights, time activated lights).
4. Change numbered options as needed.
Close the cover to exit program mode when you are finished programming.
Reset memory to the factory defaults
To reset memory to factory defaults, do the following: 1. Open the panel cover and enter Utility Access code 1. 2. Unplug the transformer and disconnect the battery.4. Restore power to the panel with the battery while pressing the three buttons. The panel announces, Hello, System XX OK. Release the buttons.
5. Plug in the transformer to the outlet.
Note: If Option 8 (phone lock) is on, options 4, 5, 6, 7, 8, 9, 12, 13, 54, 56, and dealer code will not reset to their defaults.
Set the clock
To reset the clock, do the following:
1. Press Clock Set from the Start Menu.
2. Press the Hours + and – keys and listen to the voice prompts. Stop when panel voice announces the correct hour.
3. Press the Minutes + and – keys and listen to the voice prompts. Stop when the panel announces the correct minutes.
4. Press Done. The panel announces the set time.
Adding (learning) sensors
These instructions describe how to add sensors, touchpads and other system devices into panel memory. The panel recognizes a sensor when you press a sensor program button, press and release a tamper switch, press a sensor test button, or put a sensor into alarm.
The hardwired inputs must have sirens or hardwired sensors with 47 kohm
resistors connected between the DCOUT and HWIN1 or HWIN2 terminals before learning in a sensor. If one of these connections is not made, the panel will learn in a hardwired zone.
Note: If you are installing a sensor on a gun case, jewelry box, or similar usage, and the sensor is active in level one, you must sub-disarm to avoid putting the panel into alarm when the sensor and the magnet are separated.
Table 6 below describes the programming button location for each device.
Table 6: Device programming
Device Programming
Door/window sensor Press the button on the top of the sensor (cover removed) or trip the tamper.
Motion sensor Press the button on the back of the sensor (mounting plate removed) or trip the tamper.
Device Programming
Smoke sensor Trip the tamper, press the test button, remove the base, or put the sensor in alarm.
Keyfob Press and hold Lock and Unlock buttons together. ELM keyfob
Remote handheld touchpad
Press the Emergency buttons. QS1500 keypad Press Light off button six times. Hardwired sensors Separate the sensor from the magnet.
CO alarm Plug in the module, wait five to seven seconds, and press and hold the Test button for nine beeps.
Freeze and water Trip the tamper or press and hold the button on top of the sensor (cover removed) until the control panel confirms programming. If the button is not held down long enough, system status reports the sensor as open. Dialog RF electronic
thermostat
Unplug the thermostat from the base plate, wait a few seconds, then plug the thermostat back into the base plate.
Personal help button Press the help button until the light blinks. DTIM
(When changes are made to panel programming options that affect DTIM, the DTIM is not updated until panel
programming mode is existed. After a few minutes, the DTIM should be updated.)
Press and release the DTIM tamper switch as follows:
1. Press three times, holding the tamper switch down on the third press until the LED flashes three times. Release after the third flash.
2. Immediately press two times, holding the tamper switch down on the second press until the LED flashes two times. Release after the second flash.
3. Immediately press and hold, then wait for the panel to beep once indicating it learned the DTIM. Release the tamper switch.
When adding (learning) sensors, the panel uses an ascending numbering sequence starting with 1. You can override this by entering a 2 digit sensor number using the numbered keys immediately after entering the sensor group. Use Table 22 on page 90 (that you filled out during system planning), to help program sensors.
Note: For a more specific location name, press Option # for compass directions (north, northeast, east, southeast, south, southwest, west, northwest).
Add hardwired or RF sensors or remote control
To add a hardwired sensor, an RF sensor, or a remote control, see Figure 13 below and do the following:
1. Press Add. The panel announces Select from Main Menu.
2. Press Sensor/Remote. The panel announces Press button on sensor.
3. Press the sensor program button or release sensor tamper switch. The panel announces Keychain Remote. Press sensor again for next name or press Done to select.
4. Press Sensor/Remote repeatedly until you hear the name or item you want to use. An alphabetical list of names the panel uses appears in “System
configuration” on page 90. Each name may be used more than once. 5. Press Done when you hear the desired name. The panel announces Use
numbered keys to enter sensor group.
6. Enter the 2-digit sensor group. The panel announces the sensor group and the first available sensor number, then prompts you to press Done to accept. 7. Press Done. The panel confirms programming by announcing the sensor
number, name, and group.
Delete sensors
To delete sensors, do the following:
1. Press Delete. The panel announces Select from Main Menu.
2. Press Sensor/Remote repeatedly until you hear the name and number you want deleted, then press Done. The panel announces that the sensor is deleted.
X10 module operation
Use the following procedures to program X10 module operations into panel memory. Notice that the Light Control button is used to program all X10 module operations (light, appliance, and universal).
House code
To program the house code, do the following: 1. Press Add.
2. Press Light Control repeatedly until you hear the desired house code letter. 3. Press Done.
4. Set the HOUSE dial on each lamp, appliance, and universal module, to the same letter.
5. Set the HOUSE dial on power horn/remote sirens to the next sequential alphabetical letter.
Entry/exit activated module
To add an entry/exit activated module, do the following: 1. Press Add.
2. Press Light Control.
3. Press Unit # repeatedly until you hear the unit number that matches the one you chose for the module.
4. Press Entry/Exit Delay. The panel confirms your programming. To delete an entry/exit-activated module, do the following:
1. Press Delete.
2. Press Light Control.
3. Press Unit # repeatedly until you hear the unit number you want deleted. 4. Press Entry/Exit Delay, then press Done. The panel confirms your
Sensor-activated module
To add a sensor-activated module, do the following: 1. Press Add.
2. Press Light Control.
3. Press Unit # repeatedly until you hear the unit number that matches the one you chose for the module.
4. Press Sensors until you hear the sensor you want to control the light. 5. Press Done. The panel confirms your programming.
Note: A keyfob button can also be programmed to control a light or appliance module.
To delete a sensor-activated module, do the following: 1. Press Delete.
2. Press Light Control.
3. Press Unit # repeatedly until you hear the unit number you want deleted. 4. Press Sensors until you hear the one you want deleted.
5. Press Done. The panel confirms your programming.
Time-activated module
To add a time-activated module, do the following: 1. Press Add.
2. Press Light Control.
3. Press Unit # until you hear the unit number that matches the one you chose on the module.
4. Press Time.
5. Press Hours and Minutes to set the beginning of the schedule. 6. Press Done.
7. Press Hours and Minutes to set the end of the schedule. 8. Press Done. The panel confirms your programming. To delete a time-activated module, do the following: 1. Press Delete.
2. Press Light Control.
4. Press Time.
5. Press Done. The panel confirms your programming
Ethernet interface module
The following are requirements for an ethernet interface module: • Broadband Internet connection (DSL or cable modem) • An available 10Base-T or 10/100Base-T Ethernet port
Note: Devices between the Ethernet interface module and the transmission line (hub, router, cable modem, etc. must be UL listed and must not receive power from a switched outlet.
Caution: If connecting devices (hub, router, cable modem) do not have a battery backup, the system will lose communication with the reporting station if AC power is lost.
In order to program the module through the Simon panel you must activate the connection between the panel and module. Activating the communication
channel and gaining access to the module’s remote options is accomplished by turning Option 89: Serial port protocol on page 60 on.
To activate the Ethernet interface module, do the following:
1. Enter Utility Access Code 1 (Dealer Code) if you are not already in program mode.
2. Press Add. 3. Press Option #. 4. Press 8, then 9.
5. Press Done. The panel announces Option 89 is on.
6. Verify both the red and green LEDs on the module and ethernet connector are blinking.
See Options 89 to 92 for custom programming options. Refer to the Ethernet Interface Installation Instructions (466-2161) for more information on this module.
Numbered options
Numbered options let you customize system operation according to dealer and user needs.
The “Option settings” on page 95 lists all system options and their characteristics. Fill in the last column of the table before programming to help speed up the programming process.
Although the panel voice prompts you through programming, it is not necessary to wait for the complete message before pressing the next button in the
programming sequence.
There are two ways to reach the desired option setting.
• Press Add or Delete, then press Option # repeatedly until you hear the option you want changed.
Or—
• Press Add or Delete, Option #, then enter the option number using the numbered keys.
The instructions in the following section use the last method.
Option 1: Panel piezo beeps
This option determines whether the panel piezo produces beeps based on system activity (on) or is silent (off). Default is on.
To turn this option on, press Add, Option #, 01, Done. To turn this option off, press Delete, Option #, 01, Done. Note: For all UL listed systems, Option 1 must be on (added). Table 7 below describes all possible beeps.
Table 7: Possible piezo beeps
Activity Piezo beep response
Arm doors/windows Exit delay: Two beeps sound every five seconds and two times per second during the last ten seconds.
Silent exit: Two beeps sound at the beginning of the exit delay and two more sound just before the exit delay expires.
Entry delay: Two beeps sound every five seconds and two times per second during the last ten seconds.
Arm motion sensors Exit delay: Three beeps sound every five seconds and three times per second during the last ten seconds.
Silent exit: Three beeps sound at the beginning of the exit delay and three more sound just before the exit delay expires.
Entry delay: Three beeps sound every five seconds and three times per second during the last ten seconds.
Activity Piezo beep response
Arm doors/windows and motion sensors
Exit delay: Four beeps sound every five seconds and four times per second during the last ten seconds.
Silent exit: Four beeps sound at the beginning of the exit delay and Four more sound just before the exit delay expires.
Entry delay: Four beeps sound every five seconds and four times per second during the last ten seconds.
Disarm One beep.
Chime doors Two beeps (when programmed). Chime special
motion
Three beeps (when programmed).
Trouble beeps Six times every minute. Press System Status to stop beeps for four hours. No activity Twenty beeps every minute for five minutes (when programmed).
Option 02: Panel voice
This option determines whether the panel announces all status, alarm, and program mode messages (on), or only announces messages for canceled alarms, open sensors (protesting), when System Status is pressed, or if the panel is in program mode (off). Default is on.
To turn this option on, press Add, Option #, 02, Done. To turn this option off, press Delete, Option #, 02, Done.
Option 03: Latchkey
This option determines whether the panel reports a latchkey alarm if the system is not disarmed at a preset time between midnight and 11:59 P.M. (on). If the latchkey feature is disabled (off), the panel will not report a latchkey alarm. Default is off.
To turn this option on, do the following: 1. Press Add, Option #, 03.
2. Press the Hours +/- buttons to select the correct hour. 3. Press the Minutes +/- buttons to select the correct minute. 4. Done.
To turn this option off, press Delete, Option #, 03, Done.