Implementing Automated
Inventory Scanning and
Software Distribution After
Auto Discovery
Vasfi Gucer
Ashish Bahuguna
Olusegun Egungbohun
Paul Field
Carrie Horwedel
Rajesh Kannaujia
Solution to automatically install endpoint code
on new workstations
Implement NetView discovery-initiated
scanning and distribution
Learn NetView Integration Module for
Configuration Manager
Implementing Automated Inventory Scanning and
Software Distribution After Auto Discovery
April 2003
© Copyright International Business Machines Corporation 2003. All rights reserved.
First Edition (April 2003)
This edition applies to Tivoli Management Framework Version 4.1, IBM Tivoli Configuration Manager Version 4.2, and IBM Tivoli NetView Version 7.1.3.
Note: Before using this information and the product it supports, read the information in “Notices” on page ix.
Contents
Figures . . . vii
Notices . . . ix
Trademarks . . . x
Preface . . . xi
The team that wrote this redbook . . . xi
Become a published author . . . xiii
Comments welcome . . . xiii
Chapter 1. Introduction . . . 1
1.1 Short description of the solution . . . 2
1.2 Systems overview . . . 2
1.2.1 Objectives . . . 2
1.2.2 Features . . . 3
1.2.3 Benefits of the solution . . . 3
1.2.4 Tivoli management solution, Configuration Manager, and NetView . . 4
Chapter 2. High-level design and architecture . . . 11
2.1 Architecture overview . . . 12
2.1.1 Products used in the solution . . . 12
2.1.2 Infrastructure diagram used for testing our scenarios . . . 12
2.2 Step one: Discovering new nodes with NetView . . . 14
2.2.1 Discovering new nodes with NetView: Process flow . . . 14
2.3 Step two: Automated endpoint installation script. . . 17
2.3.1 Summary of the winstlcf command . . . 17
2.3.2 The logic the script follows . . . 18
2.3.3 Automated endpoint installation script: Process flow . . . 18
2.4 Step three: Automated inventory scans . . . 19
2.4.1 Configuring inventory profiles or using scripts to create profiles . . . . 19
2.4.2 Inventory scan scenario using Activity Planner . . . 20
2.4.3 Brief overview of Activity Planner . . . 20
2.4.4 Distributing a scan using the command line interface . . . 20
2.5 Step four: Extending the solution . . . 21
2.5.1 Creating a software distribution package . . . 21
2.5.2 Distributing a software package using Activity Planner. . . 22
2.5.3 Distributing a software package using the command line interface . 23 2.6 NetView Integration Module for Configuration Manager . . . 23
Chapter 3. Implementation . . . 25
3.1 Discovery of nodes by NetView. . . 26
3.1.1 Prerequisites to discover the nodes with NetView . . . 26
3.1.2 Summary of steps to discover nodes with NetView . . . 28
3.2 Tivoli management agent installation on discovered nodes . . . 33
3.2.1 Tivoli management agent installation prerequisites . . . 33
3.2.2 Summary of steps to install Tivoli management agent on nodes . . . 34
3.3 Inventory scan on nodes with Tivoli management agent installed . . . 41
3.3.1 Inventory scan prerequisites for nodes . . . 41
3.3.2 Summary of inventory scan steps . . . 42
3.4 Software Distribution and Inventory details . . . 48
3.4.1 Software Distribution and Inventory prerequisites. . . 48
3.4.2 Software Distribution and Inventory steps. . . 48
Chapter 4. Installation, configuration, and administration . . . 51
4.1 Installation sequence. . . 52
4.1.1 Tivoli Management Region server . . . 52
4.1.2 RDBMS host . . . 53
4.1.3 RIM host . . . 53
4.1.4 IBM Tivoli NetView . . . 54
4.1.5 NetView Integration Module for Configuration Manager . . . 54
4.1.6 Source host . . . 54
4.1.7 Gateways and depots . . . 54
4.1.8 Setting up your environment: Installing the solution . . . 54
4.2 Configuration . . . 56
4.2.1 UNIX scenario: Configuration and script execution. . . 56
4.2.2 Windows NT scenario: Configuration and script execution . . . 65
4.2.3 Tivoli policy regions, profile managers, and tasks. . . 76
4.3 Administration and troubleshooting . . . 77
4.3.1 Troubleshooting the scripts . . . 78
4.3.2 Generic problem determination outline . . . 79
4.3.3 Troubleshooting Tivoli Management Framework Version 4.1 . . . 80
4.3.4 Troubleshooting Software Distribution . . . 81
4.3.5 Troubleshooting Inventory. . . 83
Chapter 5. NetView Integration Module implementation and scenarios . 85 5.1 NetView Integration Module components . . . 86
5.1.1 NetView Integration Module component list . . . 86
5.2 Installing NetView Integration Module components . . . 90
5.2.1 Using IBM Tivoli Network Diagnostics for Configuration Manager . . 95
5.3 Accessing Network Diagnostics from the command line interface . . . 98
5.4 Accessing Network Diagnostics from the NetView console . . . 100
5.5.1 Configuring Tivoli Discovery . . . 101
5.5.2 Displaying your Tivoli environment . . . 102
5.5.3 Generating reports . . . 102
5.5.4 Configuring and using Tivoli Wake on LAN. . . 105
5.6 IBM Tivoli NetView Integration Module for Configuration Manager. . . 106
5.6.1 Installing the IBM Tivoli NetView Integration Module components . 106 5.6.2 Installing IBM Tivoli NetView Integration Adapter . . . 107
5.6.3 Installing IBM Tivoli NetView Integration Module . . . 110
5.6.4 Installing RDBMS tables and views . . . 111
5.6.5 Creating the NetView Inventory query library . . . 111
5.6.6 Using IBM Tivoli NetView Integration Module . . . 112
5.6.7 Tivoli Inventory schema additions . . . 125
Chapter 6. Extending the solution and best practices . . . 137
6.1 Possible extensions of the solution . . . 138
6.2 Best practices . . . 140
6.2.1 Definition . . . 141
6.2.2 Strategy . . . 141
6.2.3 Scope . . . 141
Appendix A. Scripts used in this publication . . . 143
rk_first.sh . . . 144
rk_second.sh . . . 150
rk_third.sh. . . 156
rk_fourth.sh . . . 161
Appendix B. Additional material . . . 163
Locating the Web material . . . 163
Using the Web material . . . 163
System requirements for downloading the Web material . . . 164
How to use the Web material . . . 164
Abbreviations and acronyms . . . 165
Related publications . . . 167
IBM Redbooks . . . 167
Other resources . . . 167
How to get IBM Redbooks . . . 168
IBM Redbooks collections . . . 168
Figures
2-1 Our Tivoli infrastructure for the scenarios . . . 13
2-2 Discovering new nodes with NetView: Process flow . . . 15
2-3 Automated endpoint installation script: Process flow . . . 19
4-1 The script checks the exclusion list before proceeding . . . 57
4-2 Script execution . . . 59
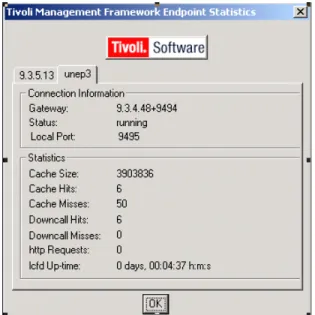
4-3 Endpoint statistics for the newly installed endpoint . . . 64
4-4 Output from an inventory query for unep3 . . . 65
4-5 The nv_exclude.lst file . . . 66
4-6 Output from an inventory query for endpoint unep1 . . . 72
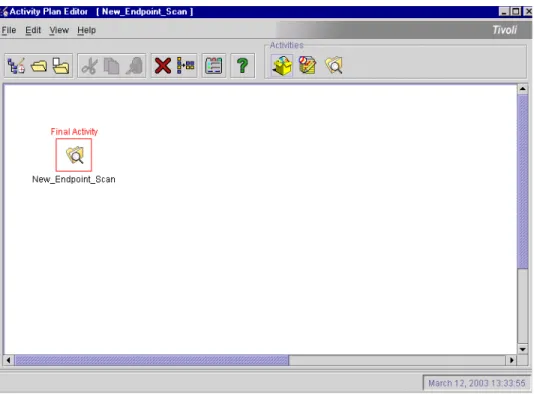
4-7 Activity Planner showing New_Endpoint_Scan plan . . . 73
4-8 Activity Plan Monitor showing the successful inventory scan . . . 73
4-9 Endpoint statistics for the newly installed node . . . 74
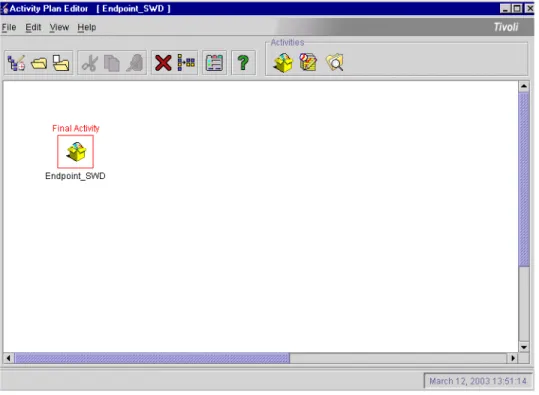
4-10 Activity Plan for Endpoint_SWD. . . 75
4-11 Activity Plan Monitor showing successful installation . . . 76
5-1 Tivoli environment used in the scenarios . . . 90
5-2 Install Product selection . . . 92
5-3 Select Product to Install list . . . 94
5-4 Clients to Install On list . . . 96
5-5 Successful installation message . . . 97
5-6 NetView Report example . . . 103
5-7 Select Product to Install list . . . 108
5-8 Start the installation . . . 109
5-9 Successful installation message . . . 110
5-10 Policy Region window . . . 112
5-11 Set Managed Resources dialog box . . . 114
5-12 Profile Manager window. . . 115
5-13 Create Profile dialog box . . . 116
5-14 New profile icon . . . 117
5-15 NetView Inventory Profile dialog box . . . 118
5-16 Add Entry to NetView Inventory Profile dialog box . . . 119
5-17 NetView Inventory Profile: Objects To Export list . . . 120
5-18 Distribute Profile dialog box . . . 121
5-19 Add Scheduled Job dialog box . . . 122
5-20 NETVIEW_QUERIES dialog box . . . 124
Notices
This information was developed for products and services offered in the U.S.A.
IBM may not offer the products, services, or features discussed in this document in other countries. Consult your local IBM representative for information on the products and services currently available in your area. Any reference to an IBM product, program, or service is not intended to state or imply that only that IBM product, program, or service may be used. Any functionally equivalent product, program, or service that does not infringe any IBM intellectual property right may be used instead. However, it is the user's responsibility to evaluate and verify the operation of any non-IBM product, program, or service.
IBM may have patents or pending patent applications covering subject matter described in this document. The furnishing of this document does not give you any license to these patents. You can send license inquiries, in writing, to:
IBM Director of Licensing, IBM Corporation, North Castle Drive Armonk, NY 10504-1785 U.S.A.
The following paragraph does not apply to the United Kingdom or any other country where such provisions are inconsistent with local law: INTERNATIONAL BUSINESS MACHINES CORPORATION PROVIDES THIS PUBLICATION "AS IS" WITHOUT WARRANTY OF ANY KIND, EITHER EXPRESS OR IMPLIED, INCLUDING, BUT NOT LIMITED TO, THE IMPLIED WARRANTIES OF NON-INFRINGEMENT,
MERCHANTABILITY OR FITNESS FOR A PARTICULAR PURPOSE. Some states do not allow disclaimer of express or implied warranties in certain transactions, therefore, this statement may not apply to you.
This information could include technical inaccuracies or typographical errors. Changes are periodically made to the information herein; these changes will be incorporated in new editions of the publication. IBM may make improvements and/or changes in the product(s) and/or the program(s) described in this publication at any time without notice.
Any references in this information to non-IBM Web sites are provided for convenience only and do not in any manner serve as an endorsement of those Web sites. The materials at those Web sites are not part of the materials for this IBM product and use of those Web sites is at your own risk.
IBM may use or distribute any of the information you supply in any way it believes appropriate without incurring any obligation to you.
Information concerning non-IBM products was obtained from the suppliers of those products, their published announcements or other publicly available sources. IBM has not tested those products and cannot confirm the accuracy of performance, compatibility or any other claims related to non-IBM products. Questions on the capabilities of non-IBM products should be addressed to the suppliers of those products.
This information contains examples of data and reports used in daily business operations. To illustrate them as completely as possible, the examples include the names of individuals, companies, brands, and products. All of these names are fictitious and any similarity to the names and addresses used by an actual business enterprise is entirely coincidental.
COPYRIGHT LICENSE:
This information contains sample application programs in source language, which illustrates programming techniques on various operating platforms. You may copy, modify, and distribute these sample programs in any form without payment to IBM, for the purposes of developing, using, marketing or distributing application programs conforming to the application programming interface for the operating platform for which the sample programs are written. These examples have not been thoroughly tested under all conditions. IBM, therefore, cannot guarantee or imply reliability, serviceability, or function of these programs. You may copy, modify, and distribute these sample programs in any form without payment to IBM for the purposes of developing, using, marketing, or distributing application programs conforming to IBM's application programming interfaces.
Trademarks
The following terms are trademarks of the International Business Machines Corporation in the United States, other countries, or both:
AIX 5L™ AIX® AS/400® DB2® IBM® ibm.com® NetView® OS/2® OS/390® OS/400® Redbooks™ Redbooks (logo) ™ RS/6000® Tivoli® Tivoli Enterprise™ Tivoli Enterprise Console® Wake on LAN®
WebSphere®
The following terms are trademarks of other companies:
ActionMedia, LANDesk, MMX, Pentium and ProShare are trademarks of Intel Corporation in the United States, other countries, or both.
Microsoft, Windows, Windows NT, and the Windows logo are trademarks of Microsoft Corporation in the United States, other countries, or both.
Java and all Java-based trademarks and logos are trademarks or registered trademarks of Sun Microsystems, Inc. in the United States, other countries, or both.
C-bus is a trademark of Corollary, Inc. in the United States, other countries, or both.
UNIX is a registered trademark of The Open Group in the United States and other countries.
SET, SET Secure Electronic Transaction, and the SET Logo are trademarks owned by SET Secure Electronic Transaction LLC.
Preface
This IBM® Redbook describes a solution to provide readers with the ability to automatically install endpoint code and perform inventory scans and required software distributions on new workstations that have been discovered by IBM Tivoli® NetView®, reducing the time and effort it takes to manually gather and maintain current information in a distributed environment. Using IBM Tivoli Configuration Manager Version 4.2 and NetView Version 7.1.3, this solution will benefit the reader by providing reliability, potential cost reduction, and rapid time-to-value incentives, which free up administrators and allow them to focus on actual IT needs.
To get a common understanding of the solution, we provide an overview of the high-level design and architecture, including the different customer environments where this solution can be applied, followed by implementation, scenarios, and extending the solution.
This IBM Redbook also covers the IBM Tivoli NetView Integration Module for Configuration Manager (formerly called Tivoli Integration Pack for NetView, TIPN) implementation and scenarios.
This publication will assist customer and business partners support staff and managers, and IBM systems engineers who are involved in Tivoli sales or implementation services in general.
The team that wrote this redbook
This redbook was produced by a team of specialists from around the world working at the International Technical Support Organization, Austin Center. Vasfi Gucer is an IBM Certified IT Specialist working at the ITSO, Austin Center. He worked with IBM Turkey for 10 years and has been with the ITSO since January 1999. He has more than 10 years experience in systems management, networking hardware, and distributed platform software. He has worked on various Tivoli customer projects as a Systems Architect in Turkey and the U.S. Vasfi is also a Certified Tivoli Consultant.
Ashish Bahuguna has been working for IBM Global Services, India for three years and is currently working as an IT Specialist in Tivoli Services within the IBM Strategic Outsourcing group. He has extensive experience in large deployments of IBM Tivoli product suites. He holds a B.S. in Electronics and
Telecommunications Engineering and has five years experience in systems management, networking hardware, and distributed platform software. He is an IBM Tivoli Certified and Microsoft Certified Systems Engineer and holds two IBM Patent Awards.
Olusegun Egungbohun is an IT Analyst with Softworks Limited in Nigeria, specializing in the design, implementation, and support of enterprise management and security systems. He has over six years IT experience covering networking, systems management, administration, and support. He holds a B.S. degree in Computer Science and Economics, and he is a Microsoft Certified Systems Engineer (MCSE) and a Microsoft Certified Database
Administrator (MCDBA).
Paul Field is an IT Specialist from Johannesburg, South Africa. He joined the Server Systems Operations division of IBM Global Services in January 2000, as a part of the IBM graduate recruitment program. He has worked in the Tivoli Technical Infrastructure team in South Africa for the past two years and has experience in systems management, administration, and support. He supports the core suite of Tivoli Systems management products, as well as performing Windows and AIX® system administration functions. He holds a Bachelor of Commerce degree from the University of the Witwatersrand, with majors in Information Systems and Accounting.
Carrie Horwedel has eight years project management experience, distinguished by a Project Management Professional (PMP) certification. Her broad experience includes managing multiple software and manufacturing projects, as well as consulting on project management methodology. She previously worked as a Program Manager for the Tivoli Framework group before her arrival to the ITSO, Austin Center as a Project Leader supporting IBM Tivoli products.
Rajesh Kannaujia is currently working as a Deputy Manager (IIS Projects) with Bharat Petroleum Corporation Limited (BPCL), India. He holds a Bachelor of Engineering degree in Computer Science and has more than 12 years
experience in the IT field. For the past three years, his team has been involved with the implementation and administration of an Enterprise Systems
Management (ESM) solution at BCPL using IBM Tivoli solutions. Before working with ESM projects, he worked as a INGRES DBA and UNIX and Microsoft Windows NT Exchange Administrator, as well as designing, developing, and implementing the various in-house applications in UNIX shell scripts, Ingres, COBOL, and ISP with DB2® and SQL 7.
Thanks to the following people for their contributions to this project: Elizabeth Barnes, Stephen Hochstetler
Debbie Bandera, Patrick Davis, Dave Ertl, Mark Fantacone, Craig Lawton, Jonathan Lewis, Mike Mallo, Christopher Peters, Lorin Ullmann, Brian Vassberg, John Whitfield
IBM U.S.
Become a published author
Join us for a two- to six-week residency program! Help write an IBM Redbook dealing with specific products or solutions, while getting hands-on experience with leading-edge technologies. You'll team with IBM technical professionals, Business Partners and/or customers.
Your efforts will help increase product acceptance and customer satisfaction. As a bonus, you'll develop a network of contacts in IBM development labs, and increase your productivity and marketability.
Find out more about the residency program, browse the residency index, and apply online at:
ibm.com/redbooks/residencies.html
Comments welcome
Your comments are important to us!
We want our Redbooks™ to be as helpful as possible. Send us your comments about this or other Redbooks in one of the following ways:
Use the online Contact us review redbook form found at:
ibm.com/redbooks
Send your comments in an Internet note to: [email protected]
Mail your comments to:
IBM Corporation, International Technical Support Organization Dept. JN9B Building 003 Internal Zip 2834
11400 Burnet Road Austin, Texas 78758-3493
Chapter 1.
Introduction
The solution covered in this IBM Redbook is designed to automatically install endpoint code and do inventory scans on new workstations discovered by IBM Tivoli NetView. This solution is based on IBM Tivoli Configuration Manager Version 4.2 and NetView Version 7.1.3. This redbook will also cover the NetView Integration Module for Configuration Manager component (formerly called Tivoli Integration Pack for NetView, TIPN) implementation and scenarios. The solution described in this book can also be applied to other IBM Tivoli products, such as IBM Tivoli Monitoring, where it will automatically start monitoring new
workstations.
In this chapter, we discuss the following topics: Short description of the solution
Systems overview
1.1 Short description of the solution
Automated installation of endpoint code and inventory scanning on newly discovered endpoints is a highly desired functionality by Tivoli customers worldwide. The solution described in this book provides this requested functionality.
In today’s IT environment, it is critical to keep your servers, workstations, and other devices up-to-date in terms of software system levels in order to comply with the ever-changing requirements of your business.
Using traditional methods to install endpoint code and assess inventory, you must travel to each system, install the code, write down the software and hardware inventory information you collect, and enter the information into a spreadsheet or database program. When users upgrade software and hardware, you must update the spreadsheet or database.
This method is time-consuming and difficult to keep current. As a result, administrators and accounting personnel cannot automatically reuse inventory information to perform system and software upgrades and management tasks. However, with the Inventory component, gathering and maintaining up-to-date inventory information in a distributed environment is quick, accurate, and easy. By this automated process, manual intervention is reduced to the barest
minimum, freeing administrators and IT staff from mundane tasks to concentrate on actual IT needs.
1.2 Systems overview
In this section, we provide an overview of the solution. We cover the following topics:
Objectives Features
Benefits of the solution
Tivoli management solution, Configuration Manager, and NetView
1.2.1 Objectives
Our objectives are to provide an automated solution with the following features: Capable of installing endpoint code on newly discovered workstations Capable of doing an inventory scan on these workstations
Scalable in medium or large customer sites Reliable
Rapid installation
Customizable for additional requirements or future enhancements Use of standard IBM Tivoli desktop and products
1.2.2 Features
The solution can be used as a plug-in-and-operate component. The solution was designed to provide the following features: Easy installation
Customizable for future enhancements
Use of standard Tivoli products and procedures Independent of product database schema changes
Use of standard RDBMS Interface Module (RIM) access to databases available in previous versions of Tivoli products
1.2.3 Benefits of the solution
Enterprises are becoming more demanding and require faster and more diverse deployment, change, and asset management in order to achieve their goals. This solution is the answer to helping businesses keep up with demanding deployment and asset issues.
Some of the benefits to be derived by applying this solution include: Reliability
Under administrator control, the system will bring new devices under management and do the appropriate inventory scan for each machine and operating system. Manual intervention is reduced to a minimum.
Cost reduction
Again, by reducing the amount of manual intervention and freeing
administrators from mundane tasks, the IT staff is able to concentrate efforts on actual IT needs.
Rapid time-to-value
The solution may be used as a plug-in-and-operate component by automatically and continuously adjusting your environment to comply with your time-to-change and cost-to-change requirements.
1.2.4 Tivoli management solution, Configuration Manager, and
NetView
The following sections provide a brief description of the Tivoli management solution, IBM Tivoli Configuration Manager, and IBM Tivoli NetView.
Tivoli management solution
Tivoli enterprise management solution provides a consistent management interface to different operating systems and services. It enables administrators to manage users, systems, databases, networks, and applications from one interface and provides a streamlined way to automate and delegate routine, time-consuming tasks.
Tivoli consists of an underlying infrastructure known as Tivoli Management Framework and a growing set of Tivoli and third-party management applications that can utilize this framework to manage heterogeneous systems and
applications in a consistent manner. Because it uses object technology, the distributed object framework performs the same functions in the same way on platforms with different operating systems (UNIX, Windows NT, OS/390®, OS/2®, NetWare, and so forth).
The basic Tivoli environment employs a three-tiered architecture that consists of the Tivoli server (Tivoli Management Region), managed nodes, and endpoints. The Tivoli server and managed nodes are created by installing Tivoli
Management Framework. Endpoints are created by installing endpoint services and select Tivoli Management Framework software on a system. A single system can be the host for a managed node, a gateway, a repeater, and multiple endpoints. When these managed resources are installed in your distributed network, they become your Tivoli environment. See the IBM Redbook An Introduction to Tivoli Enterprise, SG24-5494 for further details.
IBM Tivoli Configuration Manager
IBM Tivoli Configuration Manager, Version 4.2, is a solution for controlling software distribution and asset management inventory in a multiplatform environment. It focuses on deploying and managing software in complex, distributed enterprise environments. IBM Tivoli Configuration Manager is a key solution to rapidly and efficiently deploying complex mission-critical or desktop productivity applications to multiple locations from a central point and to gather and maintain the inventory information about hardware and software assets, easily, quickly, and accurately.
Tivoli Configuration Manager consists the following main components: Inventory
Software Distribution enables you to install, configure, and update software remotely within your network.
Inventory enables you to gather and maintain up-to-date inventory asset management information in a distributed environment. This aids system administrators and accounting personnel to manage complex, distributed enterprises.
Tivoli Configuration Manager also provides the following services: Activity Planner
Change Manager Resource Manager Web Interface
Enterprise Directory Query Facility
Activity Planner enables you to define a group of activities that originate from different applications in an activity plan, submit or schedule the plan for running, and monitor the plan while it runs.
Change Manager functions with Activity Planner to support software distribution, inventory, and change management in large networks. It uses reference models to simplify the management of the network environment.
You can use Resource Manager, together with Software Distribution and Inventory, to perform the management operations for pervasive devices. Resource Manager is installed on a Tivoli server and on the gateways.
You can use the Web Interface to install and manage various Tivoli Configuration Manager Web objects. The Web Interface has a server component that pushes software packages, inventory profiles, and reference models from the Tivoli region to the Web Gateway where they are stored until they are pulled by the Web Interface endpoint.
With enterprise directory integration, you can exploit organizational information that is stored in enterprise directories in order to determine a set of targets for a software distribution or an inventory scan. The Enterprise Directory Query Facility enables you to select a specific directory object, or container of directory objects, as subscribers for a reference model or an activity plan.
Our main focus in this book, however, is on the Inventory component of IBM Tivoli Configuration Manager.
Components used by Inventory
Inventory relies on the following components to collect and store information: The Tivoli Management Region server, which is responsible for issuing scan
requests to the target systems.
The Inventory application, which includes both the graphical user interface (GUI) components and the command line interface (CLI) utilities.
The Inventory gateway application, which allows a managed node to act as a gateway for distributing inventory profiles to endpoints.
The relational database management system (RDBMS) server and the configuration repository in the RDBMS. The configuration repository is the RDBMS that contains the schema (tables and columns) in which software and hardware inventory information is stored. The configuration repository schema provides a structure for storing information collected during an inventory scan.
The RDBMS interface module (RIM) host, which enables Inventory to communicate with an RDBMS.
One or more RIM objects, which connect Inventory to the RDBMS for access to the configuration repository. You can configure multiple RIM objects to write Scalable Collection Service (SCS) data in parallel to the configuration repository.
The Web Gateway component, if you plan to distribute scans to pervasive devices or allow users to perform inventory scans using the Web Interface. SCS uses the following components for Inventory collections:
Repeater sites organized into a repeater hierarchy. Repeater sites are systems that use the multiplexed distribution (MDist 2) service. MDist 2 parameters control the way that information is distributed throughout a Tivoli environment. A repeater hierarchy is the order in which information flows from one repeater to the next and then to the targets of the distributed data. SCS uses a collector hierarchy that mirrors the MDist 2 repeater hierarchy. SCS sends data upstream through this hierarchy, in the opposite direction of MDist 2 distributions. (See the Tivoli Management Framework Planning for Deployment Guide Version 4.1, GC32-0803 for more information about configuring a repeater hierarchy.)
Collectors, which are repeater sites on which SCS has been installed. Specifically, a collector is an SCS daemon process on either a managed node or gateway that stores and then forwards data to other collectors or to the inventory data handler. This guide refers to any managed node as a collector if SCS has been installed on the node and the node is part of the repeater hierarchy.
Collectors are composed of the following components:
– The depot, which persistently stores data that has been collected from scan targets or other collectors.
– The queues, which hold the collection table of contents (CTOCs). CTOCs contain, among other things, the name and size of the data file and the source and destination of the collected data. The input queue controls the order in which CTOCs are processed for collection. The output queue controls the order of the CTOCs as they are sent out from the collector. The completed, deferred, and error queues hold CTOCs for completed and deferred data collection and error conditions, respectively.
– A multithreaded scheduler daemon, which processes input and output queues and controls data flow through the collector depot.
A collection manager, which maintains the collector hierarchy based on repeater hierarchy information obtained from the MDist 2 repeater manager. An inventory data handler, which is the Inventory object that receives data
from collectors and sends the data to one or more RIM objects. The inventory data handler can be considered the final collector in an Inventory system. Like collectors, the inventory data handler has a depot and queues. However, the inventory data handler decompresses and decodes the data and sends it to one or more RIM objects rather than requesting collection from an upstream collector.
The status collector, which collects, stores, and distributes status information for each target in a scan. You can configure the status collector to keep lists of completed scans, successful scans, failed scans, and error messages. The status collector maintains this information throughout the scan, so scan status information is available during the scan.
The status collector is installed on the same managed node as the inventory data handler. If that node fails and is restarted, status information tracked by the status collector is automatically restored.
The inventory callback object, which performs the following functions: – When inventory data cannot be collected using the collector hierarchy,
MDist 2 sends the data to the inventory callback object, which sends it to the inventory data handler. The data is then sent through one or more RIM objects to the configuration repository.
– For endpoint scans, MDist 2 sends a status message to the inventory callback object indicating whether it successfully delivered the inventory profile to the target. This message indicates only that the endpoint processed the profile, not that the scan data successfully reached the configuration repository.
A pervasive callback object. For pervasive device scans, MDist 2 sends a status message to a special pervasive callback object. This message indicates only whether the job for the devices to be scanned was created successfully on the Web Gateway component; the data is not sent through one or more RIM objects to the configuration repository until a device actually connects to the Web Gateway component and a scan occurs.
IBM Tivoli NetView
In today's computing environments, network management is of strategic importance. IBM Tivoli NetView extends traditional network management to ensure the availability of critical business systems and to provide rapid resolution of problems.
NetView is a scalable, comprehensive, distributed network solution that helps provide you with the flexibility to manage mission-critical networks. It helps ensure availability of critical business systems and rapid problem resolution. IBM Tivoli NetView discovers TCP/IP networks, displays network topologies, correlates and manages events and Simple Network Management Protocol (SNMP) traps, monitors network health, and gathers performance data. Tivoli NetView meets the needs of managers of large networks by providing the scalability and flexibility to manage mission-critical environments.
IBM Tivoli NetView accomplishes these through its functionality, including: Policy-based management
With IBM Tivoli NetView SmartSets, you can group network resources that require similar management and apply policies to these groups. As a result, you can manage a set of resources as though it were a single device. With SmartSets, you can group resources by type, location, vendor, services offered, or other characteristics.
For example, you can create a SmartSet containing Cisco routers and then develop a policy requiring these routers to have CPU utilization collected every 30 minutes. As new devices are discovered and added to the SmartSet, policies can automatically extend to include them. As a result, CPU utilization can be automatically collected against these new devices.
Integration with leading vendors such as Cisco
To help manage your expanding network, IBM Tivoli NetView integrates with CiscoWorks2000 and provides the device configuration to help efficiently manage Cisco devices. The IBM Tivoli NetView Java Web console and CiscoWorks2000 work together to help simplify the management, configuration, and availability of Cisco equipment in a distributed, heterogeneous environment.
Automated event response
Tivoli NetView uses a rules-based event correlation engine that graphically constructs guidelines to implement business policies, and it can help diagnose root problems without reporting all symptomatic events. It can manage events locally or centrally, or by propagating them to other Tivoli applications, such as IBM Tivoli Enterprise Console®, for advanced event correlation. In addition, Tivoli NetView can handle a variety of actions when responding to events and exceeded thresholds, including paging, e-mail, and programmable responses to specific failures.
Router fault isolation
Router fault isolation is a root-cause analysis feature built in to Tivoli NetView. In the event of a serious network problem, router fault isolation can
immediately focus on the failing device and mark affected network regions as unreachable. In response, Tivoli NetView can reduce networking polling of the affected networks, potentially reducing overall event traffic. Without a router fault isolation feature, customizing this function could be expensive and time-consuming. This feature can help simplify root-cause analysis of network failures.
Network topology management
TCP/IP networks are more complex than ever. Technologies, such as MPLS, Hot Standby Router Protocol by Cisco, and unnumbered serial interfaces, allow for greater network flexibility while also presenting greater network management challenges. In supporting these technologies, Tivoli NetView can help you manage and represent complex topologies and provide accurate status information.
In addition, networks often consist of a wide variety of devices, such as hubs, routers, bridges, switches, workstations, PCs, laptops, and printers. With NetView, you can choose which of these devices to manage. Many network management platforms let you exclude a node from being managed, but NetView further enables you to specify which nodes, device types, or address ranges to include or exclude. It can help you focus on your most important devices, and the most important information about those devices.
Widely available management
With its scalable design, the IBM Tivoli NetView Web console lets you observe network activity from many locations. Using the Web console, you can view events, node status, and SmartSets and also perform network diagnostics, such as ping, traceroute, demand poll, nongraphical generated Management Information Base (MIB) application, and MIB browser.
Distributed network management
Tivoli NetView offers flexibility in a distributed environment. With IBM Tivoli NetView Mid-Level Manager, you can distribute management functions to remote locations that cannot support full-scale management. It can perform status polling, threshold setting, event automation, and automatic detection of new or deleted devices. Tivoli NetView Mid-Level Manager also can help minimize administrative overhead and avoid the need for dedicated management systems throughout the network.
The NetView Web browser interface lets users view network information from any supported Web browser. NetView also can be configured to operate in a regional mode. When set up this way, NetView can manage a local region, such as a campus or building, and forward selected information to a central NetView server. This can enable local management to handle most problems, while staff members in the network operations center monitor critical systems. It also can enable management in regions where SNMP and Internet Control Message Protocol (ICMP) traffic cannot flow (such as the DMZ).
Integration with Tivoli Enterprise products
IBM Tivoli NetView can be used by itself to provide network management capabilities, or it can be integrated with other Tivoli Enterprise™ products for extended capabilities. For example, integration with IBM Tivoli Enterprise Console lets you consolidate and perform correlation against enterprise events, including network events. With Tivoli Inventory, network device information can be added to the Tivoli Inventory database.
Chapter 2.
High-level design and
architecture
This chapter provides a high-level design and architure overview of the proposed solution. We also describe the products used, how they were configured, and the scripts we created to achieve the solution.
In this chapter, we discuss the scenarios that we used for the solution in this book, and we also cover the necessary checks before implementing the solution in your environment.
In this chapter, we discuss the following topics: Architecture overview
Step one: Discovering new nodes with NetView Step two: Automated endpoint installation script Step three: Automated inventory scans
Step four: Extending the solution
NetView Integration Module for Configuration Manager
2.1 Architecture overview
To cover the broadest possible customer scenarios, we approached the design and testing on the two most common platforms, UNIX and Microsoft Windows NT. Obviously, the solution we provide will be deployable on both these
platforms, so no script alteration is needed, provided you have the prerequisite products installed.
2.1.1 Products used in the solution
Table 2-1 gives you an idea of the products we used to formulate the solution.
Table 2-1 Tivoli products
2.1.2 Infrastructure diagram used for testing our scenarios
The diagram illustrated in Figure 2-1 on page 13 represents the infrastructure we used for testing the solution.
Tivoli products Product level and comments
Tivoli Management Framework Version 3.7.1 or later.
IBM Tivoli Configuration Manager Version 4.2.
IBM Tivoli NetView Version 7.1 or later is recommended.
NetView Integration Module for Configuration Manager (packaged with IBM Tivoli Configuration Manager)
Formally known as Tivoli Integration Pack for NetView (TIPN).
RDBMS Any supported relational database management system.
Figure 2-1 Our Tivoli infrastructure for the scenarios
Stage one: IP address and operating system from NetView
The solution was broken down into three identifiable components. The first stage was the NetView component. This entailed using certain NetView commands to query the NetView database to obtain IP addresses of newly discovered nodes along with the operating system type if the node was SNMP enabled.
Stage two: Automatically installing the endpoint agent
After the IP address and operating system type is determined, this information is parsed through to the second stage. We describe this stage as the automated endpoint installation process. Depending on the SNMP agent type, we attempt to install the endpoint code.
Stage three: Distributing inventory and software profiles
Now, we proceed to stage three: automated inventory, software distributions, or any other product distributions you want to add, for example, a distributed monitoring profile. We provide two options. The first option uses the functionality of Activity Planner (a component of IBM Tivoli Configuration Manager) to make
•Tivoli Management Region Server (UNIX) •NetView
•Tivoli Management Region Server (Windows NT)
•Database Server •RIM Host
•IBM Tivoli Configuration Manger •NetView Integration Module Two-way interconnection •Managed Node (NT) •NetView •NetView Integration Module •Database Client •Gateway Endpoint Endpoint Endpoint •Managed Node (Windows NT) •Gateway •Endpoint Endpoint
the necessary distributions. The second option assumes that Activity Planner is not installed and, therefore, uses the command line functionality for distributions of your inventory and software profiles.
2.2 Step one: Discovering new nodes with NetView
The script involved in this stage uses the NetView auto discovery node feature to query the NetView object database, using inherent NetView command line functions, as explained in Chapter 3, “Implementation” on page 25.
2.2.1 Discovering new nodes with NetView: Process flow
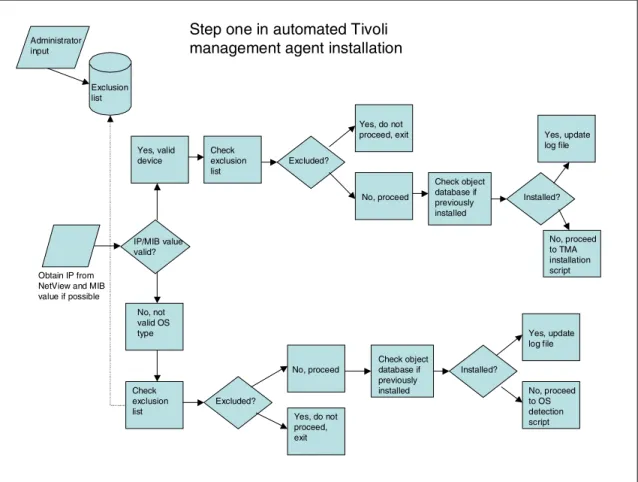
Figure 2-2 on page 15 shows a process flow diagram for the first stage in the Tivoli management agent (TMA) installation.
Note: The scripts that make up the solution are provided on an “AS IS” basis in Appendix A, “Scripts used in this publication” on page 143. You can also download the scripts from the IBM redbooks site. See Appendix B, “Additional material” on page 163 for instructions about how to download the scripts.
Figure 2-2 Discovering new nodes with NetView: Process flow
Devices are either SNMP enabled or not. If the community names have been set correctly for your environment, NetView will keep track of this information in its object database.
As previously noted, NetView will discover nodes that are SNMP enabled and non-SNMP enabled. The challenge is to separate out the non-SNMP devices from the SNMP devices, as well as determine the operating system types if possible.
By running an ovobjprint command, we can pull out all the SNMP agents that are present in the NetView environment. Based on this result, we can
dynamically build our queries, according to the types of SNMP agents
“discovered.” Now that we have a list of SNMP agent types, we mapped them to operating system types using a lookup table (provided with the scripts).
Step one in automated Tivoli management agent installation
Exclusion list
Obtain IP from NetView and MIB value if possible Administrator input No, not valid OS type Check exclusion list No, proceed Yes, do not proceed, exit Installed? IP/MIB value valid? No, proceed to OS detection script Yes, update log file Yes, valid device Check exclusion list Excluded? Excluded? Yes, do not proceed, exit No, proceed Check object database if previously installed Installed? Yes, update log file No, proceed to TMA installation script Check object database if previously installed
We now had to formulate a query that would output a list or lists of nodes IP addresses pertaining to specific SNMP agent types. After much deliberation, we decided to use a simple NetView command called uvUtil (smartsetutil for Windows NT) to categorize and subsequently query for IP addresses and operating system type (SNMP agent) if applicable. SNMP-enabled devices allow you to determine the operating system type, so we dymancially build the query ruleset based on the ovobjprint output as previously mentioned.
We now had a list or lists of IP addresses, with the possibility of an unwanted device, which had been included. So, we employed some of the ruleset options provided by the uvUtil command. The command allows you to filter out as many of the “unlikely nodes” as possible. For example, you can tell it to exclude nodes having port x occupied, implying that product y is installed. By using this logic we are left with a list of nodes that are suitable candidates for the Tivoli management agent code installation. In addition to this filtering, we can also filter out the nodes where the Lightweight Client Framework (LCF) agent is already installed, thereby excluding the possibility of installing the agent again. However, the Tivoli
endpoint service must be running at the time the nvsniffer command is executed.
As previously mentioned, we also look for nodes already installed with the LCF agent. The nvsniffer.conf file needs an entry in it to cater to the LCF agent “sniff” when executed. The nvsniffer.conf file may need some configuration if you are not running IBM Tivoli Configuration Manager. IBM Tivoli Configuration Manager ships with an additional nvsniffer.conf file, and this file should be used when running the nvsniffer command. If you are not running IBM Tivoli Configuration Manager, the default nvsniffer.conf file is automatically edited with the
appropriate entry when the script is executed for the first time.
Note: The nvsniffer configuration file (nvsniffer.conf) sniffs out ports being used on a node to determine what products or what functions this node serves. It then sets the appropriate field or fields in the NetView database. If the nvsniffer command needs to be run on a regular basis to update the fields in the NetView object database. It is recommended to schedule this command on a daily basis, or as frequently as you deem appropriate for your environment, bearing in mind that it does place additional load on network traffic.
2.3 Step two: Automated endpoint installation script
From the previous stage, we have now have a list of IP addresses with the corresponding operating system types if applicable.
This stage uses a UNIX shell script. The script, as you will see in Chapter 3, “Implementation” on page 25, uses the winstlcf command. As you may already know, the winstlcf command can determine the operating system type for UNIX-based machines by running an uname command. That takes care of the Tivoli-supported flavors of UNIX for installation purposes, but leaves us guessing to a certain extent about Windows machines. Remembering that Windows 98 is not supported by the winstlcf method, we attempt to install the code; if
unsuccessful, the appropriate action would need to be taken by the system administrator. In all our scripts, there are detailed log files to guide you for debugging purposes if necessary. The script can be run on both platforms as per the infrastructure diagram shown in Figure 2-1 on page 13. To give you a better understanding of the winstlcf command, we provide a summary of the
command functions and flags used in our scripts.
2.3.1 Summary of the winstlcf command
The winstlcf command installs an endpoint on all operating systems except AS/400®, OS/2, and Windows 98.
Syntax
The syntax of the winstlcf command is as follows:
winstlcf [–f file_name][–g machine[+port][:machine[+port][–N endpoint][–Y]
Description
The winstlcf command installs and starts the endpoint service (lcfd) on one or more workstations. This command can be used to install an endpoint on all operating systems except OS/400®, OS/2, and Windows 98. For OS/2 and
Note: In determining operating system types, we separated the nodes into two lists. The first list contains UNIX machines and the other Windows. If the node in question is SNMP enabled, we are certain about our categorization. However, if a machine does not have an SNMP agent running, how do we determine operating system type? The answer is we cannot, but through this process, we filtered out as many of the non-Windows machines as possible. There are tools on the market that can determine operating system type, but listing these tools here is beyond the scope of this book.
Windows 98, use the provided InstallShield program or Tivoli Software Installation Service.
For Windows workstations, the first endpoint installed in a domain must be installed using the InstallShield image. For additional endpoints, use winstlcf –N
to reference that endpoint as a proxy. This proxy installs all other Windows endpoints in this domain or trust. By default, the endpoint service starts after installation. You can install endpoints to multiple workstations by listing the machine names on the command line or using the –f option to specify a file that contains a list of machine names. If you run winstlcf on a machine more than once, you have more than one instance of lcfd running on that machine. Only one instance of lcfd should exist on each machine. Remove any additional instances.
2.3.2 The logic the script follows
The following lists some of the logic the script follows. More details are in Chapter 3, “Implementation” on page 25.
1. Checks the NetView interpreter type. 2. Checks the exclusion list.
3. Checks the Tivoli object database to prevent duplicate installations. 4. Runs the winstlcf command for UNIX and Windows installations. 5. Performs set label of new endpoint.
6. Creates the appropriate log files.
7. Parses the necessary values to the third stage script.
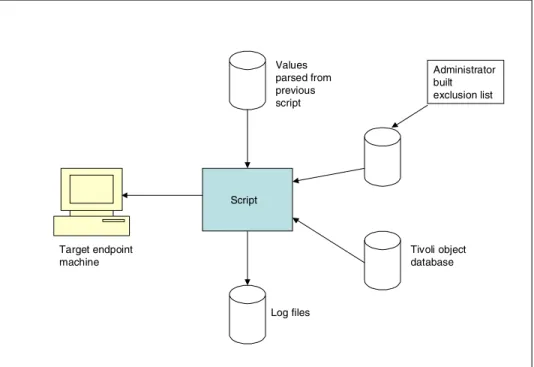
2.3.3 Automated endpoint installation script: Process flow
The diagram in Figure 2-3 on page 19 illustrates the process flow of the endpoint installation script.
Figure 2-3 Automated endpoint installation script: Process flow
2.4 Step three: Automated inventory scans
We used two different distribution methods for the inventory hardware and software scans and software distributions:
The first distribution method uses the given functionality of IBM Tivoli Configuration Manager to run the scans and distributions. For detailed instructions about the configuration of Activity Planner (which ships with IBM Tivoli Configuration Manager), refer to All About IBM Tivoli Configuration Manager Version 4.2, SG24-6612.
The second distribution method uses the command line functionality to make the appropriate distributions.
2.4.1 Configuring inventory profiles or using scripts to create
profiles
We provide scripts to create hardware and software inventory profiles. You can customize them to suit your needs, or you can use your existing profiles.
Values parsed from previous script Administrator built exclusion list Tivoli object database Script Log files Target endpoint machine
See Appendix A, “Scripts used in this publication” on page 143 for the profile creation and customization scripts.
2.4.2 Inventory scan scenario using Activity Planner
If you use Activity Planner to schedule and distribute your scans, see All About IBM Tivoli Configuration Manager Version 4.2, SG24-6612. Activity Planner automatically picks up and scans the newly installed endpoints in the same manner as you have done with your existing endpoints. Running tasks and doing software distributions and inventory scans are the part of the operations
performed in an enterprise on a daily basis. Activity Planner takes care of all these through a graphical user interface.
2.4.3 Brief overview of Activity Planner
Activity Planner is an IBM Tivoli Configuration Manager component that enables you to define a group of activities in an activity plan, submit the plan to be executed, and monitor the execution of the plan. Activities are single operations that are performed on a set of targets, such as profile managers and managed nodes. These activities can be performed at specified times or run as a scheduled activity as a whole. Operations can include software distribution operations, Tivoli Management Framework tasks, and inventory scans. Change Management operations supported by Activity Planner are as follows: Run hardware and software scans
Install, remove, undo, accept, commit, and verify software packages Load and unload
Delete, send, retrieve single files or groups of files Execute Tivoli Management Framework tasks Activity Planner performs the following action:
Manage a group of activities originating from different applications, such as Software Distribution, Inventory, and Tivoli Management Framework, as a single activity from a single machine in the network.
2.4.4 Distributing a scan using the command line interface
In the second distribution method, we used the command line interface
functionality of Inventory to make our distributions. At this point, you should have all the information necessary to run a scan, provided you have configured your inventory hardware and software profiles.
The script uses the wdistinv command to make the hardware or software inventory distribution. The basic syntax of the command is as follows: wdistinv @InventoryConfig:First_Scan @Endpoint:sly @Endpoint:robbie Where:
@InventoryConfig:First_Scan
Specifies the name of the inventory profile you have preconfigured. @Endpoint:sly @Endpoint:robbie
Specifies to distribute the profile to the endpoints named sly and robbie. In our scenario, the endpoint name will be automatically substituted into the script at run time.
Summary of the steps so far
From the point that the new node was discovered by NetView, we have made prerequisite checks, installed the endpoint code, and subsequently taken an inventory snapshot.
2.5 Step four: Extending the solution
With the successful endpoint installation, we can now extended the functionally of this solution. For example, from the previous step, we took an inventory snapshot of the node. Using IBM Tivoli Configuration Manager, we can determine what packages or software is missing from the node and distribute accordingly. Other possibilities may include a distributing monitoring profile. See Chapter 6, “Extending the solution and best practices” on page 137 for more information.
2.5.1 Creating a software distribution package
In our testing, as you will see in Chapter 4, “Installation, configuration, and administration” on page 51, we used the IBM Tivoli Configuration Manager prebuilt software packages to make our distributions. In the scripts, we included the command or commands we used to make the distributions. If you want to use this functionality, please follow the customization options for including your software packages. We followed recommendations from All About IBM Tivoli Configuration Manager Version 4.2, SG24-6612.
All About IBM Tivoli Configuration Manager Version 4.2, SG24-6612 discusses the following topics and best practices for building software packages.
It provides generic guidelines, best practices, and hints and tips for using IBM Tivoli Configuration Manager as part of an enterprise-wide deployment process. The following Software Distribution business processes will be involved in the overall change management process that applies to your specific environment: Naming standards Software packaging Endpoint control Lenient distributions Endpoints as depots Activity plans Pristine installations Security
If you are going to build software packages, we found it useful to define the package as lenient. This simplifies the scripting somewhat, mainly because you do not have to subscribe the endpoint to a profile before making the distribution.
2.5.2 Distributing a software package using Activity Planner
As with inventory distributions, you can use either Activity Planner or the command line interface, if you do not have Activity Planner installed, to install your software packages. As discussed in Chapter 4, “Installation, configuration, and administration” on page 51, we used Activity Planner to make our software package distributions.
The following are some recommendations for configuring activity plans.
We recommend keeping your plans simple. When dealing with a large number of packages and distributions, it is sometimes complex to track the number of on-the-fly plans and their statuses. When possible, we recommend assigning one software package per activity plan. In addition, we recommend using naming standards for your activity plans so that you can easily track them.
Note: Lenient distributions. If you define a software package as lenient, there is no need to subscribe endpoints to the profile to be able to distribute it. In this way, we avoid an operation, such as subscribing and unsubscribing endpoints in our Tivoli Management Region. Usually, this is very helpful when dealing with large numbers of endpoints and distributions. Typically, the target list of endpoints can be built based on grouping endpoints by machine roles in RDBMS. We strongly recommend choosing this option as part of your default software package definitions.
Please refer to the redbook All About IBM Tivoli Configuration Manager Version 4.2, SG24-6612 for information about configuring Activity Planner.
2.5.3 Distributing a software package using the command line
interface
We also provide the command line syntax to make a software distribution using the winstsp command. You will need to alter the script to incorporate your packages. See Chapter 4, “Installation, configuration, and administration” on page 51 for more information about customizing the script.
We used the winstsp command for making the distributions. To familiarize yourself with the use and syntax of the winstsp command, see Tivoli Software Distribution Reference Manual Version 4.1, GC32-0716.
2.6 NetView Integration Module for Configuration
Manager
Chapter 5, “NetView Integration Module implementation and scenarios” on page 85 explains the implementation, customization, and administration of the IBM Tivoli NetView Integration Module for Configuration Manager Version 4.2, or simply NetView Integration Module.
The NetView Integration Module for Configuration Manager Version 4.2 component integrates NetView and Tivoli applications to provide combined systems and network management. You can use NetView Integration Module to catalog all the network devices in your enterprise. Importing the NetView discovery of Tivoli Management Region members into the Inventory database helps you maintain and diagnose the Tivoli environment.
The NetView Integration Module provides you with network device inventory data, reporting functions, and other Tivoli desktop functions from the NetView console. After you have run the schema setup scripts, your Inventory database is ready to be populated with Network device data. There is also an additional task library script that needs to be run in order to build the necessary queries for the network inventory data. NetView Integration Module for Configuration Manager (formerly called Tivoli Integration Pack for NetView, TIPN) uses the NetView object database to populate the additional tables in your Inventory database. To configure this product, the following prerequisites need to be met:
Running a schema script (needs to be run to make the necessary changes to the Inventory repository).
Supported and configured database management system.
Tivoli NetView Enabler 7.1 for Windows NT (if you are running NetView on Windows).
These are explained in more detail in Chapter 5, “NetView Integration Module implementation and scenarios” on page 85.
Chapter 3.
Implementation
This chapter provides an overview of the steps required to implement the solution successfully in a user’s environment. This chapter covers the points that have to be addressed before implementing this solution in a production
environment. The scripts developed to achieve this goal can be executed on UNIX and Windows NT operating systems without modifying the operating system-level changes.
This book provides a list of shell scripts that detect the new node discovered by NetView without Tivoli management agent (TMA). Depending on the type of operating system of the node, subsequent Tivoli management agent installation code is executed, and after successful Tivoli management agent installation, inventory details are scanned and stored in the Tivoli Inventory database repository.
In this chapter, we cover the following topics: Discovery of nodes by NetView
Tivoli management agent installation on discovered nodes Inventory scan on nodes with Tivoli management agent installed Software Distribution and Inventory details
3.1 Discovery of nodes by NetView
This section explains how new nodes are discovered by NetView.
In this section, we provide the various commands used in the scripts and the prerequisites, which the administrator needs to provide to ensure successful execution.
3.1.1 Prerequisites to discover the nodes with NetView
Before the scripts are executed, the administrator must ensure that the following mandatory parameters are in the scripts:
mdir: The directory name.
mep_shell: The name of the script to install the Tivoli management agent (endpoint) on a newly discovered node. The full name of the script (followed by extension) must be provided.
minp1: The name of NetView agent master file. This file contains all of the agents with the type of operating system. The records in this file contain two columns. First is the name of the agent being identified by the NetView system, and the second column contains the type of operating system (OS) we need to refer to in our script to decide the appropriate action. These two columns are separated by a $ sign. A sample extract of the file is provided in Example 3-1.
Example 3-1 Sample NetView agent master file WANServant Probe$SKIP
Microsoft Windows NT$NT Microsoft Windows NT 4.0$NT IBM X Station$UNKNOWN Linux UCD-SNMP Agent;$UNIX IBM RS/6000$UNIX
Note: The scripts that make up the solution are provided on an “AS IS” basis in Appendix A, “Scripts used in this publication” on page 143. You can also download the scripts from the ibm redbooks site. The instructions about how to download the scripts are in Appendix B, “Additional material” on page 163.
Note: The scripts referenced in this section must be executed on a server installed with NetView and a managed node. In Windows NT (2000), the administrator must execute it from the bash shell.
In Example 3-1 on page 26, we notice that the OS types are SKIP, Microsoft Windows NT, UNIX, and UNKNOWN. In scripts, nodes with node type SKIP are not processed, because these pertain to network devices (such as routers, modems, and switches).
minp2: List of nodes to be excluded. This entry contains the IP address on the node where Tivoli management agent installation has to be ignored. The sample record of this file is shown in Example 3-2.
Example 3-2 Sample list of nodes to be excluded file 10.72.15.201
10.72.15.254
mfirst_var: Starting name of the output file. This variable creates the file name containing the list of nodes based on the operating system (OS) type generated from NetView. This file is referred to as input into the Tivoli management agent installation script and appears before the OS. If we enter the mfirst_var value as out, the file name is “out”<OS Name><mlast_va>.
mlast_var: Ending name of the output file. This variable creates a file name containing the list of nodes based on the operating system (OS) type generated from NetView. This file is referred to as input into the Tivoli management agent installation script and appears after the OS. If the value provided for mlast_var variable is .nep, the file name is <mfirst_var><OS Name>”.nep”. For Windows NT, if we take the mfirst_var and mlast_var values as previously mentioned, the file name is “outNT.nep”. mout2: This variable contains the operating system file with the node name
and address. This variable’s exact name is derived from mfirst_var, the operating system, and the mlast_var parameter (for example, mout2 = $mfirst_var< OperatingSystem> $mlast_var).
mout1: Temporary variable name used in the script. mtmp: Temporary variable name used in the script. mtmp1: Temporary variable name used in the script.
mlog_sniff: The name of the log file to contain the standard output message and error message generated during the execution of the nvsniffer
command.
mlog_ovobj: The name of the log file to contain the standard output message and error message generated during the execution of the ovobjprint
mlog_nvutil: The name of the log file that contains the standard output message and error message generated during the execution of the nvUtil
and smartsetutil commands.
mdefault_password: True/False is the only value for this. This parameter checks whether or not the administrative account with the password is available. If the value of the mdefault_log parameter is True, it assumes that an administrative account with a password is provided. If the value of the mdefault_log parameter is False, the system assumes that an administrative account will be provided by an administrator at a later time.
mdefault_file: The name of the file containing the entry of the operating system administrative account and password. These entries are needed in case the mdefault_password parameter value is set to True. A sample entry in this file is shown in Example 3-3.
Example 3-3 Sample mdefault_file NT Administrator adminpassword UNIX root rootpassword
Example 3-3 indicates that for all nodes of Windows NT operating systems, a default login and password will be used during Tivoli management agent installation. The same is true for UNIX operating systems. After the
mdefault_password parameter is set to True, and the mdefault_file file is not present, or present with a blank account and password, the system logs the message as Blank account / password and resets the mdefault_password value to False.
mnvpath: This variable contains the path of the NetView sniffer configuration file (nvsniffer.conf).
msniff: This variable contains the exact file name with the path of the NetView sniffer configuration file (nvsniff.conf). This file updates the NetView object database using the sniffer command.
mconf: Contains the exact value to verify from the nvsniff.conf file. IF this entry is not present in the nvsniff.conf file, it appends it. The correct details serve only this purpose.
3.1.2 Summary of steps to discover nodes with NetView
Here is the summary of steps to discover nodes with NetView:
1. The execution of the script starts by checking the LCF entry from the
nvsniffer.conf configuration file. If the entry is not there, it gets appended with the value of the mconf variable.