Table of Contents
1. Installing Internet Information Services (IIS)
1.1 Adding Windows Components
1.2 .NET 2.0 Framework
2
3
2. Configuring IIS
2.1 Virtual Directory
2.2 Virtual Directory Creation Wizard
4
5
3. Configuring Simple Mail Transfer Protocol (SMTP)
7
4. Troubleshooting
4.1 Unable to load page
4.2 Unable to load page
8
9
5. Contact Details
10
HCA-Vision Web Service
Installation Guide
1.
Installing Internet Information Services (IIS)
1.1 Adding Windows Components*If you already have IIS installed, please move onto step 2.
HCA-Vision Web Service requires IIS to be installed. IIS is a free add-on component of Microsoft Windows XP
Professional, Windows Server 2003, Windows Vista and Windows Server “Longhorn”.
To install IIS:
1. Go to “Start” -> “Settings” -> “Control Panel”.
2. In “Control Panel”, click “Add or Remove Programs”.
3. Click the tab labelled “Add/Remove Windows Components” on the left-hand panel.
4. A window labelled “Windows Components Wizard” will pop-up, tick “Internet Information Services (IIS)” and press “Next”.
5. The Wizard will prompt you for your “Microsoft Windows CD”, insert the CD and continue with the installation.
1.
Installing Internet Information Services (IIS) Cont.
1.2 .NET 2.0 FrameworkHCA-Vision Web Service also requires Microsoft .NET Framework 2.0. Chances are you already have .NET Framework 2.0 installed from your Windows Updates in the past.
To check for .NET Framework 2.0:
1. Go to “Start” -> “Settings” -> “Control Panel”.
2. In “Control Panel”, click “Add or Remove Programs”.
3. Find Microsoft .NET Framework 2.0 If you are unable to find it, please visit:
http://www.microsoft.com/downloads , download and install .NET Framework 2.0 then move onto Step 2. If .NET Framework 2.0 was installed prior to you installing IIS, you would need to “repair” the framework to reset some access permissions.
To do this, you need to locate Microsoft .NET Framework 2.0 under your list of programs, click “Change/Remove”, select “Repair” and click “Next”.
2.
Configuring IIS
2.1 Virtual DirectoryTo allow public access to HCA-Vision Web Service, you will need to point the web page files to a virtual directory:
1. Go to “Control Panel”, and select “Administrative Tools” (If you are unable to see this selection, click “Switch to Classic View” on the left-hand panel). 2. Under “Administrative Tools”, select “Internet
Information Services”.
3. Expand your local computer on the left-hand panel. 4. Expand the “Web Sites” folder.
5. Right click on “Default Web Site”. 6. Go down to “New”.
2.
Configuring IIS Cont.
2.2 Virtual Directory Creation WizardThe first item the wizard will prompt you for is an “alias”. This is the application name following your machine name (URL), which you type in a browser to access HCA-Vision Web Service.
For example, if the alias is set to “HCA-VisionWeb” and your machine name is “lab01”, then the user will need to type: http://lab01/Hca-VisionWeb in his or her browser to access HCA-Vision Web Service.
The second item the wizard asks for is “path to the
content”, meaning the directory of the ASP.NET page files. This is located under “WebService” inside your
HCA-Vision program folder.
For example, if you installed HCA-Vision to: “C:/Program Files/CSIRO/HCA-Vision” Then you need to point the wizard to:
2. Configuring IIS Cont.
2.2 Virtual Directory Creation Wizard Cont.The third and final task is to set the access permissions to the virtual directory.
HCA-Vision Web Service requires that all of the listed permissions are allowed.
After you have ticked all the boxes, click “Next”. You should be now able to access HCA-Vision Web Service.
To access on the local host, type in:
“http://localhost/your-alias” in Internet Explorer, where “your-alias” is the alias you specified in the wizard.
To access from another computer on the network, type in: http://host-machine-name/your-alias in Internet Explorer, where “host-machine-name” is the machine name of the computer hosting the web service.
3.
Configuring Simple Mail Transfer Protocol (SMTP)
HCA-Vision Web Service contains a “Password Recovery” feature. This feature requires the installation and
configuration of Microsoft’s SMTP protocol.
SMTP is installed together with IIS, but is disabled by default. To enable SMTP:
1. Click “Internet Information Services” under “Administrative Tools”.
2. Expand your local computer on the left-hand panel. 3. Right click on “Default SMTP Virtual Server” and
select “Properties”.
4. Select the “Access” tab, and click “Relay” under “Relay restrictions”.
5. Select “All except the list below”, and then click “OK” until the changes are made.
4.
Troubleshooting
4.1 Unable to load pageThe most common problem for this is missing Dynamic Link Library files. This can be because Windows doesn’t know where to look for them, or the operating system itself doesn’t contain them.
You will need to check and change the “Path” environmental variable in Windows:
1. Right click on “My Computer”, go to “Properties”. 2. Click on the “Advanced” tab.
3. Click “Environmental Variables”.
4. Under “System variables”, locate “Path” and click “Edit”.
5. Add “your_hca-vision_dir/WebService/Bin” to the Path, where “your_hca-vision_dir” is the path of where you installed HCA-Vision.
For example, if HCA-Vision is installed in “C:\Program Files\CSIRO\HCA-Vision”, then you would need to add “C:\Program Files\CSIRO\HCA-Vision\WebService\Bin” to the path.
4. Troubleshooting Cont.
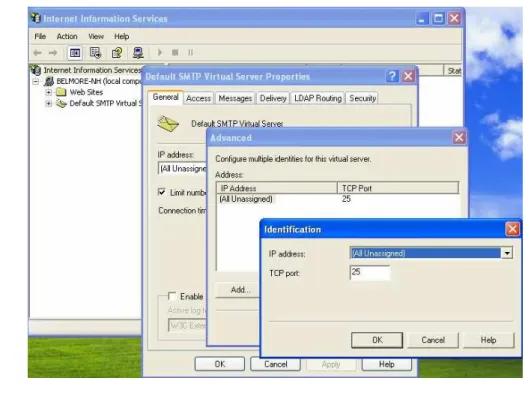
4.2 Unable to send EmailWindows SMTP uses the default port of “25” for its mail transfers. Due to internet security reasons, some anti-virus software blocks this port automatically.
It is simpler to configure your Anti-Virus software to allow port 25, to do this consult your anti-virus software manual. Alternatively, HCA-Vision has an option of changing this port. Locate the “web.config” file in
“HCA-Vision/WebService” then editing “HCA_VisionSMTPPort” value.
You will also need to change the setting in IIS by selecting “Default SMTP Virtual Server” -> “Properties” -> “General” tab, click “Advanced” and then edit the port to the same as your new “web.config” file.
Note: This guide only contains the most common
problems; if you experience any further difficulties please contact us.
5. Contact Details
HCA-Vision Contact: Enquiries and Support Biotech Imaging
CSIRO Mathematical and Information Sciences Email: [email protected]
Website: http://www.hca-vision.com/support
CSIRO Contact: Pascal Vallotton
Leader, Biotech Imaging
CSIRO Mathematical and Information Sciences Locked Bag 17, North Ryde NSW 1670 AUSTRALIA Phone: +61 (0)2 9325 3208
Fax: +61 (0)2 9325 3200
Email: [email protected]
Location:
CSIRO Mathematical and Information Sciences - North Ryde
Building E6B
Macquarie University Campus North Ryde NSW 1670 Australia --- Lock Bag 17 North Ryde NSW 1670 Australia