Engagement
Guide to the Tax Software
Interface
ProSystem
fx
Tax and
Introduction
This guide provides step by step instructions for exporting trial balance information from ProSystem fx
Engagement into ProSystem fx Tax and Global fx Tax. It will also explore breaking the Dynalink and how to use the Add or Remove Tax Grouping Utility and the Tax Grouping Update Wizard.
Objectives
After reading this guide, you should be able to:
Prepare the Tax Software Interface within Engagement
Import the file into ProSystem fx or Global fx Tax
Better understand the Dynalink and the Dynalink Options
Understand what actions break the Dynalink
Use the Add or Remove Tax Grouping Utility
Use the Tax Grouping Update Wizard
Ic
on Le
gen
d
Tip Best practice tips and shortcutsNote Informational notes about functions Caution Important warnings about a function
Table of Contents
Importing the Engagement Trial Balance into the Tax Return ... 1
Engagement Tax Software Interface ... 1
ProSystem fx Tax Configuration ... 3
Importing the Dynalink ... 5
Reprocessing a Dynalinked Tax Return in Global fx Tax ... 11
Breaking the Dynalink ... 12
Dynalink Tips and Troubleshooting ... 13
Add or Remove Tax Grouping Utility ... 14
Tax Grouping Update Wizard ... 15
Importing the Engagement Trial Balance into the Tax Return
Engagement Tax Software Interface
1. Select any tab or workpaper within the Binder Index Window or the binder itself within the Engagement File Room to activate the Tax Software Interface option.
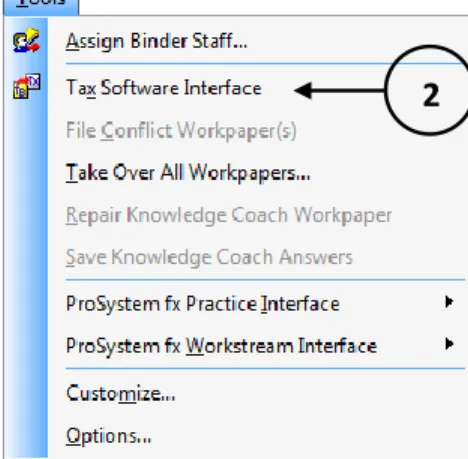
2. Select Tools/Tax Software Interface from the Binder Index Window or the Engagement File Room.
Figure 1 – Access Tax Software Interface Tool
3. Select the trial balance to export. This step is not necessary unless more than one trial balance database exists in the binder.
Only staff members assigned to the binder can export a trial balance to ProSystem fx Tax.
4. Select the appropriate tax software. The Dynalink is the recommended option for ProSystem fx Tax. 5. Select the trial balance view containing the tax balance you are exporting.
6. Select the tax year. The beginning and ending dates then default to the calendar year. To change these dates, click the appropriate drop-down arrow.
7. Select the ProSystem fx Tax grouping list.
8. Select the Federal Tax Balance to export. The Federal Tax Balance will automatically appear once the trial balance view containing the tax balance is selected.
9. Enter the client's federal employer identification number. This number is used as the EIN in the tax return and the client code for building the client list when you configure ProSystem fx Engagement as an accounting bridge in ProSystem fx Tax.
Be sure to enter a unique Employer ID # for each trial balance you export.
Figure 2 – Tax Software Interface Options
10.Click OK to create the export file. Prior year data will automatically be included in the export file. You can choose whether or not to import prior year data from within ProSystem fx Tax. By default the option to Save as default for this trial balance is checked by default when establishing a Dynalink.
3 4
5 6
9
7
ProSystem fx Tax Configuration
Configuring the Accounting Bridge (does not apply to Global fx Tax)
1. Open ProSystem fx Tax.
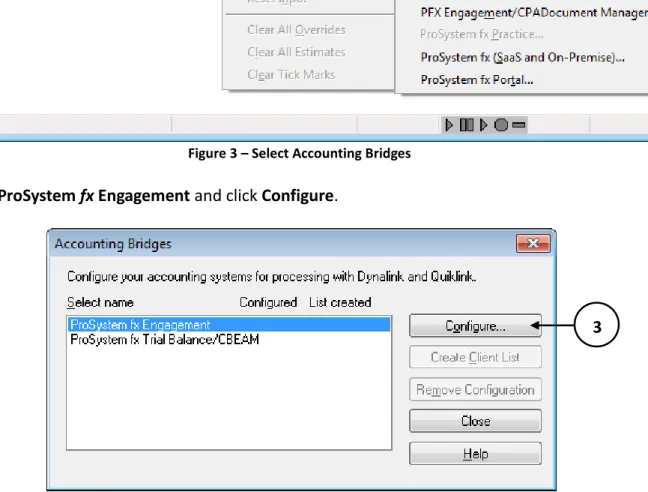
2. Select Options/Interface Options/Accounting Bridges.
Figure 3 – Select Accounting Bridges
3. Select ProSystem fx Engagement and click Configure.
Figure 4 – Tax Software Interface Options
2
4. Browse out to C:\Pfx Engagement\WM to set the accounting system path.
Figure 5 – Accounting System Path & Quiklink Option
5. Select your preferred “Quiklink option”.
a. From the first tax line highlighted returns you to the same place in the tax return where you started before switching to the trial balance.
b. From the last tax line highlighted returns you to the place in the tax return that corresponds to the last tax line selected in the trial balance.
6. Click OK.
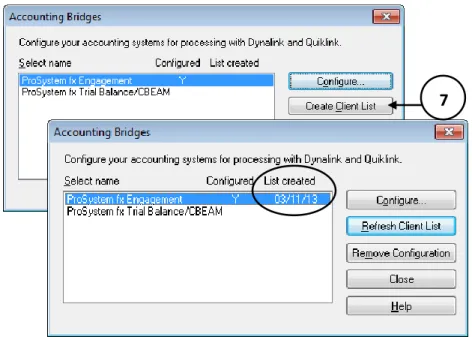
Configuring the accounting bridge is required only once on each computer. 7. Click Create Client List, then Close.
Figure 6 – Client List Created
4
5
Importing the Dynalink 1. Open the tax software.
2. Create or refresh the client list as discussed in step 7 above.
a. Select Create Client List if this is the first time the trial balance is being imported. b. Select Refresh Client List if this is a subsequent import of the trial balance.
Refreshing the Client List is not required for processing Dynalinks with Global fx Tax. 3. Click Close.
4. Select File/Import/Dynalink.
5. Click Select Client.
Figure 8 – Dynalink Window
6. Select the appropriate tax product (entity type).
Figure 9 – ProSystem fx Tax Dynalink Window
7. Select ProSystem fx Engagement as the Accounting System, then click OK.
5
6 7
8. Select the client to import from the client list.
Figure 10 – Select Client
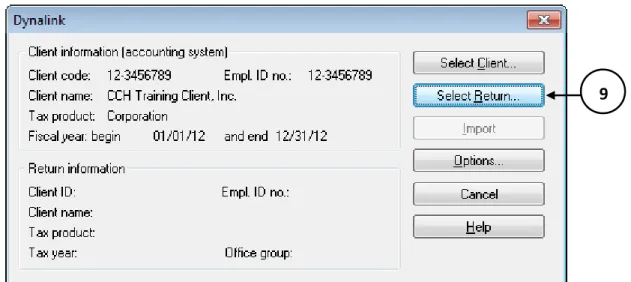
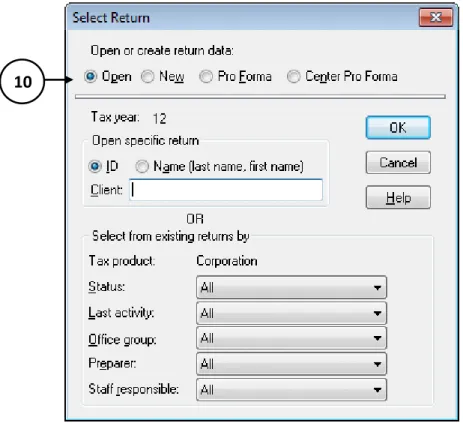
9. Click Select Return to select the return to import the trial balance information into.
Figure 11 – Dynalink Window
9 8
10.Select the appropriate type of return and enter the required information, then click OK.
a. Select Open if the tax return has already been opened in the tax software for the current year. b. Select New if this is a new return and a return was not prepared in the prior year.
c. Select Pro Forma if the return has not yet been opened and exists as a pro forma.
d. Select Center Pro Forma if the return has not yet been opened and exists as a pro forma created by the service center.
Figure 12 – Select Return 10
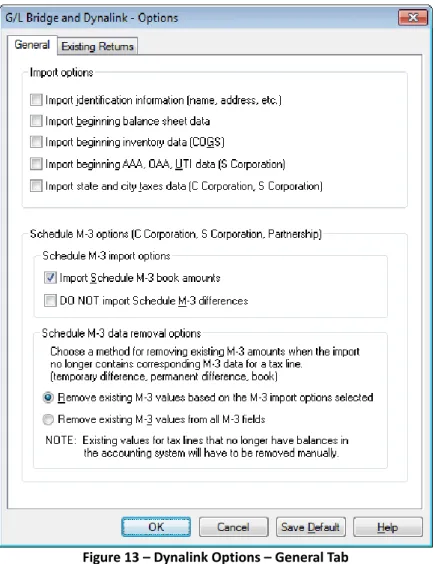
11.Verify Dynalink Options.
Figure 13 – Dynalink Options – General Tab
The general settings above are recommended for returns that you have prepared using ProSystem fx Tax in the past.
For new returns, consider importing identification information and prior year trial balance data.
Schedule M-3 options can be ignored for returns which do not require preparation of the Schedule M-3.
Figure 14 – Dynalink Options – Existing Returns Tab
Remove existing data is recommended for returns that you have prepared using ProSystem fx Tax in the past. This will prevent duplication of line items on supplemental statements.
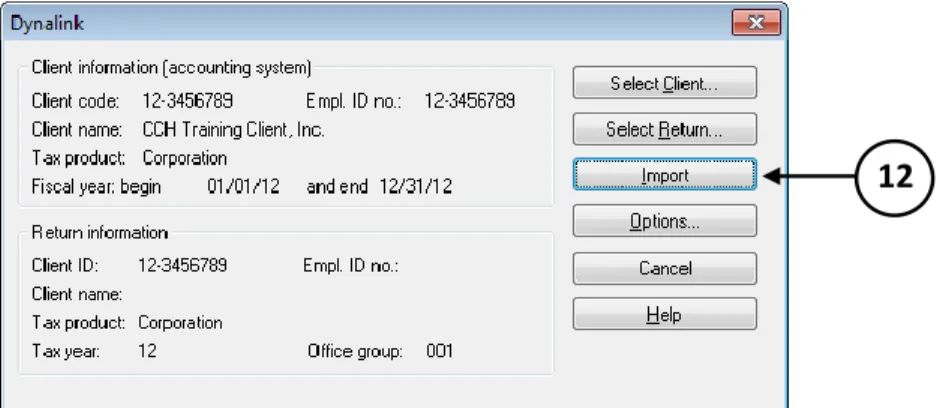
Note that Dynalink Options can be saved as default. 12.Click OK to save Dynalink Options, then Import.
Figure 15 – Completed Dynalink Window
13.Calculate the tax return and verify imported data.
Reprocessing a Dynalinked Tax Return in Global fx Tax
Global fx Tax does not establish a dynamic link between Engagement and your tax return. Therefore, changes made in the trial balance database are not automatically processed and updated in the return. However, you can easily update the data in the return by using the Desktop Updates function in Global fx Tax.
1. Select File/Import/Desktop Updates.
Figure 16 – Global fx Tax: Updating the Tax Return
The Desktop Update button, , can be added to the toolbar in Global fx Tax for easier access. The toolbar can be customized from the Options menu.
Breaking the Dynalink
The following circumstances will cause the link between the tax return and the trial balance to become disconnected.
For Global fx Tax users, Quiklink Updates will not be available. Trial balance updates made in
Engagement can be transferred to Global fx Tax via the Desktop Updates function. See Reprocessing a Dynalinked Tax Return in Global fx Tax in this guide.
1. The trial balance data is changed when the tax return is not open (for example, a journal entry is made or an account balance is changed).
2. Trial balance data is imported using either the Import Conversion Wizard or Paste TB Import. 3. The trial balance is deleted.
4. The trial balance is “taken over” by another staff member (The link between the trial balance and the tax return will remain active if the current editor is changed by assigning the trial balance to another staff member or by checking in and checking out the trial balance during synchronization).
5. The binder containing the Dynalink trial balance is backed up and then restored. 6. The Tax Software Interface dialog is changed.
7. The Binder Properties period information is modified.
8. The federal tax balance is the balance selected for Dynalink and the formula for calculating the balance is changed in the TB Column Setup.
9. The Grouping List ID used in the export to Dynalink is renamed or deleted.
10.The Trial Balance View chosen for the Dynalink export configuration is deleted or the balance column is removed from the view chosen for configuration.
11.A trial balance consolidation is reprocessed and the linked database is the consolidated database. 12.The Quiklink Updates Status option is deactivated.
13.When certain changes are made in the trial balance and these changes effect the tax return: a. You will be prompted with a message notifying you that your change will break the link.
14.A grouping list is imported in the Account Groupings window, and it replaces the grouping list that was configured for Dynalink.
15.A binder in your Local File Room is deleted (and you are the current editor of a trial balance that is Dynalinked), then the binder is brought back into your local file room through one of the following:
a. Synchronize with another staff member b. Synchronize with the Central File Room c. Via Receive Binder Package
d. Via Restore Binder
16.A Central File Room is deleted (when there is a binder with a checked out, Dynalinked trial balance), and the staff member with the trial balance checked out to them syncs their Local File Room binder with another Local File Room or a Central File Room, or receives a binder package of the binder. 17.Changing the M-3 Option within the Account Grouping Options window.
Dynalink Tips and Troubleshooting
1. Account Groupings: Ensure that all accounts are assigned to the correct tax groupings prior to Dynalinking the trial balance.
2. Tax Forms: The Dynalink will not prepare the entire tax return for you. The Dynalink imports amounts from the trial balance according to where you grouped up the accounts, how you prepared the tax journal entries, M-3 Options, etc. Schedule D, Form 4562 and other common forms will still need to be prepared manually or with help from other software applications such as ProSystem fx Fixed Assets. For specific guidance regarding which forms and schedules can be prepared using the Dynalink, download the Tax Line Conversion Charts available on the CCH Support website.
3. Supplemental Statements: To prepare a supplemental statement for a specific line on a tax return, the respective Engagement tax grouping must contain subgroups. Subgroup index numbers must follow the Group index number. For example, an appropriate Subgroup index number for Auto Expense under Group 26 – Other Deductions would be 26.01. Subgroup index numbers should be in the ##.## format. An index number of 26.A is not acceptable.
4. Form 8825: This form can be linked from Engagement into Tax if grouped correctly.
a. Each rental property is identified with an assigned alphabetical letter in the account grouping list. For example, the letter “A” in 802A is the first rental property, 802B is the second rental property and so on.
b. To add or remove rental properties, see instructions for the Add or Remove Tax Grouping Utility in this guide.
c. You can add up to 99 rental properties in one tax grouping list using this utility. d. Farming operation groupings work similar to rental groupings.
5. State and Local Taxes: These can be linked to the tax return under the following conditions: a. The client only has one state and local tax authority.
b. The Send to Tax options in the Account Groupings are set to “Yes”. c. The state return has been created and calculated in ProSystem fx Tax.
d. The Dynalink option to import state and local tax data is selected in the Dynalink Options window. e. For multiple state and/or local tax returns, set the Send to Tax options to NO, and do not select the
Dynalink option to import state and local tax data in the Dynalink Options window.
6. Consolidated Tax Returns: You cannot Dynalink an Engagement trial balance to tax when the Schedule M-3 option is selected in Account Grouping Options window. Using the G/L Bridge function is possible. However, you should consider Dynalinking each subsidiary trial balance database, then completing the consolidation in ProSystem fx Tax instead of using the G/L Bridge. This is the recommended best practice.
Add or Remove Tax Grouping Utility
This utility is designed to help you easily modify tax groupings in the trial balance database by allowing the addition and removal of tax groupings. The utility is commonly used for rental properties, farming operations and Form 1040 Schedule C. You can also use the utility to remove unused tax groupings and improve the refresh rate of trial balance reports.
This grouping utility is for ProSystem fx Tax users only.
The user must have ProSystem fx Engagement version 4.1 or above.
The utility may be used for tax year groupings 2005 or above.
Uncheck the option to “Launch separate instances of Excel” (Binder Window/Tools/Options).
Figure 17 – Add or Remove Tax Group Utility
(User Guide Chapter 7: Using the Trial Balance)
Steps to Add/Remove Tax Groupings:
1. Open Trial Balance database
2. Click the Microsoft Office Button and select “Open”
3. Browse to C:\Pfx Engagement\WM\Utilities\Add or Remove Tax Group Utility
4. Select “Open”
5. Enable Macros if prompted
6. Complete the steps on the Process worksheet of the Excel file 7. Close the Notepad report and verify changes to Account Groupings
Tax Grouping Update Wizard
Figure 18 –Tax Grouping Update Wizard
(User Guide Chapter 7: Using the Trial Balance)
The Tax Grouping Update Wizard can be downloaded from the CCH website each year (usually completed by IT personnel).
After downloading the wizard, an administrator or IT personnel may run the Tax Grouping Update for the entire CFR or staff can run the update on their individual hard drives.
If the administrator or IT personnel perform the update for the entire Central File room, all binders that have not been rolled forward will need the tax groupings updated manually.
Steps to Update Annual Tax Groupings:
1. Make sure that all binders you are updating are closed. 2. Select the Tools menu in the Engagement File Room.
Help and Support Options
Figure 19 – Help Menu
ProSystem fx Engagement Support on the Web
Access support on the web from the File Room or Binder View by selecting Help/ProSystem fx Engagement Support on the Web/Product Home Page.
Browse through Hot Topics and FAQs or Search the Knowledge Base to find the help you need.
Check out our new Community Forum where you can gain valuable knowledge from other Engagement users and even ask your own questions to the community at large.
Figure 20 – ProSystem fx Engagement Online Knowledge Base
Chat live with CCH support representatives by clicking on the Live Chat option under the
Guidance section of the Shortcut Bar in the Engagement Binder.
The User Guide
Access the User Guide from the File Room or Binder View by selecting the Help/User Guide.
The User Guide is indexed by chapter topics as shown beneath some figures in this handout.
The User Guide includes a topical index.