Page 1
NET CONTROL
2
USER GUIDE.
TOOLS AND FEATURES
Revision 4.0
(April 15, 2013)Page 2
The software described in this book is furnished under a license agreement and may be used only in accordance with the terms of the agreement.
Copyright ©2013, Net Software P.C. All Rights Reserved.
Any technical documentation that is made available by Net Software P.C. is the copyrighted work of Net Software P.C. and is owned by Net Software P.C..
NO WARRANTY. The technical documentation is being delivered to you AS-IS and Net Software P.C. makes no warranty as to its accuracy or use. Any use of the technical documentation or the information contained therein is at the risk of the user. Documentation may include technical or other inaccuracies or typographical errors. Net Software P.C. reserves the right to make changes without prior notice.
Microsoft, Windows, and the Windows logo are registered trademarks of Microsoft Corporation.
Intel, Pentium are registered trademark of Intel Corporation.
Other product names mentioned in this manual may be trademarks or registered trademarks of their respective companies.
Page 4
Table of Contents
Installation and configuration ... 7
Teacher Console. Main window. ... 7
The left panel ... 7
Bottom toolbar controls ... 9
Top toolbar... 10
The right panel ... 11
Main Menu ... 11
Workspace (only Standard Edition) ... 11
Connections menu (only Standard Edition) ... 12
Options menu ... 12
All Tools Menu ... 13
Macro Menu ... 13
Help and Support ... 13
Registration ... 13
Views ... 14
Control tool. Remote Desktop. ... 18
Screen flashing, cursor flashing, Aero theme and other graphic mode issues during control/broadcast. ... 19
Broadcast Desktop tools. ... 25
Broadcast troubleshooting... 28
Annotate Tool ... 32
Restrictions ... 34
General principles ... 34
Internet Access restrictions. ... 36
Internet restrictions troubleshooting ... 40
Switching between different Internet restriction modes... 41
Windows Policies (access to system folders and settings) ... 45
Program Restrictions. ... 49
Printing restrictions ... 56
Removable drive restrictions ... 56
Sound volume ... 57
Controlling features ... 57
Shutdown manager ... 58
Program Manager. ... 59
Login Tool ... 61
Quick Run tool ... 67
Messaging ... 68
Speech features. ... 70
Hand Raising ... 70
Chat ... 73
User Help Requests. ... 74
Co-Play... 75
Co-Browse ... 76
Whiteboard Tool ... 77
Register Tool ... 78
Rewards tool ... 80
Journal tool ... 80
Quiz Tool ... 82
Quick Question Tool ... 90
Desktop Recorder ... 93
Advanced tools ... 95
Workspace Manager (only Standard Edition) ... 96
File Management ... 98
Monitoring ... 101
Event Monitor ... 101
Event Logger ... 101
Control Options ... 103
Connections section ... 103
Interface section ... 106
Commands section ... 108
Control/Broadcast section ... 109
Hot keys section ... 110
Right panel section ... 111
Update section ... 111
Advanced Options section ... 112
Client Options ... 113
View profiles ... 113
Student Console and Mini Toolbar ... 117
Macro ... 120
Macro Commands ... 120
Page 7
Installation and configuration
Installation and configuration guides are distributed as separate documents. Please visit
http://www.netcontrol2.com/downloads for the latest versions of that documents.
Teacher Console. Main window.
The left panel
The left panel contains group and connection list management tools and commands:
Refresh Connections – on Connections tab re-opens connections: closes all
existing connections and opens them again, on Groups tab for PRO edition – refreshes the list of groups.
Scan – (only in Standard Edition):
- when clicked on Connections tab, scans a network for connections within currently opened group;
- when clicked on Groups tab, performs searching groups in the network..
Scan button’s sub-menu contains additional workspace management commands: Scan group for new connections – the same as clicking Scan button
Scan network for new groups and connections – performs full scanning of the network:
first the software will scan the network for new groups, then every group will be scanned for new connections.
Page 8
Scan IP address range – scans address
space of a network for available connections. For more information please refer to Workspace Management chapter.
Add group/connection – add new
connection manually, specifying address of client computer.
Delete group/connection – deletes selected groups or connections.
Modify group/connection – changes
parameters of selected connections: name, address, description etc.
Import Connections from CSV file – imports new connections to the workspace from a
text or comma-separated value (CSV) file, prepared in a spreadsheet editor.
Workspace Manager - opens Workspace Manager tool. Please refer to Workspace Management chapter for additional information.
View As Thumbnails – enables Thumbnail View mode, when client connection is
displayed as a snapshot of Desktop of client computer. Button’s sub-menu contains additional view-management commands. For more information please refer to Views chapter.
Lock –locks the teacher console. The unlocking is possible only after entering the
correct unlock password. The unlock password may be changed at any moment by clicking the main menu command N – Options – Options, on Interface page.
Page 9
see the log of commands executed, occurred events, and send internal commands directly to clients.
Select random – selects a random client. The command first will try to find a
random connected client. If none client is connected, it is selecting a random unconnected client.
Color groups – allows to assign a color group to one or several client
connections. Then all these connections may be selected in one click, just by clicking the respective color group button.
To define connections of a color group, select connections and click respective color group button. To re-define connections of a color group, click Define connections in … group command from color group button’s sub-menu.
Bottom toolbar controls
Bottom toolbar buttons enable Arranged or Free Views, Computer Name View, User Name View and allows changing dynamically a size of client connection thumbnail.
In Arranged View the icons/connections are displayed arranged to the top-left hand corner of the connection list; in Free View you can drag connections and place it at any custom position in the list, for example building a scheme of your class.
When Computer Name View button is “pressed”, a connection caption in the connections list will include the computer name; when User Name View button is pressed, the caption will contain the user name (login) or full user name (if Active Directory services are enabled in your network). Both buttons may be pressed at the same time.
Page 10
Top toolbar
The top toolbar contains the main menu (N menu)
The Main menu commands are described in the chapter below
Tools:
The detailed description of tools you can find in chapters of this guide below.
Quick Status panel
Double click the status to change it. The status is visible on student computers in Student Console, as also it is displayed in a tooltip over Net Control 2 icon in the System Tray when you’re changing the status. Use statuses to send quick and short information to students: lesson topic, current theme etc.
Quick tools:
With Quick tools panel you can:
- send quick message to students;
- select and send a previously stored question in the quick questions list; - send rewards;
- accept the “raised hand”;
- reset the “raised hand” statuses;
Page 11
The right panel
The right panel contains the Rated Commands List, which is created on a base of rating of tools (i.e. the most often used tools will be grouped at the top of the list) and Custom Commands List, which may be customized by the Instructor using menu command N -> Options -> Options; on “Right Panel” tab.
To disable or enable the right panel, please click menu command N -> Options -> Options. On the Right Panel tab, enable or disable “Show right panel” option and click the OK button. To disable only the Rated Commands list or the Custom Commands list enable or disable the respective option in this group.
Main Menu
The main menu provides quick access to the Net Control 2 workspace management functions, connection management functions, settings, the product registration features, the help and update routines.
To open the Main menu please click N button at upper left-hand corner of the main window of the Teacher Console.
Workspace
(only Standard Edition)
The Workspace – is a list of Net Control 2
groups and connections.
New – creates new, empty workspace. Open – opens a workspace from a file. Save Default – saves current workspace
Page 12
as default workspace. Default workspace will be loaded automatically at the program start up.
Save As – saves current workspace using file path and name specified by user. Workspace Manager – opens the Workspace Manager tool (described below).
Connections menu (only Standard Edition)
Search – scans local network for available connections. Only connections belonging to the currently selected group will be found.
Search Groups – performs full scan of a network. The command first scans a network for available groups and then scans every found group for new connections within this group.
Add – add new connection to the current group. Delete – deletes selected connections.
Edit – modifies selected connection.
Join – creates a grouped connection from several selected connections. Grouped connection will be represented in a workspace by one icon but will mean several client computers, i.e. any action applied to a connection will be applied to all client computers of the connection.
Separate – separates grouped connection, so every new connection represents one client computer.
Open – opens inactive, unconnected connections. If a connection was created without “Autoconnect at startup” option enabled, this command allows to open unconnected connection.
Options menu
Options – opens configuration options of the Teacher Console
Client Options – opens client configuration dialog for selected client connections.
View Options – opens connection list view options submenu. For more information please refer to Views chapter.
View Profiles – (Standard and PRO Editions only) - allows to set up view profiles of the Teacher Console. With View Profile an administrator can hide some functions of the teacher console from teachers or other users. For more
Page 13 information please refer to View Profiles chapter.
All Tools Menu
All Tools menu contains reference for all tools listed on the Top toolbar
Macro Menu
Contains the macro commands list, tools for macro command creation and managing autoexecutable commands, i.e. macro commands that may be executed on student computers automatically on some event, even if no teachers connected at this moment to the student computer.
For additional information please refer to Macro Commands and
Autoexecutable Commands chapters below.
Help and Support
Help – open Net Control 2 Help.
Bug Found – use this menu command to send quick message to developers regarding the technical issue found.
Check for update – checks update server for new versions of the software. Update Client – use this command to send an update to client computers:
- select student computers that should be updated; - click this menu command;
- open the latest installation package (.exe) downloaded from
http://www.netcontrol2.com ;
- the software will be uploaded to student computers and updated there.
Registration
Register – (unregistered state) – allows to enter registration information. Re-register – (registered state) – allows to reset current registration information.
Page 14
About - displays Administrator Console’s version information.
Views
The Administrator Console supports different view modes. To change the view mode, click the “View” button’s submenu or use the main menu’s command N -> Options -> View Options.
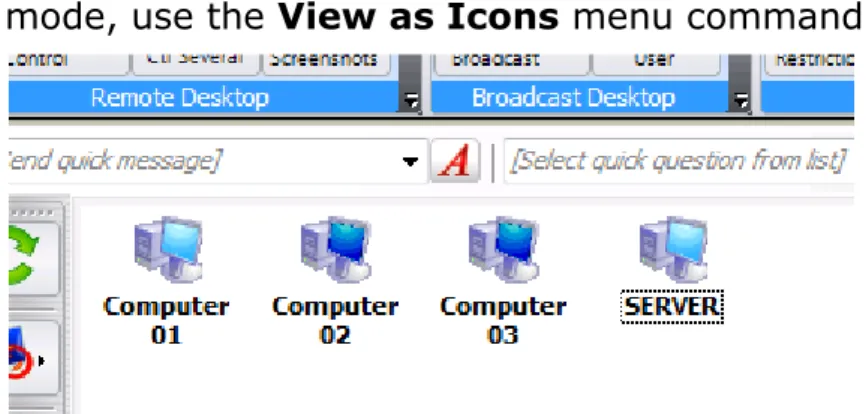
View as Thumbnails: client computer icon is displayed as a thumbnail with a screenshot of the client computer. To select this mode, use the “View as Thumbnails” menu command.
Page 15 mode, use the View as Icons menu command:
Small Icon View. To select this mode, use the View as Small Icons menu command:
Table View. Provides additional information: IP address or host name of client computer and custom description assigned to the connection. To select this mode, use the View as Table menu command:
Web Cam View. Displays a snapshot from web-camera, installed on client computer. To select this mode, use the Web-cam View mode menu command.
Arranged view – icons or thumbnails are sorted and arranged to the upper-left corner of the connections list. This is default view mode. Sort method may
Page 16
be changed or selected in the main menu command N -> Options -> Options -> View Options -> Sort.
Free view – icons or thumbnails are not sorted or arranged, and may be freely moved within the connections list. Net Control 2 will remember layout of icons/thumbnails and will restore it at next startup.
Free and arranged view modes may be selected, switching the “Switch Arranged/Free View” menu command or clicking the Arranged/Free View button at the bottom of the Administrator Console window:
Page 17 connection Net Control 2 will display:
- full user name of the currently logged in user on client computer (if this name is set up in the Active Directory for this user account);
- login name of the currently logged in user on client computer (if the user is logged in);
- custom Alias if the alias name was set up in Client settings (on Groups tab); - a name, entered by the student on client computer in Student Registration dialog, if the student was registered.
Computer Name View – the software will display default connection name as specified in its settings, by default host or DNS name.
To enable Computer or User Name View, click the Computer Name View or User Name View command of Views menu; or click the respective button at the bottom of the Administrator Console window:
Page 18
Control tool. Remote Desktop.
Features:
Controls the desktop of a selected remote computer, using keyboard and mouse;
Controls several user computers at the same time. The Instructor can switch Remote Desktop between controlled computers manually or automatically after a set time interval;
The Instructor can record the picture from remote desktop of controlled computer for further replay using the Desktop Recorder tools;
The Instructor can make annotations for the user of the remote computer, drawing and typing on his desktop.
During a Remote Desktop session, the Instructor can block the keyboard and mouse of a remote computer;
Save or print snapshots of the remote screen.
To start the Remote Desktop session:
Select one or several user computers;
On the “Control” page of the top toolbar, click:
The button has a submenu, which provides additional commands for controlling commands for Remote Desktop sessions:
Page 19
Control - the same as clicking Control button: opens remote desktop sessions for selected computers.
To open a separate control window for each user computer, select the View - opens remote desktop session in “View-only” mode, i.e. the instructor can see activity on student computers but cannot control it. The View only may be changed by Instructor to the Control mode at any moment in Remote Desktop window.
To close the Remote Desktop service on user and Instructor's computers, use the Close Control Sessions command in the Control button submenu.
Screen flashing, cursor flashing, Aero theme and other graphic mode
issues during control/broadcast.
Depending on settings of Net Control 2 Broadcast Desktop and Remote Desktop tools Net Control 2 may use acceleration of special display driver – VHD driver (or Video Hook Driver). Use of VHD driver acceleration can significantly improve the accuracy and performance of the Remote Desktop engine.
When use of VHD driver is enabled, Net Control 2 will load this driver automatically when the Remote Desktop or Broadcast Desktop service is started, and will unload it automatically when the session is closed.
For Remote Desktop tool (“Control” or “View” commands) the VHD driver acceleration will be turned on for “controlled” side, i.e. student computers.
For Broadcast Desktop tool (“Broadcast” and “User” commands) the acceleration is enabled for the “source” computer, i.e. for the teacher computer (“Broadcast” command) or the user computer, which display is shown on other computers (“User” command).
The side effect of VHD driver acceleration may include:
- Screen flashing when the driver is activating or deactivating, i.e. on begin and at the end of the session.
Page 20
Windows Vista, 7 and 2008. The theme will be restored back to Aero theme, when Remote Desktop/Broadcast session is stopped.
- In Windows XP – opaque background of Desktop icon labels.
- Black screen of video during playback. If video playback was started before VHD driver activation, after the driver becomes active, the movie screen may be changed to black screen. One of solutions in this case would be starting playback after the driver activation, i.e. after Remote/Broadcast Desktop session is started.
If these side effects are important in your work and you would like to avoid them, you can disable VHD Driver acceleration as follows:
For Instructor computer:
- Click the main menu command of the teacher console N – Options – Options. On Control/Broadcast page of Options window select “Do not use (Aero safe)” option and click OK.
For Student computers:
- Select student computers in the teacher console;
- Click the main menu command N – Options – Client Options;
- On Control/Broadcast page of Client Module Configuration window select “Do not use (Aero safe)” option and click OK.
Changes will be applied after restart of Remote/Broadcast Desktop sessions.
When VHD driver acceleration is disabled for Remote/Broadcast Desktop, the software will use special GDI mode. One of side effects for this mode may be the frequent cursor flashing during broadcast/control.
To prevent cursor flashing: On Instructor computer:
- Click the main menu command N – Options – Options;
- On Advanced Options page select (check) “Prevent cursor flashing” option.
- Click OK.
For Student computers:
- Select computers in the teacher console;
Page 21
- On Control/Broadcast page enable “Prevent cursor flashing in GDI mode” option and click OK.
Changes will be applied after restart of Broadcast/Control session.
Remote Desktop viewer:
View-only mode – enables/disables view-only mode. When enabled, the Instructor can view the desktop of the user computer, but cannot control it with keyboard and mouse;
Topmost – when Topmost mode is enabled, the Remote Desktop window will be placed on the top of all other (“non-topmost”) windows;
Panning – when enabled, Remote Desktop viewer will automatically scroll the content of the Remote Desktop window, whenever the Instructor moves the cursor over the window;
Cursor mode – when enabled, Remote Desktop will display the actual location of the cursor on the remote computer;
Drawer – click to enable the drawer mode. For more information please refer to the Annotation Mode section, below;
Fullscreen – when enabled, the Remote Desktop window will be expanded to full-screen;
Page 22
Stretched – when enabled, the contents of the Remote Desktop will be automatically resized to fit the window;
Monitor – in multimonitor environment here you can select a monitor, which will be the source for control/broadcast. By default the software uses the “primary” display as a source.
Lock – locks keyboard and mouse of the remote computer; Unlock – unlocks keyboard and mouse of the remote computer;
Ctrl-Alt-Del – simulates Ctrl+Alt+Delete key combination on the remote computer. In Windows Vista/2008/7, SAS simulation policy should be enabled on each user computer. For more details, please refer to the Knowledge Base’s article: http://kb.netcontrol2.com/entry/41/
To top-left – moves the currently active window on remote computer to the top-left-hand corner of the screen. This feature is useful when the Instructor is controlling several computers at the same time and the user computers have different screen resolutions. Clicking this command forces the current window on all user computers to be arranged in the same position: in the top-left-hand corner of the screen.
Record – allows the Instructor to save Remote Desktop session as a Desktop Recorder record, which later may be replayed using the Desktop Viewer.
The following commands are available only when the Remote Desktop session was started using the Control Several Computers command:
Previous – switches the view to the previous computer in the list of Remote Desktop connections;
Next – switches the view to the next computer in the list of Remote Desktop connections;
Page 23
Scan – enables “Scanning” mode. Remote Desktop will activate the next computer in the list of Remote Desktop connections after a specific time interval (3 seconds by default). The interval may be changed using the menu command Mode –> Scan;
Thumbnails – display thumbnails of the computers in the Remote Desktop list;
Current – when this mode is enabled, all the actions of the Instructor will be applied to the currently selected user computer only. Otherwise, the Instructor's actions will be applied to all the computers in the Remote Desktop connections list.
In addition, using the menu commands File –> Save Snapshot As and File – > Print Snapshot As, the Instructor can take snapshots of the user computer desktop and save them as Windows Bitmap files or print them on a selected printer.
Drawer Mode in Remote Desktop Viewer.
The Instructor can use Drawer mode in Remote Desktop Viewer to make graphic and text annotations on the desktop of the user computer.
After switching to Drawer Mode, the Instructor can draw directly within the Remote Desktop window, by pressing the left mouse button and moving the mouse. You can also type text using the keyboard. All actions will be reproduced on the user computer.
In Drawer Mode, you can use F2, F3 and F4 keys to change the color and F5…F8 keys to change the width of the pen.
Page 25
Broadcast Desktop tools.
Broadcast Desktop tools provide the ability to demonstrate an image of the desktop of the Instructor's computer on selected User computers. The performance of Broadcast Desktop does not depend on the number of computers where the images will be demonstrated.
To start a Broadcast Desktop session: select user computers;
on the “Control” page of the top toolbar, click:
To show Instructor’s screen to students
To show selected student’s desktop to other students.
In addition, Broadcast button has a sub-menu, which contains additional Broadcast Desktop management functions:
Broadcast – show instructor’s screen to selected students;
Broadcast – Restricted – the same as Broadcast button, but Broadcast Desktop Viewer windows will be opened in restricted mode: the keyboard and mouse of the user computer(s) will be blocked and the user(s) will not be able to close Broadcast Desktop Viewer or switch to other applications.
User button – initiates Broadcast Desktop session on selected user computer. At next step you need to select client computers, where the broadcast will be displayed. The Instructor can watch the information sent from the client computer using Broadcast Desktop Viewer:
Broadcast Desktop Viewer – opens Broadcast Desktop Viewer on the Instructor's computer. Use this command to view an image sent from selected user computers in Broadcast Desktop mode.
Page 26
Close Broadcast Desktop sessions – this command closes Broadcast Desktop sessions (senders and viewers) on all selected user computers and on the Instructor's computer.
Channels
Broadcast Desktop tool sends information over the whole network and therefore the signal may be received in any part of the network, for example, in other labs. To exclude interference of different sources in the same network you need to assign unique Broadcast Desktop Channel to every Instructor computer. The Broadcast Desktop Channel is a number (recommended range is 0..100), which internally will be mapped to a respective network port number.
Broadcast Desktop channel may be assigned to the Instructor computer in a process of installation, and changed at any moment in the teacher console:
- click the main menu command N – Options – Options;
Page 27
- click OK. Changes will be applied after restart of Broadcast/Desktop sessions on student and teacher computers.
Screen flashing, cursor flashing, Aero theme disappearing and other
graphic mode issues during broadcast
Screen flashing on broadcast activation/deactivation, cursor flashing, temporary disabling Aero theme are possible and described in the Control/ Remote Desktop chapter above.
Broadcast Desktop Toolbar
When a Broadcast Desktop session is started on the Instructor's computer, Net Control 2 will display the special Broadcast Desktop
toolbar on top-right-hand corner of the screen:
Pause/Resume button may be used to pause or resume the broadcast. Stop button allows the Instructor to stop the Broadcast Desktop session. In several cases, when due to some network problem the connection between student and teacher computers is lost, Stop button may be unable to stop the session on student computers through Broadcast Desktop interface. In this case please use “Close Broadcast Desktop sessions” command of Broadcast button sub-menu in the main window of the teacher console:
Page 28
Annotate tool button activates special Annotation mode. See below for more details about Annotation mode.
Select area button allows the Instructor to select an area on the screen that will be used for capture and broadcast. Any part of the screen outside of the selected area will not be broadcast to the user computers. The area selected will be in effect until restart of the computer or until it is reset with the Reset area button.
Reset area restores full-screen broadcast mode after an area has been selected using the Select area button.
Audio Broadcast on/off – starts/stops broadcasting of sound to students from the default audio recording device (by default – microphone, may be changed in Control Panel – Sound applet)
Broadcast troubleshooting.
If instead of teacher’s screen only white Broadcast Desktop Viewer window with logo is displayed on student computers, and it does not change within a minute or more:
1. Try to broadcast to a subnetwork address:
a. In the teacher console click N – Options – Options. On Control/Broadcast page:
Page 29
b. Select “Broadcast” in Broadcast Mode Connection group c. Check “Broadcast to the following subnets only” option
d. In the field below specify broadcast address of your network. If your network consists of several VLANs, add here broadcast addresses for every VLAN, one address per line:
To determine the broadcast address for a subnetwork you need to know IP address range of your network and the address mask. Example:
IP addresses of a network are 192.168.1.1…192.168.1.254 and IP mask is 255.255.255.0
Then, the broadcast address is 192.168.1.255 (we replaced last digit of the IP address with 255)
To calculate Broadcast address for your subnetworks you can use our online broadcast address calculator: http://www.netcontrol2.com/broadcast_calc
2. Try to change broadcast protocol:
Page 30 – Options;
b. On Control / Broadcast page enable (check) “Multicast” protocol and click OK.
c. Restart Broadcast Desktop session.
3. Try to change quality/performance parameters for Broadcast: a. In the teacher console click the main menu command N – Options
– Options;
b. On Control / Broadcast page move Broadcast desktop performance slider to right:
c. click OK.
d. Restart Broadcast Desktop session.
4. Try to enable “Old-versions compatibility mode”
a. In the teacher console click the main menu command N – Options – Options;
b. On Control / Broadcast page enable (check) “Old versions compatibility mode” option and click OK.
c. Restart Broadcast Desktop session. To restart the broadcast desktop session:
Page 31
- Click “Close Broadcast Desktop sessions” command of Broadcast button’s submenu.
If during broadcast, an image is partially present on student computers but it is garbled, this means that the network loses some part of the information sent from the Instructor computer. The problem may be temporary (if the network is overloaded at this moment) or permanent (if the network has high latency). In this case you need to adapt Broadcast Desktop transfer speed to the parameters of your network.
In the Broadcast Desktop toolbar, click the “Garbled image on user side” link:
`
Then move slider of “Broadcast speed” option to right:
Page 32 received correctly by clients.
Do not set up the rightmost positions at once, this may result worse quality of an image or higher delays in broadcasting.
Wireless network adapters often use special power-saving mode, which may increase network latency and affect the performance of the Broadcast Desktop. Try to turn low power consumption mode off, when possible. Try to ping one or several client computers:
- run Command Prompt from Windows Start menu;
- type the following command: ping client_computer_name - the response time should be below 10ms:
Annotate Tool
The Annotate Tool provides a way for the Instructor to make annotations on his/her screen directly and share them with remote computers.
To use the Annotate Tool: start the Broadcast session;
Page 33
toolbar. Another toolbar will open on the right-hand side of the screen. Using this new toolbar, the Instructor will be able to add shapes, lines, arrows and text of different color and sizes.
Page 34
Restrictions
Features:
Internet Access – restrict access of users to web-based resources or network services, enable web content-filtering;
Policies – restrict access to system settings and folders;
Programs – restrict execution of selected programs and applications; Printing – restrict printing;
USB – restrict access to storage devices;
Sound Volume – restrict sound volume control; Restrict access to CD/DVD/Floppy drives.
Restrictions, except for Policies, may be applied permanently, for some specified time or until restart of client computer.
General principles
All restrictions may be applied to several computers at a time. To apply a restriction, select user computers in the computers list and click appropriate button of the Restrictions tool:
Page 35
Many restrictions may be easily customized and configured, using Profiles.
Net Control 2 includes a set of predefined profiles, and the Instructor may create his/her own profiles or modify existing ones.
Timed restrictions
If “Timed restrictions” option is enabled (at the bottom of “Restrictions” window):
Before applying restrictions, Net Control 2 will prompt for time, when the profile applied will be active:
Page 36
Permanently – the restriction or profile will be applied without time limitations;
Until restart of client computer – the restriction or profile will be active until restart of client computer;
To the specified time interval – allows to specify how much time (in minutes) the profile will be active.
When time of the profile will elapse, the latest permanent profile/restriction will be applied.
Internet Access restrictions.
Click Block Internet to disable access to Internet on selected student computers.
Click Enable Internet to enable/restore access to Internet on selected student computers.
Click Profiles button to customize restriction with additional or custom profiles.
After applying a profile it may take 20-30 seconds on student computers while the profile will be loaded and activated.
Page 37
ADDITIONAL OR CUSTOM PROFILES
Click Profiles button; in the appeared Send profile window:
SEND and RUN – applies a selected profile to student computers. NEW – creates a new profile;
DELETE – deletes an existing profile; EDIT – modifies an existing profile.
The default installation of Net Control 2 includes the following profiles and examples:
Disable Internet Access – forbids access to all Internet services;
Enable Full Access – removes all Internet restrictions and enables full access;
Disable www.mydomain.com site – an example, which disables access to
www.mydomain.com web-site;
Enable www.mydomain.com web-site only – an example, enables access to
www.mydomain.com web-site only;
Page 38
only works when the Internet Control Engine is installed in “Protocol Layer” mode (see below for more details);
Internet Access with Adult Content filtering only – visited websites will be checked for “adult” content, and forbidden content will be blocked.
Block Internet [Default] and Enable Internet [Default] are default profiles, which correspond (indirectly applied) to Block Internet and Enable Internet buttons of main Restrictions window. Modifying these profiles you will change behavior of these buttons.
Editing an existing profile or creating a new one, you will be switched to Internet Access Profile editor window. Any Internet restriction profile consists of one or several rules:
In the Internet Access Profile window you can add or delete rules, forming new profile.
Page 39
The set of rules that is included with the software provides the ability to block Internet access completely, enable/disable specific web sites, disable adult content, enable/disable a specific port, etc.
Currently Net Control 2 supports the following rules:
Disable World-Wide-Web – (Internet Explorer Plug-in mode only) – forbid access to all Internet services.
Block Web-site – blocks a website by its domain name. Please note,
http://www.domain.name, http://domain.name, http://forum.domain.name – are different websites, to forbid access to all these websites, please use a wildcard as follows: *domain.name
Enable Website – enables access to website. As previously described, please take into account subdomain names.
Please note: A profile cannot include both “blocked” and “enabled” websites. Only last verb - “enable” or “disable” will be applied to all specified websites in a profile.
Disable website containing keyword or a sentence – enables content filtering on visited websites. Will verify incoming information for presence of forbidden keywords, if any keyword is found, access to the website will be automatically blocked.
Disable adult content – enables “adult” content filtering. Includes specific keywords for “adult” content.
Page 40 default in “Internet Explorer plugin” mode:
Disable all network services – effective in “Protocol Layer” mode only. Disables all services except those specified in the profile.
Enable service or network port – effective in “Protocol Layer” mode only. Enables access to a specified service or network port. Should be used together with “Disable all network services” rule.
Disable service or network port – effective in “Protocol Layer” mode only. Disable access to a specified service or network port.
Enable content filtering for network service – effective in “Protocol Layer” mode only. Enables content filtering for all incoming data of a specified service.
Enable content filtering for all network services – effective in “Protocol Layer” mode only. Enables content filtering on all network services.
Internet restrictions troubleshooting
1. Internet restrictions work in Internet Explorer, but don’t work in other browsers (Firefox, Chrome, Safari, Opera):
Is the support of these browsers important? a. No.
If you can leave on your student computers Internet Explorer browser only, and uninstall the alternative browsers, this would be the preferred and recommended way.
b. Yes, I must keep restrictions in these browsers also. Enable the “Protocol Layer” mode (described below).
2. Internet restrictions don’t work in Internet Explorer, or restrictions worked, but after some time have stopped working.
Page 41
3. On Terminal Server: Internet restrictions are applied to all users of this terminal server, how to enable per-user restrictions.
Please see below enabling the “Individual user restrictions” mode
4. Adult content filtering is too restrictive, or contrary, don’t block non-English adult web-sites.
Create new empty restriction profile, add “Disable website containing a keyword or a sentence” rule and add keywords that mostly suits to adult content in your language.
5. Content filtering don’t work.
a. Check Internet Explorer options, Net Control 2 Internet Explorer Addon should be enabled in the list of Internet Explorer browser extensions.
b. Enable the “Protocol Layer” mode.
c. Content filtering may not work with several web-sites, if Internet Control Engine was installed in the “Protocol Layer Mode” and the web-site uses encryption (https:// ) or traffic compression.
Switching between different Internet restriction modes.
In the process of installation you can select what Internet restriction mode should be used on student computers if you select “Advanced installation” mode:
Page 42 And on Select components page:
Page 43
- Select Internet Control Components: Protocol Layer Mode – for Protocol Layer Mode
- Select Internet Control Components: IE Plugin Mode – for default “Internet Explorer plugin” mode
If the software is already installed, to change Internet restriction mode settings:
- Select computers in the teacher console;
- Click the main menu command N – Options – Client Options; - Open Internet tab, change settings;
- Click OK.
In most cases changes may require restart of a browser or even restart of the student computer, where the settings were applied.
1. To enable Protocol Layer Mode, with support of Firefox, Chrome, Safari etc., select settings as follows:
Page 44
2. To enable restrictions for Internet Explorer only:
3. To enable restrictions individually for each user (work with Internet Explorer only, content filtering don’t work):
Page 45
Attention! Internet Control Engine maintenance option group in Internet settings means actions, the action (Install/Uninstall) will be reset back to “Do nothing” after the action is applied. If you open Internet settings dialog after previous settings were applied, the initial state will be switched back to “Do nothing”
Windows Policies (access to system folders and settings)
Understanding “Policies”.
Policies are special, hidden system settings which enable or restrict access to
system settings, objects or services. Policies are managed by Windows internally, and may depend on the version of that operating system. Most
Page 46
Policies require a restart of the computer or of the Windows shell to be applied. By default Windows applies a Policy only to the currently logged on user. Net Control 2 has the ability to apply policies to all users. Windows and its components use more than 2000 different policies, Net Control 2 implements only the most popular of these.
Profiles.
Policies may be applied using the Restrictions tool or the Tools -> Policies menu command.
The restrictions window contains two pre-defined modes for quick access:
Guest Mode – restricts access to the Control Panel the Desktop settings, and the Taskbar.
Master mode – disables all restrictions.
Advanced configuration may be done using the Profiles window. This window contains several pre-defined profiles and provides the ability to create your own profiles or to modify existing ones:
Page 47 Pre-defined profiles:
Disable Uninstall Tools - disables access to the “Add/Remove programs” Control Panel program;
Guest mode – disables access to the most important system settings and folders;
Master mode – disables all restrictions. Enables normal access to system settings and folders.
Guest Mode (default) and Master Mode (default) profiles are mapped to
Guest Mode and Master Mode buttons of the Restrictions tool. If you change
these profiles, these buttons will work respectively in accordance with the changed profiles.
New button allows you to create new profile. Delete button deletes the selected profile. Edit button modifies the selected profile.
Clicking the New or Edit button of the Send profile window will open the Policies Editor window, where you can specify restrictions for the profile:
Page 48
When sending a profile to a selected user computer, you can select the “Apply to all users” option in the Send Profile dialog window to apply the profile to all users. When this option is not selected, the restriction will be applied to currently logged in users only.
Many policies may require a restart of Windows Shell (Explorer) to be applied. To apply settings, you can either:
Page 49
- Log the current user out and require a new log in;
- Restart Windows shell manually: terminate explorer.exe process using Program Manager and then restart it.
Program Restrictions.
The Program Restrictions feature provides the ability to enable or disable programs and applications on remote users computers.
To reset all restrictions and enable all programs with a single click: select user computers;
click the “Restrictions” button in “Control” toolbar; click the “Enable all Programs” button.
To disable or enable programs: select user computers;
click the “Restrictions” button in “Control” toolbar;
Page 50
- The above window will appear. The Instructor may select programs being run on users computer (Started tab), installed ones (All programs tab), or specify the program by browsing to it in the Custom tab. Once found, it can be enabled (“Add as enabled program”) or disabled (“Add as disabled program”) by checking the corresponding option at the right side of the Program Restrictions window;
- click “Add to restrictions”;
- to apply the restrictions click “Apply immediately”.
In addition, the list of restricted programs may be saved as a profile. This profile may then be sent to user computers and applied with one click using the Profiles tool. To save the list of restricted programs as a profile, click the “Save as profile” button.
Page 51 select user computers;
click the “Restrictions” button in the “Control” toolbar;
in the “Restrict programs and applications” section, click the “Profiles” button;
In the Send Profile window:
Select the "Keep active after restart" option if you want the profile to remain active after a restart of the user's computer). Select the "Apply to all users" option, if you want the profile to be applied to all user accounts on the remote computer.
To send the profile, click the Send and Run button. To delete a profile:
select the profile from the list; click “Delete”;
confirm the operation.
To edit a profile:
select the profile from the list; click “Edit”;
edit the profile;
Page 52
Example: How to disable standard Windows programs Paint and Calculator:
1. In the Send Profilewindow, click the “New” button to create a new profile.
2. The Program Restrictions window will appear. Open the “Custom” tab. 3. Find the file name of the Calculator program in the left-hand pane (using any tab) and add it to the Restrictions column (in the right-hand pane) by clicking the green arrow;
4. Select “Restriction mode” in the bottom right-hand corner of the window (“Add as a disabled program” option). Select “Keep restriction after restart” if the profile should remain active after a restart of the user's computer. Repeat this operation for the Paint program.
Page 53
Note: It is recommended that you leave “Ignore paths” checked in case the program paths on the Instructor's and User's computer are not identical.
Selecting a program from the “Started” or “All programs” tabs, you need to select the program's executable file (which ends with .exe), all other files (help files, manuals etc.) cannot be added.
If the program cannot be found using the “Started” or “All programs” tabs, you can add it using the “Custom” tab, by specifying path to the program on your computer, or by entering it manually.
If you don’t know where the program is located on your computer, you can determine the path as followings:
- open the properties of the program’s shortcut by right-clicking its shortcut icon;
Page 54
- In the “Properties” window, the “Target” field contains the full path
Page 55
5. Save the new profile by clicking on “Save as Profile”:
The new profile will be added to the list of available profiles in the Send Profile window:
6. In order to send the profile to the user's computer, select it from the list and click “Send and Run”.
Page 56
Printing restrictions
Net Control 2 provides an easy way for enabling and disabling printing services on client computers in one click. The restriction may be applied permanently, for some time interval (up to 180 minutes) or until restart of client computer. When printing services are disabled, users will not be able to print documents on local or network printers installed in the system, add, remove or manage printers.
To disable printing services, select client computers; click Restrictions button on top toolbar to open Restrictions tool, then click “Disable printing” button. To enable printing services, in Restrictions tool click “Enable printing” button instead.
Removable drive restrictions
With Net Control 2 software you can dynamically enable or disable access to removable devices (CD/DVD/BlueRay and Floppy drive devices). The restriction may be applied permanently, for some time interval (up to 180 minutes) or until restart of client computer. Timed profiles are available when Timed profiles option is enabled at the bottom of Restrictions window.
When removable drive restrictions are applied, users will not be able to access these devices, including reading, writing, modifying, copying, deleting etc. To disable access to removable devices:
- Select client computers;
- Click Restrictions button on top toolbar;
- Click “Disable” button in CD/DVD/Floppy devices group. To enable access to removable devices:
- Select client computers;
- Click Restrictions button on top toolbar;
Page 57
Sound volume
Sound volume restrictions allow to mute or restore volume level of default audio output device on client computers. The restriction may be applied permanently, for some time interval (up to 180 minutes) or until restart of client computer. Timed profiles are available when Timed profiles option is enabled at the bottom of Restrictions window.
To mute sound on client computers: - Select client computers;
- Click Restrictions button on top toolbar;
- Click “Disable” button in Sound volume group. To restore default volume level on client computers:
- Select client computers;
- Click Restrictions button on top toolbar;
- Click “Enable” button in Sound volume group.
Controlling features
Features:
Remote power management: restart, shut down computers remotely, log users out, switch computer to hibernate or stand-by mode, turn on or wake up computers.
Start and terminate programs, applications and system services remotely. File management: copy, rename, delete, find and execute files remotely. Send/Collect tool: send work to several user computers with one click and
collect it back, collating the information received by user log-in name. Lock tool: lock and unlock user computer remotely with one click.
Page 58
Shutdown manager
To apply shutdown management operations: select user computers;
click the “Shutdown” button in the “Control” toolbar;
in the Shutdown Manager, select desired operation and click the “Yes” button;
if “Forced” option is selected, the operation will be applied in “forced” style - without any prompts on the user's computers to save documents, close programs, etc.;
Note: the “Wake-up” command works only when:
The Wake-up on LAN (WOL) feature is enabled in the CMOS BIOS Setup of each user computer. Most often this feature may be found in the Power Management Setup section of the CMOS BIOS Setup program as “Wake-up on LAN”, “WOL”, “Resume by PCI” or “Resume by Network Adapter” option. For more information about enabling WOL feature for the computer, please refer to your computer or motherboard's user guide.
Network adapter must support Wake-up On LAN feature.
Net Control 2 must have performed a connection to the computer at least once. During first connection, the Administrator module records the MAC address of the computer's network adapter, which is required for WOL feature.
By default Net Control 2 displays a notification on client computers, when a shutdown operation is applied. To disable the notification: select student computers in the teacher console; click the main menu command N –
Page 59
Options – Client Options. On “Security” tab uncheck “Warn user before shutdown operation” option and click OK.
Program Manager.
To start or terminate a program, application, or system service remotely:
select user computers;
click the “Programs” button in the “Control” toolbar;
“End program” tab:
Select the process from the list and click “End program” to terminate the program. Before termination, you can also disable the program, by clicking the “Disable program” button. In this case, the remote user will not be able to
Page 60
start the program again until the computer has been restarted or the “Enable all programs” profile of the Restrictions tool has been sent to the user's computer. For more about the “Restrictions” tool see the appropriate chapter, above.
When the “Applications only” option is selected, only applications (programs which have visible windows) will be listed.
The “Run from Programs menu” and “Run from Desktop” tabs contain a list of the shortcuts in the All programs menu of the Start menu and Desktop shortcuts respectively.
“Command prompt” tab
Execute program or URL: runs specified program, document or Internet link on student computers. To specify a link for opening on student computers start it with http:// , https:// etc. prefix.
Page 61
In the “Services” tab, Net Control 2 will display all the system services that are installed on the user's computer. You can start, stop or pause these services remotely:
Login Tool
Using Login tool an Instructor can login user on client computers remotely. At the moment of applying login command, the client computer must be on logon screen.
Welcome screen mode of Windows XP logon/user settings should be disabled
Page 62 To disable Welcome screen in Windows XP:
- login as administrator;
- click Start -> Control Panel; - Select User Accounts command;
- Select “Change the way users log on or off”; - Unselect the “Welcome Screen” option;
- Click Apply options.
Welcome screen is disabled by default in a network with domain.
In Windows Vista/2008/7/8 and higher, the "Do not display last user name" policy should be enabled, otherwise Net Control 2 service will not be able to login the user to the system.
To enable this policy you can use any of the provided methods: 1. Active Directory
- open Group Policy Editor (Start -> Administrative Tools -> Group Policy Management);
- create new group policy or edit existing one;
- at left pane open and select the following tree: Computer Configuration -> Policies -> Windows Settings -> Security Settings -> Local Policies -> Security Options - at right pane find the following parameter: Interactive Logon:
Page 63
Do not display last user name policy;
- double click to edit it; - enable it and click OK.
2. Local Policies
If a computer is not a part of Active Directory, you can enable "Do not display last user name" policy on this computer as follows:
- open Local Policy Editor (press Win+R key combination to open Run dialog window; enter the following command:
gpedit.msc and press Enter
- at left pane open and select the following tree: Computer Configuration -> Windows Settings -> Security Settings -> Policies -> Windows Settings -> Security Settings -> Local Policies -> Security Options
- at right pane find the following parameter: Interactive Logon: Do not display last user name policy;
- double click to edit it; - enable it and click OK.
3. Registry Editor.
Alternatively you can change the option of system Registry. This operation should be made on every client computer.
Click Start button and type in Search programs box or press Win+R key combination and enter:
Regedit.exe
At left pane navigate to the following sub-key:
HKEY_LOCAL_MACHINE\SOFTWARE\Microsoft\Windows\CurrentVersion\P olicies\System
At right pane find the parameter DontDisplayLastUsername, double click it and change its value to 1
Click OK.
Page 64 in user remotely:
- Select clients in connections list; - Click Login command on top toolbar;
- Enter user name and password. Leave domain field empty if a network does not use domains or specify correct domain name; - Click OK.
Send/Collect Tool
The Send/Collect Tool provides a way for the Instructor to send files to remote users with one click. In addition, these files can be collected back from the users' computers to the Instructor and sorted by computer name.
To use the Send/Collect Tool:
click the “Send/Collect” button in the “Control” toolbar;
Page 65 To send files:
click “Add”;
specify local path of the file to be sent;
repeat the above steps until all the desired files are selected;
in the drop down menu “Folder for files on user computer” specify the folder on the remote computer where the file or files should be saved;
click “Go!”.
To remove files from list of files to be sent:
select the file to be removed from the “Files to send” list;
click “Remove”.
To save a list of files to be sent: add the desired files to the list; click “Save List”.
To send a list of files: click “Load List”;
browse to the local path of the saved list (it will be a *.ncfcol file); click “Open”;
Page 66 click “Go!”.
To collect the work:
in the “Send/Collect Work” window, select the “Collect” tab;
specify the files or list of files to be collected; if all files of the source folder should be collected, click All files button.
specify the folder on the user's computer where the files are located; specify the local path where collected files should be saved;
click “Go!”.
When Do not sort to folders option is disabled (default), Net Control 2 will create a folder in destination folder (specified in “Folder for files on this computer” field) using connection name and place collected files in this folder. When the option is enabled, Net Control 2 will place all files collected in destination folder, without sorting to folders, adding to the file name a name of connection as prefix.
Page 67
Quick Run tool
Quick Run tool may be used for quick running applications on client computers. To modify application list of Quick Run tool, click the Quick Run button on the top toolbar, then click menu command Customize Quick Run Menu.
In the Quick Run Menu editor, click Add button to add a new item to the list or select an item and click Remove button to delete this item from the list.
Adding new Quick Run menu item you need to specify a name, which will be displayed in Net Control 2, and select an object. As an object you can specify an Internet link (with http:// or https:// protocol prefix), a document (with full file path and name, for example C:\Users\All Users\Documents\file.doc ), a program module (with full file path and name, for example C:\Windows\System32\Calc.exe ) or a program from the Start Menu. To select a program from the Start menu, click the Browse Client button and select a program from the list (at least one client computer should be selected at this moment in connection list).
Adding a new item of the Quick Run menu you can also specify its appearance: when “Create separate button in Top menu” option is enabled, the item will be displayed on the Top menu directly. When this option is unchecked, the item will be placed in the Quick Run menu only.
Page 68
Messaging
Features:
display full-screen text messages on user computers; display text messages in dialog windows remotely; display images (in a full-screen window);
display images with text annotations; play audio samples remotely;
change sound volume remotely;
hide full-screen message windows remotely. To send any of the above messages:
select user computers;
Page 69
Enter text of the message, select a background, add a sound (optional), change sound volume, then click Send button. To hide the message on student computers click Hide button.
Page 70
Speech features.
The Speech manager provides for voice communication between computers in one or both directions:
select user computers;
click the “Speech” button in the top toolbar, or select the Speech Manager menu command from the Tools menu.
In the Speech Manager window:
The Microphone button turns on and off the microphone of the user computer.
The Close button ends communication with selected recipient.
Hand Raising
To “raise” hand a student can click Net Control 2 button at the top-right hand corner of the screen or click N (Net Control 2) icon in the System Tray. In appeared Student Console:
Page 71
Click Raise Hand to raise hand; on the student computer the button will change to “Put Hand Down”:
Clicking “Put hand down” button the status of “raised hand” on teacher computer will be reset.
When the hand is “raised”, the student computer thumbnail in the teacher console will contain a special icon:
Page 72
Or reset the status on one or several computers by clicking “Reset Raised Hands” button:
When a teacher is accepting the “raised hand” request, clicking “Call on” button, the button in the Student Console on student computer will be changed to:
To disable “hand raising” interface on student computers:
- select student computers in the teacher console;
- click the main menu command N – Options – Client Options; - on “Appearance” tab uncheck “Enable hand-raising” option and
Page 73
Chat
Net Control 2 includes several chat features:
Chat, initiated by Instructor:
To initiate chatting with remote users: select user computers;
in the “Messaging” tab, click the “Chat” button;
Net Control 2 will start a new chat session and open chat windows on user computers.