The Wireless LAN and HP iPAQ Handheld Devices
Overview... 2
HP iPAQ wireless products... 2
What is a WLAN? ... 2
Common WLAN terms ... 3
WLAN standards... 4
What is roaming?... 5
HP supported authentication wireless protocols... 5
Then and now—HP iPAQ wireless implementation... 7
ROM and driver updates ... 7
rx3000 series... 8
h4100 and h4300 series ... 13
hx4700 series ... 22
h5400 series with Microsoft Pocket PC 2002... 27
h5400 series with Microsoft Pocket PC 2003 ROM upgrade ... 32
h5500 series... 39
h6300 series... 46
Typical WLAN setup and installation scenarios ... 53
The HP lab setup ... 53
Troubleshooting problems ... 54
Overview
This document is designed to assist users in understanding wireless communication, how it works, and how to create and configure Wireless Local Area Network (WLAN) connections on HP iPAQ rx3000 series, h4100/4300 series, hx4700 series, h5400/h5500 series, h6300 series handheld devices.
HP iPAQ wireless products
HP currently offers integrated WLAN capability with the HP iPAQ rx3000 series, h4100 series, h4300 series, hx4700 series, h5400 series, h5500 series, and the h6300 series.
What is a WLAN?
This section includes the following topics:
• Overview
• Wireless fidelity
Overview
A wireless network is a group of computers and associated devices that share a common wireless communication link over radio waves. A wireless network is enabled by a collection of wireless access points residing within a small geographic area, such as in an office building or wireless fidelity (Wi-Fi) public hotspot.
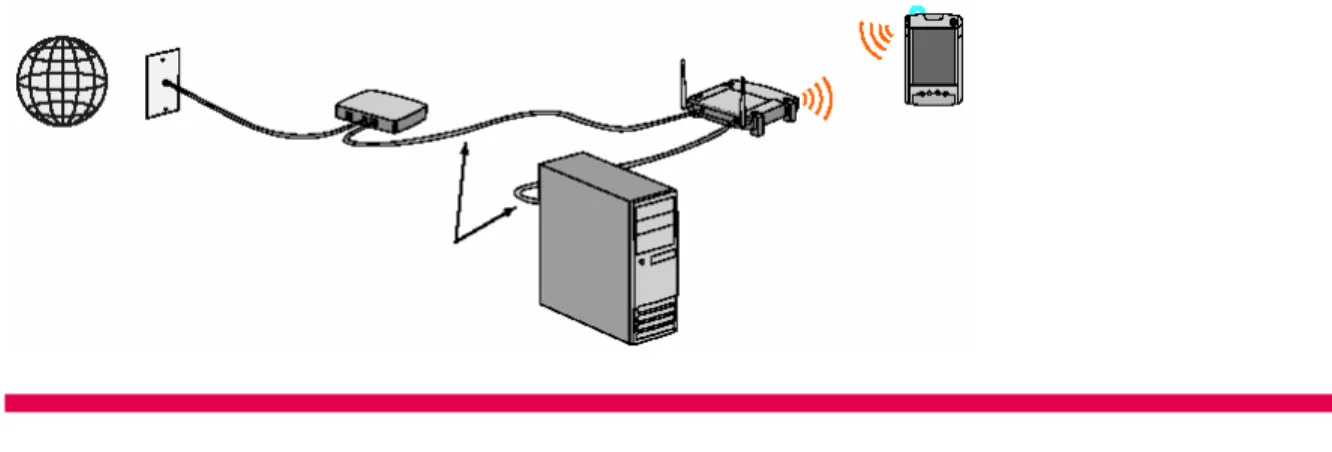
WLANs enable a variety of mobile transactions such as Internet and e-mail access, and sophisticated tasks such as allowing sales people to access customer records from customer locations. The signal strength of a WLAN can normally reach a maximum radius of 500 feet indoors and 1,000 feet outdoors; however, the area can be extended with antennas, transmitters and other access devices. Figure 1 illustrates a WLAN setup with an access point.
Figure 1. WLAN with access point
Note: Signal strength can be reduced by conditions such as wireless interference, obstructions (walls, for instance), and signal reflection. The radius listed represents the maximum distance an unenhanced WLAN signal can travel under prime operating conditions.
Wireless fidelity
Wi-Fi, also known as 802.11, is a communication standard created by the Institute of Electrical and Electronic Engineers (IEEE). The 802.11 standard defines the electrical and radio frequency
components of a wireless Ethernet. This standard also defines an encryption algorithm (Wired Equivalent Privacy, or WEP) to secure the network. The Wi-Fi Alliance is the body that ensures compatibility and is responsible for issuing standard compliance tests and logos.
Wi-Fi hotspots
Wi-Fi hotspots are WLANs that use the IEEE 802.11 protocol to establish wireless connections for general public use. Offered to customers by a growing number of hotels, restaurants, airport lounges, coffee shops and other businesses, Wi-Fi hotspots enable users to access Internet resources, send and receive e-mail, use instant messaging, and perform similar tasks they would otherwise perform on their business or home PCs. Many Wi-Fi hotspots charge their customers a fee for this service.
Convenience and increased productivity make Wi-Fi hotspots attractive to users on the go, but hotspots can also increase the possibility of security risks. The security risks are manageable, however, if safety precautions are taken. For information about measures users can take to minimize security risks in WLAN connections, refer to the HP white paper entitled secure wireless local area networks with hp mobile devices located at http://www.hp.com/sbso/wireless/secure_wlan_mobile.pdf.
What’s the difference between wireless and mobile?
A mobile device is a portable device. A desktop could be a mobile device if it could be easily carried around. A wireless device, such as the HP iPAQ rx3000, h4100, h4300, hx4700, h5400, h5500, or h6300 series handheld device, provides some type of network connectivity. A cell phone is wireless; a laptop or PDA can be wireless when using a wireless modem. Similarly, applications are wireless when they connect and exchange data with a network.
Common WLAN terms
Use the next few sections to become familiar with the following terms as you begin to use wireless technology. This section includes the following topics:
• Access points
• Virtual private network
• Voice over IP
• Terminal Services client
• Subnet
Access points
Access points connect wireless networks and enable the sending and receiving of data between wireless clients. It is the connection point for a network, most often a component that is hard wired into the main network. Access points are responsible for converting the wired network into a wireless one. An access point serves as a communication hub, a traffic controller, directing all the data on the network and allowing a user to communicate at maximum speed.
Wireless networks allow users to “roam” between access points, working in much the same way as cellular phones. More detailed information about roaming appears later in this document.
Virtual private network
A virtual private network (VPN) allows two or more private networks to be connected over a publicly accessed network. In a sense, VPNs are similar to WANs or a securely encrypted tunnel, but the key feature of VPNs is that they can use public networks like the Internet, rather than rely on expensive, privately leased lines. Additionally, VPNs have the same security and encryption features as private networks.
Voice over IP
Voice over Internet Protocol (VoIP) is the ability to make telephone calls and send faxes over IP-based data networks with a suitable quality of service and superior cost-benefit ratio.
Terminal Services client
The Terminal Services client establishes a session with the server. User keyboard and mouse activity is sent by way of a network to control the server session. Applications launched in the session use the resources (processor and memory, for example) on the server, and displayed output is resent to the user display screen. Multiple clients can connect to the server simultaneously.
Subnet
By definition, a subnet (short for subnetwork) is an identifiably separate part of an organization’s network. Typically, a subnet can represent all the machines (computers, laptops, handheld devices, printers, etc.) at one geographic location, in one building, or on the same LAN. Having an
organization’s network divided into subnets allows it to be connected to the Internet with a single shared network address.
WLAN standards
IEEE wireless standards such as 802.11 have undergone many improvements and addendums since they were first defined. The following list offers a high-level description of each of the better known standards:
• 802.11, which operates in the 2.4-GHz frequency band and offers only 2 megabits per second (Mbit/s) of overall throughput, was the original implemented standard.
• 802.11b is the most widely used form of Wi-Fi today. The radio operates within the 2.4-Ghz frequency band but allows a maximum data throughput of 11 Mbit/s.
• 802.11a is a short-range, but extremely high-speed, Wi-Fi network. This standard is not compatible with existing 802.11b networks. This high-speed Wi-Fi network operates in the 5-Ghz frequency band and can transfer data at a maximum speed of 54 Mbit/s.
• 802.11g is compatible with existing 802.11b networks, but also enables higher speeds. Its maximum speed is 54 Mbit/s, but 802.11g operates in the 2.4-Ghz frequency band.
Note: The 54-Mbit/s maximum speed of 802.11g is obtained only when the network contains other 802.11g-based devices. Users who mix 802.11b devices in that network will see a maximum throughput value of only 11 Mbit/s.
• The 802.1X standard defines the method of encapsulating Extensible Authentication
Protocols (EAPs) over wired or wireless Ethernet networks. This standard does not define any specific security protocol, but is based on EAP types documented and ratified by the Internet Engineering Task Force (IETF).
What is roaming?
Roaming refers to the ability of a WLAN to switch between wireless access points to maintain a WLAN connection as a user travels from one location to another. This access point switching, referred to as roaming, occurs automatically and is normally transparent to the user.
Wireless connections roam from one access point to another when the detected signal strength weakens. A weak signal in an HP iPAQ triggers the handheld device to search for another signal to “jump” to. The new signal is chosen from a list of preferred networks configured by the Wi-Fi user interface in the device operating system.
Two basic roaming techniques are currently available: address transition roaming and location transition roaming.
Devices using the address transition roaming technique briefly break their network connection when roaming between (changing) access points. The HP iPAQ immediately renegotiates for a valid address. The user’s ability to communicate is virtually guaranteed, but sessions open at the time the network breaks will also disconnect. The address transition roaming technique is best suited to
networks that have access points on different subnetworks with different address ranges. The HP iPAQ h5500 series supports this type of roaming.
The location transition roaming algorithm enables a handheld device to move seamlessly between access points without disconnecting from the network. Using this roaming algorithm, a given device will not change its address and devices will maintain sessions when roaming across access points on the same subnet. Most shipping Wi-Fi devices support this roaming technique.
However, HP iPAQ handheld devices with zero-configuration-based Microsoft Windows Pocket PC Operating Systems, allow WLAN connections to disconnect and reconnect when a new access point is found. HP iPAQ h4100, h4300, rx3000, hx4700, and h5400 series are affected by this anomaly.
HP supported authentication wireless protocols
This section includes the following topics:
• Overview
• LEAP
• PEAP
• EAP-TLS
• WEP
Overview
HP iPAQ h4100, h4300, h5400, h5500, hx4700, and h6300 series handheld devices currently support the following wireless authentication protocols:
• Lightweight Extensible Authentication Protocol (LEAP) • Protected Extensible Authentication Protocol (PEAP) • Transport Layer Security (TLS)
HP iPAQ supported wireless authentication protocols
HP iPAQ series with either Microsoft Pocket PC 2003 ROM Upgrade or Microsoft Pocket PC 2002 Operating System
Protocol model
h5400 (PPC 2002)
h5400
(PPC 2003) h5500 h4100 h4300 rx3000 hx4700 h6300
WEP 64* √ √ √ √ √ √ √ √
WEP 128* √ √ √ √ √ √ √ √
LEAP* √ √ √ √ √ X √ √
EAP-TLS* X √ √ √ √ √ √ √
PEAP* X √ √ √ √ √ √ √
WPA* ** X X √ √ √ √ √ √
*h5400 with Microsoft Widows Pocket PC 2003 ROM upgrade
**h5500 component of WPA supported with ROM, WLAN firmware, and driver updates
LEAP
Cisco Compatible Extensions (CCXs) are a collection of authentication protocol features that include some security enhancements. One part of this Cisco collection is LEAP. LEAP is not a true EAP type protocol, as such LEAP authentication is not supported in networks using WPA/WPA-PSK encryptions; support for LEAP is found only in Cisco access points and infrastructure. All HP iPAQ handheld devices that ship with Wi-Fi radios support LEAP. Another aspect of CCX is Cisco Key Integrity Protocol (CKIP), which is a Cisco proprietary implementation of temporal key support.
A LEAP-based network authenticates user credentials before allowing access to the network; inner and outer authentications are not required. While this does reduce the overall infrastructure load, there are some security concerns surrounding this implementation.
For additional information about the LEAP authentication protocol, refer to the Cisco web site: www.cisco.com.
PEAP
802.1X EAP type PEAP uses digital certificates for network server authentication and passwords for client authentication. PEAP requires an EAP user name, EAP password, and a Certificate of Authority (CA). Dynamic encryption keys are also used in this authentication type.
Microsoft, Cisco, and RSA Security created this EAP type to reduce the certificate requirements found in EAP-TLS. This EAP type uses a root server certificate in setting up the secure tunnel to the
authentication server. This allows user credentials to then be obtained and transmitted to the authentication server. Unlike EAP-TLS, this protocol will authenticate the user, but not necessarily the device.
EAP-TLS
802.1X EAP type Transport Layer Security (EAP-TLS) ensures Internet privacy between communicating applications and their users. When a server and user communicate, TLS prevents a third party from eavesdropping or tampering with the transmissions. A TLS connection uses an encryption method. TLS allows the server and user to authenticate each other and to negotiate for an encryption algorithm
EAP-TLS utilizes a certificate pair for authentication. This EAP type was originally developed by Microsoft and is used as a core component for the other EAP types listed below as a first line authentication. This system uses a public/private key infrastructure to setup a secure conduit to exchange the encryption keys. The exchange is very similar to the exchange used in a secure web site (HTTPS). The disadvantage to this protocol is the requirement for extensive certificate management; this EAP type does not authenticate the user as much as it authenticates the device.
WEP
WEP encrypts data immediately before wireless transmissions are sent, and decrypts data it receives. WEP security is considered the first significant line of defense against casual eavesdroppers. If WEP uses a secret key, which is considered similar to a password, then the key must be available on all of the network’s wireless devices.
Temporal Key Integrity Protocol (TKIP) technology improves WEP by using a per-packet key
mechanism, in which the base key is modified for each packet sent over the network. The overall key length is extended to 256 bits for encryption.
Then and now—HP iPAQ wireless implementation
HP iPAQ handheld devices are designed to increase productivity by giving customers the ability to continue working, even when their work takes them away from the office. Whether meeting in an office on the other side of the company, across town at a customer site, at home working late, whatever the reason, HP produces wireless and mobile devices to help customers expand their working world.
Today, HP engineering works continuously to provide enhancements, new functionality, and evolving products that will keep customers on the cutting edge of the still emerging wireless technology. A key component in enabling the HP wireless vision involves the process of roaming. Roaming is discussed in more detail in the next section, but it is important to mention here.
HP iPAQ 4000 and 5000 series handheld devices were originally designed to disconnect and reconnect during roaming between access points. While the design works flawlessly under address transition roaming, it causes interruption to applications under location transition roaming.
HP engineering has released a solution to the roaming issue, which will soon be available for download on the HP web site at www.hp.com. (On the HP homepage, click Support &
Troubleshooting, Handheld Devices, and then iPAQ Pocket PCs; select the series, and then download the drivers and software).
Note: It is a good idea to periodically check the HP web site for ROM updates and SoftPaq releases. HP engineering is working on a number of enhancements, updates, and fixes in addition to the roaming issue.
ROM and driver updates
ROM updates often contain information that is more recent than that contained in the original ROM release or in the most recently updated version of the ROM (for example, one or more ROM updates could have already been released since the original ROM version). A ROM update can include driver updates to either enhance or correct driver performance, software updates, and more.
Updates are released in one of two download types: RAM or Execute in Place (XIP). XIP updates are permanent updates in the ROM.
ROM updates are language specific, but might not be intended for all customers. If a ROM update contains information that is not critical to the user, then the user may download it at a later date, or not at all.
Use one of the following methods to determine the most recent ROM release on an HP iPAQ handheld device:
• Perform a soft reset on the device. The ROM version appears on the bottom right-hand corner of the screen.
• On the Start menu, tap Start > Settings > System tab. Tap the Asset Viewer icon, and then tap the +
sign next to Version. The ROM revision and revision date appear, along with operating system information.
rx3000 series
This section includes the following topics:
• Turning on and off the WLAN
• Connecting to a network
• Manually entering new network settings
• Working with HP supported wireless authentication protocols
• Searching for networks to access
• Managing wireless networks
• Network settings
• VPN server connections
Turning on and off the WLAN
Perform the following steps to turn on or off the WLAN on the rx3000:
1. From the Today screen, tap the wireless icon ( ), and then tap the Wi-Fi button. When Wi-Fi is on, the wireless LED (on the top left corner of your HP iPAQ) turns blue and the Wi-Fi button turns amber. Once you connect to a wireless network, the Wi-Fi button turns green.
Note: Before accessing your wireless network, you must turn on Wi-Fi. When the blue wireless LED is on and the arrows at the top of the screen show connected, your HP iPAQ is connected to the wireless network.
2. To turn off Wi-Fi, tap the Wi-Fi button again. When Wi-Fi is off, the wireless LED is no longer blue and the Wi-Fi button turns gray.
Battery saving tip: When you are not using Wi-Fi, turn it off. When Wi-Fi is on, be sure one of the power-saving modes is selected.
Connecting to a network
Perform the following steps to connect to a WLAN network using the rx3000:
1. If one or more networks are present, the Network Indicator icon ( ) appears in the Navigation bar. Tap the network you want to connect to, and then tap whether the network connects to the
Internet (does not use proxy settings) or Work (uses proxy settings).
Manually entering new network settings
A wireless network can be added either when the network is detected (when the Network Indicator
icon displays in the Navigation bar) or manually by entering setting information. To manually set up a wireless network connection:
1. Turn on Wi-Fi.
2. Tap the iPAQ Wireless icon.
3. From the iPAQ Wireless screen, tap the Wi-Fi Settings button. The Configure Wireless Networks
screen displays.
4. Review the list of networks, and then tap your network name if it is present. (If one or more networks are present, the Network Indicator icon appears in the Navigation bar.)
Note: If your network name is not listed, you need to add it to the preferred network lists. If Wi-Fi is turned on, tap the Settings
button then tap Add New from the Configure Wireless Networks list. Enter your network name, then choose to connect to
Work or Internet.
Note: To use iPAQ Mobile Media, you must select Work to use the wireless network. For more information about the iPAQ Mobile Media features, refer to the Special Features Guide.
5. If network authentication or data encryption is required, then follow the instructions in the following section, “Working with HP supported wireless authentication protocols.” If network authentication or data encryption is not required, then tap OK repeatedly until you return to the
Today screen.
Working with HP supported wireless authentication protocols
Instructions for configuring an HP iPAQ with a high-security authentication protocol vary between product series and the selected protocol. Other affecting issues are ROM releases, operating systems, and protocol-specific requirements, to name a few.
The following instructions are intended as a roadmap to help you get started. Actual implementation may require additional steps, consultation with ISPs, network administrators, and implementation direction from third-party software companies such as Cisco Systems. Assistance may also be obtained from the HP web site (www.hp.com) and the Cisco Systems web site (www.cisco.com).
Perform the following steps to set up an HP supported authentication protocol on an HP iPAQ rx3000 Mobile Media Companion series handheld device:
6. After the wireless network has been added, then on the Configure Wireless Network screen, tap the Network Key tab. If in doubt about possible required authentication information, then contact the system administrator.
7. Select the type of network authentication to be used: • Open
• Shared
• WPA
• WPA-PSK
8. Select the type of data encryption to be used:
• For open or shared network authentication, only WEP data encryption is available. To enable WEP data encryption, select WEP from the Data Encryption drop-down list.
• If WPA or WPA-PSK was selected in step 10, then TKIP and WEP are both available data encryption options. To enable data encryption, select the desired protocol from the Data
9. If a network key is provided by the network automatically, then tap the The Key is provided for me automatically checkbox. Otherwise, enter the network key in the Network key box.
10.If IEEE 802.1x is supported by the network environment, then tap the 802.1x tab. On the 802.1x
tab, check the Use IEEE 802.1x network access control checkbox. Select the appropriate EAP type
from the drop-down list. 802.1x provides an increased level of security. If unsure whether the network environment supports the 802.1x protocol, then contact the network administrator. 11.Tap OK twice to exit the Configure Network Authentication window and Configure wireless
networks window.
12.Tap the Select Networks box on the Connections screen to open the Network Management
window. Under Programs that automatically connect to the Internet should connect using tap the down arrow and select My Work Network. Tap OK three times to return to the Today screen. 13.Perform a soft reset of the HP iPAQ. When the wireless card associates with an access point, the
Logon Window pop-up box appears. Select the appropriate keyboard and enter the user name and the password to be used. Leave the domain field blank, and tap the Save Password box.
Searching for networks to access
Networks that you have already configured are preferred networks and can be found in the iPAQ Wireless screen > Settings > Wireless Networks list box. You can choose whether to connect only to preferred networks or to have your HP iPAQ search for and connect to any available network (preferred or not).
To search for networks to access:
• From the iPAQ Wireless screen, tap Settings > Wireless tab.
• In the Networks to access box, tap the type of network you want to connect to (All Available, Only access points, or Only computer-to-computer).
• To connect only to networks that have already been configured, clear the Automatically connect to non-preferred networks checkbox.
Note: If you check the Automatically connect to non-preferred networks checkbox, your HP iPAQ detects any new networks and provides you the opportunity to configure them.
Managing wireless networks
In managing your wireless networks, sometimes it is necessary to change network settings. In the next sections, learn how to view, edit, and delete available wireless network settings.
Viewing or editing a network
To view or edit an existing or available wireless network: 1. Be sure Wi-Fi is on.
2. Tap the iPAQ Wireless icon.
3. From the iPAQ Wireless screen, tap Settings > Wireless tab.
4. In the Configure Wireless Networks box, tap the desired network name. 5. Edit the existing settings as necessary, and then tap OK to save the changes.
Deleting a network
To delete an existing or available wireless network: 1. Be sure Wi-Fi is on.
2. Tap the iPAQ Wireless icon.
Monitoring signal strength and status
To view the signal strength between your HP iPAQ and an access point Wi-Fi connection: 1. Tap the Connectivity icon in the Navigation bar.
2. When the Connectivity box displays, you will be able to view the type of network the HP iPAQ is connected to (for example, Work or Internet) and an icon displaying the signal strength.
3. To exit the Connectivity box, tap the Hide button.
Note: The signal strength icon will not be displayed if a connection is not present.
Network settings
Use the next few sections to learn how to set up and change network configuration settings so your HP iPAQ can communicate with other networks.
Locating an IP address
To find the IP address the wireless network is using: 1. Be sure Wi-Fi is powered on.
2. Establish a Wi-Fi connection. 3. Tap the iPAQ Wireless icon.
4. From the iPAQ Wireless screen, tap the Wi-Fi Settings button > Network Adapters tab.
5. Tap the appropriate adapter to modify the settings. The IP address appears in the IP address box.
Changing TCP/IP settings
Note: Most ISPs and private networks now use dynamically assigned IP addresses. You will not need to change TCP/IP settings unless your ISP or private network does not use dynamically assigned IP addresses. If you are not sure, check with your network administrator.
To change TCP/IP settings:
1. Contact your ISP or network administrator to determine your IP address, subnet mask, and default gateway (if needed).
2. Be sure Wi-Fi is powered on. 3. Tap the iPAQ Wireless icon.
4. From the iPAQ Wireless screen, tap Settings > Network Adapters tab. 5. In the My network card connects to list box, tap either The Internet or Work.
Note: If you are connecting to your ISP at home, tap The Internet. If you are connecting to a private network, such as a corporate network at work, tap Work.
6. In the Tap an adapter to modify settings box, tap HP iPAQ Wi-Fi Adapter. 7. Tap the IP Address tab.
8. Tap Use specific IP address and enter the requested information. 9. Tap OK to save your settings.0.
Changing DNS and WINS settings
Note: Most ISPs and private networks now use dynamically assigned IP addresses. You will not need to change Domain Name System (DNS) and Windows Internet Naming Service (WINS) settings unless your ISP or private network does not use dynamically assigned IP addresses. If you are not sure, check with your network administrator.
Servers that require an assigned IP address may also require a way to map computer names to IP addresses. HP iPAQ rx3000 series devices support two name resolution options:
To change server settings:
1. Contact your ISP or network administrator to determine which name resolution to use, obtain the specific server address, and determine whether alternate addresses are available.
Note: An alternate address may enable you to connect when the primary server is unavailable. 2. Be sure the Wi-Fi is powered on.
3. Tap the iPAQ Wireless icon.
4. From the iPAQ Wireless screen, tap Settings > Network Adapters tab. 5. In the My network card connects to list box, tap either The Internet or Work.
Note: If you are connecting to your ISP at home, tap The Internet. If you are connecting to a private network such as a corporate network at work, you should tap Work.
6. In the Tap an adapter to modify settings box, tap HP iPAQ Wi-Fi Adapter. 7. Tap the Name Servers tab and enter the requested information.
8. Tap OK to save your settings.
Changing ISP settings
If you are connected to your ISP or private network during synchronization, your HP iPAQ should download proper proxy settings from your computer. If these settings are not on your computer or need to be changed, you will need to set them up manually. To set up proxy server settings: 1. Contact your ISP or network administrator for the proxy server name, server type, port, type of
Socks protocol used, and your user name and password. 2. Be sure Wi-Fi is powered on.
3. Tap the Connectivity icon in the Navigation bar, and then Settings > Tasks tab. 4. Under My Work Network, tap Set up my proxy server > Proxy Settings tab.
5. Tap the This network connects to the Internet and This network uses a proxy server to connect to the Internet checkboxes.
6. In the Proxy server box, enter the proxy server name.
7. If you need to change port number or proxy server type settings, tap the Advanced button and change the desired settings.
8. Tap OK.
VPN server connections
Creating a VPN connectionA VPN connection enables you to securely connect to servers, such as a corporate network, via the Internet. To set up a VPN server connection:
1. Contact your network administrator for your user name, password, domain name, TCP/IP settings, and host name or IP address of the VPN server.
2. Tap the Connectivity icon in the Navigation bar, then tap Settings > Tasks tab on the Connections
screen.
3. Under My Work Network, tap Add a new VPN server connection. 4. Follow the instructions on the Make New Connection screen.
Changing a VPN connection
To change/edit a VPN server connection:
1. Tap the Connectivity icon in the Navigation bar, and then Settings > Tasks tab on the Connections
3. Tap the VPN connection you want to change and then tap Edit, or tap New to add a new VPN connection.
4. Follow the instructions on the screen to complete the changes to your VPN server connections.
Starting a VPN connection
To start a connection through a VPN server: 1. Be sure Wi-Fi is powered on.
2. Select the VPN network by tapping the Connectivity icon located in the Navigation bar. Your HP iPAQ will automatically begin connecting to the VPN.
h4100 and h4300 series
This section includes the following topics:• Turning on and off the WLAN
• Connecting to a network
• Manually entering new network settings
• Working with HP supported wireless authentication protocols
• Searching for networks to access
• Managing wireless networks
• Network settings
• VPN server connections
Turning on and off the WLAN
Perform the following steps to set up a WLAN connection on an HP iPAQ Pocket PC h4100 or h4300 series handheld device:
1. On the Today screen, tap the Connectivity icon ( or ) in the Navigation bar at the top of the device or tap Start and then tap iPAQ Wireless.
2. If you tapped the Connectivity icon in the Navigation bar, then tap Turn Wireless On or Turn off flight mode when the Connectivity box appears. Or, tap Start, iPAQ Wireless, and then tap the
WLAN icon; the iPAQ Wireless screen appears with the message, Tap a button to turn an individual wireless feature ON/OFF. The WLAN icon displays in orange (the “off” color); tap the
WLAN icon to turn on the WLAN. The icon changes to green (the “on” color) and the WLAN indicator light flashes green.
Note: Even though the WLAN indicator flashes green (on), it does not necessarily mean a connection has been established. Battery saving tip: Turn the WLAN off when it is not being used. When the WLAN is on, make sure one of the WLAN power saving modes is enabled. (Tap Start > Settings > System tab. On the Settings
screen, tap the Power icon, the Control tab, and then tap Auto for the WLAN Power save mode).
Note: The power save modes are not always supported by all access points and networks. If a connection cannot be made to a particular wireless network, then try turning off the WLAN Power save mode.
Connecting to a network
Perform the following steps to connect to a WLAN network:
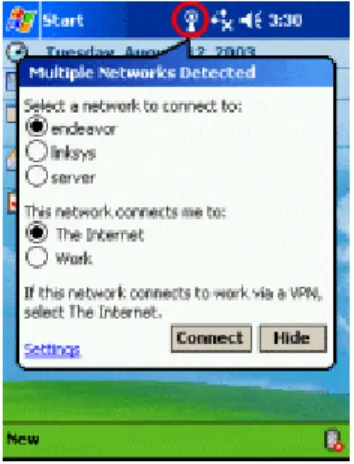
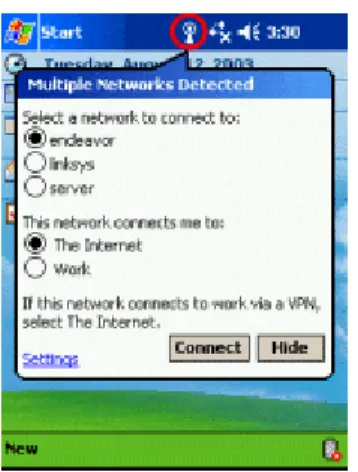
1. If at least one network is present on the HP iPAQ, then the Network Indicator icon ( ) will appear in the Navigation bar. Tap the icon; when the Multiple Networks Detected pop-up box appears, tap the desired network.
Figure 2. The network indicator pop-up box
2. In the same pop-up box, under This network connects me to, tap The Internet (if the network connects to the Internet without using proxy settings) or Work (if the network uses proxy settings to connect). If doubt exists about whether the network uses proxy settings, then contact the system administrator.
3. If the display prompts for a Network key (WEP), then enter the key and tap Connect. (If unsure about the network key, then contact the network administrator.)
Manually entering new network settings
A wireless network can be added either when the network is detected (the Network Indicator icon is showing in the Navigation bar) or manually by entering setting information. To manually add a wireless network, perform the following steps:
1. Turn on the WLAN.
2. Tap the Connectivity icon ( or ) at the top, tap Settings > Advanced tab, and then tap
Network Card.
3. On the Configure Wireless Networks screen, tap the Wireless tab at the bottom.
4. Still on the Configure Wireless Networks screen, in the Wireless networks box, tap Add New Settings.
5. Tap the General tab at the bottom; in the Network name box, type the network name (SSID).
Note: If a network was detected in step 2, then the SSID is automatically entered and cannot be changed.
6. In the Connects to box, tap to select either The Internet (no proxy server is used), or Work (a proxy server is used).
7. If the network is an ad-hoc connection, then tap the This is a device-to-computer (ad-hoc) connection box.
8. If network authentication or data encryption is required, then follow the instructions in the following section, “Working with HP supported wireless authentication protocols.” If network authentication or data encryption is not required, then tap OK repeatedly until you return to the
Today screen.
Working with HP supported wireless authentication protocols
Instructions for configuring an HP iPAQ with a high-security authentication protocol vary between product series and the selected protocol. Other affecting issues are ROM releases, operating systems, and protocol-specific requirements, to name a few.
The following instructions are intended as a roadmap to help you get started. Actual implementation may require additional steps, consultation with ISPs, network administrators, and implementation direction from third-party software companies such as Cisco Systems. Assistance may also be obtained from the HP web site (www.hp.com) and the Cisco Systems web site (www.cisco.com). The procedure for setting up an HP supported authentication protocol on an HP iPAQ Pocket PC h4100 or h4300 series handheld device varies depending on the ROM version on the device.
Note: HP iPAQ Pocket PC h4100 or h4300 series devices are not CCX compliant and Cisco Aironet Extension is not supported. The following instructions are for using HP iPAQ Pocket PC h4100 or h4300 series devices in a CISCO LEAP environment.
ROM version 1.10
Perform the following steps to begin setting up an HP supported authentication protocol on an HP iPAQ Pocket PC h4100 or h4300 series handheld device with ROM version 1.10:
1. After the wireless network has been added, then on the Configure Wireless Network screen, tap the Network Key tab. If in doubt about possible required authentication information, then contact the system administrator.
2. Select the type of network authentication to be used: • Open
• Shared
• WPA
• WPA-PSK
3. Select the type of data encryption to be used:
• For open or shared network authentication, only WEP data encryption is available. To enable WEP data encryption, select WEP from the Data Encryption drop-down list.
• If WPA or WPA-PSK was selected in step 10, then TKIP and WEP are both available data encryption options. To enable data encryption, select the desired protocol from the Data Encryption drop-down list.
4. If a network key is provided by the network automatically, then tap the The Key is provided for me automatically checkbox. Otherwise, enter the network key in the Network key box.
5. If IEEE 802.1x is supported by the network environment, then tap the 802.1x tab. On the 802.1x
tab, check the Use IEEE 802.1x network access control checkbox. Select the appropriate EAP type
from the drop-down list. 802.1x provides an increased level of security. If unsure whether the network environment supports the 802.1x protocol, then contact the network administrator. 6. Tap OK twice to exit the Configure Network Authentication window and Configure wireless
7. Tap the Select Networks box to open the Network Management window. Under Programs that automatically connect to the Internet should connect using tap the down arrow and select My Work Network. Tap OK three times to return to the Today screen.
8. Perform a soft reset of the HP iPAQ. When the wireless card associates with an access point, the
Logon Window pop-up box appears. Select the appropriate keyboard and enter the user name and the password to be used. Leave the domain field blank, and tap the Save Password box.
ROM version 1.00
Perform the following steps to begin setting up an HP supported authentication protocol on an HP iPAQ Pocket PC h4100 or h4300 series handheld device with ROM version 1.00:
1. After the wireless network has been added, then on the Configure Wireless Network screen, tap the Authentication tab.
2. To use data encryption, tap the Data encryption (WEP Enabled) checkbox. If in doubt about possible required authentication information, then contact the system administrator.
3. To use shared key authentication, tap the Network Authentication (Shared mode) checkbox. 4. If a network key is provided by the network automatically, then tap the The Key is provided for me
automatically checkbox. Otherwise, enter the network key in the Network key box.
5. If IEEE 802.1x is supported by the network environment, then tap the Enable network access using IEEE 802.1x checkbox, and then select the appropriate authentication protocol (TLS, PEAP) from the drop-down list. 802.1x provides an increased level of security. If unsure whether the network environment supports the 802.1x protocol, then contact the network administrator.
6. Tap OK twice to exit the Configure Network Authentication window and Configure wireless networks window.
7. Tap the Select Networks box to open the Network Management window. Under Programs that automatically connect to the Internet should connect using tap the down arrow and select My Work Network. Tap OK three times to return to the Today screen.
8. Perform a soft reset of the HP iPAQ. When the wireless card associates with an access point, the
Logon Window pop-up box appears. Select the appropriate keyboard and enter the user name and the password to be used. Leave the domain field blank, and tap the Save Password box.
Searching for networks to access
Networks that have already been configured (preferred networks) are listed in the Wireless Networks
box on the Configure Wireless Networks screen. You can choose to connect only to preferred networks or have the HP iPAQ search for and connect to any available network.
Perform the following steps to search for available networks:
1. Tap the Connectivity icon in the Navigation bar and then tap Settings (or, from the Today screen, tap Start > Settings > Connections tab, and the Connections icon). Tap the Advanced tab,
Network Card, and the Wireless tab.
2. In the Networks to access box, tap the type of network desired (All Available, Only access points, or Only computer-to-computer).
3. To restrict the search to networks that have already been configured, uncheck the Automatically connect to non-preferred networks checkbox.
Note: If the Automatically connect to non-preferred networks checkbox is checked, then the HP iPAQ will detect any new networks and provide the opportunity to configure them.
Managing wireless networks
Viewing or editing a networkTo view or edit an existing or available wireless network, perform the following steps: 1. Turn on the WLAN.
2. Tap the Connectivity icon in the Navigation bar, tap Settings > Advanced tab > Network Card, and then select the Wireless tab. In the Wireless networks box, tap name of the desired network to review or edit. Or on the Start screen, tap Settings > Connections tab > Connections icon >
Advanced > Network Card > Wireless tab. Tap the network desired to review or edit. 3. If edits are made to the existing settings, then tap OK to save the new settings.
Deleting a network
To delete a wireless network, perform the following steps: 1. Turn on the WLAN.
2. Tap the Connectivity icon in the Navigation bar.
3. In the Connectivity pop-up box, tap Settings, the Advanced tab, Network Card, and then the
Wireless tab.
4. In the Wireless networks box tap the name of the desired network to delete, and hold down the stylus for a few seconds until the Connect/Remove Settings drop-down box appears. Tap Remove Settings. Or on the Start menu tap Settings, the Connections tab, the Connections icon, the
Advanced tab, and then Network Card. Tap the Wireless tab, highlight the desired connection to delete, and hold the stylus down a few seconds until the drop-down box appears.
5. Tap Remove Settings.
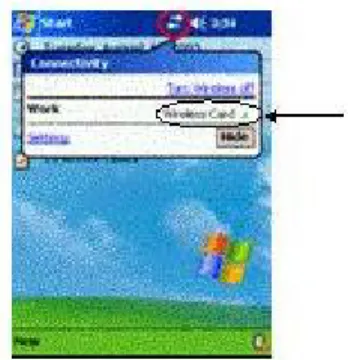
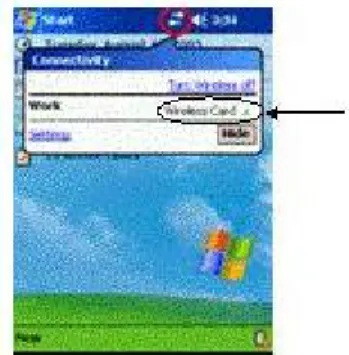
Monitoring signal strength and status
Perform the following steps to view the signal strength between the HP iPAQ Pocket PC h4100 or h4300 series handheld device and the access point WLAN connection:
Note: The signal strength icon will only display when a connection is present.
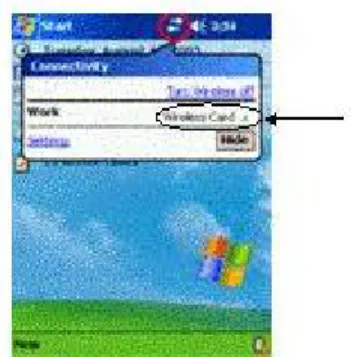
1. Tap the Connectivity icon ( or ) in the Navigation bar. The Connectivity box displays the type of network the HP iPAQ is connected to (Work or Internet). Displayed next to the network type (either Internet or Work) is the field Wireless Card, followed by vertical green bars. Four bars indicate the strongest signal strength.
Figure 3. The WLAN signal strength indicator
Network settings
Locating an IP addressPerform the following steps to identify the IP address of a wireless network on an HP iPAQ Pocket PC h4100 or h4300 series handheld device:
1. Turn on the WLAN.
2. Establish a WLAN connection.
3. Tap the Connectivity icon > Settings > Advanced tab > Network Card, and then the Network Adapters tab.
4. Tap the appropriate adapter in the Tap an adapter to modify settings box.
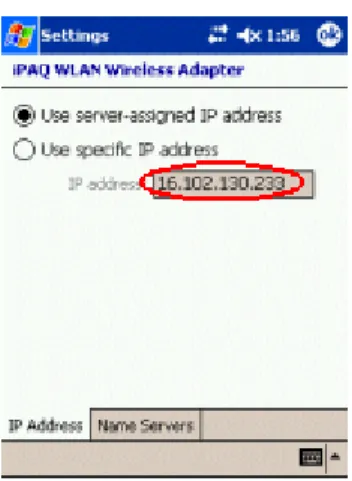
5. When the iPAQ WLAN Wireless Adapter screen appears, tap Use server-assigned IP address. The IP address displays in the IP address box.
Figure 4. The IP address display screen
Changing TCP/IP settings
Note: Most ISPs and private networks use dynamically assigned IP addresses. Unless the ISP or private network does not use dynamically assigned IP addresses, the TCP/IP settings require no change. If unsure about TCP/IP settings using dynamically assigned IP addresses, then contact the network administrator.
Perform the following steps to change the TCP/IP settings on an HP iPAQ Pocket PC h4100 or h4300 series handheld device:
1. If the IP address, subnet mask, and default gateway are not known, then contact the system administrator.
2. Turn on the WLAN.
3. Tap the Connectivity icon > Settings > Advanced tab> Network Card. On the Configure Wireless Networks screen, tap the Network Adapters tab. Or, on the Today screen, tap Start > Settings > Connections tab, and then the Connections icon; tap the Advanced tab, Network Card, and then the Network Adapters tab.
4. On the Configure Network Adapters screen, in the My network card connects to drop-down box, tap either The Internet (the network uses no proxy server) or Work (network uses a proxy server).
Note: If connecting to the ISP at home, then tap The Internet. If connecting to a private network such as a corporate network, then tap Work.
5. In the Tap an adapter to modify settings box, tap iPAQ WLAN Wireless Adapter. 6. Tap the IP Address tab.
7. Tap Use specific IP address, and then enter the appropriate information. 8. Tap OK to save the settings.
Changing DNS and WINS settings
Servers that require an assigned IP address may also require a way to map computer names to IP addresses. The HP iPAQ Pocket PC h4100 and h4300 series handheld devices support two name resolution options:
• DNS • WINS
Perform the following steps to change the server settings on HP iPAQ Pocket PC h4100 and h4300 series handheld devices:
1. Contact the ISP or network administrator to: • Determine the correct name resolution. • Obtain the specific server IP address.
• Determine if alternate addresses are available.
Note: An alternate address may be enabled to establish a connection when the primary server is unavailable. 2. Turn on the WLAN.
3. Tap the Connectivity icon > Settings > Advanced tab > Network Card > Network Adapters tab. 4. In the My network card connects to drop-down box, tap either The Internet (no proxy server is
used) or Work (proxy server is used).
Note: If connecting to the ISP at home, then tap The Internet. If connecting to a private network such as a corporate network at work, then tap Work.
5. In the Tap an adapter to modify settings box, tap iPAQ WLAN Wireless Adapter. 6. Tap the Name Servers tab, and enter the appropriate information.
7. Tap OK to save the new settings.
Configuring ISP settings
To add, edit, or delete the ISP settings on an HP iPAQ h4100 or h4300 series handheld device, perform the following steps:
To add a new modem connection:
1. Tap Start > Settings > Connections tab > the Connections icon > Advanced tab.
2. In the Connections screen, tap Select Networks. Networks are groups of settings used by programs to automatically connect to an ISP or private network.
3. On the Network Management screen, select My Work Network from one of the drop-down lists and then tap the New box beneath the connection.
4. On the General tab, enter a name for the settings. 5. Tap the Modem tab
6. Tap New.
7. On the Make a NewConnection screen, enter a name for the connection in the Enter a name for the connection box.
8. Select the desired modem in the Select a modem drop-down box. 9. Tap Next.
11.Type the desired user name and password for the connection.
12.Type the domain, if a domain was provided by the ISP or network administrator. 13.Tap Finish.
To change an existing connection:
1. Tap the Connectivity icon, and then tap Settings.
2. On the Connections screen, tap Manage existing connections. 3. To change the connection name, tap Edit, and type the new name. To delete an existing connection:
1. Tap the Connectivity icon, and then tap Settings.
2. On the Connections screen, tap Manage existing connections.
3. Locate the connection in the Name box and tap the name, holding the stylus in place for a few seconds until the Delete/Connect box appears. Tap Delete to delete the connection.
To establish a WLAN connection using the modem connection just added or changed: 1. Tap the Connectivity icon, and then tap Settings.
2. On the Connections screen, tap Manage existing connections.
3. Locate the connection in the Name box and tap the name, holding the stylus in place for a few seconds until a Delete/Connect box appears. Tap Connect to complete the connection.
VPN server connections
Creating a VPN connectionA VPN connection provides a secure connection to servers, such as a corporate network, via the Internet. If the name, password, domain name, TCP/IP settings, and host name or IP address of the VPN server are not known, then contact the network administrator. Perform the following steps to set up a VPN server connection:
Note: At this point, you may use the New Connection wizard to set up a VPN connection, or continue with the steps below. The New Connection wizard provides online Help and is available at any time in the VPN server connection setup by tapping the keyboard question mark (?).
1. Turn on the WLAN.
2. On the Today screen, tap Start > Settings > Connections tab > Connections > Tasks tab. 3. Under My Work Network, tap Add a new VPN server connection.
4. On the Make New Connection screen, enter a name for the connection in the Name box. Enter the appropriate information provided by the network administrator in the Host name/IP box. 5. Tap the appropriate VPN type received from the network administrator and then tap Next. 6. On the My VPN screen, tap either A certificate on this device or A pre-shared key. If you tapped
A pre-shared key, enter the key number in the box.
7. On the My VPN screen, enter a user name, password, and domain provided by the network administrator.
8. Tap Finish.
9. Follow the instructions in the New Connection wizard.
Changing a VPN connection
Perform the following steps to make changes to VPN server connections on an HP iPAQ Pocket PC h4100 or h4300 series handheld device:
1. Turn on the WLAN.
2. On the Today screen, tap Start, Settings, the Connections tab, the Connections icon, and then the
Tasks tab.
3. On the Connections screen, under My Work Network, tap Manage existing connections. 4. Tap the VPN tab.
5. Tap the desired VPN connection to change and then tap Edit.
6. On the My VPN screen, enter a name for the connection in the Name box (for example, a company name).
7. Still on the My VPN screen, enter the VPN server name or IP address in the Host name/IP box. 8. Next to VPN type tap the authentication type desired (IPSec/L2TP or PPTP). If unsure which option
to choose, contact the network administrator. 9. Tap Next.
10.If IPSec/L2TP in was chosen in step 8, then tap the appropriate authentication type. If you
selected A pre-shared key, then enter the key provided by the network administrator and then tap
Next.
Note: If PPTP was selected in the previous screen, then skip the following step.
11.Enter the user name, password, and domain name provided by the network administrator. If a domain name was not provided, then a connection may be made without entering one. 12.To change advanced settings, tap the Advanced button. Advanced settings should be changed
only if one of the following situations exists:
• The server to which the connection is made does not use dynamically assigned IP addresses, so the TCP/IP settings must be entered.
• The DNS or WINS settings on the server must be changed. 13.Tap Finish.
Starting a VPN connection
If an HP iPAQ Pocket PC h4100 or h4300 series handheld device is connected to the ISP or private network during synchronization, then the proper settings from the host computer will be downloaded. If the host computer does not have the proper settings, or if the settings must be changed, then manual setup will be required. To set up proxy server settings, perform the following steps:
1. Contact the ISP or network administrator to obtain the following: • Proxy server name
• Server type • Port
• Type of Socks protocol used, and the user name and password 2. Turn on the WLAN.
3. On the Today screen, tap Start > Settings > Connections tab > Connections icon > Tasks tab. 4. On the Connections screen under My Work Network, tap Edit my proxy server, and then tap the
Proxy Settings tab.
5. Tap the This network connects to the Internet and This network uses a proxy server to connect to the Internet checkboxes.
6. In the Proxy server box, enter the proxy server name received from the network administrator. If the port number or proxy server type settings do not require changes, tap OK and skip step 7.
hx4700 series
This section includes the following topics:
• Turning on and off the WLAN
• Connecting to a network
• Manually entering new network settings
• Working with HP supported wireless authentication protocols
• Searching for networks to access
• Managing wireless networks
• Network settings
• VPN server connections
Turning on and off the WLAN
Perform the following steps to turn on or off the WLAN:
1. From the Today screen, tap the iPAQ Wireless icon ( ) in the command bar located at the bottom of the screen.
2. Tap the Wi-Fi button on the iPAQ Wireless screen. When Wi-Fi is powered on, the Wi-Fi icon on the iPAQ Wireless screen turns from gray to amber (and then to green when connected to an access point) and the Wi-Fi LED, located on the top left corner of the unit, is solid blue indicating Wi-Fi or Bluetooth is on.
Note: Even though the indicator is blue to indicate Wi-Fi is turned on, it does not necessarily mean a connection has been established with another device or access point.
If Wi-Fi is off, the Wi-Fi icon turns from amber or green to gray.
Battery saving tip: Turn Wi-Fi off when you are not using it.
Connecting to a network
Perform the following steps to connect to a WLAN:
1. If one or more broadcast networks are present, the Network Indicator icon appears in the
navigation bar. Tap the network you want to connect to, then tap whether the network connects to
The Internet (does not use proxy settings) or Work (uses proxy settings).
2. If you are prompted for a network key, enter it. If you are not sure, contact your network administrator.
3. Tap Connect.
Manually entering new network settings
A wireless network can be added either when the network is detected (the Network Indicator icon is showing in the Navigation bar) or manually by entering setting information. To manually add a wireless network:
1. From the Today screen, tap the iPAQ Wireless icon in the Command bar at the bottom of the screen.
2. Be sure Wi-Fi is powered on, and tap Settings.
3. On the Wireless tab, select the network name (or tap Add New to enter a new name) you want to use to either connect to The Internet (does not use proxy settings) or to Work (uses proxy settings).
The next step is to configure your wireless network.
Note: If a network was detected in step 3, the SSID of that network is automatically entered and cannot be changed. Skip the next step.
4. Enter an SSID into the Network name box.
5. In the Connects to box, select where your network connects to (The Internet or Work). 6. If you want to connect to an ad-hoc connection, tap the This is a device-to-device (ad-hoc)
connection checkbox.
7. If network authentication or data encryption is required, then follow the instructions in the following section, “Working with HP supported wireless authentication protocols.” If network authentication or data encryption is not required, then tap OK repeatedly until you return to the
Today screen.
Working with HP supported wireless authentication protocols
Instructions for configuring an HP iPAQ handheld device with a high-security authentication protocol vary between product series and the selected protocol. Other affecting issues are ROM releases, operating systems, and protocol-specific requirements, to name a few.
The following instructions are intended as a roadmap to help you get started. Actual implementation may require additional steps, consultation with ISPs, network administrators, and implementation direction from third-party software companies such as Cisco Systems. Assistance may also be obtained from the HP web site (www.hp.com) and the Cisco Systems web site (www.cisco.com). Perform the following steps to set up an HP supported authentication protocol on an HP iPAQ Pocket PC hx4700 series handheld device:
1. After the wireless network has been added, then on the Configure Wireless Network screen, tap the Network Key tab. If in doubt about possible required authentication information, then contact the system administrator.
Note: To determine whether authentication information is needed, see your network administrator. 2. Select the type of network authentication to be used:
• Open
• Shared
• WPA
• WPA-PSK
3. Select the type of data encryption to be used:
• For open or shared network authentication, only WEP data encryption is available. To enable WEP data encryption, select WEP from the Data Encryption drop-down list.
• If WPA or WPA-PSK was selected in step 10, then TKIP and WEP are both available data encryption options. To enable data encryption, select the desired protocol from the Data Encryption drop-down list.
4. If a network key is provided by the network automatically, then tap the The Key is provided for me automatically checkbox. Otherwise, enter the network key in the Network key box, and select the
Key index if necessary.
5. If IEEE 802.1x is supported by the network environment, then tap the 802.1x tab. On the 802.1x
tab, check the Use IEEE 802.1x network access control checkbox. Select the appropriate EAP type
from the drop-down list. 802.1x provides an increased level of security. If unsure whether the network environment supports the 802.1x protocol, then contact the network administrator. 6. Tap OK repeatedly until you return to the Today screen.
7. Tap the Connectivity icon > Settings > Advanced tab > Select Networks box to open the Network Management window.
8. Under Programs that automatically connect to the Internet should connect using, tap the down arrow and select your work network.
9. Tap OK repeatedly to return to the Today screen.
10.Perform a soft rest of the HP iPAQ. When the wireless card associates with an access point, the
Logon Window pop-up box appears. Select the appropriate keyboard and enter the user name and the password to be used. Leave the domain field blank, and tap the Save Password box.
Searching for networks to access
Networks that you have already configured are preferred networks and can be found on the iPAQ Wireless screen by tapping the iPAQ Wireless icon > Wi-Fi Settings. You can choose whether to connect only to preferred networks or to have your HP iPAQ search for and connect to any available network (preferred or not).
1. Be sure Wi-Fi is powered on.
2. From the iPAQ Wireless screen, tap the Wi-Fi Settings button > Wireless tab.
3. In the Networks to access box, tap the type of network you want to connect to (All Available,
Only access points, or Only computer-to-computer).
4. To connect only to networks that have already been configured, clear the Automatically connect to non-preferred networks checkbox.
Note: If the Automatically connect to non-preferred networks checkbox is checked, then the HP iPAQ will detect any new networks and provide the opportunity to configure them.
Managing wireless networks
In managing your wireless networks, sometimes it is necessary to change network settings. In the next two sections, learn how to view, edit, and delete available wireless network settings.
Viewing or editing a network
To view or edit an existing or available wireless network: 1. Be sure Wi-Fi is powered on.
2. From the iPAQ Wireless screen, tap Wi-Fi Settings > Wireless tab. 3. In the wireless networks list box, tap the desired network name.
4. Edit the existing settings as necessary, and then tap OK to save the changes.
Deleting a network
To delete an existing or available wireless network: 1. Be sure Wi-Fi is powered on.
2. From the iPAQ Wireless screen, tap Wi-Fi Settings > Wireless tab.
3. In the wireless networks list box, tap and hold the network you want to delete. 4. Tap Remove Settings.
Monitoring signal strength and status
To view the signal strength between your HP iPAQ and an access point Wi-Fi connection: 1. Tap the Connectivity icon in the Navigation bar.
2. When the Connectivity box displays, you will be able to view the type of network the HP iPAQ is connected to (for example, Work or The Internet) and an icon displaying the signal strength.
Note: The signal strength icon will not be displayed if a connection is not present. 3. To make changes to the connection settings, tap Settings. 4. To exit the Connectivity box, tap the Hide button.
Network settings
Locating an IP addressTo find the IP address the wireless network is using: 1. Be sure Wi-Fi is powered on.
2. Tap the iPAQ Wireless icon.
3. From the iPAQ Wireless screen, tap the Wi-Fi Settings button > Wireless tab.
4. Tap and hold the network you want to connect to and tap Connect. If you have already connected to a network, skip to step 5.
5. From the Configure Wireless Networks screen, select the Network Adapters tab.
6. Tap the HP iPAQ Wi-Fi Wireless adapter. The IP address displays in the IP address box.
Changing TCP/IP settings
Note: Most ISPs and private networks now use dynamically assigned IP addresses. You will not need to change TCP/IP settings unless your ISP or private network does not use dynamically assigned IP addresses. If you are not sure, check with your network administrator.
To change TCP/IP Settings:
1. Contact your ISP or network administrator to determine your IP address, subnet mask, and default gateway (if needed).
2. Be sure Wi-Fi is powered on.
3. From the iPAQ Wireless screen, tap Wi-Fi Settings > Network Adapters tab. 4. In the My network card connects to list box, select either The Internet or Work.
Note: If you are connecting to your ISP at home, select The Internet. If you are connecting to a private network, such as a corporate network at work, select Work.
5. In the Tap an adapter to modify settings box, tap HP iPAQ Wi-Fi Wireless Adapter. 6. Tap the IP Address tab.
7. Tap Use specific IP address and enter the requested information. 8. Tap OK to save your settings.
Changing DNS and WINS settings
Note: Most ISPs and private networks now use dynamically assigned IP addresses. You will not need to change Domain Name System (DNS) and Windows Internet Naming Service (WINS) settings unless your ISP or private network does not use dynamically assigned IP addresses. If you are not sure, check with your network administrator.
Servers that require an assigned IP address may also require a way to map computer names to IP addresses. Your HP iPAQ supports two name resolution options:
To change server settings:
1. Contact your ISP or network administrator to determine which name resolution to use, obtain the specific server address, and determine whether alternate addresses are available.
Note: An alternate address may enable you to connect when the primary server is unavailable. 2. Be sure Wi-Fi is powered on.
3. From the iPAQ Wireless screen, tap Wi-Fi Settings > Network Adapters tab. 4. In the My network card connects to list box, select either The Internet or Work.
Note: If you are connecting to your ISP at home, select The Internet. If you are connecting to a private network such as a corporate network at work, you should select Work.
5. In the Tap an adapter to modify settings box, tap HP iPAQ Wi-Fi Wireless Adapter. 6. Tap the Name Servers tab and enter the requested information.
7. Tap OK to save your settings.
Changing ISP settings
If you are connected to your ISP or private network during synchronization, your HP iPAQ should download proper proxy settings from your computer. If these settings are not on your computer or need to be changed, you will need to set them up manually. To set up proxy server settings: 1. Contact your ISP or network administrator for the proxy server name, server type, port, type of
Socks protocol used, and your user name and password. 2. Be sure Wi-Fi is powered on.
3. Tap the Connectivity icon in the Navigation bar, and then tap Settings > Tasks tab. 4. Under your work network, tap Set up my proxy server > Proxy Settings tab.
5. Tap the This network connects to the Internet and This network uses a proxy server to connect to the Internet checkboxes.
6. In the Proxy server box, enter the proxy server name.
7. If you need to change port number or proxy server type settings, tap the Advanced button and change the desired settings.
8. Tap OK twice to return to the Today screen.
VPN server connections
Creating a VPN connectionA VPN connection enables you to securely connect to servers, such as a corporate network, via the Internet. To set up a VPN server connection:
1. Contact your network administrator for your user name, password, domain name, TCP/IP settings, and host name or IP address of the VPN server.
2. Tap the Connectivity icon in the Navigation bar, and then tap Settings > Tasks tab on the
Connections screen.
3. Under your work network, tap Add a new VPN server connection.
4. In the Name box of the Make New Connection screen, enter name for the connection (for example, your company’s name).
5. In the Host name/IP box, enter the VPN server name or IP address.
6. Next to VPN type, tap the type of authentication to use with your device (IPSec/L2TP or PPTP). If you aren’t sure which option to choose, ask your network administrator.
7. Tap Next.
8. If you selected IPSec/L2TP on the previous screen, select the type of authentication. If you are using A pre-shared key, enter the key provided by your network administrator, and then tap