Shelve in Mobile Computing User level: Beginning–Advanced
GUI Design for Android Apps
GUI Design for Android Apps is the perfect—and concise—introduction for mobile app developers and designers. Through easy-to-follow tutorials, code samples, and case studies, the book shows the must-know principles for user-interface design for Android apps running on the Intel platform, including smartphones, tablets, and embedded devices.
This book is jointly developed for individual learning by Intel Software College and China Shanghai JiaoTong University, and is excerpted from Android Application Development for the Intel ® Platform.
What You’ll Learn:
• Key aspects of why UI and UX design for embedded systems is different than for desktops
• Troubleshooting UI design issues
• Understanding how key concepts such as state transition, Context class, and intents work
• How to use the interface app design tools provided by Android • Planning for complex apps (apps with multiple activities) • Optimizing app design for touchscreen input
Cohen Wang
For your convenience Apress has placed some of the front
matter material after the index. Please use the Bookmarks
Contents at a Glance
About the Lead Project Editor �����������������������������������������������������������
xi
About the Lead Contributing Author �����������������������������������������������
xiii
About the Technical Reviewer ���������������������������������������������������������
xv
Introduction �����������������������������������������������������������������������������������
xvii
Chapter 1: GUI Design for Android Apps, Part 1:
■
General Overview ���������������������������������������������������������������������������
1
Chapter 2: GUI Design for Android Apps, Part 2:
■
The Android-Specific GUI ��������������������������������������������������������������
33
Chapter 3: GUI Design for Android Apps, Part 3:
■
Designing Complex Applications ��������������������������������������������������
71
Chapter 4: GUI Design for Android Apps, Part 4:
■
Graphic Interface and Touchscreen Input �����������������������������������
105
Introduction
This mini book is a collection of four chapters pulled from Android Application Development for the Intel Platform, designed to give developers an introduction to creating great user interfaces for their Android applications. These chapters cover topics ranging from the differences between developing UIs for desktop systems and embedded systems to optimizing the UI of applications for touchscreens.
Chapter 1
This chapter introduces the general GUI design method for desktop systems and then shows how designing the UI and UX for embedded systems is different. Next, it discusses general methods and principles of GUI design for Android applications and how to develop user interfaces suitable for typical user interaction on Android smartphone and tablets.
Chapter 2
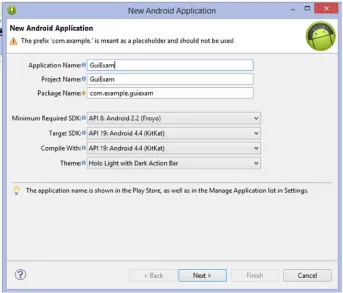
This chapter introduces Android interface design by having you create a simple application called GuiExam. You learn about the state transitions of activities, the
Context class, intents, and the relationship between applications and activities. Finally, the chapter shows how to use the layout as an interface by changing the layout file
activity_main.xml, and how the button, event, and inner event listeners work.
Chapter 3
In this chapter, you learn how to create an application with multiple activities. This application is used to introduce the explicit and implicit trigger mechanisms of activities. Next, you see an example of an application with parameters triggered by an activity in a different application, which will help you understand of the exchange mechanism for the activity’s parameters.
Chapter 4
GUI Design for Android
Apps, Part 1: General
Overview
Since its emergence in the 1980s, the concept of the graphical user interface (GUI) has become an indispensable part of human-computer interaction (HCI). As embedded systems have evolved, they have gradually adopted this concept as well. The Android embedded OS running on the Intel Atom hardware platform is at the forefront of this movement.
Because resources are limited, the GUI design of Android systems is more
challenging than that of desktop systems. In addition, users have more rigorous demands and expectations for a high-quality user experience. Interface design has become one of the important factors in determining the success of systems and applications on the market. This chapter introduces how to develop user interfaces suitable for typical user interaction on Android embedded systems.
Overview of GUIs for Embedded Applications
These days, the user interface (UI) and user experience (UX) of software are increasingly important factors in determining whether software will be accepted by users and achieve market success. UX designs are based on the types of input/output or interaction devices and must comply with their characteristics. Compared to desktop computer systems, Android systems have different interaction devices and modalities. If a desktop’s UI designs are copied indiscriminately, an Android device will present a terrible UI and unbearable UX, unacceptable to users. In addition, with greater expectations for compelling user experiences, developers must be more meticulous and careful in designing system UIs and UXs, making them comply with the characteristics of embedded applications.Chapter 1 ■ GUI DesIGn for anDroID apps, part 1: General overvIew
Characteristics of Interaction Modalities of Android
Devices
A general-purpose desktop computer has powerful input/output (or interaction) devices such as a large, high-resolution screen, a full keyboard and mouse, and diverse interaction modalities. Typical desktop computer screens are at least 17 inches, with resolutions of at least 1,280 × 960 pixels. The keyboard is generally a full keyboard or an enhanced keyboard. On full keyboards, letters, numbers, and other characters are located on corresponding keys—that is, full keyboards provide keys corresponding to all characters. Enhanced keyboards have additional keys. The distance between keys on a full keyboard is about 19 mm, which is convenient for users to make selections.
The GUI interactive mode of desktop computers based on screen, keyboard, and mouse is referred to as WIMP (windows, icons, menus, and pointers), which is a style of GUI using these elements as well as interactive elements including buttons, toolbars, and dialog boxes. WIMP depends on screen, keyboard, and mouse devices to complete the interaction. For example, a mouse (or a device similar to a mouse, such as a light pen) is used for pointing, a keyboard is used to input characters, and a screen shows the output. In addition to screens, keyboards, mice, and other standard interaction hardware, desktop computers can be equipped with joysticks, helmets, data gloves, and other multimedia interactive devices to achieve multimedia computing functions. By installing cameras, microphones, speakers, and other devices, and by virtue of their powerful computing capabilities, users can interact with desktop computers in the form of voice, gestures, facial expressions, and other modalities.
Desktop computers are also generally equipped with CD-ROM/DVDs and other large-capacity portable external storage devices. With these external storage devices, desktop computers can release software and verify ownership and certificates through CD/DVD.
As a result of the embeddability and limited resources of embedded systems, as well as user demand for portability and mobility, Android systems have interaction modalities, methods, and capabilities that are distinct from those of desktop systems. Due to these characteristics and conditions, interaction on Android systems is more demanding and more difficult to achieve than it is on desktop systems.
The main differences between Android devices and desktop computers are described next.
Screens of Various Sizes, Densities, and Specifications
Instead of large, high-resolution screens like those on desktop computers, Android device screens are smaller and have various dimensions and densities measured in dots per inch (DPI). For example, the K900 smartphone’s screen is 5.5 inches with a resolution of 1920 ×1080 pixels, and some smartphone screens are only 3.2 inches.
Keypads and Special Keys
Desktop computers have full keyboards, where a key corresponds to every character and the generous distance between keys makes typing convenient. If an Android device has a keyboard, it’s usually a keypad instead of the full keyboard. Keypads have fewer keys than full keyboards; several characters generally share one key. A keypad’s keys are smaller and more tightly spaced than on full keyboards, making it harder to select and type characters. As a result, keypads are less convenient to use than full keyboards. In addition, some keypads provide special keys that are not found on standard full keyboards, so users must adjust their input on the Android device.
Generally speaking, on Android devices, keys and buttons are a unified concept. Whether you press a button or a key, the action is processed as a keyboard event with a uniform numbering scheme. Keyboard events in Android have corresponding android.view.KeyEvent classes. Figure 1-1’s button/key callouts correspond to the event information listed in Table 1-1.
Chapter 1 ■ GUI DesIGn for anDroID apps, part 1: General overvIew
Table 1-1. Android Event Information Corresponding to Key and Button Events
Key/Button
Key Code
Another Name
Key Event
Key ① in Figure 1-1
24 KEYCODE_VOLUME_UP {action=0 code=24 repeat=0 meta=0 scancode=115 mFlags=8}
Key ② in Figure 1-1
25 KEYCODE_VOLUME_DOWN {action=0 code=25 repeat=0 meta=0 scancode=114 mFlags=8}
Key ③ in Figure 1-1
82 KEYCODE_MENU {action=0 code=82
repeat=0 meta=0 scancode=139 mFlags=8}
Key ④ in Figure 1-1
No response
Key ⑤ in Figure 1-1
4 KEYCODE_BACK {action=0 code=4 repeat=0
meta=0 scancode=158 mFlags=8}
Key ⑥ in Figure 1-1
No response
A–Z 29–54 KEYCODE_A–KEYCODE_Z
0–9 7–16 KEYCODE_0–KEYCODE_9
Key ⑨ in Figure 1-1
19 KEYCODE_DPAD_UP
Key 11 in Figure 1-1
20 KEYCODE_DPAD_DOWN
Key 12 in Figure 1-1
21 KEYCODE_DPAD_LEFT
Key 10 in Figure 1-1
22 KEYCODE_DPAD_RIGHT { action=ACTION_DOWN, keyCode=KEYCODE_DPAD_ RIGHT, scanCode=106, metaState=0, flags=0x8, repeatCount=0, eventTime=254791, downTime=254791, deviceId=0, source=0x301 }
Key/Button
Key Code
Another Name
Key Event
Key 13 in Figure 1-1
23 KEYCODE_DPAD_CENTER { action=ACTION_DOWN, keyCode=KEYCODE_DPAD_ CENTER, scanCode=232, metaState=0, flags=0x8, repeatCount=0, eventTime=321157, downTime=321157,
deviceId=0, source=0x301 }
Key ⑦ in Figure 1-1
5 KEYCODE_CALL { action=ACTION_DOWN,
keyCode=KEYCODE_ CALL, scanCode=231, metaState=0, flags=0x8, repeatCount=0, eventTime=331714, downTime=331714,
deviceId=0, source=0x301 } Key ⑧ in
Figure 1-1
6 KEYCODE_ENDCALL
Table 1-1. (continued)
See help documents like that for android.view.KeyEvent for details. Table 1-1’s contents are excerpts.
Touch Screens and Styluses, in Place of Mice
A touch screen is an input device covering a display device to record touch positions. By using the touch screen, users can have a more intuitive reaction to the information displayed. Touch screens are widely applied to Android devices and replace a mouse for user input. The most common types of touch screens are resistive touch screens, capacitive touch screens, surface acoustic wave touch screens, and infrared touch screens, with resistive and capacitive touch screens being most often applied to Android devices. Users can directly click videos and images on the screen to watch them.
Chapter 1 ■ GUI DesIGn for anDroID apps, part 1: General overvIew
Touch and styluses can perform most functions that mice typically do, such as click and drag, but can’t achieve all the functions of mice, such as right-click and left-click/ right-click at the same time. When designing embedded applications, you should control the interaction mode within the range of functions that touch screens or styluses can provide and avoid operations that are not available.
Onscreen Keyboards
Onscreen keyboards, also known as virtual keyboards or soft keyboards, are displayed on
the screen via software. Users tap the virtual keys like they would tap the keys on physical keyboards.
Few Multimodal Interactions
Multimodal interaction refers to human-computer interaction with the modes involving
the five human senses. It allows the user to interact through input modalities such as speech, handwriting, and hand gesture. Because computing capability is limited, Android devices generally do not adopt multimodal interaction.
Few Large-Capacity Portable External Storage Devices
Most Android devices do not have the CD-ROM/DVD drives, hard disks, or other large-capacity portable storage peripherals such as solid-state drives (SSDs) that are usually configured on desktop computers. These devices cannot be used on Android devices to install software or verify ownership and certificates. However, Android devices usually support microSD cards, which now have capacities of up to 128 GB; and more and more cloud-based storage solutions such as Dropbox, One Drive, and Google Drive are being developed for Android devices, with Android-compatible client apps available for download from Google Play Store.
UI Design Principles for Embedded Systems
This section introduces interactive design issues and corrective measures to take when transforming traditional desktop applications to embedded applications.Considerations of Screen Size
Size of Text and Icons
Another problem is the size of text and icons. When an application is reduced from a typical 15-inch desktop screen to a typical 5- or 7-inch phone or tablet screen, its text is too small to be seen clearly. In addition to the size of the text font, the text window (such as a chat window) also becomes too small to read the text. Trying to reduce the font size to suit smaller windows makes the text hard to recognize.
Therefore, the design of embedded systems should use as few text prompt messages as possible; for example, replace the text with graphic or sound information. In addition, where text is necessary, the text size should be adjustable. On Android, some predefined fonts and icons are available in the res directory, such as drawable-hdpi, drawable-mdpi, and drawable-xhdpi.
Clickability of Buttons and Other Graphical Elements
Similar to the problem of small text, buttons and other graphical elements also bring interaction problems when migrating applications. On desktop systems, the size of buttons is designed for mouse clicks, whereas on Android systems, the button size should be suitable for fingers (on touch screens) or styluses. Therefore, when porting a Windows-based app to support Android devices, the application UI needs to be redesigned; and predefined drawables provided by the Android SDK should be selected in order to suit fingers or styluses.
Developers should use bigger and clearer buttons or graphic elements to avoid such problems and leave enough gap between graphic elements to avoid errors, which are common when a small touch screen is used for selecting by fingers or styluses. In addition, if an application has text labels near buttons, the labels should be part of the clickable area connected with the buttons, so the buttons are easier to click.
Size of Application Windows
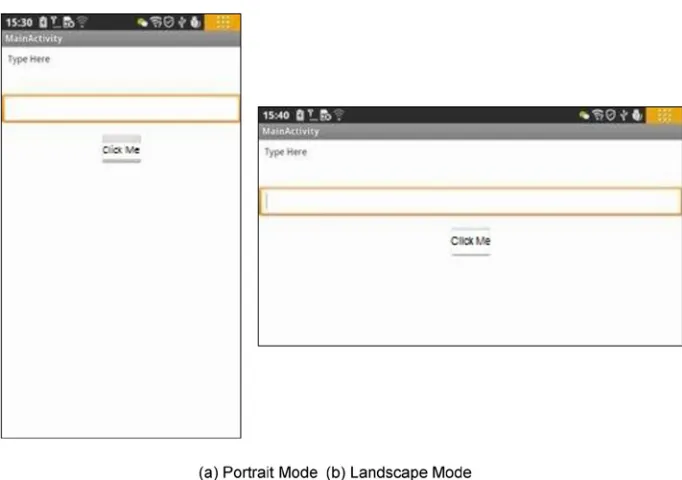
Many applications, such as games, use windows with fixed sizes instead of windows that automatically adjust to fill any size screen. When these applications are migrated to Android systems, because the screen’s aspect ratio does not match its resolution, part of the picture may not be seen, or part of the area may not be reachable.
These problems may be more complicated on smartphones and tablets because their screens have various densities such as small (426 dp × 320 dp), normal (470 dp × 320 dp), large (640 dp × 480 dp), and extra large (960 dp × 720 dp). Their aspect ratios are diverse and different from those commonly adopted by desktop systems.
Chapter 1 ■ GUI DesIGn for anDroID apps, part 1: General overvIew
Considerations Arising from Touch Screens and Styluses
As mentioned earlier, touch screens and styluses are used on many Android systems to perform some traditional mouse functions. Such input devices are called tap-only touchscreens. However, tap-only touch screens cannot provide all mouse functions. There is no
right button, and the current finger/stylus location cannot be captured when the screen is not touched. So, desktop applications that allow functions such as cursor moves without clicking, different operations for left-clicks and right-clicks, and so on, cannot be realized on Android systems using touch screens and styluses.
The following sections talk about several problems often seen when migrating applications from desktop systems to Android systems using tap-only touch screens.
Correctly Interpreting the Movement and Input of the Cursor
(Mouse) on Tap-Only Touch Screens
Many applications need mouse movement information when no mouse key is pressed. This operation is called moving the cursor without clicking. For example, a lot of PC shooting games1 simulate the user’s field of vision such that moving the mouse without
clicking is interpreted as moving the game player’s vision field; but the cursor should always stay in the middle of the new vision field. However, an embedded device with a tap-only touch screen does not support the operation of moving the cursor without clicking. Once the user’s finger touches the screen, a tap event is triggered. When the user moves a finger on the screen, a series of tap events at different positions is triggered; these events are interpreted by the existing game code as additional interaction events (that is, moving the aiming position of the game player’s gun).
The original interaction mode needs to be modified when migrating this type of application to Android systems. For example, this problem can be modified into a click operation: once the user touches the screen, the game screen should immediately switch to the vision field, in which the cursor is located at the screen center. This way, the cursor is always displayed at the screen center and not at the position the user actually touched. One advantage you benefit from on mobile platforms is that most smartphones and tablets on the market are equipped with sensors such as accelerometers, gyroscopes, GPS sensors, and compasses, and they allow applications to read data from the sensors. As a result, developers have more options than just touch input.
Setting Screen Mapping Correctly
Many applications run in full-screen mode. If such applications do not perfectly fill the entire tap-only touch screen (that is, they are smaller or bigger than the screen), input mapping errors result: there is a deviation between the display position and the click position.
One situation that often occurs in migrating a full-screen application to a tap-only touch screen with a low aspect ratio is the application window being centered on the screen with blank space showing on both sides. For example, when a desktop application window with a resolution of 640 × 480 (or 800 × 600) pixels is migrated to a tap-only touch screen with a resolution of 960 × 720 (or 1280 × 800, a WXGA on Dell Venue 8) pixels, it appears on the screen as shown in Figure 1-2. The resulting mapping errors cause the app to incorrectly respond to user interaction. When the user taps the position of the yellow arrow (the target), the position identified by the application is the point where the red explosion icon is located. These kinds of errors also occur when the user taps a button.
Figure 1-2. Screen-mapping errors due to a low aspect ratio
You should consider the position-mapping logic and take this blank space into consideration, even if the blank space is not part of the migrating application’s window. By making these changes, the tap-only touch screen can map the touch position correctly.
Another situation occurs when the desktop full-screen window is migrated to a tap-only touch screen with a higher aspect ratio. The height of the original application window does not fit on the tap-only touch screen, and mapping errors occur in the vertical direction instead of the horizontal direction.
Chapter 1 ■ GUI DesIGn for anDroID apps, part 1: General overvIew
One solution is to ensure that the OS accurately maps the tap-only touch screen to the entire visible area of the screen. The OS provides special services to complete the screen stretching and mouse position mapping. Another solution is to consider, at the beginning of application development, allowing configuration options to support preconfigured display densities and aspect ratios provided by the Android SDK, such as screens with a resolution of 640 × 480, 960 × 720, or 1,080 × 800 pixels. This way, if the final dimension deformation is acceptable, the application may automatically stretch the window to cover the whole screen.
How to Solve Hover-Over Problems
Many applications allow hover-over operations: that is, users can place the mouse over a certain object or locate the mouse over an application icon to trigger an animated item or display a tooltip. This operation is commonly used to provide instructions for new players in games; but it is not compatible with the characteristics of tap-only touch screens, because they do not support the mouse hover-over operation.
You should consider selecting an alternative event to trigger animations or tips. For example, when the user touches the operation of applications, relevant animated themes and tips are triggered automatically. Another method is to design an interface interaction mode that temporarily interprets tap events as mouse hover-over events. For example, the action of pressing a certain button and moving the cursor would not be interpreted as a tap operation.
Providing Right-Click Functionality
As mentioned before, tap-only touch screens generally do not support right-click operations on mice. A commonly used alternative is a delayed touch (much longer than the tap time) to represent a right-click. This could result in the wrong operation occurring if the user accidentally releases their finger too soon. In addition, this method cannot perform simultaneous left-click and right-click (also known as double-click).
You should provide a user-interaction interface that can replace the right-click function: for example, using double-click or installing a clickable control on the screen to replace the right-click.
Keyboard Input Problems
As mentioned earlier, desktop computers use full keyboards, whereas Android systems usually have much simpler keypads, button panels, user-programmable buttons, and a limited number of other input devices. These limitations cause some problems when designing embedded applications that are not seen in desktop systems.
Restricting the Input of Various Commands
The keyboard limitations on Android systems make it difficult for users to type a large number of characters. Therefore, applications that require users to input many characters, especially those depending on command input, need appropriate adjustments when migrating to an Android system.
One solution is to provide an input mode that restricts the number of characters by reducing the number of commands or selectively using convenient tools like menu item shortcut keys. A more flexible solution is to create command buttons on the screen, especially context-sensitive buttons (that is, buttons that appear only when needed).
Meeting Keyboard Demand
Applications need keyboard input, such as naming a file, creating personal data, saving progress, and supporting online chat. Most applications tend to use the screen keyboard to input characters, but the screen keyboard does not always run or show at the front of the application interface, making character-input problems hard to solve.
Chapter 1 ■ GUI DesIGn for anDroID apps, part 1: General overvIew
file can also be uniquely obtained by combining various user information items extracted from the screen or even using the date-time stamp. Some text input services (such as a chat service) should be disabled if they are not the core functions of an application. This will not cause any negative impact on the user experience.
Software Distribution and Copyright Protection Problems
Desktop computers are generally equipped with CD-ROM/DVD drives, and their software is generally distributed via CD/DVD. In addition, for anti-piracy purposes, CD/DVD installation usually requires users to verify the ownership of the disk or load contents dynamically from the CD/DVD, especially video files. However, Android systems (smartphones and tablets, for instance) generally do not have CD-ROM/DVD drives; Android does support an external microSD card, but directly installing an application from it is still not supported.A good solution is to allow users to download or install applications via the Internet instead of installing from CD/DVD. Consumers buy and install applications directly from application stores such as the Apple App store, Google Play, and Amazon Appstore. This popular software release model allows mobile developers to use certificates, online accounts, or other software-based ways to verify ownership, instead of physical CD/ DVDs. Similarly, you should consider providing the option of placing content on an online cloud service instead of requiring users to download videos and other content from a CD/DVD.
Android Application Overview
The following sections describe the application file framework and component structure of Android applications.
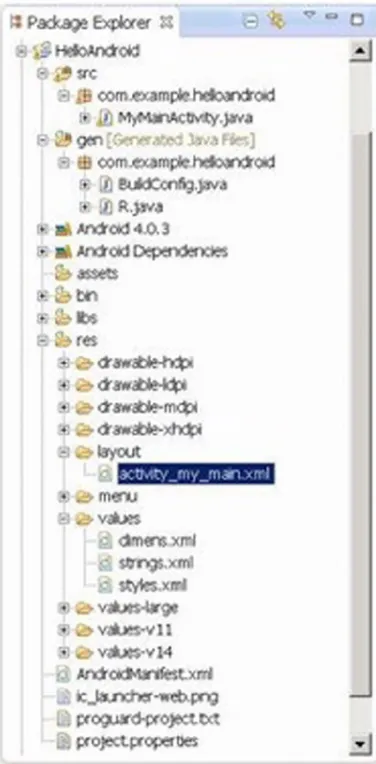
Application File Framework
Chapter 1 ■ GUI DesIGn for anDroID apps, part 1: General overvIew
Even if you are not using Eclipse, you can directly access the project folder and see the same file structure, as listed next:
E:\Android Dev\workspace\HelloAndroid>TREE /F E:.
│ .classpath │ .project
│ AndroidManifest.xml │ ic_launcher-web.png │ proguard-project.txt │ project.properties │
├─.settings
│ org.eclipse.jdt.core.prefs │
├─assets ├─bin
│ │ AndroidManifest.xml │ │ classes.dex
│ │ HelloAndroid.apk │ │ resources.ap_ │ │
│ ├─classes │ │ └─com
│ │ └─example
│ │ └─helloandroid
│ │ BuildConfig.class │ │ MainActivity.class │ │ R$attr.class │ │ R$dimen.class │ │ R$drawable.class │ │ R$id.class │ │ R$layout.class │ │ R$menu.class │ │ R$string.class │ │ R$style.class │ │ R.class │ │
│ └─res
│ ├─drawable-hdpi
│ │ ic_action_search.png │ │ ic_launcher.png │ │
│ ├─drawable-mdpi
│ │ ic_action_search.png │ │ ic_launcher.png │ │
│ └─drawable-xhdpi
│ ic_action_search.png │ ic_launcher.png │
├─gen │ └─com
│ └─example
│ └─helloandroid
│ BuildConfig.java │ R.java
│ ├─libs
│ android-support-v4.jar │
├─res
│ ├─drawable-hdpi
│ │ ic_action_search.png │ │ ic_launcher.png │ │
│ ├─drawable-ldpi │ │ ic_launcher.png │ │
│ ├─drawable-mdpi
│ │ ic_action_search.png │ │ ic_launcher.png │ │
│ ├─drawable-xhdpi
│ │ ic_action_search.png │ │ ic_launcher.png │ │
│ ├─layout
│ │ activity_main.xml │ │
│ ├─menu
│ │ activity_main.xml │ │
│ ├─values
Chapter 1 ■ GUI DesIGn for anDroID apps, part 1: General overvIew
│ ├─values-large │ │ dimens.xml │ │
│ ├─values-v11 │ │ styles.xml │ │
│ └─values-v14 │ styles.xml │
└─src └─com
└─example
└─helloandroid
MainActivity.java
Let’s explain the features of this Android project file structure: • src directory: Contains all source files.
• R.java file: Is automatically generated by the Android SDK integrated in Eclipse. You do not need to modify its contents. • Android library: A set of Java libraries used by Android
applications.
• assets directory: Stores mostly multimedia files and other files. • res directory: Stores preconfigured resource files such as
drawable layouts used by applications.
• values directory: Stores mostly strings.xml, colors.xml, and arrays.xml.
• AndroidManifest.xml: Equivalent to an application configuration file. Contains the application’s name, activity, services, providers, receivers, permissions, and so on.
• drawable directory: Stores mostly image resources used by applications.
• layout directory: Stores mostly layout files used by applications. These layout files are XML files.
Similar to general Java projects, a src folder contains all the .java files for a project; and a res folder contains all the project resources, such as application icons (drawable), layout files, and constant values.
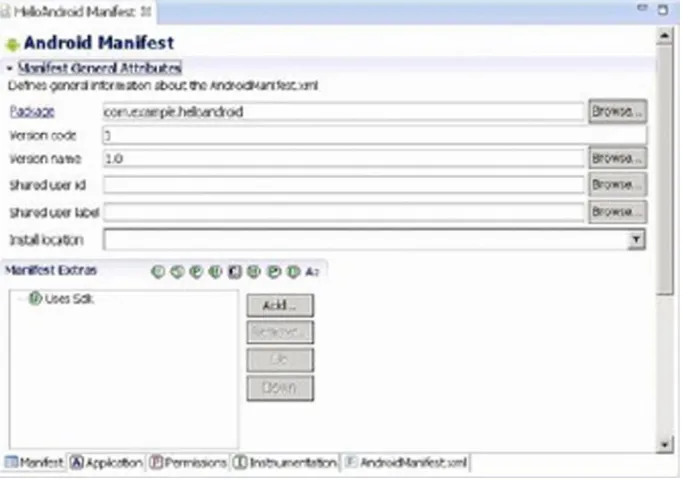
AndroidManifest.xml
The AndroidManifest.xml file contains information about your app essential to the Android system, which the system must have before it can run any of the app’s code. This information includes activities, services, permissions, providers, and receivers used in the project. An example is shown in Figure 1-5.
Figure 1-5. The content of AndroidManifest.xml displayed in Eclipse
The file’s code is as follows:
<manifest xmlns:android="http://schemas.android.com/apk/res/android" package="com.example.helloandroid"
android:versionCode="1" android:versionName="1.0" > <uses-sdk
android:minSdkVersion="8" android:targetSdkVersion="15" /> <application
Chapter 1 ■ GUI DesIGn for anDroID apps, part 1: General overvIew
<activity
android:name=".MyMainActivity"
android:label="@string/title_activity_my_main" > <intent-filter>
<action android:name="android.intent.action.MAIN" />
<category android:name="android.intent.category.LAUNCHER" /> </intent-filter>
</activity> </application> </manifest>
The AndroidManifest.xml file is a text file in XML format, with each attribute defined by a name = value pair. For example, in Android, label = "@ string / title_ activity_my_main", label indicates the name of the Android application as
activity_my_main.
An element consists of one or more attributes, and each element is enclosed by the start (<) and end (/>) tags:
<Type Name [attribute set]> Content </ type name> <Type Name Content />
The format [attribute set] can be omitted; for example, the <intent-filter> ... </ intent-filter> text segment corresponds to the activity content of the element, and <action... />corresponds to the action element.
XML elements are nested in layers to indicate their affiliation, as shown in the previous example. The action element is nested within the intent-filter element, which illustrates certain aspects of the properties or settings of intent-filter. Detailed information about XML is beyond the scope of this book, but many excellent XML books are available.
In the example, intent-filter describes the location and time when an activity is launched and creates an intent object whenever an activity (or OS) is to execute an operation. The information carried by the intent object can describe what you want to do, which data and type of data you want to process, and other information. Android compares the intent-filter data exposed by each application and finds the most suitable activity to handle the data and operations specified by the caller.
Descriptions for the main attribute entries in the AndroidManifest.xml file are listed in Table 1-2.
Table 1-2. The Main Attribute Entries in the AndroidManifest.xml File
Parameter
Description
Manifest Root node that contains all contents in the package.
xmlns:android Contains the manifest of the namespace.
Parameter
Description
package Package of manifest application.
Application Contains the root node of the application-level component manifest in the package. This element can also contain some global and default properties for the application, such as label, icon, theme, and necessary permissions. One manifest may contain zero or one (no more than one) element.
android:icon Icon of the application.
android:label Name of the application.
Activity Name of the initial page to load when users start the application. It is an important tool for user interaction. Most other pages are displayed when other activities are performed or manifested by other activity flags.
Note: Each activity must have a corresponding <activity> flag whether it is used externally or in its own package. If an activity has no corresponding flag, you cannot operate it. In addition, to support a searching activity, an activity can contain one or several <intent-filter> elements to describe the operations it supports.
android:name Default activity launched by the application.
intent-filter Is formed by manifesting the intent value supported by a designated component. In addition to specifying different types of values, intent-filter can specify properties for describing a unique label, icon, or other information required by an operation.
Action Intent action supported by a component.
Category Intent category supported by a component. The default activity launched by the application is designated here.
uses-sdk Related to the SDK version used by the application. Table 1-1. (continued)
R.java
The R.java file is generated automatically when a project is created. It is a read-only file and cannot be modified. R.java is an index file defining all resources of the project. For example:
/* AUTO-GENERATED FILE. DO NOT MODIFY. ... ...
*/
package com.example.helloandroid; public final class R {
Chapter 1 ■ GUI DesIGn for anDroID apps, part 1: General overvIew
public static final class dimen {
public static final int padding_large=0x7f040002; public static final int padding_medium=0x7f040001; public static final int padding_small=0x7f040000; }
public static final class drawable {
public static final int ic_action_search=0x7f020000; public static final int ic_launcher=0x7f020001; }
public static final class id {
public static final int menu_settings=0x7f080000; }
public static final class layout {
public static final int activity_my_main=0x7f030000; }
public static final class menu {
public static final int activity_my_main=0x7f070000; }
public static final class string {
public static final int app_name=0x7f050000; public static final int hello_world=0x7f050001; public static final int menu_settings=0x7f050002;
public static final int title_activity_my_main=0x7f050003; }
public static final class style {
public static final int AppTheme=0x7f060000; }
}
You can see that many constants are defined in this code. The names of these constants are the same as the file names in the res folder, which proves that the R.java file stores the index of all resources of the project. With this file, it is more convenient to use resources in applications and identify the resources required. Because this file does not allow manual editing, you only need to refresh the project when adding new resources to it. The R.java file automatically generates the index of all resources.
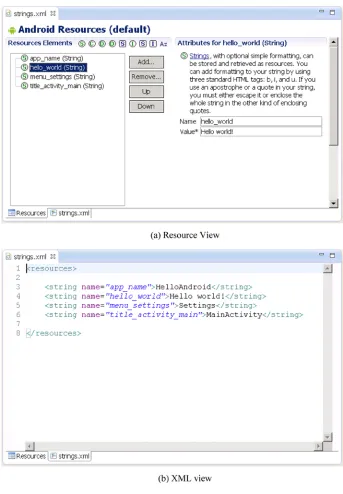
Definition File of Constants
The values subdirectory of the project contains a definition file for the strings, colors, and array constants; the string constant definitions are in the strings.xml file. These constants are used by other files in the Android project.
Chapter 1 ■ GUI DesIGn for anDroID apps, part 1: General overvIew
The file content is as follows:
<resources>
<string name="app_name">HelloAndroid</string> <string name="hello_world">Hello world!</string> <string name="menu_settings">Settings</string>
<string name="title_activity_main">MainActivity</string>
</resources>
The code is very simple; it only defines four string constants (resources).
Layout Files
Layout files describe the size, location, and arrangement of each screen widget
(combination of window and gadget). A layout file is the “face” of the application. Layout files are text files in XML format.
Widgets are visual UI elements, such as buttons and text boxes. They are equivalent to controls and containers in the Windows system terminology. Buttons, text boxes, scroll bars, and so forth are widgets. In the Android OS, widgets generally belong to the View class and its descendant classes and are stored in the android.widget package.
Chapter 1 ■ GUI DesIGn for anDroID apps, part 1: General overvIew
When you click the design window (in this case, activity_main.xml), you can see the corresponding contents of the XML-formatted text file, as shown in Figure 1-8.
Figure 1-8. The main layout file of the HelloAndroid example
The contents of the file are as follows:
<RelativeLayout xmlns:android="http://schemas.android.com/apk/res/android" xmlns:tools="http://schemas.android.com/tools"
android:layout_width="match_parent" android:layout_height="match_parent" >
<TextView
android:layout_width="wrap_content" android:layout_height="wrap_content" android:layout_centerHorizontal="true" android:layout_centerVertical="true" android:padding="@dimen/padding_medium" android:text="@string/hello_world" tools:context=".MainActivity" />
In this code, there are several layout parameters:
• <RelativeLayout>: The layout configuration for the relative position.
• android:layout_width: Customizes the screen width of the current view; match_parent represents the parent container (in this case, the activity) match; fill_parent fills the entire screen; wrap_content, expressed as text fields, changes depending on the width or height of this view.
• android:layout_height: Customizes the screen height occupied by the current view.
Two other common parameters, not shown in this layout file, are as follows: • android:orientation: Here means the layout is arranged
horizontally.
• android:layout_weight: Give a value for the importance assigned to multiple views of a linear layout. All views are given a layout_weight value; the default is zero.
Although the layout file is an XML file, you do not have to understand its format or directly edit it, because the Android Development Tools and Eclipse provide a visual design interface. You simply drag and drop widgets and set the corresponding properties in Eclipse, and your actions are automatically recorded in the layout file. You can see how this works when you walk though the application development example in following sections.
Source Code File
When a project is built, Eclipse generates a default .java source code file that contains the application basic runtime code for the project. It is located in the project folder under the src\com\example\XXX directory (where XXX is the project name). The file name of the generated application projects in this case is the source code file name that corresponds to the [Activity Name] key, so the file is named MainActivity.java.
The content of MainActivity.java is as follows:
package com.example.flashlight;
import android.os.Bundle; import android.app.Activity; import android.view.Menu; import android.view.MenuItem;
Chapter 1 ■ GUI DesIGn for anDroID apps, part 1: General overvIew
public class MyMainActivity extends Activity { @Override
public void onCreate(Bundle savedInstanceState) { super.onCreate(savedInstanceState);
setContentView(R.layout.activity_my_main); }
@Override
public boolean onCreateOptionsMenu(Menu menu) {
getMenuInflater().inflate(R.menu.activity_my_main, menu); return true;
} }
Component Structure of Applications
The Android application framework provides APIs for developers. Because the application is built in Java, the first level of the program contains the UI needs of the various controls. For example, views (View components) contain lists, grids, text boxes, buttons, and even an embedded web browser.
An Android application usually consists of five components:
Activity • Intent receiver • Service • Content provider •
Intent and intent filters •
The following sections discuss each components a bit more.
Activity
Applications with visual UIs are implemented using activities. When a user selects an application from the main screen or an application launcher, it starts an action or an activity. Each activity program typically takes the form of a separate interface (screen). Each activity is a separate class that extends and implements the activity’s base class. This class is shown as the UI, consisting of View components responding to events.
Most programs have multiple activities (in other words, an Android application is composed of one or more activities). Switching to another interface loads a new activity. In some cases, a previous activity may give a return value. For example, an activity that lets the user select a photo returns the photo to the caller.
An activity is a container, which itself is not displayed in the UI. You can roughly imagine an activity as a window in the Windows OS, but the view window is not only for displaying but also for completing a task.
Intent and Intent Filters
Android achieves interface switching through a special class called intent. An intent describes what the program does. The two most important parts of the data structure are the action and the data processed in accordance with established rules (data). Typical operations are MAIN (activity entrance), VIEW, PICK, and EDIT. Data to be used in the operation is presented using a Universal Resource Identifier (URI). For example, to view a person’s contact information, you need to create an intent using the VIEW operation, and the data is a pointer to the person’s URI.
A class associated with an intent is called an IntentFilter. An intent encapsulates a request as an object; IntentFilter then describes what intentions an activity (or, say, an intent receiver, explained in a moment) can process. In the previous example, the activity that shows a person’s contact information uses an IntentFilter, and it knows how to handle the data VIEW operation applied to this person. The activity in the AndroidManifest.xml file using IntentFilter is usually accomplished by parsing the intent activity switch. First, it uses the startActivity (myIntent) function to start the new activity, next it systematically checks the IntentFilter of all installed programs, and then it finds the activity that is the best match with the myIntent corresponding to IntentFilter. This new activity receives the message from intent and then starts. The intent-resolution process occurs in real time in the startActivity called. This process has two advantages:
The activity emits only one
• intent request and can reuse the
function of other components.
The activity can always be replaced by an equivalent new activity •
of the IntentFilter.
Service
A service is a resident system program that has no UI. You should use a service for any application that needs to run continuously, such as a network monitor or checking for application updates.
Chapter 1 ■ GUI DesIGn for anDroID apps, part 1: General overvIew
When two modes are in mixed use—for example, one mode calls startService() and other modes call bindService()—then only when both the stopService call and the unbindService call occur will the service be terminated.
A service process has its own life cycle, and Android tries to keep a service process that has been started or bound. The service process is described as follows:
If the service is the implementation process of the method •
onCreate(), onStart, or onDestroy(), then the main process becomes a foreground process to ensure that this code is not stopped.
If the service has started, the value of its importance is lower •
than that of the visible process but above all invisible processes. Because only a few processes are visible to the user, as long as the memory is not particularly low, the service does not stop.
If multiple clients have bound to the service, as long as any one of •
the clients is visible to the user, that service is visible.
Broadcast Intent Receiver
When you want to execute some code associated with external events, such as have a task performed in the middle of the night or respond to a phone ringing, use IntentReceiver. Intent receivers have no UI and use NotificationManager to inform users that their event has happened. An intent receiver is declared in the AndroidManifest.xml file Table 1-3. The Usage Model of a Service
Mode
Start
End
Visit
Notes
Start/ stop Context. startService() Context. stopService()
receiver is triggered, the system starts your program. Programs can also use Context.broadcastIntent() to send their intent broadcast to other programs.
Android applications can be used to handle a data element or to respond to an event (such as receiving text messages). Android applications are deployed to the device together with an AndroidManifest.xml file. AndroidManifest.xml contains the necessary configuration information, so the application is properly installed on the device. AndroidManifest.xml also includes the necessary class names and the types of events that can be handled by the application, as well as the necessary permissions to run the application. For example, if an application needs to access the network—to, say, download a file—the manifest file must be explicitly listed in the license. Many applications may enable this particular license. This declarative security can help reduce the possibility of damage to equipment from malicious applications.
Content Provider
You can think of content providers as database servers. A content provider’s task is to manage persistent data access, such as a SQLite database. If the application is very simple, you might not need to create a content-provider application. If you want to build a larger application or need to build applications to provide data for multiple activities or applications, you can use the content provider for data access.
If you want other programs to use their own programs’ data, a content provider is very useful. The content-provider class implements a series of standard methods that allows other programs to store and read data that can be processed by the content provider.
Android Emulator
Android does not use the ordinary Java virtual machine (JVM); it uses the Dalvik virtual machine (DVM) instead. The DVM and JVM are fundamentally different. The DVM takes up less memory, is specifically optimized for mobile devices, and is more suitable for mobile phones used in embedded environments. Other differences are as follows:
The general JVM is based on the stack-based virtual machine, but •
the DVM is a register-based virtual machine. The latter is better because applications can achieve maximum optimization based on the hardware, which is more in line with the characteristics of mobile devices.
The DVM can run multiple virtual machine instances simultaneously •
Chapter 1 ■ GUI DesIGn for anDroID apps, part 1: General overvIew
The DVM provides a less restrictive license platform than the •
general JVM. The DVM and JVM support different generic code. The DVM does not run standard Java bytecode, but rather Dalvik executable format (.dex). Java code compilation of Android applications actually consists of two processes. The first step is to compile the Java source code into normal JVM executable code, which uses the file-name suffix .class. The second step is to compile the bytecode into Dalvik execution code, which uses the file-name suffix .dex. The first step compiles the source code files under the src subdirectory in the project directory into .class files in the bin\class directory; and the second step moves the files from the bin\class subdirectory to classes.dex files in the bin directory. The compilation process is integrated into the Eclipse build process; however, you can also use the command line to compile manually.
Introducing Android Runtime (ART)
ART is an Android runtime that first became available in Google Android KitKat (4.4) as a preview feature. It is also called Dalvik version 2 and is under active development in the Android Open Source Project (AOSP). All smartphones and tablets with Android KitKat keep Dalvik as the default runtime. This is because some OEMs still do not support ART in Android implementations, and most third-party applications are still built based on Dalvik and have not yet added support for the new ART.
As described by Google on the Android developer site, most existing apps should work when running with ART. However, some techniques that work on Dalvik do not work on ART. The differences between Dalvik and ART are shown in Table 1-4.
Table 1-4. Dalvik vs. ART Summary
Dalvik
ART
Application APK package with DEX class file Same as Dalvik
Compile Type Dynamic compilation (JIT) Ahead-of-time compilation (AOT)
Functionality Stable and went through extensive QA
Basic functionality and stability
Installation Time Faster Slower due to compilation
App Launch Time Mostly slower due to JIT compilation and interpretation
Mostly faster due to AOT compilation
Storage Footprint Smaller Larger, with precompiled binary
ART offers some new features to help with application development, performance optimization, and debugging, such as support for the sampling profiler and debugging features like monitoring and garbage collection. Transitioning from Dalvik to ART is likely to take some time, and Dalvik and ART will both be provided in Android to allow smartphone and tablet users to select and switch. However, future 64-bit Android will be based on ART.
Summary
Chapter 2
GUI Design for Android
Apps, Part 2:
The Android-Specific GUI
This chapter describes the state transitions of activities and discusses the Context class, intent, and the relationship between applications and activities.
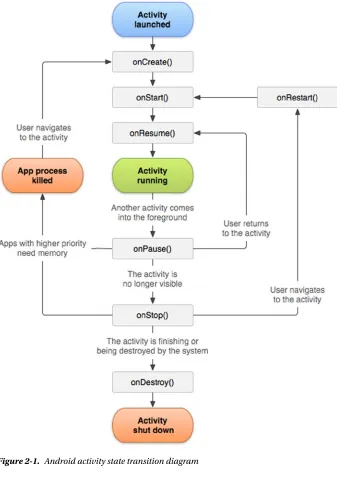
State Transitions of Activities
As mentioned in Chapter 1, the activity is the most important component. Activities have their own state and transition rules, and they are the basis of what you need to understand to write Android applications.
Activity States
When activities are created or destroyed, they enter or exit the activity stack. And as they do, they transition among four possible states:
Paused: In some cases, an activity is visible but does not have focus. At this moment, it is suspended. When the active activity is fully transparent or is the non-full screen activity, the activity below reaches this state. Paused activities are considered active but do not accept user input events. In extreme cases, Android will kill a paused activity to restore resources to the active activity. When an activity is completely invisible, it becomes stopped.
Stopped: When an activity is not visible, it is stopped. This activity remains in memory to save all state and member information. But when the system needs memory, this activity is “taken out and shot.” When an activity stops, it is very important to save the data and the current UI state. Once the activity exits or is closed, it becomes inactive.
Inactive: When an activity is killed, it becomes inactive. Inactive activities are removed from the activity stack. When you need to use or display the activity, it needs to be started again.
Chapter 2 ■ GUI DesIGn for anDroID apps, part 2: the anDroID-speCIfIC GUI
State change is not artificial and is controlled entirely by the Android memory manager. Android first closes applications that contain inactive activities, followed by those with stopped activities. In extreme cases, it removes paused activities.
To ensure a flawless user experience, transition of these states is invisible to users. When an activity returns to active status from the paused, stopped, or inactive state, the UI must be nondiscriminatory. So, when an activity is stopped, it is very important to save the UI state and data. Once an activity becomes active, it needs to recover the saved values.
Important Functions of Activities
The activity state transition triggers the function of the corresponding activity class (that is, the Java method). Android calls these functions; developers do not have to explicitly call them. They are called state-transition functions. You can override the state-transition functions so they can complete their work at the specified time. There are also some functions that are used to control the state of the activity. These functions constitute the basis of activity programming. Let’s learn about those functions.
onCreate State-Transition Function
The onCreate function prototype is as follows:
void onCreate(Bundle savedInstanceState);
This function is run when the activity is first loaded. When you start a new program, its main activity’s onCreate event is executed. If the activity is destroyed (OnDestroy, explained later) and then reloaded into the task, its onCreate event participants are re-executed.
An activity is likely to be forced to switch to the background. (An activity switched to the background is no longer visible to the user, but it still exists in the middle of a task, such as when a new activity is started to “cover” the current activity; or the user presses the Home button to return to the home screen; or other events occur in the new activity on top of the current activity, such as an incoming caller interface.) If the user does not view the activity again after a period of time, the activity may be automatically destroyed by the system along with the task and process. If you check the activity again, the
onCreate event initialization activity will have to be rerun.
And sometimes you may want users to continue from the last open operating state of the activity, rather than starting from scratch. For example, when the user receives a sudden incoming call while editing a text message, the user may have to do other things immediately after the call, such as saving the incoming phone number to a contact. If the user does not immediately return to the text-editing interface, the text-editing interface is destroyed. As a result, when the user returns to the SMS program, that user may want to continue from the last edit. In this case, you can override the activity’s void
Chapter 2 ■ GUI DesIGn for anDroID apps, part 2: the anDroID-speCIfIC GUI
onStart State-Transition Function
The onStart function prototype is as follows:
void onStart();
The onStart function executes after the onCreate event or when the current activity is switched to the background. When the user switches back to this activity by selecting it from switch panel, if it has not been destroyed, and only the onStop event has been performed, the activity will skip onCreate event activities and directly execute onStart
events.
onResume State-Transition Function
The onResume function prototype is as follows:
void onResume()
The onResume function is executed after the OnStart event or after the current activity is switched to the background. When the user views this activity again, if it has not been destroyed, and if onStop events have not been performed (activities continue to exist in the task), the activity will skip onCreate and onStart event activities and directly execute onResume events.
onPause State-Transition Function
The onPause function prototype is as follows:
void onPause()
The onPause function is executed when the current activity is switched to the background.
onStop State-Transition Function
The onStop function prototype is as follows:
void onStop()
The onStop function is executed after the onPause event. If the user does not view the activity again for some time, the onStop event of the activity is executed. The onStop
onRestart State-Transition Function
The onRestart function prototype is as follows:
void onRestart()
After the onStop event is executed, if the activity and the process it resides in have not been systematically destroyed, or if the user views the activity again, the onRestart
event(s) of the activity are executed. The onRestart event skips the onCreate event activities and directly executes the onStart events.
onDestroy State-Transition Function
The onDestroy function prototype is as follows:
void onDestroy()
After an onStop event of the activity, if the user does not view the activity again, it is destroyed.
The finish Function
The finish function prototype is as follows:
void finish()
The finish function closes the activity and removes it from the stack, which leads to a call to the onDestroy() state-transition function. One way to resolve this is for the user to navigate to the previous activity using the Back button.
In addition to the activity switch, the finish function triggers the activity’s state-transition function, and the startActivity and startActivityForResult methods of the context class (described in the next sections) also activate it. Functions such as Context. startActivity also cause the construction of activity objects (that is, create new ones).
Chapter 2 ■ GUI DesIGn for anDroID apps, part 2: the anDroID-speCIfIC GUI
Functions such as Context.startActivity in Table 2-1 trigger three actions: constructing new Activity objects, onCreate, and onStart. When an activity that is moved from off screen places to the top of the screen display (that is, displayed in front of the user), it generally only includes functions being called by onStart.
The Context Class
The Context class is an important Android concept to know. The class is inherited from the Object function, whose inheritance is as follows:
java.lang.Object
↳ android.content.Context
The literal meaning of context is the text in the adjacent area, which is located in the
android.content.Context of the framework package. The Context class is a LONG type, similar to the Handle handler in Win32. Context provides the global information interface about the application environment. It is an abstract class, and its execution is provided by the Android system. It allows access to resources and characterized types of applications. At the same time, it can start application-level operations, such as starting activities and broadcasting and receiving intents.
Many methods require the caller to be identified through a context instance. For example, the first parameter of Toast is Context; and usually you use this to replace the activity, which indicates that the caller’s instance is an activity. But other methods, such as a button’s onClick (View view), cause errors if you use this. In this case, you may use
Table 2-1. Triggers and Their Functions
Typical Trigger Cause
Corresponding Method
of Activity Executed
Explanations
Context.
startActivity[ForResult]()
Note: As long as the activity is displayed and viewable on the screen, this method will be called.
new Activity()
onCreate() Completes the constructor function, Saves the activity
object to the application object, and initializes the various controls (such as
View).
onStart() Similar to View.onDraw().
ActivityName.this to solve the problem, because the class implements the context of several major Android-specific models like activities, services, and broadcast receivers.
If the parameter—especially the constructor parameter of the class (such as
Dialog)—is the Context type, the actual parameters are typically activity objects, generally [this]. For example, the Dialog constructor prototype is
Dialog.Dialog(Context context)
Here’s an example:
public class MyActivity extends Activity{ Dialog d = new Dialog(this);
Context is the ancestor of most classes of Android, such as broadcasting, intents, and so on, and it provides the interface of the global information application environment. Table 2-2 lists the important subclasses of Context. You can find a detailed description in the help documentation for the Android Context class.
Table 2-2. Important Subclasses of Context
Subclass
Explanation
Activity User-friendly interface class
Application Base class that provides global application state maintenance
IntentService Base class used to handle asynchronous requests for the service (expressed in an Intent way)
Service A component of the application that represents either a time-consuming operation that has no interaction with the user or a task that provides functionality for other application tasks
Classes are called offspring classes because they are direct or indirect subclasses of
Context and have an inheritance relationship like activities:
java.lang.Object
↳ android.content.Context
Chapter 2 ■ GUI DesIGn for anDroID apps, part 2: the anDroID-speCIfIC GUI
Context can be used for many operations in Android, but it main function is to load and access resources. There are two commonly used contexts: the application context and the activity context. The activity context is usually passed between a variety of classes and methods, similar to the code of onCreate for an activity, as follows:
protected void onCreate(Bundle state) { super.onCreate(state);
TextView label = new TextView(this); // Pass context to view control setContentView(label);
}
When the activity context is passed to the view, it means that view has a reference pointed to an activity and references resources taken by the activity: view hierarchy, resource, and so on.
You can also use the application context, which always accompanies the application’s life but has nothing to do with the activity life cycle. The application context can be acquired with the Context.getApplicationContext or Activity.getApplication method.
Java usually uses a static variable (singleton and the like) to synchronize states between activities (between classes inside a program). Android’s more reliable approach is to use the application context to associate these states.
Each activity has a context, which contains the runtime state. Similarly, an application has a context that Android uses to ensure that it is the only instance of that context.
If you need to make a custom application context, first you must define a custom class that inherits from android.app.Application; then describe the class in the application’s AndroidManifest.xml file. Android automatically creates an instance of this class. By using the Context.getApplicationContext() method, you can get the application context inside each activity. The following example code gets the application context in the activity:
class MyApp extends Application {
// MyApp is a custom class inherited from android.app.Application public String aCertainFunc () {
... }
}
class Blah extends Activity {
public void onCreate(Bundle b){ ... ...
MyApp appState = ((MyApp)getApplicationContext()); // Get Application Context
appState.aCertainFunc();
//Use properties and methods of the application ... ...
Table 2-3. Commonly Used Methods for Obtaining Context
Function Prototype
Function
abstract Context ContextWrapper. getApplicationContext ()
Returns the current process corresponding to the global context of a single application.
abstract ApplicationInfo
ContextWrapper.getApplicationInfo ()
Returns the context package corresponding to the information of the entire application.
abstract ContentResolver
ContextWrapper.getContentResolver ()
Returns the content-resolver instance of the corresponding application package.
abstract PackageManager
ContextWrapper.getPackageManager ()
Returns the package-manager instance for finding all package information.
abstract String ContextWrapper. getPackageName ()
Returns the current package name.
abstract Resources ContextWrapper. getResources ()
Returns the resource instance of the (user) application package.
abstract SharedPreferences
ContextWrapper.getSharedPreferences (String name, int mode)
Finds and holds the contents of the preference file whose name is specified by the parameter name. Returns the value of the shared preferences (SharedPreferences) that you can find and modify. When using a proper name, only one instance of SharedPreferences is returned to the caller, which means once the changes are complete, the results are shared with each other.
public final String Context. getString (int resId)
Returns a localized string from the application package’s default string table.
abstract Object ContextWrapper. getSystemService (String name)
Returns processing system-level services according to the name specified by the variable name. The returned object classes vary based on the name of the request. You can get global information about the application environment using the
get function of Context. The main functions are shown in Table 2-3 and are either