LAND FORCE
COMBAT TEAM OPERATIONS
(INTERIM)
(ENGLISH)
(This publication is active on receipt.)
Issued on the Authority of the Chief of Land Staff
B-GL-321-006/FP-001
WARNING
LAND FORCE
COMBAT TEAM OPERATIONS
(INTERIM)
(ENGLISH)
(This publication is active on receipt.)
Issued on the Authority of the Chief of Land Staff
OPI: DAD 4 2003-10-28
B-GL-321-006/FP-001
WARNING
FOREWORD
1. B-GL-321-006/FP-001, Combat Team Operations(Interim), is issued on authority of the Chief of the Land Staff.
2. This publication is effective upon receipt.
3. The French version of this publication is B-GL-391-006/FP-002, Les operations de l’équipe de combat.
4. Unless otherwise noted, masculine pronouns contained herein refer to both genders.
5. Suggestions for amendment and/or improvement shall be forwarded through normal channels to the Army Lessons Learned Centre or to the Directorate of Army Doctrine as appropriate. 6. This publication is available electronically on both the Defence Information Network (DIN) and the World Wide Web in the Army Electronic Library. Keyword—Army Electronic Library.
PREFACE
GENERAL
1. This interim edition of B-GL-321-006/FP-001 Combat Team Operations (Interim) builds upon the previous drafts of the Tactics School’s Combat Team TTPs, and also incorporates lessons learned from the Mobile Automated Instrumentation Suite (MAIS) Trial conducted in CFB Gagetown. This interim edition supersedes all earlier drafts, and is the principal reference for LF units conducting combat team training and operations.
PURPOSE
2. The purpose of B-GL-321-006/FP-001, Combat Team Operations (Interim), is to provide LAV III and Leopard C2 equipped units with the low level tactical knowledge that will maximize their effectiveness.
DOCTRINAL RELEVANCE
3. Combat Team Operations, along with its complementary manual, B-GL-321-007/FP-001, LAV Company Tactics, are being produced as interim editions. While the fielding, integration, training and level of experience with the LAV III and Leopard C2 continues across the field force, there are many issues yet to be resolved. In the meantime, these units are to use Combat Team Operations and LAV Company Tactics as primary doctrinal guidance for training and operations. Only through application of this doctrine will we be able to effectively gauge the precision and relevance of these manuals. 4. In the near future, LFDTS will coordinate an Army-wide review of these manuals to include your feedback regarding all aspects of integrating and fighting the LAV III and Leopard C2. Following the review process, the manuals will be improved, perhaps integrated into one publication, and will then be produced as final editions. Your assistance in this process is critical to the success of the review and to the standard of our combat team doctrine.
TABLE OF CONTENTS
FOREWORD ...I
PREFACE ...iii
General ...iii
Purpose ...iii
Doctrinal Relevance ...iii
CHAPTER 1 INTRODUCTION SECTION 1 COMBAT TEAM DEFINITION AND STRUCTURE... 1
Definition... 1
Structure ... 1
SECTION 2 COMBAT TEAM FREQUENCIES... 1
Combat Team Frequencies ... 1
SECTION 3 THE COMBAT ESTIMATE... 3
General ... 3
CHAPTER 2 OFFENSIVE OPERATIONS SECTION 1 HASTY ATTACK ... 5
Warning, Security, Recce and Plan ... 5
Hasty Attack with One Tank Troop in Fire Base ... 9
Hasty Attack with Two Tank Troops in Fire Base ... 15
Hasty Attack from the Line of March... 20
Hasty Attack on Converging Axes ... 21
Hasty Attack with Armour in Fire Base While Infantry Assaults ... 23
Hasty Attack Assault and Fight Through ... 24
Consolidation... 30
Pursuit Operations ... 35
Radio Warning Order for Hasty Attack ... 38
SECTION 2 OBSTACLE BREACHING ... 40
Action on Mine Contact ... 40
Hasty Minefield Breach... 43
Composite Obstacle Breach ... 47
CHAPTER 3 DEFENSIVE OPERATIONS SECTION 1 DEFENCE... 57
Area and Mobile Defence... 57
Defence in a Built-up Area... 70
Reserved Demolition Guard ... 78
CHAPTER 4 DELAYING OPERATIONS Delaying Operations... 85
CHAPTER 5 TRANSITIONAL PHASES SECTION 1 THE ADVANCE... 89
Advance to Contact ... 89
Crest Drill ... 93
Gap Drill... 94
Short Defile Drill... 96
Long Defile Drill ... 99
Blind Corner Drill ... 102
Blind Corner / T-Junction Drill ... 104
Point Obstacle Drill ... 105
SECTION 2 MEETING ENGAGEMENT ... 107
Meeting Engagement... 107
SECTION 3 LINK-UP... 109
Link-up ... 109
SECTION 4 BREAKOUT ... 114
Breakout ... 114
Withdrawal ... 117
SECTION 6 RELIEF ... 123
Relief ... 123
Passage of Lines ... 129
CHAPTER 6 COMBAT SERVICE SUPPORT SECTION 1 COMMAND AND CONTROL OF THE COMBAT TEAM ECHELON ... 132
Command and Control of the Combat Team Echelon... 133
SECTION 2 A COMPARISON OF THE ECHELONS ... 137
A Comparison of the Echelons……….133
SECTION 3 HIDE/HARBOUR, LEAGUER, AND RUNNING REPLENISHMENT DRILLS ... 141
Hide/Harbour, Leaguer, and Running Replenishment Drills ... 139
LIST OF FIGURES
Figure 2-1: Illustrates Warning, Security, Recce and Plan for
Hasty Atk... 6
Figure 2-2: Illustrates Right Flank Hasty Atk ... 7
Figure 2-3: Illustrates Right Flank Hasty Atk – One Troop in Fire Base ... 10
Figure 2-4: Two Lanes—One Troop in Fire Base ... 11
Figure 2-5: One Lane—One Troop in Fire Base... 13
Figure 2-6: Illustrates Right Flank Hasty Atk—wo Troops in Fire Base ... 16
Figure 2-7: Two Lanes—Two Troops in Fire Base ... 17
Figure 2-8: One Lane—Two Troops in Fire Base ... 18
Figure 2-9: Atk from the Line of March ... 21
Figure 2-10: Hasty Atk Armour/Inf on Converging Axes ... 22
Figure 2-11: Armour in Fire Base While Inf Assaults ... 24
Figure 2-12: Break-in, Initial Approach... 25
Figure 2-13: Break-in, the Edge of Enemy Position ... 26
Figure 2-14: Break-in of a Trench System... 27
Figure 2-15: Break-in of a Trench System, One Lane ... 28
Figure 2-16: Fight-through... 28
Figure 2-17: Hasty Atk Consolidation ... 31
Figure 2-18: Combat Team Pursuit Operations ... 35
Figure 2-19: Action on Mine Contact ... 41
Figure 2-20: Hasty Minefield Breach, Initial ... 44
Figure 2-21: Hasty Minefield Breach... 46
Figure 2-22: Composite Obstacle Breach, Initial ... 48
Figure 2-23: Composite Obstacle Breach, Step 1 ... 48
Figure 2-24: Composite Obstacle Breach, Step 2 ... 50
Figure 2-25: Composite Obstacle Breach, Step 3 ... 50
Figure 2-26: Composite Obstacle Breach, Step 4 ... 51
Figure 2-27: Composite Obstacle Breach, Step 5 ... 51
Figure 2-28: Composite Obstacle Breach, Step 6 ... 52
Figure 2-29: Composite Obstacle Breach, Step 7 ... 53
Figure 2-30: Composite Obstacle Breach, Assault Force Entry... 53
Figure 3-1: Illustrates an Area Defence ... 58
Figure 3-2: Illustrates a Mobile Defence... 59
Figure 3-3: Dividing a Killing Zone ... 60
Figure 3-4: Disrupt... 67
Figure 3-5: Turn ... 67
Figure 3-6: Fix ... 68
Figure 3-7: Block ... 68
Figure 3-9: Bridge Demolition Guard... 79
Figure 4-1: The Delay... 87
Figure 5-1: Combat Team Advance—Sqn Box, Coy Column... 89
Figure 5-2: Combat Team Advance—Sqn 3-Up Line, Coy 2-Up Column ... 91
Figure 5-3: Crest Drill... 94
Figure 5-4: Gap Drill ... 95
Figure 5-5: Short Defile Drill, Recce... 97
Figure 5-6: Short Defile Drill, Clearance... 98
Figure 5-7: Short Defile Drill, Crossing ... 99
Figure 5-8: Long Defile Drill, Recce ... 100
Figure 5-9: Long Defile Drill, Clearance... 101
Figure 5-10: Long Defile Drill, Crossing... 102
Figure 5-11: Blind Corner Drill, Left... 103
Figure 5-12: Blind Corner Drill, T-Junction ... 104
Figure 5-13: Point Obstacle Drill... 106
Figure 5-14: Tactical Options for a Meeting Engagement... 108
Figure 5-15: Link-up of Moving Force with a Stationary Force.... 110
Figure 5-16: Link-up of Two Moving Forces ... 111
Figure 5-17: The Withdrawal... 119
Figure 5-18: Combat Team Relief in Place... 125
Figure 5-19: Forward Passage of Lines ... 129
Figure 5-20: Rearward Passage of Lines, Responsibilities ... 131
Figure 5-21: Rearward Passage of Lines ... 132
Figure 6-1: LAV Inf Coy A1 Ech ... 137
Figure 6-2: Armd Sqn A1 Ech ... 137
Figure 6-3: LAV Rifle Coy A2 Ech... 138
Figure 6-4: Armd Sqn A2 Ech ... 138
Figure 6-5: Example of a Perimeter Hide/Harbour Layout... 141
Figure 6-6: Example Layout of a Combat Team Leaguer... 143
CHAPTER 1 INTRODUCTION
SECTION 1
COMBAT TEAM DEFINITION AND STRUCTURE
DEFINITION
1. A combat team is defined as: “A tactical grouping based on either a mechanized infantry company or a tank squadron, with at least a platoon or troop of the other arm and additional support as required” (ATB approved 2002-01-23).
STRUCTURE
2. The table of organization and equipment of 20 Canadian Mechanized Brigade Group (the Land Force doctrinal warfighting order of battle) was the basis for the establishment of the structure of the combat team that is used throughout this document. Specifically, the combat team is structured as follows (these composite elements include their A echelons as applicable):
a. 19-tank squadron;
b. 15-light armoured vehicle (LAV III) mechanized company;
c. an engineer troop, in the close support role; and d. one forward observation officer (FOO) party. 3. The combat team can be task organized with the addition of battle group (BG) assets such as Tube-launched, Optically-tracked, Wire-guided missile (TOW) under armour, recce, etc. and other supporting assets such as air defence (AD). These will not be discussed further within the context of the tactics, techniques and procedures (TTP).
SECTION 2
COMBAT TEAM FREQUENCIES
COMBAT TEAM FREQUENCIES
“C” sets. The basic premise is that the combat team commander’s “domestic net” is the combat team net.
SER APPOINTMENT INFANTRY COY CBT TM ARMD SQUADRON CBT TM
(a) (b) (c) (d)
1. Cbt Tm Commander
A—Cbt Tm Freq
C—BG Freq
A—Cbt Tm Freq
C—BG Freq
2. Cbt Tm 2IC A—Cbt Tm Freq
C—BG Freq
A—Cbt Tm Freq
C—BG Freq
3. Altn Arm Commander
A—Cbt Tm Freq
C—Squadron Freq
A—Cbt Tm Freq
C—Coy Freq
4. Altn Arm 2IC A—Cbt Tm Freq
C—BG Freq
A—Cbt Tm Freq
C—BG Freq
5. Sub-Sub-Unit (Troop/Platoon) Comds
Platoon: A—Cbt Tm Freq C—Nil or Coy Altn Freq
Troop:
A—Cbt Tm Freq C—Squadron Freq
Platoon:
A—Cbt Tm Freq C—Nil or Sqn Altn Freq
Troop:
A—Cbt Tm Freq C—Coy Freq
6. Engineer Troop Commander
A—Cbt Tm Freq
C—Fd Sqn Freq
A—Cbt Tm Freq
C—Fd Squadron Freq
7. FOO A—Cbt Tm Freq
C—Bty Freq
A—Cbt Tm
C—Bty Freq
8. Coy/Sqn Sergeant-Major
A—Cbt Tm Freq
C—Coy Freq
A—Cbt Tm Freq
C—Sqn Freq
NOTE
SECTION 3
THE COMBAT ESTIMATE
GENERAL
5. The 15 steps of battle procedure, as outlined in
B-GL-300-003/FP-000 Command, apply at the combat team level. The aim of this TTP is to outline the combat estimate, which is as follows:
SER STEP FACTOR CONSIDERATIONS
(a) (b) (c) (d)
1. One Mission Analysis
1 Superior commander’s intent two up and concept of operations one up. 2. Assigned/implied tasks. 3. Constraints. 4. Changed situation. 5. Mission statement.
2. Two Enemy 1. Intentions:
a. Two up—intent. b. One up—enemy concept of
operations.
c. Courses open to the enemy facing you.
2. Capabilities (armoured fighting vehicles, weapons, air, NBC, etc.) to include strengths and weaknesses.
3. Objectives (offence). 4. Dispositions (defence).
3. Three Ground 1. FLOCARK if time available. 2. Ground LEFT—COPPED. 3. Ground CENTRE—COPPED. 4. Ground RIGHT—COPPED. 5. Key terrain/vital ground.
4. Four Own Troops 1. Effect that friendly troops (flanks, front, rear) will have on our mission/tasks. 2. What effect will deficiencies to our combat strength (casualties) have on our ability to execute mission/tasks, i.e., need to regroup or fight with under strength elements.
5. Five Meteorology (Met)
1. Hours of daylight available.
2. Weather impact on air threat, NBCD, etc.
6. Six Time and
Space
SER STEP FACTOR CONSIDERATIONS
(a) (b) (c) (d)
7. Seven Assessment of
Tasks: a. Examine two
down. b. Order one
down.
1. Summarize tasks. 2. Prioritize tasks.
3. Options for grouping and/or phasing. 4. Combine tasks or forces.
5. Additional support required. 6. Eliminate tasks (risk management).
8. Eight Courses Open 1. Identify courses open.
2. Advantages/disadvantages (risks). 3. Compare to enemy most likely and most dangerous course open.
4. Select best course of action. 5. Review against principles of war and applicable fundamentals.
9. Nine Plan/orders Style of orders, i.e., radio/overlay, etc.
CHAPTER 2
OFFENSIVE OPERATIONS
SECTION 1 HASTY ATTACK
WARNING, SECURITY, RECCE AND PLAN
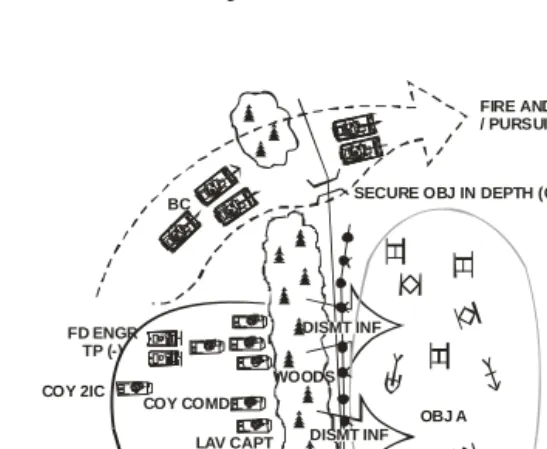
1. General. This TTP covers the actions of the combat team from initial contact to the arrival of the assault force in the attack position.
2. Warning. The following actions will be taken upon initial contact:
a. the first element of the combat team that comes into contact with the enemy (normally the leading tank troops) will send a contact report and tries to win the direct firefight;
b. the combat team will send a contact report to battle group HQ (infantry combat team—2IC and armoured combat team—battle captain (BC)); and c. the FOO will move to a position of observation,
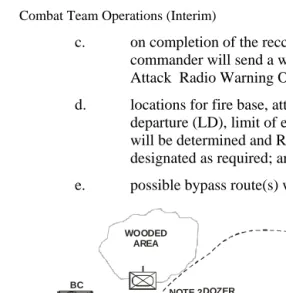
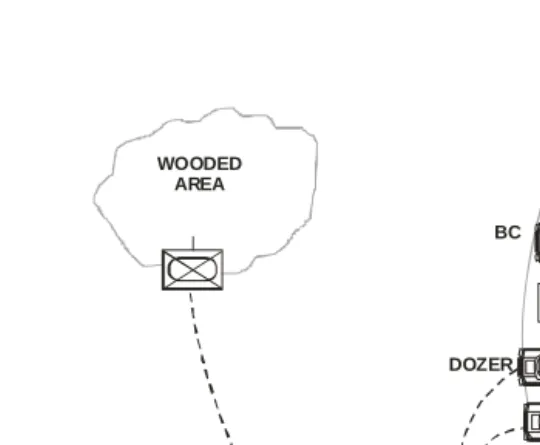
which could be at the fire base or other location (Note 1 on Figure 2-1), and will start adjusting and recording the enemy position.
3. Security. Normally, armour elements will be involved in winning the initial firefight. Elements of the combat team not involved in the direct firefight will move into a position concealed from enemy observation (air and ground) under the control of the company 2IC (Note 2 on Figure 2-1). This may be the potential rendezvous (RV). 4. Recce. The following actions will be taken in order to conduct the recce:
a. the combat team commander and the supporting arm officer commanding (OC) will move into a position of observation (Note 3 on Figure 2-1);
c. on completion of the recce, the combat team commander will send a warning order (see “Hasty Attack Radio Warning Order”, page 38 for format); d. locations for fire base, attack position, line of
departure (LD), limit of exploitation, and cut-off will be determined and RVs and routes will be designated as required; and
[image:20.612.37.323.57.350.2]e. possible bypass route(s) will be located.
Figure 2-1: Illustrates Warning, Security, Recce and Plan for a Hasty Atk
5. Plan. The following preliminary moves and orders will occur:
a. if required, designated elements will move to secure the attack position, LD and fire base;
b. the fire base and cut-off force will move to designated location;
c. the assault force will move to RV location (RV optional) under the control of the company 2IC; d. the combat team commander will issue orders (see
“Hasty Attack Radio Orders”, page 39 for format) and the battle group HQ will be informed;
FIRST TPS IN CONTACT
NOTE 3
NOTE 1 NOTE 2DOZER
SQN OC
INF OC FOO BC
WOODED AREA
(½)
ENGR TP COMD
Figure 2-2: Illustrates Right Flank Hasty Atk
e. the squadron OC, the company OC, (Note 1 of Figure 2-2) and assault force will move to attack position (Note 2 on Figure 2-2); and
f. upon arrival in the attack position, intimate support tanks will elevate their barrels for ease of
identification and the troop leader will operate on company radio frequency while monitoring combat team frequency, which may be the same (see Chapter 1, Section 2).
6. Combat Functions:
a. Command. The first decision a combat team commander has to make is based on a quick analysis of the tactical situation he is facing; i.e., he has to conduct a Combat Estimate. Generally, he has to consider three options: bypass, conduct a hasty attack or becoming a fixing force for a battle group attack. His decision will be based on his mission analysis.
b. Protection. Location for consolidation will be determined by the protection available on the enemy
WOODED AREA
NOTE 1
FOO DOZER
BC
NOTE 2 SQN OC
COY OC ATK POSN
LD FB
RV (OPTIONAL)
position compared to the threat of enemy indirect fire and/or counter-moves.
c. Firepower:
(1) The enemy should be suppressed with direct fire and neutralized with indirect fire prior to crossing the LD. As a minimum, the enemy should be neutralized by indirect fire.
(2) For a combat team hasty attack, the fire base will normally be controlled by the squadron BC. As a fixing force for a battle group or higher formation attack, the fire base will likely be controlled by the combat team commander.
(3) Cutting off or blocking the enemy may be done by manoeuvre, direct fire and/or indirect fire.
d. Manoeuvre:
(1) If bypassing the enemy is an option, the enemy must be picketed to maintain contact. The picket will pass the enemy over to follow-on battle group elements. The picket must have the battle group frequency. Flank and rear security will have to be increased.
(2) Fire base or assault forces may be used to cut off or block the enemy.
(3) Limit of exploitation and arcs must be identified for consolidation.
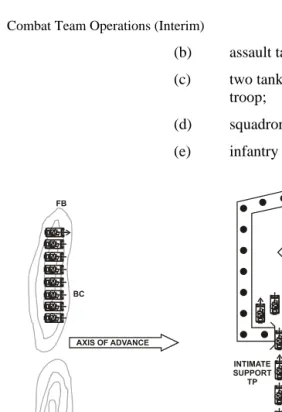
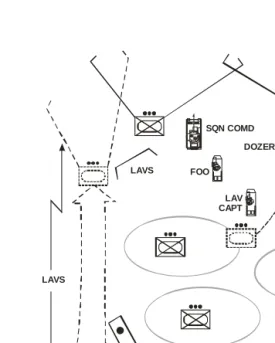
HASTY ATTACK WITH ONE TANK TROOP IN FIRE BASE
7. Mounting (Figure 2-3). For warning, security, recce and plan, see “Warning, Security, Recce and Plan”, page 5. The hasty attack with one tank troop in fire base will be mounted as follows:
a. The first tank troop in contact will normally become the fire base. The squadron BC will move to fire base location.
b. Upon arrival in the attack position (unless otherwise stated in the warning order), the three tank troops will adopt the following positions:
(1) the first troop to arrive will be left forward (assault troop);
(2) the second troop to arrive will be right forward (assault troop); and
(3) the third troop to arrive will take position behind the assault troops and become the intimate support troop, elevating their barrels for identification.
c. Two breaching teams, one from each assault troop, will be formed in attack position. A team is
comprised of one tank with plough and one engineer section (barrels of breaching tank will be at the 9 o’clock position).
d. Breaching reserve will be the plough tank of the intimate support troop, which is normally situated centrally so that the plough tank can be sent to either lane if required. Refer to “Obstacle Breaching Hasty Minefield Breach”, page 43 for breaching drill.
Figure 2-3: Illustrates Right Flank Hasty Atk—One Troop in Fire Base
8. Assault. The assault will be conducted as follows: a. the breaching teams will cross LD at H hour; b. the rest of assault force will remain in the attack
position until committed by the combat team commander;
c. elements not required during the assault (such as armoured engineer section) will stay in attack position under cover unless called forward;
LD LD
ASLT TPS
BREACHING TEAM
ASLT
FORCES BREACHING RESERVE
ENGR TP COMD
FD ENGR SECT
FD ENGR SECT
BREACHING TEAM SQN OC
DOZER
COY
OC SUPPORT TPINTIMATE
PL PL
COY 2IC DEPTH PL LAV CAPT FB
BC
FOO
AXIS OF ADVANCE
Figure 2-4: Two Lanes—One Troop in Fire Base
d. order of march if two lanes available (Figure 2-4):
(1) lane one:
(a) breaching team;
(b) assault tanks (the troop will pick up the plough tank as troop arrives on enemy side of obstacle);
NOTES
1. Lanes will always be numbered from left to right. 2. Minimum 200 m between lanes.
3. If no obstacles are detected or suspected, the assault force will move to the attack position, cross the LD at H hour and move at best possible speed to the objective.
FB
BC
FOO
AXIS OF ADVANCE
(-)
FD ENGR FD ENGR
ASLT TK TPS MOVE TO CUT-OFF AND
NEUTRALIZE IN DEPTH
200 m
INTIMATE SUPPORT TP
LANE 1 LANE 2
SQN OC
DOZER
ENGR TP COMD
COY 2IC COY OC
(c) two tanks of intimate support troop;
(d) infantry platoon; (e) infantry company OC; (f) infantry platoon; and (g) LAV Capt; and
(2) lane two:
(a) breaching team;
(b) assault tanks (the troop will pick up the plough tank as troop arrives on enemy side of obstacle); (c) two tanks of intimate support
troop;
(d) squadron OC and dozer tank; and (e) infantry platoon.
e. order of march if one lane available (Figure 2-5): (1) breaching team;
(2) assault tanks; (3) intimate support tanks; (4) infantry platoon; (5) squadron OC and dozer tank; (6) infantry company OC;
(7) two remaining infantry platoons; and
Figure 2-5: One Lane—One Troop in Fire Base
9. Other Considerations—Combat Functions:
a. Command:
(1) The combat team commander will have to make the decision of committing the assault force to one lane only or two lanes when one of the lanes is 75 percent cleared. Once the first lane reports, the second lane will immediately send a SITREP. His decision will be based on the progression in the other attempted lane.
FB
BC
FOO
AXIS OF ADVANCE
(-) INTIMATE SUPPORT
TP
FD ENGR SECT
SQN OC
DOZER
COY 2IC COY OC
LAV CAPT FD ENGR SECT
(2) The company 2IC could be with the assault force or remain in the attack position.
b. Manoeuvre:
(1) Field engineers will clear wire obstacles and be prepared to support dismounted infantry on the objective.
(2) Reserve options will be tank troop(s) (normally from fire base after the arrival of the assault force on the objective), engineer section(s), infantry platoon and LAVs once infantry has dismounted.
c. Firepower:
(1) The fire base and indirect fire resources will concentrate their fires on objective while the breaching takes place. (2) LAVs could be used for tasks such as
secure attack position/LD, cut-off or flank protection after infantry has dismounted, etc.
(3) Fire support must be concentrated on those targets that it is vital to neutralize for the success of the attack.
(4) As the combat team approaches the enemy position, indirect fire will have to be maintained until last safe moment. (5) Once on the objective, fire support will
target in depth to disrupt a possible enemy counter-attack.
d. Protection:
NOTE
(1) Dispersion. Vehicles should be no closer than 50 m from one another in attack position. Vehicles will go to hatches down on arrival in attack position.
(2) Flank protection normally will be provided from within troops/platoons.
(3) Once the breaching teams are on the enemy side of the obstacle, they will move to fire positions.
(4) Follow on forces need to use confirmed track plan, i.e., those tracks that friendly vehicles have travelled and that are clear of mines.
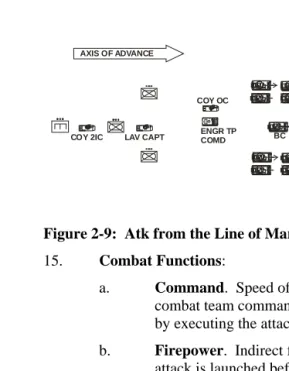
HASTY ATTACK WITH TWO TANK TROOPS IN FIRE BASE
10. Mounting (Figure 2-6). For warning, security, recce and plan, see “Warning, Security, Recce and Plan”, page 5. The hasty attack with two tank troops in fire base will be conducted as follows:
a. The first troop in contact will become fire base. The squadron BC and another tank troop will move to fire base location. The plough tank from the fire base will move to the attack position.
b. The breaching force will consist of:
(1) one troop of tanks, augmented with one of the ploughs coming from the troops in the fire base, and two engineer sections; and (2) the plough from the intimate support troop,
Figure 2-6: Illustrates Right Flank Hasty Atk—Two Troops in Fire Base
11. Assault. The assault will be conducted as follows:
a. the assault troop with the breaching force of combat team will cross LD at H hour;
b. the rest of assault force will remain in attack
position, to avoid congestion, until committed by the combat team commander;
Figure 2-7: Two Lanes—Two Troops in Fire Base
d. order of march if two lanes available (Figure 2-7):
(1) lane one:
(a) breaching team;
(b) assault tanks (the troop will pick up the plough tank as troop arrives on the enemy side of the obstacle); (c) two tanks of intimate support
troop;
(d) infantry platoon; (e) infantry company OC; (f) infantry platoon; and
(g) LAV Capt.
(2) lane two:
(a) breaching team;
FB
BC
FOO
AXIS OF ADVANCE
(-)
FD ENGR FD ENGR ASLT TK TPS
MOVE TO CUT-OFF AND NEUTRALIZE IN DEPTH
200 m INTIMATE SUPPORT
TP
LANE 1 LANE 2
SQN OC DOZER
COY 2IC COY OC
(b) assault tanks;
(c) two tanks of intimate support troop;
[image:32.612.49.331.47.458.2](d) squadron OC and dozer tank; and (e) infantry platoon.
e. order of march if one lane available Figure 2-8): (1) breaching team;
(2) assault tanks (the troop will pick up the plough tank as troop arrives on the enemy side of the obstacle);
(3) intimate support troop; (4) infantry platoon; (5) squadron OC and dozer tank;
(6) company OC;
(7) two remaining infantry platoons; and
(8) LAV Capt.
12. Combat Functions:
a. Command. Combat team commander will have to make the decision of committing the assault force to one lane only or two lanes when one of the lanes is cleared at 75 percent. This decision will be based on the progression in the other attempted lane.
b. Manoeuvre:
(1) Field engineers will have to clear wire obstacles and be prepared to support dismounted infantry on the objective. (2) Reserve options will be tank troop(s)
(normally from fire base after arrival of the assault force on the objective), engineer
NOTE
section(s), infantry platoon and LAVs once infantry has dismounted.
c. Firepower:
(1) The fire base and indirect fire resources will concentrate their fires while the breaching takes place.
(2) LAVs could be used for tasks such as secure attack position/LD, cut-off or flank protection after infantry has dismounted, etc.
d. Protection:
(1) Dispersion. Vehicles should be no closer than 50 m from one another in attack position. Vehicles should go to hatches down on arrival in attack position. (2) Once the breaching elements are on the
enemy side of the obstacle, if possible, they will position themselves to be concealed from enemy fire/observation.
HASTY ATTACK FROM THE LINE OF MARCH
13. General. A hasty attack will normally follow “Hasty Attack with One or Two Tank Troops in Fire Base”, pages 9 and 15
respectively. However, given the limitations, such an attack may be executed directly through fire and movement (versus the establishment of a “conventional” fire base). The conditions in which an attack from the line of march would be warranted are:
a. the ground may not allow for a “conventional” fire base; and
b. the enemy position is weak and could be overrun easily, particularly if speed and violence are employed.
Figure 2-9: Atk from the Line of March
15. Combat Functions:
a. Command. Speed of execution is paramount. The combat team commander must maintain momentum by executing the attack as soon as possible.
b. Firepower. Indirect fire might not be adjusted if the attack is launched before the FOO has adjusted fire on targets. That should not stop the combat team commander from launching the attack as soon as possible. Because of limited time, it is unlikely that an elaborate fire plan could be developed; it is likely that the fire plan would consist of a series of predicted targets as in a continuous fire support plan (CFSP), i.e., on call. The employment of indirect tank smoke should be considered. Consideration should also be given to using the LAV for intimate support to the company.
HASTY ATTACK ON CONVERGING AXES
16. General. The conditions in which an attack on converging axes would be warranted are:
a. the objective can be easily split into two distinctive parts that could be attacked simultaneously; and b. deception of the enemy is of particular importance. 17. Conduct. The hasty attack on converging axes will be conducted as follows:
AXIS OF ADVANCE
COY OC FOO
ENGR TP COMD
SQN OC
DOZER BC LAV CAPT
COY 2IC
a. upon receiving orders from the combat team commander, the combat team will split into two assault forces;
b. armoured, infantry and engineer assets would likely be grouped in each of the assault forces; and c. the fire base must be in a position to observe both
[image:36.612.38.331.53.410.2]approaches.
Figure 2-10: Armour/Inf Hasty Atk on Converging Axes
18. Combat Functions:
a. Command. During his estimate, the combat team commander will have to assess whether the advantages of executing an attack on converging axes—deception and confusion imposed upon the enemy—outweigh the disadvantages. For example, command and control of two assault forces will likely present significant challenges such as
some risks, e.g., loss of momentum, added exposure to enemy direct and indirect fire, etc.
b. Firepower. Synchronization of the direct and indirect fire plans will necessitate special
consideration. Priority of fire must be determined by the combat team commander.
HASTY ATTACK WITH ARMOUR IN FIRE BASE WHILE INFANTRY ASSAULTS
19. General. The conditions for conducting a hasty attack with the armour remaining in the fire base while the infantry assaults are as follows:
a. the ground does not allow armour to move through the enemy position but tanks are on the objective; b. the momentum of advance by armour is maintained;
and
c. assist transit to pursuit.
20. Conduct. A hasty attack with armour remaining in the fire base while infantry assaults will be conducted as follows:
a. the squadron will move to the fire base; b. the infantry company will move to the attack
position with an engineer troop minus; and
Figure 2-11: Armour in Fire Base While Inf Assaults
21. Combat Functions:
a. Protection. Artillery/mortar danger close
limitations and orders for fire base check firing must be carefully considered in relation to dismounted infantry.
HASTY ATTACK ASSAULT AND FIGHT THROUGH
22. General. This TTP details the actions of a combat team during the assault/break-in/fight through of a hastily prepared enemy position after the breach of an obstacle.
OBJ A DISMT INF DISMT INF WOODS COY COMD
LAV CAPT
FIRE SUPPORT LAVS COY 2IC
FD ENGR TP (-)
BC
FIRE AND MOVEMENT AROUND FLANKS (ENVELOPMENT) / PURSUIT / CONTINUE ADVANCE
SECURE OBJ IN DEPTH (OPTION)
CUT OFF
Figure 2-12: Break-in, Initial Approach
23. Break-in(Figure 2-12). Actions of the combat team after it is beyond the obstacle are:
a. The assault force closes rapidly to the objective. Speed is critical.
b. The assault tank troops manoeuvre along the flanks of the position to neutralize the initial platoon objectives and to suppress any depth positions. c. The intimate support troop and the LAVs
concentrate on the initial platoon objectives and try to suppress any enemy fire. All known and suspected enemy trenches must be neutralized. d. Intimate support tanks guide platoons to gaps and
objectives.
e. Infantry platoons must remain close to intimate support tanks.
ASLT TP ASLT TP
Figure 2-13: Break-in, the Edge of Enemy Position
24. Break-in(Figure 2-13). Actions of the combat team once the intimate support tanks and the platoons are on the edge of the trenches are:
a. Intimate support tanks and LAVs continue to neutralize lead trenches.
b. Infantry dismounts on order behind intimate support tanks and maintain communications with tanks through tank phone or radio. Options include dismounting short, on or plus of the objective. c. Intimate support tanks and LAVs continue
neutralizing fire at the point of attack for the break-in by the dismounted break-infantry break-into the enemy trenches.
e. Intimate support tanks shift fire to depth targets. f. Infantry sections break into the enemy trenches. g. Field engineer sections clear wire obstacles as well
as support infantry in trench clearance.
Figure 2-14: Break-in of a Trench System
25. Break-in of a Trench System: a. Two Lanes:
(1) Break-in Point and Trench Clearance. Should the combat team use two lanes through the enemy obstacles, the combat team will then enter the trench system through two break-in points. The second break-in point (the one along the direction of clearance) must mark its position inside the trench system to indicate that friendly forces are around the next bend or corner. (2) Order of March Through Lanes. See
Section 1 for hasty attack with obstacles (two lanes), pages 11 and 17.
b. One Lane:
(1) Break-in Point and Trench Clearance. Should the combat team use only one lane through the enemy obstacles, the combat team will then enter the trench system through one break-in point. Looking at the enemy position, if it is the right edge of the enemy position, the infantry will clear the trench system to the left using the normal
Marker Direction of clearance
trench clearance drills. Likewise, if it is the left edge of the enemy position, the infantry will clear to the right.
(2) Order of March Through Lane. See Section 1 for hasty attack with obstacles (one lane), pages 13 and 18.
Figure 2-15: Break-in of Trench System—One Lane
Figure 2-16: Fight-through
26. Fighting Through (Figure 2-16). Actions of the combat team after the infantry has broken into the enemy trenches are:
Break-in point Direction of clearance
200/300 m up to 400 m
a. The infantry fights through and clears the trench system.
b. LAVs continue to provide intimate support, however, LAVs may be employed in flank security. c. Intimate support tanks move along flanks to
neutralize depth positions and prevent enemy reinforcements from moving forward. Intimate support tanks remain until released by the dismounted company commander using the codeword PUNCH.
d. The depth platoon can remain mounted if not committed.
e. The infantry clears through to the depth and consolidates on or off the position. See “Hasty Attack Consolidation”, page 30.
f. Tanks move to position to secure the objective and push on as detailed to limit of exploitation. 27. Combat Functions:
a. Command:
(1) Company OC fights dismounted the battle. (2) Squadron OC focuses on the area
surrounding the objective to isolate the position and destroy counter-attacks. Control options for the tanks and Zulu LAVs, which are under the control of the LAV Capt, are as follows:
(a) squadron commander commands all, i.e., controls Zulu LAVs through LAV Capt;
(b) LAV Capt and LAVs remains under control of infantry company commander; and
(c) LAV Capt acts independently. (3) The plan must consider the orientation of
(4) The combat team commander must decide if objectives will be taken in succession or simultaneously. This will determine the degree of depth and the need for mounted or dismounted platoons.
(5) Control measures for consolidation and limits of exploitation must be given. (6) Troop leader(s) of intimate support troop(s)
will operate on company radio frequency— after implementation of Tactical Command, Control, and Communications System (TCCCS), radio frequency will be the “dismounted frequency”—until released by the company OC.
b. Protection. If depth platoon remains mounted, it should focus on all-arms air defence (AAAD) by observing likely attack helicopter fire positions around the objective.
c. Firepower:
(1) The fire plan (direct and indirect) remains simple and focuses on neutralizing targets during the approach to the objective and isolating the position from supporting enemy locations. This should also include likely attack helicopter fire positions. (2) Indirect and direct fires should be shifted in
depth to prevent enemy vehicles from reinforcing the position or enemy
withdrawal and disrupt any possible enemy counter-attack.
d. Sustainment. The A1 echelon remains concealed until the position is secured and it is called forward.
CONSOLIDATION
Figure 2-17: Hasty Atk Consolidation
29. Conduct. The hasty attack will be consolidated as follows: a. Consolidation could either take place on the
objective, as shown on figure 2-17, or beyond it. The decision will be based on:
(1) what is the best ground in relation to the follow-on task;
(2) the exploitation policy; and
NOTE
Possible LAV tasks: remain on obj; flank protection; block possible counter-attack routes.
BC
MRT AMB
AMMO VEH
ECH VEHS FD ENGR
SECTION
FD ENGR SECTION LAVS
LAVS LAVS
LAVS
SQN COMD
FOO
DOZER
LAV CAPT
ENGR TP COMD
(3) the importance given to protection provided by enemy defensive positions.
b. The combat team needs to quickly adopt a hasty defence posture.
c. Assault tanks and LAVs will move forward and secure flanks, cover possible enemy counter-attack approaches and engage withdrawing enemy. Consideration should be given to the limit of exploitation before launching into a pursuit (see “Hasty Attack Pursuit Operations”, page 35 for details on conduct of pursuit).
d. Infantry crew-served weapons will be dismounted and sited by the company OC to cover most likely enemy counter-attack approaches. Once this is done, the infantry company OC will order a sweep of the objective in order to destroy or capture all remaining enemy and collect casualties.
e. The fire base can either stay in location or move forward. Decision will be based on best location available to cover approaches on flanks and beyond objective area.
f. Once situation is stabilized, casualty and prisoner of war (PW) evacuation will take place. A1 echelon will move forward under the control of the squadron sergeant-major (SSM) to conduct replenishment of combat supplies.
30. Combat Functions:
a. Command:
(1) During the consolidation stage, the combat team commander should be focused on the following:
(a) regaining control over his organization;
(b) defeating a possible enemy counter–attack; and
i. hasty defence;
ii. resuming the
advance(maintaining momentum is then important);
iii. supporting forward passage of lines; and iv. exploiting any tactical
opportunity, e.g., pursuit. (2) Frequent SITREPs must be sent to BG HQ
during this critical stage of the battle. A consolidated SITREP including combat strength remaining and number of wounded, missing and killed in action are of particular importance along with ammunition status such as MASH (for tanks) and emergency ADREPs, etc. (3) The combat team commander should
consider replacing key losses by doing the following:
(a) utilizing personnel from disabled vehicles;
(b) ensuring all command positions are filled; and
(c) ensuring key weapons systems are manned.
b. Information Operations. All around defence and observation (including AAAD) is critical to avoid being surprised by an enemy counter-attack coming from an unexpected direction. Observation posts (OP) to cover unobserved/concealed approaches have to be deployed soonest.
c. Manoeuvre. Marking of all obstacles is to be done if follow-on forces are to move through the objective area.
possible enemy counter-attack approaches and withdrawal routes.
e. Protection:
(1) If consolidation is conducted in the immediate vicinity of the objective, enemy trenches should be used by dismounted infantry and for casualty collection points. (2) If time and resources are available,
consideration should be given to the siting of a protective obstacle and the
development of the position if it is considered that the combat team will remain.
(3) Possible tasks for field engineers include the following:
(a) clear booby-traps in trenches; (b) lay point obstacles such as
nuisance minefields (surface laid) to increase flank protection; (c) clear wire obstacles that impede
the movement of combat team elements on or around the objective; and
(d) improve the breached lanes to facilitate the movement of A echelon vehicles. (4) Possible tasks for LAVs include the
following:
(a) blocking possible counter-attack routes;
(b) flank protection; and (c) mounted protection against enemy
volumetric munitions.
the combat team, redistribution must be considered. Emergency repairs could be necessary in order to carry on with any follow on task. The company sergeant-major (CSM) will establish casualty collection point and coordinate casualty evacuation. PW evacuation will be conducted if necessary.
PURSUIT OPERATIONS
31. General. This TTP covers the action of the combat team in the pursuit.
Figure 2-18: Combat Team Pursuit Operations ?
FLANK SECURITY TO COVER MOVING FORCE
MAINTAIN CONTACT
EN AXIS OF WDR
FIXING FORCE
FORCE MANOEUVRES TO BLOCK ENEMY WITHDRAWAL
½
32. Concept:
a. Pursuit operations are normally conducted following successful offensive or defensive operations. They are mounted to exploit tactical opportunities and prohibit the enemy from being able to withdraw in an orderly fashion and establish a cohesive defence. The pursuit seeks to destroy enemy cohesion through force destruction.
b. Pursuits usually develop quickly and will require maximum use of radio orders. Regrouping is unlikely and battle procedure will be compressed. Pursuing units must be committed in time to ensure pressure is maintained on the withdrawing enemy force.
c. Bold action is required during pursuits. Risks must be accepted by the force commander. In order to destroy an enemy, a pursuit force must first fix the enemy. A fixing force can seize ground of tactical importance in depth in order to accomplish this task. The striking force maintains pressure to ensure the enemy does not establish a defensive posture. Once the fixing force blocks the withdrawal of the enemy units, the striking force will then manoeuvre to destroy enemy.
33. Combat Functions:
a. Command:
(1) Combat estimates must be rapid with a constant review of the mission analysis to ensure the pursuit conforms to the superior commander’s intent.
(2) The commander must be flexible to deal with unexpected events. The commander must also be well forward to deal with a rapidly changing tactical situation. (3) Plans must be clear, simple and flexible to
(4) The need for alternate means of communications over long distances (e.g., radio rebroadcast) should be considered.
(5) If time and authorization permits (requested through BG HQ), scatterable mines should be considered to fix the enemy or provide flank security.
b. Information Operations. Little opportunity will be available for a detailed recce during a pursuit. The commander must rely on forces in contact for combat intelligence.
c. Protection:
(1) Consider whether the Nuclear, Biological and Chemical Defence (NBCD) posture and measures should be changed prior to commencing the pursuit.
(2) A pursuing force must establish security elements sufficient to prevent surprise of the force while retaining combat power. In other words, risk versus concentration should be considered. A force will cover its flanks by detaching an element or by adopting a tactical formation suited to the threat.
(3) AAAD policy must receive a high
consideration due to likelihood of operating outside of friendly AD coverage (e.g., anti-helicopter sentries).
e. Firepower:
(1) Firepower should be coordinated with the FOO to determine limitations to fire support.
(2) Depth fire should be used to fire into retreating enemy columns to keep them off balance and to prevent reorganization, reinforcement or respite from pressure.
RADIO WARNING ORDER (WNG O)
CHARLIE CHARLIE _____ THIS IS ______ WNG O IN _____ MINS … OVER.
CHARLIE CHARLIE ________ THIS IS ________ WNG O: SIT: EN (Strength) ________________________________ LOC AT GR ________ FACING ________
MSN ________________________________
EXEC LEFT FLANKING FRONTAL RIGHT FLANKING ________ UP ________ PHASES
ASSAULT FORCE C/S ________ WITH C/S ________ COMMANDING FIRE BASE C/Ss ______ AT GR _______ C/S _______ COMMANDING C/S ________ TO PROVIDE INTIMATE SUPPORT
BREAK-IN TMS WITH C/S ________ AND C/S ________ FOO LOC GR: ________
CUT OFF C/S ________ FROM GR ________ RV AT GR ________________________________ RTE TO RV ________________________________ C/S ________ TO SECURE RV ASAP
ORDER OF MARCH IS _______________________________ ATTACK POSITION GR ________ FACING ________ FIRE PLAN ________________________________
H-HOUR NOT BEFORE ______________________________
RADIO ORDERS
CHARLIE CHARLIE ________ THIS IS ________ ORDERS IN ONE MIN…OVER.
CHARLIE CHARLIE ________ THIS IS ________ ORDERS: SIT NO CHANGE.
MSN CONFIRMED.
EXECUTION CONFIRMED LEFT FLANKING FRONTAL RIGHT FLANKING
ASSAULT FORCE:
C/S ________ LEFT, C/S ________ CENTRE, C/S ________ RIGHT AND INDIA ________
BREACHING TEAMS WITH C/S ________ AND C/S ________
C/S ________________________TO PROVIDE INTIMATE SUPPORT
FIRE BASE CONFIRMED C/S. ________ FM GR ________
C/S ________ IS AUTH TO CHECK FIRE
CUT OFF CONFIRMED C/S ________ FROM GR ________
RESERVE C/S ________________________________
FLANK SECURITY C/S ________________________________
ATTACK POSITION CONFIRMED AT GR ________ SECURED BY C/S ________
ROUTE TO ATTACK POSITION ________________________
LD ________ SECURED BY C/S ________________________
NOTE
ROUTE TO OBJECTIVE ________________________________
H-HOUR IS AT ________ HRS
DISMOUNT ________________________________
CONSOLIDATION ________________________________
LIMIT OF EXPLOITATION _________________________
FIRE PLAN (TARGETS, TIMINGS AND EFFECT) _______________
DF TARGET GR: ________________________________
C/S ________AUTH TO CHECK FIRE ________________
ORDERS FROM TANGO INDIA IN ________ MINS
SECTION 2 OBSTACLE BREACHING
ACTION ON MINE CONTACT
34. General. This TTP details the actions of the combat team when one of the lead vehicles strikes a mine during the advance to contact.
35. In the event of a mine strike during the advance to contact, the following action is to be taken:
a. the contact is reported;
b. vehicles forward or adjacent to strike immediately adopt fire positions with minimal movement (see “Warning, Security, Recce and Plan”, page 5 ); c. depth vehicles adopt positions of fire covering the
forward vehicles;
(1) and the mined area cannot be bypassed, the combat team will conduct a hasty minefield
breach in the effort to clear two lanes (see “Obstacle Breaching Hasty Minefield Breach”, page 43); or
(2) and the mined area can be bypassed, the combat team will continue the advance and the following drill will be conducted: (a) forward and adjacent vehicles will
reverse out of the mined area; (b) the crew of the vehicle that struck
the mine will either remain with the vehicle or extract themselves from the vehicle and minefield depending on the tactical situation; and
(c) the combat team will inform BG HQ of the vehicle casualty status and location for recovery; or f. if enemy direct fire into the obstacle area, the
following drill will be conducted:
(1) the enemy will be suppressed immediately using the most expedient combination of direct and indirect fire and smoke; (2) the situation will be assessed (i.e., mission
analysis) by the combat team commander to determine the appropriate course of action, e.g., attack, fix or bypass the enemy; and
(3) when the enemy has been suppressed, the vehicle and personnel casualties will be extracted as described above—an engineer field section supported by an appropriate protection party should be deployed to clear a path to the vehicle that sustained the mine strike.
36. Combat Functions:
b. Manoeuvre. If lanes through the obstacle are to be attempted, refer to “Obstacle Breaching Hasty Minefield Breach”, page 43.
c. Protection. The portion of combat team not involved in suppressing the enemy will remain in a position concealed from enemy observation and fire. Safe distances must be considered in the
employment of indirect fire.
d. Sustainment. It is likely that the combat team will not have the maintenance resources to repair a vehicle that has struck a mine. Casualties will have to be left in location and recovered by BG/brigade resources. However, the vehicle should be extracted from a minefield area if possible. If A1 echelon vehicles are sent forward to recover vehicle or personnel casualties, the lane created by the vehicle that stuck the mine will be used. If the area is secure, obstacle breaching resources integral to the combat team (ploughs, field engineer, etc.) will be used to improve the lane.
HASTY MINEFIELD BREACH
Figure 2-20: Hasty Minefield Breach, Initial
38. Sequence of Events. A hasty minefield breach will be conducted as follows:
a. If possible, the forward edge of minefield along with lanes to be cleared (plough lanes) will be identified by engineers and marked to include the direction of the breach.
b. The breaching teams, composed of field engineers set and plough tanks, will form in the attack position.
c. Plough tanks mounted with Safe Lane Under armour Marking Systems (SLUMS) will begin ploughing 100 m short of the known/suspected edge of minefield at the area indicated by the engineers. d. If the threat of direct and indirect fire is low:
(1) the engineer section following the plough tank will pull off to the right-hand side of the entrance (positioning the section vehicle
FD ENGR SECTION
100 m PLOUGH FD ENGR SECTION
PLOUGH
200 m (min)
LANE 2 LANE 1
100 m
to the right of the plough scar so as to not block the lane) and start constructing a funnel (See Figure 2-20); and
(2) the engineer section will mark and prove the lane by doing the following:
(a) marking the funnel entrance; (b) removing the mines that have
fallen into the track (the mines on the berm will be dealt with by the engineers if required);
(c) once the lead plough is approximately 50 m into the minefield, commencing to mark the right-hand side of the lane (lane marking personnel move mounted, standing on the open APC ramp, throwing the lane placing markers from the vehicle ramp or dismounting personnel only as necessary to place markers); and
(d) ensuring markers are a minimum of one metre high to enable crews to see them while driving hatches down.
e. The engineer section will report when approximately 75 percent of the minefield is clear. Immediately, the second engineer section will report on their progress.
f. If the lead plough tank becomes a casualty, the engineer section will close with the tank, and the plough tank from the breaching reserve, on order, will continue to breach, bypassing the casualty to the left.
g. The plough tanks will seek fire positions on the far side of the minefield (see Figure 2-21).
identifying the end of the lane. A funnel will be created as part of lane improvement.
i. The lane will be reported “open” by the engineer section to the combat team commander.
Figure 2-21: Hasty Minefield Breach
39. Combat Functions:
a. Command:
(1) The combat team commander will have to make the decision of committing the assault force to one lane only or to two lanes when one of the lanes is 75 percent cleared. His decision will be based on progression in the other attempted lane.
(2) H hour is when the breaching team crosses the LD.
FD ENGR SECTION
RES PLOUGH
PLOUGH
LANE 2 LANE 1
ASSAULT FORCE
FD ENGR SECTION
b. Firepower. Suppression and/or neutralizing of the enemy with direct and indirect fire while the breaching is conducted will be critical to the success of the operation.
c. Protection. Lanes will be a minimum of 200 m apart but can be up to 300 m depending upon the tactical plan and dispersion desired. This is
established on a dispersion requirement of 200 m for 122 mm and 300 m for 152 mm artillery. The advantages/disadvantages of separation must be weighed by the commander. They include the factors of command and control, concentration of force/dispersion and enemy layout.
COMPOSITE OBSTACLE BREACH
40. General. This section covers the actions of a combat team executing a breach of a composite obstacle—an obstacle that necessitates the commitment of more than one type of breaching resource (ploughs, rollers, armoured engineer vehicle (AEV), armoured vehicle-launched bridge (AVLB), etc.)—from the attack position to the completion of the breach. The following guidelines apply to executing a breach of a typical composite obstacle as shown in the figure below:
a. a combat team can execute a breach of a composite obstacle as an independent task or when tasked as the breaching force of a BG deliberate breach; b. the breach of two lanes should be attempted for
every lane required; and
c. the following gaps can be crossed: (1) AEV with fascine—8 m; and
Figure 2-22: Composite Obstacle Breach, Initial
41. Sequence of Events. A breach of composite obstacle will be executed as follows:
a. Figure 2-22:
(1) If possible, forward edge of minefield will be identified by engineer recce (not illustrated).
(2) The breaching teams will form up in the attack position under the control of the engineer section commander with the plough tank leading followed by the engineer section vehicle followed by the roller (if available) followed by the AEV or AVLB.
Figure 2-23: Composite Obstacle Breach, Step 1 LANE 1
FD ENGR
PLOUGH
?
ROLLER AEV
100 m 100 m
DITCH
LANE 2 FD
ENGRPLOUGH ROLLER
AVLB
500 m (min)
b. Figure 2-23:
(1) A plough tank mounted with SLUMS will begin ploughing 100 m short of the known/suspected edge of minefield and start ploughing towards the near side of the gap requiring breaching by the AEV or AVLB.
(2) If the threat of direct and indirect fire is low, the engineer section following the plough tank will pull off to the right-hand side of the entrance (positioning the section vehicle to the right of the plough scar so as to not block the lane) and start constructing a funnel.
(3) A roller tank (if employed) will prove the lane.
(4) If the threat of direct and indirect fire is low and the roller is not employed, engineers will prove the lane by doing the following: (a) marking the funnel entrance; (b) removing mines that have fallen
into the track (mines found on the berm will only be dealt with by the engineers if required);
(c) once the lead plough is approximately 50 m into the minefield, commencing marking the right-hand side of the lane (lane marking personnel moved mounted, standing on the open APC ramp, through the lane placing markers from the vehicle ramp or dismounting personnel only as necessary to place markers); and
Figure 2-24: Composite Obstacle Breach, Step 2
c. Figure 2-24:
(1) The engineer section will commence marking the right hand side of the lane. Lane marking personnel move mounted through the lane placing markers from the vehicle ramp or dismounting personnel are used only as necessary to place markers. (2) The roller will drive left of the lane before
the ditch, park parallel to the lane and adopts a fire position.
(3) The engineer section vehicle will stop to the rear of the plough tank leaving sufficient room for the tank to reverse.
Figure 2-25: Composite Obstacle Breach, Step 3
d. Figure 2-25:
(1) The plough will clear up to the ditch then reverse and plough a “cushion area” on the right hand side and adopt a fire position. The engineer section commander will ensure that the lane is proven for mines that
?
FD ENGR SECTION
PLOUGH ROLLER
AEV
DITCH
BUND
?
PLOUGH ROLLER
AEV
DITCH
BUND FD ENGR
may have rolled back in behind the plough and guide the plough on the radio as it reverses.
(2) The engineer section vehicle will follow the plough into the cushion area.
(3) If the threat of direct and indirect fire is low, the engineer section will dismount and prepare the ditch as follows:
(a) AEV/fascine: clear bund, mark cleared area; and
(b) AVLB: clear bund and 5 m on far side, mark launch point for bridge on home side.
Figure 2-26: Composite Obstacle Breach, Step 4
e. Figure 2-26. On order of the engineer section, the AEV/AVLB will move forward from the attack position and breach the obstacle.
Figure 2-27: Composite Obstacle Breach, Step 5
?
PLOUGH ROLLER
AEV
DITCH
BUND FD ENGR
SECTION
AEV
?
PLOUGH ROLLER
AEV
DITCH
BUND FD ENGR
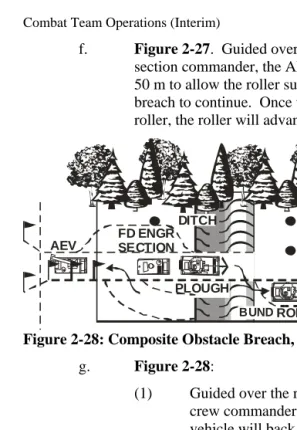
f. Figure 2-27. Guided over the radio by the engineer section commander, the AEV/AVLB will reverse 50 m to allow the roller sufficient room for the breach to continue. Once the AEV is clear of the roller, the roller will advance onto the lane.
Figure 2-28: Composite Obstacle Breach, Step 6
g. Figure 2-28:
(1) Guided over the radio by the AEV/AVLB crew commander, the engineer section vehicle will back up on the lane. (2) Guided by the engineer section
commander, the plough will back up out of the cushion area and on to the lane. (3) The roller will cross the gap first to prove it
and then pull off on the right-hand side. Note: the roller will deploy before plough because there is less of a “skip zone” as the roller moves off the fascine/bridge as compared to the plough.
ROLLER DITCH
BUND FD ENGR
SECTION AEV
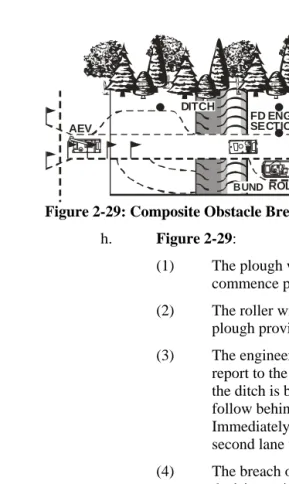
[image:66.612.33.330.50.480.2]Figure 2-29: Composite Obstacle Breach, Step 7
h. Figure 2-29:
(1) The plough will continue over the ditch and commence ploughing as soon as possible. (2) The roller will advance and follow the
plough proving the lane.
(3) The engineer section commander will report to the combat team commander that the ditch is breached and the section will follow behind the roller marking the lane. Immediately, the section commander of the second lane will send a SITREP.
(4) The breach of the ditch will be a likely decision point for the combat team to commit.
Figure 2-30: Composite Obstacle Breach, Assault Force Entry
i. Figure 2-30:
(1) The AEV/AVLB will move into the cushion area vacated by the plough and remain at the ditch to maintain the crossing.
ROLLER DITCH
BUND FD ENGR
SECTION AEV
PLOUGH
ASSAULT FORCE
(-)
ROLLER DITCH
BUND FD ENGR SECTION AEV
(2) The plough and roller will exit the minefield and adopt fire positions.
(3) The engineer section vehicle will stop at the end of the minefield and park to the right-hand side of the end of the lane identifying the end of the lane.
(4) The assault forces will move through the lane and pass the engineer vehicle on the left side (for order of march refer to “Hasty Attack with One or Two Tank Troops in Fire Base” [Two Lanes, pages 11 and 17, One Lane, pages 13 and 18]).
(5) Engineers will improve the safe lane as required.
42. Combat Functions:
a. Command:
(1) Control of each lane during the breach is given to the engineer section commander operating on that lane. All breaching assets will be on the combat team net.
(2) The relative complexity and the deliberate nature of a composite breach imply that it is a high risk operation.
(3) The combat team commander has to make the decision to commit the assault force to one or two lanes based on the progression of the breaching.
b. Firepower. Suppression and/or neutralization of the enemy with direct and indirect fire while the
breaching is conducted is critical to the success of the operation.
CHAPTER 3
DEFENSIVE OPERATIONS
SECTION 1 DEFENCE
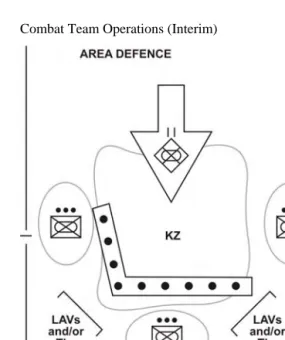
AREA AND MOBILE DEFENCE
1. General. This TTP covers the actions of the combat team in the defence.
2. Area Defence:
a. focuses on retention of terrain in accordance with commander’s intent;
b. absorbs enemy into an interlocked series of arcs of fire upon which indirect fire is superimposed; c. normally requires a relatively small reserve; and d. emphasis is placed on depth within the position to
Figure 3-1: Illustrates an Area Defence
3. Mobile Defence:
a. focuses on destruction of enemy in accordance with commander’s intent;
b. permits enemy to advance to a position(s) which exposes it to offensive operations;
c. forward positions identify, shape, delay, and/or attrit enemy advance;
d. canalizes enemy into killing zones (KZ); e. fixes enemy using depth elements; and f. striking force completes the destruction of the
Figure 3-2: Illustrates an Area Defence
4. Combat Functions:
a. Command:
(1) The locating of the commander requires special consideration to allow him to be in a position that best influences the battle. (2) Division of a KZ. A KZ is divided by
engagement band, desired weapon effect, and for direct and indirect fire control. Control measures for KZ management are assigned using a matrix that includes the following information for each segment of the KZ:
(a) responsibilities by weapons system and call sign;
(b) open fire policy;
(c) description of the enemy to be destroyed;
MOBILE DEFENCE
Shape, delay and/or attrit the en in order to set the conditions for their destruction 104
106 105
103 101 102
107 FIX
STR IKE
RES Successive