3.1
TOOLS AND UTILITIES GUIDE
• ERROR MESSAGES
• WINSIGHT
'"
• MAKE
• HELP/RESOURCE COMPILERS
• TLiNK
Borlanct
c++
Version 3.1
Tools
and
Utilities Guide
Rl
Copyright © 1991, 1992 by Borland International. All rights reserved. All Borland products are trademarks or registered trademarks of Borland International, Inc. Other brand and product names are trademarks or registered trademarks of their respective holders. Windows, as used in this manual, refers to Microsoft's
implementation of a windows system.
c
o
N
T
Introduction 1
Chapter 1 Import library tools 3
IMPDEF: The module definitions
manager ... 3
Classes in a DLL ... 4
Functions in a DLL . . . .. 5
IMPLIB: The import librarian ... 6
Re-creating IMPORT. LIB ... 7
IMPLIBW: The import librarian for Windows ... 7
Select an import library ... 7
From a DLL ... 7
From a module definition file ... 7
Creating the import library . . . .. 8
Chapter 2 Make: The program manager 9 How MAKE works . . . .. 10
Starting MAKE ... 10
Command-line options ... 11
The BUlL TINS.MAK file ... 13
A simple use of MAKE ... 13
Crea ting makefiles ... 16
Components of a makefile . . . .. 16
Comments ... 17
Command lists for implicit and explicit rules ... 17
Prefixes ... . Command body and operators ... . Compatibility option ... . Batching programs ... . Executing commands ... . Explicit rules ... . Special considerations ... . Multiple explicit rules for a single 18 18 19 20 21 22 23 target ... 24
E
N
T
s
Examples ... 24Automatic dependency checking ... 25
Implicit rules . . . .. 25
Macros' ... 28
Defining macros ... 29
U sing macros. . . .. 29
Using environment variables as macros ... 29
Substitution within macros ... 30
Special considerations ... 30
Predefined macros ... 30
Defined Test Macro ($d) ... 31
File name macros ... 32
Base file name macro ($*) ... 32
Full file name macro ($<) . . . .. 32
File name path macro ($:) ... 33
File name and extension macro ($.) . . . .. 33
File name only macro ($&) ... 33
Full target name with path macro ($@) ... 33
All dependents macro ($**) . . . . .. 34
All out of date dependents macro ($?) ... 34
Macro modifiers ... 34
Directives . . . .. 35
Dot directives ... 36
.precious ... 36
.path.ext ... 36
.suffixes ... 37
File-inclusion directive ... 38
Conditional execution directives ... 38
Expressions allowed in conditional directives ... 40
Error directive . . . .. 41
The compatibility option -N . . . .. 42
Chapter 3 TLlB: The Turbo librarian 45 Why use object module libraries? ... 46
The TLIB command line ... 46
The operation list ... 47
, File and module names ... 48
TLIB operations. . . .. 48
U sing response files ... 49
Creating an extended dictionary: The
IE
option ... 49Setting the page size: The
IP
option .... 50Advanced operation: The
IC
option. , ... 50Examples ... 51
Chapter 4 TLlNK: The T~Jrbo linker 53 Invoking TLINK .. . . .. 53
An example of linking for DOS ... 54
An example of linking for Windows .. 55
File names on the TLINK command line ... 55
Using response files ... 56
The TLINK configuration file ... 57 Using TLINK with Borland C++
modules ... . Startup code ... . Libraries ... . BGI graphics library ... : . Ma th libraries ... . Run-time libraries ... . Using TLINK with BCC ... . TLINK options ... . The TLINK configuration file ... .
13
(32-bit code) ... .I
A (align segments) ... .Ic
(case sensitivity) ... ~ .. . ./C (case sensitive exports) ... .I
d (duplicate symbols) ... .I
e (no extended dictionary) ... .Ii
(uninitialized trailing segments) .. .II
(line numbers) ... .IL
(library search paths) ... .1m, Is,
andIx
(map options) ... .In
(ignore default libraries) ... . 58 59 59 60 60 61 62 62 62 63 63 63 64 64 65 65 65 65 66 68/0
(overlays) ... .IP
(pack code segments) ... .It
(tiny model.COM file) ... .lTd and ITw (target options) ... .
I
v (debugging information) ... .lye
(expanded memory) ... .I
yx (extended memory) ... . The module definition file ... . Module definition file defaults ... . A quick example ... . Module definition reference ... . CODE ... . DATA ... . DESCRIPTION ... , ... . EXETYPE ... . EXPORTS ... . HEAPSIZE ... . IMPORTS ... . LIBRARy ... . NAME ... . SEGMENTS ... . STACKSIZE ... . STUB ... .Chapter 5 USing WinSight
Getting started ... . Getting out ... . Choosing a view ... . Picking a pane ... . Arranging the panes ... . Getting more detail ... . Class detail ... . Window detail ... . Using the window tree ... . Pruning the tree ... . Showing child windows ... . Hiding child windows ... . Finding a window ... . Leaving Find Window mode ... . Spying on windows ... . Working with classes ... . U sing the Class List pane ... . Spying on classes ... . Taking time out ... .
Turning off tracing . . . .. 88
Suspending screen updates ... 88
Choosing messages to trace ... 88
Filtering out messages ... 89
Message tracing options ... 89
Formatting message parameters ... 89
Logging traced messages ... 89
WinSight windows . . . .. 93
Class List pane ... "... 93
Display format ... 93
Window Tree pane . . . .. 94
Display format ... 94
Message Trace pane ... 94
Format ... 95
Chapter 6 RC: The Windows resource compiler 97 Creating resources ... 97
Adding resources fo an executable ... 98
Resource compiling from the IDE .... 98
Resource compiling from the command line .. " ... 99
Resource compiling from a makefile .. 99
Resource Compiler syntax. . . .. 99
Chapter 7 HC: The Windows Help compiler 101 Creating a Help system: The development cycle ... 101
How Help appears to the user ... 102
How Help appears to the help writer. 103 How Help appears to the help programmer ... 104
Planning the Help system ... 104
Developing a plan ... 104
Defining the audience ... 104
Planning the contents ... 105
Planning the structure ... 106
Displaying context-sensitive Help topics ... 107
Determining the topic file structure .. 108
Choosing a file structure for your application . . . .. 108
Designing Help topics ... 110
iii Layout of the Help text ... 110
Type fonts and sizes . . . .. 111
Graphic images ... 112
Creating the Help topic files ... 113
Choosing an authoring tool ... 113
Structuring Help topic files . . . .. 113
Coding Help topic files ... 114
Assigning build tags ... 115
Assigning context strings ... 116
Assigning titles ... 117
Assigning keywords ... 118
Creating multiple keyword tables ... 119
Assigning browse sequence numbers . . . .. 120
Organizing browse sequences .. 120
Coding browse sequences . . . . .. 122
Creating cross-references between topics ... 122
Defining terms ... 123
Creating definition topics ... 123
Coding definitions ... 124
Inserting graphic images . . . .. 124
Creating and capturing bitmaps .. 124
Placing bitmaps using a graphical word processor ... 125
Placing bitmaps by reference ... 125
Managing topic files . . . .. 126
Keeping track of files and topics .. 127
Creating a help tracker ... 127
Building the Help file . . . .. 129
Creating the Help project file ... 129
Specifying topic files ... 130
Specifying build tags ... 131
Specifying options ... 131
Specifying error reporting . . . .. 132
Specifying build topics ... 132
Specifying the root directory ... 133
Specifying the index . . . .. 134
Assigning a title to the Help system ... 134
Converting fonts . . . .. 134
Changing font sizes ... 135
Compressing the file ... 136
Specifying alternate context strings .. 137
Mapping context-sensitive topics .... 138
Including bitmaps by reference ... 140
Compiling Help files ... 140
Using the Help Compiler ... 141
Programming the application to access Help ... 141
Calling WinHelp from an application. . . .. 142
Getting context-sensitive Help .... 143
Shift+F1 support. . . .. 144
F1 support ... 145
Getting help on items on the Help menu ... 147
Accessing additional keyword tables ... : . . . .. 147
iv Canceling Help ... 148
Help examples ... 149
The Helpex project file ... 151
Appendix A Error messages 153 Finding a message in this appendix ... 153
Types of messages ... 154
Compile-time messages . . . .. 154
DPMI server messages . . . . ... . . . .. 155
Help compiler messages ... 155
MAKE messages . . . .. 157
Run-time error messages . . . .. 157
TLIB messages. . . .. 157
TLINK messages . . . .. 158
Message explanations ... 158
T
A
B
1.1: IMPLIB options ... 6
2.1: MAKE options ... 12
2.2: MAKE prefixes ... 18
2.3: MAKE predefined macros ... 31
2.4: MAKE filename macros ... 31
2.5: MAKE macro modifiers ... 35
2.6: MAKE directives ... 35
2.7: MAKE operators ... 41
3.1: TLIB options ... 47
3.2: TLIB action symbols ... .48
4.1: TLINK options ... 53
4.2: DOS application .OBJ and .LIB files .. 61
4.3: Windows application .OBJ and .LIB files ... 61
4.4: DLL object and library files ... 61
4.5: TLINK overlay options ... 68
5.1: Mouse and keyboard actions ... 84
5.2: Mouse messages ... 89
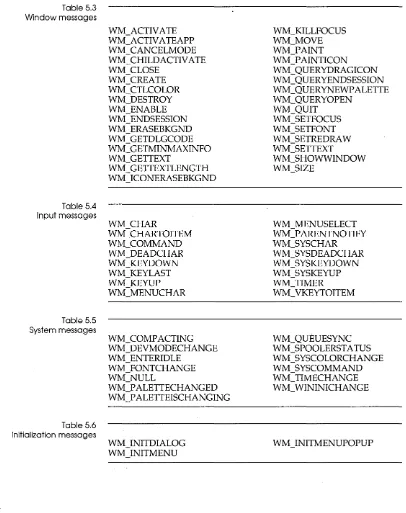
5.3: Window messages ... 90
5.4: Input messages ... 90
5.5: System messages ... 90
5.6: Initialization messages ... 90
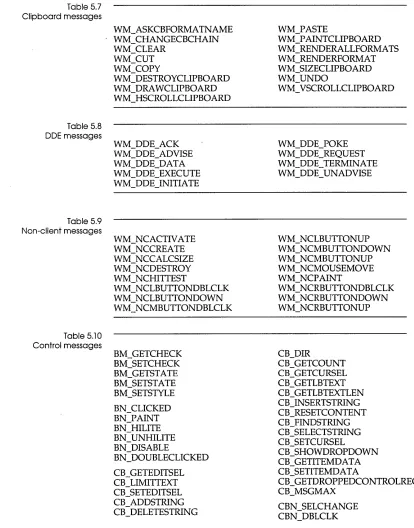
5.7: Clipboard messages ... 91
5.8: DDE messages ... 91
L
E
s
5.9: Non-client messages ... 915.10: Control messages ... 91
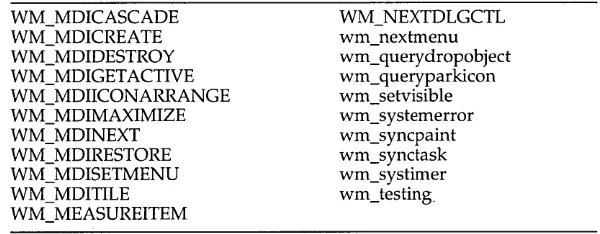
5.11: Other messages ... 92
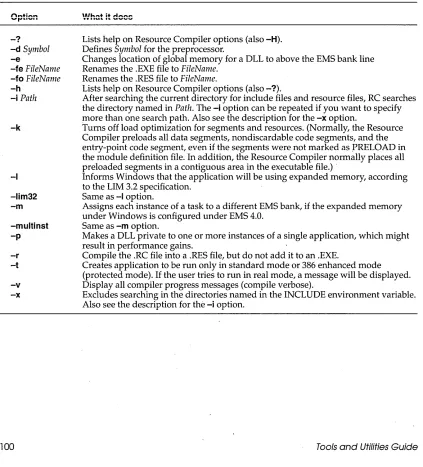
6.1: Resource Compiler options ... 100
7.1: Your application audience ... 105
7.2: Help design issues ... 110
7.3: Windows fonts ... 112
7.4: Help control codes ... 114
7.5: Restrictions of Help titles ... 118
7.6: Help keyword restrictions ... 119
7.7: Help project file sections ... 129
7.8: The Help [Options] options ... 131
7.9: WARNING levels ... 132
7.10: Build tag order of precedence ... 133
7.11: Build expression examples ... 133
7.12: wCommand values ... 142
7.13: dwData formats ... 143
7.14: MULTIKEYHELP structure formats ... ; ... 148
A.1: Compile-time message variables ... 155
A.2: Help message variables ... 156
A.3: MAKE error message variables .... 157
A.4: TLIB message variables ... 157
A.5: TLINK error message variables .... 158
F
G
u
R
E
s
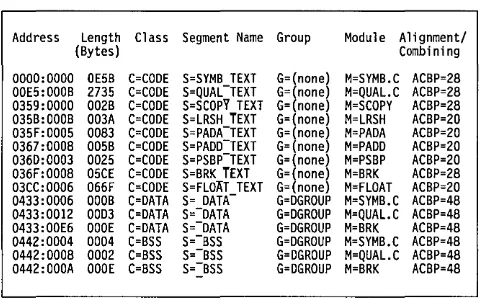
4.1: Detailed map of segments ... 67 7.6: Help topic display showing bitmaps by
7.1: Helpex help window ... 103 reference ... 126
7.2: Topic file ... 103 7.7: Help tracker text file example ... 128
7.3: Example of a help hierarchy ... 106 7.8: Help tracker worksheet example ... 128
7.4: Basic help file structure ... 108 7.9: Word for Windows topic ... 149
7.5: Help file structure showing hypertext 7.10: Help topic display ... 150
jumps ... 109 7.11: Bitmap by reference in topic ... 150
7.12: Help topic display ... 151
N T R
Introduction
o
Du
c
To
NBorland C++ comes with a host of powerful standalone utilities that you can use with your Borland C++ files or other modules to ease your DOS and Windows programming.
This book describes IMPDEF, IMP LIB, IMPLIBW, MAKE, TLIB, TLINK, and WinSight, and illustrates, with code and command-line examples, how to use them. The rest of the Borland C++ utilities are documented in a text file called UTIL.DOC that the INSTALL utility placed in the DOC subdirectory.
Name Description
Documented in this book
IMPDEF Creates a module definition file
IMPLIB Generates an import library
IMPLIBW Windows application that generates an import library
MAKE Standalone program manager
TLIB Turbo Librarian
TLINK Turbo Linker
WinSight Windows message monitor
Documented in the online document UTIL.DOC
BGIOBJ CPP GREP OBJXREF PRJCFG
PRJCNVT PRJ2MAK THELP TOUCH TRANCOPY TRIGRAPH
Conversion utility for graphics drivers and fonts Preprocessor
File-search utility
Object module cross-referencer
Updates options in a project file from a configuration file, or converts a project file to a configuration file
Converts Turbo C project files to the Borland C++ format Converts Borland C++ project files to MAKE files Turbo Help utility
Updates file date and time
c
H A p T E R1
Import library tools
Dynamic link libraries (DLLs) are an important part of Windows programming. You can create DLLs of your commonly used code, and can use DLLs in your applications, both of your own code and from third parties.
TLINK uses import libraries as it builds a Windows application to know when a function is defined in and imported from a DLL. Import libraries generally replace module definition (.DEF) files.
IMPDEF creates a module definition file containing an EXPORT statement for each of the exported functions in the DLL. IMPLIB creates an import library for a DLL. IMPLIBW also creates an import library for a DLL, but is a Windows application.
IMPDEF: The module definitions manager
An import library provides access to the functions in a Windows DLL. See page 6 for more details.
IMPDEF works with IMPLIB to let you customize an import library to suit the needs of a specific application. The syntax is
IMPDEF DestName.DEF SourceName.DLL
This creates a module definition file named DestName.DEF from
the file SourceName.DLL. The module definition file would look
something like this:
LIBRARY FileName
DESCRIPTION 'Description'
Classes in a DLL
4
EXPORTS
ExportFuncName @Ordinal
ExportFuncName @Ordinal
where FileName is the DLL's root filename, Description is the value of the DESCRIPTION statement if the DLL was previously linked with a module definition file that included a DESCRIPTION statement, ExportFuncName names an exported function and
Ordinal is that function's ordinal value (an integer).
This utility is particularly handy Jor a DLL that uses C++ classes, for two reasons. First, if you use the _export keyword when defining a class, all of the non-inline member functions and static data members for that class are exported. It's easier to let IMPDEF make a module definition file for you because it lists all the exported functions, automatically including the member functions and static data members.
Since the names of these functions are mangled, it would be very tedious to list them all in the EXPORTS section of a module definition file simply to create an import library from the module definition file. If you use IMPDEF to create the module definition file, it will include the ordinal value for each exported function. If
the exported name is mangled, IMPDEF will also include that function's unmangled, original name as a comment following the function entry. So, for instance, the module definition file created by IMPDEF for a DLL that used C++ classes would look
something like this:
LIBRARY FileName
DESCRIPTION 'Description'
EXPORTS
MangledExportFuncName @Ordinal ExportFuncName
MangledExportFuncName @Ordinal ExportFuncName
where FileName is the DLL's root filename, Description is the value of the DESCRIPTION statement if the DLL was previously linked with a module definition file that included a DESCRIPTION statement, MangledExportFuncName provides the mangled name,
Ordinal is that function's ordinal value (an integer), and
ExportFuncName gives the function's original name.
Functions in a DLL
IMPDEF creates an editable source file that lists all the exported functions in the DLL. You can edit this .DEF file to contain only those functions that you want to make available to a particular application, then run IMPLIB on the edited .DEF file. This results in an import library that contains import information for a specific subset of a DLL's export functions.
For instance, let's say you're distributing a DLL that provides functions to be used by several applications. Every export function in the DLL is defined with _export. Now, if all the applications used all the DLL's exports, then you could simply use IMP LIB to make one import library for the DLL, and deliver that import library with the DLL, which would provide import information for all of the DLL's exports. The import library could be linked to any application, thus eliminating the need for the particular application to list every DLL function it uses in the IMPORTS section of its module definition file.
Now, let's say you want to give only a handful of the DLL's exports to a particular application. Ideally, you want a customized import library to be linked to that application-an import library that only provides import information for the subset of functions that the application will use. All of the other export functions in the DLL will be hidden to that client application.
To create an import library that satisfies these conditions, run IMPDEF on the compiled and linked DLL. IMPDEF produces a module definition file that contains an EXPORT section listing all of the DLL's export functions. You can edit that module definition file, removing EXPORTS section entries for those functions that you don't want in the customized import library. Once you've removed the exports that you don't want, run IMPLIB on the module definition file. The result will be an import library that contains import information for only those export functions listed in the EXPORTS section of the module definition file.
IMPLIB: The import librarian
01
The IMPLIB utility creates an import library that can be~ substituted for part or all of the IMPORTS section of a module definition file for a Windows application.
Since TUNKs default settings suffice for most applications, module definition files aren't usually needed.
See page 3 for information on using IMPDEF and IMPUB to customize an import library for a specific application.
Note that a DLL can also have an extension of .EXE or
DRV, not just DLL.
Table 1.1
IMPLIB options
You can use either a hyphen or a slash to precede IMPLlBs options but the options must
be lowercase.
6
If a module uses functions from DLLs, you have two ways to tell the linker about them:
• You can add an IMPORTS section to the module definition file and list every function from DLLs that the module will use. • Or you can include the import library for the DLLs when you
link the module.
If you've created a Windows application, you've already used at least one import library, IMPORT.LIB. IMPORT.LIB is the import library for the standard Windows DLLs. (IMPORT.LIB is linked automatically when you build a Windows application in the IDE and when using Bee to link. You only have to explicitly link with IMPORT.LIB if you're using TLINK to link separately.)
An import library lists some or all of the exported functions for one or more DLLs. IMPLIB creates an import library directly from DLLs or from module definition files for DLLs (or a combination of the two).
To create an import library for a DLL, type
IMPLIBOptions LibName [ DefFiles ... I DLLs ...
where Options is an optional list of one or more IMPLIB options
(see Table 1.1), LibName (required) is the name for the new import
library, DefFiles is a list of one or more existing module definition
files for one or more DLLs, and DLLs is a list of one or more
existing DLLs. You must specify at least one DLL or module definition file.
Option What it does
-i Tells IMPLIB to ignore WEP, the Windows exit
procedure required to end a DLL. Use this option if you are specifying more than one DLL on the IMPLIB command line.
Warning control:
-t Terse warnings.
-v Verbose warnings. -w No warnings.
Re-creating
IMPORT.LlB
Enter this command on a single line while at the Windows SYSTEM directory.
When Microsoft releases new versions of Windows, you will probably need to replace the current version of IMPORT. LIB with a new one. The easiest way to do this is to build it yourself.
This command line builds the current version of IMPORT.LIB:
IMPLIB -i IMPORT.LIB GDI.EXE KERNEL.EXE USER.EXE KEYBOARD.DRV SOUND.DRV WIN87EM.DLL
If Windows is extended so that it uses additional DLLs, any new DLLs will also have to appear on the command line.
IMPLIBW: The import librarian for Windows
See the discussion of IMPLIB on page 6 for more information on the uses of
import libraries and DLLs.
Select an import
library
From a DLL
From a module definition file
The IMPLIBW Windows utility creates an import library that can be substituted for part or all of the IMPORTS section of a module definition file for a Windows application. Unlike most of the other tools and utilities discussed in this book, IMPLIBW is an
application that runs under Windows.
To create an import library with IMPLIBW, double-click on the IMPLIBW icon. An empty window will appear. Selecting File I
Create ... will bring up a dialog box listing all DLLs in the current directory. You can navigate between directories as normal by double-clicking on directory names in the list box.
When you select a DLL and click on Create (or simply double-click on a DLL filename), IMPLIBW will create an import library with the same base name as the selected DLL, and an extension of .LIB.
If you have a module definition (.DEF) file for a DLL, you can use
it instead of the DLL itself to create an import library.
Instead of selecting a DLL, type the name of a .DEF file into the edit control and click on Create. IMPLIBW will create an import
8
Creating the
import library
See Appendix A "Error
mes-sages, " for possible IMPLlBW error messages.
library with the same base name as the selected .DEF file, and an extension of .LIB.
If there were no errors as IMPLIBW examined the DLL or module definition file and created the import library, the window will report "No Warnings." That's all there is to it. You now have a new import library that you can include in a project;
c
H A p T E R2
Make.' The program manager
To find out how to create a
makefile for a Windows application, see Chapter 8, "Building a Windows application" in the Programmer's Guide.
Borland's command-line MAKE, derived from the UNIX'program of the same name, helps you keep the executable versions of your programs current. Many programs consist of many source files, each of which may need to pass through preprocessors, assem-blers, compilers, and other utilities before being combined with the rest of the program. Forgetting to recompile a module that has been or that depends on something you've changed-can lead to frustrating bugs. On the other hand, recompiling
everything just to be safe can be a tremendous waste of time.
MAKE solves this problem. You provide MAKE with a descrip-tion of how the source and object files of your program are pro-cessed to produce the finished product. MAKE looks at that description and at the date stamps on your files, then does what's necessary to create an up-to-date version. During this process, MAKE may invoke many different compilers, assemblers, linkers, and utilities, but it never does more than is necessary to update the finished program.
MAKE's usefulness extends beyond programming applications. You can use MAKE to control any process that involves selecting files by name and processing them to produce a finished product. Some common uses include text processing, automatic backups, sorting files by extension into other directories, and cleaning temporary files out of your directory.
How MAKE works
The original IBM PC and compatibles didn't come with a built-in clock. If your system falls into this category, be sure to set the system time and date correctly.
Starting MAKE
10
MAKE keeps your program up-to-date by performing the following tasks:
iii Reads a special file (called a makefile) that you have created. This file tells MAKE which .OBJ and library files have to be linked in order to create your executable file, and which source and header files have to be compiled to create each .OBJ file.
B Checks the time and date of each .OBJ file against the time and
date of the source and header files it depends on. If any of these is later than the .OBJ file, MAKE knows that the file has been modified and that the source file must be recompiled . • Calls the compiler to recompile the source file .
.. Once all the .OBJ file dependencies have been checked, checks the date and time of each of the .OBJ files against the date and time of your executable file.
g If any of the .OBJ files is later than the .EXE file, calls the linker
to recreate the .EXE file.
MAKE relies completely upon the time stamp DOS places on each file. This means that, in order for MAKE to do its job, your
system's time and date must be set correctly. Make sure the system battery is in good repair. Weak batteries can cause your system's clock to lose track of the date and time, and MAKE will no longer work as it should.
There are two versions of MAKE: A protected mode version-MAKE.EXE-and a real mode version-MAKER.EXE. They work identically; the only difference is that the protected mode version can process larger make files. When we refer to MAKE, we mean either version.
To use MAKE, type make at the DOS prompt. MAKE then looks for a file specifically named MAKEFILE. If MAKE can't find
MAKEFILE, it looks for MAKEFILE.MAK; if it can't find that or BUILTINS.MAK (described later), it halts with an error message.
MAKE stops if any command it has executed is aborted
via a CtrI-Break. Thus, a CtrI-Break
stops the currently executing command and MAKE as well.
Command-line
What if you want to use a file with a name other than MAKEFILE or MAKEFILE.MAK? You give MAKE the file (-1) option, like
this: .
MAKE -f MYFILE.MAK
The general syntax for MAKE is make [option ... ] [target. .. ]
where option is a MAKE option (discussed later), and target is the name of a target file to make.
Here are the MAKE syntax rules:
EI The word make ·is followed by a space, then a list of make
options.
El Each make option must be separated from its adjacent options
by a space. Options can be placed in any order, and any number of these options can be entered (as long as there is room in the command line). All options that do not specify a string (-5 or ±a, for example) can have an optional- or + after them. This specifies whether you wish to turn the option off (-) or on (+).
[J The list of MAKE options is followed by a space, then an
optional list of targets.
c Each target must also be separated from its adjacent targets by a space. MAKE evaluates the target files in the order listed, re-compiling their constituents as necessary.
If the command line does not include any target names, MAKE uses the first target file mentioned in an explicit rule. If one or more targets are mentioned on the command line, they will be built as necessary.
options
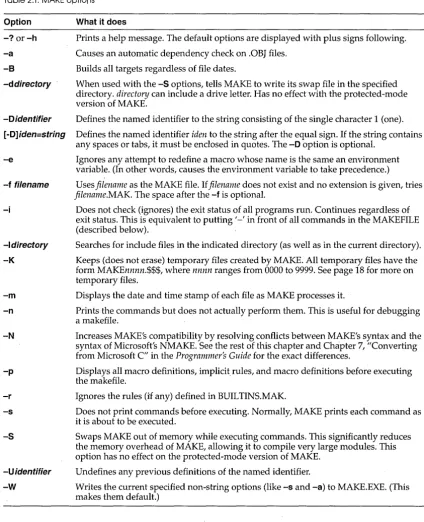
Here's a complete list of MAKE's command-line options. Note thatcase (upper or lower) is significant; for example, the option -d is not a valid substitution for -D. Also note that you can use either a - or a I to introduce the options.
Table 2.1: MAKE options
Option What it does
-? or -h Prints a help message. The default options are displayed with plus signs following.
-a Causes an automatic dependency check on .OBI files.
-8 Builds all targets regardless of file dates.
-ddirectory When used with the -S options, tells MAKE to write its swap file in the specified
directory. directory can include a drive letter. Has no effect with the protected-mode version of MAKE.
-0 identifier Defines the named identifier to the string consisting of the single character 1 (one).
[-O]iden=string Defines the named identifier iden to the string after the equal sign. If the string contains
any spaces or tabs, it must be enclosed in quotes. The -0 option is optional.
-e Ignores any attempt to redefine a macro whose name is the same an environment variable. (In other words, causes the environment variable to take precedence.)
-f filename Uses filename as the MAKE file. If filename does not exist and no extension is given, tries
filename.MAK. The space after the -f is optional.
-i Does not check (ignores) the exit status of all programs run. Continues regardless of exit status. This is equivalent to putting '-' in front of all commands in the MAKE FILE (described below).
-I directory Searches for include files in the indicated directory (as well as in the current directory).
-K Keeps (does not erase) temporary files created by MAKE. All temporary files have the form MAKEnnnn.$$$, where nnnn ranges from 0000 to 9999. See page 18 for more on temporary files.
-m Displays the date and time stamp of each file as MAKE processes it.
-n Prints the commands but does not actually perform them. This is useful for debugging a makefile.
-N Increases MAKE's compatibility by resolving conflicts between MAKE's syntax and the syntax of Microsoft's NMAKE. See the rest of this chapter and Chapter 7, "Converting from Microsoft C" in the Programmer's Guide for the exact differences.
-p Displays all macro definitions, implicit, rules, and macro definitions before executing the makefile.
-r Ignores the rules (if any) defined in BUILTINS.MAK.
-5 Does not print commands before executing. Normally, MAKE prints each command as it is about to be executed.
-S Swaps MAKE out of memory while executing commands. This significantly reduces the memory overhead of MAKE, allowing it to compile very large modules. This option has no effect on the protected-mode version of MAKE.
-Uidentifier Undefines any previous definitions of the named identifier.
-w
Writes the current specified non-string options (like -5 and -a) to MAKE.EXE. (Thismakes them default.)
The BUILTINS,MAK
file
You will often find that there are MAKE macros and rules thatyou use again and again. There are three ways of handling them.
e First, you can put them in every makefile you create.
c Second, you can put them all in one file and use the !include
directive in each makefile you create. (See page 35 for more on directives.)
c Third, you can put them all in a BUlLTlNS.MAK file. Each time you run MAKE, it looks for a BUlLTINS.MAK file; however, there is no requirement that any BUlL TlNS.MAK file exist. If MAKE finds a BUlLTlNS.MAK file, it interprets that file first. If MAKE cannot find a BUlL TlNS.MAK file, it proceeds directly to interpreting MAKE FILE or MAKEFILE.MAK (or whatever makefile you specify with the -f option).
The first place MAKE searches for BUlL TlNS.MAK is the current directory. If it's not there, MAKE then searches the directory from which MAKE.EXE was invoked. You should place the
BUlLTlNS.MAK file in the same directory as the MAKE.EXE file.
MAKE always searches for the makefile in the current directory only. This file contains the rules for the particular executable program file being built. Both BUlLTlNS.MAK and the makefile files have identical syntax rules.
MAKE also searches for any !include files (see page 38 for more on this MAKE directive) in the current directory. If you use the-I
(include) option, it will also search in the directory specified with the -I option.
A simple use of MAKE
For our first example, let's look at a simple use of MAKE that doesn't involve programming. Suppose you're writing a book, and decide to keep each chapter of the manuscript in a separate file. (Let's assume, for the purposes of this example, that your
MAKE can also back up files, pull files out of different subdirectories, and even automatically run your programs should the data files they use be modified.
14
book is quite short: It has three chapters, in the files CHAPl.MSS, CHAP2.MSS, and CHAP3.MSS.) To produce a current draft of the book, you run each chapter through a formatting program, called FORM.EXE, then use the DOS COpy command to concatenate the outputs to make a single file containing the draft, like this:
Chap1.MSS
forrn.9>
Chapt1.TXTChap2.MSS
form.9>
Chapt2.TXT Book.TXTChap3.MSS
form.9>
Chap3.TXTLike programming, writing a book requires a lot of concentration. As you write, you may modify one or more of the manuscript files, but you don't want to break your concentration by noting which ones you've changed. On the other hand, you don't want to forget to pass any of the files you've changed through the
formatter before combining it with the others, or you won't have a fully updated draft of your book!
One inelegant and time-consuming way to solve this problem is to create a batch file that reformats everyone of the manuscript files. It might contain the following commands:
FORM CHAP1.MSS FORM CHAP2.MSS FORM CHAP3.MSS
COPY /A CHAP1.TXT+CHAP2.TXT+CHAP3.TXT BOOK. TXT
Running this batch file would always produce an updated version of your book. However, suppose that, over time, your book got bigger and one day contained 15 chapters. The process of refor-matting the entire book might become intolerably long.
MAKE can come to the rescue in this sort of situation. All you need to do is create a file, usually named MAKEFILE, which tells MAKE what files BOOK. TXT depends on and how to process them. This file will contain rules that explain how to rebuild BOOK.TXTwhen some of the files it depends on have been changed.
In this example, the first rule in your makefile might be
BOOK.TXT: CHAP1.TXT CHAP2.TXT CHAP3.TXT
COpy /A CHAP1.TXT+CHAP2.TXT+CHAP3.TXT BOOK.TXT
What does this mean? The first line (the one that begins with BOOK. TXT:) says that BOOK.TXT depends on the formatted text of each of the three chapters. If any of the files that BOOK.TXT depends on are newer than BOOK. TXT itself, MAKE must rebuild BOOK. TXT by executing the COpy command on the subsequent line.
This one rule doesn't tell the whole story, though. Each of the chapter files depends on a manuscript (.MSS) file. If any of the CHAP?TXT files is newer than the corresponding .MSS file, the .MSS file must be recreated. Thus, you need to add more rules to the make file as follows:
CHAP1.TXT: CHAP1.MSS FORM CHAP1.MSS
CHAP2.TXT: CHAP2.MSS FORM CHAP2.MSS
CHAP3.TXT: CHAP3.MSS FORM CHAP3.MSS
Each of these rules shows how to format one of the chapters, if
necessary, from the original manuscript file.
MAKE understands that it must update the files that another file depends on before it attempts to update that file. Thus, if you change CHAP3.MSS, MAKE is smart enough to reformat Chapter 3 before combining the .TXT files to create BOOK.TXT.
We can add one more refinement to this simple example. The three rules look very much the same-in fact, they're identical except for the last character of each file name. And, it's pretty easy to forget to add a new rule each time you start a new chapter. To solve these problems, MAKE allows you to create something called an implicit rule, which shows how to make one type of file from another, based on the files' extensions. In this case, you can replace the three rules for the chapters with one implicit rule:
.MSS.TXT:
FORM $*.MSS
This rule says, in effect, "If you need to make a .TXT file out of an .MSS file to make things current, here's how to do it." (You'll still have to update the first rule-the one that makes BOOK.TXT, so that MAKE knows to concatenate the new chapters into the
output file. This rule, and others following, make use of a macro.
See page 28 for an in-depth discussion of macros.)
Once you have the makefile in place, all you need to do to create an up-~o-date draft of the book is type a single command at the DOS prompt: MAKE.
Creating makefiles
Creating a program from an assortment of program files, include files, header files, object files, and so on, is very similar to the text-processing example you just looked at. The main difference is that the commands you'll use at each step of the process will invoke preprocessors, compilers, assemblers, and linkers instead of a text formatter and the DOS COpy command. Let's explore how to create makefiles-the files that tell MAKE how to do these things-in greater depth.
A makefile contains the definitions and relationships needed to help MAKE keep your program(s) up-to-date. You can create as many makefiles as you want and name them whatever you want; MAKE FILE is just the default name that MAKE looks for if you don't specify a make file when you run MAKE.
You create a makefile with any ASCII text editor, such as the IDE built-in editor, Sprint, or SideKick. All rules, definitions, and directives end at the end of a line. If a line is too long, you can continue it to the next line by placing a backslash (\) as the last character on the line.
Use whitespace (blanks and tabs) to separate adjacent identifiers, (such as dependencies) and to indent commands within a rule.
Components of a makefile
16
Creating a makefile is like writing a program, with definitions, commands, and directives. These are the constructs allowed in a makefile:
• comments • explicit rules • implicit rules
Comments
Explicit and implicit rules are discussed following the section on commands.
Command lists for
implicit and
explicit rules
• macro definitions • directives:
• file inclusion directives
• conditional execution directives • error detection directives • macro undefinition directives
Let's look at each of these in more detail.
Comments begin with a pound sign (#) character; the rest of the line following the # is ignored by MAKE. Comments can be placed anywhere; they don't have to start in a particular column.
A backslash will not continue a comment onto the next line; instead, you must use a # on each line. In fact, you cannot use a backslash as a continuation character in a line that has a comment.
If the backslash precedes the #, it is no longer the last character on tl1e line; if it follows the #, then it is part of the comment itself. Here are some examples of comments in a makefile:
# Makefile for my book
# This file updates the file BOOK. TXT each time I
# change one of the .MSS files
# Explicit rule to make BOOK. TXT from six chapters. Note the
# continuation lines.
BOOK.TXT: CHAPl.TXT CHAP2.TXT CHAP3.TXT\ CHAP4.TXT CHAPS.TXT CHAP6.TXT
COPY fA CHAPl.TXT+CHAP2.TXT+CHAP3.TXT+CHAP4.TXT+\ CHAPS.TXT+CHAP6.TXT BOOK. TXT
# Implicit rule to format individual chapters .MSS.TXT:
FORM $*.MSS
Both explicit and implicit rules (discussed later) can have lists of commands. This section describes how these commands are
pro-~essed by MAKE.
Commands in a command list take the form
[ prefix ... ] command_body
18
Each command line in a command list consists of an (optional) list of prefixes, followed by a single command body.
Prefixes The prefixes allowed in a command modify the treatment of these commands by MAKE. The prefix is either the at-sign (@) or a hyphen (-) followed immediately by a number.
Table 2.2 MAKE prefixes
Exit codes are status codes returned by the executed commands.
Command body and operators
Prefix
@
-num
What it does
Prevents MAKE from displaying the command before executing it. The display is hidden even if the -5 option is not
given on the MAKE command line. This prefix applies only to the command on which it appears.
Affects how MAKE treats exit codes. If a number (num) is provided, then MAKE aborts processing only if the exit status exceeds the number given. In this example, MAKE aborts only if the exit status exceeds 4:
-4 MYPROG SAMPLE.X
If no -num prefix is given and the status is nonzero, MAKE stops and deletes the current target file.
With a hyphen but no number, MAKE will not check the exit status at all. Regardless of the exit status, MAKE continues.
& The ampersand operator causes MAKE to execute the command for each of the dependents the $** or $? macros in an explicit rule expands to. See page 34 for more information on these macros.
The command body is treated exactly as if it were entered asa line to the DOS command line, with the exception that pipes (I)
are not supported.
In addition'to the <, >, and» redirection operators, MAKE adds the« and && operators. These operators create a file on the fly for input to a command. The «operator creates a temporary file and redirects the command's standard input so that it comes from the created file. If you have a program that accepts input from
stdin, the command
MYPROG «!
This is a test
would create a temporary file containing the string "This is a test \n", redirecting it to be the sole input to myprog. The excla-mation point (!) is a delimiter in this example; you can use any character except # or \ as a delimiter for the file. The first line containing the delimiter character as its first character ends the
Macros are covered starting onpage2B.
The KEEP option for the «
operator in compatibility mode tells MAKE not to delete specific temporary files. See the next section.
file. The rest of the line following the delimiter character (in this case, an exclamation point) is considered part of the preceding command.
The && operator is similar to «. It creates a temporary file, but
instead of making the file the standard input to the command, the
&& operator is replaced with the temporary file's name. This is
useful when you want MAKE to create a file that's going to be used as input to a program. The following example creates a "response file" for TLINK:
MYPROG.EXE: $ (MYOBJS) TLINK Ie @&&!
cos
$ (MYOBJS) $*$*
$ (MYLIBS) EMU.LIB MATHS.LIB CS.LIB
Note that macros (indicated by $ signs) are expanded when the file is created. The $* is replaced with the name of the file being built, without the extension, and $(MYOBJS) and $(MYLIBS) are replaced with the values of the macros MYOBJS and MYLIBS. Thus, TLINK might see a file that looks like this:
cos
A.OBJ B.OBJ C.OBJ D.OBJ MYPROGMYPROG
W.LIB X.LIB Y.LIB Z.LIB EMU.LIB MATHS.LIB CS.LIB
All temporary files are deleted unless you use the -K command-line option. Use the -K option to "debug" your temporary files if
they don't appear to be working correctly.
Compatibility option
If you specified -N on the MAKE command line, the « operator
changes its behavior to be more like that of the && operator; that is, the temporary file isn't redirected to standard input, it's just created on the fly for use mainly as a response file. This behavior is consistent with Microsoft's NMAKE.
The format for this version of the «operator is:
command «ffilenamel] ... «ffilenameN]
text .
Note that there must be no space after the « and before the KEEP or NOKEEP option.
«[KEEP I NOKEEP]
text
«[KEEP I NOKEEP]
20
The KEEP option tells MAKE to not delete the file after it's been used. If you don't specify anything or specify NOKEEP, MAKE will delete the temporary file (unless you specified the -K option to keep temporary files).
Botching programs MAKE allows utilities that can operate on a list of files to be batched. Suppose, for example, that MAKE needs to submit several C files to Borland C++ for processing. MAKE could run BCC once for each file, but it's much more efficient to invoke BCC with a list of all the files to be compiled on the command line. This saves the overhead of reloading Borland C++ each time.
MAKE's batching feature lets you accumulate the names of files to be processed by a command, combine them into a list, and invoke that command only once for the whole list.
To cause MAKE to batch commands, you use braces in the command line:
command { batch-item} .. . rest-oJ-command
This command syntax delays the execution of the command until MAKE determines what command (if any) it has to invoke next. If
the next command is identical except for what's in the braces, the two commands will be combined by appending the parts of the commands that appeared ~side the braces.
Here's an example that shows how batching works. Suppose MAKE decides to invoke the following three commands in succession:
Bee {file1.c
Bee {file2.c
Bee {f i 1 e 3. c
Rather than invoking Borland C++ three times, MAKE issues the single command
Bee filel.c file2.c file3.c
Note that the spaces at the ends of the file names in braces are essential to keep them apart, since the contents of the braces in each command are concatenated exactly as-is.
Here's an example that uses an implicit rule. Suppose your makefile had an implicit rule to compile C programs to .OBJ files:
.c.obj:
BCC -c {$< }
As MAKE uses the implicit rule on each C file, it expands the macro $< into the actual name of the file and adds that name to the list of files to compile. (Again, note the space inside the braces . to keep the names separate.) The list grows until one of three
things happens:
I:J MAKE discovers that it has to run a program other than BCC Il there are no more commands to process
lJ MAKE runs out of room on the command line
If MAKE runs out of room on the command line, it puts as much as it can on one command line, then puts the rest on the next command line. When the list is done, MAKE invokes BCC (with the -c option) on the whole list of files at once.
Executing commands MAKE searches for any other command name using the DOS search algorithm:
1. MAKE first searches for the file in the current directory, then
se~rches each directory in the path.
2. In each directory, MAKE first searches for a file of the specified name with the extension .COM. If it doesn't find it, it searches for the same file name with an .EXE extension. Failing that, MAKE searches for a file by the specified name with a .BA T extension.
3. If MAKE finds a .BAT file, it invokes a copy of COM-MAND.COM to execute the batch file.
4. If MAKE can't find a .COM, .EXE, or .BA T file matching the command to be executed, it will invoke a copy of the DOS command processor (COMMAND.COM by default) to execute the command.
If you supply a file name extension in the command line, MAKE searches only for that extension. Here are some examples:
• This command causes COMMAND.COM to change the current directory to C: \INCLUDE:
cd c: \ include
22
Explicit rules
Note that the braces must be included if you use the paths parameter.
• MAKE uses the full search algorithm in searching for the appropriate files to p~rform this command:
tlink lib\cOs x y,z,z,lib\cs
• MAKE searches for this file using only the .COM extension: myprog.com geo.xyz
a MAKE executes this command using the explicit file name provided:
c:\myprogs\fil.exe -r
The first rule in the example on page 17 is an explicit rule-a rule that specifies complete file names explicitly. Explicit rules take the form
target [target ... ] : [{paths}] [dependent ... ] [command]
where target is the file to be updated, dependent is a file on which
target depends, paths is a list of directories, separated by semicolons and enclosed in braces, in which dependent files might reside, and command is any valid DOS command (including invocation of .BAT files and execution of .COM and .EXE files).
Explicit rules define one or more target names, zero or more dependent files, and an optional list of commands to be performed. Target and dependent file names listed in explicit rules can contain normal DOS drive and directory specifications; they can also contain wildcards.
. . Syntax here is important .
• target must be at the start of a line (in column 1).
a The dependent file(s) must be preceded by at least one space or tab, after the colon.
a paths, if included, must be enclosed in braces.
• Each command must be indented, (must be preceded by at least one blank or tab). As mentioned before, the backslash can be used as a continuation character if the list of dependent files or a given command is too long for one line.
Both the dependent files and the commands are optional; it is possible to have an explicit rule consisting only of target [target ... J
followed by a colon.
The idea b"ehind an explicit rule is that the command or com-mands listed will create or update target, usually using the
dependent files. When MAKE encounters an explicit rule, it first
checks to see if any of the dependent files are themselves target files elsewhere in the makefile. If so, MAKE evaluates that rule first. MAKE will check for dependent files in the current directory first. If it can't find them, MAKE will then check each of the directories specified in the path list.
Once all the dependent files have been created or updated based on other rules, MAKE checks to see if target exists. If not, each com-mand is invoked in the order given. If target does exist, its time and date of last modification are compared against the time and date for each dependent. If any dependent has been modified more recently than target, the list of commands is executed.
A given file name can occur on the left side of an explicit rule only once in a given execution of MAKE.
Each command line in an explicit rule begins with whitespace. MAKE considers all lines following an explicit rule to be part of the command list for that rule, up to the next line that begins in column 1 (without any preceding whitespace) or to the end of the file. Blank lines are ignored.
Special considerations An explicit rule with no command lines following it is treated a little differently than an explicit rule with command lines.
!J If an explicit rule includes commands, the only files that the
target depends on are the ones listed in the explicit rule.
D If an explicit rule has no commands, the targets depend on two
sets of files: the files given in the explicit rule, and any file that matches an implicit rule for the target(s). This lets you specify a dependency to be handled by an implicit rule. For example in
.c.obj:
Bee
-c $<prog.obj:
PROG.OBJ depends on PROG.C; If PROG.OBJ is out of date, MAKE executes the command line
Bee
-c prog.c24
Multiple explicit rules for a single target
A single target may have more than a single explicit rule. You might use multiple explicit rules to create a module library with TLIB, for example, since the .OBJ object module files might be built differently (some with BCC and some with T ASM, for example).
The format is the same as for normal explicit rules, except there are two colon~ following the target. The second colon tells MAKE to expect additional explicit rules for this target.
In the following example, MYLIB.LIB consists of four object modules, two of which are C++ modules. The other two are assembly modules. The first explicit rule compiles the C++ modules and updates the library. The second explicit rule assembles the ASM files and also updates the library.
mylib.lib:: fl.epp f2.epp bee -e fl.epp f2.epp tlib mylib -+fl.obj -+f2.obj
mylib."lib:: f3.asmf4.asm tasm /mx f3.asm f4.asm tlib mylib -+f3.obj -+f4.obj
Examples Here are some examples of explicit rules:
1. prog.exe: myprog.obj prog2.obj
Bee
myprog.obj prog2.obj2. myprog.obj: myprog.c include\stdio.h
Bee
-c myprog.c3. prog2.obj: prog2.c include\stdio.h
Bee
-c -K prog2.cThe three examples are from the same makefile. Only the modules affected by a change are rebuilt. If PROG2.C is changed, it's the only one recompiled; the same holds true for MYPROG.C. But if the include file stdio.h is changed, both are recompiled. (The link step is done if any of the .OBJ files in the dependency list have changed, which will happen when a recompile results from a change to a source file.)
Automatic dependency checking
Implicit rules
Borland C++ works with MAKE to provide automatic
dependency checking for include files. BCC and BC produce .OBJ files that tell MAKE what include files were used to create those .OBJ files. MAKE's -a command-line option checks this
information and makes sure that everything is up-to-date.
When MAKE does an automatic dependency check, it reads the include files' names, times, and dates from the .OBJ file. The autodependency check will also work for include files inside of include files. If any include files have been modified, MAKE causes the .OBJ file to be recompiled. For example, consider the following explicit rule:
myprog.obj: myprog.e inelude\stdio.h BCC -e myprog.e
Now assume that the following source file, called MYPROG.C, has been compiled with BCC:
#inelude <stdio.h> #include "del. h"
void myprog() {}
If you then invoke MAKE with the following command line
make -a myprog.obj
it checks the time and date of MYPROG.C, and also of stdio.h and dcl.h.
MAKE allows you to define implicit rules as well as explicit ones. Implicit rules are generalizations of explicit rules; they apply to all files that have certain identifying extensions.
Here's an example that illustrates the relationship between the two rules. Consider this explicit rule from the preceding example. The rule is typical because it follows a general principle: An .OBJ file is dependent on the .C file with the same file name and is created by executing BCC. In fact, you might have a makefile where you have several (or even several dozen) explicit rules following this same format.
The symbol $< is a special macro. Macros are discussed starting on page 28. The $<
macro will be replaced by the full name of the appropriate. C source file each time the command
executes.
26
By rewriting the explicit rule as an implicit rule, you can eliminate all the explicit rules of the same form. As an implicit rule, it would look like this:
.c.obj: BCC -c $<
This rule means" Any file with the extension .C can be translated to a file of the same name with the extension .OBJ using this sequence of commands." The .OBJ file is created with the second line of the rule, where $< represents the file's name with the source (.C) extension.
Here's the syntax for an implicit rule:
[ {source _dir}] .source _extension. [{ target _dir}] target_extension:
[command]
As before, the commands are optional and must be indented.
source_dir (which must be enclosed by braces) tells MAKE to
search for source files in the specified directory. target _dir tells MAKE where the target files will be placed.
source_extension is the extension of the source file; that is, it applies to any file having the format
fname.source _extension
Likewise, the target_extension refers to the file
fname . target _extension
where fname is the same for both files. In other words, this implicit rule replaces all explicit rules having the format
fname .target_extension: fname.source _extension [command]
for any fname.
MAKE uses implicit rules if it can't find any explicit rules for a given target, or if an explicit rule with no commands exists for the target.
The extension of the file name in question is used to determine which implicit rule to use. The implicit rule is applied if a file is found with the same name as the target, but with the mentioned source extension.
Note that with the -N compatibility option, the searches go in the opposite
direction: from the bottom of the makefile up.
For example, suppose you had a makefile (named MAKE FILE) whose contents were
.c.obj:
Bee
-c $<If you had a C program named RA TIO.C that you wanted to compile to RATIO.OBJ, you could use the command
make ratio.obj
MAKE would take RA TIO.OBJ to be the target. Since there is no explicit rule for creating RA TIO.OBJ, MAKE applies the implicit rule and generates the command
Bee
-c ratio.cwhich, of course, does the compile step necessary to create RATIO.OBJ.
MAKE also uses implicit rules if you give it an explicit rule with no commands. Suppose you had the following implicit rule at the start of your makefile:
.c.obj:
Bee
-c $<You could then remove the command from the rule:
myprog.obj: myprog.c include\stdio.h
Bee
-c myprog.cand it would execute exactly as before.
If you're using Borland C++ and you enable automatic dependency checking in MAKE, you can remove all explicit dependencies that have .OBJ files as targets. With automatic dependency checking enabled and implicit rules, the three-rule C example shown in the section on explicit rules becomes
.c.obj:
Bee
-c $<prog.exe: myprog.obj prog2.obj
tlink lib\cOs myprog prog2, prog, , lib\cs
You can write several implicit rules with the same target exten-sion. If more than one implicit rule exists for a given target exten-sion, the rules are checked in the order in which they appear in the makefile, until a match is found for the source extension, or until MAKE has checked all applicable rules.
Macros
28
MAKE uses the first implicit rule that involves a file with the source extension. Even if the commands of that rule fail, no more implicit rules are checked.
All lines following an implicit rule, up to the next line that begins without whitespace or to the end of the file, are considered to be part of the command list for the rule.
Often, you'll find yourself using certain commands, file names, or options again and again in your makefile. For instance, if you're writing a e program that uses the medium memory model, all your Bee commands will use the option -mm, which means to compile to the medium memory model. But suppose you wanted to switch to the large memory model. You could go through and change all the -mm options to -ml. Or, you could define a macro. A macro is a name that represents some string of characters. A macro definition gives a macro name and the expansion text; thereafter, when MAKE encounters the macro name, it replaces the name with the expansion text.
Suppose you defined the following macro at the start of your makefile:
MODEL = m
This line defines the macro MODEL, which is now equivalent to the string m. Using this macro, you could write each command to invoke the e compiler to look something like this:
Bee
-c -m$(MODEL) myprog.cWhen you run MAKE, each macro (in this case, $ (MODEL) is replaced with its expansion text (here, m). The command that's actually executed would be
Bee
-c -mm myprog.cNow, changing memory models is easy. If you change the first line to
MODEL = 1
you've changed all the commands to use the large memory model.
In fact, if you leave out the first line altogether, you can specify which memory model you want each time you run MAKE, using the -0 (define) command-line option:
make -DMODEL=l
This tells MAKE to treat MODEL as a macro with the expansion text 1.
Defining macros Macro definitions take the form
macro _name = expansion text
where macro _name is the name of the macro. macro _name should be a string of letters and digits with no whitespace in it, although you can have whitespace between macro_name and the equal sign
(=). The expansion text is any arbitrary string containing letters, digits, whitespace, and punctuation; it is ended by newline.
If macro _name has previously been defined, either by a macro
definition in the makefile or on the MAKE command line, the new definition replaces the old.
Case is significant in macros; that is, the macro names model, Model, and MODEL are all different.
Using macros You invoke macros in your make file using this format
Using environment variables as macros
$(macro_name)
You need the parentheses for all invocations, except when the macro name is just one character long. This
construct-$ (macro_name)-is known as a macro invocation.
When MAKE encounters a macro invocation, it replaces the invocation with the macro's expansion text. If the macro is not defined, MAKE replaces it with the null string.
If you invoke a macro where macro_name hasn't been defined in the makefile or on the command line, MAKE will try to find
macro_name as a DOS environment variable. If MAKE does find it
in the environment, the expansion text will be the value of the environment variable.
Macros defined in the makefile or on the command line override environment variables of the same name unless the -e option was
specified.
Substitution within You can invoke a macro while simultaneously changing some of
macros its text by using a special format of the macro invocation format.
Note that no extraneous whitespace should appear between the: and =. If spaces appear offer the colon, MAKE will attempt to find the string, including the preceding space.
Special considerations
See page 35 for information on directives.
Instead of the standard macro invocation form, use
$( macro_name: textl =text2)
In this form, every occurrence of textl in macro_name will be replaced with text2. macro_name can also be one of the predefined macros. This is useful if you'd prefer to keep only a single list of files in a macro. For example, in the following example, the macro
SOURCE contains a list of all the C++ source files a target depends on. The TLINK command line changes all the .CPP extensions to the matching .OBJ object files and links those.
SOURCE = fl.epp f2.epp f3.epp
rnyapp.exe: $ (SOURCE) bee -e $ (SOURCE)
tlink cOs $(SOURCE:.epp=.obj) ,rnyapp"es
Macros in macros: Macros cannot be invoked on the left side
(macro_name) of a macro definition. They can be used on the right
side (expansion text), but they are not expanded until the macro being defined is invoked. In other words, when a macro invocation is expanded, any macros embedded in its expansion text are also expanded.
Macros in rules: Macro invocations are expanded immediately in rule lines.
Macros in directives: Macro invocations are expanded imme-diately in !if and !elif directives. If the macro being invoked in an
!if or !elif directive is not currently defined, it is expanded to the value 0 (FALSE).
Macros in commands: Macro invocations in commands are expanded when the command is executed.
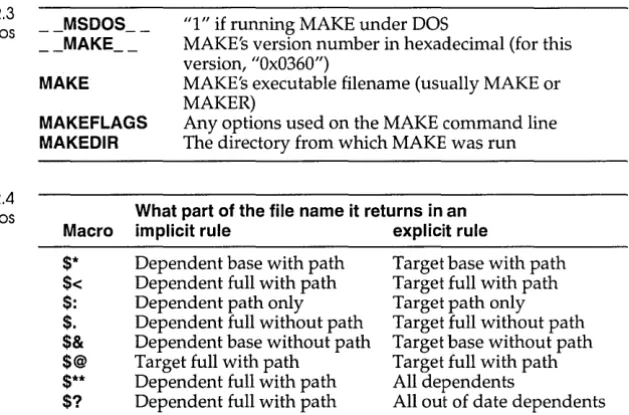
Predefined macros MAKE comes with several special macros built in: $d, $*, $<, $:, $., $&, $@, $**, and $? The first is a test to see if a macro name is defined; it's used in the conditional directives !if and !elif. The others are file name macros, used in explicit and implicit rules. Finally, MAKE defines several other macros; see Table 2.3.
Table 2.3 MAKE predefined macros
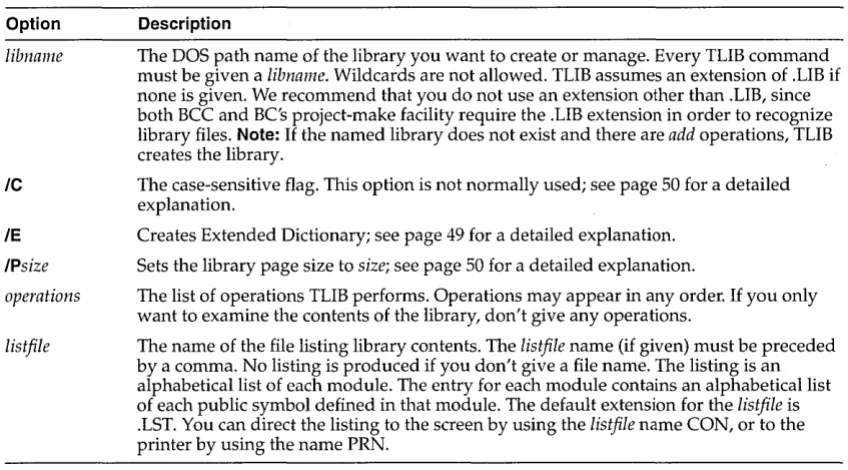
Table 2.4 MAKE filename macros
__ MSDOS __ __ MAKE __
"1" if running MAKE under DOS
MAKE's version number in hexadecimal (for this version, "Ox0360")
MAKE MAKE's executable filename (usually MAKE or MAKER)
MAKEFLAGS MAKEDIR
Any options used on the MAKE command line The directory from which MAKE was run
What part of the file name it returns in an Macro implicit rule explicit rule $*
$< $:
$. $& $@ $** $?
Dependent base with path Dependent full with path Dependent path only Dependent full without path Dependent base without path Target full with path
Dependent full with path Dependent full with path
Defined Test Macro ($d)
Target base with path Target full with path Target path only Target full without path Target base without path Target full with path All dependents
All out of date dependents
The defined test macro ($d) expands to 1 if the given macro name is defined, or to 0 if it is not. The content of the macro's expansion text does not matter. This special macro is allowed only in !if and
!elif directives.
For example, suppose you want to modify your makefile so that if you don't specify a memory model, it'll use the medium one. You could put this at the start of your makefile:
!if !$d(MODEL) # if MODEL is not defined MODEL=m# define it to m (MEDIUM)
!endif
If you then invoke MAKE with the command line
make -DMODEL=l
then MODEL is defined as 1. If, however, you just invoke MAKE by itself,
make
then MODEL is defined as m, your "default" memory model.
32
File name macros The various file name macros work in similar ways, expanding to some variation of the full path name of the file being b.uilt.
Base file name macro
($
*)The base file name macro is allowed in the commands for an explicit or an implicit rule. This macro ($*) expands to the file name being built, excluding any extension, like this:
File name is A:\P\TESTFILE.C $* expands to A:\P\TESTFILE
For example, you could modify this explicit rule
prog.exe: myprog.obj prog2.obj
tlink lib\cOs myprog prog2, prog, , lib\cs
to look like this:
prog.exe: myprog.obj prog2.obj
tlink lib\cOs myprog prog2, $*, , lib\cs
When·the command in this rule is executed, the macro $* is replaced by the target file name without an extension and with a path. For implicit rules, this macro is very useful.
For example, an implicit rule might look like this:
.cpp.obj: BCC -c $*
Full file name macro ($<)
The full file name macro ($<) is also used in the commands for an explicit or implicit rule. In an explicit rule, $< expands to the full target file name (including extension), like this:
File name is A:\P\TESTFILE.C
$< expands to A:\P\TESTFILE.C For example, the rule
mylib.obj: mylib.c
copy $< \oldobjs BCC -c $*.c
copies MYLIB.OBJ to the directory \OLDOBJS before compiling MYLIB.C.
In an implicit rule, $< takes on the file name plus the source exten-sion. For example, the implicit rule
.c.obj:
BCC -c $*.c
produces exactly the same result as
.c.obj:
BCC -c $<
because the exten