Ian Lyons
Digitize your analogue images
A practical workflow guide
Do it once, do it right
Introduction 3
Choosing the Software and Hardware 3
1. Scanning with more Details 4
2. Colors true to Nature 5
3. Bit Depth 6
4. Resolution 6
5. Scan Speed 7
6. Scanner Type and Graphics 8-9 7. Digitization and Archiving Workflow 10-19 Archiving your Work 20-21 Conclusion 22
Introduction
If you’re anything like me you’ve probably got a drawer full of photographs that you’d love to pre-serve digitally, but the expense of getting them scanned professionally can’t be justified. Well, the good news is that there’s an easy way for you to scan the photographs yourself whilst still main-taining quality standards only slightly less than you would expect from a professional scanning service. Better still, it will cost you a lot less. The following illustrated workflow shows how your slides are scanned, optimized and archived. Should you wish to make further enhancements in the future it’s simply a matter of retrieving the optimized scan from the archive storage device and opening it into your favorite photo imaging software. Using this workflow, even the oldest of photographs can be easily enhanced and given a new lease of life.
Choosing the Software and Hardware
It is important that the scanner you intend using is capable of capturing all of the information contained in the original photograph. If a scanner does not capture all of the details and nuances contained within areas such as shadows and highlights, it cannot be recovered later, even when working with the best imaging software. We can see the scanner and scan software have an important role to play.
Specialists agree that a good scan depends on the combination of scanner, scanning software and possibly a post processing software.
However - good quality scans are obtained easier if the scanning software was specifically designed to handle the scanner’s RAW data as compared to a well developed post processing software. Today, SilverFast is considered the worldwide standard of professional scanning software.
Scan with Multi-Exposure
Scan without Multi-Exposure Details
Scan with Multi-Exposure
1. Scanning with more details
Professional photographers are well aware that it’s the dynamic range that determines the qual-ity of an image. To this end, it’s widely acknowl-edged that multiple-exposure scans can ensure that the maximum dynamic range of the pho-tograph is captured, which in turn significantly reduces noise, particularly when scanning color slide film.
SilverFast Multi-Exposure® has the potential to reveal even the finest nuances in the shadows and highlights, yet is still able to differentiate the blackest dark tones and the brightest light tones of the slide. Unlike conventional multi-sampling, SilverFast Multi-Exposure® performs multiple scans of the original photograph with different exposures. This way, the dynamic range of the scanner is effectively doubled. Thus, SilverFast scans are capable of covering the entire contrast range of modern slide films.
Increasing Dynamic Range with SilverFast 6.6 Multi-Exposure
Epson Perfection V700 Photo
4000
2000
0
Dynamic Range based on ISO21550
1288
2399
)el
acs
yar
G( r
avL
without SilverFast Multi-Exposure 1288 with SilverFast Multi-Exposure 2399 Lvar
2. Colors true to nature
Consistent colors and color management has been and is still in many cases a mystery for pro-fessionals and even more so for consumers. For a long time obtaining color consistent scans has been the domain of professional color consul-tants and operators, but not any longer.
SilverFast Ai IT8 Studio helps professionals and enables consumers to benefit from the added value of consistent colors whilst ignoring the sophisticated process behind it. With SilverFast Ai IT8 Studio users of all experience levels can quickly and easily calibrate their scanners so as to obtain color consistent scans.
The integral IT8 Calibration has become a fully automated process with SilverFast Ai IT8 Studio. Therefore, with SilverFast Ai IT8 Studio, it only takes a single mouse click to calibrate your scanner.
The ease with which SilverFast Ai IT8 Studio cali-brates the scanner can be attributed to the com-bination of automatic frame detection and the integrated bar code technology imprinted on SilverFast IT8 targets. In effect, the complete cali-bration process is fully automatic. Just place the original LaserSoft Imaging IT8 target on to the scanner and press the IT8 Calibration start icon. The bar code imprinted on every LaserSoft Imaging IT8 target (patented) ensures that SilverFast automatically identifies the required reference data.
The optimum color reproduction at the start of your imaging workflow will ensure maximum quality in your output.
5 1 2 3 4 5 6 7 8 9 10 11 12 13 14 15 16 17 18 19 20 21 22 1 2 3 4 5 6 7 8 9 10 11 12 13 14 15 16 17 18 19 20 21 22 A B C D E F G H I J K L A B C D E F G H I J K L IT8.7/2-1993 2001:12 Charge: R011204
Scan with Multi-Exposure
Scan before Auto IT8 Calibration
3. Bit Depth
The 48Bit TIFF format was originally developed in order that raw scan data with extended dynamic range (HDR: High Dynamic Range) could be saved. Even scanners with only 30 or 36Bit capa-bility generate their maximum output range in this format. So, regardless of the effective dynamic range supplied, the file will always become a 48Bit file. Normal scanning software tends to save images into a 24Bit file, discarding the extra information created by the scanner. However, 48Bit files retain all of the captured information and it’s for this reason that they are capable of recording even the finest of color and tonal nuances.
4. Resolution
Great care needs to be taken when reading scan-ner specifications, especially when very large fig-ures are quoted. The most important resolution figure is that attributed to optical resolution. Generally, for photographs that were taken with a simple compact camera an optical resolution of around 2800 ppi is sufficient. However, for pho-tographers, who use high quality SLR cameras, 4000 ppi should be considered the minimum optical resolution.
5. Scan Speed
For high resolution scans the time required to scan a photograph can take anywhere between one minute and one hour. The speed depends also on the software setup. For example, a mul-tiple-exposure scan requires more time than a standard scan.
Much more crucial is the number of photographs that are to be scanned at once. The keyword here is “Batch Scans”. With SilverFast and a suitable scanner, batch scans are relatively straightfor-ward, requiring no user intervention once the scanning process is started.
For the reasons outlined above we recommend that the digitization and archiving process is divided into two main stages; i.e. the process of image capture and the process of image optimi-zation. We will discuss both later.
Although SilverFast Ai IT8 Studio is designed for image capture it incorporates two features that are designed to speed up the process of image optimization:
• The first feature (i.e. IT8 Color Calibration) dis-cussed earlier saves a lot of time, since the additional color optimization of the scanned photograph is significantly reduced.
• The second feature is less obvious but none-theless important. Normally, loading of large images (500 MB or higher) can be quite slow. For example, on slower hardware it can take up to 3 minutes or more to load an image of this size into Photoshop.
However, SilverFast HiRePP® (High Resolution Picture Performance) embeds a high resolution preview within the scanned image. This preview image dramatically speeds up the process of loading and working with large image files.
0 50 100 150 200 250 300
3 5
3
27
3
279
401 MB 903 MB 1605 MB seconds to open in SilverFast HDR Studio v6.6r02 seconds to open in Photoshop CS3 24Bit RGB TiffMacBookPro 2.4GHz Intel Core 2 Duo; 4GB RAM, OSX 10.5.5
Hardware
File
Comparison of SilverFast HDR vs Photoshop CS3
seconds to open x MB files
lens coatings and a high-reflection mirror. This technology also helps you achieve faster scans. The Dual Lens System is designed to optimize each scan by automatically selecting from two lenses for the desired scan resolution.
The built-in dust and scratch removal feature from Digital ICE Technologies enables you to automatically remove many surface defects from film and prints during the scanning process. Likewise, Digital ICE can be used to reduce grain when scanning black-and-white film.
The Epson Perfection V750 PRO is supplied with a range of film holders making it equally suitable for small, medium and large formats. For increased productivity, the film holders are designed to allow batch scans of multiple negatives and slides. In addition, due to narrower depth of focus at high optical resolutions the height of the film holders can be manually adjusted to optimize for the individual film type and mount thickness.
Taken together the attributes outlined above make the Epson Perfection V750 PRO uniquely able to produce fast high quality scans from both printed photographs and film.
6. Scanner Type
Amongst numerous scanner types (i.e. high-end drum scanners, film scanners and flatbed scanners) flatbed units are considered to be the most flexible, and probably offer the best value for money, although this has usually been at the expense of image quality. That being said, flatbed scanner technology has made great advances in recent times. In particular, the Epson Perfection V750 PRO is a flatbed scanner with a 10 by 8 inch Transparency Unit (TPU) built into the lid. The maximum optical resolution of the V750 PRO is 6400 ppi for film material, and 4800 ppi for reflective material such as printed pho-tographs. Although, these high resolutions only really make sense with film negatives or slides - with printed photographs such high resolutions are usually unnecessary.
The Epson Perfection V750 PRO also benefits from a high optical density (Dmax 4.0) and a Dual Lens System, both of which make a significant contribution to image quality when it comes to scanning either reflective or transpar-ent materials. The V750’s enhanced optical sys-tem (High-Pass Optics) consists of anti-reflective
Optimized Workflow
Example with 35mm slides
Film Holder
Batch Scan
48 Bit RAW-Data
(or even optimized scans)
Picture Archive SilverFast Ai Studio SilverFast HDR Studio “Delocalized
Remote Processing”
Server, www,...
Optimized Scans Calibrated Scanner
Example with two 35mm slide films
( = 72 slides)
Job order: two color slide films (each 36 slides) having different brands which were exposed individually (thus do not represent a series) are to be scanned: including color and gradation correction, sharpening, scaling.
Two scans: output A: 900%, 228 dpi CMYK; output B: 200%, 72 dpi RGB.
Classical workflow, slide after slide
SilverFast Archive workflow with integrated JobManager
331 min saved !
Operator time
Prescan, zoom, image optimization, USM prescan, batch scans
Prescan, zoom, image optimization, USM prescan, save to Jobmanager
Operator time: = 540 min
Machine time: = 342 min
Operator time: = 209 min
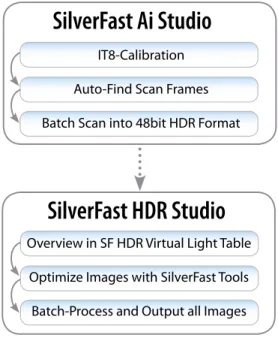
7. Digitization and Archiving Workflow
A: Set-Up and Capture Image raw data with SilverFast Ai IT8 Studio (Multi-Exposure®)
1. Start
• Start SilverFast Ai IT8 Studio (Multi-Exposure) with the SilverFast Universal Launcher.
2. IT8 Calibration
• Place the original LaserSoft Imaging IT8 target on the scanner and press the IT8 Calibration start button.
• A dialog confirms that the calibration was suc-cessful and reports the average deltaE, which is a measure of the calibration quality. A deltaE of 3 or less is considered very good.
Figure 1 – SilverFast Universal Launcher
Figure 2 – IT8 Calibration
SilverFast Ai Studio
IT8-Calibration Auto-Find Scan Frames Batch Scan into 48bit HDR Format
SilverFast HDR Studio
Overview in SF HDR Virtual Light Table Optimize Images with SilverFast Tools
Batch-Process and Output all Images
SilverFast Ai Studio
IT8-Calibration Auto-Find Scan Frames Batch Scan into 48bit HDR Format
SilverFast HDR Studio
Overview in SF HDR Virtual Light Table Optimize Images with SilverFast Tools
Batch-Process and Output all Images
SilverFast Ai Studio
IT8-Calibration Auto-Find Scan Frames Batch Scan into 48bit HDR Format
SilverFast HDR Studio
Overview in SF HDR Virtual Light Table Optimize Images with SilverFast Tools
Batch-Process and Output all Images
SilverFast Ai Studio
IT8-Calibration Auto-Find Scan Frames Batch Scan into 48bit HDR Format
SilverFast HDR Studio
Overview in SF HDR Virtual Light Table Optimize Images with SilverFast Tools
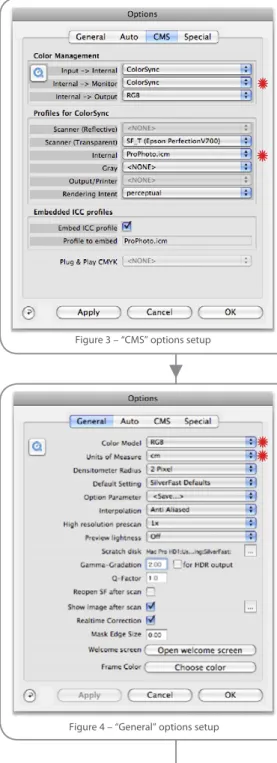
3. Color Management and Metrics setup
• Open the SilverFast main dialog / Options / Tab “CMS”.
• Set the Color Management pop-up for: “Internal -> Monitor:” to ColorSync (Mac) or ICM (Win). • Set “Profiles for ColorSync” (Mac) or “ICM”
(Win) so that “Internal” matches the working RGB color space used in your imaging soft-ware (Photoshop), e.g. ProPhoto or Adobe RGB 1998.
• Switch to the main dialog / Options / Tab “General”. Choose “Color Model” (RGB or CMY) and “Units of Measure” (inch or cm) as the met-rics for your work.
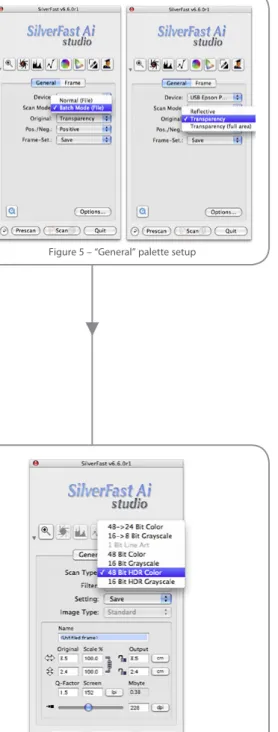
4. Open “General” palette and set “Scan Mode”:
to Batch Mode (File) then set “Original”: to Reflective or Transparency.
Figure 3 – “CMS” options setup
5. Scan Type
Open “Frame” palette and choose “”: 48Bit HDR Color. Note that with the exception of the zoom tool the Adjustments toolbar will be disabled.
6. Load the film holder
Load images into film holder. Note that the Epson Perfection V750 PRO is supplied with a range of film holders.
Tip - Ensure that you follow the guidance pro-vided in the documentation supplied with the scanner when loading the images into the film holder.
7. Press the Prescan button Figure 5 – “General” palette setup
8. Position and resize the scan frame
(colored red). If necessary zoom into image using the Zoom tool (i.e. press “+” button on adjustment toolbar), fine tune the size and position of scan frame, and zoom out.
9. Scaling
• Enter a “Name” for the frame e.g. Archive_Image.
• Set “Scale” to 100%, take care that the scaling lock is closed. Choose the optical resolution of the scanner by first pushing the resolu-tion slider (lpi) to the extreme right (12800) then shifting back until the readout displays 6400 (i.e. the optical resolution of the Epson Perfection V750 PRO when scanning film). • Set Q-Factor to 1.0
Figure 3 – “CMS” options setup
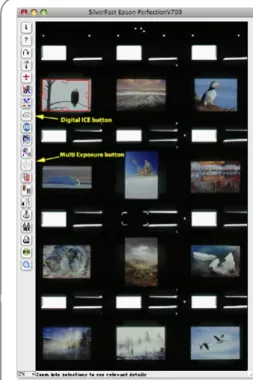
Figure 7 – Prescan window showing scan “Frame” in red
Result:
For a 48Bit HDR raw file with integrated HiRePP® Preview (TIFF) from a 35mm slide “Mbyte” will indicate your file size at approximately 300 MB.
10. Dust and scratch removal
For automatic dust and scratch removal select “ICE” on Special Function toolbar [refer to Figure 7]. Digital ICE Lite - Speed is recom-mended.
11. Multi-Exposure®
Activate SilverFast “Multi-Exposure” button on Special Function toolbar [Figure 7]
12. Duplicate the scan frame
(i.e Alt + Click outside scan frame) then drag the copy frame to the next image. Zoom in and readjust the new frame. Zoom out, make another duplicate frame and copy it to the next image. Continue until all images are framed. Note that this process ensures that all settings applied in steps 9-11 above are also applied to subsequent images.
13.Batch Scan
Click the (Batch) “Scan” button [refer to Figure 8]
• Choose “TIFF” as file format. Alternatively, you might prefer to work with JPEG2000, although TIFF is recommended.
• Select the target directory for your images, e.g. Desktop, and/or create a “New folder” on your disk drive.
• Enter a “Name” for the folder e.g. “Archive_Scans”.
• Start the scanning process with “Save”.
Result:
SilverFast will begin the raw scan production.
Note:
Depending upon the number and size of slides to be scanned, the whole process might take several hours.
B: Image Optimization with SilverFast HDR Studio
1. Start
• Start SilverFast HDR Studio with the SilverFast Universal Launcher.
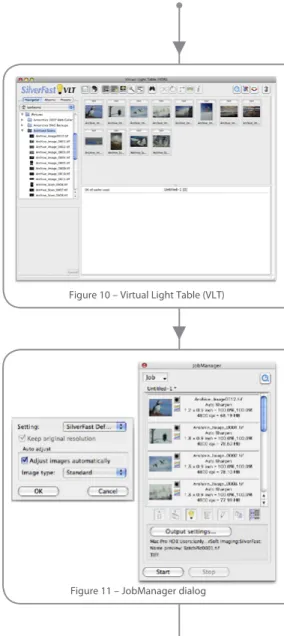
2. Virtual Light Table
SilverFast Virtual Light Table (VLT) opens. Navigate to your image directory.
3. Open SilverFast JobManager 4. Select images
from your image directories and drag them into SilverFast JobManager window. Ensure “Adjust images automatically” is active and click OK.
5. Main menu
Switch from VLT to Main menu (with SF Eye symbol) and double click (open) the first image inside the JobManager window for preview.
Figure 10 – Virtual Light Table (VLT)
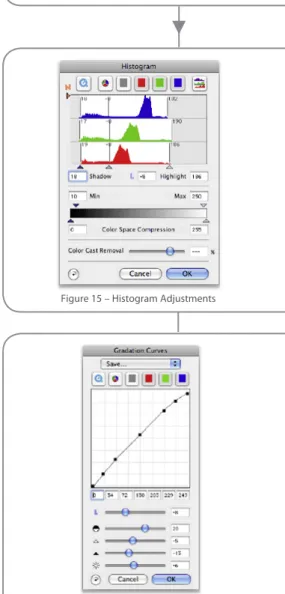
6. NegaFix®
Position scan frame, e.g. to adjust rotation and crop.
(7. For Negatives:)
Select Negative in (Pos./Neg.:) dialogue at “General“ settings and define the necessary settings on the NegaFix® Dialogue.
8. Image Mode
Choose “Image Mode”: 48->24 Bit Color at “Frame” settings.
9. Filter
Choose “Filter”: Auto Sharpen or open the USM dialogue and define the sharpness manually (USM: Unsharp Masking)
Figure 12 – Adjust scan frame and crop image
Figure 14 – Apply automatic image adjustment
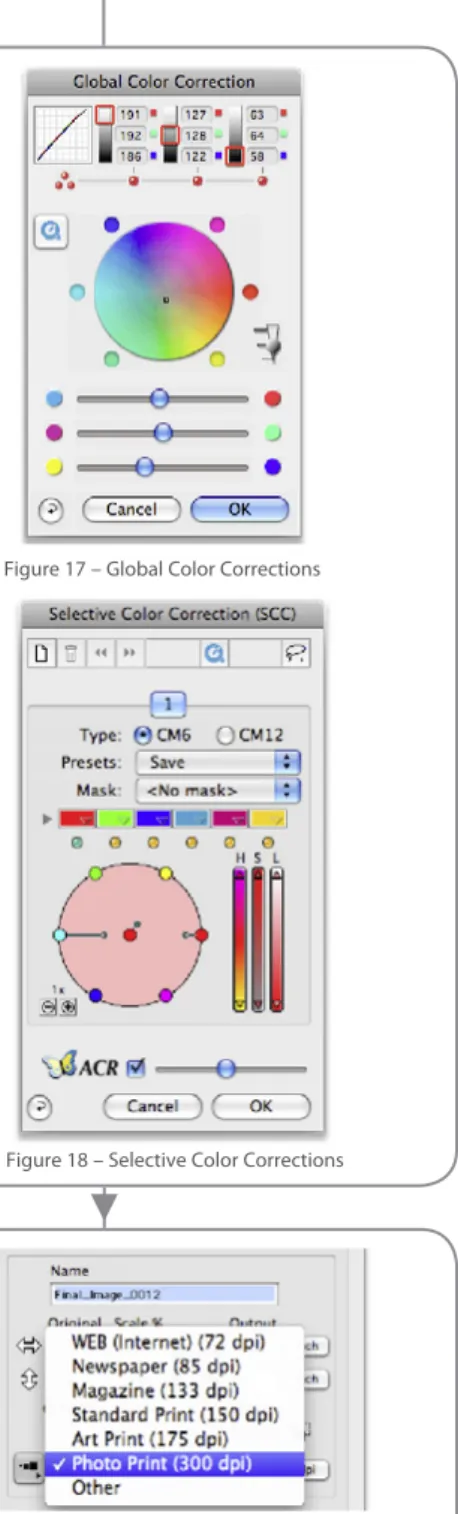
Figure 15 – Histogram Adjustments 10. Auto Adjust
Click the Image-Automatic (Highlight-Shadow-Midtone-Optimization) button
11. Refine adjustments
Refine automatically applied image adjust-ments
• “Histogram” for adjustment of brightest, darkest pixels and color casts.
• If necessary: use the midtone pipette to neutralise shades, metals, or in general: areas which should be “neutral” grey.
• “Gradation Curves” adjustment, i.e. midtone-brightness and contrast.
12. Color Correction – if necessary
• Global Color Correction for overall color adjust-ments.
• Selective Color Correction for changing indi-vidual colors.
13. Scaling
• Set “Scale” to the requested output size in met-rics, e.g. cm. Choose the requested resolution for output, e.g. 300 lpi
• Ensure that Q-Factor is 1.0 • Enter a “Name” for the file
14. Save
“Save” and repeat steps 6-13 individually for every image.
Figure 17 – Global Color Corrections
Figure 19 - “Frame” palette setup for image “Scaling” Figure 18 – Selective Color Corrections
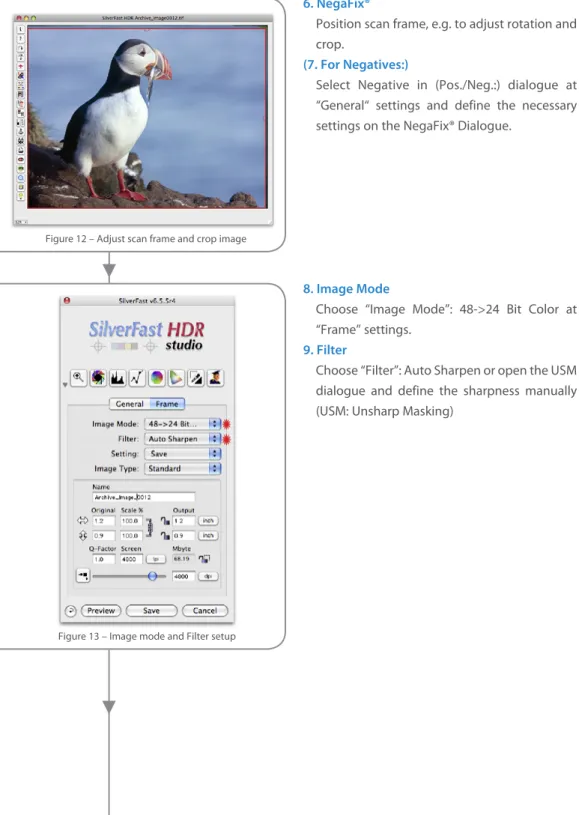
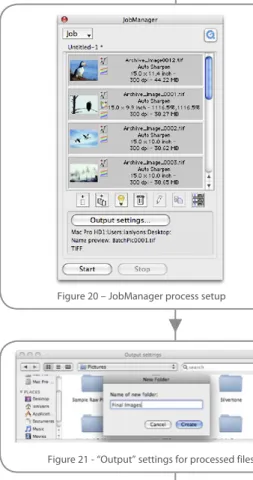
Figure 20 – JobManager process setup 15. Start JobManager process:
• Click on the “Edit” mode button of the JobManager (i.e. Pencil symbol) and confirm “OK”
• Select all of the images inside the JobManager window that you want to process, i.e. click the “all” button (right button), or select them indi-vidually
• Click on the Output settings button - (output-locations dialog appears)
• Select the target directory, e.g. “New folder” • Select the file format, e.g. “TIFF”
• Click the “Save” button. The JobManager will now apply the appropriate saved adjustments to each image. A colored LED will indicate the status of each image as it is processed in JobManager. Additionally, a progress bar will indicate the total number of images to be processed along with actual progress.
• Click on the “Quit” button when the JobManager has processed all images. Confirm that you wish to close SilverFast HDR Studio by
clicking the Yes button. Figure 21 - “Output” settings for processed files
Flash-Memory A
Flash-Memory B
Work Folder
(Hotfolder Source directory)
ColorServer
(in action)
Hotfolder Archive Folder
Hotfolder Destination Folder
Hotfolder Error Folder
Flash-Memory A
Flash-Memory B
Work Folder
(Hotfolder Source directory)
ColorServer
(in action)
Hotfolder Archive Folder
Hotfolder Destination Folder
Hotfolder Error Folder
Flash-Memory A
Flash-Memory B
Work Folder
(Hotfolder Source directory)
ColorServer
(in action)
Hotfolder Archive Folder
Hotfolder Destination Folder
Hotfolder Error Folder
external hard disksUSB external hard disks
FireWire
CD or DVD
Archiving your work
Now that you have digitized your photographs it’s time to decide on the best file format and media type for storing them.
There are number of alternative file formats i.e. JPEG, JPEG 2000 or even PSD, and each have their supporters, but none are as widely used as TIFF. TIFF is also the industry-standard cross platform format, so, it’s probably the best file format to save your digitized images in. TIFF also supports file compression where storage space is limited.
The most common storage options include hard disk and optical disks (i.e. CD or DVD). Obviously, the size and number of digitized photographs will have a bearing on your choice of storage media, but it should be remembered that digital archiving technology is continually developing. So, make sure that you don’t end up using a media type that’s nearing the end of its life. For example, compact disks (CDs) have limited capacity and can become unreadable after only a few years if not stored properly. Even DVDs are of little use if your storage needs run to many hundreds of gigabytes. My recommendation would be to use external hard disks, which can be connected to your computer via a USB or FireWire port when needed. External hard disks can be obtained in capacities ranging from a few 10’s of gigabytes through to 2 terabytes, and there are plenty of options in between.
Any printer can be used with SilverFast HDR® Studio. Better still, you can print your images directly from your folders; create your custo-mized layouts or even templates directly. The embedded color management eases the true- to-color printing and with the optional upgrade to SilverFast PhotoProof it offers to create con-tract proofs according to international standards. All in all, the Epson Perfection V750 PRO with SilverFast Ai IT8 Studio (Multi-Exposure®) and SilverFast HDR® Studio is a full input/output workflow solution for capturing and optimizing analogue and digital images with the added ben-efit of a professional standard output capability.
Conclusion
Whether you’re a professional with high expecta-tions or just a hobbyist with many photographs to scan, the Epson Perfection V750 PRO and SilverFast are the perfect combination.
With the Epson Perfection V750 PRO you can enjoy unparalleled performance when scanning: black-and-white or color negatives, color slides or photographic prints. The V750 PRO with its built-in TPU combined with SilverFast Ai Studio obtains better results than many dedicated film scanners, with the added advantage of allowing film scans up to 10 by 8 inches. The Dual Lens System, 6400 ppi resolution and High-pass optics are features that differentiate the V750 from other flatbed type scanners, making it uniquely suitable for archiving both film and printed pho-tographs.
Features such as SilverFast Multi-Exposure® and automatic IT8 Calibration will ensure that you do justice to your original photographs with minimum effort.
SilverFast HDR 48Bit workflow ensures that you obtain the maximum quality digital archive images from your original photographs. If required, creative retouching can be done with Photoshop.
Beyond the scanning application SilverFast HDR Studio provides two additional and interesting highlights. This enhanced version of SilverFast HDR® can also read raw data from digital SLR cameras, making the processing of your digital images much easier and more convenient. PrinTao is an integrated printing functionality that supports templates, allowing you to reduce repetitive steps in the layout process - either by predefined templates (included in PrinTao®) or by creating your own.
Customer‘s comments
«I need something that is consistent, predicta-ble and reliapredicta-ble. With SilverFast I obtain those objectives, …»
Robert D. Vernon
«I have been a SilverFast user since 2001. I got the software then because it was recognized as the best available, and over the years it has only got better.»
Ricardo Barros
«The difference between the single pass scan and SilverFast‘s Multi-Exposure scan is nothing less than phenomenal. »
Steve Hoffmann, Nature and Landscape Photographer
«What a fool I‘ve been. ... I could have saved myself a boatload of wasted time. ... And from now on, I‘m scanning things with SilverFast.»
Presented in cooporation with Epson and LaserSoft Imaging
Headquarters: LaserSoft Imaging AG Luisenweg 6-8 24105 Kiel • Germany Tel.: +49 (0) 431/5 60 09-0 Fax.: +49 (0 ) 431/5 60 09-96 E-Mail: [email protected] http://www.SilverFast.com Office USA:LaserSoft Imaging Inc. 3212 Gulf Gate Drive Sarasota, FL 34231, USA Phone: (+1) 941-921-4815 Fax: (+1) 941-925-9417 E-Mail: [email protected] http://www.SilverFast.com
Ian Lyons
www.computer-darkroom.com