Close Talk Control version 2.6.1.7
New features and changes
Close Talk Control version 2.6.1.7 contains several enhancements and additions that will add to the already powerful functionality of the Close Talk Conference System range of products. This document describes the functional changes and new features of this major update relative to the time tested version 2.4.2.6. Familiarity with Close Talk Control is assumed, new users should also study the full program manual.
Installation
This version will automatically upgrade the existing version, the only prerequisite is to uninstall the previous version of Close Talk Control before installing this new version, simply use the Windows Control Panel-Add/Remove software tool to uninstall the current version.
Attendance tools
Earlier version of Close Talk Control used text menu commands and an alternating work in the
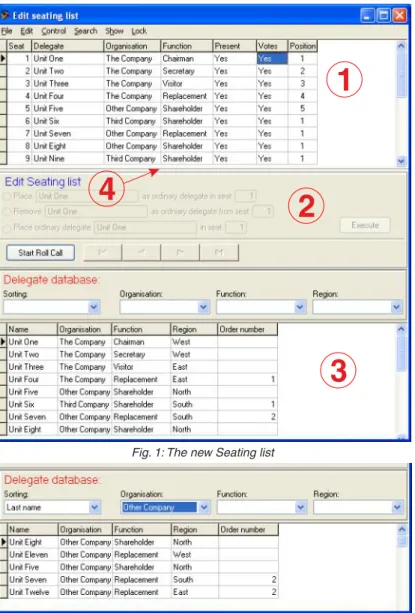
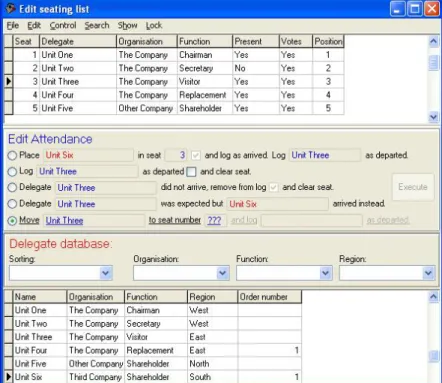
Delegate- and Seating lists. Even though this was very effective once getting used to it also had a quite high learning curve. With this version, all the functions for Seating list editing has been replaced with clearly readable function texts and procedures. The alternating work between the Delegate and Seating list has been eliminated by the inclusion of a simplified version of the Delegate list directly in the Seating list as figure 1 shows, making all the necessary attendance tools available in the same window.
2012-01-26
Figure 1 shows the new look of the Seating list where the upper table (1) is the original
Seating list.
In the middle (2) there is now a toolbar for editing of the Seating list and attendance. The lower table (3) is a reduced version of the Delegate list including sorting and filtering functions.
The Seating and Delegate list distribution in the window can be adjusted by clicking and dragging the border pointed to by (4).
The reduced version of the Delegate list is shown in figure 2. Only information required for attendance is shown in the table.
This table is also write-protected, for edit-ing the Delegate list, use the full Delegate list window as described in section 5 in the full manual.
Just as in the full Delegate list window, there are sorting and filtering tools avail-able here for quick and easy location of groups and individual delegates.
Side 1
Fig. 1: The new Seating list
1
2
3
4
In earlier versions all the editing functions were available as text menu commands.
Many of the functions are still there but the most important attendance tool functions have now been removed and are now available in the toolbar shown in figure 1.
Compare the image in figure 3 with the image shown in the full manual section 4 Seating list to see which functions that have been moved.
Fig. 3: New menu texts
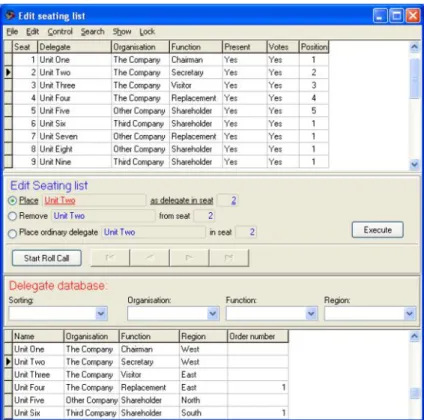
Fig. 4: The editing tools are now in clear text Figure 4 show the Seating list before the
conference is started. The new editing functions is now shown clearly readable in the middle toolbar.
In the example in figure 4, “Unit Two” will be placed on seat 2 when the Execute
button is clicked. Colors are used to highlight from which table the informa-tion is derived where red indicates that the name is from the lower Delegate list and blue indicates the Seating list.
The work method is very simple, select the delegate to be edited by clicking the name in the lists, as different delegates are clicked the toolbar in the middle is updated continuously. When the desired delegate(s) have been selected, choose the desired operation by clicking the respective circle.
The text of the selected function is then underlined to further emphasize the operation. Once the desired operation is shown, in the example above it is “Place Unit Two as delegate in seat 2”, click the Execute button and the function is executed. If no errors where found the program is now ready to accept a new command, if not, study the error message, correct the parameters and try again. Just as in earlier versions, the available functions are different before and during a conference. Figure 4 shows the toolbar before a started conference and all the available functions are only used for pre-conference editing of the Seating list, no changes to the attendance and fee system is made until the conference has been started. The available pre-conference functions as shown in figure 4 are “Place Xxx Yyyy as delegate in seat Z” that is used to place persons from the Delegate list in specific seats in the Seating list. A duplicate error message is shown if the person already is placed in another seat. The function “Remove Xxx Yyyy from seat Z” clears that seat, the seat is then empty. Finally, the function “Place ordinary delegate Xxx Yyyy in seat Z” copies the ordinary (the difference between ”Ordinary” and “Active” delegate is described under Seating list in section 4 of the full manul) to its active seat. To reset active seats of the entire Seating list to it’s ordinary delegates, use
When the Seating list is ready for conference start the conference control panel is used to start the conference, see section 5 in the full manual. Once the conference is started all the delegates marked as Present in the Seating list (the column Present in figure 5 shows Yes) will be logged as arrived at the time of the conference start. From now on, all editing in the Seating list will directly affect the atten-dance records.
Figure 5 shows the Seating list with a started conference. The toolbar in the middle has now been updated to contain the available attendance control tools. The working order for these new tools are as described earlier.
All the previous attendance tools and one new is now available in clearly readable text.
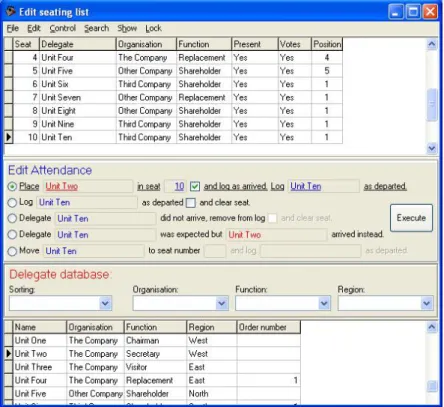
The top-most function shown in figure 5
Place Xxx Yyyy in seat Z (and log as arrived). Log Vvv Wwww as departed is used to place a delegate in the desired seat in the Seating list. If the new delegate immediately should be logged as arrived, tick the check box after the seat number to activate the command text and log as arrived. If there already is a present delegate in the intended seat (Present -column shows Yes) it will automatically be logged as departed. Now click the
Execute button, if no problems are found the operation is executed and all arrivals and departures are logged in the atten-dance system.
Figure 6 shows how to log a single dele-gate as arrived or departed. Choose the desired delegate name, select the func-tion Log Xxx Yyyy as departed/arrived and click Execute. The delegate is now regis-tered in the time log as required. The system automatically senses if the dele-gate is present or not an dupdates the function accordingly.
To also clear the seat at departures, tick the check box to activate the and clear seat
text, to leave the departed delegate make sure that the check box is not ticked and that the text and clear seat is greyed before clicking Execute.
Fig. 5: The Seating list during a started conference
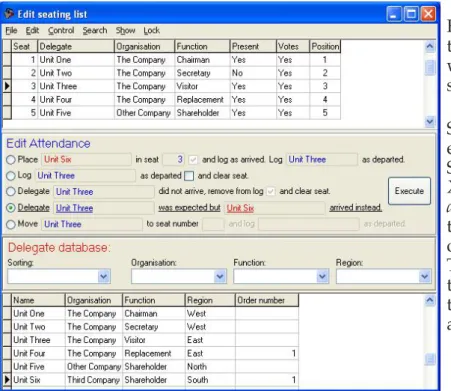
Fig. 7: The expected delegate did not arrive
Figure 7 shows the function to handle a delegate that is ate for the conference start and that eventually did not arrive.
Select the delegate in the Seating list and choose the function Delegate Xxx Yyyy did not arrive, remove from log (and clear seat). When the Execute button is clicked the delegate will be completely removed from the attendance time log and marked as departed. Just as with the earlier functions the seat can also be cleared by ticking the check box to activate the function text and clear seat, if the delegate name should remain for that seat, disable this function before clicking
Execute.
Figure 8 shows the function for handling the situation where a specific delegate was expected for a seat but another shows up as his/her replacement.
Select the name of the delegate that was expected for the required seat in the Seating list, select the function Delegate XxxYyyy was expected but Vvv Wwww arrived instead in the toolbar and then use the Delegate list below to select the name of the delegate that actually arrived. Then click Execute. The accumulated time log for the expected delegate is transferred to the actual delegate that arrived.
expected but l
Fig. 10: Move delegate in the Seating list, step 2 Fig. 9: Move delegate in the Seating list Figure 9 shows the new function to move
delegates between seats in the Seating list. This function is a two-step function, using only the top Seating list, first the delegate to be moved and second to which seat. Select the name of the dele-gate to be moved and activate the func-tion Move Xxx Yzzz to seat number Z (and
log Vvv Wwww as departed) as shown in
figure 9. Then select the name for the seat where the delegate should be moved to. Now the command selection is done and the Execute button is activated as shown in figure 10, If the delegate in the target seat currently is present, the function text
and log Vvv Wwww as departed will become active to inform that the delegate in the target seat will be automatically logged as departed by the delegate move operation.
When the command line reads correctly click the Execute button. If the delegate in the target seat is present he/she will be logged as departed. The current time log of the delegate that was moved is not affected, i.e. if the delegate being moved is not present, it will remain not present after the move. Use the previous func-tions to maintain the correct state of present/departed. The seat that a dele-gate is moved from will be cleared by the move operation.
Fig. 12: The use of ”Ghost seats” Fig. 11: Abort a function To abort or restart an attendance function
without clicking the Execute button, click any field in the Seating list that is not a name field and all the functions in the toolbar will be greyed. The desired attendance function is then ready to be used as described earlier. At the moment, Close Talk Control can not differentiate between present and serving
delegates in the attendance reports. This may be a problem in situations where you have present but not serving replacement delegates in for example parliamentary situations. To be able to register attendance for present but not serving delegates, a functionality using so called ”ghost seats” have been included in the Seating list. ”Ghost seats” are seats that cannot get a microphone or participate in voting. Add the required numbers of ”ghost seats ” in the Seating list. Start the ”ghost seat” numbering with something easily recognizable, e.g. if you have 55 “real seats”, start the ghost seats with number 100 and upwards. The Delegate unit-ID
field must also contain a number other than 0 for a ghost seat. Before adding ghost seats, click the Show->Unit ID on the Seating list menu to show the delegate unit ID:s in the list. While entering ghost seat numbers also enter running
Delegate unit ID numbers other than 0 but lower than 1000, for example Unit-id=1 for seat 100, ID=2 for seat 101 and so on.
“Ghost seats” cannot participate in voting so one additional setting must be made. Click
File->Settings on the main program window menu
to open the program settings dialog as shown in figure 13. Select the Voting tab and find the setting as figure 13-(1) shows. Enter the starting number for the “ghost seats”. Seats starting with this number will now be excluded from voting permanently, regardless of what the
Votes column in the Seating list shows. The default setting for this is 0, enabling all seats in the Seating list to participate in voting.
With the use of ”ghost seats” in the Seating list and the new attendance tool function Move delegate described earlier the situation with
present but not serving and present and serving
can be handled. Keep
delegates in the ghost seats and move them to
present but not serving
1
2
3
Voting
Four new functions are added to the voting system. Figure 13-(2) shows the choice for how to handle no cast votes, i.e. when a user doesn’t make an active vote choice on their unit. Earlier there where only two choices available, Report as no vote cast and Interpret as voter is absent. A third choice has now been added, Interpret as vote result Abstain which means that if the delegate doesn’t make an active vote result choice on their delegate unit it will be handled as the vote result Abstain. Another new function is the setting Exclude absentees from vote reports as shown in figure 13-(3). When this setting is activated, absent voters will not be included in vote result reports but the total number of absentees will still be summed and included in the vote report heading.
Fig. 14: New printing options for voting results
The settings for automatic printing and exporting of vote results was earlier available in the voting control panel. It has now been moved to the program settings found in
File->Settings. Figure 13-(4) show the new settings, checkmark all desired automatic report handling func-tions that will be executed for every successful vote session. These settings are now saved after exiting the program.
The manual printing and exporting of vote results is still available in the voting control panel as figure 14 shows with the added possibility of printing results sorted by name or seat number.
Conference
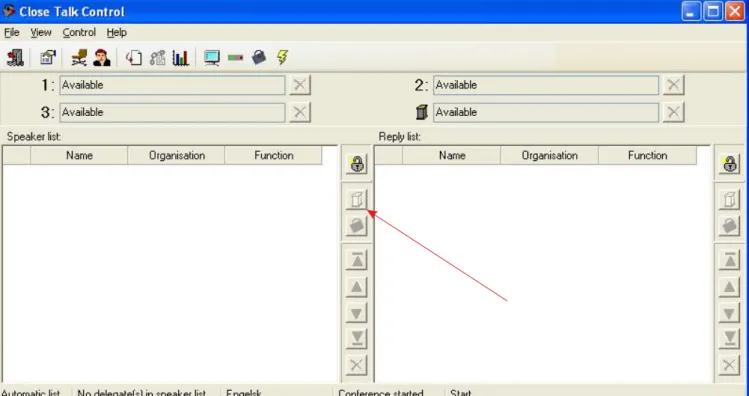
The bottom status line on the main operator panel shown in figure 15 has been updated. The field that earlier showed the chairman microphone priority method has now been removed and a field for the current agenda matter has been added. The status line fields are now from left to right speaker list handling method, number of delegates in the speaker list, the name of the active database, the state of the conference and current agenda matter.
Fig. 16: New platform microphone functionality
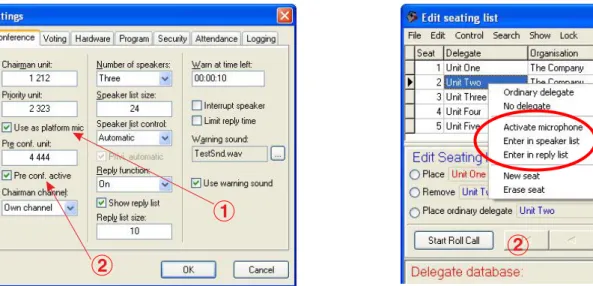
A new function for using a Delegate Unit as a platform microphone has been added. Figure 16-(1) shows the new setting. When the function is enabled the Priority unit, i.e. a Close Talk delegate unit with the programmed ID number, will be controlled by the Platform button pointed to by the arrow in figure 15. By using this function, the operator can choose whether a delegate shall speak from the seat or from a platform. When speaking from the seat the operator clicks on the regular delegate unit button in figure 15. If the delegate is supposed to speak from the platform the Platform button is used instead. The microphone on the Priority unit on the platform will be activated instead and the name of the current speaker is shown on the display. The name of the current speaker will be shown in the audio channel status field for the platform, located in the main program window. The status field for the actual audio channel used by the platform will show “Platform”. The platform micro-phone can be shut down by clicking the red cross as usual.
A tool to simplify a traditional roll call is now added to the Seating list toolbar as figure 17-(2) shows. Activating microphones pre-conference is now possible. The Chairman, Priority Unit and one extra delegate unit can now activate their microphones before a started conference as figure 16-(2) shows. The microphone on the delegate units can now be activated remotely by the software operator using the new tools shown in figure 17-(1). Simply select the desired seat in the Seating List and right-click the mouse and select the Activate microphone command. A remote activation will be treated as any regular user activation according to the selected priority and channel availability rules. Delegate Units can also be entered into the Speaking and Reply Lists remotely by the operator with the new Enter in speaking list and Enter in reply list tools.
1 2
Fig. 17: Remote activation of microphones
Fig. 18: New printing options for the Seating list
As figure 18 shows, the Seating List can now be printed and exported in seat and name order with 1
The Seating list has a new function Lock->Seating list. By checking this setting as figure 19 shows the Seating list becomes locked from direct editing, i.e. it is no longer possible to edit the Seating list by clicking the table fields directly.
When the Seating list is locked it is only possible to use the toolbar and menu commands for editing. This function has been added to prevent accidental editing of the Seating list which may happen quite easily at stressful situations. The Seating list is locked for direct editing as standard, remove the checkmark to unlock the list for direct editing and lock it again when done, whenever possible keep it locked and use the available toolbar and menu functions instead.
Fig. 19: New menu function in the Seating list
A new function has been added to Manage databases as figure 20 shows. By using the button Export databases the complete database can be saved as a compressed ZIP-file archive. Click the button and the dialog for database export is shown as in figure 21. The resulting file archive is saved using a special name format as described in the dialog text. Do not alter the file name later, it provides important version information. Using an exported database with an older version of Close Talk Control may damage the structure of the database!
Click the “...”-button to select the target folder for the data-base export as figure 22 shows. When the desired folder has been selected click the OK button and the dialog in figure 23 is shown. Click the Export button to start the export, it will take a from a few to several seconds to complete depending on the size of the database and the computer performance, wait until the file has been created and then click Close to return to the previous dialog.
Fig. 21: Export database Fig. 20: New function in Manage databases
Camera control
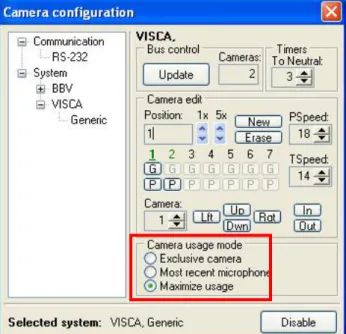
The camera follow functionality has been updated with three new modes, Exclusive camera, Most recent microphone and Maximize usage as figure 24 shows. In Exclusive camera mode, once a free camera has been assigned to a position, i.e. a delegate has acti-vated the microphone, it will remain at that position until the microphone is deactivated and then return to the neutral position after the To neutral setting delay. If any delegate activates a microphone during this delay and the camera has a programmed posi-tion for this new microphone, the camera will be moved to that delegate directly and will not return to the neutral position.
Fig. 24: New camera control functions
In Most recent microphone camera mode the system first checks if there is a free camera with a pro-grammed position for that microphone. If so it is moved to the newly activated microphone. If no free camera is available, the camera that has been in longest use with a programmed position for the new microphone will be repositioned to the newly activated microphone. Once a camera is no longer needed it will be moved to the neutral position.
The Maximize usage mode has the same logical functionality as Exclusive camera, i.e. a camera will remain at an activated microphone as long as it is active. The difference with this mode is that all active microphones that did not get an active camera is stored in a queue on a first-in first-out basis. When a microphone is deactivated the system checks this queue to see if there are any active micro-phones that does not have an active camera. If there are no active micromicro-phones without an active camera, the now free camera is moved to the neutral position. If there are microphones in this queue, the camera is moved directly to the active microphone and not to the neutral position. If an active microphone without a camera is deactivated, it is removed from the camera waiting queue.