TORQUE Resource Manager
Administrator Guide 4.2.5
© 2013 Adaptive Computing Enterprises Inc. All rights reserved.
Distribution of this document for commercial purposes in either hard or soft copy form is strictly prohibited without prior written consent from Adaptive Computing Enterprises Inc.
Adaptive Computing, Cluster Resources, Moab, Moab Workload Manager, Moab Viewpoint, Moab Cluster Manager, Moab Cluster Suite, Moab Grid Scheduler, Moab Grid Suite, Moab Access Portal, and other Adaptive Computing products are either registered trademarks or trademarks of Adaptive Computing Enterprises Inc. The Adaptive Computing logo and the Cluster Resources logo are trademarks of Adaptive Computing Enterprises Inc. All other company and product names may be trademarks of their respective companies.
Adaptive Computing Enterprises Inc. 1712 S. East Bay Blvd., Suite 300 Provo, UT 84606
+1 (801) 717-3700
www.adaptivecomputing.com
Scan to open online help
Contents
Welcome
ix
Introduction ix
TORQUE Administrator Guide overview xi
Chapter 1: Overview
1
TORQUE installation overview 1
TORQUE architecture 1
Installing TORQUE 2
Compute nodes 5
Enabling TORQUE as a service 7
Initializing/Configuring TORQUE on the server (pbs_server) 7
Specifying compute nodes 9
Configuring TORQUE on compute nodes 10
Configuring Ports 11
Configuring trqauthd for client commands 13
Finalizing configurations 14
Advanced configuration 14
Customizing the install 15
Server configuration 21
Manual setup of initial server configuration 26
Server node file configuration 27
Basic node specification 27
Specifying virtual processor count for a node 28
Specifying GPU count for a node 28
Specifying node features (node properties) 29
Testing server configuration 29
TORQUE on NUMA systems 31
TORQUE NUMA configuration 31
Building TORQUE with NUMA support 31
TORQUE Multi-MOM 35
Multi-MOM configuration 35
Stopping pbs_mom in Multi-MOM mode 37
Chapter 2: Submitting and managing jobs
39
Job submission 39
Multiple job submission 40
iv
Requesting generic resources 47
Requesting floating resources 48
Requesting other resources 48
Exported batch environment variables 48
Enabling trusted submit hosts 49
Example submit scripts 50
Monitoring jobs 51
Canceling jobs 51
Job preemption 51
Keeping completed jobs 52
Job checkpoint and restart 52
Introduction to BLCR 53
Configuration files and scripts 53
Starting a checkpointable job 61
Checkpointing a job 62
Restarting a job 62
Acceptance tests 63
Job exit status 63
Service jobs 67
Submitting service jobs 68
Submitting service jobs in MCM 68
Managing service jobs 68
Chapter 3: Managing nodes
69
Adding nodes 69
Node properties 70
Changing node state 71
Host security 71
Linux cpuset support 72
Scheduling cores 74
Geometry request configuration 74
Geometry request usage 74
Geometry request considerations 75
Scheduling accelerator hardware 75
Chapter 4: Setting server policies
77
Queue configuration 77
Queue attributes 78
Example queue configuration 88
Setting a default queue 89
Mapping a queue to subset of resources 89
Creating a routing queue 89
Chapter 5: Integrating schedulers for TORQUE
105
Chapter 6: Configuring data management
107
SCP setup 107
Generating SSH key on source host 107
Copying public SSH key to each destination host 108 Configuring the SSH daemon on each destination host 108
Validating correct SSH configuration 109
Enabling bi-directional SCP access 109
Compiling TORQUE to support SPC 109
Troubleshooting 110
NFS and other networked filesystems 110
File stage-in/stage-out 111
Chapter 7: MPI (Message Passing Interface) support
113
MPICH 113
Open MPI 114
Chapter 8: Resources
115
Chapter 9: Accounting records
119
Chapter 10: Job logging
121
Job log location and name 121
Enabling job logs 121
Chapter 11: Troubleshooting
123
Host resolution 123
Firewall configuration 124
TORQUE log files 124
Using "tracejob" to locate job failures 125
Using GDB to locate job failures 127
Other diagnostic options 127
Stuck jobs 128
Frequently asked questions (FAQ) 129
Compute node health check 134
Configuring MOMs to launch a health check 135
Creating the health check script 135
Adjusting node state based on the health check output 135
Example health check script 136
Debugging 136
Appendices
143
Commands overview 145
momctl 146
vi pbs_server 161 pbs_track 165 pbsdsh 166 pbsnodes 168 qalter 169 qchkpt 178 qdel 179 qgpumode 181 qgpureset 181 qhold 182 qmgr 184 qmove 187 qorder 188 qrerun 189 qrls 190 qrun 192 qsig 193 qstat 195 qsub 202 qterm 221 Server parameters 223
Node manager (MOM) configuration 241
Parameters 241
Node features and generic consumable resource specification 256
Command-line arguments 257
Diagnostics and error codes 259
Considerations before upgrading 267
Large cluster considerations 269
Scalability guidelines 269
End user command caching 270
Other considerations 272
Prologue and epilogue scripts 275
Script order of execution 276
Script environment 276
Per job prologue and epilogue scripts 278
Prologue and epilogue scripts time out 279
Prologue error processing 279
Running multiple TORQUE servers and MOMs on the same node 283
Security overview 285
Job submission filter ("qsub wrapper") 287
"torque.cfg" configuration file 289
TORQUE Quick Start Guide 295
BLCR acceptance tests 299
Test 1 - Basic operation 299
Test 2 - Persistence of checkpoint images 301
Test 3 - Restart after checkpoint 302
Test 4 - Multiple checkpoint/restart 303
Test 5 - Periodic checkpoint 303
Welcome
Welcome to theTORQUE Administrator Guide, version4.2.5. This guide is intended as a reference for both users and system administrators.Note:Advanced TORQUE Administrationis a video tutorial of a session offered at Moab Con that offers further details on advanced TORQUE administration.
For more information about this guide, see these topics: l TORQUE Administrator Guide overviewon page xi l Introductionon page ix
Introduction
This section contains some basic introduction information to help you get started using TORQUE. It contains these topics:
l What is a Resource Manager?on page ix l What are Batch Systems?on page ix l Basic Job Flowon page x
What is a Resource Manager?
While TORQUE has a built-in scheduler,pbs_sched, it is typically used solely as aresource managerwith a scheduler making requests to it. Resources managers provide the low-level functionality to start, hold, cancel, and monitor jobs. Without these capabilities, a scheduler alone cannot control jobs.
What are Batch Systems?
While TORQUE is flexible enough to handle scheduling a conference room, it is primarily used in batch systems. Batch systems are a collection of computers and other resources (networks, storage systems, license servers, and so forth) that operate under the notion that the whole is greater than the sum of the parts. Some batch systems consist of just a handful of machines running single-processor jobs, minimally managed by the users themselves. Other systems have thousands and thousands of machines executing users' jobs simultaneously while tracking software licenses and access to hardware equipment and storage systems.
Pooling resources in a batch system typically reduces technical administration of resources while offering a uniform view to users. Once configured properly, batch systems abstract away many of the details involved with running and managing jobs, allowing higher resource utilization. For example, users
typically only need to specify the minimal constraints of a job and do not need to know the individual machine names of each host on which they are running. With this uniform abstracted view, batch systems can execute thousands and thousands of jobs simultaneously.
Batch systems are comprised of four different components: (1) Master Node, (2) Submit/Interactive Nodes, (3) Compute Nodes, and (4) Resources.
Component
Description
Master Node A batch system will have a master node wherepbs_serverruns. Depending on the needs of the systems, a master node may be dedicated to this task, or it may fulfill the roles of other components as well.
Submit/Interactive Nodes
Submit or interactive nodes provide an entry point to the system for users to manage their workload. For these nodes, users are able to submit and track their jobs. Additionally, some sites have one or more nodes reserved for interactive use, such as testing and troubleshoot-ing environment problems. These nodes have client commands (such asqsubandqhold).
Computer Nodes Compute nodes are the workhorses of the system. Their role is to execute submitted jobs. On each compute node,pbs_momruns to start, kill, and manage submitted jobs. It com-municates withpbs_serveron the master node. Depending on the needs of the systems, a compute node may double as the master node (or more).
Resources Some systems are organized for the express purpose of managing a collection of resources beyond compute nodes. Resources can include high-speed networks, storage systems, license managers, and so forth. Availability of these resources is limited and needs to be managed intelligently to promote fairness and increased utilization.
Basic Job Flow
The life cycle of a job can be divided into four stages: (1) creation, (2) submission, (3) execution, and (4) finalization.
Welcome
Stage
Description
Creation Typically, a submit script is written to hold all of the parameters of a job. These parameters could include how long a job should run (walltime), what resources are necessary to run, and what to execute. The following is an example submit file:
#PBS -N localBlast #PBS -S /bin/sh #PBS -l nodes=1:ppn=2,walltime=240:00:00 #PBS -M [email protected] #PBS -m ea source ~/.bashrc cd $HOME/work/dir sh myBlast.sh -i -v
This submit script specifies the name of the job (localBlast), what environment to use (/bin/sh), that it needs both processors on a single node (nodes=1:ppn=2), that it will run for at most 10 days, and that TORQUE should email "[email protected]" when the job exits or aborts. Additionally, the user specifies where and what to execute.
Submission A job is submitted with theqsubcommand. Once submitted, the policies set by the administration and technical staff of the site dictate the priority of the job and therefore, when it will start execut-ing.
Execution Jobs often spend most of their lifecycle executing. While a job is running, its status can be queried withqstat.
Finalilzation When a job completes, by default, thestdoutandstderrfiles are copied to the directory where the job was submitted.
Related topics
l TORQUE Administrator Guide overviewon page xi
TORQUE Administrator Guide overview
Chapter 1: Overview on page 1provides the details for installation and initialization, advanced configuration options, and (optional) qmgr option necessary to get the system up and running. System testing is also covered.
Chapter 2: Submitting and managing jobs on page 39covers different actions applicable to jobs. The first section details how to submit a job and request resources (nodes, software licenses, and so forth), and provides several examples. Other actions include monitoring, canceling, preemption, and keeping completed jobs.
Chapter 3: Managing nodes on page 69covers administrator tasks relating to nodes, which include the following: adding nodes, changing node properties, and identifying state. Also an explanation of how to configure restricted user access to nodes is covered inHost securityon page 71.
Chapter 4: Setting server policies on page 77details server-side configurations of queue and high availability.
Chapter 5: Integrating schedulers for TORQUE on page 105offers information about using the native scheduler versus an advanced scheduler.
Chapter 6: Configuring data management on page 107deals with issues of data management. For non-network file systems,SCP setupon page 107details setting up SSH keys and nodes to automate
transferring data.NFS and other networked filesystemson page 110covers configuration for these file systems. This chapter also addresses the use of file staging using thestageinandstageoutdirectives of theqsubcommand.
Chapter 7: MPI (Message Passing Interface) support on page 113offers details supporting MPI.
Chapter 8: Resources on page 115covers configuration, utilization, and states of resources.
Chapter 9: Accounting records on page 119explains how jobs are tracked by TORQUE for accounting purposes.
Chapter 10: Job logging on page 121explains how to enable job logs that contain information for completed jobs.
Chapter 11: Troubleshooting on page 123is a guide that offers help with general problems. It includes FAQ and instructions for how to set up and use compute node checks. It also explains how to debug TORQUE.
The appendices provide tables of commands, parameters, configuration options, error codes, the Quick Start Guide, and so forth.
l Commands overview on page 145 l Server parameters on page 223
l Node manager (MOM) configuration on page 241 l Diagnostics and error codes on page 259
l Considerations before upgrading on page 267 l Large cluster considerations on page 269 l Prologue and epilogue scripts on page 275
l Running multiple TORQUE servers and MOMs on the same node on page 283 l Security overview on page 285
l Job submission filter ("qsub wrapper") on page 287 l "torque.cfg" configuration file on page 289
l TORQUE Quick Start Guide on page 295 l BLCR acceptance tests on page 299
Related topics
l Introductionon page ix Welcome
Chapter 1: Overview
This section contains some basic information about TORQUE, including how to install and configure it on your system. For details, see these topics:
l TORQUE installation overviewon page 1
l Initializing/Configuring TORQUE on the server (pbs_server)on page 7 l Advanced configurationon page 14
l Manual setup of initial server configurationon page 26 l Server node file configurationon page 27
l Testing server configurationon page 29 l TORQUE on NUMA systemson page 31 l TORQUE Multi-MOMon page 35
TORQUE installation overview
This section contains information about TORQUE architecture and explains how to install TORQUE. It also describes how to install tpackages on compute nodes and how to enable TORQUE as a service. For details, see these topics:
l TORQUE architectureon page 1 l Installing TORQUEon page 2 l Compute nodeson page 5
l Enabling TORQUE as a serviceon page 7
Related topics
l Troubleshootingon page 123
TORQUE architecture
A TORQUE cluster consists of one head node and many compute nodes. The head node runs thepbs_ serverdaemon and the compute nodes run thepbs_momdaemon. Client commands for submitting and managing jobs can be installed on any host (including hosts not running pbs_server or pbs_mom).
The head node also runs a scheduler daemon. The scheduler interacts with pbs_server to make local policy decisions for resource usage and allocate nodes to jobs. A simple FIFO scheduler, and code to construct more advanced schedulers, is provided in the TORQUE source distribution. Most TORQUE users choose to use a packaged, advanced scheduler such asMauiorMoab.
Users submit jobs to pbs_server using the qsubcommand. When pbs_server receives a new job, it informs the scheduler. When the scheduler finds nodes for the job, it sends instructions to run the job with the node list to pbs_server. Then, pbs_server sends the new job to the first node in the node list and instructs it to launch the job. This node is designated the execution host and is calledMother Superior. Other nodes in a job are calledsister MOMs.
Related topics
l TORQUE installation overviewon page 1 l Installing TORQUEon page 2
Installing TORQUE
Build the distribution on the machine that will act as the TORQUE server - the machine which monitors and controls all compute nodes by running the pbs_server daemon.
The built distribution package works only on compute nodes of a similar architecture. Nodes with different architecture must have the installation package built on them individually.
The following software is required to run TORQUE 4.2.5: l libxml2-devel package (package name may vary) l openssl-devel package (package name may vary)
l ANSI C compiler. The native C compiler is recommended if it is ANSI; otherwise, use gcc. l A fully POSIX make. If you are unable to "make" PBS with your make, we suggest usinggmake
from GNU.
l Tcl/Tk version 8 or higher if you plan to build the GUI portion of TORQUE or use a Tcl based scheduler.
l If you use cpusets,libhwloc1.1 or later is required (for TORQUE 4.0.0 and later)
Important: If you intend to use TORQUE 4.2.5 with Moab, you must run Moab version 7.1 or later. TORQUE 4.2.5 will not work with versions earlier than Moab 7.1.
To install TORQUE
1. Install the gcc,libssl-devel, andlibxml2-develpackages to build 4.2.5. The package names may vary.
Use these commands to install the packages on the following operating systems: Chapter 1: Overview
RHEL, CentOS, and Scientific Linux: [root]# yum update
[root]# yum install libxml2-devel openssl-devel gcc gcc-c++
SLES(You must have a licensed installation of SuSE and have installed theSuSE Linux Enterprise Software Development Kit and added the ISO to the repository):
[root]# zypper update
[root]# zypper install libxml2-devel libopenssl-devel gcc gcc-c++ 2. Verify that the following ports are open for essential communication:
l For client communication topbs_server, all privileged ports must be open (ports under 1024). l Forpbs_servercommunication topbs_mom, the default port is 15003.
l Forpbs_momtopbs_server, the default port is 15001.
For more information on configuring ports, see Configuring Portson page 11.
3. TORQUE is now hosted athttps://github.comunder the adaptivecomputing organization. To download source, you will need to use the gitutility. For example:
[root]# git clone https://github.com/adaptivecomputing.com/torque.git -b 4.2.5 4.2.5
To download a different version, replace each 4.2.5 with the desired version. After downloading a copy of the repository, you can list the current branches by typinggit branch -afrom within the directory of the branch you cloned.
If you're checking source out from git, read the README.building-40file in the repository.
4. Extract the packaged file and navigate to the unpackaged directory. [root]# tar -xzvf torque-4.2.5.tar.gz
[root]# cd torque-4.2.5/
5. Do the following to configure the package:
a. Run./configure. TORQUE has many options you can specify to configure your installation. For more information, seeCustomizing the installon page 15.
b. By default, the TORQUE directory is/var/spool/torque. If you want to change the location, use the--with-server-homeconfiguration option.
c. By default,make installinstalls all files in/usr/local/bin,/usr/local/lib, /usr/local/sbin,/usr/local/include, and/usr/local/man. You can specify an installation prefix other than/usr/localby using--prefixas an argument to
./configure. Note that TORQUE cannot be installed into a directory path that contains a space.
If you decide to use--prefixto specify a custom directory and that directory does not already exist, you must create it before running./configure --prefix=.... [root]# ./configure
6. Runmakeandmake install.
TORQUE must be installed by a root user. If runningsudofails, switch to root withsu -. [root]# make
[root]# make install
OSX 10.4 users need to change#define __TDARWINinsrc/include/pbs_config.hto #define __TDARWIN_8.
7. Configure thetrqauthddaemon to start automatically at system boot (SeeConfiguring trqauthd
for client commandson page 13).
* If Debian distribution, do the following *
[root]# cp contrib/init.d/debian.trqauthd /etc/init.d/trqauthd * If SLES distribution, do the following *
[root]# cp contrib/init.d/suse.trqauthd /etc/init.d/trqauthd * If RHEL distribution, do the following *
[root]# cp contrib/init.d/trqauthd /etc/init.d/ [root]# chkconfig --add trqauthd
[root]# echo /usr/local/lib > /etc/ld.so.conf.d/torque.conf [root]# ldconfig
[root]# service trqauthd start
8. Themake packagescommand can be used to create self-extracting packages that can be copied and executed on your nodes. For information on creating packages and deploying them, seeSpecifying compute nodeson page 9.
You will also want to scp theinit.dscripts to the compute nodes and install them there.
The TORQUE initialization scripts are provided in the/init.ddirectory as a courtesy and may be modified at your discretion to work on your system.
9. Verify that the/var/spool/torque/server_namefile exists and contains the correct name of the server.
[root]# echo <pbs_server's_hostname> > /var/spool/torque/server_name
10. After installation, verify that you have the PATHenvironment variable configured to include /usr/local/bin/and/usr/local/sbin/for both the installation user and the root user. By default,make installcreates a directory at/var/spool/torque. This directory is referred to as TORQUE_HOME. TORQUE_HOME has several sub-directories, includingserver_priv/, server_logs/,mom_priv/,mom_logs/, and other directories used in the configuration and running of TORQUE.
Chapter 1: Overview
11. Verify you have environment variables configured so your system can find the shared libraries and binary files for TORQUE. This step is not necessary if the shared libraries are in their default locations.
To set the library path, add the directory where the TORQUE libraries are installed. For example, if your TORQUE libraries are installed in/usr/local/lib(if you changed the default library path at configure time, use that path instead.), execute the following:
[root]# echo '/usr/local/lib' > /etc/ld.so.conf.d/torque.conf [root]# ldconfig
12. Initializeserverdbby executing thetorque.setupscript. [root]# ./torque.setup root
If you are upgrading from TORQUE 2.5.9, run pbs_server -u before running torque.setup. [root]# pbs_server -u
13. Add nodes to the/var/spool/torque/server_priv/nodesfile. For information on syntax and options for specifying compute nodes, see Node manager (MOM) configurationon page 241. 14. Configure the MOMs if necessary. SeeConfiguring TORQUE on compute nodeson page 10.. 15. Configure pbs_server and pbs_mom to start automatically at system boot, then start their daemons.
SeeEnabling TORQUE as a serviceon page 7.
While Adaptive Computing distributes the spec files to create RPMs, it doesn't support RPM installation. Not every Linux distribution uses RPM. Adaptive Computing provides a single solution using makeand make installthat works across all Linux distributions and most UNIX systems. We recognize the RPM format provides many advantages for deployment but it is up to the
individual site to repackage the TORQUE installation to match their individual needs.
If you have a multi-homed host, or if your host name resolves to the loopback address, you may encounter an "unauthorized request" error when runningqmgr. The resolution is to as a manager manually add the host name of the specified interface to the serverdbfile with the attributes tag.
<managers>[email protected]</managers>
Related topics
l TORQUE installation overviewon page 1 l Compute nodeson page 5
Compute nodes
Use the Adaptive Computing tpackage system to create self-extracting tarballs which can be distributed and installed on compute nodes. The tpackages are customizable. See theINSTALLfile for additional Chapter 1: Overview
options and features.
To create tpackages
1. Configure and make as normal, and then runmake packages. > make packages Building ./torque-package-clients-linux-i686.sh ... Building ./torque-package-mom-linux-i686.sh ... Building ./torque-package-server-linux-i686.sh ... Building ./torque-package-gui-linux-i686.sh ... Building ./torque-package-devel-linux-i686.sh ... Done.
The package files are self-extracting packages that can be copied and executed on your production machines. Use --help for options.
2. Copy the desired packages to a shared location.
> cp torque-package-mom-linux-i686.sh /shared/storage/ > cp torque-package-clients-linux-i686.sh /shared/storage/ 3. Install the tpackages on the compute nodes.
Adaptive Computing recommends that you use a remote shell, such as SSH, to install tpackages on remote systems. Set up shared SSH keys if you do not want to supply a password for each host.
The only required package for the compute node is mom-linux. Additional packages are recommended so you can use client commands and submit jobs from compute nodes.
The following is an example of how to copy and install mom-linux in a distributed fashion. > for i in node01 node02 node03 node04 ; do scp torque-package-mom-linux-i686.sh ${i}:/tmp/. ; done
> for i in node01 node02 node03 node04 ; do scp torque-package-clients-linux-i686.sh ${i}:/tmp/. ; done
> for i in node01 node02 node03 node04 ; do ssh ${i} /tmp/torque-package-mom-linux-i686.sh --install ; done
> for i in node01 node02 node03 node04 ; do ssh ${i} /tmp/torque-package-clients-linux-i686.sh --install ; done
Alternatively, you can use a tool like xCAT instead of dsh.
To use a tool like xCAT
1. Copy the tpackage to the nodes.
> prcp torque-package-linux-i686.sh noderange:/destinationdirectory/ 2. Install the tpackage.
> psh noderange /tmp/torque-package-linux-i686.sh --install
Although optional, it is possible to use the TORQUE server as a compute node and install apbs_mom
with thepbs_serverdaemon. Chapter 1: Overview
Related topics
l Installing TORQUEon page 2
l TORQUE installation overviewon page 1
Enabling TORQUE as a service
Enabling TORQUE as a service is optional. In order to run TORQUE as a service, you must enable running client commands (for instructions, seeConfiguring trqauthd for client commandson page 13.
The method for enabling TORQUE as a service is dependent on the Linux variant you are using. Startup scripts are provided in thecontrib/init.d/directory of the source package. To enable TORQUE as a service, run the following on the host for the appropriate TORQUE daemon:
l RedHat (as root)
> cp contrib/init.d/pbs_mom /etc/init.d/pbs_mom > chkconfig --add pbs_mom
> cp contrib/init.d/pbs_server /etc/init.d/pbs_server > chkconfig --add pbs_server
l SuSE (as root)
> cp contrib/init.d/suse.pbs_mom /etc/init.d/pbs_mom > insserv -d pbs_mom
> cp contrib/init.d/suse.pbs_server /etc/init.d/pbs_server > insserv -d pbs_server
l Debian (as root)
> cp contrib/init.d/debian.pbs_mom /etc/init.d/pbs_mom > update-rc.d pbs_mom defaults
> cp contrib/init.d/debian.pbs_server /etc/init.d/pbs_server > update-rc.d pbs_server defaults
You will need to customize these scripts to match your system.
These options can be added to the self-extracting packages. For more details, see theINSTALLfile.
Related topics
l TORQUE installation overviewon page 1
Initializing/Configuring TORQUE on the server (pbs_
server)
The TORQUE server (pbs_server) contains all the information about a cluster. It knows about all of the
MOM nodes in the cluster based on the information in the file
(SeeConfiguring TORQUE on compute nodeson page 10). It also maintains the status of each MOM node through updates from the MOMs in the cluster (see pbsnodeson page 168). All jobs are submitted via qsubto the server, which maintains a master database of all jobs and their states.
Schedulers such as Moab Workload Manager receive job, queue, and node information from pbs_server and submit all jobs to be run to pbs_server.
The server configuration is maintained in a file namedserverdb, located in$TORQUE_HOME/server_ priv. Theserverdbfile contains all parameters pertaining to the operation of TORQUE plus all of the queues which are in the configuration. Forpbs_serverto run,serverdbmust be initialized.
You can initializeserverdbin two different ways, but the recommended way is to use the ./torque.setupscript:
l As root, execute./torque.setupfrom the build directory (see./torque.setupon page 8). l Usepbs_server-t create (seeInitializing/Configuring TORQUE on the server (pbs_server)on
page 7).
Restartpbs_serverafter initializingserverdb. > qterm
> pbs_server
./torque.setup
Thetorque.setupscript usespbs_server -tcreate to initializeserverdband then adds a user as a manager and operator of TORQUE and other commonly used attributes. The syntax is as follows: /torque.setupusername
> ./torque.setup ken > qmgr -c 'p s' #
# Create queues and set their attributes. #
#
# Create and define queue batch #
create queue batch
set queue batch queue_type = Execution set queue batch resources_default.nodes = 1
set queue batch resources_default.walltime = 01:00:00 set queue batch enabled = True
set queue batch started = True #
# Set server attributes. #
set server scheduling = True set server acl_hosts = kmn set server managers = ken@kmn set server operators = ken@kmn set server default_queue = batch set server log_events = 511 set server mail_from = adm set server node_check_rate = 150 set server tcp_timeout = 6 set server mom_job_sync = True set server keep_completed = 300 Chapter 1: Overview
pbs_server -t create
The-t createoption instructspbs_serverto create theserverdbfile and initialize it with a minimum configuration to runpbs_server.
> pbs_server -t create
To see the configuration and verify that TORQUE is configured correctly, useqmgr: > qmgr -c 'p s'
#
# Set server attributes. #
set server acl_hosts = kmn set server log_events = 511 set server mail_from = adm set server node_check_rate = 150 set server tcp_timeout = 6
A single queue named batch and a few needed server attributes are created. This section contains these topics:
l Specifying compute nodeson page 9
l Configuring TORQUE on compute nodeson page 10 l Finalizing configurationson page 14
Related topics
l Node manager (MOM) configurationon page 241 l Advanced configurationon page 14
Specifying compute nodes
The environment variableTORQUE_HOMEis where configuration files are stored. If you used the default locations during installation, you do not need to specify theTORQUE_HOMEenvironment variable. Thepbs_servermust recognize which systems on the network are its compute nodes. Specify each node on a line in the server's nodes file. This file is located atTORQUE_HOME/server_priv/nodes. In most cases, it is sufficient to specify just the names of the nodes on individual lines; however, various
properties can be applied to each node.
Only a root user can access theserver_privdirectory.
Syntax of nodes file:
node-name[:ts] [np=] [gpus=] [properties]
l Thenode-namemust match the hostname on the node itself, including whether it is fully qualified or shortened.
l The[:ts]option marks the node as timeshared. Timeshared nodes are listed by the server in the node status report, but the server does not allocate jobs to them.
l The[np=]option specifies the number of virtual processors for a given node. The value can be less than, equal to, or greater than the number of physical processors on any given node. l The[gpus=]option specifies the number of GPUs for a given node. The value can be less than,
equal to, or greater than the number of physical GPUs on any given node.
l The node processor count can be automatically detected by the TORQUE server ifauto_node_np is set to TRUE. This can be set using this command:
qmgr -c set server auto_node_np = True
Settingauto_node_npto TRUE overwrites the value of np set inTORQUE_HOME/server_ priv/nodes.
l The[properties]option allows you to specify arbitrary strings to identify the node. Property strings are alphanumeric characters only and must begin with an alphabetic character. l Comment lines are allowed in the nodes file if the first non-white space character is the pound
sign (#).
The following example shows a possible node file listing. TORQUE_HOME/server_priv/nodes:
# Nodes 001 and 003-005 are cluster nodes #
node001 np=2 cluster01 rackNumber22 #
# node002 will be replaced soon node002:ts waitingToBeReplaced # node002 will be replaced soon #
node003 np=4 cluster01 rackNumber24 node004 cluster01 rackNumber25
node005 np=2 cluster01 rackNumber26 RAM16GB node006
node007 np=2 node008:ts np=4 ...
Related topics
l Initializing/Configuring TORQUE on the server (pbs_server)on page 7
Configuring TORQUE on compute nodes
If using TORQUE self-extracting packages with default compute node configuration, no additional steps are required and you can skip this section.
If installing manually, or advanced compute node configuration is needed, edit theTORQUE_HOME/mom_ priv/configfile on each node. The recommended settings follow.
TORQUE_HOME/mom_priv/config: Chapter 1: Overview
$pbsserver headnode # hostname running pbs server $logevent 225 # bitmap of which events to log
This file is identical for all compute nodes and can be created on the head node and distributed in parallel to all systems.
Related topics
l Initializing/Configuring TORQUE on the server (pbs_server)on page 7
Configuring Ports
You can optionally configure the various ports that TORQUE uses for communication. Most ports can be configured multiple ways. The ports you can configure are:
l pbs_server listening port l pbs_mom listening port
l port pbs_server uses to communicate to the pbs_mom l port pbs_mom uses to communicate to the pbs_server l port client commands use to communicate to the pbs_server l port trqauthd uses to communicate to the pbs_server
If you are running pbspro on the same system, be aware that it uses the same environment variables and/etc/servicesentries.
Configuring the pbs_server listening port
To configure the port thepbs_serverlistens on, follow any of these steps:
l Set an environment variable calledPBS_BATCH_SERVICE_PORTto the port desired. l Edit the/etc/servicesfile and setpbs port_num/tcp.
l Startpbs_serverwith the-poption. $ pbs_server -p port_num
l Edit the$PBS_HOME/server_namefile and changeserver_nametoserver_name:<port_ num>
l Startpbs_serverwith the-Hoption. $ pbs_server -H server_name:port_num
Configuring the pbs_mom listening port
To configure the port thepbs_momlistens on, follow any of these steps: Chapter 1: Overview
l Set an environment variable calledPBS_MOM_SERVICE_PORTto the port desired. l Edit the/etc/servicesfile and setpbs_mom port_num/tcp.
l Startpbs_momwith the-Moption. $ pbs_mom -M port_num
l Edit thenodesfile entry for that list: addmom_service_port=port_num.
Configuring the port pbs_server uses to communicate with pbs_mom
To configure the port thepbs_serveruses to communicate withpbs_mom, follow any of these steps: l Set an environment variable calledPBS_MOM_SERVICE_PORTto the port desired.
l Edit the/etc/servicesfile and setpbs_mom port_num/tcp. l Startpbs_momwith the-Moption.
$ pbs_server -M port_num
Configuring the port pbs_mom uses to communicate with pbs_server
To configure the port thepbs_momuses to communicate withpbs_server, follow any of these steps: l Set an environment variable calledPBS_BATCH_SERVICE_PORTto the port desired.
l Edit the/etc/servicesfile and setpbs port_num/tcp. l Startpbs_momwith the-Soption.
$ pbs_mom -p port_num
l Edit thenodesfile entry for that list: addmom_service_port=port_num.
Configuring the port client commands use to communicate with pbs_server
To configure the port client commands use to communicate withpbs_server, follow any of these steps:l Edit the/etc/servicesfile and setpbs port_num/tcp.
l Edit the$PBS_HOME/server_namefile and changeserver_nametoserver_name:<port_ num>
Configuring the port trqauthd uses to communicate with pbs_server
To configure the port trqauthd uses to communicate withpbs_server, follow any of these steps:l Edit the$PBS_HOME/server_namefile and changeserver_nametoserver_name:<port_ num>
Related topics
l Initializing/Configuring TORQUE on the server (pbs_server)on page 7 l pbs_server
Chapter 1: Overview
l pbs_mom l trqauthd
l client commands
Configuring trqauthd for client commands
trqauthd is a daemon used by TORQUE client utilities to authorize user connections to pbs_server. Once started, it remains resident. TORQUE client utilities then communicate with trqauthd on port 15005 on the loopback interface. It is multi-threaded and can handle large volumes of simultaneous requests.
Running trqauthd
trqauthd must be run as root. It must also be running on any host where TORQUE client commands will execute.
By default, trqauthd is installed to/usr/local/bin.
trqauthd can be invoked directly from the command line or by the use of init.d scripts which are located in thecontrib/init.ddirectory of the TORQUE source.
There are threeinit.dscripts for trqauthd in thecontrib/init.ddirectory of the TORQUE source tree:
Script
Description
debian.trqauthd Used for apt-based systems (debian, ubuntu are the most common variations of this)
suse.trqauthd Used for suse-based systems
trqauthd An example for other package managers (Redhat, Scientific, CentOS, and Fedora are some com-mon examples)
You should edit these scripts to be sure they will work for your site.
Inside each of the scripts are the variables PBS_DAEMON and PBS_HOME. These two variables should be updated to match your TORQUE installation. PBS_DAEMON needs to point to the location of trqauthd. PBS_HOME needs to match your TORQUE installation.
Choose the script that matches your dist system and copy it to/etc/init.d. If needed, rename it to trqauthd.
To start the daemon
/etc/init.d/trqauthd start
To stop the daemon
/etc/init.d/trqauthd stop Chapter 1: Overview
OR
service trqauthd start/stop
If you receive an error that says "Could not open socket in trq_simple_connect. error 97" and you use a CentOS, RedHat, or Scientific Linux 6+ operating system, check your/etc/hostsfile for multiple entries of a single host name pointing to the same IP address. Delete the duplicate(s), save the file, and launch trqauthd again.
Related topics
l Initializing/Configuring TORQUE on the server (pbs_server)on page 7
Finalizing configurations
After configuring theserverdband theserver_priv/nodesfiles, and after ensuring minimal MOM configuration, restart thepbs_serveron the server node and thepbs_momon the compute nodes. Compute Nodes:
> pbs_mom Server Node:
> qterm -t quick > pbs_server
After waiting several seconds, thepbsnodes -acommand should list all nodes in statefree.
Related topics
l Initializing/Configuring TORQUE on the server (pbs_server)on page 7
Advanced configuration
This section contains information about how you can customize the installation and configure the server to ensure that the server and nodes are communicating correctly. For details, see these topics:
l Customizing the installon page 15 l Server configurationon page 21
Related topics
l Server parameterson page 223 Chapter 1: Overview
Customizing the install
The TORQUEconfigurecommand has several options available. Listed below are some suggested options to use when running./configure.
l By default, TORQUE does not install the admin manuals. To enable this, use--enable-docs. l By default, only children MOM processes use syslog. To enable syslog for all of TORQUE, use
--enable-syslog. Table 1-1: Optional Features
Option
Description
--disable-cli-ents
Directs TORQUE not to build and install the TORQUE client utilities such as qsub, qstat, qdel, etc.
--disable-FEATURE
Do not include FEATURE (same as --enable-FEATURE=no).
--disable-lib-tool-lock
Avoid locking (might break parallel builds).
--disable-mom Do not include the MOM daemon.
--disable- mom-check-spool
Don't check free space on spool directory and set an error.
--disable-posixmemlock
Disable the MOM's use of mlockall. Some versions of OSs seem to have buggy POSIX MEMLOCK.
--disable-priv-ports
Disable the use of privileged ports for authentication. Some versions of OSX have a buggy bind () and cannot bind to privileged ports.
--disable- qsub-keep-override
Do not allow the qsub -k flag to override -o -e.
--disable-server
Do not include server and scheduler.
--disable-shell-pipe
Give the job script file as standard input to the shell instead of passing its name via a pipe. Chapter 1: Overview
Option
Description
--disable-spool
If disabled, TORQUE will create output and error files directly in $HOME/.pbs_spool if it exists or in $HOME otherwise. By default, TORQUE will spool files in TORQUE_HOME/spool and copy them to the users home directory when the job completes.
--disable- xopen-net-working
With HPUX and GCC, don't force usage of XOPEN and libxnet.
--enable-acct-x Enable adding x attributes to accounting log.
--enable-array Setting this under IRIX enables the SGI Origin 2000 parallel support. Normally autodetected from the /etc/config/array file.
--enable-blcr Enable BLCR support.
--enable-cpa Enable Cray's CPA support.
--enable-cpu-set
Enable Linux 2.6 kernel cpusets.
It is recommended that you turn on this feature to prevent a job from expanding across more CPU cores than it is assigned.
--enable-debug Prints debug information to the console for pbs_server and pbs_mom while they are running. (This is different than--with-debugwhich will compile with debugging symbols.)
--enable- dependency-tracking
Do not reject slow dependency extractors.
--enable-fast-install[=PKGS]
Optimize for fast installation [default=yes].
--enable-FEATURE [=ARG]
Include FEATURE [ARG=yes].
--enable-file-sync
Open files with sync on each write operation. This has a negative impact on TORQUE per-formance. This is disabled by default.
--enable-force-nodefile
Forces creation of nodefile regardless of job submission parameters. Not on by default. Chapter 1: Overview
Option
Description
--enable-gcc-warnings
Enable gcc strictness and warnings. If using gcc, default is to error on any warning.
--enable-geo- metry-requests
TORQUE is compiled to useprocs_bitmapduring job submission.
--enable-gui Include the GUI-clients.
--enable-main-tainer-mode
This is for the autoconf utility and tells autoconf to enable so called rebuild rules. See main-tainer modefor more information.
--enable-maxdefault
Turn on the RESOURCEMAXDEFAULT flag.
Versions of TORQUE earlier than 2.4.5 attempted to apply queue and server defaults to a job that didn't have defaults specified. If a setting still did not have a value after that, TORQUE applied the queue and server maximum values to a job (meaning, the maximum values for an applicable setting were applied to jobs that had no specified or default value).
In TORQUE 2.4.5 and later, the queue and server maximum values are no longer used as a value for missing settings. To re-enable this behavior in TORQUE 2.4.5 and later, use--enable-maxdefault.
--enable-nochildsignal
Turn on the NO_SIGCHLD flag.
--enable-nodemask
Enable nodemask-based scheduling on the Origin 2000.
--enable-pemask
Enable pemask-based scheduling on the Cray T3e.
--enable- plock-dae-mons[=ARG]
Enable daemons to lock themselves into memory: logical-or of 1 for pbs_server, 2 for pbs_sched-uler, 4 for pbs_mom (no argument means 7 for all three).
--enable-quick-commit
Turn on the QUICKCOMMIT flag.
--enable-shared[=PKGS]
Build shared libraries [default=yes]. Chapter 1: Overview
Option
Description
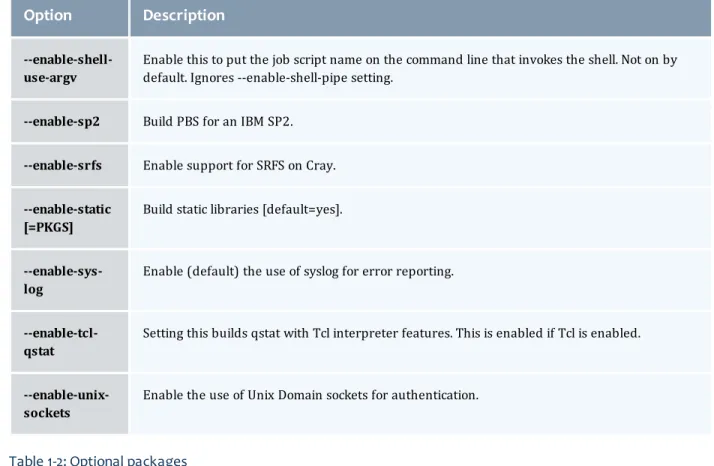
--enable-shell-use-argv
Enable this to put the job script name on the command line that invokes the shell. Not on by default. Ignores --enable-shell-pipe setting.
--enable-sp2 Build PBS for an IBM SP2.
--enable-srfs Enable support for SRFS on Cray.
--enable-static [=PKGS]
Build static libraries [default=yes].
--enable-sys-log
Enable (default) the use of syslog for error reporting.
--enable-tcl-qstat
Setting this builds qstat with Tcl interpreter features. This is enabled if Tcl is enabled.
--enable-unix-sockets
Enable the use of Unix Domain sockets for authentication.
Table 1-2: Optional packages
Option
Description
--with-blcr=DIR BLCR installation prefix (Available in versions 2.5.6 and 3.0.2 and later).
--with-blcr-include=DIR Include path for libcr.h (Available in versions 2.5.6 and 3.0.2 and later).
--with-blcr-lib=DIR Lib path for libcr (Available in versions 2.5.6 and 3.0.2 and later).
--with-blcr-bin=DIR Bin path for BLCR utilities (Available in versions 2.5.6 and 3.0.2 and later).
--with-cpa-include=DIR Include path for cpalib.h.
--with-cpa-lib=DIR Lib path for libcpalib.
--with-debug=no Do not compile with debugging symbols.
--with-default-server-r=HOSTNAME
Set the name of the computer that clients will access when no machine name is specified as part of the queue name. It defaults to the hostname of the machine on which PBS is being compiled.
Chapter 1: Overview
Option
Description
--with-environ=PATH Set the path containing the environment variables for the daemons. For SP2 and AIX systems, suggested setting is to /etc/environment. Defaults to the file "pbs_ environment" in the server-home. Relative paths are interpreted within the con-text of the server-home.
--with-gnu-ld Assume the C compiler uses GNU ld [default=no].
--with-mail-domain=MAILDOMAIN
Override the default domain for outgoing mail messages, i.e. "user@maildomain". The default maildomain is the hostname where the job was submitted from.
--with-modulefiles[=DIR] Use module files in specified directory [/etc/modulefiles].
--with-momlogdir Use this directory for MOM logs.
--with-momlogsuffix Use this suffix for MOM logs.
--without-PACKAGE Do not use PACKAGE (same as --with-PACKAGE=no).
--without-readline Do not include readline support (default: included if found).
--with-PACKAGE[=ARG] Use PACKAGE [ARG=yes].
--with-pam=DIR Directory that holds the system PAM modules. Defaults to /lib(64)/security on Linux.
--with-pic Try to use only PIC/non-PIC objects [default=use both].
--with-qstatrc-file=FILE Set the name of the file that qstat will use if there is no ".qstatrc" file in the dir-ectory where it is being invoked. Relative path names will be evaluated relative to the server home directory (see above). If this option is not specified, the default name for this file will be set to "qstatrc" (no dot) in the server home directory.
--with-rcp One of "scp", "rcp", "mom_rcp", or the full path of a remote file copy program. scp is the default if found, otherwise mom_rcp is used. Some rcp programs don't always exit with valid error codes in case of failure. mom_rcp is a copy of BSD rcp included with this source that has correct error codes, but it is also old, unmain-tained, and doesn't have large file support.
Option
Description
--with-sched=TYPE Sets the scheduler type. If TYPE is "c", the scheduler will be written in C. If TYPE is "tcl" the server will use a Tcl based scheduler. If TYPE is "basl", TORQUE will use the rule based scheduler. If TYPE is "no", then no scheduling is done. "c" is the default.
--with-sched-code=PATH Sets the name of the scheduler to use. This only applies to BASL schedulers and those written in the C language. For C schedulers this should be a directory name and for BASL schedulers a filename ending in ".basl". It will be interpreted relative to srctree/src/schedulers.SCHD_TYPE/samples. As an example, an appropriate BASL scheduler relative path would be "nas.basl". The default scheduler code for "C" schedulers is "fifo".
--with-scp In TORQUE 2.1 and later, SCP is the default remote copy protocol. See--with-rcp if a different protocol is desired.
--with-sendmail[=FILE] Sendmail executable to use.
--with-server-home=DIR Set the server home/spool directory for PBS use. Defaults to /var/spool/torque.
--with-server-name-file-e=FILE
Set the file that will contain the name of the default server for clients to use. If this is not an absolute pathname, it will be evaluated relative to the server home dir-ectory that either defaults to /usr/spool/PBS or is set using the --with-server-home option to configure. If this option is not specified, the default name for this file will be set to "server_name".
--with-tcl Directory containing tcl configuration (tclConfig.sh).
--with-tclatrsep=CHAR Set the Tcl attribute separator character this will default to "." if unspecified.
--with-tclinclude Directory containing the public Tcl header files.
--with-tclx Directory containing tclx configuration (tclxConfig.sh).
--with-tk Directory containing tk configuration (tkConfig.sh).
--with-tkinclude Directory containing the public Tk header files.
--with-tkx Directory containing tkx configuration (tkxConfig.sh).
--with-tmpdir=DIR Set the tmp directory that pbs_mom will use. Defaults to "/tmp". This is a Cray-spe-cific feature.
Chapter 1: Overview
Option
Description
--with-xauth=PATH Specify path to xauth program.
HAVE_WORDEXP
Wordxp()performs a shell-like expansion, including environment variables. By default,HAVE_WORDEXP is set to1insrc/pbs_config.h. If set to 1, will limit the characters that can be used in a job name to those allowed for a file in the current environment, such as BASH. If set to 0, any valid character for the file system can be used.
If a user would like to disable this feature by settingHAVE_WORDEXPto 0 insrc/include/pbs_ config.h, it is important to note that the error and the output file names will not expand environment variables, including$PBS_JOBID. The other important consideration is that characters that BASH dislikes, such as(), will not be allowed in the output and error file names for jobs by default.
Related topics
l Advanced configurationon page 14 l Server configurationon page 21
Server configuration
See these topics for details:l Server configuration overviewon page 21 l Name service configurationon page 22 l Configuring job submission hostson page 22
l Configuring TORQUE on a multi-homed serveron page 23 l Architecture specific noteson page 23
l Specifying non-root administratorson page 23 l Setting up emailon page 23
l Using MUNGE authenticationon page 24 l Setting up the MOM hierarchyon page 25
Server configuration overview
There are several steps to ensure that the server and the nodes are completely aware of each other and able to communicate directly. Some of this configuration takes place within TORQUE directly using the
qmgrcommand. Other configuration settings are managed using thepbs_server nodesfile, DNS files such as/etc/hostsand the/etc/hosts.equivfile.
Name service configuration
Each node, as well as the server, must be able to resolve the name of every node with which it will interact. This can be accomplished using/etc/hosts, DNS, NIS, or other mechanisms. In the case of /etc/hosts, the file can be shared across systems in most cases.
A simple method of checking proper name service configuration is to verify that the server and the nodes can "ping" each other.
Configuring job submission hosts
Using RCmd authentication
When jobs can be submitted from several different hosts, these hosts should be trusted via the R* commands (such as rsh and rcp). This can be enabled by adding the hosts to the /etc/hosts.equiv file of the machine executing thepbs_serverdaemon or using other R* command authorization methods. The exact specification can vary from OS to OS (see the man page forruserokto find out how your OS validates remote users). In most cases, configuring this file is as simple as adding a line to your /etc/hosts.equivfile, as in the following:
/etc/hosts.equiv:
#[+ | -] [hostname] [username] mynode.myorganization.com ...
Either of the hostname or username fields may be replaced with a wildcard symbol (+). The (+) may be used as a stand-alone wildcard but not connected to a username or hostname, e.g.,+node01or
+user01. However, a (-) may be used in that manner to specifically exclude a user.
Following the Linux man page instructions for hosts.equiv may result in a failure. You cannot precede the user or hostname with a (+). To clarify,node1 +user1will not work anduser1will not be able to submit jobs.
For example, the following lines will not work or will not have the desired effect: +node02 user1
node02 +user1 These lines will work:
node03 + + jsmith node04 -tjones
The most restrictive rules must precede more permissive rules. For example, to restrict user tsmith but allow all others, follow this format:
node01 -tsmith node01 +
Please note that when a hostname is specified, it must be the fully qualified domain name (FQDN) of the host. Job submission can be further secured using the server or queueacl_hostsandacl_host_enabled parameters (for details, seeQueue attributeson page 78).
Chapter 1: Overview
Using the "submit_hosts" service parameter
Trusted submit host access may be directly specified without using RCmd authentication by setting the serversubmit_hostsparameter viaqmgras in the following example:
> qmgr -c 'set server submit_hosts = host1' > qmgr -c 'set server submit_hosts += host2' > qmgr -c 'set server submit_hosts += host3'
Use ofsubmit_hostsis potentially subject to DNS spoofing and should not be used outside of controlled and trusted environments.
Allowing job submission from compute hosts
If preferred, all compute nodes can be enabled as job submit hosts without setting.rhostsor hosts.equivby setting theallow_node_submitparameter totrue.
Configuring TORQUE on a multi-homed server
If thepbs_serverdaemon is to be run on a multi-homed host (a host possessing multiple network interfaces), the interface to be used can be explicitly set using theSERVERHOSTparameter.
Architecture specific notes
With some versions of Mac OS/X, it is required to add the line$restricted *.<DOMAIN>to thepbs_ momconfiguration file. This is required to work around some socket bind bugs in the OS.
Specifying non-root administrators
By default, only root is allowed to start, configure and manage thepbs_serverdaemon. Additional trusted users can be authorized using the parametersmanagersandoperators. To configure these parameters use theqmgrcommand, as in the following example:
> qmgr
Qmgr: set server managers += josh@*.fsc.com Qmgr: set server operators += josh@*.fsc.com
All manager and operator specifications must include a user name and either a fully qualified domain name or a host expression.
To enable all users to be trusted as both operators and administrators, place the+(plus)
character on its own line in theserver_priv/acl_svr/operatorsandserver_priv/acl_ svr/managersfiles.
Setting up email
Moab relies on emails from TORQUE about job events. To set up email, do the following: Chapter 1: Overview
To set up email
1. Use the--with-sendmailconfigure option at configure time. TORQUE needs to know where the email application is. If this option is not used, TORQUE tries to find the sendmail executable. If it isn't found, TORQUE cannot send emails.
> ./configure --with-sendmail=<path_to_executable>
2. Set mail_domainin your server settings. If your domain is clusterresources.com, execute: > qmgr -c 'set server mail_domain=clusterresources.com'
3. (Optional) You can override the defaultmail_body_fmtandmail_subject_fmtvalues viaqmgr: > qmgr -c 'set server mail_body_fmt=Job: %i \n Name: %j \n On host: %h \n \n %m \n \n %d'
> qmgr -c 'set server mail_subject_fmt=Job %i - %r'
By default, users receive e-mails on job aborts. Each user can select which kind of e-mails to receive by using theqsub -moption when submitting the job. If you want to dictate when each user should receive e-mails, use a submit filter (for details, see Job submission filter ("qsub wrapper")on page 287).
Using MUNGE authentication
MUNGE is an authentication service that creates and validates user credentials. It was developed by Lawrence Livermore National Laboratory (LLNL) to be highly scalable so it can be used in large environments such as HPC clusters. To learn more about MUNGE and how to install it, see
http://code.google.com/p/munge/.
Configuring TORQUE to use MUNGE is a compile time operation. When you are building TORQUE, use -enable-munge-authas a command line option with./configure.
> ./configure -enable-munge-auth
You can use only one authorization method at a time. If-enable-munge-authis configured, the privileged port ruserok method is disabled.
TORQUE does not link any part of the MUNGE library into its executables. It calls the MUNGE and UNMUNGE utilities which are part of the MUNGE daemon. The MUNGE daemon must be running on the server and all submission hosts. The TORQUE client utilities call MUNGE and then deliver the encrypted credential topbs_serverwhere the credential is then unmunged and the server verifies the user and host against the authorized users configured in serverdb.
Authorized users are added to serverdb usingqmgr and theauthorized_usersparameter. The syntax for authorized_usersisauthorized_users=<user>@<host>. To add an authorized user to the server you can use the followingqmgrcommand:
> qmgr -c 'set server authorized_users=user1@hosta > qmgr -c 'set server authorized_users+=user2@hosta
The previous example adds user1 and user2 from hosta to the list of authorized users on the server. Users can be removed from the list of authorized users by using the-=syntax as follows:
> qmgr -c 'set server authorized_users-=user1@hosta Chapter 1: Overview
Users must be added with the <user>@<host> syntax. The user and the host portion can use the '*' wildcard to allow multiple names to be accepted with a single entry. A range of user or host names can be specified using a [a-b] syntax whereais the beginning of the range andbis the end.
> qmgr -c 'set server authorized_users=user[1-10]@hosta
This allows user1 through user10 on hosta to run client commands on the server.
Setting up the MOM hierarchy
The MOM hierarchy allows you to override the compute nodes' default behavior of reporting status updates directly to thepbs_server. Instead, you configure compute nodes so that each node sends its status update information to another compute node. The compute nodes pass the information up a tree or hierarchy until eventually the information reaches a node that will pass the information directly to
pbs_server. This can significantly reduce traffic and time required to keep the cluster status up to date. The name of the file that contains the configuration information is namedmom_hierarchy. By default, it is located in the/var/spool/torque/server_privdirectory. The file uses syntax similar to XML:
<path>
<level> comma-separated node list </level>
<level> comma-separated node list </level>
...
</path>
...
The<path></path>tag pair identifies a group of compute nodes. The<level></level>tag pair contains a comma-separated list of compute node names. Multiple paths can be defined with multiple levels within each path.
Within a<path>tag pair the levels define the hierarchy. All nodes in the top level communicate directly with the server. All nodes in lower levels communicate to the first available node in the level directly above it. If the first node in the upper level goes down, the nodes in the subordinate level will then communicate to the next node in the upper level. If no nodes are available in an upper level then the node will communicate directly to the server.
If an upper level node has fallen out and then becomes available, the lower level nodes will eventually find that the node is available and start sending their updates to that node.
If you want to specify MOMs on a different port than the default, you must list the node in the form:hostname:mom_manager_port. For example:
<path>
<level>hostname:mom_manager_port</level>
...
</path>
...
Chapter 1: OverviewPutting the MOM hierarchy on the MOMs
You can put the MOM hierarchy file directly on the MOMs. This way, thepbs_serverdoesn't have to send the hierarchy to all the MOMs during eachpbs_serverstartup. The hierarchy file still has to exist on the
pbs_serverand if the file versions conflict, the pbs_serverversion overwrites the local MOM file. Due to this, it is recommended that the hierarchy file either be symlinked to the MOMs or put on a global NFS share.
Once the hierarchy file exists on the MOMs, startpbs_serverwith the-noption which tellspbs_serverto not send the hierarchy file on startup. Instead,pbs_serverwaits until a MOM requests it.
Related topics
l Advanced configurationon page 14
Manual setup of initial server configuration
On a new installation of TORQUE, the server database must be initialized using the commandpbs_ server -t create. This command creates a file in$TORQUEHOME/server_privnamedserverdb which contains the server configuration information.
The following output from qmgr shows the base configuration created by the commandpbs_server -t create:
qmgr -c 'p s' #
Set server attributes. #
set server acl_hosts = kmn set server log_events = 511 set server mail_from = adm set server node_check_rate = 150 set server tcp_timeout = 6
This is a bare minimum configuration and it is not very useful. By using qmgr, the server configuration can be modified to set up TORQUE to do useful work. The following qmgr commands will create a queue and enable the server to accept and run jobs.
pbs_server -t create
qmgr -c "set server scheduling=true"
qmgr -c "create queue batch queue_type=execution" qmgr -c "set queue batch started=true"
qmgr -c "set queue batch enabled=true"
qmgr -c "set queue batch resources_default.nodes=1" qmgr -c "set queue batch resources_default.walltime=3600" qmgr -c "set server default_queue=batch"
These commands must be executed by root.
In this example, the configuration database is initialized and the scheduling interface is activated (using 'scheduling=true'). This option allows the scheduler to receive job and node events which allow it to be more responsive. The next command creates a queue and specifies the queue type. Within PBS, the queue must be declared an'executionqueue in order for it to run jobs. Additional configuration (i.e., Chapter 1: Overview
setting the queue tostartedandenabled) allows the queue toacceptjob submissions, andlaunch queued jobs.
The next two lines are optional, setting defaultnodeandwalltimeattributes for a submitted job. These defaults will be picked up by a job if values are not explicitly set by the submitting user. The final line,default_queue=batch, is also a convenience line and indicates that a job should be placed in the batchqueue unless explicitly assigned to another queue.
Additional information on configuration can be found in the admin manual and in theqmgrmain page.
Related topics
l TORQUE installation overviewon page 1
Server node file configuration
This section contains information about configuring server node files. It explains how to specify node virtual processor counts and GPU counts, as well as how to specify node features or properties. For details, see these topics:
l Basic node specificationon page 27
l Specifying virtual processor count for a nodeon page 28 l Specifying GPU count for a nodeon page 28
l Specifying node features (node properties)on page 29
Related topics
l TORQUE installation overviewon page 1 l Server parameterson page 223
l Moab node feature overview
Basic node specification
For thepbs_serverto communicate with each of the MOMs, it needs to know which machines to contact. Each node that is to be a part of the batch system must be specified on a line in the servernodesfile. This file is located atTORQUE_HOME/server_priv/nodes. In most cases, it is sufficient to specify just the node name on a line as in the following example:
server_priv/nodes: node001 node002 node003 node004 Chapter 1: Overview
Related topics
l Server node file configurationon page 27
Specifying virtual processor count for a node
By default each node has one virtual processor. Increase the number using thenpattribute in the nodes file. The value of np can be equal to the number of physical cores on the node or it can be set to a value which represents available "execution slots" for the node. The value used is determined by the
administrator based on hardware, system, and site criteria.
The following example shows how to set the np value in the nodes file. In this example, we are assuming that node001 and node002 have four physical cores. The administrator wants the value of np for node001 to reflect that it has four cores. However, node002 will be set up to handle multiple virtual processors without regard to the number of physical cores on the system.
server_priv/nodes: node001 np=4
node002 np=12 ...
Related topics
l Server node file configurationon page 27
Specifying GPU count for a node
Administrators can manually set the number of GPUs on a node or if they are using NVIDIA GPUs and drivers, they can have them detected automatically. For more information about how to set up TORQUE with GPUS, see the Moab Workload Manager accelerators documentation.
To manually set the number of GPUs on a node, use the gpusattribute in the nodes file. The value of GPUs is determined by the administrator based on hardware, system, and site criteria.
The following example shows how to set the GPU value in the nodes file. In the example, we assume node01 and node002 each have two physical GPUs. The administrator wants the value of node001 to reflect the physical GPUs available on that system and addsgpus=2to the nodes file entry for node001. However, node002 will be set up to handle multiple virtual GPUs without regard to the number of physical GPUs on the system.
server_priv/nodes: node001 gpus=1 node002 gpus=4 ...
Related topics
l Server node file configurationon page 27 Chapter 1: Overview