The batch ribbon blender’s versatility for mixing
solids — and for combining mixing with heating,
cooling, coating, and other processes — makes it a
real workhorse in bulk solids processing
applica-tions. Although this blender is well-known in the
in-dustry, many of us may not to be up to speed on how
to improve the blender’s mixing productivity. Here
are four practical ways to ensure that your batch
ribbon blender performs at peak efficiency in your
application.
A
batch ribbon blender can process dry powders, gran-ules, and pellets in widely different applications. The unit can blend ingredients to produce animal feeds, fertilizers, glass batches, and food products. The blender can heat, cool, or dry materials, including metal powders, plastics, and others. It can also coat solid particles with small amounts of liquid to produce pigments, pharma-ceuticals, chemical blends, and other products. The variety of particle size ranges, bulk densities, and other ingredient characteristics the ribbon blender can handle confirms the unit’s standing as a versatile solids-mixing workhorse. The ribbon blender, like all solid-solid mixers, operates by inducing one or a combination of the following mixing mechanisms: small-scale random motion (called diffu-sion), large-scale random motion (called convection), and shear resulting from particle-to-agitator, particle-to-wall, and particle-to-particle collisions. While diffusion is eas-ily achieved with free-flowing ingredients in any mixer, rapid mixing of free-flowing and other ingredients typi-cally requires convection, as well — that is, the intermix-ing of large groups of particles. The ability to providehigh-speed convective mixing is the ribbon blender’s real advantage among bulk solids mixers.
Ribbon blender basics
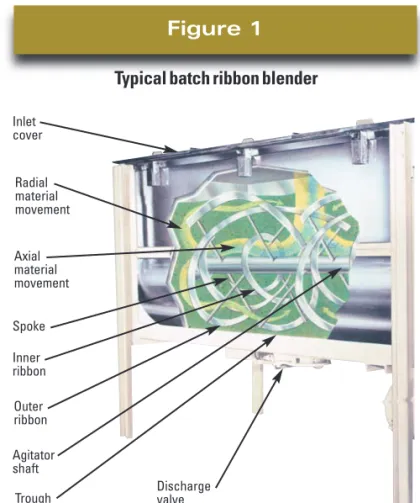
The ribbon blender consists of a U-shaped horizontal trough mounted on leg supports and containing a rotating agitator, as shown in Figure 1. The agitator shaft is pow-ered by a drive and mounted with spokes that support outer and inner helical blades called ribbons.Typically, the inlet is at the trough’s top center and the discharge is at
Four practical ways to optimize your batch
ribbon blender’s efficiency
Christine Angos and Warren Ang Charles Ross & Son Co.
Figure 1
Typical batch ribbon blenderDischarge valve Inlet cover Radial material movement Axial material movement Outer ribbon Inner ribbon Spoke Agitator shaft Trough
the bottom center. The inlet is usually an opening with a cover; the cover can also be fitted with a charge port or spout to provide an air-tight connection to upstream equip-ment, such as a weigh hopper. The inlet cover also pro-vides maintenance and cleaning access to the trough interior. The discharge can be fitted with any of various valves, depending on the application.
In operation, ingredients are loaded into the blender, typi-cally filling it to between 40 and 100 percent of its rated ca-pacity. This is up to the level of the outer ribbon’s tip, less than the unit’s total holding volume, and allows room for the material to be vigorously agitated and mixed. The agi-tator rotates and produces a peripheral speed (that is, rib-bon tip speed) of up to approximately 300 fpm, depending on the application. The ribbons move material radially: The outer ribbons move the ingredients in toward the blender’s center, and the inner ribbons move ingredients out toward the blender wall. The difference in the outer and inner ribbons’ speeds moves material laterally or axi-ally— that is, along the blender’s horizontal axis — in two opposite directions. These radial and axial mixing actions promote diffusion, convection, and shear.
Compared with other common batch mixers, such as coni-cal screw mixers and tumble blenders, the ribbon blender typically requires a smaller initial investment. But at big-ger sizes and throughput capacities, the ribbon blender’s initial cost approaches that of other batch mixers. Regard-less of your batch ribbon blender’s capacity, you can make it more cost-effective by improving its mixing productiv-ity. The following describes four practical ways to do this. As the information shows, most of the steps in optimizing the ribbon blender take place when you select the unit for your application.
1
Mind your mixing time.The ribbon blender can achieve complete mixing in a short time — 15 minutes or less — with little possibility of over-mixing or unover-mixing, especially for ingredients with simi-lar particle sizes and bulk densities. In fact, ingredient particle size and bulk density have the strongest influence on the ribbon blender’s mixing efficiency: The more simi-lar these characteristics are among your ingredients, the faster the ribbon blender can mix them. While developing a product formulation with ingredients of similar particle sizes and densities is a great way to speed mixing, this isn’t always possible. In most applications, the best approach is to ensure that your ribbon blender doesn’t mix any longer than necessary to achieve a complete blend (covered later in this section).
Another strong influence on mixing time is the blender de-sign. The trough and ribbons should be precisely designed and fabricated for your application to ensure fast mixing with well-balanced radial and axial ingredient transfer. For instance, the trough design and ribbon-tip-to-wall
clear-ance should eliminate dead spots where ingredients can stagnate rather than mix. The ribbon width, spacing be-tween the outer and inner ribbons, and ribbon pitch (the distance between spokes supporting the ribbons) should be matched to your ingredients’ characteristics. The trough and agitator should be large enough to provide the throughput capacity your application requires and should be well-made with high-quality welded or molded con-struction to ensure that they can withstand your mixing conditions without failing and causing maintenance downtime.
The trough and ribbons should be precisely designed and fabricated for your application to ensure fast mixing with well-balanced radial and axial ingredient transfer
Once you’ve chosen blender components that contribute to fast mixing, you need to invest time and effort in a com-prehensive sampling test series, which is a standard way of testing mixers. Such a test series can help you determine precisely when the blender achieves a complete mix and thus can shorten the mixing cycle. You may be able to quickly run the tests on a ribbon blender in the manufac-turer’s lab. Or you can run the tests in your own plant so you can run lengthier tests for each of multiple formula-tions. You can typically rent a ribbon blender from the manufacturer for this purpose, or you may choose to run the test series on your new blender after it’s installed in your plant.
For each test in the series, the ingredients are loaded into the blender, the blender is operated for a period, and mix-ture samples are taken from different points in the blender at defined intervals. These samples are analyzed to
deter-Figure 2
Dust-tight slide-gate valvemine how well the ingredients have been mixed at each point in the mixing cycle. When a sample reveals that the ingredients are completely mixed, the mixing cycle is ended to prevent unnecessary overmixing and unmixing. The sampling test series can save your plant’s resources for years to come by reducing batch cycle time and thus in-creasing mixing productivity, reducing energy costs, and preventing segregation and other problems that can lead to scrapped batches. The more batches your mixer must pro-duce in a shift or a day, the greater the savings can be. If the sampling test series reveals that your batch takes more than an hour to become completely mixed in the rib-bon blender, regardless of the blender’s capacity, there’s probably a more appropriate mixer for your application. In fact, if you’re willing to pay the price, you can usually find another batch mixer that will produce your desired blend in just 15 minutes.
2
Think about what happens before and after mixing.Optimizing the ribbon blender’s total cycle time — that is, the mixing time as well as the time required for loading and discharging the blender and cleaning it out between batches — will also improve your blender’s productivity. Several blender components play a role in making load-ing, dischargload-ing, and cleaning as fast and problem-free as possible.
Loading and discharging. The inlet type, whether an
opening with a cover or a charge port in the cover, should be large enough to allow fast ingredient loading. The cover should be large enough to allow easy access to the agitator and other components for maintenance and cleaning. It should also be designed with effective gasketing to pro-vide an air-tight seal that eliminates contamination and dusting problems. When handling fine or dusty powders, the blender should have a vent port with a dust sock to cap-ture fugitive airborne particles.
The ribbon blender’s discharge rate depends primarily on your mixed product’s flowability and the discharge valve’s type and size. The discharge valve you choose should promote product flow for rapid discharge and make the blender easy to clean between batches. Various discharge valves are available, including slide-gate, but-terfly, knife-gate, spherical, and other types, and most can be operated manually or, for faster discharge, automati-cally. A typical dust-tight slide-gate valve is shown in Fig-ure 2. The rate at which downstream equipment, such as a mechanical or pneumatic conveyor, can receive the dis-charged product also affects the discharge rate and should be considered when your mixing process is designed. Dead spots at the trough bottom that collect stagnant mate-rial can be a problem with some discharge valves. With
such a valve, the valve face is slightly lower than the trough bottom, causing a dead spot to develop between the ribbon tips and the valve face. Certain valve types can be installed with a tighter ribbon-tip-to-trough-bottom clear-ance and minimize the dead spot (in the case of a spherical valve) or even eliminate it (as with a flush plug valve), making between-batch cleaning faster and easier.
Trough end plate
Scraper
Figure 3
Special ribbon design with scraper for removing residue in trough corners
Because the ribbons’ mixing action moves product axially toward the discharge, you should run the blender at maxi-mum speed during discharge to ensure fast emptying. If your application requires very fast discharge, you can in-stall more than one discharge valve along the trough bot-tom.
Cleaning. Properly cleaning your ribbon blender will help
improve and maintain the unit’s mixing productivity by preventing batch-to-batch contamination. The blender’s trough geometry leaves a small amount of material in the trough after mixing ends, preventing complete discharge. This is an innate property of all ribbon blenders. The residue collects primarily at the trough bottom, and some collects in the trough corners. Some manufacturers offer a removable agitator so that workers can easily and quickly clean out the residue. Special ribbon designs that prevent powders from stagnating in the trough corners, such as the ribbon shown in Figure 3, are also available.
While the amount of residue is negligible compared to the batch size, especially in a large ribbon blender, the residue is a cross-contamination concern when the blender mixes multiple incompatible batches. To prevent batch-to-batch contamination, you need to select a blender cleaning sys-tem that uses compressed air, steam, hot water, or washing solution to remove any remaining residue from the
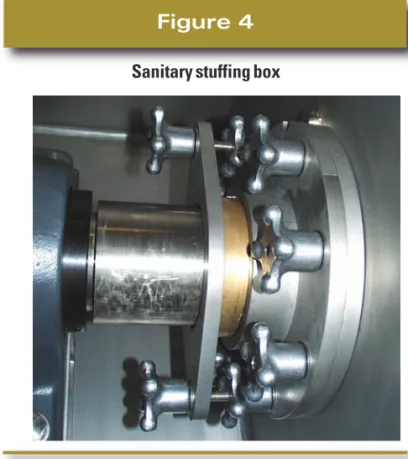
blender interior. Which system is best suited to your blender depends on the ingredients in your batch and your application’s cleaning requirements. For instance, a rib-bon blender handling milk powder formulations must be cleaned to sanitary standards to eliminate bacteria growth and typically requires a cleaning system that washes the blender interior with a detergent solution after each batch. In addition to the areas around the discharge valve and at the trough corners, the agitator seal can be particularly dif-ficult to clean. By carefully considering seal designs and options, you can simplify and speed cleaning and improve the total mixing cycle time. The seal at the agitator shaft is typically a stuffing box, which encloses rings of packing material that fit tightly around the agitator shaft, com-pressed by a gland assembly. To make the seal easier to clean and maintain, you can choose a split-housing stuff-ing box that’s easily disassembled with tools into two halves for cleaning and repacking. You can also choose a sanitary stuffing box, as shown in Figure 4, which has hand knobs for even quicker disassembly and molded chevron Teflon packing rings that are easy to clean and re-place and provide a better seal than standard packing rings. If you’re mixing abrasive materials or cross-contamina-tion is a critical concern, you can upgrade to a stuffing box modified with an air- or liquid-purged ring seal. This ring seal is a perforated hollow lantern ring that distributes air or liquid around the agitator shaft to provide positive pres-sure that prevents contaminants from entering the seal and damaging it or the shaft. The seal can be purged with nitro-gen rather than air or liquid if your blender will handle ma-terials susceptible to oxidation.
3
Make sure your blender has the right horse-power.Using the right motor size and horsepower is another way to improve your ribbon blender’s efficiency. The blender manufacturer typically calculates the unit’s required horsepower by considering your mixed product’s bulk density, the batch volume, and the peripheral agitator speed. While the first two are usually givens, the manufac-turer typically determines the optimal peripheral agitator speed based on previous experience with similar applica-tions or with lab tests. Then the manufacturer computes the motor’s required horsepower by considering the torque required by your blender model.
If the range of product formulations your ribbon blender must handle eventually expands to include new ones with higher bulk densities, the blender’s horsepower require-ments will probably increase. A standard ribbon blender typically handles bulk densities to around 32 lb/ft3. More
robust units with larger motors are available to handle product formulations with bulk densities up to and over 75 lb/ft3. While it can be tempting to replace your existing
rib-Figure 4
Sanitary stuffing boxbon blender’s motor with a larger one to handle a new higher-density formulation, this isn’t always a practical move. The larger motor will not only increase the blender’s operating costs but can overpower the blender’s
standard-duty agitator shaft and spokes. These compo-nents are typically designed to handle torque loading only up to a certain level and are bound to bend, break, or fail mechanically when used with an overpowered motor. In-stead, talk to the blender manufacturer about ways to safely beef up your blender. For instance, the manufac-turer may suggest running the new larger motor at a low speed that won’t exceed your existing agitator’s torque limits, or replacing your agitator with one that can safely work with the larger motor.
While it can be tempting to replace your existing ribbon blender’s motor with a larger one to handle a new higher-density formulation, this isn’t always a practical move.
Another way to improve your ribbon blender’s efficiency and prevent motor damage is to avoid dead-load starts — that is, starting the blender at maximum horsepower (full torque load). Such a start can produce sudden torque and amperage spikes that overstress the motor, agitator shaft, and other components. To avoid this problem, you should select equipment — such as an electronic soft-start motor controller or a variable-frequency drive — that allows you
to start the blender by gradually applying more torque. Such devices are easy to retrofit into an existing blender.
4
Know your options.A final way to increase your blender’s efficiency is to learn what blender options are available and then choose the right ones for your application. Several options can boost your ribbon blender’s productivity: High-speed choppers in the blender wall can quickly break apart agglomerates and speed processing time in the blender. A jacketed trough can hasten heat transfer to the ingredients. A re-movable agitator and other options discussed in previous sections can speed blender cleaning and maintenance. The best time to choose these and other options is before the ribbon blender is operating in your plant. By working closely with the manufacturer during blender selection, you can reap the benefit of the manufacturer’s experience and customize the blender to meet your exact needs. Such customization is seldom a luxury. In fact, it’s the best way to ensure that your ribbon blender operates at peak
effi-ciency for the long term. PBE
For further reading
Find more information on ribbon blenders and other batch mixers in articles listed under “Mixing and blending” in Powder and Bulk Engineering‘s comprehensive article index at www.powderbulk.com and in the December 2007 issue.
Christine Angos is an application engineer at Charles
Ross & Son Co., 710 Old Willets Path, Box 12308, Haup-pauge, NY 11788; 631-234-0500, fax 631-234-0691 (can [email protected], www.mixers.com). She holds a BS in chemical engineering from the University of the Philip-pines-Diliman in Quezon City. Warren Ang is the com-pany’s product manager for ribbon blenders and holds a BS in mechanical engineering from Stony Brook Univer-sity, New York.