Microimplant (AbsoAnchor )
Dept. of Orthodontics, Dental School, Kyungpook National University, 188-1, Sam Duk 2 Ga,Jung Gu, Daegu, KOREA, 700-412 (*corresponding author contact : hmkyung@knu.ac.kr)
DDS, MS, Ph.D* Hee-Moon KYUNG DDS, MS, Ph.D Hyo-Sang PARK DDS, MS, Ph.D Seong-Min BAE DDS, MS, Ph.D Oh-Won KWON DDS, MS, Ph.D Jae-Hyun SUNG
1. Introduction 4 2. Terms used in skeletal anchorage 7 3. Types of AbsoAnchor Microimplant 7 4. Terms used in Microimplant surgical procedures 9 5. Selection of Microimplants 11 6. Various clinical sites for Microimplant placement 14 7. Surgical Procedures 21 8. Advice for Microimplant driving 26 9. Avoiding root damage 29 10. Orthodontic Force application 30 11. Postoperative patient management 30 12. Explanation for possibility of failure 30 13. Microimplant removal 30 14. Concluding remarks 32 References 33
CONTENTS
Brochure for the AbsoAnchor
1. Introduction
The control of anchorage is one of the most critical factors in orthodontic treatment. The reinforcement of an anchorage usually needs a a complete understanding of biomechanics and a patient compliance. Unfortunately, there are many orthodontic treatments during which absolute anchorage is needed. However, considering Newton's Third Law, it is virtually impossible to achieve absolute anchorage condition in which reactional force produces no movement at all, especially with intraoral anchorage. Thus, extraoral anchorage, such as head gear, is traditionally used to reinforce anchorage. However, the use of extraoral anchorage demands full cooperation of patient as well as 24 hours of continuous wear which cannot always be done. Therefore, it is extremely difficult to attain excellent result without compromising treatment in some way.
Hence, to treat patients without patient compliance, clinicians and researchers have tried to use skeletal anchorage. Gainsforth and Higley (1945) placed metallic vitallium screws in dog’s ramus as anchors and applied elastics to the maxillary arch wire for distalization of maxillary dentition as long ago as 1945. However, all screws failed within one month. There were no more published reports of attempts to use skeletal anchorage to move teeth until the clinical case report of Linkow (1969, 1970), who used mandibular blade-vent implants in a patient to apply class II elastics.
After Brånemark and co-workers reported successful osseointegration of prosthodontic implants in bone, osseointegrated implants (Sherman, 1978; Roberts et al., 1994; Wehrbein et al, 1999) have been used as intraoral orthodontic anchorage, but their usage has many limitations for routine orthodontic practice. First of all, it is difficult to select a proper insertion site for a conventional implant in orthodontic patients due to the large diameter of implant. Also, waiting time for osseointegration, high cost, severity of surgery, etc. are known problems for both patients and orthodontists. Thus, a smaller diameter miniscrew has been developed for orthodontic anchorage rather than bulky conventional dental implants. Creekmore & Eklund (1983) reported the use of a small-sized vitallium bone screw as anchorage for the intrusion of maxillary incisors. The screw was inserted below the anterior nasal spine, and elastic thread was applied to the archwire. After the treatment, maxillary central incisors were elevated by about 6mm. The screw was stable over a long period of time without infection, pain & pathology.Even though the successful use of the screw for orthodontic treatment, there was no clinical report using screws for orthodontic treatment until Kanomi (1997) introduced micro-screws as orthodontic anchorage. He showed that 1.2mm diameter of micro-screw is enough for intrusion of anterior teeth.
1. Introduction
Since 1998, Park & Bae (Park, 1999; Park et al, 2001; Bae et al, 2002; Bae et al, 2002) have started to use surgical micro-screws (1.2mm in diameter) to retract maxillary anterior teeth after placing them between the roots of upper 2nd premolars and 1st molars. The treatment was very successful without any complications. They also showed that almost all kinds of tooth movement were possible including molar intrusion, molar protraction and whole dentition retraction using small diameter of micro-screws. These micro-screws were inserted into many areas of maxilla and mandible such as in between roots of adjacent teeth and midpalatal suture which were previously unavailable for conventional dental implants. In addition, they showed that micro-screw head can be exposed when it is placed on the attached gingival area.
Originally, micro-screw was used to fix mini-plate into bone in surgical fields. So, it was difficult to apply orthodontic elastomers onto the screw head without forming connectional ligature wire loop on the cervical portion of the screw. Thus, there was periodontal involvement which was caused by the location of ligature wire that is under the screw and towards gingival, even though the screw itself was located on the attached gingival area. This micro-screw location allowed gingival embedment of ligature wire producing steady irritation on soft tissue and also caused difficulty for patients in keeping good oral hygiene around the screw.
To compensate for these drawbacks, we developed orthodontic Microimplant (AbsoAnchor ), which has been designed specifically for orthodontic purpose and has a button-like head with a small hole. Also, by giving inclination on cervical area of the button allows natural separation of elastomers from gingiva. A hole is made in upper structure for smooth application of elastomer such as elastomeric thread and/or ligature wire (Fig.1). This newly designed microimplant has helped to solve the main objections to previous implants and surgical screws (Sung et al, 2006). AbsoAnchor microimplants come in several sizes of diameter ranging from 1.2mm to 2.7mm. These titanium alloy (Ti6Al4Va) micro-implants also come with different types of head for different applications and sites (Fig.1-1).
However, many orthodontists are still hesitating to use orthodontic microimplants, because many of them are afraid of surgical intervention and post-surgical complications. But unlike prosthetic implants, there is little complication, and every dentist including orthodontist can insert orthodontic microimplants due to its ease of application. Here, we would like to introduce you to AbsoAchor microimplant system as an orthodontic anchorage for your practice.
Fig. 1. A typical surgical microscrew (left) and the newly designed AbsoAnchor microimplant with nickel titanium coil spring attached (middle & right).
2. Terms used in skeletal anchorage
There are many terms used in orthodontic skeletal anchorage, such as, skeletal anchorage system (SAS), mini-screw, micro-screw, mini-implant, micro-implant, mini-screw implant, micro-screw implant, Temporary Anchorge Device (TAD) etc. A prefix of micro- comes from Greek and mini- comes from English. The terms, micro- and mini-, have the same meaning of being small when they are used as adjective. Generally, however, the term micro is used to express a size that is a little bit smaller than , such as mini-car and micro-mini-car, mini-scan disk and micro-scan disk. Academically the term of micro- is used more rather than mini-, for example, micrognathia, microglossia, microdontia, etc. Also, implantologists already used the term mini-implant, which is a kind of temporary implant to make temporary crown during osseointegration of implant. The diameter of prosthodontic mini-implant is a bit larger than orthodontic implants. The term skeletal anchorage can include all kinds of skeletal anchorage devices including prosthodontic implant and onplant. Many doctors are using the term TAD, however, almost all kinds of conventional anchorage, such as transpalatal bar, lingual arch, etc. can be classified into temporary anchorage device. Prosthodontic implants vary from screw implants to non-screw type implants. Usually, however, we do not differentiate them as screw-implant or non- screw implant. Every orthodontic implant has screw portion. For the same reason, we do not need to put the term screw, such as micro-screw implant. Therefore, we prefer to use the term microimplant for orthodontic screw.
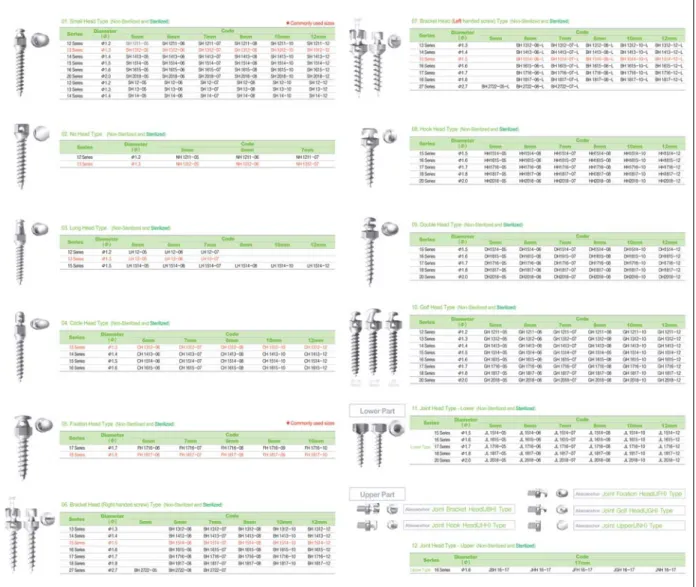
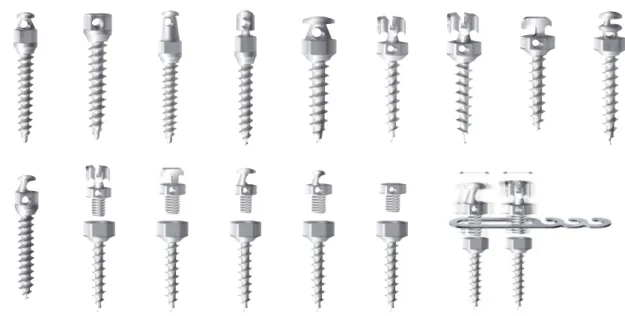
3. Types of AbsoAnchor Microimplant
Fig. 2. Various types of AbsoAnchor microimplants.
Length: 5mm ~ 12 mm, Diameter: 1.2mm ~ 2.7 mm
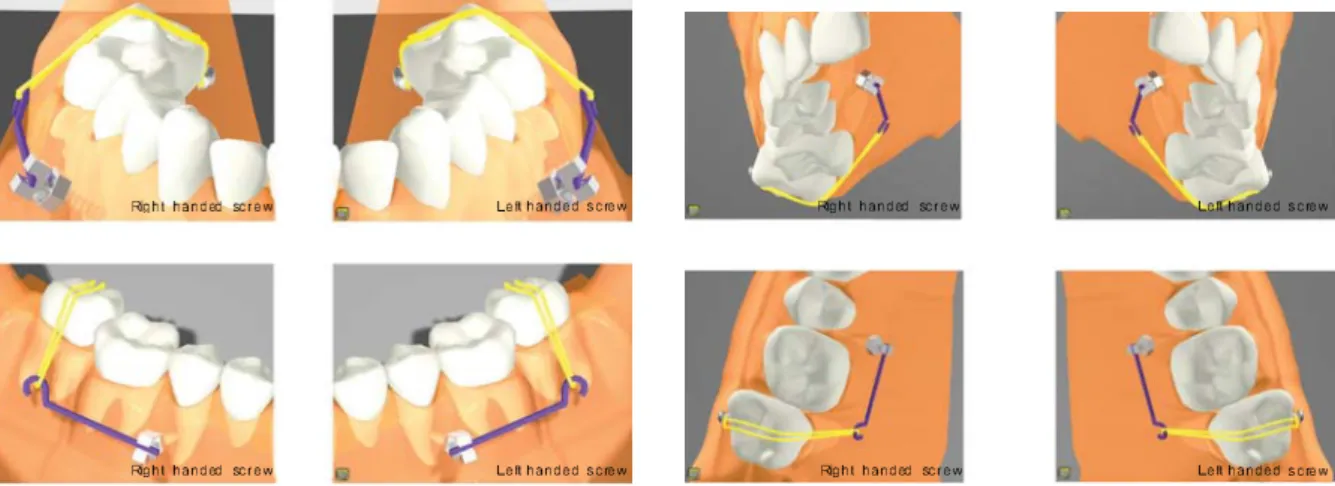
Several types of AbsoAnchor microimplants are available for different tasks and sites (Fig. 2). Different types of head structures can be chosen depending on kinds of elastomers, biomechanics, sites of placement and individual preference. In Bracket head type, right handed and left handed screws are available for use depending on the driving directions. Left handed screw should turn counter clockwise direction during driving. (Fig. 3 and 4). When you need to apply moment to the microimplant head using wire, you can choose proper screw type depending on the applied moment.
In the Joint Head type, many different kinds of upper head shape can be joined with the lower part the screw portion (Fig. 2). Also, non-invasive mini-plate can be joined without surgical flap (Fig. 5).
Fig. 3. Possible applications of right-handed and left-handed Bracket Head (BH) type screws.
4. Terms used in Microimplant surgical procedures
Fig. 5. Clinical applications of non-invasive mini-plate using Joint Head type microimplants (Courtesy of Dr. Corrodi Ritto).
4. Terms used in Microimplant surgical
procedures
Microimplant Anchorage (MIA) in orthodontics is a relatively new field in orthodontic treatment. So here we are going to introduce some descriptive terms, that are used in this brochure.
1) According to head exposure (Fig. 6)
(1) Open Method
For open method,the head of microimplant is exposed in the oral cavity. Usually, this method is possible when the microimplant is placed in a tight soft tissue area like the attached gingiva.
(2) Closed Method
For closed method,the head of the microimplant is embedded under the soft tissue. When the microimplant is placed in a movable soft tissue area with the open method, the soft tissue will grow around and embed the microimplant head during treatment. Instead of trying to have the microimplant head sufficiently away from the growing soft tissue, it is better to have the microimplant head under the soft tissue.
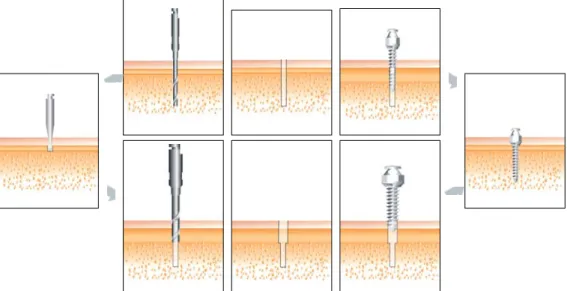
Fig. 8. One-step (upper) and two-step (lower) self-drilling procedures. When the microimplant is inserted in a diagonal direction, it is better to make an indentation first in the cortical bone using a round bur (two-step protocol) to prevent slippage of the microimplant during driving.
Fig. 7. One-step (upper) and two-step (lower) self-tapping procedures. When the cortical bone is too dense, it is better to redrill the cortical bone with a slightly larger sized drill (lower).
2) According to the Driving methods
(1) Self-Tapping (Pre-Drilling) method (Fig. 7)
A tunnel is drilled into the bone first by way of a bone drill, followed by the implant being driven into that tunnel. This method is used with small diameter microimplants and microimplants that are made of low grade pure titanium.
(2) Self-Drilling (Drill-Free) method (Fig. 8)
The implant itself drills into the bone as it is being driven. This method is for larger diameter pure-titanium microimplants or microimplants that are made of titanium alloy.
5. Selection of Microimplants
3) According to the path of Microimplant insertion (Fig. 9)
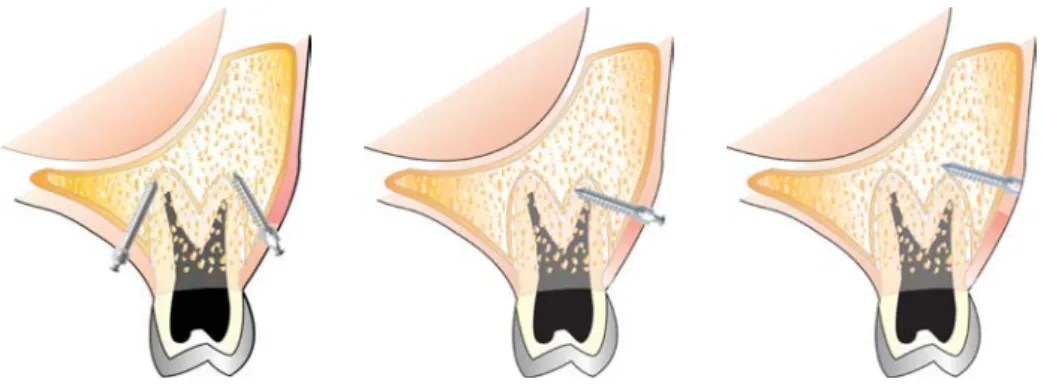
(1) Diagonal (or Oblique) direction
When the microimplant is inserted into the bone in a direction oblique to the bone surface. This method can be used when the interradicular space between the teeth is very narrow. The microimplant is inserted at an angle of 30~60 degrees to the long axes of the teeth, both buccally and lingually. Such angulated placement can reduce the risk of contacting the adjacent root during implant placement.
(2) Perpendicular direction
When the microimplant is inserted into the bone in a direction perpendicular to the bone surface. Although this direction of insertion is the easier of the two, it can be used only when there is sufficient space between the roots of the teeth.
Fig. 9. Diagonal (left) and perpendicular (middle & right) insertion of microimplants.
5. Selection of Microimplants
1) According to the Length of Microimplant
The length of screw portion ranges from 5mm to 12mm. Longer microimplants lead to better mechanical stability like dental prosthetic implants, but more possibilities of invading adjacent anatomical structures, such as roots, maxillary sinus and nerves. According to our clinical experiences, 6mm of screw depth is sufficient for maxillary bone, and 5mm is sufficient for the mandible. However, you should always take into consideration the thinkness of soft tissue when choosing proper length of microimplants. Especially palatal mucosa may be very thick in many instances. If soft tissue is 6mm thick, in order to place 6mm of screw portion into the bone, the microimplant with at least 12 mm length should be used. This protocol requires that the soft tissue thickness as well as the bone quality must be evaluated at the location of placement.
Also, in choosing the proper length of a microimplant, the path of insertion of the microimplant must be considered. A microimplant can be placed either in a diagonal direction or a perpendicular direction depending on the cortical bone condition. It is better and easier to place microimplant in a perpendicular direction, but, there are many situations in which the microimplant should be placed in a diagonal direction so as to avoid injury to an adjacent tooth root. When the microimplant is placed in a diagonal direction rather than perpendicular direction, it is better to use a slightly longer microimplant (Fig.10).
Fig.10. Perpendicular (left) and Diagonal (right) insertion of microimplants. When the microimplant is placed in a diagonal direction, it is better to select a slightly longer microimplant.
2) According to the Diameter of Microimplant
There are various diameters of AbsoAnchor microimplants which range from 1.2mm to 2.7mm for placement anywhere in the oral cavity. Depending on the inter-radicular distance, the quality of bone and the site of placement, we can choose different diameters of microimplants.
Larger the diameter of the microimplant, the greater mechanical retention becomes. However, the thicker microimplants do not always guarantee higher success rate. There is even a report that microimplant of smaller diameter showed higher success rate than thicker ones (Kuroda et al, 2007-a). Also, thicker microimplants may be more difficult to remove due to osseointegration. Thus, we prefer microimplants of smaller diameter whenever possible. When the microimplants are placed between roots and if we choose larger diameter microimplants, we run into possibility of contacting the roots. If microimplant is contacting the root, the failure rate is increased significantly (Kuroda et al, 2007-b).
The followings are general tips for selecting proper diameter of microimplants depending on the inserting sites;
a. buccal & labial areas of maxilla (Fig.11) : Cortical bone in these areas is not thick, so use tapered microimplant with neck of 1.3-1.4mm thick and tip of 1.2~1.3mm thick. Microimplants made by titanium alloys of this thickness can be inserted safely without pre-drilling on maxillary buccal and labial areas.
b. buccal & labial areas of mandible (Fig.11) : Cortical bone of mandible is denser than maxilla, so a thicker microimplants (1.4~1.6mm) are better for preventing breakage, especially for self-drilling (drill-free) method.
5. Selection of Microimplants
Fig.11. Buccal & labial anterior microimplants for anterior en masseretraction in extraction case.
Fig.12. Palatal alveolar microimplants for en masseretraction in lingual fixed appliance.
Fig.13. Various clinical applications of the midpalatal and para-midpalatal microimplants. (Courtesy of Dr. Carlo Marassi & Alfredo Alvarez)
c. palatal areas of maxilla (Fig.12) : Soft tissue is thick, so usually microimplants of longer than 10mm is needed. However, the longer the microimplants are the higher the possibility of breakage; so, use a slightly thicker microimplants (1.5~1.6 mm of neck) in comparison to buccal areas. The distance between roots is greater in palatal area than buccal area, there is less possibility of root contact even when using thicker microimplants.
d. midpalatal and para-midpalatal suture (Fig.13) : Microimplants of diameter larger than 1.7mm is recommended for sutural area and there is no worry for root contact. Even 2.7mm diameter microimplant can be used for younger patients.
6. Various clinical sites for Microimplant
placement
The followings are our recommended guidelines of microimplant sites, and recommended sizes for orthodontic anchorage purpose.
1) In Maxillary zone
(1) Infrazygomatic crest area (Fig.14)
Purpose : Retraction of the entire maxillary or maxillary anterior dentition. Intrusion of the maxillary molars.
Recommended Microimplants : Diameter : 1.3 & 1.4mm, Length : 6 & 7mm
Fig.14. Microimplants placed on the infrazygomatic crest area.
Fig.15. Microimplants placed in the maxillary tuberosity area for en masse retraction (left) and for molar intrusion (middle & right).
(2) Maxillary tuberosity area (Fig.15)
Purpose : Retraction of the maxillary posterior teeth. Intrusion of the maxillary molar. Recommended Microimplants : Diameter : 1.3 ~ 1.5mm, Length : 7 & 8mm
6. Various clinical sites for Microimplant placement
Fig.16. The inter-dental microimplants in between the maxillary 1st& 2ndmolars for molar intrution (left & middle). The hook of the 1st molar tube is used to prevent gingival impingement by the coil spring (right).
Fig.17. The mesio-buccal root of the maxillary 1stmolars are sometimes curved mesially. To avoid root injury, drill the bone somewhat mesial to the contact point between the 2nd premolar & 1stmolar. Arrow : A fractured microimplant due to root contact during driving (Osteomed Co., dia : 1.2mm).
(4) Between the maxillary 1stmolar & 2ndpremolar buccally (Fig. 17 & 18) Purpose : Retraction of the maxillary anterior teeth.
Intrusion of the maxillary buccal teeth. Intermaxillary elastics. Recommended Microimplants : Diameter : 1.2 & 1.3mm, Length : 7 & 8mm
(3) Between the maxillary 1st& 2ndmolars buccally (Fig.16) Purpose : Retraction of the maxillary anterior teeth.
Intrusion of the maxillary molars.
Recommended Microimplants : Diameter : 1.2 & 1.3mm, Length : 7 & 8mm
Fig.18. If the space between the roots is very narrow, the microimplant can be placed after making adequate space by moving the roots. If the wall of the maxillary sinus is very low, also, space can be made first and then the microimplant can be placed in a more perpendicular direction rather than in an oblique direction.
Fig.19. The microimplants in between maxillary canine & 1st premolar to move molar distally (left), en masse retraction and intrusion (right).
Fig.21. Palatal implants for en masseretraction in lingual treatment (left). Molar intrusion by combination of palatal and buccal microimplants.
Fig.20. The microimplants between maxillary incisors.
(5) Between the maxillary canine & premolar buccally (Fig.19)
Purpose : Distal & mesial movement of the maxillary molars. Intrusion & extrusion of maxillary buccal teeth.
Recommended Microimplants : Diameter : 1.2 & 1.3mm, Length : 7 & 8mm
(6) Between the maxillary incisors facially (Fig.20)
Purpose : Intrusion & torque control of the maxillary incisors.
Recommended Microimplants : Diameter : 1.3 ~ 1.6mm, Length : 6 & 7mm
(7) Between maxillary 2ndpremolar, 1stmolar & 2ndmolars palatally (Fig.21) Purpose : Retraction of the maxillary anterior teeth (Lingual ortho. Tx.).
Intrusion of the maxillary molars.
6. Various clinical sites for Microimplant placement
(8) Midpalatal and para-midpalatal (Fig.22)
Purpose : Unilateral constriction.
Molar movement with transpalatal arch.
Recommended Microimplants : Diameter : 1.5 ~ 2.7mm, Length : 5 & 6mm
Excellent implant sites in the maxilla are below the anterior nasal spine and in the midline of the palate. These areas contain very good quality of cortical bone. When placing the microimplant into the sutural area, it is better to choose a slightly thicker microimplant due osseous sutures. However, if the bony resistance of suture area is great, the microimplant can be shifted adjacent to the suture.
Fig.22. Microimplants on the midpalatal & para-midpalatal area (courtesy of Dr. Skander Ellouze & Alfredo Alvarez).
Fig.23. Microimplant in the retro-molar area for uprighting molar (left) and for retraction of the entire mandibular dentition (right).
2) In Mandibular zone
(1) Retromolar area (Fig.23 & 24)
Purpose : Uprighting of the tilted mandibular molar.
Retraction of the mandibular teeth or whole dentition.
Fig.24. Microimplant used for lingually tipped 2ndmandibular molar. It can be placed in the same surgical procedure of extraction of third molar.
(2) Between the mandibular 1st& 2ndmolars buccally (Fig.25 & 26)
Purpose : Retraction of the mandibular anterior teeth. Intermaxillary elastics. Intrusion & distal movement of the mandibular molars.
Recommended Microimplants : Diameter : 1.3 ~ 1.6mm, Length : 5 ~ 7mm
Fig.25. The microimplants between the mandibular 1st& 2ndmolars buccally.
6. Various clinical sites for Microimplant placement
(3) Between the mandibular 1stpremolar, 2ndpremolar and 1stmolar buccally (Fig.27) Purpose : Retraction of mandibular anterior teeth.
Intrusion of mandibular buccal teeth. Uprighting of tilted mandibular posterior teeth.
Recommended Microimplants : Diameter : 1.3 ~ 1.6mm, Length : 5 ~ 7mm
(4) Between the mandibular canine & premolar buccally (Fig.28)
Purpose : Protraction of the mandibular molars.
Recommended Microimplants : Diameter : 1.3 ~ 1.6mm, Length : 5 ~ 7mm
Fig.27. The microimplants between the mandibular 1stpremolar, 2ndpremolar and 1stmolar buccally.
Fig.28. Microimplants between the mandibular canine & 1stpremolar.
(5) Mandibular symphysis facially (Fig.29)
Purpose : Intrusion of the mandibular anterior teeth.
Recommended Microimplants : Diameter : 1.2 ~ 1.4mm, Length : 5 & 6mm
Fig.30. Two microimplants are placed in the edentulous area for bracket attachment. And sectional edgewise wire was used to move adjacent teeth three dimensionally.
Fig.32. Microimplants were used for temporary implants (left) and molar uprighting (right). (Courtesy of Dr. Corrodi Ritto & Maria E.Cabana)
(6) Edentulous area (Fig.30)
Purpose : Controlling the adjacent teeth of edentulous area including molar uprighting, distalization, mesialization, intrusion, extrusion & torque
(*using two microimplants)
Recommended Microimplants : Diameter : 1.3 ~ 1.6mm, Length : 7 & 8mm
3) Others (Fig.31, 32)
The AbsoAnchor microimplant system is available in variable diameters and lengths of screws for orthodontic anchorage in any area of the mouth, if there is bone present. For example, the mandibular tori and the bone adjacent to residual roots that will be extracted at a later date can be used for the placement of the microimplants.
7. Surgical Procedures
7. Surgical Procedures
1) Anesthesia
Small amount of local anesthetic is sufficient for the simple surgical procedure to insert the AbsoAnchor microimplant. It is not necessary for the clinician to achieve profound anesthesia of the teeth; rather only the soft tissue need be anesthetized. Only one-fourth of a local anesthetic carpule is needed for this type of anesthesia. Sometimes, only topical anesthetic agent(Dentipatch , Mucopain , Painless patch , Lidocaine spray etc) is enough for microimplant placement. If the patient feels some sensitivity during drilling or microimplant driving, that sensation is a sign of the microimplant touching the roots - the drill or microimplant should be redirected away from them.
When anesthetizing the palatal mucosa, the needle also can be used to probe and measure the mucosal thickness, which helps to determine the screw length necessary for anchorage (Fig.33). When the palate is anesthetized, the position of the greater palatine artery and nerve should be reviewed so as to avoid injuring them (Fig.33).
When planning the use of one or more microimplants in extraction patients, the microimplants can be placed just before the teeth are removed. Combining microimplant placement and tooth extraction at the same appointment eliminates additional surgical procedure.
Fig.33. Sometimes, only topical anesthesic agent is enough for microimplant placement. Palatal mucosa varies greatly in thickness, which requires measurement during or after local anesthesia in order to select the proper length microimplant. Review the positions of the greater palatine artery and nerve so as to avoid them.
2) Aseptic Preparation
Zepherin (benjalkorium chloride) sponge or other common disinfecting agent can be used to prepare an intraoral & extraoral scrub for keeping the surgical area aseptic (Fig.34).
3) Drilling
Mark the implant sites by using brass wires as shown in Figs. 32 & 38. Clinicians should use a speed-reduction contra angle hand piece (64:1 or 20:1 etc.) to make the original entry into the bone (Fig.35).
Before using the pilot drill, use a #2 round bur (0.9mm diameter) first to make a small indentation on the bony surface. Round bur also can penetrate attached gingiva directly to the bone. Small indentation on the bone surface can prevent slippage of pilot drill especially when drilling diagonally. The indentation can be very useful especially when encountering extremely dense cortical bone (Fig. 7&8). Using round bur can also help to reduce the blunting of pilot drill since the pilot drill is much more expensive than the bur.
Drill-free method can be used when a larger diameter pure titanium microimplants or microimplants that are made of titanium alloy. It is recommended to extend the drill to the full length of the screws if using a smaller diameter of pure titanium microimplants.
The diameter of the drill end should be at least 0.2/0.3mm smaller than that of the selected microimplant. Before beginning the surgical penetration, the clinician should check the drill for any unwanted bends in the shaft that might cause it to wobble while drilling, resulting in unduly large opening. The microimplant depends almost entirely upon mechanical retention within the bone and must have a slightly tight fit to ensure its retention.
Fig.34. Aseptic intraoral and extraoral preparation with disinfecting agent.
7. Surgical Procedures
Fig.36. Maxillary and mandibular micro-implants applied to attached gingiva (pre-drilling method).
Fig.37. Vertical incision is needed when microimplant applied to maxillary and mandibular movable soft tissue (pre-drilling method).
Fig.38. Construction of a indirect drill guide. Using of indirect drill guide can reduce root touch.
The drill can penetrate the mucosa, attached gingiva and underlying bone without a surgical flap (Fig.36). However, when making an entrance around movable soft tissue, a small vertical incision (less than 4mm) will prevent a soft tissue roll-up around the drill (Fig.37). If you do not want to make an incision, you can use drill guide to prevent rolling of soft tissue (Fig.38).
To reduce heat production, drilling speed should be around 500-1000rpm. When drilling into dense cortical bone, move the drill carefully up and down as well as stop and go strokes with normal saline irrigation to compensate for the heat generated during drilling. To increase torque with reduced rpm, prosthetic implant engine is a good but expensive choice, so speed reduction contra angle (64:1 or 20:1, Fig.35) would be a reasonable alternative. Non-speed reduced low speed (1:1) contraangle gives high rotation speed (maximum 30,000rpm) which leads to excessive heat production. On the other hand, lowering the rotation speed of 1:1 contraangle to reduce heat leads to weaker torque, so that it may not penetrate dense bone.
The microimplant sites in the maxilla require 30-60 degrees of angulation to the long axes of the teeth, both buccally and lingually (Fig.36). Such angulation augments the surface area contact between the microimplant and the cortical bone and also increases retention while lowering the risk of making contact with a root.
In the mandible, the bone has a thicker cortex and a higher density than the maxilla. However, the volume & thickness of buccal bone is less available from the lower anteriors to the distal of the 1st molar
(Fig.42). Thus in these areas, the microimplant is usually inserted more perpendicular to the long axis of the teeth. In the 2nd molar area, more volume and thickness of buccal bone is available and the microimplant can
be placed in a more oblique or vertical direction (Fig.36). Nevertheless, doctors should remember that cortical bone density and volume will vary from patient to patient and from side to side, even in the same patient.
A final surgical caveat-do not use excessive force with the drill. Any great resistance after passing through the cortical plate is probably due to root contact. The drill angulation needs to be changed.
Fig.39. Maxillary microimplant applied to attached gingiva (pre-drilling method).
7. Surgical Procedures
Fig.43. Mandibular microimplant applied to movable soft tissue with a surgical incision and a pre-drilling technique.
Fig.41. Maxillary microimplant applied to palatal mucosa with a pre-drilling method. Note that more space exists between palatal roots than buccal ones.
Fig.42. Mandibular microimplant applied to attached gingiva (pre-drilling method). Note the thickness of the cortical bone in the mandibular labial and buccal area.
8. Advice for Microimplant driving
There are 2 types of driver: hand drivers and engine drivers (Fig.45).A clinician may use engine driven method to insert microimplant, using speed reduction contra angle (256:1; about 30rpm) like prosthetic implants (Fig.46), but this may lead to more possibility of microimplant breakage, thus it is safer to use hand driver to feel resistance of microimplant driving torque. One should never give excessive force when placing a microimplant. If microimplant is broken during driving, it may be difficult to remove.
A long hand driver may be used on buccal areas of mandible and maxilla. For the sites where the long hand driver cannot be used (ex, palatal or retromolar area, etc), a short hand driver may be used instead (Fig.45).
However, the short hand driver may be inconvenient to handle. So, recently developed Hand-Driven Contraangle (Fig.46) may be a better choice. Hand-driven contraangle driver can be connected to low speed contraangle (1:1) in dental unit chair. Engine driver of appropriate size should be attached to the contraangle, and then microimplant should be fixed to engine driver (Fig.47).
Fig.44. Two types of drill-free procedures. One-step (above) & two-step drill-free procedures after round bur indentation (below).
Fig.46. Speed reduction contraangle (256:1) for motor driven (Lt) and Hand-Driven (Rt) contraangle (1:1) driver.
8. Advice for Microimplant driving
To prevent breakage of microimplant during driving, a long hand driver with a built-in torque restrain has been developed (Fig.48). The smaller size of pure titanium microimplant (1.2 & 1.3mm diameter) can be broken easily, if torque forces of more than 1Kgf.cm are applied. Usually less than 0.5Kgf.cm is more than enough to get initial mechanical stability. So in order to prevent breakage of microimplants while driving, the clinician must know the maximun tolerable torque-resisting force of microimplants that he is using to load them accordingly. Fig.51 shows the torque resisting force of titanium alloy microimplants (Dentos Inc.) in relation to their diameters.
Fig.47. On the sites where long hand driver is not accessible, like maxillary tuberosity area and palatal area, mandibular retromolar areas etc, it is better to use Hand-driven contrangle driver.
Fig.50. Pre-sterilized ( -radiation) package of AbsoAnchor microimplant.
Fig.51. The torque resisting force of microimplants of Dentos Inc. (Daegu, Korea) depend on the diameters. (*1kgf=9.8N)
Fig.49. Sterilization package for AbsoAnchor microimplant (left). The package can be cut with scissors just before use and the driver can engage the microimplant in its package (middle & right). Do not touch the microimplant part with fingers.
Fig.48. Long hand drivers with torque gauge. The torque force can be adjusted from 0.5Kg.cm to 2Kg.cm. Tip DT-S & DT-L Body LHD-B-TG Locking Nut Scale 0.5 ~ 2.0kgf.cm Rotating Handle Supporting Handle
9. Avoiding root damage
9. Avoiding root damage
The proximity of microimplants to the roots of teeth present orthodontists with an important challenge. They must use extreme care to avoid roots when positioning the microimplant. Serial periapical X-rays taken by tube shift technique can help determine if adequate space exists for the implant between teeth. CT scans offer 3-D images for precise interpretation (Fig.52), but this brings up the issues of radiation exposure and extra expense. To date, root damage has not presented many problems. Roots typically demonstrate good recuperative power, even when severely challenged as it happens during apicoectomies. The day after placing microimplant, patients will complain of a dull pain during mastication, if a microimplant comes in contact with a root, moving the root away from the implant will usually relieve patient discomfort. However, occasionally there are no adverse signs and symptoms whilst the root comes in contact with the microimplant, by virtue of their own movement. Thus, a diagonal path of microimplant insertion will help to avoid root injury when placing the microimplant between roots. If there is not enough inter-radicular space, the roots can be moved apart orthodontically before placing the implants (Fig.18).
Fig.52. Review root approximation by microimplant with a conventional radiographs or CT scans.
If a microimplant touches the root during driving, an increased resistance is felt and often patients will complain of dull pain, if shallow anesthesia was given to patients. In this situation, the microimplant can be redirected after redrilling or a shorter length of microimplant with a size larger in diameter (rescue microimplant) can be used. Slight injury to the root surface by the microimplants is not so harmful to teeth, but root contact of microimplant is one of the main reasons for the failure of the implants. The masticatory forces inducing the mobility of the tooth when the microimplants that are in contact with the roots will eventually result in loosening of the microimplants.
Using light forces (less than 0.7Kgf.cm) while driving microimplants can avoid microimplant fracture. When an operator encounters heavy resistance, the microimplant should be withdrawn and then re-drill the bone with the next larger re-drill and resume the microimplant driving. For example, if 0.9 mm diameter of drill was used at the first time, then 1.0mm diameter of pilot drill should be used for redrilling. At this time, redrilling should be done only in the cortical bone area (Fig. 7 : Two-step drilling).
To reiterate, success with microimplants depends upon initial tightness. Before drilling, check the straightness of drill and make sure it does not vibrate during drilling. If there is no initial mechanical tightness of the microimplant after placement, choose one size larger microimplant. When such tightness does not occur, replace the implant with the next larger size. Occasionally, a new site adjacent to the original onsite may be prepared.
11. Postoperative patient management
There is little to report about noticeable pain or side effect like infection after microimplant placement. Antibiotics prescription is not necessary with microimplant installation without incision. Also analgesics or NSAIDs is not necessary since microimplant of small diameter rarely induces pain or swelling. However patients should be told to revisit the clinic when feeling pain during mastication. This kind of pain is usually derived from microimplant contact with root. If it is diagnosed to be root contact, one should move teeth away from microimplant. If only slight mobility is felt, retighten the microimplant instead of removing it.
Although patients seldom need any medication, doctors should make prescriptions of antibiotics and other pain medications available for them on a needed basis.
Microimplant sites require excellent oral hygiene with soft brushing and possibly water irrigation. From time to time chemotherapeutic rinses may ward off any inflammation and infection. Also patients should be warned not to touch microimplant by their fingers and chopsticks etc.
12. Explanation for possibility of failure
Microimplant has a failure rate of 5~25% depending on the operaters' technique, patient type and insertion sites. Usually more failures occur in mandible than maxilla. The patients should be fully aware with the possibility of failure before starting microimplant treatment.
13. Microimplant removal
Fortunately, strong osseointegration does not occur between titanium alloy microimplant and bone, and this simplifies the removal of the microimplant. In the open method, a clinician can easily remove the microimplant by engaging the microimplant head with the driver and turn it in the opposite direction of the
10. Orthodontic Force application
Theoretically, we have to wait 2-3 months for osseointegration between titanium surface and bone tissue. Also, it is better to wait about 2 weeks for soft tissue healing before applying orthodontic force when we do use stab incision for implantation. However, when we attempt distraction osteogenesis (DO), we do not wait for osseointegration between screw pin and bone before force application. Similarly we can commence immediate loading after implantation, if needed. Actually, there were no clinical differences in failure rates between immediate loading and delayed loading the applied the force was kept to less than 300gm. It can be inferred that the mechanical stability is far more important than osseointegration in microimplant anchorage systems. Light continual forces as generated by nickel titanium coils are more favored over chain elastomerics that often have excessive initial forces.
13. Microimplant removal
Fig.53. Removal of microimplant (AbsoAnchor , Dentos Inc.) using hand driver on the buccal surface of maxilla (upper row) and the palate (lower row). There is no need of needle-stick anesthesia for its removal. Only a topical anesthesia is recommended.
insertion. What is more, local needle-stick anesthesia is not needed during this procedure. Patients may have some minor discomfort when the implant irritates the soft tissue during its removal, but this gives far less discomfort than an anesthetic needle-prick. Topical anesthesia is enough if you want to avoid any pain during removal of microimplant. In the closed method, small incision is made over the head portion of microimplant to expose it after local anesthesia. The initial turn, sometimes does offers some resistance, so, use caution with the first turn so as not to fracture the microimplant.
Fig.54. Removal of microimplant using a speed reduction engine driver on the palatal surface without needle-stick anesthesia (above). Hand-Driven contraangle drive is also very useful to remove the microimplant (below).
14. Concluding remarks
The AbsoAnchor microimplant system was developed specifically for orthodontic anchorage and comes variable sizes and lengths for wide application. Microimplants are small enough to be placed virtually in any area of the mouth, if there is bone available. A microimplant can be placed without mucoperiosteal incision or flap, so there is almost no pain or swelling after implantation. Routine placement of a microimplant takes less than a few minutes. Orthodontists and general dentists can easily place microimplants in their practices.
Unfortunately, one cannot achieve a 100% success rate when placing microimplants for temporary orthodontic anchorage. Maxillary microimplants have had a high success rate of more than 90%, a rate that is similar to that of prosthodontic implants. The success rate of mandibular microimplants is less than 90%. It is our mission to find ways to increase the success rate of microimplant placement.
Microimplant anchorage has become one of the most effective and powerful tool for absolute anchorage, which up until now was one of the biggest dreams of the practicing orthodontist. This treatment approach can bring about a paradigm shift in orthodontic treatment planning in contemporary orthodontic world. By adding this new type of anchorage system to the armamentarium of the practicing orthodontists, we can broaden the domain of orthodontic treatment possibilities. Many other applications for microimplant anchorage will be developed by creative orthodontists in the near future.
References
References
1. Bae SM, Kyung HM : Clinical Application of Micro-Implant Anchorage(MIA) in Orthodontics(1)- Introduction and developmental background. The Korean Journal of Clinical Orthodontics, l(2);14-19, 2002
2. Bae SM, Kyung HM : Clinical Application of Micro-Implant Anchorage(MIA) in Orthodontics(10)- En Masse retraction with sliding mechanics (Low pull retraction for anterior openbite case). The Korean Journal of Clinical Orthodontics, 3(11);18-27, 2004
3. Bae SM, Kyung HM :Clinical Application of Micro-Implant Anchorage(MIA) in Orthodontics(11)- Anterior Midline MicroImplant (AMI). The Korean Journal of Clinical Orthodontics, 3(12):6-17, 2004
4. Bae SM, Kyung HM :Clinical Application of Micro-Implant Anchorage(MIA) in Orthodontics(12)- Molar intrusion with MIA. The Korean Journal of Clinical Orthodontics, 3(13):14-21, 2004
5.Bae SM, Kyung HM :Clinical Application of Micro-Implant Anchorage(MIA) in Orthodontics(13)- Molar protraction with MIA. The Korean Journal of Clinlcal Orthodontics, 3(15):6-19, 2004
6. Bae SM, Kyung HM :Clinical Application of Micro-Implant Anchorage(MIA) in Orthodontics(14)- Anterior Midline Microlmplant (AMI) for Linfual Orthodontics. The Korean Journal of Clinlcal Orthodontics, 3(16):6-16, 2004
7. Bae SM, Kyung HM :Clinical Application of Micro-Implant Anchorage(MIA) in Orthodontics(15)- Molar distalization with Pendulum appliance. The Koream Journal of Clinlcal Orthodontics, 4(18);6-13, 2005
8.Bae SM, Kyung HM :Clinical Application of Micro-Implant Anchorage(MIA) in Orthodontics(16)- Nonextraction treatment by molar distalization with MIA. The Korean Journal of Clinlcal Orthodontics, 4(19):6-15, 2005
9. Bae SM, Kyung HM :Clinical Application of Micro-Implant Anchorage(MIA) in Orthodontics(17)- Midline Correction using MIA in Facial Asymmetric Patient. The Korean Journal of Clinlcal Orthodontics, 4:20:6-10, 2005
10. Bae SM, Kyung HM :Clinical Application of Micro-Implant Anchorage(MIA) in Orthodontics(18)- Correction of Canted Occlusal Plane by using MIA. The Korean Journal of Clinlcal Orthodontics, 4(22):6-16, 2005
11. Bae SM, Kyung HM :Clinical Application of Micro-Implant Anchorage(MIA) in Orthodontics(2)- Anatomic consideration and surgical procedures. The Korean Journal of Clinical Orthodontics, l(3);16-29, 2002
12. Bae SM, Kyung HM :Clinical Application of Micro-Implant Anchorage(MIA) in Orthodontics(3)- Adjunctive Treatment with MIA. The Korean Journal of Clinical Orthodontics, l(4);14-25, 2002
13.Bae SM, Kyung HM :Clinical Application of Micro-Implant Anchorage(MIA) in Orthodontics(4)- Saving the sound teeth with MIA. The Korean Journal of Clinical Orthodontics, 2(5);26-33, 2003
14. Bae SM, Kyung HM :Clinical Application of Micro-Implant Anchorage(MIA) in Orthodontics(5)- Asymmetric Maxillary Arch Constriction with MIA. The Korean Journal of Clinical Orthodontics, 2(6);18-25, 2003
15. Bae SM, Kyung HM :Clinical Application of Micro-Implant Anchorage(MIA) in Orthodontics(6)- En Masse retraction with sliding mechanics The Korean Journal of Clinical Orthodontics, 2(7);24-35, 2003
16. Bae SM, Kyung HM :Clinical Application of Micro-Implant Anchorage(MIA) in Orthodontics(7)- En Masse retraction withloop mechanics(Medium pull combined with intrusion arch). The Korean Journal of Clinical Orthodontics,2(8);20-27, 2003
17. Bae SM, Kyung HM :Clinical Application of Micro-Implant Anchorage(MIA) in Orthodontics(8)- En Masse retraction withloop mechanics(High pull retraction with two Micro-Implant). The Korean Journal of Clinical Orthodontics,2(9);24-33, 2003
18. Bae SM, Kyung HM :Clinical Application of Micro-Implant Anchorage(MIA) in Orthodontics(9)- En Masse retraction withloop mechanics(High pull retraction with four Micro-Implant). The Korean Journal of Clinical Orthodontics,2(10):22-29, 2003
19. Bae SM, Kyung HM :Mandibular molar Intrusion with Miniscrew Anchorage Journal of Clinical Orthodontics(ISSN 0022-3875), Vol:XL,No.2, 107-108, 2006
20. Bae SM, Park H.S, Kyung HM, Kwon OW, Sung JH : Clinical Application of Micro-Implant Anchorage, J Clin
Orthod.36;298-302, 2002
21. Bae SM, Park HS, Kyung HM, Sung JH : Ultimate anchorage control, Tex Dent J. 119;580-591, 2002
22. Chen Y, Zhao WT, Kyung HM : Biomechanical comparision of self-drilling and self-tapping orthodontic micro-implants. Chin J Stomatol, 42(10):605-607, 2007
23. Chen Y, Shin HI, Kyung HM :Biomechanical and histological comparison of self-drilling and self-tapping orthodontic microimplants in dogs. Am J Orthod Dentofacial Orthop, 133(1), 44-50, 2008
24. Creekmore TD, Eklund MK :The possibility of skeletal anchorage, J Clin Orthodont. 17:266-269, 1983
25. Gainsforth BL, Higley LB : A stydy of orthodontic anchorage possibility in basal bone, Am J Orthod. 31:406-417, 1945 26. Kanomi R. :Mini implant for orthodontic anchorage, J Clin Orthod. 31; 763-767, 1997
27. Kuroda S, Sugawara Y, Deguchi T, Kyung HM, Takano-Yamamoto T :Clinical use of miniscrew implants as orthodontic anchorage : Succes rates and postoperative discomfort, Am J Orthod Dentofacial Orthop, 13:9-15, 2007-a
28. Kuroda S, Yamada K, Deguchi T, Hashimoto T, Kyung HM, Takano-Yamamoto T : Root proximity is a major factor forscrew failure in orhtodontic anchorage. Am J Orthod Dentofacial Orthop, 131:s68-s73, 2007-b
29. Kyung HM :Development of orthodontic Microimplant, Dentl Focus, 22(5);571-579, 2002
30. Kyung HM : The use of Microimplants in Lingual Orthodontic Treatment. Seminars in Orthodontics, Vol 12, No 3(September), 186-190, 2006
31. Kyung HM, Bae SM, Park HS, Kwon OW, Alvarez A, Sung JH : Microimplant Anchorage(MIA) in orthodotnics :
Variousapplication sites and their considerations. Craniofacial Growth Series; Implants, Microimplants, Onplants and Transplants : New Answers to Old Questions in Orthodontics, 42; 69-88, 2005, the Univ of Michigan, 2005
32. Kyung HM, Park CS, Sung JH :Miniscrew Anchorage in Lingual orthodontic Treatment for Severe lip Protrusion. Inf. Orthod Kieferorthop. 35; 259-265, 2003
33. Kyung HM, Park HS, Bae SM, Sung JH, Kim IB :Development of orthodontic micro-implants for intraoral anchorage,J ClinOrthod. 37;21-328, 2003
34. Kyung HM, Park HS, Bae SM, Sung JH, Kim IB :Development of orthodontic micro-implants for intraoral anchorage. JClin. Orthod. 37(6) : 321-328, 2003
35. Kyung HM, Park HS, Bae SM, Sung JH, Kim IB : The Lingual Plain-Wire system with Micro-Implant Anchorage. J Clin.Orthod. 38(7); 388-395, 2004
ntic Microimplant -6th ed, 200
37. Lee JS, Park HS, Kyung HM :Micro-implant Anchorage in Lingual Orthodontic Treatment for a Skeletal Class II Malocclusion. J. Clin. Orthod. 35(10);643-647, 2001
38. Linkow LI :Implanto-Orthodontics, J Clin Orthod. 4:685-705, 1970
39. Maino BG, Weiland F, Attanasi A, Zachrisson B, Buyukyilmaz T :Root damage and repair after contact with miniscrews, J Clin Orthod. 36:762-766, 2007
40. Nam OH, Yu WJ, Choi MY, Kyung HM :Monitering of Bone Temperature During Osseous Preparation for Orhodontic Micro-Screw Implants : Effect of Motor Speed and Pressure Key Engineering Materials, Vol 321-323, 1044-1047, 2006
41. Park HS :An anatomic study using CT images for Micro-implants implantation. Kor J Ortho. 32; 435-441, 2002
42. Park HS :Clinical study on success rate of microscrew implants for orthodontic anchorage. Kor. J. Orthod. 33(3):151-156, 2003 43. Park HS :Intrusion molar con anclaje de microimplantes(MIA, Micro-implants Anchorage), Orthodoncia Clinica, 6(1):31-36, 2003 44. Park HS : The skeletal cortical anchorage using titanium microscrew implant, Korean J Orthod. 29; 699-706,1999
45. Park HS, Bae SM, Kyung HM, Sung JH :Micro-implant anchorage for treatment of skeletal Class I bialveolar protrusion, J Clin Orthod. 35; 417-422, 2001
46. Park HS, Bae SM, Kyung HM, Sung JH :Simultaneous Incisor Retraction and distal molar movement with Microimplant Anchorage. World J of Orthod. 5(2); 164-171, 2004
47. Park HS, Kim JB : The use of titanium microscrew implant as orthodontic anchorage. Keimyung medical J. 18(4):509-515, 1999 48.Park HS, Kyung HM, Sung JH :A simple method of molar uprighting with Micro-implant anchorage. J Clin. Orthod.
36(10);592-596, 2002
49. Park Hyo-Sang :A new protocol of sliding mechanics with micro-implant anchorage(MIA). Kor. J. Orthod.30(6):677-685, 2000 50. Ritto AK, Kyung HM :Bracket Head Microimplant for Orthodontic Anchorage. ORTHODONTIA, 9(1);50-66, 2004
51. Ritto AK, Kyung HM :Solutions with microimplants, Orthodontia, 8;6-13, 2003
52. Roberts, WE, Nelson, CL, Goodacre CJ :Rigid implant anchorage to close a mandibular first molar extraction site, J Clin Orthod. 28;693-704, 1994
53. Sherman A :Bone reaction to orthodontic forces on vitreous carbon dental implants, Am J Orthod. 74:79-87, 1978
54. Sung JH, Kyung HM, Bae SM, HS Park, Kwon OW, McNamara JA : Microimplants in Orthodontics, Daegu, Dentos Inc., 2006 55. Sung JH, Park HS, Kyung HM, Kwon OW, Kim IB :Micro-implant anchorage for directional force technique. International
Orthodontics, 2;137-161, 2004
56. Umemori M, Sugawara J, Nagasaka H :Kawamura H. Skeletal anchorage system for open-bite correction, Am J Orthop. 115:166-174, 1999
57. Wehrbein H, Merz BR, Diedrich P :Palatal bone support for orthodontic implant anchorage-a clinical and radiological study, Eur J Orthod.21;65-70, 1999
58. Yu WJ, Kyung HM :A finite element approach for evaluation of bony stresses influenced by geometrical characteristics of the orthodontic micro-implant to cervical cortical bone interface. The Journal of the Korea Research society for dental materials,33: (4) 381-393, 2006
59. Yu WJ, Kyung HM :A quantitative avaluation of cortical bone stresses influenced by diameter of orthodontic microimplant, The Journal of the Korea Research society for dental materials,34(1)75-87, 2007