Digital Business Telephone Systems
Publication Information
Toshiba America Information Systems, Inc.,Telecommunication Systems Division, reserves the right, without prior notice, to revise this information publication for any reason, including, but not limited to, utilization of new advances in the state of technical arts or to simply change the design of this document.
Further, Toshiba America Information Systems, Inc., Telecommunication Systems Division, also reserves the right, without prior notice, to make such changes in equipment design or components as engineering or manufacturing methods may warrant.
DKA-UG-STDTELVE 4016161
Version E, May 1999 (DK40i)
Version D, January 1999 (Format change) Version C, April 1998
Version B, October 1997
Toshiba America Information Systems, Inc. Telecommunication Systems Division
All rights reserved. No part of this manual, covered by the copyrights hereon, may be reproduced in any form or by any means—graphic, electronic, or mechanical, including recording, taping, photocopying, or information retrieval systems—without express written permission of the publisher of this material.
Contents
Introduction
Organization ... iii
Conventions ... iv
Chapter 1 – Features
Before You Begin ... 1Flash ... 1
Incoming Call Ringing Patterns ... 2
Quick Reference ... 3
Making an Internal Call ... 3
Making an Outside Call ... 3
Making an Outside Call Using ISDN ... 3
Answering Calls ... 4
Account Code Calls ... 4
Forced Account Codes ... 4
Emergency Override of Forced Account Code Dialing Requirements ... 5
Verified Account Codes ... 5
Voluntary Account Codes ... 5
Automatic Callback (ACB) ... 7
Attendant Console Calling ... 8
Call Forward ... 8
Chapter 2 - Using Toshiba Voice Mail Systems
Call Hold ...13
Call Park Orbits ...14
Call Pickup ...16
Pick up Calls to a Group ...16
Call Transfer with Camp-on ...17
CO Line Queuing ...18
Conference and Tandem Calls ...19
Standard Telephones and/or Voice Mail Auto Attendant Devices ...19
Direct Inward System Access (DISA) ...22
Door Phones ...24
Emergency Ringdown/Hotline Service ...25
Message Waiting ...26
Set Message Waiting On Other Telephones ...27
Override Calls ...27
Busy Override or Off-hook Call Announce ...27
Do Not Disturb (DND) Override ...28
Executive Override ...28
Paging Announcements ...28
Repeat Last Number Dialed ...29
Speed Dial ...29
Tone/Voice First Signaling ...31
Chapter 2 – Using Toshiba Voice
Mail Systems
Setting Call Forward ...33Voice Mail Identification Code ...33
Call Forward To Toshiba Voice Systems ...34
Voice Mail Message Retrieval ...35
Appendix – Access Codes
CO Line Access Codes ...37Paging Access Codes ...39
Speed Dial Access Codes ...40
Introduction
This guide provides instructions for operating a standard tone or rotary dial telephone for Strata DK Systems. These systems include:
♦ DK14
♦ DK16e/16
♦ DK40i/40
♦ DK424/DK280 (Release 3.0 or higher)
Organization
This guide is divided as follows:
♦ Chapter 1 – Feature Operation provides descriptions and operating procedures for
all of the features available with standard telephones.
♦ Chapter 2 – Toshiba Voice Mail Integration explains how to set up your telephone
to forward calls to a Toshiba Voice Processing System and to retrieve recorded messages left by callers.
♦ Appendix – Access Codes includes CO Line Access Codes, Paging Group and Zone
Conventions
Conventions
Note Elaborates specific items or references other information.
Important! Calls attention to important instructions or information.
([WUDEROG letters represent telephone buttons. For example: .
➤ denotes the step in a one-step procedure.
~ means “through”. For example: 5~10.
+ is used for multiple key entries.
Example: Enter + [PDN] + Remote Call Forward Security Code +.
The left column gives you single or numbered steps that you need to perform a procedure. These steps apply to both mouse or keyboard use.
The right column gives the immediate response to your action. This column also includes additional notes and comments.
Features
1
This chapter explains how to use the features on your standard tone or rotary dial telephone. There is a Quick Reference section for basic telephone use, followed by the features in alphabetical order.
Before You Begin
Your telephone may not have all of the features mentioned in this guide. See your System Administrator to find out which features and codes apply to your telephone. If your telephone has a rotary dial, dial when a procedure requires that you dial . For example, to dial from a rotary phone, dial .
Flash
Before You Begin
➤ To Flash the hookswitch
Some CO line features, such as conferencing, Centrex, or behind PBX operation require “flashing the CO line,” to dial Centrex/PBX feature access code or extension numbers.
➤ To flash a CO line
Incoming Call Ringing Patterns
Your telephone ringing pattern is set in system programming.
Some systems may use the internal call ring pattern—one second ON, three seconds OFF—for incoming outside calls.
A distinct outside call ring pattern—0.4 seconds ON, 0.2 seconds OFF, 0.4 seconds ON, three seconds OFF—is available.
➤ While on a call, flash (press) the
hookswitch down about 1/2 second, then release it.
You hear dial tone after flashing the hookswitch. Some telephones may have a special button which flashes the hookswitch.
Note The hookswitch is located in the handset cradle of your telephone.
1. Momentarily press the hookswitch for about 1/2 second.
After you press the hookswitch, You hear dial tone. This hookflashes the Toshiba system only.
2. Press. You hear Centrex or PBX dial tone.
Quick Reference
Quick Reference
Making an Internal Call
Making an Outside Call
Making an Outside Call Using ISDN
If your Strata DK telephone system has Integrated Services Digital Networking (ISDN) features, you can make calls using this advanced service. See your System Administrator regarding your system’s capabilities.
1. Lift the handset. You hear internal dial tone.
2. Dial the desired station number.
1. Lift the handset. You hear internal dial tone.
2. Enter a CO line number access code.
See Table 1 on Page 38.
You hear dial tone after entering the access code.
3. Dial the desired telephone number.
1. Lift the handset. You hear internal dial tone.
2. Enter a CO line number access code.
See Table 1 on Page 38. You hear dial tone after entering the access code.
3. Enter the desired telephone number.
Your call rings through to the destination.
Account Code Calls
Answering Calls
Account Code Calls
Account Codes are used for a variety of reasons, including billing, call tracking, and line restriction applications. The system records the Account Codes and can print them with other call details on a Station Message Detail Recording (SMDR) report.
Forced Account Codes
Some applications may require that you enter an Account Code, called a Forced Account Code, before dialing a telephone number. Forced Account Codes can be recorded for outgoing calls only.
➤ To record a forced account code
4. Press to enable the system to dial the call
...or to enter a subaddress, press , enter the subaddress, then press .
➤ When your telephone rings, lift the handset and speak.
The internal ring pattern is one second ON, three seconds OFF—for incoming outside calls.
You are connected to the calling party.
1. Lift the handset. You hear dial tone.
2. Dial a CO line number access code.
See Table 1 on Page 38. The CO line accessed must be set to require a forced Account Code in system programming.
3. Enter the Forced Account Code.
Account Code Calls
Emergency Override of Forced Account Code Dialing
Requirements
Forced Account Code requirements can be bypassed by three emergency numbers, including 911. See your system administrator for these numbers:
Verified Account Codes
Some Strata DK systems verify the numbers entered when you enter Forced or Voluntary Account Codes. These are called Verified Account Codes.
Voluntary Account Codes
Voluntary Account Codes are optional and can be entered anytime after accessing a CO line or during a call.
An exception is a Voluntary Account Code which is required to change the Toll
Restriction classification of your station. The code gives you access to telephone numbers outside your usual dialing area and must be entered prior to dialing the telephone number. As an example, if your station is restricted to local area calls, you can make out-of-state calls by using a Voluntary Account Code set in system programming.
If the system is set for Verified Account Codes, you must enter specific codes when entering the Voluntary Account Code(s) or the code is not validated for the SMDR call report.
➤ To record a voluntary account code
4. Dial the telephone number.
1) 911 2) 3)
1. After accessing a CO line or talking on a line, flash the hookswitch.
Account Code Calls
2. Press. You hear dial tone or if you were talking, a one-way speech path is connected: you can hear the caller, but they can’t hear you nor the account code entry.
3. Enter the Voluntary Account Code.
One sound burst confirms a verified code. If you hear two burst tones (invalid code), repeat Steps 1~3.
Voluntary Account Codes must be entered during the call. Dial tone stops after the first telephone number digit is dialed.
If you enter the code after accessing a CO line, you are either reconnected to the outside caller or you hear dial tone.
4. Dial a telephone number if you entered the code after
accessing the CO line
Automatic Callback (ACB)
Automatic Callback (ACB)
After reaching a busy or the Do Not Disturb (DND) mode, you can set Automatic Callback (ACB) to have the system call you back when the called station is no longer busy or in the DND mode. Automatic Callback does not apply to outside calls.
➤ To set Automatic Callback
➤ To cancel ACB (to busy or DND station)
1. Lift handset.
2. Press.
3. Hang up.
1. After reaching a busy station, press .
You hear busy tone, followed by dial tone (2 secs.), then busy tone.
2. Hang up. You can make other calls while waiting for the called station to become available.
3. Your telephone rings at a fast rate when the called station
becomes idle.
4. Answer within three rings to prevent the callback from being cancelled.
You hear a single tone, as if making a regular internal call. If you used Tone Signaling instead of Voice First
Signaling, you hear repetitive ringing.
If you hear busy tone after answering, it means the called party has already received or originated another call. Your request is not cancelled. You will be called again when the station becomes idle.
5. If you were
attempting to make an outside call and did not use LCR, you must now redial the telephone number.
Attendant Console Calling
Attendant Console Calling
Up to four attendant consoles can be installed per system. There can be up to three ways to call the attendant console, depending upon system programming.
➤ To call any attendant console
➤ To call a particular console
➤ To make an emergency call to a console
Call Forward
You can set your station to Call Forward (CF) to another station or voice mail for a variety of conditions, described in Step 2.
➤ To set Call Forward
➤ Lift the receiver and press.
The call rings the attendant console’s button. These calls rotate between the consoles if more than one console is installed.
➤ Lift the receiver and dial the console’s Directory Number ______.
The call rings the console’s [PDN] button. Your System Administrator can provide the Attendant Console(s) internal number(s).
➤ Lift the receiver and enter.
The In-EMGR LED flashes on all consoles.
1. Lift the handset. You hear internal dial tone.
2. Enter a Call Forward access code:
You hear confirmation tone.
Call Forward
= Busy Call Forward-Busy—forwards calls immediately when your telephone is busy or in Do Not Disturb mode.
= No Answer Call Forward-No Answer—forwards calls to another station if you do not answer within a certain time (that you designate). Not available from a rotary telephone.
= Busy/No Answer
Call Forward-Busy/No Answer—forwards calls
immediately to another station whenever you are busy on another call. Calls will also forward if you do not answer within a certain time (that you designate). Not available from a rotary telephone.
3. Enter the destination number.
This is the phone number where calls will forward.
4. If setting CF-No Answer or CF-Busy/ No Answer, press
, enter the time in seconds, then press.
You can enter the amount of time that your telephone rings before it forwards (08~60 seconds). Always enter two digits. If you do not wish to change the ring time, press
then to make the ring time the same as the last setting.
You hear a confirmation tone after pressing
and again after pressing.
5. Hang up. Notes
● You can continue using your phone in the usual
manner while Call Forward is in effect.
● If Call Forward is set:
● CO lines that ring your station exclusively will
forward—CO lines that ring more than one station will not forward.
● CO line calls transferred to your station will
forward.
● Internal calls will forward.
● Call \Forward has priority over the hunt feature set
Call Forward
➤ To cancel Call Forward
Call Forward—External
This feature enables you to forward new, incoming calls to a number outside of the system.
Call Forward-External does not forward internal calls or calls transferred to your telephone. The only calls that it forwards are incoming Direct-In-Dial (DID) calls and calls over CO lines dedicated to ring your station.
However, any of the other Call Forward modes can be set simultaneously with Call Forward-External. Other Call Forward modes will be active for internal and transferred calls.
➤ To set Call Forward-External
1. Lift the handset. You hear internal dial tone.
2. Press.
3. Hang up. You hear confirmation tone again.
1. Store the number that calls will be Station Speed Dial location 49 (RCTUA, B, C/D processors), or location 139 (RCTUE/F processor).
Important! Only perform Step 1 the first time Call Forward-External is set or when you change the
destination. It is not necessary to store the destination each time; it remains in system memory.
The Call Forward destination can be a telephone number over a CO line, a station over a tie line, or a station within your Strata DK system.
Use the Speed Dial storage procedures on Page 29 to store the destination number.
Call Forward-External.
Call Forward
➤ To cancel Call Forward-External
➤ Lift the handset and press.
Remote Call Forward—External Destination Change
If Call Forward-External mode is set at your station, you can change the forwarding destination from a telephone outside of the system.
The destination is normally an external Public Telephone Network Number, but it can also be an internal Directory Number.
➤ To change the destination number
Example: 8015833700 801 = CO Line access code 5833700 = Telephone number
Important! See Table 1 on Page 38 for CO Line/Line Group access codes. The LCR access code “9” cannot be used.
2. Lift the handset and press.
3. Hang up. Incoming calls will forward to the destination stored at Station Speed Dial Location 49.
1. Call into the Strata DK system over a CO line programmed for the DISA feature.
You hear ring back tone signal, then internal dial tone for 10 seconds. Try again if you hear busy tone.
Note See the System Administrator for DISA telephone numbers.
2. After you hear dial tone, press, then enter a [PDN].
You hear a confirmation tone.
Call Forward
➤ To cancel Call Forward-External remotely
➤ Enter + [PDN] + Remote Call Forward Security Code +. 3. Enter the Remote Call
Forward-External security code.
You hear a confirmation tone. See the System Administrator for the access code.
4. Enter the new destination number.
You can enter an internal [PDN], or a CO or tie line access code + an external telephone number.
With some systems, you can dial a line group code instead of a CO line number access code (see
Table 1 on Page 38). You cannot enter the LCR access code .
Important!
Do not press , since that ends the
procedure (see Step 5). Instead, use when entering a CO line access code.
Call Hold
Call Hold
You can place a call on hold and then make another call.
➤ To place a call on hold
➤ To return to the call on hold
➤ To put the second call on hold
➤ Flash the hookswitch, then press . ➤ To go back to the original call
➤ Flash the hookswitch, then press. ➤ To return to the second call
➤ Terminate that original call. Then press to retrieve the second call or wait for it to recall.
1. While on a call, flash the hookswitch.
You hear dial tone.
2. Press and hang up.
You hear a one-second burst of dial tone to confirm the call is on hold. You can now make or receive calls.
➤ Lift the handset and press.
You are reconnected with the held call.
If you do not return to the call within a specified time, the call rings back your phone.
If you are busy on another call when the held call recalls your station, you hear two tone bursts of two beeps each, three seconds apart, in your handset.
Call Park Orbits
Call Park Orbits
The Call Park feature enables you to hold a call temporarily in an orbit (the area where the call is held). Anyone can retrieve the call from the orbit using the same or a different station. There are 20 General Park Orbits for the system and 1 Personal Park Orbit for each station.
Once you have parked a call in an orbit, you can:
♦ Hang up and retrieve the parked call at a later time
♦ Originate another call
♦ Access a voice paging device to announce the parked call for pickup from another station
➤ To Park a call
1. While on a call, flash the hookswitch.
You hear dial tone.
2. Press.
3. Enter a General Orbit Number (a) or [PDN].
You hear a one second confirmation tone. The call is parked at the orbit or to an assigned [PDN]. If an orbit number is busy, enter another number.
4. Hang up. Once the call is parked, you can make or receive other calls.
Notes
● If the parked call is not retrieved within a specified
time, the call rings back to your phone.
● If your phone is busy when the parked call recalls, you
Call Park Orbits
➤ To retrieve a Parked call from any station
➤ To park a call and page another station
1. Lift the handset. You hear dial tone.
2. Press and enter the Orbit Number that you used to park the call.
You are reconnected to the parked call.
1. While on a call, flash the hookswitch, press
.
2. Enter the General Orbit Number (a) or [PDN].
The original call is now parked on the lowest vacant Orbit Number or [PDN]. After you enter an Orbit Number, a short burst of dial tone prompts you to enter the Page access code.
3. Enter a Page Group or Zone access code (see
Tables 2 and 3 on Page 39).
4. Make your
announcement and include the Orbit Number.
5. Hang up to free the paging device.
Call Pickup
Call Pickup
You can pick up a call that is ringing another station, a call placed on hold at another station, and other types of calls with the Call Pickup feature.
Pick up Calls to a Group
Stations may be assigned in system programming to Pickup Groups. As many as 20 groups can be created to enable you to easily pick up incoming (new or transferred) or internal calls that are ringing stations in your group or in other groups. You can belong to more than one group. See the System Administrator for group assignments.
➤ To pick up a call that is ringing in your pickup group(s)
➤ To pick up a call that is ringing in another group
1. Lift the handset and press.
2. Press a Call Pickup code:
You are connected to the caller.
+ ;;; (XXX=[PDN]/ [PhDN]
Pick up a call ringing or on hold at a specific Primary or Phantom Directory Number [PDN] or [PhDN] (Release 3.1 and above).
Pick up a telephone group page, internal call, or door phone call ringing a station.
~ Pick up an external page.
Pick up a ringing CO line.
~ Pick up a CO line on hold (Lines 1~200).
➤ Lift the handset, then press.
Call Transfer with Camp-on
Call Transfer with Camp-on
This feature enables you to transfer an outside call to a station that is either idle or busy.
➤ To transfer a call
2. Enter + the group pickup access code
(~).
You are connected to the call after dialing the group access code. If the called station belongs to more than one group, any of the Group Pickup codes associated with those groups will pick up the call.
Note These group pickup access codes can be entered into a speed dial location for easier access.
1. While on an external call, flash the hookswitch.
You hear dial tone.
2. Dial the station number to which the call will be
transferred.
3. If the station is idle, announce the call and hang up
If you hear repetitive ringing after dialing, the call was made with Tone Signaling and you have to wait for the called party to answer.
...or if the called station is busy or does not answer, hang up.
The call camps on to the busy station.
...or if the call rings back to your phone, inform the caller and repeat the procedure.
CO Line Queuing
CO Line Queuing
If all outgoing CO lines are busy, the CO Line Queuing feature will ring your telephone when one is available.
➤ To set CO Line Queuing
...or, to reconnect to the transferred line before it is answered, flash the hookswitch again.
If the called party lifts the handset (or presses a [PDN] button on digital and electronic telephones) just before you flash the hookswitch again, you will enter a conference call.
1. If you hear busy tone after dialing a CO line access code, press .
Busy tone stops, followed by dial tone (2 secs.), then busy tone resumes.
2. Hang up. (You can make other calls while waiting for a line to become available.)
3. Your telephone rings at a fast rate when a CO line becomes idle.
4. Answer within three rings to prevent the callback from being cancelled.
You hear CO dial tone. (If you hear busy tone, it means the line has already been seized or has received an incoming call. Your request is not cancelled. You will be called again the next time a line becomes idle.)
5. Dial the desired telephone number.
Conference and Tandem Calls
➤ To cancel CO Line Queuing
Conference and Tandem Calls
Standard Telephones and/or Voice Mail Auto Attendant Devices
Strata DK enables you to participate in a variety of conference calls:
♦ Up to four stations (including your own) may be conferenced on internal lines.
♦ Up to three stations (including your own) may be conferenced with one CO line.
♦ Up to two stations (including your own) may be conferenced with two CO lines.
With Release 3.2 and higher, you can also connect (tandem) two CO lines, and then drop out of the call.
Step 1: Make a Conference Call or Tandem Two CO Lines
➤ Lift the handset and press.
1. While on either an external call or internal call, flash the hookswitch.
You hear internal dial tone and the call is placed on hold. You will not hear the held party again until Step 4.
2. (Optional) If you want to add an outside line, dial the CO line access code;
otherwise proceed to Step 3.
See Table 1 on Page 38 for CO line access codes. You hear dial tone when the line is accessed. (Up to two CO lines can be conferenced.)
Conference and Tandem Calls
4. If you hear a single tone, voice announce the call and ask the party to pick up
On internal calls, the new party must pick up the handset or press a [PDN] button to participate in a conference call.
...or, if you hear ringing, announce the call once the party answers
...or, if the called station is busy, you can flash the
hookswitch to return to the existing call.
Note If a called external number is busy, you must hang up and re-initiate the call.
5. If you are ringing an internal party, flash the hookswitch after the party answers
...or if you are ringing an outside line, you can flash the
hookswitch before or after the party answers.
All parties are conferenced.
If only your telephone is connected with two parties on external CO lines, you can exit the conference by hookflashing again before you hang up. (See “(Optional) Add More Callers to a Conference or Tandem Call” on Page 21.) The external lines remain connected.
Conference and Tandem Calls
Step 2: (Optional) Add More Callers to a Conference or Tandem Call
Step 3: (Optional) Pick Up a Tandem CO Line Call
Note This step enables you to pick up a tandem CO-to-CO line call that was established from your telephone.
➤ For Conference calls: repeat substeps 1~4 of
Step 1: “Make a Conference Call or Tandem Two CO Lines” to add another party to the
conference.
If one of the stations hangs up on a two-station/two CO line conference call, the remaining station maintains the conference.
...or for Tandem calls: hookflash again and hang up.
If only your telephone is connected with two parties on external CO lines, you can exit the call to allow the two external parties to continue talking.
➤ Go off-hook and dial
.
Direct Inward System Access (DISA)
Direct Inward System Access (DISA)
Outside callers with telephones that send Dual-tone Multi-frequency (DTMF) tones (push-button dialing) can call in on CO lines programmed for DISA and dial stations or outgoing CO lines without going through an attendant or operator.
➤ To make a Direct Inward Station call with DISA
1. From outside the system, call the DISA CO line phone number:___-______.
See the System Administrator for this number.
2. Listen for the repetitive ringback tone signal, followed by dial tone.
Try again if you hear busy tone.
3. During the 10 secs. of dial tone, make your call.
If a number is not dialed, the system automatically causes the DISA CO line to ring at telephones as a normal incoming call. Then, if the call is not answered within 15 seconds after the ringing starts it disconnects.
To call another station after completing a DISA station call, the internal party must transfer you. Station Paging and System Paging cannot be made on DISA calls.
4. If you hear busy tone, press
.
If the call is not answered after 6 rings or 24 seconds, whichever occurs first, you hear busy tone.
Direct Inward System Access (DISA)
➤ To make an outgoing call with DISA
1. From outside the system, call the DISA CO line telephone number:___-_____.
See the System Administrator for this number.
2. Listen for repetitive ringback tone, then listen for dial tone.
Try again if you hear busy tone.
The dial tone is present for 10 seconds to allow direct dialing of a station internal number or CO line access code. If a number is not dialed, the system automatically causes the DISA CO line to ring at telephones as a normal incoming call. Then, if the call is not answered within 15 seconds after the ringing starts, it disconnects.
3. Dial a CO line number or line group access code. See
Table 1 on Page 38. 4. If a DISA security
code is required (see the System
Administrator), dial the code and listen for CO dial tone.
If the correct code is not entered, the call is disconnected.
...or if a DISA security code is not required, you hear CO dial tone.
Door Phones
Door Phones
You can call a door phone and monitor the immediate area surrounding the door phone. Only digital and electronic telephone stations can be called by door phone users, but you can pick up these calls when they are incoming by lifting your handset and dialing a pick up access code.
➤ To call/monitor a door phone
5. Press to reset the timer four more minutes; otherwise, the call disconnects approximately one min. after the tone.
6. Dial a telephone number.
1. Lift the handset. You hear dial tone.
2. Dial the door number:
Door Phone ID Location
1A
1B
1C
2A
2B
2C
3A
3B
3C
4A
4B
Emergency Ringdown/Hotline Service
➤ To pick up a door phone call that is ringing another station
Emergency Ringdown/Hotline Service
The Emergency Ringdown or Hotline Service feature enables standard telephones to automatically ring a designated extension, after the ringdown timer expires, by going off-hook.
The Hotline Service feature is often used for telephones in hotel/motel lobbies. This same feature is referred to as Emergency Ringdown in healthcare facilities, where it is used to assist callers who may not be able to complete a call by dialing.
Note Electronic and digital telephones cannot perform this feature, but they can receive Hotline Service or Emergency Ringdown from standard telephones.
➤ To make a hotline or emergency ringdown call
1. When you hear a door phone call, lift the handset.
Door phone calls ring from one to five times, depending on system programming.
2. Press.
➤ Lift the handset off-hook.
The designated station will automatically ring after the ringdown timer expires.
If a valid feature access code or DN is dialed before the ringdown timer expires, automatic ringdown does not occur.
An example of an incoming Emergency Ringdown call to an electronic or digital LCD
telephone is shown on the right. The calling [DN] and “Ringdown” displays whether soft keys are ON or OFF.
Message Waiting
Message Waiting
If your station is idle or busy on a call while another station tries to contact you, the calling station can turn on the message waiting LED on your telephone. Your Message Waiting lamp flashes when there is a message.
When you respond by pressing 0VJ, you will either hear a voice message or your phone will dial the telephone which set a callback message. Voice mail devices and stations can leave message waiting indications.
Up to four Message Waiting indications can be left at a station at one time. One of the indications is for the Message Center.
➤ To answer a Message Waiting light
➤ To cancel the Message Waiting light
1. Lift the handset. You hear dial tone.
2. Press. Your phone rings the device that set the indication. If there is no answer, hang up and try later. (The LED continues to flash.)
3. If your telephone calls a busy station or there is no answer, hang up and try later.
The LED continues to flash.
...or you can bypass this message and listen to the next message by going on-hook and repeating Steps 1 and 2.
This feature is available for DK14, DK16e, DK16, DK40i, DK40, DK424 release 1 and DK280, release 3.1 and higher.
4. After receiving the message, hang up.
If the Message Waiting LED continues to flash, you have more messages—repeat Steps 1~3 to retrieve them.
1. Lift the handset. You hear dial tone.
Override Calls
Set Message Waiting On Other Telephones
After reaching a busy or unanswered telephone equipped with a Message Waiting indicator, you can set a Message Waiting indication on the called telephone. A flashing lamp or LED at the called telephone indicates a call is waiting. The station user can press the button associated with the flashing LED or enter to call you back.
➤ To set a message waiting indication on another telephone
➤ To cancel the message waiting indication on another telephone
Override Calls
Busy Override enables you to send a tone to a busy station to indicate that a call is waiting. Any station can initiate Busy Override. Off-hook Call Announce is another way to contact a busy station; it lets you speak to a digital telephone user who is off-hook.
Busy Override or Off-hook Call Announce
1. If a called telephone station is busy or does not answer, press .
A Message Waiting light is set at the station. If you are calling a standard telephone, the telephone must have with a message waiting light. All Toshiba digital or electronic telephones have Message Waiting lights.
2. Hang up.
➤ Lift the handset and press + ;;;. (;;; = station number with the message light.)
You hear busy tone if the called station is busy, or you hear repetitive ringing or a single tone if the called station is idle.
The Message Waiting indication on the station is turned OFF.
➤ After reaching a busy station, press
...or to OCA, dial or .
The busy station receives a tone signal, indicating a waiting call.
Paging Announcements
Do Not Disturb (DND) Override
DND Override lets you send a tone to an idle station in the DND mode to indicate that a call is coming in.
Note Executive Override and DND Override are optional features, enabled in system programming
Executive Override
Executive Override enables you to enter a conversation.
Paging Announcements
You can make page announcements to digital and electronic telephone speakers and external speakers. Telephones are assigned to specific page groups in system
programming. A page can be sent to external speakers (all zones), if enabled in system programming.
➤ After reaching a station in DND mode, press .
The DND station receives a tone signal, indicating that a call is coming in.
Note Your station must be programmed for this feature.
➤ After reaching a busy station, press .
You can now enter the conversation. An optional tone signal can be heard by the called parties prior to your entrance.
Note Your station must be programmed for this feature.
1. Lift the handset. You hear dial tone.
2. Enter a page access code.
Repeat Last Number Dialed
Repeat Last Number Dialed
This feature enables you to easily redial the last number called.
Speed Dial
Speed Dial enables you to call a telephone number by dialing a brief access code, instead of having to dial the entire telephone number. There are two types of Speed Dial numbers: Station Speed Dial numbers, which you can assign to buttons on your own station and System Speed Dial numbers, which are assigned from the System Administrator’s station or an attendant console, but they can be used by other stations.
Speed Dialing is not available on rotary telephones.
➤ To store a station speed dial number
3. Make your
announcement in a normal voice level and then repeat the announcement.
4. Hang up when you have completed your announcement.
1. Lift the handset. You hear dial tone.
2. Press. The system automatically dials the last telephone number that you entered.
1. Lift the handset. You hear dial tone.
2. Press. You hear a short tone.
Speed Dial
➤ To make a call with a station or system speed dial code
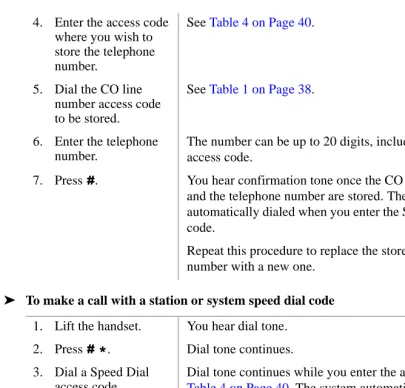
4. Enter the access code where you wish to store the telephone number.
See Table 4 on Page 40.
5. Dial the CO line number access code to be stored.
See Table 1 on Page 38.
6. Enter the telephone number.
The number can be up to 20 digits, including the CO line access code.
7. Press. You hear confirmation tone once the CO line access code and the telephone number are stored. They will be
automatically dialed when you enter the Speed Dial access code.
Repeat this procedure to replace the stored telephone number with a new one.
1. Lift the handset. You hear dial tone.
2. Press
. Dial tone continues.
3. Dial a Speed Dial access code.
Dial tone continues while you enter the access code. See
Tone/Voice First Signaling
Tone/Voice First Signaling
Your Strata DK system may be set for Tone Signaling or Voice First Signaling as the standard internal call signaling method for calls to digital and electronic telephones. The Tone Signal consists of repetitive ring tones, while the Voice First Signal consists of a tone burst followed by the caller’s voice. Standard telephones always ring with Tone Signaling, no matter what the system signaling method. When you initiate a call, you can change to the alternate signaling method.
➤ To change the signaling mode
1. Call an internal digital/electronic telephone.
If the signaling mode is set for Voice First Signaling, you hear a single tone burst followed by the caller’s voice or sounds from the surrounding area of the called telephone.
If the signaling mode is set for Tone Signaling, you hear repetitive ringback tone.
2. To change the mode, press .
Ringing stops and you hear a tone burst if you changed from Tone Signaling to Voice First Signaling. You can converse after the tone burst.
Using Toshiba Voice
Mail Systems
2
This chapter explains how to program your telephone for Call Forward and message retrieval when using a Toshiba Voice Mail System with your Strata DK system.
Refer to the appropriate Toshiba Voice Mail user guide for more information:
♦ Stratagy Voice Processing User Guide
♦ Toshiba VP User Guide
Setting Call Forward
You can program your telephone to forward to the Toshiba Voice Mail System to answer your calls when you are busy or not available.
Voice Mail Identification Code
Setting Call Forward
➤ To store the voice mail ID code
➤ To cancel the voice mail ID code
Call Forward To Toshiba Voice Systems
By setting Call Forward to the Toshiba Voice Mail System on your telephone, information about the call will automatically be sent to the Voice Mail system, so that the callers who call your telephone and call forward to voice mail will be automatically connected to your voice mail box. (See “Call Forward” on Page 8 for instructions on using this function.)
1. Go off-hook. You hear dial tone.
2. Press. You hear confirmation tone. is the access code for setting the Voice Mail Call Forward digit sequence. This code does not forward calls to the Voice Mail system.
3. Press .
4. Enter your mailbox number.
This could be the mailbox number for your Directory Number.
5. Press. You hear confirmation tone. The VM ID code is
automatically sent to the Voice Mail system whenever calls to your telephone are forwarded to it.
Note Steps 1~5 are required for the initial storage of VM ID code to the Toshiba Voice Mail system. Once programmed, these digits remain in memory until changed. Repeat Steps 1~5 to change the code.
1. Go off-hook. You hear dial tone.
2. Press. You hear confirmation tone.
Voice Mail Message Retrieval
Voice Mail Message Retrieval
You can program your telephone to automatically retrieve your voice mail messages.
➤ To program your telephone to retrieve messages
➤ To retrieve messages
1. Go off-hook. You hear dial tone.
2. Press. You hear confirmation tone. is the access code for setting the Voice Mail message retrieval digit sequence. This code does not forward calls to the Toshiba Voice Mail system.
3. Press.
4. Enter your mailbox number plus your security code.
By storing your security code, you avoid having to enter your code every time you access your mailbox; however, this will also allow anyone to retrieve your messages from your phone. If a security code is not desired, do not include it.
5. Press. You hear confirmation tone.
➤ When the Msg Lamp flashes, go off-hook and press.
The Voice Mail System is called and you are automatically connected to your Voice Mail box.
If you have multiple messages from other telephones, go on-hook and then repeat this step to skip the next message.
Access Codes
This appendix contains access codes for outside Speed Dial numbers, CO lines, Paging Group and Paging Zone Codes.
CO Line Access Codes
CO Line Access Codes
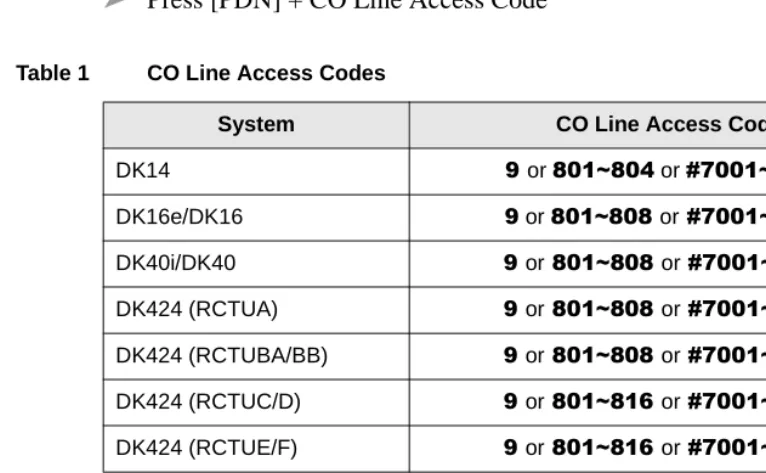
➤ To access a line
➤ Press [PDN] + CO Line Access Code
Table 1 CO Line Access Codes
System CO Line Access Codes
DK14 or a or a
DK16e/DK16 or aora
DK40i/DK40 oraora
DK424 (RCTUA) oraora
DK424 (RCTUBA/BB) oraora
DK424 (RCTUC/D) oraora
DK424 (RCTUE/F) oraora
Notes
♦ In some systems, accesses a general group code, an outside line, or Least Cost
Routing (LCR). System users are required to dial in order to access an outside line.
If you press in a system programmed with LCR, you may not hear internal dial
tone, depending on system programming.
♦ a accesses line groups 1~16, respectively.
Paging Access Codes
Paging Access Codes
Your telephone can be assigned to page group(s). Telephones can be a member of more than one group and each group can have as many as 120 stations. Station users can access each group separately by dialing an access code (Tables 2~3).
➤ To enter a paging group access code
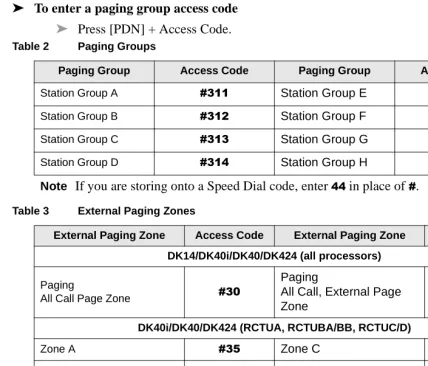
➤ Press [PDN] + Access Code. Table 2 Paging Groups
Paging Group Access Code Paging Group Access Code
Station Group A Station Group E
Station Group B Station Group F
Station Group C Station Group G
Station Group D Station Group H
Note If you are storing onto a Speed Dial code, enter in place of .
Table 3 External Paging Zones
External Paging Zone Access Code External Paging Zone Access Code DK14/DK40i/DK40/DK424 (all processors)
Paging
All Call Page Zone
Paging
All Call, External Page Zone
DK40i/DK40/DK424 (RCTUA, RCTUBA/BB, RCTUC/D)
Zone A Zone C
Zone B Zone D
DK424 (RCTUE/F)
Zone A Zone E
Zone B Zone F
Zone C Zone G
Speed Dial Access Codes
Speed Dial Access Codes
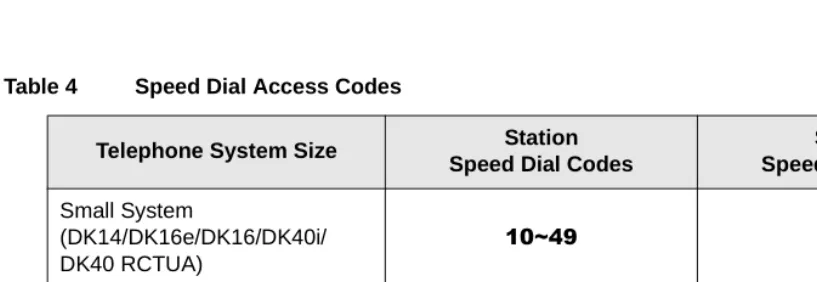
The number of station and system speed dial numbers available to you depends on the size of your company’s telephone system. Check with your System Administrator to find out which codes apply to your system.
Once you store a telephone number on any of the codes listed below, you can dial the number by entering the code, such as
(see Table 4.)
Table 4 Speed Dial Access Codes
Telephone System Size Station
Speed Dial Codes
System Speed Dial Codes Small System
(DK14/DK16e/DK16/DK40i/ DK40 RCTUA)
a a
Medium System
(RCTUBA/BB and RCTUC/D) a a
Large System
(RCTUE/F) a
Index
A
about this book conventions,
iv
access codes,
37
account code calls,
4
answering,
3
,4
attendant console calling,
8
automatic callback (ACB),
7
B
busy override,
27
C
call
hold,
13
park orbits,
14
pickup,
16
transfer with camp-on,
17
call forward,
8
external,
10
to voice mail,
33
calling
internally,
3
outside,
3
CO line
access codes,
37
queuing,
18
conference calls,
19
CO-to-CO line calls (tandem),
19
D
direct inward system access ( DISA),
22
do not disturb (DND),
7
do not disturb (DND) override,
28
door phones,
24
E
emergency
call to a console,
8
override of forced account code,
5
ringdown,
25
executive override,
28
external paging zones,
39
F
flash a CO line,
2
flash the hookswitch,
2
H ~ V
H
hold,
13
hotline service,
25
I
integrated services digital networking (ISDN),
3
L
Least Cost Routing (LCR),
18
M
message waiting,
26
other telephones,
27
O
override,
27
busy,
27
do not disturb,
28
forced account code,
5
P
paging announcements,
28
paging group codes,
39
park and page,
15
park calls,
14
pickup calls,
16
primary directory number (PDN),
iv
R
repeat last number dialed,
29
ringing patterns,
2
S
speed dial,
29
access codes,
40
T
tandem CO line call,
19
tone/voice first signaling,
31
transfer,
17
V
verified account codes,
5
voice mail,
33
message retrieval,