Suite 64
Integrated
Communications
Exchange
PCS
digital
The information contained in this document is proprietary and is subject to all relevant
copyright, patent and other laws protecting intellectual property, as well as any specific
agreement protecting PCS Digital, LLC. (herein referred to as the “Manufacturer”)
rights in the aforesaid information. Neither this document nor the information
contained herein may be published, reproduced or disclosed to third parties, in whole
or in part, without the express, prior, written permission of the Manufacturer. In
addition, any use of this document or the information contained herein for any
purposes other than those for which it was disclosed is strictly forbidden.
The Manufacturer reserves the right, without prior notice or liability, to make changes
in equipment design or specifications.
Information supplied by the Manufacturer is believed to be accurate and reliable.
However, no responsibility is assumed by the Manufacturer for the use there of nor for
the rights of third parties which may be affected in any way by the use thereof.
Any representation(s) in this document concerning performance of the Manufacturerʹs
product(s) are for informational purposes only and are not warranties of future
performance either express or implied. The Manufacturerʹs standard limited warranty,
stated in its sales contract or order confirmation form, is the only warranty offered by
the Manufacturer in relation thereto.
This document may contain flaws, omissions or typesetting errors; no warranty is
granted nor liability assumed in relation thereto unless specifically undertaken in the
Manufacturerʹs sales contract or order confirmation. Information contained herein is
periodically updated and changes will be incorporated into subsequent editions. If you
have encountered an error, please notify the Manufacturer. All specifications are subject
to change without prior notice.
© Copyright by PCS Digital, LLC., 2004.
All rights reserved worldwide.
Record of Revisions
Revision Date of Issue Supercedes Major Changes - Brief Description
1
Introduction ...1
‐
1
1.1 About Suite 64 . . . . 1‐1 1.2 Suite 64 28‐Button Telephone . . . . 1‐2 1.3 Document Overview . . . . 1‐3 1.4 Applicable Documents . . . . 1‐3
2
Telephone
Setup ...2
‐
1
2.1 Reminder‐Extension . . . . 2‐1 2.2 Auto Hold . . . . 2‐2 2.3 Preference. . . . 2‐3 2.4 Background Music (BGM) . . . . 2‐4 2.5 Call Forward . . . . 2‐5 2.6 Default Extension . . . . 2‐9 2.7 Touch Tone (On/Off). . . . 2‐10 2.8 Extension Ring Adjustment. . . . 2‐10 2.9 Do Not Disturb . . . . 2‐11 2.10 Extension Password . . . . 2‐12 2.11 Feature/DSS Button Reset . . . . 2‐13 2.12 Feature/DSS Button Programming. . . . 2‐14 2.13 Access Codes . . . . 2‐15 2.14 Hot Key Enable/Disable . . . . 2‐16 2.15 Hot Line . . . . 2‐17 2.16 Voice Announce. . . . 2‐18 2.17 Night Mode/Activate . . . . 2‐20 2.18 Pause Insertion . . . . 2‐21 2.19 Speakerphone . . . . 2‐22 2.20 Status Lamp . . . . 2‐23 2.21 Volume Control . . . . 2‐24
3
Making
Calls...3
‐
1
3.1 Making an Outgoing Call . . . . 3‐1 3.2 Making an Intercom Call . . . . 3‐2 3.3 Making a Call Using Account Code. . . . 3‐3 3.4 Auto Redial . . . . 3‐4 3.5 Calling the Operator/Attendant . . . . 3‐5 3.6 Meet‐Me Conference . . . . 3‐5 3.7 Supervised/Unsupervised Conference . . . . 3‐7 3.8 Direct Inward System Access (DISA). . . . 3‐9 3.9 Last Number Redial . . . . 3‐10
tion
1
Introduction
The Suite 64, is a versatile, Digital Hybrid Key Telephone System that includes
many advanced features. The System Configuration is comprised of a Main Service Unit and optional expansion boards per specific configuration
requirement. The components of a basic system include a KSU Main Service Unit with 31‐Button Telephones or a 28‐Button Telephones. An Analog Telephone is optionally available.
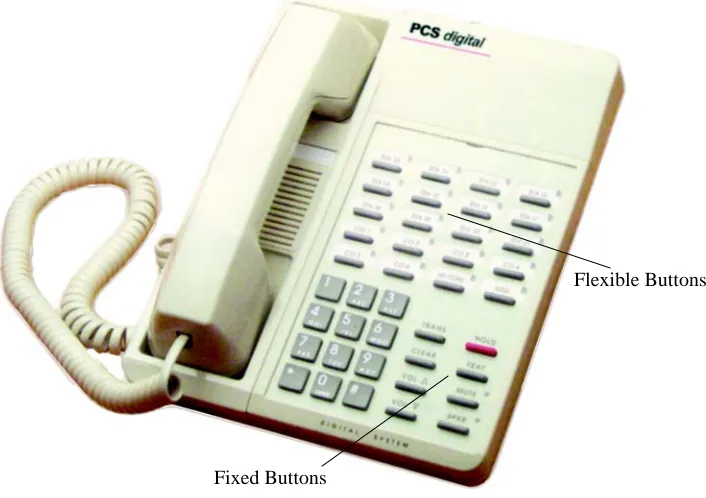
An illustration of the KSU Main Service Unit, the 31‐Button Telephone and the 28‐Button Telephone are shown below in Figure 1-1.
Figure 1-1 KSU Main Service Unit, 31-Button Station Terminal and 28-Button Station Terminal
1.1
About Suite 64
31-Button Telephone
tion
The Suite 64 28‐Button Telephone features 14 programmable Feature/DSS
buttons (dual color LED), Headset Jack, 8 fixed feature keys (Mute, Speaker, Hold, Transfer, Conference, Feature, Volume Up, Volume Down), and one Status Bar type message waiting lamp.
Figure 1-2 below shows the keys necessary for use with this manual.
Figure 1-2 Suite 64 28-Button Telephone
1.2
Suite 64 28-Button Telephone
Fixed Buttons
This document is a User Guide who’s target audience is a skilled or unskilled user. The purpose of this manual is to provide operational instructions on the use of the main features of the Suite 64 Standard Telephone keyset. It is divided in to several sections, designed to clearly and quickly provide information to the user. The sections are:
Section 1 ‐ Introduction ‐ this section describes the basic Suite 64 system components, the 28‐Button Telephone, an overview of this manual and the applicable documentation.
Section 2 ‐ Telephone Setup ‐ this section provides descriptions of the Standard Telephone Setups including; Setting Defaults, Do Not Disturb, Call
Forwarding, Passwords, Feature/DSS Button Programming, Phone
Locking/Unlocking and Night Mode operation as well as basic telephone use.
Section 3 ‐ Making Calls‐ this section provides operational descriptions of the basic call features such as Intercom Calls, Speed Dial, Conference, Paging and Last Number Redial, among other features.
Section 4 ‐ Calling Features‐ this section provides operational descriptions of some of the in‐progress call features such as Hold, Intrusion, Monitor, and Saved Number Redial among other topics.
Suite 64 Installation and Maintenance Manual
1.3
Document Overview
e
Set
u
p
2
Telephone Setup
Feature Code:f92
Description
The Suite 64 allows you to activate your own private alarm on your telephone to
remind you of special appointments, events, etc. When the alarm activates, you will hear tone ringing. After the alarm rings, it is automatically canceled. You can program the alarm to operate one time or repeatedly. When programmed for repeated calls, the alarm will sound at the same time everyday.
Activate Reminder-Extension
1. Press f92 + the new time in HHMM (24‐hour format) + 1 (one time only). If you would like a continuous alarm press f92 + the new time in HHMM (24‐hour format) + 2 (continuos).
Deactivate Alarm Clock-Extension
1. Press f*92.Operational Notes
• The Alarm Clock feature code f92 can be programmed on any pro‐
grammable Feature/DSS Button.
• Alarm Clock will be automatically canceled after the programmed Alarm Play Time is reached for a one‐time alarm.
e Set u p
Feature Code: f94
Description
The Auto Hold feature will automatically place the current call on hold if you are
on a call and you press an outside line button. For example, if you are currently on a call on the first line and you press a second line, the call on the first line will be placed on Exclusive Hold automatically. Similarly, if you are currently on an intercom call with another Suite 64 extension and you press an outside line button, the intercom call will be placed on Exclusive Hold. You do not need to press Hold unless you want to place a call on System Hold.
Setup Auto Hold
1. Press f94. You hear confirmation tone.
2. The extension returns to an idle state.
Enable Automatic Hold
1. While connected to an intercom or outside line call, press another outside line button, if programmed.
2. The current connection is placed on hold and the next connection is established.
Cancel
1. Press f*94. You hear confirmation tone.
2. The extension returns to an idle state.
Operational Notes
• The Feature Code f94 can be programmed under a flexible button on a Standard Telephone. To enable/disable the feature, toggle the Feature/DSS Button.
• If you access an idle line and skip to another line before dialing, the first line will not be automatically placed on Hold. (A line must be connected with an active call; either you dialed a number or answered a ringing line.)
• Auto Hold places a call on Exclusive Hold.
u
p
Feature Code: f95
Description
The Preference feature allows you to access specific outside lines or intercom
automatically when you lift the handset or press the Sbutton.
Setup
1. Press f95.
2. Enter the outside line Directory Number (700–756).
3. Enter the valid outside line Group Directory Number 9 for outside line Group 1.
4. Lift the handset to access the line you selected.
Cancel
1. Press f*95.
2. The extension returns to an idle state.
Operational Notes
• The system will not allow invalid directory numbers to be programmed dur‐ ing setup.
• When a CO Line or CO Line Group is programmed as your Preference that CO line or group must be programmed as available for access by the exten‐ sion in the system programming.
• The feature code f95 can be programmed on a Feature/DSS button on a Standard Telephone.
e
Set
u
p
Feature Code: 800
/
801Description
Background Music can be activated on either of the two music channels to monitor music at the extension. An External music source is required.
While the extension is idle, enter the music channel that you want to monitor:
800 for Music Channel 1 (Enter the same number again to cancel.)
801 for Music Channel 2 (Enter the same number again to cancel.)
Operational Notes
• One Feature/DSS Button is already setup for Background Music operation at the factory.
• The Feature/DSS Button LED will not light when Background Music is acti‐ vated.
• Background Music automatically turns off when you receive or make a call. • Background Music turns on again when the telephone return to idle status.
u
p
Feature Code: f2
Description
There are several choices for forwarding your calls:
• Direct – Forward all of your calls,
• Busy – Forward your calls when your telephone is busy.
• Follow Me – Forward calls at your extension to the extension where you are currently working (conference room, associate’s office, etc.)
• Follow Preset – Invoke call forward at your extension so that it can be changed from another extension.
• No Answer – Forward your calls for no answer conditions.
• External – Forward calls transferred to your extension to a different tele‐ phone number. This feature must be enabled for your extension in database administration.
Forward conditions can be set as follows for each call forward type:
• Intercom calls only.
• Intercom and outside line (including transferred outside lines) calls. • Outside line (CO Line) calls only.
Setup
Direct Call Forward
1. Press f22 or the Feature/DSS Button designated as CALL FWD (if programmed).
2. Enter the extension number to which calls are to be forwarded.
3. Select the type of calls to forward.
a. 1 = outside line incoming or transferred calls
b. 2 = both intercom and outside line calls
e Set u p
Busy Call Forward
1. Press f21 or the Feature/DSS Button designated as CALL FWD (if programmed).
2. Enter the extension number to which calls are to be forwarded.
3. Select the type of calls to forward.
a. 1 = outside line incoming or transferred calls
b. 2 = both intercom and outside line calls
c. 3 = intercom calls only.
4. You hear a confirmation tone and the extension returns to idle. The Status Bar is lit green.
No Answer Call Forward
1. Press f24 or the Feature/DSS Button designated as CALL FWD (if programmed).
2. Enter the extension number to which calls are to be forwarded.
3. Select the type of calls to forward.
a. 1 = outside line incoming or transferred calls
b. 2 = both intercom and outside line calls
c. 3 = intercom calls only.
4. Enter a No Answer Time #1 between 10 and 50 (seconds). This is the time period setting that will alert the system that if there is no answer, the call is to be forwarded.
5. Enter a No Answer Time #2 between 10 and 50 (seconds). This is the second time period setting that will alert the system that if there is no answer, the call is to be forwarded.
u
p
External Call Forward
1. Press f26 or the Feature/DSS Button designated as CALL FWD (if programmed).
2. Enter the telephone number (cell phone, other office, etc.) where calls are to be forwarded.
3. You hear a confirmation tone.
Follow Call Forward
1. Press f25 or the Feature/DSS Button designated as CALL FWD (if programmed).
2. Enter the extension number to which calls are to be forwarded.
3. Select the type of calls to forward.
a. 1 = outside line incoming or transferred calls
b. 2 = both intercom and outside line calls
c. 3 = intercom calls only.
4. You hear a confirmation tone and the extension returns to idle. The Status Bar is lit green.
Follow Me (From Another Extension to This Extension)
1. Press f23or the Feature/DSS Button designated as CALL FWD (if programmed).
2. Enter the extension number where calls are to be forwarded from (originator).
3. Select the type of calls to forward.
a. 1 = outside line incoming or transferred calls
b. 2 = both intercom and outside line calls
c. 3 = intercom calls only.
e Set u p
Follow Me (From This Extension to Another Extension)
1. Press f25 or the Feature/DSS Button designated as CALL FWD (if programmed).
2. Enter the extension number from which calls will be forwarded.
3. Select the type of calls to forward.
a. 1 = outside line incoming or transferred calls
b. 2 = both intercom and outside line calls
c. 3 = intercom calls only.
4. You hear a confirmation tone and the extension returns to idle.
Delete Forward (Own Extension)
1. Press f*2+(Number of Forwarding Type) at own extension.
Delete Forward (Other Extension)
1. Press f*23+(Extension Number of Originator) a+ Password of originating Extension.
Delete All Forwarding
1. Press f20Operational Notes
• Regardless of whether the extension where calls are being forwarded is a Standard Telephone or single line telephone, the user at the forwarded extension will hear special Intercom Reminder tone signifying that Call For‐
ward is activated.
• The Status Bar light will not light green in call forward mode if that function has been disabled via the attendant in Attendant Administration.
u
p
Feature Code:f69
Description
The Default Set feature can be used to clear all active settings at your extension
(Call Forward, DND, etc.) 1. Press f69.
2. A confirmation tone will be played.
Operational Notes
The following extension parameters are reset to the value shown:
LNR = empty
SNR = No Saved Number
Memo = No Saved Number
Telephone Lock = No
Auto Hold = No
Page Receive = Yes
Busy Ring = Yes
Hotline = NULL (none)
e
Set
u
p
Feature Code: f#1
Description
Dial Pad Confirmation or Touch Tone is the tone you hear to confirm that you have pressed a button on the Dial Pad. Touch Tone can be disabled.
While the telephone is idle, press f#1. You hear a confirmation tone.
Operational Notes
N/A
Feature Code: f#7
Description
You can choose one of eight Extension Ring Adjustment for your extension to differentiate your ringing tone from others.
1. Press the ringing code f#7+(1‐8)
2. You hear the selected tone.
Operational Notes
• The Extension Ring Adjustment code can be programmed on any available
Feature/DSS Button.
• A CO Line – ringing type overrides an extension’s ringing type.
2.7
Touch Tone (On/Off)
u
p
Feature Code: f4
Description
The Do Not Disturb (DND) feature blocks all outside line and intercom call ringing. You can activate Do Not Disturb while your telephone is idle or busy. Some
extensions with a higher Class Of Service can override the active Do Not Disturb condition.
When you have activated Do Not Disturb, you will hear special intercom (short stutter tone followed by continuos dial tone) reminder tone when you lift the handset or use the speakerphone. If you have assigned a button on your Standard Telephone specifically for Do Not Disturb, that button will light whenever you activate the feature.
Set Do Not Disturb
1. While your extension is idle (no other call activity), press f4.
Cancel Do Not Disturb
1. While your extension is idle (no other call activity), press f4.
Operational Notes
• Do Not Disturb is not enabled if you have activated Call Forward.
• At any time while your Standard Telephone is idle, you can immediately divert an incoming tone ringing intercom call to the attendant by using the Do Not Disturb feature – Forced Intercom Call Forward.
• Any Feature/DSS button of your extension will flash when you activate Do
Not Disturb.
• The Do Not Disturb feature code can be programmed on a programmable Feature/DSS Button.
• A Feature/DSS Button programmed for the Do Not Disturb code will light steady whenever Do Not Disturb is active.
e
Set
u
p
Feature Code: f97
Description
All extensions of the Suite 64 system have an associated User Password. Passwords are used to activate Phone Lock, Call Forward Remote and Attendant features. Password length is from four to eight characters, depending on system programming.
Change Your Password
1. Press f97+ Current Password + New Password
Operational Notes
N/A
u
p
Feature Code: PGMp58
Description
This feature is used to reset all Feature/DSS Buttons to factory settings.
1. While the extension is idle, press PGMp58+ (Extension Password)+ *.
Operational Notes
N/A
e Set u p
Feature Code: f#3
Description
Suite 64 Standard Telephones have 14 dual‐colored programmable Feature/DSS Buttons. You can program any system feature code on any Feature/DSS Button for one‐button operation. Certain programmed Feature/DSS Buttons will light when activated (Do Not Disturb, Call Forward, DSS/BLF, etc.), while others such as Call Pick‐Up, Background Music, Last Number Redial, do not.
Features are separated into two distinct categories for programming onto Flexible Buttons: Directory Numbers or Feature Codes.
1. While the phone is idle, press f#3.
2. Press the Feature/DSS Button that you want to program. When
programming, the red LED of the feature key being programmed will flash slowly until programming is completed.
To program the button you must know the code number of the feature.
3. For a Directory Number press 1+ Directory Number+ h.
4. For a Feature press 2+ Pfp+ Feature Code + h.
Operational Notes
• In some cases a user can program a Feature/DSS Button for a specific CO line although access is restricted to that line via database programming. In this situation, the telephone is still governed by database programming and would still be unable to access the CO line if restricted.
• Any Feature/DSS Button programmed with a code previously assigned to a different Feature/DSS Button will cause the previously programmed Fea‐ ture/DSS Button to become unassigned.
• Programmable Feature/DSS Buttons cannot be programmed for CO Line
u
p
Feature Code: f61
Description
The Access Code feature allows you to store a four‐digit code so you can dial it by
pressing only one button. To operate, the Access Code must be stored on a
Feature/DSS Button. This feature is typically used to store a password for the voice mail mailbox.
Storing a Code
1. While the telephone is idle, access Feature/DSS Button Programming (Refer to Feature/DSS Button Programming in Section 2.12) and program a
Feature/DSS Button to be stored with your Access Code.
2. Press f61 + {the four‐digit code to store}.
Using the Access Code
1. Access the voice mail system (either the Suite 64 Voice or an external voice mail system) by pressing the Feature/DSS Button designated as VOICE MAIL (if programmed).
2. When you hear the prompt to enter your password, press the Access Code button.
Operational Notes
• The Access Code feature can only be used when stored on a Feature/DSS But‐
ton.
e
Set
u
p
Feature Code: f#6
Description
Hot Key enables you to dial directly using the keypad without pressing the s button first.
Disable
While the telephone is idle, press f#6.
Enable
While the telephone is idle, press f#6.
Operational Notes
N/A
u
p
Feature Code: f9*
Description
The Hot Line feature allows the user to access an extension or Speed Dial Directory number simply by going off hook. This feature is useful for elevator phones and some other applications.
Setup
1. While the telephone is idle, press f9*.
3. Enter the speed dial directory number or extension number to which this extension is to be connected when the phone goes off hook.
4. Enter 0‐9 for the delay (seconds) immediate or delayed. You hear a confirmation tone and the function is invoked.
Invoke Hotline
1. While the telephone is idle, lift the handset or press the s button. A call is placed to the selected destination either immediately or after the delay time.
2. Hang up to finish the call.
Cancel
1. While the telephone is idle, press f*9*. You hear a confirmation tone and the function is cancelled.
Operational Notes
• If delay mode is selected other calls can be placed during the delay period. • The Hotline feature code f9* can be programmed on an available Fea‐
ture/DSS Button.
e Set u p
Feature Code: f98
Description
In order to use the Voice Announce features described below, a Feature/DSS button must be programmed First.
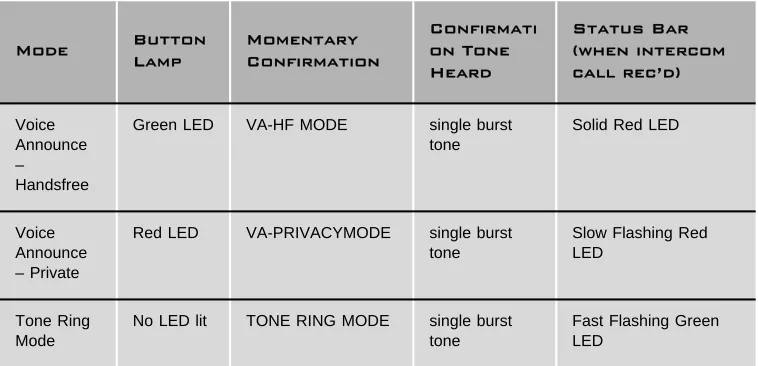
A Standard Telephone has the benefit of receiving intercom calls in three ways:
• Voice Announce Hands‐free reply mode. • Voice Announce Privacy Mode.
Tone Ringing Mode.
The Status Bar Lamp and Feature/DSS Button LED will illuminate as shown in Table 2‐1 below.
Table 2-1 Voice Announce Mode LED Indications
2.16
Voice Announce
Mode Button Lamp Momentary Confirmation Confirmati on Tone Heard Status Bar (when intercom call rec’d) Voice Announce – Handsfree
Green LED VA-HF MODE single burst tone
Solid Red LED
Voice Announce – Private
Red LED VA-PRIVACYMODE single burst tone
Slow Flashing Red LED
Tone Ring Mode
No LED lit TONE RING MODE single burst tone
u
p
Setup
1. Program a Feature/DSS button for Voice Announce as described in Section
2.12 if you have not programmed it already. Use f98 as the applicable Feature Code.
2. While your extension is idle, press f98. You hear a confirmation tone.
3. Press f98 again to advance through each of the available modes.
The LED for the Voice Announce Feature/DSS button will illuminate as
described in Table 2‐1.
Receiving a Call in VA-HF Mode
When your extension is idle, you will be alerted of intercom calls by one tone burst. The voice connection is then established immediately and you can respond to the calling extension via the speakerphone.
Receiving a Call in VA-Privacy Mode
1. When your extension is idle, you will be alerted of an intercom call by one tone burst. The voice connection is then established immediately with the Mute function activated at your extension. You hear the calling extension voice announcement over the speaker, but the microphone in your telephone is disabled.
2. You can:
a. Lift the handset for privacy.
b. Press the m button to deactivate the Mute feature and speak with the caller using the speakerphone.
Receiving a Call in Tone Mode
1. When your extension is idle, you will be alerted of an intercom call by a double‐burst tone which is repeated until you respond or until the call follows a Call Forward route.
2. You can:
a. Lift the handset for privacy.
b. Press theS button to activate the speakerphone and speak with the caller using the speakerphone.
e
Set
u
p
Feature Code: f63
Description
After‐hours operation can require different ringing patterns than those during normal business operations. The system can be placed into Night Mode as one of the available Service Modes.
Any extension can manually switch the system service from day to night mode, or vice‐versa, using the Attendant Administration (password is required). The attendant extension can set the system mode of operation using the Night Mode code or a Feature/DSS Button programmed with the code for simple one‐button operation.
Change Service Mode
1. At the attendant extension press the Feature/DSS button programmed with the Service Mode feature code or enter the feature code f63.
2. Enter the attendant extension password.The Service Mode is advanced to the next mode.
Operational Notes
N/A
u
p
Feature Code: f70 Description
Pause Insertion is used to add a delay in dialing on outgoing outside line calls. You can store a pause or a combination of pauses in the Speed Dial bins to allow timed access to special services while allowing you to monitor the progress of the call.
When storing numbers in speed dial, use the feature code f70 to insert a pause.
Operational Notes
• A pause occupies one digit position when stored in speed dial.
e
Set
u
p
Feature Code: s
Description
The Suite 64 Standard Telephones are all equipped with a high‐quality,
half‐duplex speakerphone. This feature makes it possible to place hands‐free calls.
Placing a Call
1. Press an idle outside line button or dial an intercom number.
2. The s button LED lights immediately and the speakerphone is active.
3. Press s to hang up the call.
Answering a Call
1. While your phone is ringing, press the s button.
2. The s button LED lights immediately and the speakerphone is active.
3. Press s to hang up the call.
Operational Notes
• The speakerphone function is impacted by environmental conditions. • To dial intercom numbers directly from an idle condition, the Hot Key set‐
ting must be Enabled. Otherwise, the extension user must press a pro‐ grammed Intercom Button or press thes button prior to dialing the extension number.
• For privacy, you can lift the handset at any time to exit from Speakerphone mode.
u
p
Description
The Standard Telephone uses a dual colored LED Status Bar Lamp to assist the user in recognizing the extension status. The Status Bar Lamp will give these visual indications:
Operational Notes
N/A
2.20
Status Lamp
Flash
Rate Priority Red Lamp Green Lamp
Fast 1 Incoming outside line Ringing
Incoming Intercom Ringing
Slow 2 Mute Message Waiting
Steady 3 Speakerphone/Headset in use
e
Set
u
p
Description
The Suite 64 Standard Telephone is equipped with a volume control that you can
use to adjust the various volume settings of the telephone. The following function volumes can be adjusted:
• Background Music • Ringing
• Handset • Speaker • Headset
You can adjust the volume for each function while that function is in use.
You can adjust ringer volume while the telephone is idle.
While the function is active, press the <> as necessary. The volume for this function is now set and will be retained for any future use of this mode.
Operational Notes
N/A
Ca
lls
3
Making Calls
Feature Code: 9
Description
Access to Outside Lines, is available using several ways. They can be accessed by:
• Dialing the specific outside line (lines 700‐757) or outside line group (9,800‐806)
• Pressing a programmed outside line button. Refer to Section 2.12 for DSS key programming instructions.
All extensions are programmed with CO Line buttons for CO Lines 1~6.
To dial an outside line;
1. Press one of the outside line buttonsof an idle outside line where the LED is not illuminated. If the handset is still on‐hook, the Speakerphone LED will be illuminated.
2. When you hear dial tone, dial the telephone number.
3. Hang up to end the call or press s, if you are using the speakerphone, to hang up.
Operational Notes
Ca
lls
Feature Code: 401
-
464Description
To make an intercom call, dial the extension number.
Or…
Press one of the pre‐programmed Feature/DSS Buttons of the extension that you want to call. Refer to Section 2.12 for instructions on programming the Feature/DSS Buttons.
Operational Notes
• Some applications may require a button to indicate use of the intercom fea‐ ture at extensions. To meet this requirement, the feature code f65 can be programmed on an available Feature/DSS Button for use.
• Auto Line Selection is set to Intercom by default, therefore, intercom dial tone is heard automatically when lifting the handset or when pressing the s button.
• When calling an extension that is in Voice Announce mode you can Force Tone
Ring by* after the extension number.
Feature Code: 89
Description
If you would like to call to be associated with a specific account number in the Suite 64 Station Message Detail Reporting (SMDR), you must enter an account code before making the call. The account code length is predetermined and programmed to be between 2 and 8 digits.
1. Dial the Account Code access number 89.
2. Enter a valid account code. The Suite 64 system automatically accesses an idle outside line.
3. Dial the telephone number.
Operational Notes
• If you dial an invalid account code, you will hear an error tone.
• When you dial a valid account code, the call is monitored for toll restriction against the Class of Service associated with the entered Account Code.
Ca
lls
Feature Code: f78
Description
You can use Auto Redial (AR) to dial the last number that you dialed. The system
waits for a predetermined time for the call to be answered. If the call is not answered during this time, the system hangs up and tires the call again. The number of attempts the phone will make is designated in the system
programming.
Default is 2 attempts
1. Hang up when you place a call and receive a busy signal.
2. Press f78.
Operational Notes
• The Feature Code f78 can be programmed under a Feature/DSS But‐ ton on the Standard Telephone to be used with the Auto Redial feature. • The system will continue redial attempts until:
‐ The Call rings through and the caller picks up.
‐ The maximum number of attempts is reached. (2‐15)
‐ Any other feature is used on the telephone.
• The number of redial attempts and the timed interval between attempts are set in system programming and are not changeable at the individual exten‐ sions.
Feature Code: 0
Description
The extension that is programmed as the Attendant may receive internal calls via a programmed Operator Code.
To call the attendant/operator, press 0.
Operational Notes
• The Operator Code is in addition to the default assigned three‐digit intercom number for the extension.
• The attendant three‐digit extension number can be programmed in any Fea‐ ture/DSS Button.
Feature Code: 860
-
867Description
The Meet‐Me Conference feature is used to join multiple parties in one conversation.
The system provides eight separate conference bridges. (4 parties maximum each.) Callers can be easily transferred to these bridges. Users may simply dial the location number. Outside parties can join the conference using the automated attendant by dialing the bridge number at the Auto Attendant greeting.
3.5
Calling the Operator/Attendant
Ca
lls
Transfer a Caller to a Meet Me Conference
1. Press t while connected with another extension or outside line.
2. Dial the Meet‐Me Conference destination for this call. (860‐867).
3. Hang up to complete the transfer.
Join a Meet-Me Conference
1. Dial the Meet‐Me Conference destination to join (860‐867).
2. Hang up when finished.
Join a Meet-Me Conference from the Auto Attendant
1. Dial the Meet‐Me Conference destination to join (860‐867)when the
automated attendant answers.
2. Hang up when finished.
Operational Notes
• Up to 4 simultaneous connections may join any one conference.
Feature Code: f77
Description
The Suite 64 system can accommodate eight, 4‐party conferences simultaneously.
Conferences can include a maximum of 3 outside lines and up to 4 extensions. One telephone station acts as the conference manager and counts as one conference member.
Supervised/Unsupervised
A Supervised Conference is a conference whereby at least one member is an
extension of the Suite 64 system. The Suite 64 extension that establishes a
conference becomes the conference manager and can add and/or delete members of the conference at any time. The conference manager also is authorized to establish an Unsupervised Conference. An Unsupervised Conference is a conference where all members are on outside lines.
Establish a Three-party Conference
1. Answer or place the first call (internal or external).
2. Press h.
3. Place the second internal or external call.
4. Press the c button to join the connections together.
5. Hang up to end the Conference.
Establish a Four-party Conference
1. First establish a three‐party conference as described above.
2. Press
H
.3. Place the third call internal or external call.
C
Ca
lls
2. Press f77. The Unsupervised Conference is established and your
extension is returned to idle.
Rejoin an Unsupervised Conference
1. Pressf77.2. Your extension is rejoined to the conference connection.
Operational Notes
• The conference manager is the extension that establishes a conference.
• Only the manager can add new parties.
• Only the conference manager is allowed to release any attending party.
• When adding new parties to a conference and while speaking privately to a particular conference member other members of the conference will be con‐ nected to Music On Hold.
• When the conference manager exits a conference, the most recently invited internal party will be designated as the new conference manager.
Description
The Direct Inward System Access or DISA feature allows you to remotely access
system resources such as System Speed Dial, outside line Access, and Intercom dialing. DISA can be accessed via the Auto Attendant as well as by dedicated DISA lines.
1. Call into the Suite 64.
2. Press 9 or dial the DISA line number directly.
Or…
3. The DISA stutter dial tone is heard.
4. Dial an internal number.
Accessing an Suite 64 Outside Line
1. Dial # + Extension Password + Extension Number + # to access a system outside line to dial out.
2. Dial an outside line Group number or speed dial location number to place an outgoing call.
3. Hang up when finished.
Operational Notes
• Up to 4 DISA CO lines may be used simultaneously.
• The activation time for a DISA CO line is programmable for “Never,” Day,” “Night” or “Always.”
• If you dial an invalid number your call will be directly transferred to the attendant.
• The DISA Talk Time is programmable for 1, 2, 3, 5, 10, and 15 minutes (default is 1 minute). The DISA Talk Time is set to automatically A warning
Ca
lls
Feature Code: f8
Description
The Last Number Redial feature, or LNR, automatically dials the last number dialed
from your telephone. The LNR retains up to sixteen (16) digits. You may either choose a specific outside line by first pressing that outside line button or you can allow the line to be selected automatically by the LNR feature.
Choose an Outside Line First
1. Press an outside line button.
2. Pressf8.
Automatically Select an Outside Line
1. Pressf8.Operational Notes
• Last Number Redial doesn’t operate with intercom calls.
• The LNR feature code can be programmed on a Feature/DSS Button.
• LNR will dial the speed dial number and any subsequent manually dialed digits.
• In the event that all CO lines are busy you will hear busy tone.
• If the Last Number Redial memory is empty you will hear error tone.
Description
You can make outgoing calls from your Standard Telephone using the speakerphone. The s button LED is lit when you are making a call.
1. dial any extension number directly from the keypad without lifting the handset. The Hotkey feature must be active.
Or…
2. Press any outside line button and dial without lifting the handset.
3. When Hot Key is disabled, press the
S
button or press an idle outside line button then dial without lifting the handset.Operational Notes
N/A
Ca
lls
Feature Code:200-208,820
Description
You can make a public announcement to all extensions or to a group of extensions.
The Suite 64 system provides both all‐call (heard by all users) and page zone
(heard by a specific group of users). Page announcements are heard over the extension speakers.
1. While in the idle condition – lift the handset.
2. Dial the Zone Page access code (extensions) 201–208 for extensions or
820 for external page. Press the Feature/DSS Button designated as All Call Page or dial the All Call Page access code 200. You hear the Page Alert Tone.
4. Make a paging announcement.
5. Hang up when finished.
Operational Notes
• The Page Allow/Deny feature code may be programmed on a Feature/DSS Button.
Feature Code: f51
Description
The Saved Number Redial, or SNR feature is normally used whenever you want to
store a telephone number that you would like to dial later. The same feature code is used to Save a Dialed Number (SDN) and to dial the saved number – Saved
Number Redial (SNR).
SDN
After you’ve placed an outside line call to a number that you would like to store, press f51. The dialed number is stored in the Saved Number memory.
SNR
When the telephone is idle, press the Feature/DSS Button designated as SNR or press f51. The stored number is dialed.
Operational Notes
• SDN can store up to sixteen (16) digits.
• The Save Dialed Number/Saved Number Redial feature code can be pro‐
grammed on any Feature/DSS Button.
Ca
lls
Extension 500‐519,
System 600‐699
Description
The Speed Dial feature allows you to store frequently dialed numbers. There are 20
speed bins per extension and 100 system speed bins that can be shared by all extensions.
Setup
1. Press f1.
2. Dial the Speed Dial location number (500 – 519).
3. Enter the number that you want to store, including Pauses (f70), Flash (f3) and Pulse‐To‐Tone Conversion (#) codes.
4. Repeat from step 2 to continue programming Speed Dial locations from step 2 above or hang‐up (press s twice) to exit.
System Selects the Outside Line Automatically
Dial the Speed Dial location number (500 – 519,600 – 699).
You Select the Outside Line to Use
1. Press the desired outside line button or dial the outside line directory number.
2. Press f1.
3. Dial the Speed Dial location number (500 – 519,600 – 699).
Operational Notes
• Only a Standard Telephone can program System Speed Dial bins using Atten‐ dant Administration.
Featu
re
s
4
Calling Features
Feature Code: f64
Description
The Answering Machine Emulation feature requires the optional Suite 64 Voice Mail
System. Whenever your voice mailbox answers a call, the Suite 64 allows you to screen the caller leaving the message. This option is available for only a few seconds after your voice mailbox has answered the call.
1. When an extension user voice mailbox answers a caller, you’ll hear an alert tone. The Feature/DSS Button programmed for Voice Mail (f64) will flash green at a fast rate.
2. Press the flashing Voice Mail button. The button LED will now flash green at a slower rate.
Operational Notes
• To Monitor or Answer a call, action must be taken before the “Monitor Time” expires. Monitor Time starts at the time the caller is connected to the user’s voice mail box.
Featu
re
s
Description
The Call Back feature allows you to queue a busy outside line for use when it
becomes available.
1. Press a busy, programmed outside line button (steady red LED) or outside
line group button, or dial an outside line access group number (9, 700
– 756). You will hear busy tone.
2. Dial # on the dial pad.You will hear a confirmation tone.
3. A few moments later, the display will return to an idle state.
5. When the selected outside line, or an outside line in the selected outside
line group, becomes available, you will hear fast ringing at the extension.
Operational Notes
• During call back alert tones, lifting the handset will directly connect the
extension user to the selected CO Line calling back.
• Every extension may Call Back only one busy CO line at the same time.
• The Call Back Alerting Ring Time is 10 seconds. If the call back goes unan‐
swered during the 10 seconds ring time the call back is canceled.
• CO lines that have Call Back requests will recall the Call Back initiator. The
Call Back CO line will become available to other extensions if the call back
extension doesn’t answer within 10 seconds.
• During the time that the Call Back is recalling the initiator, a new incoming
call will take precedence over Call Back and will be answered when the
extension goes off hook.
re
s
Description
When you call an extension that is busy, in Do Not Disturb, or idle, you can use the Call Back‐Extension feature to queue your call so that it will be placed as soon as the extension is available.
1. Dial the intercom extension number of the busy extension or the busy trunk to be seize + #.
To cancel all active call backs prior to receiving Call Back Alert ringing:
1. Press f*#* to delete all call backs.
2. Press f*#+ Extension number or Trunk number to delete individual call backs.
Operational Notes
• The call back process begins when both your extension and the called party’s extension are in idle.
• “#” is the default Callback suffix code.
Featu
re
s
Feature Code: f73
Description
The Call Park/Call Park Answer feature allows you to “park” a call at any extension.
It is also used to retrieve a parked call from any extension. You can park and retrieve calls by dialing the Call Park code (f73) followed by the extension number where the call is to be/has been parked.
1. While connected to an outside line call, pressf73or press pre‐programmed Feature/DSS Button designated as CALL PARK (if programmed).
2. Dial the extension number where this call is to be parked, or press the Feature/DSS Button of the extension where this call is to be parked.
3. The outside line call is parked at that extension.
4. Hang up the phone.
Call Park Answer
1. While the phone is idle, press f73 or press the pre‐programmed Feature/DSS Button designated as CALL PARK.
2. Dial the extension number where this call is to be parked, or press the Feature/DSS Button of the extension where this call is parked.
3. You are connected to the call.
Operational Notes
• Each telephone/extension has one personal extension number used to park one CO line call.
• From your telephone you can park a call at any active extension number.
• The Call Park feature code may be programmed on any programmable Fea‐
re
s
Feature Code:*
Description
The Call Pick Up (Group) feature is used to answer calls ringing at another
extension.
When you hear another extension in your pickup group ringing, press *.
Or…
When you hear an extension in a different pickup group ringing, dial that Call Pick
Up Group number (260‐267).
Operational Notes
• If the call at the dialed extension has stopped ringing, you will hear an error tone.
• The Call Pick Up Group feature code can be programmed on any Feature/DSS
Button.
• If several calls of the same priority are ringing at the extension, the calls are answered in the order they are received.
Featu
re
s
Description
The Camp On feature alerts the user of a busy extension that another extension is
attempting a call.
When you initiate a Camp On by entering [4] or the suffix code, the user at the busy extension hears a Camp On alert tone.
Operational Notes
• “4” is the default Camp On suffix code.
• Each extension can have only one Camp On at the same time. • While waiting for a busy extension the caller hears music.
re
s
Feature Code: f4
Description
The One‐Time Do Not Disturb feature allows you to block outside line ringing while engaged in a call. The feature will automatically be disabled at the end of the current call.
1. While you are connected with a call and a new call rings at your extension. To cancel ringing for this call, press a pre‐programmed Feature/DSS Button designated as DO NOT DISTURB or press f4.
2. Do Not Disturb (One Time) is activated.
3. Do Not Disturb (One Time) will deactivate when the current call is disconnected.
Operational Notes
• The Do Not Disturb (One Time) feature code may be programmed on a Fea‐ ture/DSS Button.
• A Feature/DSS Button programmed for the Do Not Disturb code will flash at a fast rate while Do Not Disturb (One Time) is active.
Featu
re
s
Description
The Do Not Disturb – Override feature allows you to override the Do Not Disturb condition at another extension.
Do Not Disturb‐Override is available only if Intrusion (Section 4.14) is active on the calling extension.
Operation – Calling an Extension in Do Not Disturb
1. Place intercom call to the extension in Do Not Disturb. You will hear the Do
Not Disturb tone.
2. Press the suffix code [3].
3. The called extension begins to ring.
Operational Notes
• The default Do Not Disturb‐Override suffix code is 3.
• The Do Not Disturb feature code may be programmed on a programmable Feature/DSS Button.
re
s
Feature Code: f3
Description
The Flash – CO Line feature is used with a call waiting feature from your telephone
company. Flash – CO Line is used to generate a hook switch signal to the telephone company to answer the waiting call.
While connected to an outside line with a waiting call, press f3..
Operational Notes
N/A
Featu
re
s
Feature Code: *
Description
You can use the Forced Intercom Tone Ring feature to cause the called telephone to
ring when you initiate an intercom call. After a Voice Announce connection has been established to an extension, you may change the alert signal at that extension
from Voice Announce to Tone Ring.
1. Establish an intercom call to an extension in Voice Announce mode. 2. Press * to change the alert signal at the called extension from Voice
Announce to Tone Ring.
3. A Tone Ring alert signal is sent and continues at the called extension until it
is answered. If your call remains unanswered, you can dial * again to return to Voice Call Announce mode.
Operational Notes
• * is the default Forced Intercom Tone Ring suffix code.
• It is not possible to force an extension from Tone Ring mode to Voice Announce
mode if Tone Ring was selected in the destination.
• To leave a Callback request at a called extension that doesn’t answer, the alert signal must be set for Tone Ring.
re
s
Feature Code: h
Description
You can place any outside line on Hold by pressing the
h button. When a line is place on Hold, the green LED indicates that this is your holding line and flashes at double wink rate. The same system hold line will flash the red LED at all other extensions.
1. While on a line, the line green LED is flashing at a double wink rate.
2. Press h The line green LED now flashes at a slow rate and the call is placed on System Hold.
Operational Notes
• Any party who is placed on Hold will hear music if available.
Featu
re
s
Feature Code: h
Description
When using the f button and h together, you can place an outside call
on Exclusive Hold.
While connected on an outside line, press f and then press h.
Operational Codes
• When you place a CO line call on Exclusive Hold, the green LED for that line at your telephone will flash fast and the red LED will light steady at other extensions for that CO line.
• A CO line call will be placed on System Hold (Refer to Section 4.10) after the Exclusive Hold time expires. You will hear a tone alerting you that the timer has expired and the hold condition for that CO line changes to System Hold. The green LED at your telephone will flash slowly and the red LED at other extensions will begin to flash slowly.
• Exclusive Hold is used only for CO line calls.
re
s
Description
The Suite 64 system provides a programmable timer to remind you that a call has
been left on System Hold or Exclusive Hold. When Hold Reminder is enabled, you
will hear one ring tone repeated each time the selected time expires.
Operational Notes
• Hold Reminder applies to both intercom and CO line calls.
• Hold Reminder applies to CO line calls that are on System Hold (Refer to Section
4.10) or Exclusive Hold (Refer to Section 4.11).
Featu
re
s
Feature Code: h
Description
The Holding Call Answer feature allows you to place a call on hold and retrieve
calls from hold by pressing the h button. When multiple calls are holding at an extension, Holding Call Answer will access the outside line that has been holding the longest while placing the current call on hold.
Holding Call Answer works for all outside lines. It is possible to handle calls that do not appear (no button) at an extension via Holding Call Answer.
1. When one or multiple calls are holding at your extension, press h. The oldest holding call is connected.
2. Press h again to place this call on hold.
3. Press h again to answer the next oldest holding call.
4. Repeat as required for any calls on hold. (From your extension)
Operational Notes
• Holding Call Answer will also operate for intercom calls placed on hold. • If the person on hold hangs up, the system will automatically release the
held CO line.
re
s
Description
The Intrusion feature allows the initiator to enter into an existing conversation
when the initiator has been given the privilege to do so via Extension
programming (“Intrusion Active” = Y). Intrusion can be invoked both on a busy outside line and to a busy extension.
1. Press the busy outside line button or dial a busy extension number.
2. Press 8.
3. Hang up to disconnect.
Operational Notes
• 8 is the default Intrusion code suffix.
• An Intrusion Tone will be presented to all parties when Intrusion is invoked (extensions and CO Lines).
Featu
re
s
Feature Code: f59
,
#Description
Any internal or external page announcement can be answered using a Meet Me
Page code. After hearing a page announcement, you can dial the Meet Me Page code from any telephone and be connected to the person paging you.
1. While a page is currently in progress press # or f59.
Operational Notes
• A page may be answered at any telephone using the Meet Me Page code, even if the page announcement is not heard over the telephone speaker.
• The page may be any zone page or all page.
• The Meet Me Page code may be programmed on any Feature/DSS Button.