585-302-502
Comcode 108359167
Issue 14
May 1999
AUDIX
Notice
Every effort was made to ensure that the information in this book was complete and accurate at the time of printing. However, information is subject to change.
Your Responsibility for Your System’s Security
Toll fraud is the unauthorized use of your telecommunications system by an unauthorized party, for example, persons other than your com-pany’s employees, agents, subcontractors, or persons working on your company’s behalf. Note that there may be a risk of toll fraud associated with your telecommunications system and, if toll fraud occurs, it can result in substantial additional charges for your telecommunications services.
You and your system manager are responsible for the security of your system, such as programming and configuring your equipment to pre-vent unauthorized use. The system manager is also responsible for reading all installation, instruction, and system administration docu-ments provided with this product in order to fully understand the fea-tures that can introduce risk of toll fraud and the steps that can be taken to reduce that risk. Lucent Technologies does not warrant that this product is immune from or will prevent unauthorized use of com-mon-carrier telecommunication services or facilities accessed through or connected to it. Lucent Technologies will not be responsible for any charges that result from such unauthorized use.
Lucent Technologies Fraud Intervention
If you suspect you are being victimized by toll fraud and you need technical support or assistance, call the appropriate BCS National Cus-tomer Care Center telephone number. Users of the MERLIN®, PART-NER®, and System 25 products should call 1 800 628 2888. Users of the System 75, System 85, DEFINITY® Generic 1, 2 and 3, and DEFINITY® ECS products should call 1 800 643 2353. Customers outside the continental United States should contact their local Lucent representative, or call one of the above numbers in the following man-ner:
• Dial the International Access Code; for example, 011. • Dial the country code for the U.S., that is, 01.
• Lastly, dial either of the telephone numbers provided above.
Lucent Technologies Web Page
The world wide web home page for Lucent Technologies is: http://www.lucent.com
Federal Communications Commission Statement
Part 15: Class A Statement. This equipment has been tested and
found to comply with the limits for a Class A digital device, pursuant to Part 15 of the FCC Rules. These limits are designed to provide rea-sonable protection against harmful interference when the equipment is operated in a commercial environment. This equipment generates, uses, and can radiate radio-frequency energy and, if not installed and used in accordance with the instructions, may cause harmful interfer-ence to radio communications. Operation of this equipment in a resi-dential area is likely to cause harmful interference, in which case the user will be required to correct the interference at his own expense.
noise emissions set out in the radio interference regulations of Industry Canada.
Le Présent Appareil Nomérique n’émet pas de bruits radioélectriques dépassant les limites applicables aux appareils numériques de la class A préscrites dans le reglement sur le brouillage radioélectrique édicté par le Industrie Canada.
Trademarks
See the preface of this document.
Ordering Information
Call: Lucent Technologies BCS Publications Center
Voice 1 800 457-1235 International Voice 317 322-6791 Fax 1 800 457-1764 International Fax 317 322-6699
Write: Lucent Technologies BCS Publications Center 2855 N. Franklin Road
Indianapolis, IN 46219
Order: Document No. 585-302-502 Comcode 108359167 Issue 14, May 1999
For additional documents, refer to the section in “About This Docu-ment” entitled “Related Resources.”
You can be placed on a standing order list for this and other documents you may need. For more information on standing orders, or to be put on a list to receive future issues of this document, contact the Lucent Tech-nologies Publications Center.
Obtaining Products
To learn more about Lucent Technologies products and to order prod-ucts, contact Lucent Direct, the direct-market organization of Lucent Technologies Business Communications Systems. Access their web site at www.lucentdirect.com. Or call the following numbers: custom-ers 1 800 451 2100, account executives 1 888 778 1880 (voice) or 1 888 778 1881 (fax).
Warranty
Lucent Technologies provides a limited warranty on this product. Refer to the “Limited Use Software License Agreement” card provided with your package.
European Union Declaration of Conformity
The “CE” mark affixed to the equipment means that it conforms to the following directives. Lucent Technologies Business Communications Systems declares that DEFINITY AUDIX System equipment specified in this document conforms to the referenced European Union (EU) Directives and Harmonized Standards listed below:
EMC Directive 89/336/EEC Low-Voltage Directive73/23/EEC
Acknowledgment
Contents
iii
Contents
Contents iii
About This Document xxi
■ Intended Audiences xxii
■ Prerequisite Skills and Knowledge xxii ■ Organization of This Document xxii
■ How to Use This Document xxiv
■ Conventions Used in This Document xxv ■ Trademarks and Service Marks xxv
■ Related Resources xxvi
■ How to Make Comments About This Document xxvi
1
Introduction 1-1■ Overview 1-1
■ The PC2AUDIX User Interface 1-1
■ The ADAP Command Line Language User Interface 1-2
■ How ADAP Works 1-2
ADAP Data Retrieval 1-2
ADAP Database Modification 1-3
■ Screens Supported by ADAP 1-3
■ Data Retention Considerations 1-7
2
Installation 2-1■ Installation Requirements 2-1
Recommended Hardware Configurations 2-2
■ ADAP Directory Structure 2-2
ADAP Diskette Contents 2-3
■ Installation Procedures 2-4
Install ADAP Software 2-4
Contents
iv
3
Using PC2AUDIX Application Programs 3-1■ Working in PC2AUDIX 3-2
■ Setting Up PC2AUDIX Interface in a New Work Area 3-3
Creating PC2AUDIX Subdirectories 3-3 Establishing PC2AUDIX Setup Parameters 3-4 Establishing Setup Parameters for Call Detail
Recording (Optional) 3-9
■ Modifying PC2AUDIX Setup Parameters 3-11 ■ Setting Up PC2AUDIX Interface in an
Existing Work Area 3-11
■ Starting the PC2AUDIX Interface 3-12
■ PC2AUDIX Root Menu Options 3-13
■ Using On-line Help Files 3-15
■ Directing PC2AUDIX Output 3-15
Redirecting Output to the Screen 3-15 Redirecting Output to a File 3-16
Using Graphical Output 3-16
■ Interrupting the PC2AUDIX Interface 3-16
■ Managing PC2AUDIX Data 3-17
Scheduling PC2AUDIX Processes 3-17
Deleting PC2AUDIX Data 3-17
Generating PC2AUDIX Reports 3-18
4
PC2AUDIX Data Retrieval 4-1■ Overview 4-1
■ Prerequisites 4-2
Contents
v
5
PC2AUDIX Traffic Reports 5-1■ Overview 5-1
■ Prerequisites 5-2
■ Producing Traffic Reports 5-2
■ Average Port Usage Report 5-3
■ Peak Port Usage Report 5-5
■ Hourly File System Usage Report 5-8 ■ Daily File System Usage Report 5-10 ■ Session Usage Traffic Report 5-12
■ Traffic Data Reports 5-14
View Hourly Feature Statistics 5-15 View Daily Feature Statistics 5-18 View Hourly Load Statistics 5-19
View Daily Load Statistics 5-21
View Hourly Network Load Statistics 5-23 View Daily Network Load Statistics 5-25 View Hourly Special Feature Statistics 5-26 View Daily Special Feature Statistics 5-27 View Hourly Community Statistics 5-28 View Daily Community Statistics 5-30 View Daily Remote Message Statistics 5-31 View Monthly Remote Message Statistics 5-32 View Daily Subscriber Statistics 5-34 View Monthly Subscriber Statistics 5-36
■ Remote Traffic Report 5-39
■ Daily System Attendant Traffic Report 5-41 ■ Monthly System Attendant Traffic Report 5-44
6
PC2AUDIX Billing Reports 6-1■ Overview 6-1
■ Organization Codes 6-2
■ Prerequisites 6-2
■ Starting the Billing Process 6-2
■ Define Price Breakdown 6-3
Contents
vi
■ Generate Billing Reports 6-8
Generate Organizational Summary Report 6-9 Generate Individual Bill Totals for an
Organization 6-11
Generate Detailed Individual Report by
Organization 6-13
Generate Detailed Individual Report by
Subscriber Name 6-15
7
PC2AUDIX Database Searches 7-1■ Overview 7-1
■ Initiating PC2AUDIX Database Searches 7-2 ■ List Subscribers with Bills Over Specified Amount 7-3 ■ List Subscribers with Usage Over/
Under Specified Limits 7-5
■ List Subscriber Space Threshold Exceptions 7-7
8
Scheduling PC2AUDIX Data Retrieval 8-1■ Overview 8-1
■ Scheduling Events 8-2
■ Scheduling Call Detail Recording
(CDR) Data Retrieval 8-8
■ Displaying and Editing Scheduled Events 8-9 ■ Displaying the Scheduled Event Log 8-11
9
PC2AUDIX Site Specific Data 9-1■ Overview 9-1
■ Selecting Site Specific Data Options 9-2 ■ Display/Update Information for Local Subscribers 9-2 ■ List All Fields for All Local Subscribers 9-4 ■ Display Information for Remote Subscribers 9-6 ■ List All Fields for All Remote Subscribers 9-7
10
PC2AUDIX Database Management Tools 10-1■ Overview 10-1
■ File Naming Conventions 10-2
Contents
vii
■ Backing Up Retrieved Data 10-3
Back Up Hourly System Traffic Data 10-4 Back Up Daily System Traffic Data 10-5 Back Up Monthly System Traffic Data 10-6 Back Up Monthly Subscriber Traffic Data 10-6 Back Up Daily Subscriber Traffic Data 10-8 Back Up Monthly Billing Data 10-9 Back Up Subscriber Site Data 10-10
■ Deleting Retrieved Data 10-11
Delete Hourly System Traffic Data 10-12 Delete Daily System Traffic Data 10-13 Delete Monthly System Traffic Data 10-14 Delete Monthly Subscriber Traffic Data 10-15 Delete Daily Subscriber Traffic Data 10-16 Delete Monthly Billing Data 10-17
■ Restoring Retrieved Data 10-18
Restore Hourly System Traffic Data 10-19 Restore Daily System Traffic Data 10-20 Restore Monthly System Traffic Data 10-21 Restore Monthly Subscriber Traffic Data 10-22 Restore Daily Subscriber Traffic Data 10-23 Restore Monthly Billing Data 10-24 Restore Subscriber Site Data 10-25
11
Using the ADAP Command Line Language 11-1■ Overview 11-1
■ Logging Into the Voice Mail System 11-2
Automatic Login Procedure 11-2
Manual Login Procedure 11-5
■ Logging Out of the Voice Mail System 11-8
Contents
viii
■ Command Line Commands 11-8
Command Format 11-9
Record Description Tables 11-12
Field Types 11-14
Voice Mail Version Columns 11-15
Input Records 11-16
Input File Format 11-16
Optional Input Fields 11-17
Input of Name or Extension
(DEFINITY/INTUITY AUDIX) 11-17 Redirecting Input from Files 11-18 Entering Data from the Keyboard 11-18
Output Records 11-18
Output Record Format 11-18
Delimiters 11-19
Output Field Separator 11-19
Backward Compatibility 11-19
Redirecting Output to Files 11-20 Using Output with dBASE III PLUS 11-20
Return Codes 11-21
■ Data Retrieval Commands 11-22
■ Database Modification Commands 11-24
12
Command Line Database Retrieval Commands 12-1■ Overview 12-1
■ getaalar 12-2
Syntax 12-2
Description 12-2
Errors 12-5
Output Format 12-5
Example 12-6
■ getadj 12-7
Syntax 12-7
Description 12-7
Errors 12-7
Output Format 12-8
Contents
ix
■ getalogp 12-10
Syntax 12-10
Description 12-10
Errors 12-11
Output Format 12-11
Example 12-11
■ getannc 12-12
Syntax 12-12
Description 12-12
Errors 12-13
Output Format 12-13
Example 12-13
■ getatt 12-14
Syntax 12-14
Description 12-14
Errors 12-14
Output Format 12-15
Example 12-15
■ get_cdr 12-16
Syntax 12-16
Description 12-16
Errors 12-18
Output Format 12-18
Example 12-18
■ getcomm 12-19
Syntax 12-19
Description 12-19
Errors 12-21
Output Format 12-21
Example 12-24
■ getcos 12-25
Syntax 12-25
Description 12-25
Errors 12-25
Output Format 12-26
Contents
x
■ getdir 12-28
Syntax 12-28
Description 12-28
Errors 12-29
Output Format 12-29
Example 12-29
■ geterror 12-30
Syntax 12-30
Description 12-30
Errors 12-32
Output Format 12-33
Example 12-34
■ getevent 12-35
Syntax 12-35
Description 12-35
Errors 12-37
Output Format 12-38
Example 12-38
■ getfeat 12-39
Syntax 12-39
Description 12-39
Output Format 12-41
Errors 12-44
Example 12-44
■ getfrag 12-45
Syntax 12-45
Description 12-45
Errors 12-46
Output Format 12-46
Example 12-46
■ getlimit 12-47
Syntax 12-47
Description 12-47
Errors 12-47
Output Format 12-48
Contents
xi
■ getlist 12-50
Syntax 12-50
Description 12-50
Errors 12-51
Output Format 12-51
Example 12-51
12
■ getload 12-52Syntax 12-52
Description 12-52
Errors 12-54
Output Format 12-54
Example 12-66
■ getlog 12-67
Syntax 12-67
Description 12-67
Errors 12-69
Output Format 12-69
Example 12-70
■ getmaint 12-71
Syntax 12-71
Description 12-71
Errors 12-73
Output Format 12-73
Example 12-74
■ getmlist 12-75
Syntax 12-75
Description 12-75
Errors 12-76
Output Format 12-76
Example 12-76
■ getnet 12-77
Syntax 12-77
Description 12-77
Output Format 12-78
Contents
xii
■ getperf 12-89
Syntax 12-89
Description 12-89
Errors 12-90
Output Format 12-91
General Information 12-91
Example 12-91
Data Types 12-100
Performance Data to be Collected 12-101
Data Collection 12-109
Output Format for Each Data Type 12-109
■ getralar 12-111
Syntax 12-111
Description 12-111
Errors 12-114
Output Format 12-114
Example 12-115
■ getrem 12-116
Syntax 12-116
Description 12-116
Errors 12-118
Output Format 12-118
Example 12-121
■ getrlist 12-122
Syntax 12-122
Description 12-122
Errors 12-123
Output Format 12-123
Example 12-123
■ getrsub 12-124
Syntax 12-124
Description 12-124
Errors 12-125
Input Format 12-125
Output Format 12-126
Contents
xiii
■ getserve 12-129
Syntax 12-129
Description 12-129
Errors 12-130
Output Format 12-130
Example 12-130
■ getspfea 12-131
Syntax 12-131
Description 12-131
Errors 12-133
Output Format 12-133
Example 12-136
■ getsub 12-137
Syntax 12-137
Description 12-137
Errors 12-138
Input Format 12-138
Output Format 12-139
Example 12-141
■ getswitc 12-142
Syntax 12-142
Description 12-142
Errors 12-142
Output Format 12-143
Example 12-143
■ getsys 12-144
Syntax 12-144
Description 12-144
Errors 12-145
Output Format 12-146
Contents
xiv
■ getsysat 12-147
Syntax 12-147
Description 12-147
Errors 12-148
Input Format 12-148
Output Format 12-148
Example 12-150
■ getsyscd 12-151
Syntax 12-151
Description 12-151
Errors 12-151
Output Format 12-152
Example 12-152
■ getsysfe 12-153
Syntax 12-153
Description 12-153
Errors 12-153
Output Format 12-154
Output Format 12-156
Example 12-158
■ gettlist 12-159
Syntax 12-159
Description 12-159
Errors 12-160
Output Format 12-160
Example 12-160
■ gettraf 12-161
Syntax 12-161
Description 12-161
Errors 12-163
Input Format 12-163
Output Format 12-164
Contents
xv
13
Command Line Database Modification Commands 13-1■ Overview 13-1
■ addrsub 13-2
Syntax 13-2
Description 13-2
Input Format 13-3
Output Format 13-3
Example 13-3
■ addsub 13-4
Syntax 13-4
Description 13-4
Input Format 13-5
Output Format 13-5
Example 13-6
■ changcex 13-7
Syntax 13-7
Description 13-7
Errors 13-8
Input Format 13-8
Output Format 13-8
Example 13-8
■ changcom 13-9
Syntax 13-9
Description 13-9
Errors 13-10
Input Format 13-10
Output Format 13-10
Example 13-10
■ changcos 13-11
Syntax 13-11
Description 13-11
Errors 13-12
Input Format 13-12
Output Format 13-12
Contents
xvi
■ changext 13-13
Syntax 13-13
Description 13-13
Errors 13-14
Input Format 13-14
Output Format 13-14
Example 13-14
■ changmis 13-15
Syntax 13-15
Description 13-15
Errors 13-16
Input Format 13-16
Output Format 13-16
Example 13-16
■ changmsg 13-18
Syntax 13-18
Description 13-18
Errors 13-19
Input Format 13-19
Output Format 13-19
Example 13-19
■ changnam 13-20
Syntax 13-20
Description 13-20
Errors 13-21
Input Format 13-21
Output Format 13-21
Example 13-21
■ changpwd 13-22
Syntax 13-22
Description 13-22
Errors 13-23
Input Format 13-23
Output Format 13-23
Contents
xvii
■ changsub 13-24
Syntax 13-24
Description 13-24
Errors 13-25
Input Format 13-25
Output Format 13-27
Example 13-29
■ changsw 13-31
Syntax 13-31
Description 13-31
Errors 13-32
Input Format 13-32
Output Format 13-32
Example 13-32
■ changtex 13-33
Syntax 13-33
Description 13-33
Errors 13-34
Input Format 13-34
Output Format 13-34
Example 13-35
■ chgrcom 13-36
Syntax 13-36
Description 13-36
Errors 13-37
Input Format 13-37
Output Format 13-37
Example 13-37
■ chgrext 13-38
Syntax 13-38
Description 13-38
Errors 13-39
Input Format 13-39
Output Format 13-39
Contents
xviii
■ chgrmach 13-40
Syntax 13-40
Description 13-40
Errors 13-41
Input Format 13-41
Output Format 13-41
Example 13-41
■ chgrnam 13-42
Syntax 13-42
Description 13-42
Errors 13-43
Input Format 13-43
Output Format 13-43
Example 13-43
■ delrsub 13-44
Syntax 13-44
Description 13-44
Errors 13-45
Input Format 13-45
Output Format 13-45
Example 13-45
■ delsub 13-46
Syntax 13-46
Description 13-46
Errors 13-47
Input Format 13-47
Output Format 13-47
Example 13-47
■ setadj 13-48
Syntax 13-48
Description 13-48
Errors 13-49
Contents
xix
■ setalogp 13-51
Syntax 13-51
Description 13-51
Errors 13-52
Example 13-52
■ setscdr 13-53
Syntax 13-53
Description 13-53
Errors 13-54
Example 13-54
A
Troubleshooting A-1■ Establishing a Connection to the System A-1 ■ Terminating the Connecting to the System A-1 ■ Retrieving Data During Peak Usage A-1 ■ Interactions Between Terminals On AUDIX Systems A-2
■ Timeouts A-2
■ Data Acquisition Problems A-2
■ Alogin (Automated Login) Problems A-3 ■ Common Problems and Solutions A-3
Connection Problems with Login Commands: A-3 Problems Encountered During Data Retrieval or
Database Modification: A-4
B
RS-232 Driver Errors B-1■ Converting Error Return Codes into
RS-232 Driver Error Codes B-1
AB
Abbreviations AB-1GL
Glossary GL-1Contents
About This Document
xxi
About This Document
This document describes how to use ADAP, the PC-based Administration and Data Acquisition Package which allows voice mail customers to transfer data from a voice mail system to the PC for further processing. Customers can also use ADAP to modify data directly in the voice mail system subscriber database.
ADAP works with these voice mail systems:
■ Lucent INTUITY AUDIX R2.0, R3.2, R3.3, R4.0 and R5.0 systems
■ DEFINITY AUDIX R3.2 and earlier system versions ■ AUDIX R1V8 and earlier system versions
However, the Lucent INTUITY AUDIX version of ADAP works only for INTUITY
AUDIX System, and the AUDIX/DEFINITY AUDIX version works only with R1 AUDIX and DEFINITY AUDIX Systems.
ADAP gives you two ways to work with data from the voice mail database:
■ The command line language allows programmers to download data from
the voice mail system to the PC for use in customer-developed
applications. Using the command line language programmers can modify also subscriber data in the voice mail system.
■ PC2AUDIX is a a menu-driven application allowing system administrators
to download data from the voice mail system to the PC and to use for generating standardized traffic and billing reports with dBASE III PLUS™ software.
NOTE:
About This Document
xxii Intended Audiences
Intended Audiences
This document contains information for the following two audiences:
■ Programmers who use the ADAP command line language to:
— Retrieve data from the voice mail system to the PC for use in customized applications
— Modify subscriber records directly in the voice mail database
■ System administrators who use PC2AUDIX to:
— Retrieve DEFINITY AUDIX or AUDIX data to the PC
— Generate standardized reports
— Modify subscriber records directly in the DEFINITY AUDIX or AUDIX database
Prerequisite Skills and Knowledge
The system administrators who use the PC2AUDIX interface must know how to use a PC. Knowledge of the dBASE III PLUS database management system is helpful but not required.
Programmers who use the ADAP command line language to write application programs should have a working knowledge of the PC, the MS-DOS operating system, and the INTUITY AUDIX, DEFINITY AUDIX, or AUDIX administration screens.
Organization of This Document
This document is organized as follows:
■ Chapter 1, "Introduction", describes what ADAP does and how it works,
introduces the two user interfaces that can be used, and lists the voice mail administration screens supported by ADAP.
■ Chapter 2, "Installation" , describes ADAP installation requirements,
describers the ADAP directory structure on the PC, and tells you how to install the ADAP software.
■ Chapter 3, "Using PC2AUDIX Application Programs", describes how to set
up and use the PC2AUDIX interface.
■ Chapter 4, "PC2AUDIX Data Retrieval", describes how to verify the
About This Document
xxiii Organization of This Document
■ Chapter 5, "PC2AUDIX Traffic Reports", describes how to produce
standardized traffic reports using data that was previously retrieved from the DEFINITY AUDIX or AUDIX database.
■ Chapter 6, "PC2AUDIX Billing Reports", describes how to produce
standardized billing reports using data that was previously retrieved from the DEFINITY AUDIX or AUDIX database.
■ Chapter 7, "PC2AUDIX Database Searches", describes how to list
subscribers with bills over specified amounts, to list subscribers with usage over/under a specified amount, and to list subscriber space threshold exceptions.
■ Chapter 8, "Scheduling PC2AUDIX Data Retrieval", describes how to
schedule events, display and edit scheduled events, display the event log, and schedule Call Detail Recording (CDR) data retrieval when CDR is included with your AUDIX system.
■ Chapter 9, "PC2AUDIX Site Specific Data", describes how to display and
update information for local and remote subscribers.
■ Chapter 10, "PC2AUDIX Database Management Tools", describes how to
back up retrieved data, restore backed up data, and delete retrieved data from the PC.
■ Chapter 11, "Using the ADAP Command Line Language", describes how
to use the ADAP command line language to retrieve data from the voice mail database or to modify subscriber data in the database.
■ Chapter 12, "Command Line Database Retrieval Commands", lists and
describes commands that download information directly from the voice mail database for use in customer-developed applications.
■ Chapter 13, "Command Line Database Modification Commands", lists and
describes commands that modify subscriber information in the voice mail database.
■ Appendix A, "Troubleshooting", provides possible solutions for problems
that may occur while using the PC2AUDIX interface or the ADAP command line language.
■ Appendix B, "RS-232 Driver Errors", lists driver error codes and
About This Document
xxiv How to Use This Document
How to Use This Document
This document reflects the unique interests, requirements, and skill levels of the diverse audiences who use ADAP. Information is organized in Fs that meet the specific technical requirements of each audience.
If you are a programmers using the ADAP command line language, you will use the following chapters:
■ Chapter 1, "Introduction" ■ Chapter 2, "Installation"
■ Chapter 11, "Using the ADAP Command Line Language" ■ Chapter 12, "Command Line Database Retrieval Commands" ■ Chapter 13, "Command Line Database Modification Commands" ■ Appendix A, "Troubleshooting"
If you are a system administrator using PC2AUDIX, you will use the following chapters:
■ Chapter 1, "Introduction" ■ Chapter 2, "Installation"
■ Chapter 3, "Using PC2AUDIX Application Programs" ■ Chapter 4, "PC2AUDIX Data Retrieval"
■ Chapter 5, "PC2AUDIX Traffic Reports" ■ Chapter 6, "PC2AUDIX Billing Reports" ■ Chapter 7, "PC2AUDIX Database Searches" ■ Chapter 8, "Scheduling PC2AUDIX Data Retrieval" ■ Chapter 9, "PC2AUDIX Site Specific Data"
About This Document
xxv Conventions Used in This Document
Conventions Used in This Document
The following conventions are used throughout this document:
Trademarks and Service Marks
The following trademarks are mentioned throughout this document:
■ INTUITY® is a registered trademark of Lucent Technologies.
■ AUDIX® is a registered trademark of Lucent Technologies. ■ dBASE III PLUS™ is a trademark of Ashton-Tate.
■ DEFINITY® is a registered trademark of Lucent Technologies. ■ Microsoft® is a registered trademark of Microsoft Corporation. ■ MS-DOS® is a registered trademark of Microsoft Corporation. ■ UNIX® is a registered trademark of UNIX Systems Laboratories.
Bold Command names and options to be entered exactly as they are shown.
Example: For the command line getdir [-v] [> ofile] enter getdir and (optionally) -v.
Italics Variables to be replaced with literal values.
Example: For > ofile (shown in the previous example), enter the name of the output file to receive the data.
Brackets Optional arguments
Example: For [v], entering v is optional.
Each command option consists of a dash, followed immediately by a one-letter option identifier. For an identifier that requires an argument, you can insert a space between the identifier and the argument for readability, but it isn’t required.
Rounded box Encloses the name of a key that you will press.
Example:
Squared box Encloses the name of an action performed by the software program.
Example: is a carriage return followed by a linefeed, a combined action automatically performed by the software at the end of each output record.
RETURN
About This Document
xxvi Related Resources
Related Resources
For a complete description of the screens discussed in this document, refer to the manual corresponding to your voice mail system:
■ DEFINITY AUDIX System — Screens Reference, 585-300-211 ■ AUDIX Release 1 Version 8 Forms Reference, 585-305-209
Full instructions for using dBASE III PLUS database file structures can be found in the manuals supplied with that software package.
To order additional Lucent Technologies documents, call the Lucent Technologies Customer Information Center by dialing the toll free number (1-800-432-6600) and requesting each item by the appropriate document number.
For information about other DEFINITY AUDIX system or R1 AUDIX system documents, refer to the documentation guide corresponding to your voice mail system:
■ DEFINITY AUDIX System Documentation Guide, 585-300-011 ■ AUDIX Documentation Guide, 585-300-011
How to Make Comments About This
Document
While we have tried to make this document fit your needs, we appreciate your suggestions for its improvement. If you have any suggestions for improving this document or a similar document, please send them to us on the reader comment card. You will find the card behind the title page of this document.
If your reader comment card has been removed, please mail your comments to:
Lucent Technologies
Product Documentation Development Department Room 22-2H15
Introduction
1-1 Overview
1
1
Introduction
Overview
The AUDIX Administration and Data Acquisition Package (ADAP) allows INTUITY
AUDIX, DEFINITY AUDIX, and AUDIX customers to download traffic data, subscriber data, and other system data from the voice mail system to the PC for further processing.
ADAP has two user interfaces: a menu-driven application called PC2AUDIX used by system administrators, and a command line language used by programmers. Each of these interfaces is described separately in this manual.
The PC2AUDIX User Interface
The PC2AUDIX interface is a menu-driven application program that runs under dBASE III PLUS software. Using PC2AUDIX you can download data from a DEFINITY AUDIX or AUDIX system to the PC and create standardized traffic reports and billing reports using this data. Because PC2AUDIX uses the ADAP command line language both ADAP software and dBASE III PLUS software must reside on your PC before using PC2AUDIX.
NOTE:
If the Stella Business Graphics package is installed on your PC, PC2AUDIX reports can be presented as bar charts and line charts. The Stella Business Graphics package is no longer available, but you may have purchased it with a previous version of the ADAP software.
Introduction
1-2 The ADAP Command Line Language User Interface
1
The ADAP Command Line Language
User Interface
The ADAP command line language provides a set of commands that
programmers can use to modify subscriber information directly in the voice mail database and also to download data from voice mail database files to the PC for use in customer-developed applications.
Chapter 11 through Chapter 13 describe how to use the ADAP command line language.
How ADAP Works
The PC from which you run ADAP is connected to your voice mail system by either a direct or dial-up connection. If you are using the ADAP command line language, you log into the voice mail system from your PC and access the voice mail database using an ADAP-supplied login command. For the PC2AUDIX interface, the software automatically logs into the voice mail system whenever it needs access to the database.
ADAP does not work directly with live data in the voice mail database, except for database modification commands and the system attendant reports. Live data is the information maintained by the voice mail system and stored on the system itself. ADAP retrieves a copy of this data for storage on the PC. When you change the retrieved that is data stored on your PC this does not change the data stored on the voice mail system.
With the command line language, you can display the data on your PC screen, direct it to a printer, or direct it to a file for further processing. If you retrieve data to a file, you can develop your own programs to manipulate the data, or port the data to a mainframe for further processing,
With PC2AUDIX, data is retrieved to a file.You can then process the retrieved data on the PC using custom-developed dBASE III PLUS programs or formatted the data in standardized dBASE III PLUS reports using PC2AUDIX menu options.
NOTE:
To register for a class on dBASE III PLUS, call your account team to see if a local class is held in your area.
ADAP Data Retrieval
Data can be retrieved in four ways:
■ You can use PC2AUDIX menu options to retrieve data to your PC in a
Introduction
1-3 Screens Supported by ADAP
1
■ You can write application programs using ADAP command line language
commands to retrieve database information to your PC. Data is written in a flat ASCII format that can be read using dBASE III PLUS.
■ You can enter individual ADAP command line language commands from
the keyboard of the PC at the MS-DOS prompt to retrieve data to the PC in a flat ASCII format.
■ You can execute ADAP command line language commands from an
MS-DOS batch file.
You can use retrieved data to:
■ Bill voice mail system users, either on a space, call, or time basis ■ Analyze daily, hourly, or monthly traffic information for local and network
traffic, and monthly traffic information for system attendant traffic
■ Analyze subscriber usage
■ Analyze AUDIX system call detail recording (CDR) data and AUDIX
system performance statistics
■ Produce reports to support a wide range of decisions — from
administrative decisions, such as changing the amount of time an
individual subscriber retains a message, to management decisions, such as expanding the voice mail system to include more ports. For example, you can determine actual system use and compare it with the type of use that was initially forecast for your site when your system was configured.
ADAP Database Modification
You can use database modification commands to:
■ Add new local and remote subscriber records to the voice mail database ■ Delete existing local and remote subscriber records from the voice mail
database
■ Modify some local and remote subscriber field values in the voice mail
database
■ Modify CDR system data and adjunct machine data on the AUDIX system ■ Modify activity log system parameters on the DEFINITY AUDIX system
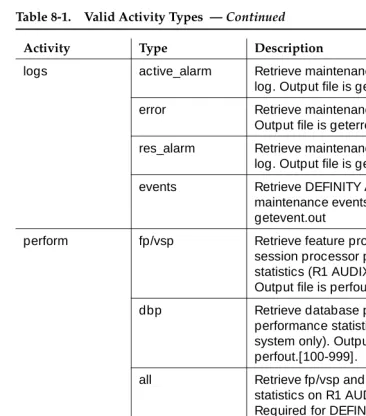
Screens Supported by ADAP
Introduction
1-4 Screens Supported by ADAP
1
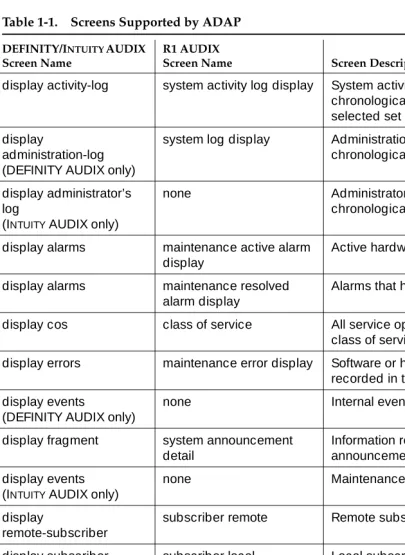
Table 1-1. Screens Supported by ADAP
DEFINITY/INTUITY AUDIX Screen Name
R1 AUDIX
Screen Name Screen Description
display activity-log system activity log display System activity log entries in chronological order for a selected set of entries
display
administration-log (DEFINITY AUDIX only)
system log display Administration log entries in chronological order
display administrator’s log
(INTUITY AUDIX only)
none Administrator’s log entries in chronological order
display alarms maintenance active alarm display
Active hardware alarms
display alarms maintenance resolved alarm display
Alarms that have been resolved
display cos class of service All service options for each class of service
display errors maintenance error display Software or hardware errors recorded in the error log
display events
(DEFINITY AUDIX only)
none Internal events
display fragment system announcement detail
Information related to announcement fragments
display events (INTUITY AUDIX only)
none Maintenance log entries
display
remote-subscriber
subscriber remote Remote subscriber information
display subscriber subscriber local Local subscriber information
display subscriber system attendant Automated attendant information
display
system-parameters activity-log
none Activity log parameters
display
system-parameters features
system translation switch connection
Type of switch connection, such as dciu-sci.DEFINITY AUDIX system feature information.
Introduction
1-5 Screens Supported by ADAP
1
display
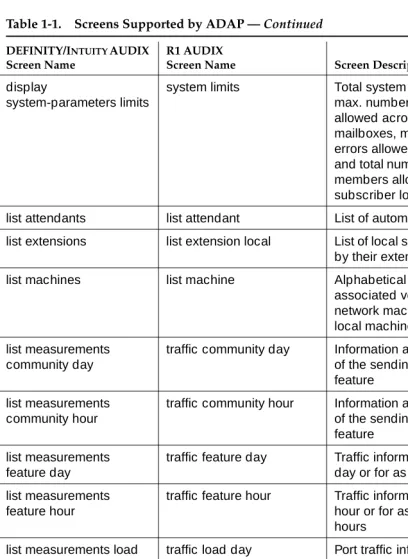
system-parameters limits
system limits Total system limits, such as max. number of messages allowed across all subscriber mailboxes, max. number of errors allowed in the error log, and total number of lists and list members allowed across all subscriber logins
list attendants list attendant List of automated attendants
list extensions list extension local List of local subscribers’ names by their extensions
list machines list machine Alphabetical list of names and associated voice IDs of all network machines (including local machine)
list measurements community day
traffic community day Information about daily usage of the sending restrictions feature
list measurements community hour
traffic community hour Information about hourly usage of the sending restrictions feature
list measurements feature day
traffic feature day Traffic information for any given day or for as many as 8 days
list measurements feature hour
traffic feature hour Traffic information for any given hour or for as many as 192 hours
list measurements load day
traffic load day Port traffic information for any given day or for as many as 32 days
list measurements load hour
traffic load hour Port traffic information for any given hour or for as many as 192 hours
list measurements remote-messages day
traffic remote messages day
Information about message traffic between the local voice mail system and each remote system for any given day or for as many as eight days
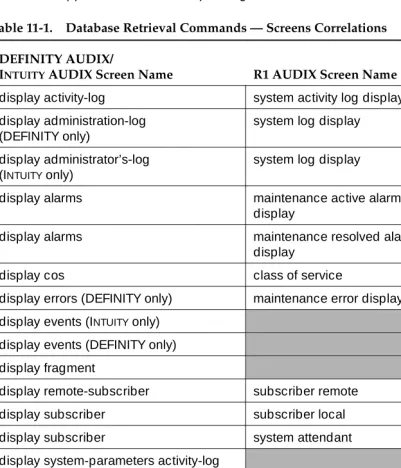
Table 1-1. Screens Supported by ADAP — Continued
DEFINITY/INTUITY AUDIX Screen Name
R1 AUDIX
Screen Name Screen Description
Introduction
1-6 Screens Supported by ADAP
1
list measurements remote-messages month
traffic remote messages month
Information about message traffic between the local voice mail system and each remote system for any given month or for as many as 13 months
list measurements special-features day
traffic special features day Standalone and Outcalling traffic for any given day or for as many as eight days
list measurements special-features hour
traffic special features hour
Standalone and Outcalling traffic for any given hour or for as many as 192 hours
list measurements subscriber day
traffic subscriber day Subscriber traffic information differentiated between call answer calls and voice mail calls, and between prime time and nonprime time within these categories for any given day or for as many as eight days
list measurements subscriber month
traffic subscriber month Subscriber traffic information differentiated between call answer calls and voice mail calls, and between prime time and nonprime time within these categories for any given month or for as many as 13 months
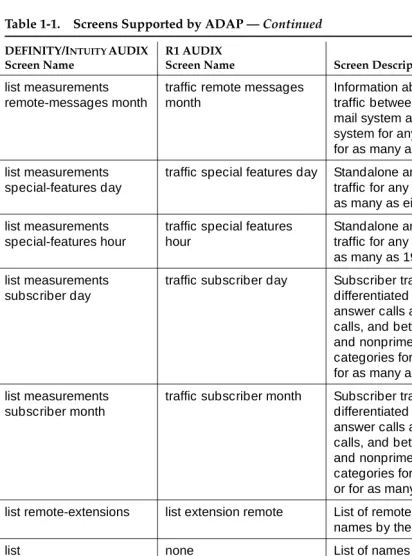
list remote-extensions list extension remote List of remote subscribers’ names by their extensions
list
remote-text-addresses (INTUITY AUDIX only)
none List of names and text
addresses for a given trusted server
list subscribers list subscriber Alphabetical list of local subscribers by name
list trusted-servers (INTUITY AUDIX only)
none List of trusted servers
associated with this AUDIX system
none system cdr Call detail recording (CDR)
information
Table 1-1. Screens Supported by ADAP — Continued
DEFINITY/INTUITY AUDIX Screen Name
R1 AUDIX
Screen Name Screen Description
Introduction
1-7 Data Retention Considerations
1
For a complete description of these screens, refer to DEFINITY AUDIX System — Screens Reference, 585-300-207, or the AUDIX Release 1 Version 8 Forms Reference, 585-306-204. For a table describing the relationships between screen names, commands, and the voice mail versions, see Chapter 11, "Using the ADAP Command Line Language".
Data Retention Considerations
To retain traffic data, you must activate traffic collection using the DEFINITY AUDIX System-Parameters Feature screen, or the AUDIX System: Appearance screen). This initiates traffic data collection on the voice mail system. You must activate the traffic collection feature for at least as many days in the past as you want to retrieve traffic data.
The voice mail systems do not retain collected traffic data for an indefinite period. You must retrieve collected traffic data from the voice mail system in a timely fashion before it is deleted from the system by internal audits.
system translation machine adjunct
Machines administered for use as a CDR PC or text service machine
list measurements network load day
traffic network load day Information about the number and duration of calls on the ACC data ports for any given day or for as many as 32 days
list measurements network load hour
traffic network load hour Information about the number and duration of calls on the ACC data ports for any given hour or for as many as 192 hours
Table 1-1. Screens Supported by ADAP — Continued
DEFINITY/INTUITY AUDIX Screen Name
R1 AUDIX
Screen Name Screen Description
Introduction
1-8 Data Retention Considerations
1
Information for the following screens is stored for 192 hours (eight days):
Information for the following screens is stored for 32 days:
Information for the following screens is stored for eight days:
Information for the following screens is stored for 13 months:
DEFINITY/INTUITY AUDIX Systems R1 AUDIX System
list measurements feature hour traffic feature hour
list measurements load hour traffic load hour
list measurements community hour traffic community hour
list measurements special-features hour traffic special features hour
list measurements network-load hour traffic network load hour
DEFINITY/INTUITY AUDIX Systems R1 AUDIX System
list measurements feature day traffic feature day
list measurements load day traffic load day
list measurements community day traffic community day
list measurements special-features day traffic special features day
list measurements network-load day traffic network load day
DEFINITY/INTUITY AUDIX System R1 AUDIX System
list measurements remote-messages day traffic remote messages day
list measurements subscriber day traffic subscriber day
DEFINITY/INTUITY AUDIX Systems R1 AUDIX System
list measurements remote-messages month traffic remote messages month
Installation
2-1 Installation Requirements
2
2
Installation
This chapter tells you how to install ADAP software on your PC. This consists of the following three tasks, described in detail later in this chapter.
1. Determine that required hardware is in place and configured properly.
2. Understand how the ADAP directories are organized on your PC.
3. Perform the installation. Installation procedures are the same whether you install ADAP for the first time or upgrade from an earlier version of ADAP.
Installation Requirements
Before you install the ADAP software, check that your PC system consists of the following:
■ An IBM-compatible PC with:
— A minimum of 640 KB of RAM
— A 3.5” 1.44 MB or 5.25” 1.2 MB floppy disk drive (DEFINITY AUDIX and R1 AUDIX systems)
— A 3.5” 1.44 MB floppy disk drive (INTUITY AUDIX systems)
— One fixed disk (hard drive) with a minimum of 40 MB of storage
— MS-DOS 3.1 or newer
NOTE:
If you have AUDIX Call Detail Recording (CDR), refer to AUDIX Call Detail Recording Package, 585-305-506, for the CDR hardware requirements. The DEFINITY AUDIX and INTUITY AUDIX systems do
Installation
2-2 ADAP Directory Structure
2
The following, optional items enhance and expand your use of the ADAP software; they are available only for DEFINITY AUDIX and R1 AUDIX systems:
■ dBASE III PLUS, Version 1.1, supplied by you, the customer, is needed to
run the PC2AUDIX portion of ADAP. You can also use dBASE III PLUS with application programs you develop.
■ Stella Business Graphics package or other graphics software, also
provided by the customer, which generates charts and graphs using data from PC2AUDIX. This is optional. The dBASE utilities do not work with Stella Business Graphics II.
NOTE:
The Stella Business Graphics package is no longer available, but you may have purchased it with a previous version of the ADAP software.
■ A PC–compatible, parallel port printer for printing text files.
Recommended Hardware Configurations
Your PC must be connected to the voice mail system through one of the following configurations:
■ Directly, with a Group 311 RS-232 cable connected from your PC to a
Group 350 null modem cable, which in turn is connected to:
— Port A on the DEFINITY AUDIX or INTUITY AUDIX system
or
— The local administration terminal (LAT) connector on the back of the R1 AUDIX system
The length of the RS-232 cable should not exceed 50 feet.
■ Through a switch using a Hayes-compatible modem
■ Through a switch using Modular Processor Data Module (MPDM)
ADAP Directory Structure
Installation
2-3 ADAP Directory Structure
2
to instructions in Chapter 3; they will contain the data that you retrieve from each voice mail machine using ADAP. If you are working with more than one voice mail machine, you need to create a directory corresponding to each machine.
Installing PC2AUDIX, DBASEIII, and Stella Business Graphics creates the additional directories and subdirectories shown in the figure below. The DBASE directory contains the dBASEIII software, and the DB3_PROG.DIR and DB3_ STRU.DIR subdirectories to contain related dBASEIII program files and
database structures. The SBG directory contains the Stella Business Graphics, software and the KEYFILES subdirectory contains links between PC2AUDIX and Stella Business Graphics for running graphic reports.
ADAP Diskette Contents
Each diskette contains a readme file that lists the ADAP files and directories contained on that diskette. To display the contents of the readme file, insert the diskette in drive A and enter type a:readme at the DOS prompt. (If you use a drive other than A, enter it instead.)
The ADAP software is contained on either 5-1/4-inch or 3-1/2-inch diskettes. Use the diskettes that fit your PC.
Root Directory
<machine1> <machine3>
(optional) (optional)
<machine2> <machine4> (optional) PCIFCE INT_ADAP
DBASE SBG
(optional) PCIFCE
DB3_PROG.DIR DB3_STRU.DIR KEYFILES
AUDIX DEFAUDIX INT_ADAP
Root Directory
<machine1> <machine4>
(optional) (optional)
(optional)
Installation
2-4 Installation Procedures
2
Installation Procedures
Installation procedures are the same whether you are installing ADAP for the first time or upgrading from an earlier version of the ADAP software.
To install ADAP, you will perform the five following procedures, in the following order (note that the second, third, and fourth tasks are optional and pertain only to DEFINITY AUDIX and R1 AUDIX systems):
1. Install the ADAP software.
2. Install the PC2AUDIX software, which also sets up database file structures on your PC (DEFINITY AUDIX and R1 AUDIX systems only). You must install the ADAP software before installing PC2AUDIX software.
NOTE:
PC2AUDIX does not operate with INTUITY AUDIX systems.
3. Install the customer-provided dBASE III PLUS database management software package (DEFINITY AUDIX and R1 AUDIX systems only).
4. Install graphics software (optional).
5. Verify that the config.sys and autoexec.bat files are set up properly for ADAP.
Install ADAP Software
Perform the following steps to install the ADAP software. Installation automatically builds the required subdirectories if they do not exist already.
1. ADAP software is installed by default to C:\PCIFCE or C:\INT_ADAP. If you want to install to a different subdirectory or drive, insert the following environment variable definition in your autoexec.bat file, and reboot your PC:
SET ADAPROOT=<drive>:\<directory>
(where <drive> is the drive letter and <directory> is the directory path name)
2. Insert AUDIX Administration and Data Acquisition Software, Disk 1 into your floppy disk drive.
3. At the DOS prompt, enter a: to change to drive A. (If you use a diskette drive other than drive A, enter that drive letter instead.)
4. Enter setup.
You are prompted for your floppy disk drive.
5. Enter your floppy disk drive letter name, or press Enter to default to drive a:.
Installation
2-5 Installation Procedures
2
6. Press a to select Install ADAP Command Line Software.
The Install ADAP Command Line Software screen appears.
7. Press i to select Install.
Messages describing installation progress appear. When installation of the disk is finished, if there are more disks to install you are prompted to insert the next disk. Each disk takes about a minute to install.
8. Insert the next disk and press any key to continue.
9. Repeat Step 8 for each diskette requested by the Setup program.
When installation is finished, an Installation Complete message appears.
10. Press any key to continue.
The Setup for AUDIX PC Software menu appears.
If you plan to use the PC2AUDX reporting package, install PC2AUDIX, according to the following section. Otherwise, press q to quit the setup program and go to the "Check Config.sys and Autoexec.bat Files" later in this chapter.
NOTE:
If you quit, and this is an initial installation, you must reboot the PC.
Install PC2AUDIX Software (Optional)
If you are upgrading from a previous version, PC2AUDIX preserves any previously-retrieved data. If you are migrating from an R1 AUDIX to DEFINITY AUDIX machine, PC2AUDIX automatically converts the data to the DEFINITY AUDIX format. However, PC2AUDIX cannot convert DEFINITY AUDIX data to R1 AUDIX format.
To install the PC2AUDIX software, perform the following steps:
1. In the Setup for AUDIX PC Software screen, press p to select Install PC2AUDIX Application Software.
The Install PC2AUDIX Application Software screen appears.
2. Insert the first PC2AUDIX disk
3. Press i to install the PC2AUDIX program software.
Messages describing installation progress appear. This takes about five minutes to install.
When the PC2AUDIX installation is finished, an Installation Complete message appears.
4. Press any key to display the Setup menu.
Installation
2-6 Installation Procedures
2
The PC2AUDIX installation is completed successfully and the DOS prompt appears.
NOTE:
Installation copies all PC2AUDIX database structures to your PC, except those contained in the TEMPLATE subdirectory. These are useful if you are developing your own application programs. If you wish, look at the contents of the TEMPLATE subdirectory on the floppy disks and copy them to your PC if you want to use them.
Now that PC2AUDIX is installed, proceed to the next procedure to install dBASE III, which is required to run PC2AUDIX.
NOTE:
PC2AUDIX, dBASE III, and graphics software only operate with DEFINITY AUDIX and R1 AUDIX systems.
Install dBASE III Plus Software (Optional)
You must install the dBASE III PLUS database management package in order to you use PC2AUDIX. If dBASE III PLUS is not installed already, perform the following steps:
1. At the DOS prompt, enter mkdir dbase to create a subdirectory named dbase. This directory is where the dBASE III PLUS programs will reside on your PC.
2. Enter cd dbase to access the subdirectory that you just created.
3. Install the dBASE III PLUS software as instructed in the dBASE III PLUS installation document, Getting Started, dBASE III PLUS, 10060-0214.
Now that dBASE III is installed, you can proceed with the next procedure to install the graphics software, or skip to the last procedure to check the config.sys and autoexec.bat files.
Install Graphics Software (Optional)
If you purchased the Stella Business Graphics Package when it was available, you may need to install or re-install the package. To do so, perform the following steps:
1. At the DOS prompt, enter mkdir sbg to create the directory where the Stella Business Graphics programs will reside.
2. Enter cd sbg to access the sbg subdirectory that you just created.
Installation
2-7 Installation Procedures
2
4. Use the setup.exe program included with the Stella Business Graphics package to set up Stella to use either the Epson dot matrix printer or the Hewlett-Packard LaserJet printer. This entry must match the entry in the PC2AUDIX Setup Parameters Printer Type field.
Check Config.sys and Autoexec.bat Files
The installation automatically modifies data in the config.sys and autoexec.bat files. Perform the following steps to ensure that these changes were made:
1. At the DOS prompt, enter type config.sys to display the contents of the config.sys file.
2. Check for the rs232 device line:
device=c:\pcifce\ex_rs232.bin
This line identifies the device driver for communicating with the voice mail system. If it is not present, use your text editor to add it to the file. (If you changed the ADAP software subdirectory to a name other than PCIFCE or INT_ADAP, the name you changed it to should appear in the file.)
3. Check for the following device line, which tells ADAP how to write things to the screen:
device=c:\dos\ansi.sys
4. At the DOS prompt, enter type autoexec.bat to display the contents of the autoexec.bat file.
5. Check for the line that begins with PATH= and validate the following: a. You should see the entry c:\pcifce or c:\int_adap on this
line.
If you installed ADAP to a directory other than either of these, the name you changed it to should appear on this line.
b. If you installed dBASE III PLUS, you should see:
c:\dbase in the PATH= line.
c. If you installed Stella Business Graphics, you should see:
c:\sbg in the PATH= line.
6. If the above entries are not included in your autoexec.bat file, use your text editor to add them to the file.
7. If you made any changes in the previous steps, reboot your system.
Installation
2-8 Installation Procedures
Using PC2AUDIX Application Programs
3-1
3
3
Using PC2AUDIX Application
Programs
PC2AUDIX is a menu-driven application that downloads selected voice mail data to your PC, and works with dBASE III PLUS software to generate standardized traffic and billing reports. PC2AUDIX also provides tools for managing retrieved data on the PC.
Using PC2AUDIX you can:
■ Retrieve traffic and subscriber data to the PC
■ Retrieve AUDIX system Call Detail Recording (CDR) data to the PC ■ Generate standardized traffic reports on the PC displayed in table format
or in graphical format with a compatible graphics package
■ Generate subscriber usage billing reports on the PC
■ Generate reports that reveal how subscribers use the voice mail system
(such as who creates voice mail messages and how many, who allows mailboxes to reach a certain percentage, and who the heavy users are)
■ Schedule data retrieval from local and network machines for on-hours or
off-hours execution
■ Display individual local and remote subscriber records
■ Update specific PC2AUDIX data fields in PC2AUDIX subscriber records
(and Name and Ext fields in the subscriber database)
■ Back up, restore, and delete retrieved voice mail database files from your
PC’s fixed disk
NOTE:
Using PC2AUDIX Application Programs
3-2 Working in PC2AUDIX
3
Working in PC2AUDIX
Before using PC2AUDIX, you must first install the ADAP and PC2AUDIX software onto your PC following the installation instructions in Chapter 2. You also must install dBASE III PLUS software, as described in Chapter 2, to use PC2AUDIX. While working in PC2AUDIX you use screens to enter report parameters and generate reports. The keys described below are your tools for moving around the screen and entering values in the data entry fields:
Function keys appear at the bottom of each PC2AUDIX screen. Each display key corresponds to a function key on your keyboard.The most typically used function keys are shown below:
moves to the next field
moves to the previous field
moves back one character
moves forward one character
moves to the start of the next field
erases to the end of the field
toggles insert mode on or off
erases the character under the cursor
(NEXT PAGE) displays the next page of data for multiple-page screens
(PRINT FORM) prints the screen with three screens to a printed page
(PREV REC) displays the previous record on the same screen
(PREV FORM returns to the previously-displayed screen
(CHANGE/RUN) saves changes that were made or starts execution of the screen. Screens containing modifiable fields do not start execution until you press
(CHANGE/RUN).
(ROOT MENU) returns to the PC2AUDIX Root Menu
Using PC2AUDIX Application Programs
3-3 Setting Up PC2AUDIX Interface in a New Work Area
3
NOTE:
If you enter an invalid date in a date field, such as 99/99/99, dBASE III PLUS does not allow you to leave that field, and function keys (including HELP) do not function properly. You can either enter a valid date, or press the key to restore the date field to its initial value. Make cautious use of the key, or you may unintentionally halt a PC2AUDIX operation.
Setting Up PC2AUDIX Interface in a
New Work Area
To set up PC2AUDIX in a new work area on your PC, you must perform three tasks:
1. Create PC2AUDIX subdirectories.
2. Establish PC2AUDIX Setup Parameters.
3. Establish Setup Parameters for Call Detail Recording (CDR).
Each of these tasks is described in this section.
Creating PC2AUDIX Subdirectories
PC2AUDIX works only in a subdirectory. Before using the interface, you must create a subdirectory on your PC to serve as a work area for storing retrieved data.
If you want to retrieve data from more than one voice mail system, you must first create a separate subdirectory on your PC corresponding to each system. To do this, perform the following steps:
1. Use the MS-DOS Date and Time commands to verify that the date and time are correct on your PC.
2. At the DOS prompt, enter cd \ to ensure that you are in your PC’s root directory (drive C:). You should see the C> prompt displayed. (If you are using an alternate drive, such as drive D, you should see that drive letter displayed.)
3. Enter mkdir machine_name (where machine_name is the name of your voice mail system) to create a PC2AUDIX subdirectory for your system.
If you have more than one voice mail system in an your network, repeat step 3 for each system.
ESC
Using PC2AUDIX Application Programs
3-4 Setting Up PC2AUDIX Interface in a New Work Area
3
Establishing PC2AUDIX Setup Parameters
Setup parameters define the link between your PC and the voice mail system from which your PC retrieves data. If you created subdirectories for more than one system in the previous task, you must also establish separate setup parameters for each system.
1. At the DOS prompt C>, enter cd machine_name to change to the AUDIX system subdirectory you created in the previous task. (If you are using an alternate disk drive, such as drive D:, that drive letter should be
displayed.)
2. Enter pc2audix to call the PC2AUDIX software. Copyright information appears on the screen for approximately five seconds. If you want to bypass this delay, press .
The PC2AUDIX software checks to see that you are currently in a subdirectory, that no database structures are missing, and that the database structures are a version prior to ADAP R1V8.
3. If subscriber data exists, a (re)indexing message appears
The PC2AUDIX Setup Parameters screen appears.
4. Position the cursor (using either or the down arrow key) at each of the fields that are empty or that have incorrect default values, and enter the correct values. Field descriptions and valid entries are shown below.
RETURN
Using PC2AUDIX Application Programs
3-5 Setting Up PC2AUDIX Interface in a New Work Area
3
Field Name Description Valid Entries
Type of connection
Connection type.
Default: direct
att4000 (ATT4000 modem)
direct (hardwired connection using NULL modem)
hayes (Hayes-compatible modem)
pdm (Modular Processor Data Module (MPDM) in conjunction with your Lucent Technologies switch)
Initialization String Initialization string for automatic modem setup
Default: a null string.
< 40 characters.
Spaces are legal in Hayes initialization strings. You cannot use automatic modem setup with the Lucent Technologies 7400B data module.
Baud Rate Sets the
communications baud rate, measured in bits per second (bps), if the connection type is set to anything other than direct.
Default: 9600
1200, 2400, 4800, or 9600 (for D-r3.2 thru D-r1.0.)
1200, 4800 (for R1 AUDIX software version)
NOTE:
Your modem must be able to transmit at the selected bits per second.
Port Number Port that connects your PC to the voice mail system.
Default: COM1
1 (COM1)
2 (COM2)
Should specify number of the port to which the null modem, modem, or PDM is connected.
Access Phone # Phone number for your Local Administration Terminal.
The PC used to access the DEFINITY AUDIX system must be connected to Port A on the DEFINITY AUDIX MFB. The PC used to access the AUDIX system must be connected to the LAT (Local Administration Terminal) port on the AUDIX equipment cabinet. You must enter the phone number if the connection type is set to anything other than direct.
NOTE:
Using PC2AUDIX Application Programs
3-6 Setting Up PC2AUDIX Interface in a New Work Area
3
5. Press (CHANGE/RUN) to save the changes you have made to page 1 of the PC2AUDIX Setup Parameters. (You can also wait until you have made all changes to page 1 and page 2 of this screen before saving.) ADAP logs into the voice mail system to verify the switch connection type and logs out again.
If you specified D-r3.2, D-r3.1, D-r3.0, D-r2.0, or D-r1.0 as the AUDIX software version, PC2AUDIX displays a message stating that you cannot revert to an R1 environment for the PC2AUDIX.
6. Press (NEXT PG) to display page 2 of this screen.
7. Enter the desired information. Field descriptions and valid entries are shown below the screen example.
AUDIX Login Name
Administrator’s login ID.
AUDIX Password Password for AUDIX Login Name.
For security purposes, the password does not appear on the screen after you press
(CHANGE/RUN). To make an entry you must clear out remaining pound signs before pressing .
AUDIX System Password
Password of the DEFINITY AUDIX system you want to access.
Password is required when the AUDIX login name is cust.
For security purposes, the password never appears (hidden by pound [#] signs) on the screen after you press (CHANGE/RUN). If the DEFINITY AUDIX system does not have a system password, place a set of double quotes (““) in the field. To make an entry you must clear out remaining pound signs before pressing .
AUDIX software version
Version of the voice mail system software used on this system.
Default: D-r3.2
NOTE:
This field must be set correctly in order for PC2AUDIX to function properly.
Field Name Description Valid Entries
Using PC2AUDIX Application Programs
3-7 Setting Up PC2AUDIX Interface in a New Work Area
3
Field Name Description Valid Entries
Printer Port The port on the PC which connects the local printer.
Default: lpt1
lpt1, lpt2, lpt3, com2
none (no printer connected; output is displayed automatically on the PC screen).
You may redirect the printed output from lpt1 to a serial port, COMn, using the DOS mode command. If you use the mode command, enter lpt1 in the Printer port field.
Printer Type Indicates that there is a printer
connected.
dotmatrix
(formats output for a 100-percent Epson compatible dot matrix printer)
laser
(formats output printing for a Hewlett-Packard LaserJet II or printer capable of 100 percent emulation of a Hewlett-Packard LaserJet II
blank (no printer connected)
Using PC2AUDIX Application Programs
3-8 Setting Up PC2AUDIX Interface in a New Work Area
3
AUDIX name for this site
Name of the voice mail system, your company, or other identifier which appears in the header information of reports generated by PC2AUDIX. display-only field Switch connection type
Identifies the type of connection between the switch and the voice mail system.
A default (dciu-sci) initially displays; this is verified and changed (if appropriate) when the PC connects to the system.
display-only field
dciu-sci, smsi, bri-api, sl1, sail, or stand-alone
For a DEFINITY AUDIX system, the connection type in this field comes from the
System-Parameters Features form, and the value is embedded.
For the AUDIX system, the connection type in this field comes from the System : Translation : Switch Connection screen.
Delete delimited data files after merged by PC2AUDIX?
Determines if intermediate data files received from the voice mail system are deleted from the PC.
Default: y
y (avoids unnecessary space usage on the PC)
n (you must manually delete these files when they are no longer needed)
AUDIX misc field = organization #?:
Interprets
organization codes
Default: n
y ( PC2AUDIX interprets org. codes from the Miscellaneous field on the DEFINITY AUDIX Subscriber screen or from the Misc field on the AUDIX Subscriber : Local screen).
n (org. codes are interpreted from PC2AUDIX site specific data fields).
Graph Option Installed?: Defines whether optional graphics software is installed. Default: n
y (Stella Business Graphics package is installed on this PC)
n (Stella not installed)
Location of Graphics Work Area
Graphics work area location.
Directory path for the directory in which the Stella Business Graphics Package was installed.
Using PC2AUDIX Application Programs
3-9 Setting Up PC2AUDIX Interface in a New Work Area
3
8. If you have the optional AUDIX Call Detail Recording (CDR) package installed on the AUDIX system, you can continue with page 3 of the PC2AUDIX setup Parameters. Refer to "Establishing Setup Parameters for Call Detail Recording (Optional)" on the next page.
9. Press (CHANGE/RUN) to save the changes you have made to the PC2AUDIX Setup Parameters.
You have now completed establishing the PC2AUDIX Setup Parameters.
10. Press (ROOT FORM) to return to the PC2AUDIX Root Menu.
11. At the PC2AUDIX Root Menu, select 9) EXIT to MS-DOS.
12. At the DOS prompt, enter cd \ to return to the root directory (C\>) on your PC.
NOTE: <