-- -- -- --
-
- - - -
-
-
-
- - -
----
-
-
---
---_
.
-IBM 5100
BASIC Reference Manual
o
o
,...
Preface
This manual contains specific information about the IBM 5100 Portable Computer and the BASIC language.
Prerequisite Publication
IBM 5100 BASIC Introduction, SA21-9216
Related Publications
IBM 5100 BASIC Reference Card, GX21-9218
Fourth Edition (July 1977)
This is a major revision of, and obsoletes, the previous edition SA21-9217·2 and Technical Newsletters SN21-0268 and SN21-0273. Changes to text and illustrations are indicated by a vertical line at the left of the change. Changes are continually made to the specifications herein; any such changes will be reported in subsequent revisions or technical newsletters.
o
o
Contents
(
CHAPTER 1. OPERATION CHAPTER 4. BASIC STATEMENTS 57
IBM 5100 Overview. Statement Li nes . 57
f
Display Screen 2 BASIC Statements 58Keyboard 3 CHAIN 60
5100 Special Keys 4 CLOSE 61
5100 Switches 5 DATA 62
5100 Indicators . 6 DEF,FNEND,ReTURN 64
Editing Input Lines. 6 Single Line Function 64
5100 Storage Capacity 7 Multiline Function 64
•
DIM 67:f
" CHAPTER 2. SYSTEM COMMANDS 8 END 69AUTO Command 10 FNEND 70
GO Command 11 FOR and NEXT. 71
LIST Command . 13 GET 73
LOAD Command 15 GOSUB and RETURN 75
Keyboard Generated Data Files 18 GOTO 77
Function Keys 18 IF . 78
MAR K Command 21 Image. 80
MERGE Command 23 INPUT 81
PATCH Command 25 LET 83
R D= Command . 29 NEXT 85
RENUM Command. 30 OPEN. 86
REWIND Command 32 Negative File Numbers 87
RUN Command . 33 PAUSE 88
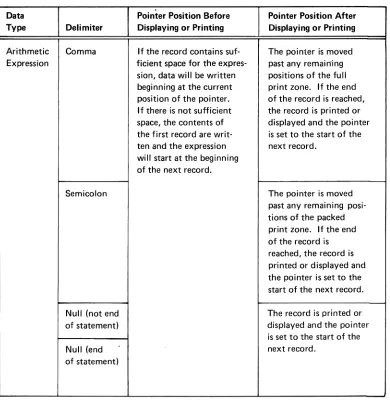
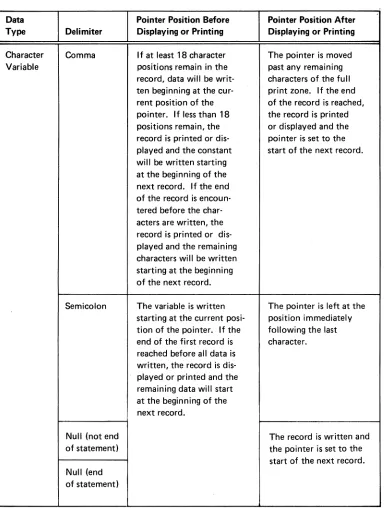
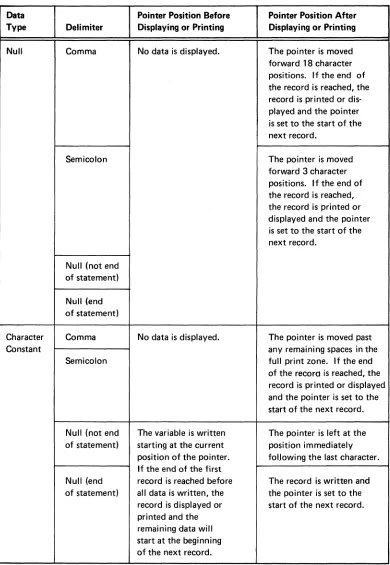
SAVE Command 35 PRINT 89
UTI L Command. 37 Print Zones 90
,'j File Types 38 Spacing of Printed or Displayed Values 90
"
Standard Output Formats for Printing or Displaying 91
CHAPTER 3. DATA CONSTANTS AND VARIABLES 40 Display Line Operation. 92
BASIC Character Set 40 Print Line Buffer Operation 96
Alphabetic Characters 40 PRINT USING and Image. 98
Numeric Characters. 40 Conversion of Data Reference Values 99
Special Characters 41 Format Specifications 100
Use of Blanks 41 PUT 103
Arithmetic Data . 41 READ 105
Arithmetic Data Formats 42 REM 107
Arithmetic Constants 44 RESET 108
Internal Constants 44 RESTORE 109
Arithmetic Variables 44 RETURN 110
Character Data 45 STOP. 111
Character Constants 45 USE 112
Character Variables . 45 Matrix Operations 113
if
Arrays 45 MA T Assignment Statements 113Declaring Arrays 47 MAT Assignment (Scalar Value) 114
Redimensioning Arrays. 48 MAT Assignment (Simple) . 116
Arithmetic Arrays 48 MAT Assignment (Addition and Subtraction) 118
Character Arrays 49 MAT Assignment (Matrix Multiplication) 120
Summary of Naming Conventions 49 MAT Assignment (Scalar Multiplication) . 122
-, System Functions 49 MAT Assignment (Identity Function) 124
(
Expressions 51 MAT Assignment (Inverse Function) . 126Arithmetic Expressions and Operators 51 MAT Assignment (Transpose Function) 128
Character Expressions 54 MAT GET 130
Relational Expressions 55 MAT INPUT. i132
Array Expressions 56 MAT PRINT. 134
Substring Function • 56 Spacing of Displayed Values 134
MAT PRINT USING 137
MAT PUT 140
MAT READ . 141 I
CHAPTER 5. MORE INFORMATION ABOUT
"'-/
YOUR 5100 143
5100 BASIC Compatibility With IBM 370/VS BASIC 143
Tape Cartridge Handling and Care. 144
Data Security 144
Storage Considerations . 145 /
APPENDIX A. BASIC CHARACTERS 147
"--APPENDIX B. BASIC ERROR MESSAGES AND
OPERATOR RECOVERY 149
APPENDIX C. SETUP PROCEDURES 157
/
Environment. 157
5100 Setup Procedure . 157
"-/ '
IBM 5106 Auxiliary Tape Unit Setup Procedure 163
Cleaning the Tape Head 164
IBM 5103 Printer Setup Procedures 165
Installing the 5103 Printer Stacker 167
APPENDIX D. 5103 PRINTER 169
How to Insert Forms 170
How to Adjust the Copy Control Dial For Forms
Thickness 173
How to Replace a Ribbon . 173
APPENDIX E. HEXADECIMAL REPRESENTATIONS 176
Chapter 1. Operation
IBM 5100 OVERVIEW
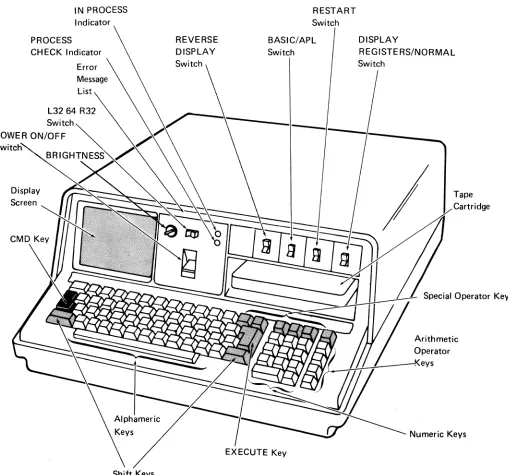
The IBM 5100 (Figure 1) is a portable computer designed for direct use by the user for solving problems. The 5100 has a display screen, a combined alphameric and numeric keyboard, a tape unit, switches, and indicator lights. The dis'play screen and indicator lights communicate information to the user, and the keyboard and switches allow the user to control the operations the system will perform. Figure 1 shows a combined BASIC/APL 5100.
IN PROCESS Indicator
RESTART Switch
PROCESS CHECK Indicator
REVERSE DISPLAY
BASIC/APL Switch
DISPLAY
REGISTERS/NORMAL
Switch POWER ON/OFF
Display Tape
Cartridge
[image:5.612.59.567.227.702.2]DISPLAY SCREEN
Line
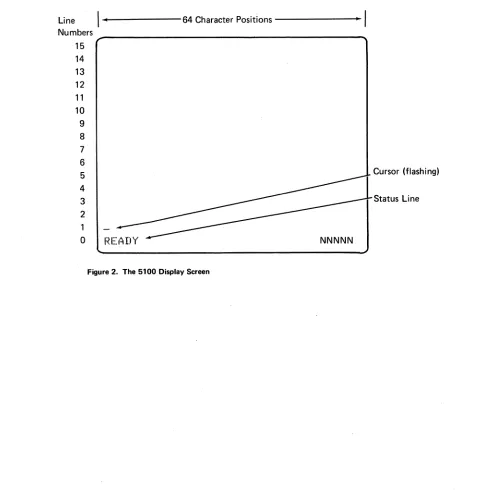
The display screen (Figure 2) can display 16 lines of data at a time, with up to 64 characters in each line. Input data (information supplied by the user) as well as out-put data (processed information) is displayed. The bottom line contains status information. The number in the lower right corner (NNNNN) indicates the number of character positions (bytes) in storage available to the user. Line 1 (input line) contains information entered from the keyboard; The cursor (flashing horizontal line) indicates where the next input from the keyboara will be displayed. If the cursor is moved to a position that already contains a character, that character flashes. As BASIC processes the input, all lines of the display (except the bottom line) are moved up so information can be entered on line 1 again.
I ·
64 Character Positions. I
Numbers 15 14 13 12 11 10
9 8 7
6
5 Cursor (flashing)
4
3 Status Line
2 1
0 I~EAIW
Figure 2. The 5100 Display Screen
, , /
[image:6.612.77.556.259.749.2]'f
(
BASIC
APL
KEYBOARD
The 5100 console (Figure 3) has a combined alphameric and numeric keyboard. Numeric data can be entered conveniently by using the calculator arrangement of numeric keys to the right of the alphameric keys. This data can also be entered by using the numeric keys above the alphameric keys. The arithmetic operator keys, located on the right of the keyboard, are also on the alphameric keys.
Note that on a BASIC-only keyboard (Figure 4), upper shift APL symbols above the alphameric characters can be entered as data, even though they do not appear on the BASIC keyboard.
When any of the keys are pressed, the characters entered appear in the input line on the display screen.
BASIC statement keywords are printed on the front of the alphameric keys. These words are entered starting at the current cursor position when the CMD key is held down and the corresponding key is pressed.
GJ
CD CD CD CD CD CD
[I)
CD CD
CJ
CD
ill II
CDCDCDCDCDCDwOJCDQQO
111111 II
088 CJ
CDCO[D[J[DCDCJCJCOOJOJCD'
888 G
COCDCDwCDCDCDeJOCIJOJ •
000 0
_ _ _ _ _ _ _ _
----J]
( )
0 []
Figure 3. Combined BASIC/APL Keyboard
BASIC
BBBGBBBBBBe'''A''''
BB
,
GJ
GJ
CD CD CD CD CD
[I)
GJ
GJ
CJ
0
II :1111 '1111
II
CDGJGJGJGJCDGJOG]QOO
088 0
CJGJCJCJGJGJCJ
CJOOJ OJ CD
888 0
GJGJGJGJGJGJCDeJOOrn. 000 0
5100 Special Keys
The following keys have special functions relating to 5100 operations:
•
o
(Attention') - You can press the ATTN key to stop system operations. While you are entering data at the keyboard, you can press ATTN to blank everything from, and including, the cursor position to the right on the input line of the display screen. You can then continue entering information. In addition, ATTN and HOLD are the only keys that are active when the display screen flashes to indicate detec-tion of an error. After you press ATTN to stop the flashing display screen, all keys are active and you can proceed.
(Command) - When you hold down the CMD key, you activate the top row of alphameric keys, which cause the command keyword to be inserted on the input line when the number below the word is also pressed. The command operation is executed when you press EXECUTE. The CMD key is also used with the numeric keys (on the right side of the keyboard) to initiate keys functions. Avoid holding down the CMD key and pressing HOLD; this activates a function restricted to use by service personnel. Holding down the CMD key and pressing a key with a BASIC statement keyword on the front will enter the keyword beginning at the current position of the cursor.
When you press EXECUTE, the system processes the line of data that you just entered on the input line. In addition, you can press EXECUTE to resume interrupted processing. Pressing EXECUTE when the input line is blank causes the same action as a GO command (see Go Command, Chapter 2).
When you press HOLD, all processing stops unless the display screen is blank. Processing resumes when you press HOLD a second time. Thus, the HOLD key allows you to read displayed data during an output operation. While processing is stopped, the CMD key and the arithmetic operator keys on the right of the keyboard are restricted to use by service personnel.
(Shift) - While you hold down a shift key, you can select an upper-case symbol for input.
(Copy Display-when CMD is held down) - When you hold down CMD and press the key below Copy Display, all data displayed on the screen is printed by the attached printer. You can use the copy display func-tion when the 5100 is in a hold state, or anytime the 5100 is waiting for input from the keyboard. On a combined BASIC/APL machine,
CO
I(
f
\
it
\\
The following keys have a repeat capability, which means that they will continue to function for as long as they are pressed:
•
•
•
•
5100 SWITCHES
(Backspace) - When you press this key, the cursor moves one posi-tion to the left. When backspaced from posiposi-tion 1 of the input line, the cursor moves to the rightmost position of the line. When you hold down the CMD key and press this key, you immediately delete the character at the current cursor position. All characters to the right of the cursor are shifted one position to the left each time you press this key. The cursor does not move.
(Forward Space) - When you press this key, the cursor moves one position to the right. When spaced beyond the end of the line, the cursor returns to the first position of the line. When you hold down the CMD key and press this key, you immediately insert a blank character at the current cursor position and all data from the cursor position is shifted one position to the right. The cursor does not move, thus you can enter another character into this position. If the line contains a character in the last (64th) position, the insert function is ignored.
(Scroll Up) - When you press this key, each displayed line moves up one line position (except the status line).
(Scroll Down) - When you press this key, each display line moves down one line position (except the status line).
The following switches are located above the 5100 keyboard on the console:
POWER ON/OFF - The power switch turns the 5100 on and off. When power is turned on, the 5100 becomes operable in approximately 10-15 seconds.
RESTART - This is a spring-returned switch that reinitializes the 5100 to its power on state. In the dual language 5100, the setting of the BASIC/APL switch determines which language is initialized.
BASIC/APL - This switch appears only on the dual language 5100, and deter-mines which language is initialized at power on and restart.
REVERSE DISPLAY - This two-position switch sets the display screen to white characters on a black background or to black characters on a white background. You may want to adjust the BRIGHTNESS switch after pressing REVERSE DISPLAY.
DISPLAY REGISTERS/NORMAL - This switch is for use by service personnel. This switch must remain in the NORMAL position during 5100 operation.
L3264 R32 - The three positions of this switch are:
L32 The leftmost 32 characters on the display screen are displayed with a blank between each character.
64 Up to 64 characters per line are displayed in adjacent positions.
R32 The rightmost 32 characters on the display screen are displayed with a blank between each character.
5100 INDICATORS
The 5100 console has two indicators:
PROCESS CHECK - When this indicator lights, a system malfunction has been detected, and further operations are not normally possible. Press RESTART. If the condition recurs, call for service.
IN PROCESS - This indicator lights only to inform you that the system is operating even though the display screen is turned off. Because some programs requ[re several minutes of processing that turns off the display, the IN PROCESS indicator is your assurance that the system is operating. When this indicator light is on, the HOLD key does not stop processing.
EDITING INPUT LINES
If you detect an error in a line before you press EXECUTE to enter the line into the 5100, you can use the forward space or backspace key to position the cursor at the error, then:
• You can use the insert or delete functions to correct the error.
• You can press the ATTN key to blank all data to the right of the cursor.
• You can enter the correct character. Note that the APL symbols (upper shift on several keys) in Figure 3 can be entered into an input line. On a BASIC-only keyboard (Figure 4), however, these symbols do not appear even though they can be entered into an input line. Because many of these symbols can be overstruck by other characters, you can take the following steps to replace an APL symbol:
1. Position the cursor at the symbol.
(
(
If you detect an error in a line after you press EXECUTE to enter the line, you can use the scroll up or scroll down key to position the line to be corrected, then use the procedures above to correct the error.
If you want to change an entire line, you can simply enter the statement number of the line, then reenter the line and press EXECUTE. The new line will replace the old line.
If you want to delete one or more program lines, enter the statement number of the line you want to delete, then enter DEL and press EXECUTE. To delete several successive lines, enter the number of the first line, enter DEL, enter the number of the last line, then press EXECUTE. For example, to delete lines 20 through 90 in a program, enter:
20 DEL 90
then press EXECUTE. Note that DEL is invalid while entering a key group (see
Function Keys in Chapter 2).
5100 STORAGE CAPACITY
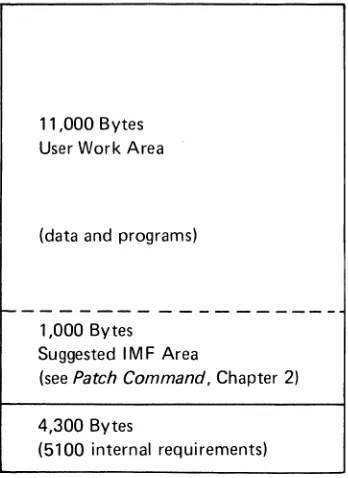
The base 5100 (Model B1) has a storage capacity of 16K (K=1,024 bytes). Figure 5 shows how this storage is allocated to various requirements. Note that the work area available to the user is approximately 12,000 bytes, while 4,000 bytes are required for internal purposes. The storage capacity is increased in the following models of the 5100:
Model B2 - 32K Model B3 - 48K Model B4 - 64K
In these models, all additional storage is allocated to the user work area. For example, on the Model B4, the user work area is approximately 60,000 bytes.
11,000 Bytes User Work Area
(data and programs)
~---1,000 Bytes Suggested 1M F Area
(see Patch Command, Chapter 2)
4,300 Bytes
[image:11.612.227.401.459.698.2]Chapter 2. System Commands
Some of the 5100 system commands are listed above the top row of numeric keys on the typewriter·like alphameric keyboard (Figure 4). These commands allow you to control tape and printer operations, such as storing a program on tape, loading a program into the 5100 from tape, and executing a loaded program. System commands can either be entered character-by-character from the keyboard, or the entire key-word can be entered by holding down the CMD key and pressing the appropriate number key below the command (except for MARK, MERGE, and PATCH, which are not listed). The latter operation inserts the keyword with a single keystroke, thus preventing possible keying errors and providing faster operation. The system commands are used to direct the 5100 to perform the following types of system operations:
• Program Execution - Start or resume execution of a BASIC program or command.
• File Operation - Load or save programs or data on tape, or mark tapes.
• Program Operation - List ano number program statements or merge several programs into one program.
Parameters required for a command can be entered after the command keyword is entered. The command operation then starts after you press the EXECUTE key. The keywords and major functions of the BASIC system commands are:
LOAD
RUN
GO
SAVE
MERGE
RENUM
AUTO
LIST
UTIL
MARK
PATCH
Load work area
Run BASIC program
Resume interrupted processing
Save work area
Merge work area
Renumber statements
Automatic line numbering
Display or print work area contents
Perform utility functions (print/display a tape directory or invoke communications operations)
Mark tape file
(
(
(
The syntax and description of each command is detailed in this section. Note that the syntax used in BASIC commands is also used for the BASIC statements (Chapter 4). In this syntax, parameters that must be specified as shown are in uppercase letters. Parameters you must supply are in lowercase letters. Optional parameters are enclosed in brackets ([
1).
Parameters enclosed in braces ( { } ) indicate that you must enter only one of the enclosed parameters. Ellipses ( ... ) indicate that the preceding parameters can be repeated. Single quotation marks and parentheses must be entered where shown. Commas must be entered to separate parameters,except between the keyword and the first parameter.
Each command or statement entered from the keyboard is checked for syntax errors. If a syntax error is detected, an up arrow (t) is displayed below the position in the line where the error was detected, the display screen flashes, and the keyboard is locked. The ATTN key and HOLD key are the only active keys when the display screen flashes. Press ATTN to stop the flashing screen, then cortect the indicated error.
Some general rules that apply to system commands are:
• No preceding statement number is needed.
• Each command must begin a new line.
• Maximum command length is 64 characters.
• Blanks are ignored except in character strings enclosed in single quotation marks.
AUTO [Iine-num [,incrementl]
AUTO COMMAND
The AUTO command allows you to initiate automatic line numbering for BASIC statements. Automatic numbering simplifies the task of entering statements in a BASIC program. You can specify both the beginning statement number and the increment between numbers. After you enter a statement and press,EXECUTE, the next statement number is generated and displayed. The syntax of the AUTO com-mand is as shown:
AUTO [line-num [,incrementl]
where:
line-num
is a positive integer specifying the first statement number to be generated. The range of this number is 1 to 9999. If a beginning number is not specified, a beginning number of 0010 and an increment of 10 are generated.increment
is a positive integer used to increment succeeding statement numbers. If a beginning line number is not specified, the increment cannot be specified. The default is 10 for this optional entry.Each statement number generated by the AUTO command is followed by a blank, then the cursor, as shown:
0010
Note About AUTO
Automatic numbering continues until any other valid data, a command word, for example, or a statement number other than the displayed number is entered in the input line. In this case, another AUTO command must be entered in order to con-tinue automatic numbering. Another way to terminate AUTO numbering is to press the scroll up key, which will display a new unnumbered line.
Example
The following examples show AUTO commands:
AUTO (then press EXECUTE)
In this example, the display screen will show statement number 0010. After you press EXECUTE at the end of an entered statement, the statement number automat-ically increases by 10, producing statement numbers 0020, 0030, 0040, and so on.
In the following example, the beginning statement is 0320. After each succeeding
(
If
(
GO [Iine-num] [,
{~~ENp
}] LRO=n] TRACE LPRINT]GO COMMAND
You can use the GO command to do the following:
1. Resume processing of a MAR K command operation that was halted.
2.
3.
Resume processing of a BASIC program that was halted by: a. a PAUSE statement,
b. executing statements in step mode (see RUN Command),
c. some error conditions, or d. your pressing the ATTN key.
End a MARK command operation or BASIC program before it reaches its normal termination point.
You can resume processing by pressing EXECUTE on a blank line. The GO command, however, allows you to resume processing in any of three modes of operation (normal, step, or trace). Thus, you can change the operating mode with the GO command. Program execution can be continued with the next sequential statement or at a statement number specified in the GO command. You can also change the decimal position that activates rounding (see RD= Command).
To terminate the execution of a system command or a BASIC program, the GO command has this syntax:
GO END
END closes input and output files, thus maintaining the integrity of the files. After the files are closed, no program statements are executed.
To continue execution of an interrupted operation, the GO command has this syntax:
GO [line-num] [,
{~~E~
}] LRO=n] TRACE LPRINT]where:
RUN specifies that processing is to continue in normal mode.
STEP specifies that processing is to continue in step mode.
TRACE specifies that processing is to continue in trace mode.
Note: If neither RUN, STEP, or TRACE is specified, processing will continue in the mode that was in operation when processing was interrupted.
PRINT specifies that trace messages are to be displayed and printed. If PRINT is omitted, the messages are only displayed. This entry should only be specified with TRACE.
RD=n indicates thE!' number of digits to the right of the decimal point that will initiate rounding. n can be 1 to 13 and is initialized to 6. If not specified, n retains its last value.
Notes About GO
• The statement number entry is valid only during execution of a BASIC program.
• When the input line is blank, pressing EXECUTE causes the same operation as a GO command, except when GO is entered in response to an error indicating an attempt to mark a file already marked. In this case, GO must be entered only in positions 1 and 2 of the input line.
Example
The following examples show a variety of GO commands.
1. To change to or resume normal operation of a BASIC program:
GO RUN (then press EXECUTE)
2. To change from step or normal mode to trace mode:
GO TRACE (then press EXECUTE)
3. To change to step mode and begin execution at statement number 620:
GO 620, STEP (then press EXECUTE)
\
(
(
LIST [PRINT
1
~{KI.
t
EYx } ] IOe-numLIST COMMAND
The LIST command allows you to display or optionally print the program or data lines from the work area. The contents of the work area are unchanged. The contents must be BASIC, DATA, or a KEY group (which requires a different LIST syntax). The syntax of the LIST command is as shown:
LIST [PRINT
.
1
~{~EYX
t
} ] IIOe-numwhere:
PRINT specifies that the list of lines in the work area is to be printed rather than displayed. If PRINT is not specified, the list will be displayed.
KEYx specifies that the indicated key group should be displayed or printed (x
=
0 to 9).line-num specifies that a group of 14 lines, ending with the indicated line number, is to be displayed. If PRINT is also specified, the entire work area,
starting with the indicated line number, will be printed. If no line number is entered, the lowest line number in the work area is assumed for printing. This entry is not valid for a KEYx group. For displaying, up to the first 14 lines are displayed.
When the listing is specified to the display, the line specified in the LIST command appears on line 2 of the display screen. The preceding 13 lines (less, if less than 14 are defined) are displayed on the lines above line 2. You can use the scroll up and scroll down keys (-I-and t) to arrive at a particular line.
Note. About LIST
• If the line number specified in the LIST command is not in the work area, the 5100 will seek the next lower line number for the LIST operation. If a lower line number is not found, an error message is displayed.
• If the line length exceeds 64 characters, the succeeding line will contain the excess over 64 characters when the line is displayed. When printed, the full line will be printed up to 128 characters. The line length will not affect the execution of the statement.
• If listing data lines longer than 118 characters (bytes), the excess over 118 char-acters is not displayed.
Example
The following examples show several LIST commands:
• To display the first group of work area lines:
LIST (then press EXECUTE)
• To display line number 250 and the preceding 13 lines:
LIST 250 (then press EXECUTE)
• To print linenumber 250 and all lines following in the work area:
LIST PRINT, 250 (then press EXECUTE)
• To display the first 14 lines in the group associated with function key 5:
LIST KEY5 (then press EXECUTE)
/
(
(
LOAD
file-num[l~;~!
lJ
r,dev-addressl BASICSOURCE
LOAD COMMAND
The LOAD command causes a previously saved file to be loaded into the work area from tape for modification and/or execution. LOAD can also be used to prepare the work area for the entry from the keyboard of a new BASIC program, data, or key group. The syntax of the LOAD command is as shown:
LOAD
file_num[l~;~!
lJ
r,dev-addressl BASICSOURCE
where:
file-num is an integer value. An entry of
a
indicates that a new file will beentered from the keyboard. An entry greater than
a
indicates the file number of the file (saved on tape) to be loaded.KEYx, KEYS, DATA, BASIC, or SOURCE specifies the type of data to be loaded into the work area. BASIC is the default when loading from the keyboard. BASIC or SOURCE is the default when loading from tape.
dev-address is the address code of the device containing a saved file to be
loaded. The default is the built-in tape unit (address E80). Auxiliary tape unit device address is E40.
Entering a LOAD command of LOADO clears the entire work area, including all key groups. A LOAD command specifying BASIC or DATA as the second parameter will only clear the specified program from the work area, without altering existing key groups. If the new file type is a KEYx file, the new key file is added to the work area without altering the existing work area. If the KEYx files already exist in storage, the loaded KEYx files will replace the old ones. The work area
is assigned the file type specified in the LOAD command. Line
a
will display READY when in a BASIC program file type, DATA for a data file type, and KEYx for key file type. You can begin entering the specified type of lines into the work area. TheA LOAD nonzero entry specifies that a saved file is to be loaded from tape into the work area. Any previous contents of the work area (except the keys files) are destroyed when the file type is specified as BASIC, Df-TA, or SOURCE. If the new file type is a KEYx file; the new key file is added to the work area without altering existing work area. If the KEYS/KEYx files already exist in storage, the loaded KEYS/KEYx files will replace the old ones. A copy of the saved file is loaded into the work area, and the following information is displayed:
• User specified file identification (if any)
• Number of contiguous 1,024-byte areas of storage in the file
• Number of contiguous 1 ,024-byte areas of unused storage in the file
• First line number (for BASIC or SOURCE)
• Last line number (for BASIC or SOURCE)
• KEYx numbers (for KEYx file types)
• Amount of unassigned work area remaining (in bytes)
If the new file type is KEYx, the new key file is added to the work area. If corre-sponding KEYx files already exist in storage, they are replaced by the new keys.
For example, if a new KEY6 function is loaded from tape, it will replace the existing KEY6 function.
Notes About LOAD
• File type KEYS (load all keys functions within the specified file) is invalid when the file number is zero (LOADO).
• File type SOURCE (load a program in user source format from the specified saved file) is invalid when loading from the keyboard (LOADO).
• When loading a general exchange (type 02) file, SOURCE is assumed unless DATA is specified. This file type is used primarily for the Communications feature. Also see Negative File Numbers in Chapter 4.
• If file type is omitted, BASIC is assumed .if loading from the keyboard, and BASIC or SOURCE is assumed if loading from a saved file (depending on the type of file). In the latter instance, if the type of file is not BASIC or SOURCE, an error message is displayed.
• The format for entering data after a LOA DO, DATA is identical to data in a DATA statement. LOADO, DATA also provides automatic line numbering and the keyword DATA for each line. The display shows:
0010 DATA
./
(
(
• If execution of a LOAD command is interrupted (when you press ATTN) while loading a saved file, operation is terminated and the contents of the work area are cleared.
• Calculator statements are invalid if DATA is specified (LOADx, DATA).
• LOADO, DATA automatically provides a 4-digit statement number and the key-word DATA on the input line in the data file.
Notes About LOAD SOURCE
• When a syntax error occurs during a LOAD SOU RCE command you must choose one of the following options:
1. Correct the line and press EXECUTE to continue.
2. Scroll up to ignore the line and continue loading.
• If you load a SOURCE file containing a line longer than 64 characters, you will get an error. The error must be corrected or the line must be scrolled up (which
ignores the line) before loading can continue.
• The LOAD SOURCE command is not completed until the READY message appears or the operation is terminated by other than a syntax error.
Example
The following examples show a variety of LOAD commands:
• To prepare for keyboard entry of a data file:
LOA DO, DATA
• To prepare for entry of a function from the keyboard for- function key 6:
LOA DO, KEY6
• To load a saved program (file 3) from tape unit E40 (auxiliary tape unit):
LOAD3, E40
• To load a program saved in user source format from file 6 on tape unit E80:
LOAD6, SOU RCE
or
Keyboard Generated Data Files
You can create a data file directly from the keyboard using the LOAD command. First, enter LOA DO, DATA, then press EXECUTE. The 5100 responds with auto-matic line numbering (starting with 0010) followed by DATA. You can then enter numeric and character constants, separated by commas, just as you would for a standard DATA statement (see DATA, C,hapter 4). The end of a data file line is indicated when you press EXECUTE. If you make a keying error, the display screen will flash and the keyboard will lock. Simply press ATTN, then correct the error, which is indicated by an up arrow (t). A typical data file line is:
0110 DATA 312.41, 'JONES', 419.21, 'BALANCE'
After all data file lines are entered into the work area, they can be saved on tape with the SAVE command. Data file lines are saved without line numbers or the keyword DATA. When data file lines are listed, the keyword DATA is displayed.
Data in a keyboard-generated data file is accessed by GET or MAT GET statements during program execution. With line numbers and keyword DATA removed, the data file is a continuous string of data items.
A saved data file ;can be edited by first loading it back into the work area with a LOAD command. When saved on tape, the,line numbers and DATA are again removed.
Function Keys
Ten function keys are available for your use in invoking programs or commands of your choosing. The function keys are the numeric keys 0-9 to the right of the typewriter-like keyboard. The functions invoked by these keys are defined in a LOAD command. First, enter a LOAD command specifying the key to which a function is to be assigned. For example, to assign a function to the 6 key, enter:
LOA DO, KEY6 (then press EXECUTE)
Now, you must define a key group, which is the statements associated with the function. When you press the CMD key and the 6 key, these are the statements that will be executed. One of four valid key group header statements must be preceded by a line number of 999x, where x = 0 to 9 to represent the function key. In the preceding example, the line number is 9996. The header statements are:
• NULL, which specifies that you are not defining a function for a particular key or that you are deleting an existing definition .
• CMD, which specifies that the remainder of the line is a system command or a calculator statement. This key group can contain only one system command or calculator statement. The specified operation is performed immediately (with-out pressing EXECUTE).
• REM, which specifies that the key group is a series of BASIC statements. These statements will be executed when the CMD key and the specified key is pressed (or when the specified key group is referenced in GOSUB). The DATA, END, STOP, DEF, and FNEND statements are not permitted. Thus READ, MAT READ should not be entered. Also, a key group should not contain a reference to a user-defined function. The last BASIC statement must be RETURN or CHAIN. The RETURN statement must not contain an expression. When referenced in GOSUB (statement 999x), the program branches to and seeks the R EM key group. If the R EM key group is not found, the program seeks statement 999x in the program.
• TXT, which specifies that the character string (enclosed in single quotation marks) is to be inserted in the input line beginning at the current cursor position. For example, assuming a character string 'RATE' is assigned to function key 5, each time function key 5 is pressed while CMD is pressed, the constant RATE is inserted into the line being entered from the keyboard.
In the following examples, the function keys will be assigned a number of functions. First, the LOA DO, KEY6 command prepares the work area for assignment of the keys function.
• 9996 NULL indicates that the 6 key will have no defined function.
• 9996 CMD REWIND E80 indicates that the 6 key will cause the tape in the built-in tape unit to be rewound each time the CMD key and the 6 key is pressed.
• 9996 REM KEY6 FUNCTION 0001 FOR X = 100 to 360 STEP 10 0002 A = X/12
00031 = 2*A
0004 PRINT FLP, I,X 0005 NEXT X 0006 RETURN
These BASIC statements will be executed each time the numeric 6 key is pressed while CMD is pressed.
• 9996 TXT 'SPINDLES AND SPANGLES' indicates that the character string will be inserted into the current input line beginning at the current cursor position each time the 6 key is pressed while the CMD key is pressed.
Another use for the function key is shown below:
9996 CMD A=&PI*Rt2
Note that statements in an REM key group can be deleted by reference to the key group and use of the DEL editing function. For example:
. KEY6, 10DEL
deletes line 10 from key group 6.
KEY6, 1 ODE L90
deletes lines 10 through 90 from key group 6.
Statements can be added in the same manner:
KEY6, 10 PRINT A
adds line 10 or replaces the previous line 10 in REM key group 6.
f
f
MARK K-characters,files,starting file Ldev-addressl
MARK COMMAND
You can use the MARK command to initialize one or more tape files to a specified number of contiguous l,024-byte areas of storage. If end of tape is reached before the mark operation is complete, the last file number and the number of l,024-byte areas used in the file are displayed. The ATTN key is not active during mark oper-ations. If you try to mark a file that is already marked, an error message is displayed (Appendix B). To continue, enter GO. Note that you must use the scroll up key to blank the input line before entering GO only in the first two positions of the line. If you end the operation by entering anything other than GO in positions 1 and 2, the file already marked is unchanged.
Note: If an existing file on tape is re-marked, the original information in the re·marked
file and the existing information in files following the re-marked file cannot be used again_
The syntax of the MARK command is as shown:
MAR K K-characters,files,starting file [,dev-addressl
where:
K-characters is the number of contiguous l,024-byte areas of storage to be used on
the tape.
files is the number of consecutive files to be marked.
starting file is the first (lowest-numbered) file number to be marked.
dev-address is the address of the tape drive in which the file resides. The default
Notes About MARK
• If an existing tape file is re-marked, the original information on the re-marked file and all files following it cannot be used again.
• The MARK command must be entered character-by-character from the keyboard.
• The MARK command can be issued any time the specified tape unit is not otherwise active.
• Tapes withCRC errors must be re-marked (reinitialized) starting with a file preceding the CRC error. A REWIND command is generally required before this MARK.
• You can determine the size required for a file by comparing the amount of work area available before and after you have entered data or programs into the work area. Note that each numeric expression requires an average of 16 storage positions (bytes), while each character expression requires 21 storage positions less one position for each trailing blank.
Example
A sample MARK command is as shown:
MARK 3,6,1
In this sample, six files will be marked, starting with file 1, with each file using 3,072 bytes on the tape residing in the built-in tape unit (E80).
(
(
'f
(
MERGE file-num G[from line-numl ,[through line-numl ,[new line-numl [,dev-addressl]
MERGE COMMAND
The MERGE command allows you to merge all or part of a saved type file with data or a program (saved in BASIC format) in the work area. In this way. you can add the same routine to several different programs. or add the same data items to several different data files. Only BASIC statements (in a BASIC file) and DATA files car be merged. The work area and saved file must be of the same type. If these files are different, the MERGE command is not executed, and an error message is displayed.
Lines from the tape file are added to the work area lines in line number sequence. If a line from the tape file and a line in the work area have the same statement number, however. the line from the file replaces the work area line. The merged file could exceed the size of the work area. which causes an error message to be displayed (see Appendix B).
As the lines are merged, you can specify that lines merged from the file be renumbered. starting with a statement number of your choice and increasing by the original file increment. After the merge is completed, the display shows the READY message. along with the number of unused bytes in the work area. The syntax of the MERGE command is as shown:
MERGE file-num
G
[from line-numl. [through line-numl. [new line-numl [,dev-addressl]where:
file-num is the number of the saved file to be merged.
from line-num is the first line to be merged in the saved file. If no number is entered, the first line in the file is the default.
through line-num is the last line to be merged in the saved file. If no number is entered, the last line in the file is the default.
new line-num is the first line number to be used in renumbering the lines from the saved file. If no number is entered. the merged file will not be renumbered.
Notes About MERGE
• This command must be entered character·by·character from the keyboard.
• Omitted parameters must be indicated by consecutive commas. For example:
MERGE 6,2,200, ,ESO
"Omitted new line·num
Example
A sample MERGE command is as shown:
ME RGE 6,4,200,1 O,E40
In this example, data from file number 6 in the auxiliary tape unit will be merged with data in the work area. Lines 4·200 from the file will be merged. As the
MERGE command is executed, lines from the saved file are renumbered, starting with line number 0010.
\
'"
(
(
If
(
PATCH COMMAND
The PATCH command allows you to apply internal machine fixes (IMFs) to the 5100. The internal machine fixes are supplied by IBM on the customer support cartridge. The PATCH command provides you with the ability to:
• Copy IMFs to a new cartridge.
• Load IMFs to storage and then return to APL or BASIC.
• Display the EC (engineering change) version of each interpreter module.
PATCH
• Perform tape recovery when tape read (007) errors occur on files with the following file types:
Data exchange (file type 01) General exchange (file type 02) BASIC source (file type 03) APL internal data (file type 08)
• Copy the contents of one tape cartridge to another tape cartridge.
The copy IMFs. load IMFs. display EC version. and tape recovery programs are provided on a cartridge supplied with the 5100. This cartridge contains the following files:
• File 1 contains: - Copy IMFs program - Load IMFs program - Display EC version program
• File 2 contains IMFs for 5100
• File 3 contains tape recovery program
• File 4 contains tape copy program
To request one of these programs:
• Insert the cartridge in the built-in tape unit.
• Enter PATCH.
There are no parameters for the PATCH command. When the PATCH command is entered and executed, the following options are displayed:
ENTER OPTION NO. 1. COPY IMF TAPE
2.
LOAD IMFs3. DISP EC VER.
4.
KEY-ENTER IMF5. END OF JOB
6. TAPE RECOVERY
7.
TAPE COpy PGM"S."
flashingJThe display shows the options available with each option identified by an option number.
To initiate a selected option:
• Enter the option number.
• Press EXECUTE.
Entering an option number other than those displayed causes the options to be redisplayed.
Once you have entered an option number, additional prompts, if any, are displayed for the option selected.
Option 1 - Copy IMF Tape
The copy IMF tape option allows you to copy the following files from the cartridge:
• File 1, which contains: - Copy IMFs program Load IMFs program - Display EC version program
• File 2, which contains IMFs for the 5100. IMFs are copied from file 2 as follows:
Copy alllMFs that apply to BASIC or to APL.
- Copy alllMFs that apply to the 5100 on which the copy IMF tape program is running.
Copy IMFs by problem number.
Copy IMFs by problem number that apply to the 5100 on which the copy
(
:{
• File 3, which contains the tape recovery program, and File 4, which contains the tape copy program, are not copied. These files can only be copied by service personnel.
Note: The cartridge onto which files 1 and 2 are to be copied must be marked. To determine what size files to mark, use the UTI L command.
Copying IMFs allows the creation of a cartridge containing only the IMFs that apply to your 5100.
The copy IMF tape program issues prompts and waits for you to respond. Respond as required to the prompts issued by the program.
Option 2 - Load IMFs
The load IMFs option allows you to load IMFs into storage and then return to the language in which your 5100 is running.
IMFs can be loaded as follows:
• Load alllMFs that apply to the 5100 on which the load IMFs program is running .
• Load IMFs by problem number. The IMFs are loaded into storage only if they apply to the 5100 on which the load IMFs program is running.
The IMFs will occupy storage in the work area (work space), so IMFs should not be applied if the problem does not affect your operation or if the problem can be circumvented by a BASIC statement or command. IMFs remain in the work area until power is turned off or RESTART is pressed. Also, if IMFs are loaded into storage, the performance of your 5100 may be reduced significantly.
The load IMFs program issues prompts and waits for you to respond. Respond as required to the prompts issued by the program.
Option 3 - Display EC Version
The display 'EC version option is primarily for use by service personnel. This option displays each interpreter module EC version and module identification. Four digits are displayed for each module. The first two digits are the module identification, the next two digits are the EC version.
Option 4 - Key-Enter IMF
The enter 1M F option allows service personnel to enter an 1M F from the key-board. After being entered from the keyboard, the IMF is copied on the tape. It r:nay then be loaded into storage with option 2 (load IMFs).
Option 5 - End of Job
Selection of this option causes a return to the language in which your 5100 is operating. After the completion of options 1, 3, and 4, the program returns to display all options. Selection of option 5 can then be made.
Option 6 - Tape Recovery
The tape recovery option allows you to recover data from a file or files on which read errors are occurring. The tape recovery program can be used on the following file types:
• Data exchange (file type 01)
• General exchange (file type 02)
• BASIC source (file type 03)
• APL internal data (file type 08)
Tape recovery will recover as much data as possible in the file. Some of.the data in the record where the read errors occur cannot be recovered. Some of the data preceding and following the record on which read errors occur may not be recovered.
Tape recovery assumes that the cartridge containing files, which cause read errors, is inserted in the internal tape unit.
The tape recovery program issues prompts and waits for you to respond. Respond as required to the prompts issued by the program.
Option 7 - Tape Copy Program
The tape copy option allows you to copy the contests (up to the end of marked tape) of one cartridge to another cartridge. Tape copy can utilitze the auxiliary tape drive, if available. Tape copy also marks the tape being copied to.
Tape copy also allows you to recover most files that have bad header records that cause an ERROR 007 ddd. During the tape copy, if a file is encountered that has a bad header record, tape copy issues prompts to assist you in correcting the bad header record.
/
(
i(
RD= COMMAND
You can use the RD= command to specify the number of digits to the right of a decimal point that will be printed or displayed. If more digits are to be printed or displayed, they will be rounded to the number specified. At power on, rounding is initially set to six digits. Rounding can then be modified with the RD= command or in the RUN or GO commands. The range of rounding (n) is 1 to 13 digits.
RENUM [KEYxl [,first line-num,incrementl
RENUM COMMAND
You can use the RENUM (renumber) command to generate new statement numbers for all the BASIC statements or data in the work area. Like the AUTO command, renumbering begins with 0010 and the increment is 10, unless specified otherwise. In addition, all references to statement numbers in GOTO, I F, PRINT USING, GOSUB, GET, and MAT GET statements are changed to the new numbers. In function key groups (see LOAD Command), each key group is renumbered as if it is a separate work area, and is only renumbered if it is a BASIC program function. (RENUM does not alter the key group header record.)
The syntax of the RENUM command is as shown:
RENUM [KEYxl [,first line-num,incrementl
where:
KEYx specifies a key group (x = 0 to 9) to be renumbered.
first line-num is an integer (1-9989) identifying the number at which renumbering will begin. If this number is not specified, a beginning number of 0010 and an increment of 10 are the default values.
increment is an integer specifying the increment for succeeding statement numbers. If a beginning statement number is not specified, an increment cannot be specified.
Notes About RENUM
• You must enter both a beginning statement number and increment, or you can enter neither.
• Statement numbers 9990-9999 are not altered by. a RENUM command.
• An error will occur if you try to renumber where a line number greater than 9989 will be generated.
(
ExampleThe following example shows the execution of a RENUM command:
RENUM 20,10 (then press EXECUTE)
(
Before After0010 INPUT A, B 0020 INPUT A, B
0011 Q = INT (A/B) 0030 Q = INT (A/B)
0020 IFQ
>
0 THEN 30 0040 I FQ>
0 GOTO 0060 0025 GOTO 10 0050 GOTO 00200030 PRINT Q 0060 PRINTQ
0035 GOTO 10 0070 GOTO 0020
REWIND [dev-address]
REWIND COMMAND
The REWIND command allows you to rewind the specified tape unit. The syntax . of the REWIND command is as shown:
REWIND [dev-address]
where:
Example
dev-address is the address of the tape unit to be rewound (E80 for the built-in
tape unit or E40 for the auxiliary tape unit). The default is E80.
A sample REWIND command is as shown:
REWIND E40
/ '
(
(
(
(
(
RUN
[{~~~CE
LPRINTl}] LP=Dl [,RD=nlRUN COMMAND
The RUN command starts execution of a BASIC program at the lowest numbered executable statement. The program must already reside in the work area and the work area must be defined as containing a BASIC program (see LOAD Command
for loading programs from tape and defining the work area type).
BASIC programs can be run (executed) in three modes:
Normal Mode - All program steps are executed without interruption.
Step Mode - The 5100 stops immediately before executing each program step (statement). The word STEP and the statement number of the next statement to be executed are displayed. To execute the next program statement, or to change execution mode, you must execute a GO command (see GO Command). Step mode allows you to display or alter variable values between steps for debug purposes.
Trace Mode - The statement number of each statement executed is displayed and/or printed while the statement is executed.
Both step and trace modes are useful in locating programming errors. Trace provides a more rapid view of the program steps as they are executed. Step, on the other hand, allows you to examine the contents of variables between program steps and to modify program steps or data.
The syntax of the RUN command is as shown:
RUN
[{~~~CE
LPRINTl}] [,P=Dl LRD=nlwhere:
STEP specifies step-by-step execution.
TRACE specifies continued statement execution, but the line number of the statement just executed is displayed and/or printed. Note that for normal mode you do not specify STEP or TRACE.
PRINT specifies that trace messages are printed and displayed (only valid with TRACE).
P=D specifies that output from programs specifying the printer is directed instead to the display screen.
Notes About RUN
• The RUN command will be rejected by the 5100 if the work area file type is DATA.
• The RUN command initializes all variables and array elements to zeros and blanks.
• When P=D is specified, all PRINT FLP, PRINT USING FLP, MAT PRINT FLP, and MAT PRINT USING FLP statements are interpreted as PRINT, PRINT USING, MAT PRINT, and MAT PRINT USING statements, respectively, during this run.
Example
Some sample RUN commands are as shown:
1. To begin normal execution of a program:
RUN (then press EXECUTE)
2. To begin a trace operation of a program and print the traced steps executed:
RUN TRACE, PRINT (then press EXECUTE)
(
(
(
(
(
SAVE COMMAND
SAVE file-num
[{,~~~;
}] [.dev-address] [:file 10']SOURCE
The SAVE command allows you to save the contents of the work area in a specified file. After a SAVE command is completed, the display will show the READY message and the following information about the file:
• The number of contiguous 1,024-byte areas of storage allocated in the file.
• The number of contiguous 1,024-byte areas of storage unused in the file.
If the file comes to end of file before all of the work area is saved, an error message is displayed (see Appendix B) and the file is reinitialized to unused status. To save the work area, enter another SAVE command specifying another file with the correct amount of available space.
The syntax of the SAVE command is as shown:
SAVE file-num [{
,~~~;
}] [,dev-address] [:file 10']SOURCE
where:
file-num is an integer specifying the file in which the contents of the work area are to be saved.
KEYx specifies that a function key (x
=
0 to 9) is to be saved (see Function Keys).KEYS specifies that the contents of all defined function keys are to be saved.
SOURCE specifies that the contents of the work area is to be saved in the same character format in which the user entered it.
dev-address is the address of the tape drive in which the specified file resides. The default is address E80.
Notes About SAVE
• If KEYx, KEYS, or SOURCE is not entered in the SAVE command, data in the work area will be stored for either a BASIC program or a DATA file, depending on the definition of the work area.
• If you interrupt execution of a SAVE command by pressing the ATTN key, the operation is terminated. If the interruption occurs before the file has been changed, the file remains unchanged. If the interruption occurs after the file has been changed, the file is reinitialized to unused status.
• IMFs are not stored with the SAVE command. You must apply IMFs with the PATCH command before you load the work area with any saved program requiring IMFs.
Example
A sample SAVE command is as shown:
SAVE 4, KEY8
In this example, the contents of function key 8 are saved in file 4, which resides on the cartridge in the built-in tape unit.
\.
:(
(
UTI L{MOOE COM }
[PRINT.] [OIR [integerJ] I.dev-addressl
UTI L COMMAND
You can use the UTI L command to list a directory of a tape cartridge or to change the 5100 operating mode from BASIC to communications. You need some space in the work area in order to list a tape cartridge directory. If adequate work space is not available during execution of a UTI L command, an error message (Appendix B) is displayed. You must then clear the work area (with a LOAOO command, for example) and reissue a UTI L command to continue. Information about each file on the tape cartridge is printed or displayed on one line per file. If you specify a list to the printer, all file information is printed without interruption. You can interrupt the listing to either the display or printer by pressing the ATTN key, which will terminate the command, or by pressing HOLD and pressing HOLD again to continue.
The following information is printed or displayed about each file:
• The file number.
• The identification you assigned to the file, if any (see SA VE Command).
• File type (see File Types).
• The number of contiguous 1,024·bytes areas of storage allocated to the file.
• The number of contiguous 1,024-byte areas of storage unused in the file.
• A number (0-9) indicating the number of defective 512-byte areas in the file, or an asterisk indicating that the number is greater than 9. This value can indicate when you should relocate a file into another file or cartridge to avoid loss of data due to defective areas on the tape.
• The first and last statement numbers for BASIC and SOURCE files.
File Types
Valid file types listed during the UTI L command are:
Type File
Q Marked or unused file 1 Data exchange file 2 General exchange file
3
BASIC source file4 BASIC work area file
5
BASIC KEYS file 6 APL continued file 7 APL SAVE file 8 APL internal data16 Patchltape recovery/tape copy 17 Diagnostic
18 IMFs
72 Tape storage dump
The syntax of the UTI L command is as shown:
UTI L{MOOE COM }
[PAINT,l [OIA [integerJ] ['dev-addressl
where:
Example
MODE COM specifies that communications be invoked. This must be the only
entry in a UTI L command invoking communications.
PRINT specifies that the listing be printed. If the printer is not specified, output
is displayed.
DIR integer specifies that a directory be listed. The integer, which identifies the
starting file number for the listing, is optional. If the integer is not entered. the listing will begin at the current physical location of the tape.
dev-address specifies the address of the tape unit from which the listing is to be
made. The default is address ESQ.
The following example shows a UTI L command, which specifies that a directory be printed, starting with file number 1 on the built-in tape unit.
UTIL PRINT, DIR1
\
'-/
(
(
(
The resulting printed output is shown in the following example:
User Identification Allocated Storage (in K) First Statement Number
001
(j0
~.~() () ,3
00
1+
o ()
!:.:,/
I ... ].
~:;11::.1-< PI~UG "/()()f.)
LIS!"
DATA
'"
File Number/
/
~
010,005 U
U010,2~50] U08,002 0 0020,3680
~.:j
OO],O()2
(Jo
()O]
~j O()~5,()O:"~ 0
Defined Function Keys
F;I'T~1714
i
Last Statement Number Unused Storage (in K) Defective Areas on TapeChapter 3. Data Constants And Variables
BASIC CHARACTER SET
The BASIC character set is used to represent arithmetic and character data entered from the keyboard as data constants and variables.
The characters that have syntactical meaning in the BASIC language fall into three categories: alphabetic, numeric, and special characters.
Alphabetic Characters
The alphabetic characters in BASIC are the uppercase letters of the English alphabet (A-Z) and the following three characters called alphabet extenders:
@ (the commercial
at
sign)#
(the number or pound sign)$
(the currency symbol)Numeric Characters
The numeric characters in BASIC are the digits 0 through 9.
/
I
(
(
-it
Special Characters
There are 22 special characters in BASIC:
Character Name
Blank
= Equal sign or assignment symbol
+ Plus sign Minus sign
*
Asterisk or multiplication symbolI
Slash or division symbolt
Up arrow or exponentiation symbol ( Left parenthesis) Right parenthesis Comma
Period or decimal point Single quotation mark Semicolon
Colon
& Ampersand or AND sign ? Question mark
>
Greater than symbol<
Less than symbol'*
Not equal symbol:0; Less than or equal symbol
~ Greater than or equal symbol OR sign or vertical bar
Use of Blanks
Blanks may be used freely throughout a program to improve readability. They have no syntactical meaning except within character constants and in the image statement (see PRINT USING and IMAGE, Chapter 4), which specifies the format of printed or displayed data.
Underscore
Note that the underscore (uppercase F) is a valid overstrike character in the 5100.
ARITHMETIC DATA
Magnitude
The magnitude of a number is its absolute value. The range of numbers permitted in 5100 BASIC programs is greater than or equal to .1 E-99 and less than 1 E+99.
Precision
In BASIC, the precision of an integer or fixed-point number is the maximum number . of significant digits it can contain. The precision of a floating-point number is the
number of significant digits to the left of the E (see Floating-Point Format). The
precision of numbers in the 5100 is 13 digits.
Arithmetic Data Formats
Arithmetic data can be entered, displayed, or printed in any of three formats: integer, fixed point, or floating point. The appropriate format for a given number depends on its magnitude and the level of arithmetic precision you require.
Numbers in any format can be positive or negative. Negative numbers must be preceded by a minus sign. When no sign is specified, a number is treated as a posi-tive number, so plus signs are optional.
Integer Format
Numbers expressed in integer format (I-format) are written as a number of digits optionally preceded by a sign. Examples of numbers in integer format are:
o
+2
-23
2683
Fixed-Point Format
Numbers expressed in fixed-point format (F-format) are written as a number of optional digits preceded by an optional sign and followed by a decimal point. The decimal point can also be followed by a number of digits. These digits are required if a number does not precede the decimal point. Examples of numbers in fixed-point format are:
33. 33.00
-.3
+3.56
/
"
/
i
\ .... /
(
(
(
(
(
(
Floating-Point Format
Numbers expressed in floating-point format (E-format) are written with an optional sign, followed by an integer or fixed-point number, followed by the letter E. An optionally signed one- or two-digit characteristic (exponent) must follow the E.
The value of a floating-point number is equal to the number to the left of the E, multiplied by 10 to the power represented by the number to the right of the E. This notation corresponds to standard scientific notation in which numbers are expressed as a power of 10. Note, however, that while the number 107 is
permis-sible in scientific notation, the number E7 is not a valid floating-point number. The value 107 must be expressed as 1 E7 in BASIC floating-point format. Thus,
BASIC floating-point format requires a number to the left of the E.
Examples of numbers in floating-point format are:
Floating Point Equivalent Decimal Number Value
.25E-4 .000025
+1.0E+5 100000
5E-7 .0000005
-15.33E6 -15330000
Selecting An Arithmetic Format
You can enter arithmetic values at the keyboard in the most convenient format for your application. The number one million, for example, can be entered in any of the following ways:
1000000 1000000.00 lE+6
The numeric size of arithmetic values is limited only by the magnitude (;:: .1 E-99
and
<
1 E+99). Note, however, that the physical length of values you enter is notlimited, although entries exceeding 13 digits will be truncated on the right to the 5100 precision of 13 digits. Thus, very small and very large numbers can be entered in E-format. For example, you can enter:
1.4E12
or the equivalent 1-or F-format value (14 followed by 11 zeros).
Arithmetic Constants
An arithmetic constant is either an integer, a fixed-point, or a floating-point number whose value is never altered during execution of the program. Thus, the integer 1 is a constant in the following statement:
x
= X +1I nternal Constants
An internal constant is an arithmetic constant with a predefined value. Unlike normal arithmetic constants, the internal constants are referred to by names, though like normal arithmetic constants, their values are never altered during program execution. The six internal constants are:
Constant Name Value
Pi (1r) &PI 3. 141592653590
Natural log &E 2.718281828459
Square root 0,('2 &SQR2 1.414213562373
/
/
Centimeters per inch &INCM 2.540000000000
Kilograms per pound &LBKG 0.453592370000
Liters pergallon &GALI 3.785411784000
The internal constant names can only be used as parts of arithmetic expressions, and can be preceded by a plus or minus sign, for example:
2*&PI (then press EXECUTE)
The result is 6.283185.
Arithmetic Variables
A variable is a named data item whose value is subject to change during execution of the program. Arithm