USER GUIDE
NEC America, Inc.
NEC America reserves the right to change the specifications, functions, or features in this document at any time without notice. NEC America has prepared this document for use by its employees and customers. The information contained herein is the property of NEC America and shall not be reproduced without prior written approval from NEC America.
Copyright 1998
TABLE OF CONTENTS
Page
Chapter 1 - Introduction . . . 1
What Sentry Alarm Control Terminal Does . . . 1
Unique Configuration Options. . . 1
Applications. . . 1
Chapter 2 - Using Sentry Alarm Control Terminal . . . 3
Logging In . . . 3
Screen Layout. . . 5
Title Bar . . . 5
Feature Windows . . . 5
Status Window . . . 7
Message Bar . . . 7
Using the Automatic Mode Feature . . . 8
Using the Terminal . . . 9
Displaying Function Key Assignments . . . 9
Displaying Color Assignments . . . 10
Changing Window Focus . . . 11
Previous Window Focus . . . 11
Next Window Focus . . . . 11
Status Window Focus . . . 11
Hiding the Status Window . . . 12
Showing the Status Window . . . 12
Scrolling Feature Windows . . . . 13
Hiding Feature Windows . . . 14
Showing Feature Windows . . . 15
Showing Active Features . . . 16
Removing Caller Information from Feature Window . . . 17
Select and Remove Individual Caller Information . . . 17
Remove all Idle Caller Information from a Feature Window . . . 18
Remove all Caller Information from a Feature Window . . . 19
Clearing the Message Bar. . . 20
Logging Off . . . 21
Chapter 3 - Emergency Conference . . . 23
Overview . . . 23
Definitions . . . 23
Caller. . . 23
Destination Party. . . 23
Idle . . . 23
Active . . . 23
Full . . . 23
Override . . . 24
Call Transfers. . . 24
Blind Call Transfers. . . 24
Screened Call Transfers . . . 24
Page
Overview . . . 27
How Annoyance Trap Works . . . 27
Annoyance Trap with Sentry Alarm Control Terminal . . . 27
Using Annoyance Trap . . . 28
When You Receive an Annoying Call . . . 28
Dterm phone. . . 28
Analog (single line) phone . . . 28
Annoyance Trap with Alarm Control Terminal . . . 29
Chapter 5 - Executive Override . . . 31
Overview . . . 31
How Executive Override Works . . . 31
Override Type . . . 31
Warning Tone . . . 31
Join Method . . . 32
Override Security . . . 32
History Logging . . . 32
Using Executive Override . . . 33
Basic Override . . . 33
From a Dterm phone . . . 33
Automatic Override . . . 34
From a Dterm phone . . . 34
Monitor . . . 35
LIST OF FIGURES
Figure Title Page
2-1 Log In screen. . . 3
2-2 NEC Sentry screen . . . 4
2-3 NEC Sentry main screen. . . 5
2-4 Function Key Assignment Display. . . 9
2-5 Color Assignment Display . . . 10
2-6 Window Focus. . . 11
2-7 Hiding the Status Window . . . 12
2-8 Showing the Status Window . . . 12
2-9 Changing Feature Windows . . . 13
2-10 Showing a Feature Window . . . 14
2-11 Showing Feature Windows . . . 15
2-12 Showing Active Features. . . 16
2-13 Select and Remove Individual Caller Information . . . 17
2-14 Remove all Idle Callers . . . 18
2-15 Remove all Caller Information . . . 19
2-16 Clearing the Message Bar. . . 20
2-17 Log Off Validation . . . 21
4-1 Annoyance Trap on Alarm Control Terminal . . . 29
Chapter 1
Introduction
This chapter provides an overview of the Sentry Alarm Control Terminal.
What Sentry Alarm Control Terminal Does
You can use the Sentry Alarm Control Terminal with one or more Sentry OAI Monitor applications, such as Emergency Conference and Annoyance Trap, to monitor conference calls and to identify annoying callers.
The Sentry Alarm Control Terminal allows you to monitor emergency conferences while they are actually happening (real-time). For example, if someone calls the extension assigned for reporting a fire, you will see the caller’s location and extension, and whether or not the call has been answered.
Unique Configuration Options
Each terminal can be configured separately. For example, if your job is to monitor only fire emergency calls, your terminal can be configured with only that option. Another terminal may be configured to include all options from all applications. It just depends on the needs of the person using the terminal.
You can also configure the way your Sentry Alarm Control Terminal screens and windows work, as well as function key assignments. Color assignments allow easy recognition of each feature on the terminal. Color options such as bold and blinking text allow you to see which features are active and visible.
The Sentry Alarm Control Terminal comes with default settings for screen setup and color. You will see the default settings for the Sentry Alarm Control Terminal screens in the next chapter. If you want to change default settings, see your administrator or refer to the Sentry Alarm Control Installation Guide.
Applications
The following applications, in addition to Sentry Alarm Control Terminal, are documented in this guide:
Chapter 2
Using Sentry Alarm Control Terminal
This chapter describes the procedures for using the Sentry Alarm Control Terminal.
Logging In
As with many of the Sentry Alarm Control Terminal features, the Log In screen is optional. If your terminal is configured to show the Log In screen, use the following steps to log in:
1. When the Log In screen displays, (Figure 2-1, “Log In screen” on page 3) the cursor appears in the Login Name field. Type your log in name and press Enter. 2. Type your password in the Password field and press Enter. You will not see the
password when you type it.
The NEC Sentry main screen (Figure 2-2, “NEC Sentry screen” on page 4) displays.
Note: If you don’t know your log in name or password, see your administrator
.
Figure 2-1 Log In screen
Default Operator ***NEC SENTRY*** 05/01/96 14:25:46
Login Name:
Password:
Figure 2-2 NEC Sentry screen
Default Operator ***NEC SENTRY*** 05/01/96 14:25:46
Date Time Ext Location Status
01/01/96 09:40:10 2400 Administration Released
01/01/96 09:40:15 4477 Building A Released
Fire Emergency (222) 2 Callers
Security Feature Ext Ring Answer Release Queue Abandon Total
Watch Call 333 0 0 0 0 0 0 Annoyance Trap *69 0 0 0 0 0 0 No Dial Alarm 0 0 0 0 0 0 Administrative 211 1 1 0 0 0 2 Fire/Emergency 222 0 0 2 0 0 2
Administrative (211) 2 Callers
01 02
Date Time Ext Location Status
01/01/96 09:40:10 2400 Administration Released
01/01/96 09:40:15 4477 Building A Released
Screen Layout
You can customize the layout of the Sentry Alarm Control Terminal screens, such as the format of windows on the screen and the type of information displayed. To show you the different parts of the screen and what they do, the default formats are illustrated in this guide. See your administrator or refer to the Sentry Alarm Control Installation Guide for information on customizing the screen layout.
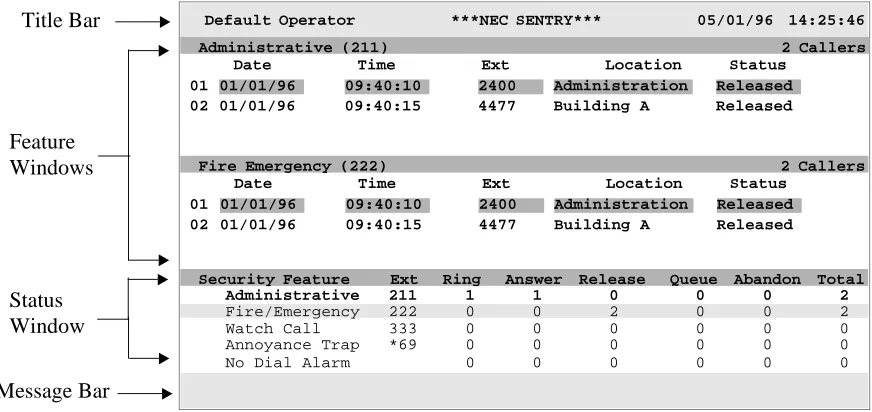
Figure 2-3, “NEC Sentry main screen” on page 5 illustrates the default Sentry Alarm Control Terminal screen layout.
Figure 2-3 NEC Sentry main screen
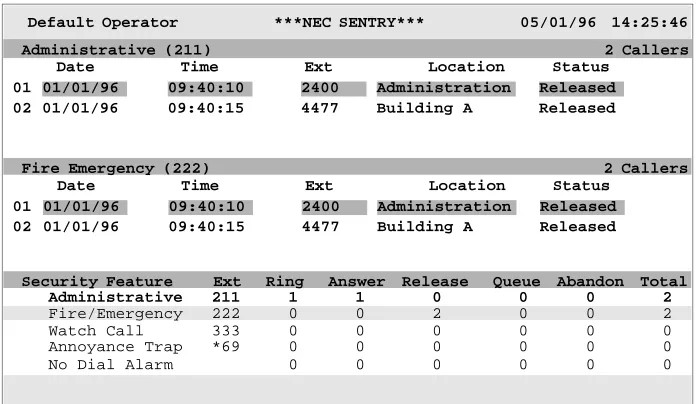
The default screen layout includes the following sections and windows:
Title Bar
The title bar is made up of one line at the top of the screen. The title bar includes (from left to right):• Terminal name • “NEC Sentry” title • Current date and time
Feature Windows
The feature windows show the real-time information from a Sentry application. For example, you might see conference call information from the EmergencyConference application. If someone calls the Fire Emergency conference number, you see information such as how many callers are conferencing and what
extensions they are using. You can change the feature window to show another Sentry application. Refer to Showing Feature Windows on page 15 for more information.
Default Operator ***NEC SENTRY*** 05/01/96 14:25:46
Date Time Ext Location Status
01/01/96 09:40:10 2400 Administration Released
01/01/96 09:40:15 4477 Building A Released
Fire Emergency (222) 2 Callers
Security Feature Ext Ring Answer Release Queue Abandon Total
Watch Call 333 0 0 0 0 0 0 Annoyance Trap *69 0 0 0 0 0 0 No Dial Alarm 0 0 0 0 0 0 Administrative 211 1 1 0 0 0 2 Fire/Emergency 222 0 0 2 0 0 2
Administrative (211) 2 Callers
01 02
Date Time Ext Location Status
01/01/96 09:40:10 2400 Administration Released
01/01/96 09:40:15 4477 Building A Released
Feature
Windows
(Continued)
The following information is included in the default configuration for feature windows: Security Feature (Unlabeled.) The name of the security feature, such as Fire
Emergency.
Monitored extension (Unlabeled.) The monitored extension number for the feature. This is the number a user dials to use the security feature and to initiate a conference call.
Number of callers (Unlabeled.) The total number of callers. This includes all calls that have been placed, even if they are queued or released.
Line number (Unlabeled.) The line number identifying the caller information.
Date The date of the call.
Time The time of the most recent action on the call, such as when the call was released.
Ext The caller’s extension. The format of the extension may be one of the following:
Integer - (Example: 1000). The format used for a station connected to the PBX or a station on another PBX via CCIS with ANI data that can be converted to an integer.
Route/Trunk or CCIS - (Example: 004/001). The format used for a call on route 4 / trunk 1. This call could be an outside call or CCIS.
Location The location of the caller’s extension.
If the call is a route/trunk without ANI data, an outside call, or CCIS, “Trunk” displays in this field.
If the outside call has ANI data, “Trunk” displays, followed by the caller’s telephone number. (Example: Trunk: (972) 555-1212).
If a CCIS call with ANI cannot be converted to an integer, the display would look similar to: CCIS 25#1000
Status The status of the call, which is one of the following:
Ringing - The caller’s phone is ringing or is calling another extension.
Answered - The caller’s phone has been answered.
Released - The caller’s phone has been answered and released.
Queued - The caller could not be connected because a line was not available. The call is placed into a queue and will be connected when a line is available.
Status Window
The status window provides a summary of the information for each feature window. You can scroll the lines to find information about each security feature. You also can hide and show the status window. Refer to Hiding the Status Window on page 12 for more information.The following information is included in the default configuration for the status window:
Security Feature The name of the security feature, such as Fire Emergency. Ext The extension number that a caller uses to activate a feature. Ring The number of calls that are ringing.
Answer The number of calls that have been answered. Release The number of calls that have been released. Queue The number of queued callers.
Abandon The number of callers who abandoned the call (queued, but hung up).
Total The total number of callers.
Using the Automatic Mode Feature
Each Sentry Alarm Control Terminal may be configured to automatically pop up feature windows containing active callers and to hide feature windows containing idle callers. A feature window is considered active if one or more callers are ringing, answered, or queued. Each time a caller update message is received, the terminal uses the following rules to determine whether or not a window should be visible:
• If the updated feature window has one or more active callers, then all feature windows containing active callers are made visible, and the remaining feature windows are hidden.
• If the updated feature window has no active callers, then it remains visible, and no other feature windows are affected. This ensures that a feature window will remain visible after the last caller releases, and until another feature window becomes active.
Using the Terminal
You can use function keys for most of the options on the Sentry Alarm Control Terminal screen. As with the screen layout, the function keys can be customized. See your Administrator or refer to the Sentry Alarm Control Installation Guide for more information.
Displaying
Function Key
Assignments
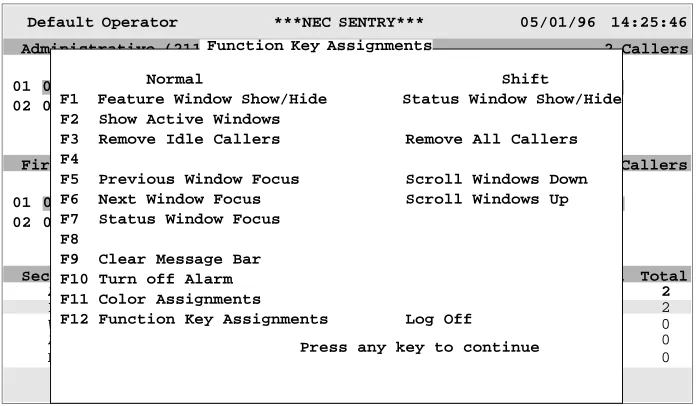
You can display function key assignments whenever you need to see them. To display the assignments:
1. Press the F12 key. (This is the default key. Your administrator may assign a different key.)
A window displays the function key assignments, as in Figure 2-4, “Function Key Assignment Display” on page 9.
Figure 2-4 Function Key Assignment Display
2. When you are finished looking at the function key assignments, press any key. The window displaying function key assignments disappears. You can press the F12 key (or the key assigned by your administrator) at any time to display it again.
Note: The options assigned to the function keys, such as hiding and showing feature win-dows, are described in this chapter.
Default Operator ***NEC SENTRY*** 05/01/96 14:25:46
Date Time Ext Location Status
01/01/96 09:40:10 2400 Administration Released
01/01/96 09:40:15 4477 Building A Released
Fire Emergency (222) 2 Callers
Security Feature Ext Ring Answer Release Queue Abandon Total
Watch Call 333 0 0 0 0 0 0 Annoyance Trap *69 0 0 0 0 0 0 No Dial Alarm 0 0 0 0 0 0 Administrative 211 1 1 0 0 0 2 Fire/Emergency 222 0 0 2 0 0 2
Administrative (211) 2 Callers
01 02
Date Time Ext Location Status
01/01/96 09:40:10 2400 Administration Released
01/01/96 09:40:15 4477 Building A Released
01 02
Normal Shift
F1 Feature Window Show/Hide Status Window Show/Hide F2 Show Active Windows
F3 Remove Idle Callers Remove All Callers F4
F5 Previous Window Focus Scroll Windows Down F6 Next Window Focus Scroll Windows Up F7 Status Window Focus
F8
F9 Clear Message Bar F10 Turn off Alarm F11 Color Assignments
F12 Function Key Assignments Log Off
Displaying
Color
Assignments
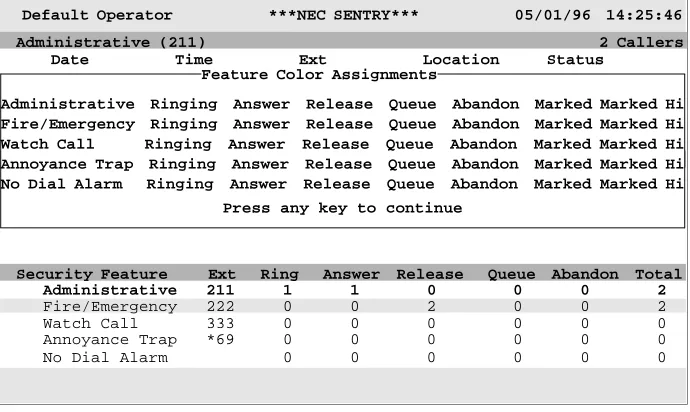
The Sentry Alarm Control Terminal uses color to help you identify features. For example, information for the Fire Emergency feature might be displayed in red. Highlighted and blinking text help you to determine the status of a feature.
You can display color assignments whenever you need to see them. To display the color assignments:
1. Press the F11 key. (This is the default key. Your administrator may assign a different key.)
A window displays the color assignments, as in Figure 2-5, “Color Assignment Display” on page 10.
Figure 2-5 Color Assignment Display
2. When you are finished looking at the color assignments, press any key.
The window displaying color assignments disappears. You can press the F11 key (or the key assigned by your administrator) at any time to display it again.
Default Operator ***NEC SENTRY*** 05/01/96 14:25:46
Date Time Ext Location Status
01/01/96 09:40:10 2400 Administration Released
01/01/96 09:40:15 4477 Building A Released
Fire Emergency (222) 2 Callers
Security Feature Ext Ring Answer Release Queue Abandon Total
Watch Call 333 0 0 0 0 0 0 Annoyance Trap *69 0 0 0 0 0 0 No Dial Alarm 0 0 0 0 0 0 Administrative 211 1 1 0 0 0 2 Fire/Emergency 222 0 0 2 0 0 2
Administrative (211) 2 Callers
01 02
Date Time Ext Location Status
01/01/96 09:40:10 2400 Administration Released
01/01/96 09:40:15 4477 Building A Released
01 02
Administrative Ringing Answer Release Queue Abandon Marked Marked Hi Fire/Emergency Ringing Answer Release Queue Abandon Marked Marked Hi Watch Call Ringing Answer Release Queue Abandon Marked Marked Hi Annoyance Trap Ringing Answer Release Queue Abandon Marked Marked Hi No Dial Alarm Ringing Answer Release Queue Abandon Marked Marked Hi
Changing
Window Focus
When a you are using a window, that window is active or has focus. You can change the focus of your windows by pressing function keys. The highlight bar is visible in the window that has focus.
Figure 2-6 Window Focus
Previous Window Focus
To change focus to the previous window, press the F5 key. (This is the default key. Your administrator may assign a different key.)
The previous window now has focus.
Next Window Focus
To change focus to the next window, press the F6 key. (This is the default key. Your administrator may assign a different key.)
The next window now has focus.
Status Window Focus
To change focus to the status window, press the F7 key. (This is the default key. Your administrator may assign a different key.)
The status window now has focus.
Note: Press F7 again (while status window has focus) to return to the feature window. Default Operator ***NEC SENTRY*** 05/01/96 14:25:46
Date Time Ext Location Status
01/01/96 09:40:10 2400 Administration Released
01/01/96 09:40:15 4477 Building A Released
Fire Emergency (222) 2 Callers
Security Feature Ext Ring Answer Release Queue Abandon Total
Watch Call 333 0 0 0 0 0 0 Annoyance Trap *69 0 0 0 0 0 0 No Dial Alarm 0 0 0 0 0 0 Administrative 211 1 1 0 0 0 2 Fire/Emergency 222 0 0 2 0 0 2
Administrative (211) 2 Callers
01 02
Date Time Ext Location Status
01/01/96 09:40:10 2400 Administration Released
01/01/96 09:40:15 4477 Building A Released
Hiding the
Status Window
To hide the status window, press Shift +F1. (This is the default key. Your administrator may assign a different key.)
When you press Shift +F1, the Status Window reappears.
Figure 2-7 Hiding the Status Window
Showing the
Status Window
To show the status window, press Shift +F1 while the Status Window is hidden. (This is the default key. Your administrator may assign a different key.)
If the status window is hidden when you press Shift +F1, it reappears.
Figure 2-8 Showing the Status Window
Default Operator ***NEC SENTRY*** 05/01/96 14:25:46
Date Time Ext Location Status
01/01/96 09:40:10 2400 Administration Released
01/01/96 09:40:15 4477 Building A Released
Fire Emergency (222) 2 Callers Administrative (211) 2 Callers
01 02
Date Time Ext Location Status
01/01/96 09:40:10 2400 Administration Released
01/01/96 09:40:15 4477 Building A Released
01 02
Default Operator ***NEC SENTRY*** 05/01/96 14:25:46
Date Time Ext Location Status
01/01/96 09:40:10 2400 Administration Released
01/01/96 09:40:15 4477 Building A Released
Fire Emergency (222) 2 Callers
Security Feature Ext Ring Answer Release Queue Abandon Total
Watch Call 333 0 0 0 0 0 0 Annoyance Trap *69 0 0 0 0 0 0 No Dial Alarm 0 0 0 0 0 0 Administrative 211 1 1 0 0 0 2 Fire/Emergency 222 0 0 2 0 0 2
Administrative (211) 2 Callers
01 02
Date Time Ext Location Status
01/01/96 09:40:10 2400 Administration Released
01/01/96 09:40:15 4477 Building A Released
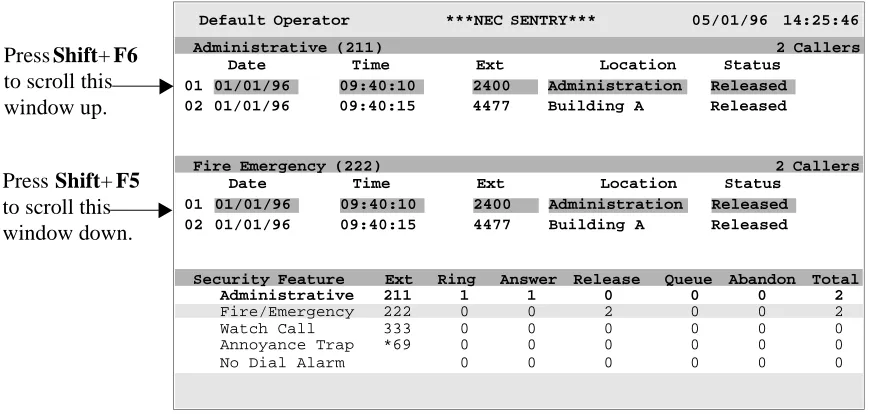
Scrolling
Feature
Windows
Depending on how many features you use on your terminal, all the feature windows may not fit on the screen at the same time. You can scroll up or down to view different feature windows.
Figure 2-9 Changing Feature Windows
Default Operator ***NEC SENTRY*** 05/01/96 14:25:46
Date Time Ext Location Status
01/01/96 09:40:10 2400 Administration Released
01/01/96 09:40:15 4477 Building A Released
Fire Emergency (222) 2 Callers
Security Feature Ext Ring Answer Release Queue Abandon Total
Watch Call 333 0 0 0 0 0 0 Annoyance Trap *69 0 0 0 0 0 0 No Dial Alarm 0 0 0 0 0 0 Administrative 211 1 1 0 0 0 2 Fire/Emergency 222 0 0 2 0 0 2
Administrative (211) 2 Callers
01 02
Date Time Ext Location Status
01/01/96 09:40:10 2400 Administration Released
01/01/96 09:40:15 4477 Building A Released
01 02 Press Shift+ F6 to scroll this window up.
Hiding Feature
Windows
You might want to hide a feature window so that you have room for other windows. To hide a feature window:
1. Make sure the status window is showing and has focus. Refer to Changing Window Focus on page 11 and Hiding the Status Window on page 12 for more information. 2. Use the arrow keys to move the highlight bar to the feature you want to hide. 3. Press F1. (This is the default key. Your administrator may assign a different key.)
The feature window you selected is hidden. In the status window, the feature’s line color changes from bold (or whatever color your administrator assigned to indicate a visible window) to its standard color.
Figure 2-10 Showing a Feature Window
Default Operator ***NEC SENTRY*** 05/01/96 14:25:46
Date Time Ext Location Status
01/01/96 09:40:10 2400 Administration Released
01/01/96 09:40:15 4477 Building A Released
Fire Emergency (222) 2 Callers
Security Feature Ext Ring Answer Release Queue Abandon Total
Watch Call 333 0 0 0 0 0 0 Annoyance Trap *69 0 0 0 0 0 0 No Dial Alarm 0 0 0 0 0 0 Administrative 211 1 1 0 0 0 2 Fire/Emergency 222 0 0 2 0 0 2
Administrative (211) 2 Callers
01 02
Date Time Ext Location Status
01/01/96 09:40:10 2400 Administration Released
01/01/96 09:40:15 4477 Building A Released
01 02 Highlight the
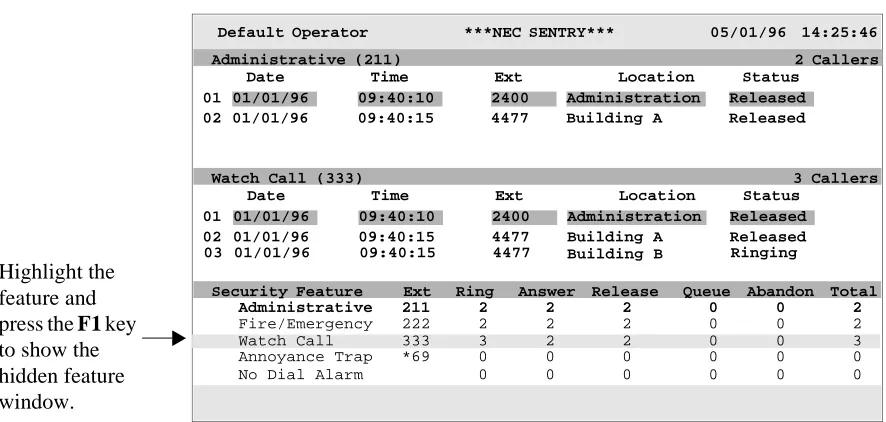
Showing
Feature
Windows
When you show a feature window, it will be visible until you hide it. Refer to Hiding Feature Windows on page 14 for more information about hiding the feature window. To show a feature window:
1. Make sure the status window is showing and has focus. Refer to Changing Window Focus on page 11 and Hiding the Status Window on page 12 for more information. 2. Use the arrow keys to move the highlight bar to the feature you want to show. 3. Press F1 . (This is the default key. Your administrator may assign a different key.)
The feature window is displayed. In the status window, the feature’s color changes to indicate that the feature is displayed. (In the default configuration, the feature is displayed in bold.)
Figure 2-11 Showing Feature Windows
Default Operator ***NEC SENTRY*** 05/01/96 14:25:46
Date Time Ext Location Status
01/01/96 09:40:10 2400 Administration Released
01/01/96 09:40:15 4477 Building A Released
Watch Call (333) 3 Callers
Security Feature Ext Ring Answer Release Queue Abandon Total
Annoyance Trap *69 0 0 0 0 0 0 No Dial Alarm 0 0 0 0 0 0 Administrative 211 2 2 2 0 0 2 Fire/Emergency 222 2 2 2 0 0 2
Administrative (211) 2 Callers
01 02
Date Time Ext Location Status
01/01/96 09:40:10 2400 Administration Released
01/01/96 09:40:15 4477 Building A Released
01 02
Highlight the feature and press the F1 key to show the hidden feature window.
01/01/96 09:40:15 4477 Ringing
03 Building B
Showing Active
Features
A feature is considered active if at least one caller is ringing, answered, or queued. To display active feature windows, press F2 . (This is the default key. Your administrator may assign a different key.)
The active feature windows are displayed. Any idle feature windows are hidden. In the status window, the active features are highlighted.
Figure 2-12 Showing Active Features
Default Operator ***NEC SENTRY*** 05/01/96 14:25:46
Date Time Ext Location Status
01/01/96 09:40:10 2400 Administration Released
01/01/96 09:40:15 4477 Building A Released
Fire Emergency (222) 2 Callers
Security Feature Ext Ring Answer Release Queue Abandon Total
Watch Call 333 0 0 0 0 0 0 Annoyance Trap *69 0 0 0 0 0 0 No Dial Alarm 0 0 0 0 0 0 Administrative 211 1 2 2 0 0 3 Fire/Emergency 222 1 1 1 0 0 2
Administrative (211) 2 Callers
01 02
Date Time Ext Location Status
01/01/96 09:40:10 2400 Administration Released
01/01/96 09:40:15 4477 Building A Ringing
01 02
01/01/96 09:40:15 4477 Building A Ringing
Removing
Caller
Information
from Feature
Window
After you have viewed caller information, you may want to remove the information from the feature window. There are several ways to remove caller information: • Remove individual lines of caller information.
• Remove all idle caller information at the same time.
• Remove all caller information (regardless of whether or not it is idle) at the same time.
Select and Remove Individual Caller Information
To remove individual lines of caller information:
1. Make sure focus is on the desired feature window. See Changing Window Focus on page 11 for more information.
2. Use the arrow keys to move the highlight bar to the desired line of caller information.
3. Press Enter to mark the line of information for removal.
The line changes color to indicate that it is marked for removal. If you need to review your terminal’s color assignments, see Displaying Color Assignments on page 10.
Note 1: To remove a mark, use the arrow keys to highlight the line and press Enter again.
Note 2: To remove marks from all highlighted lines in the window, press Esc.
4. Repeat steps 2 and 3 until all desired lines are marked. 5. Press Delete to remove the marked lines.
You may receive a prompt to confirm that you want to delete the lines of information.
6. Type Y to confirm the delete.
A message displays the number of callers removed from the feature window.
Default Operator ***NEC SENTRY*** 05/01/96 14:25:46
Date Time Ext Location Status
01/01/96 09:40:10 2400 Administration Released
01/01/96 09:40:15 4477 Building A Released
Fire Emergency (222) 2 Callers
Security Feature Ext Ring Answer Release Queue Abandon Total
Watch Call 333 0 0 0 0 0 0 Annoyance Trap *69 0 0 0 0 0 0 No Dial Alarm 0 0 0 0 0 0 Administrative 211 1 1 0 0 0 2 Fire/Emergency 222 0 0 2 0 0 2
Administrative (211) 2 Callers
01 02
Date Time Ext Location Status
01/01/96 09:40:10 2400 Administration Released 01
01/01/96 09:40:15 4477 Building A Released
02 Highlight the line of caller
Remove all Idle Caller Information from a Feature Window
You can remove idle callers from a feature window that has focus. To remove idle caller information from a feature window:
1. Make sure focus is on the desired feature window or is on the status window with the desired feature highlighted. See Changing Window Focus on page 11 for more information.
2. Press F3 to remove the idle caller information in the feature window. You may receive a prompt to confirm that you want to delete the lines of information.
3. Type Y to confirm the delete.
A message displays the number of callers removed from the feature window.
Figure 2-14 Remove all Idle Callers
Default Operator ***NEC SENTRY*** 05/01/96 14:25:46
Date Time Ext Location Status
01/01/96 09:40:10 2400 Administration Released
01/01/96 09:40:15 4477 Building A Released
Fire Emergency (222) 2 Callers
Security Feature Ext Ring Answer Release Queue Abandon Total
Watch Call 333 0 0 0 0 0 0 Annoyance Trap *69 0 0 0 0 0 0 No Dial Alarm 0 0 0 0 0 0 Administrative 211 1 1 0 0 0 2 Fire/Emergency 222 0 0 2 0 0 2
Administrative (211) 2 Callers
01 02
Date Time Ext Location Status
01/01/96 09:40:10 2400 Administration Released
01/01/96 09:40:15 4477 Building A Released
01 02 Highlight the
feature and press the F3 key to remove idle caller
Remove all Caller Information from a Feature Window
You can remove all caller information from a window that has focus, even if one or more of the callers are active. Information about active callers will continue to be monitored even if you remove the current information. If you remove a caller that is ringing, the caller’s status is still updated and displayed if the call is answered, released, etc.
To remove all caller information from a specific feature window:
1. Make sure focus is on the desired feature window or is on the status window with the desired feature highlighted. See Changing Window Focus on page 11 for more information.
2. Press Shift +F3 to remove all caller information in the feature window. You may receive a prompt confirming that you want to delete the lines of information.
3. Type Y to confirm the delete.
A message displays the number of callers removed from the feature window.
Figure 2-15 Remove all Caller Information
Default Operator ***NEC SENTRY*** 05/01/96 14:25:46
Date Time Ext Location Status
01/01/96 09:40:10 2400 Administration Released
01/01/96 09:40:15 4477 Building A Released
Fire Emergency (222) 2 Callers
Security Feature Ext Ring Answer Release Queue Abandon Total
Watch Call 333 0 0 0 0 0 0 Annoyance Trap *69 0 0 0 0 0 0 No Dial Alarm 0 0 0 0 0 0 Administrative 211 1 1 0 0 0 2 Fire/Emergency 222 0 0 2 0 0 2
Administrative (211) 2 Callers
01 02
Date Time Ext Location Status
01/01/96 09:40:10 2400 Administration Released
01/01/96 09:40:15 4477 Building A Released
Clearing the Message Bar
After a message is displayed, it remains in the message bar until you remove it or until another message is displayed.
To clear the message bar, press F9 (or the key assigned by your administrator) to remove the message.
The message bar clears.
Figure 2-16 Clearing the Message Bar
Default Operator ***NEC SENTRY*** 05/01/96 14:25:46
Date Time Ext Location Status
01/01/96 09:40:10 2400 Administration Released
01/01/96 09:40:15 4477 Building A Released
Fire Emergency (222) 2 Callers
Security Feature Ext Ring Answer Release Queue Abandon Total
Watch Call 333 0 0 0 0 0 0 Annoyance Trap *69 0 0 0 0 0 0 No Dial Alarm 0 0 0 0 0 0 Administrative 211 1 1 0 0 0 2 Fire/Emergency 222 0 0 2 0 0 2
Administrative (211) 2 Callers
01 02
Date Time Ext Location Status
01/01/96 09:40:10 2400 Administration Released
01/01/96 09:40:15 4477 Building A Released
Logging Off
To log off from your Sentry Alarm Control terminal:
1. Press Shift+F12. (This is the default key. Your administrator may assign a different key.)
You may receive a prompt to confirm that you want to log off. 2. Type Y to log off.
The Log In screen (Figure 2-1, “Log In screen” on page 3) displays, if your terminal is configured to show the Log In screen.
Figure 2-17 Log Off Validation
Default Operator ***NEC SENTRY*** 05/01/96 14:25:46
Date Time Ext Location Status
Security Feature Ext Ring Answer Release Queue Abandon Total
Watch Call 333 0 0 0 0 0 0 Annoyance Trap *69 0 0 0 0 0 0 No Dial Alarm 0 0 0 0 0 0 Administrative 211 1 1 0 0 0 2 Fire/Emergency 222 0 0 2 0 0 2
Administrative (211) 2 Callers
Chapter 3
Emergency Conference
This chapter describes how to use the Emergency Conference program. You can run the Emergency Conference program without the Sentry Alarm Control Terminal. The Sentry Alarm Control Terminal allows you to track Emergency Conference activity while it is happening, and you can save Emergency Conference events in a history log file.
Overview
The Emergency Conference program automatically connects you to a group of conferenced extensions when you dial a designated emergency number. The extensions that are included in the conference call are set up when the number for the emergency conference is defined. If you want to change the extensions included in the conference, see your administrator or refer to the Sentry Alarm Control Installation Guide.
The conference call saves time by notifying key people and allowing them to share information and problem-solve during a single conversation, instead of a series of time-consuming calls.
For example, if you work in the prison and call the number for a fire emergency, you might be connected with prison administrators in addition to the fire station. That way, all parties can talk about what steps need to be taken and can act as quickly as possible.
Definitions
To understand how Emergency Conference works, there are some terms you need to know.Caller
The person dialing the emergency number to initiate the conference.
Destination Party
An extension number to be included in the conference.
Idle
When there are no parties on the conference line, the conference is idle.
Active
The conference line is active when there are parties on the conference line.
Full
Override
If a destination extension for a conference is busy when the conference is called, the busy extension is released and connected to the conference. Both parties on the busy extension hear a warning tone before their call is released and the destination extension is connected to the conference.
You can assign the Override function to one or more conference extensions; however, it is recommended that you assign Override to the one conference extension you think is the most important. Otherwise, you may have someone on an emergency conference call who is cut off by override from another conference call.
Call Transfers
The Emergency Conference application supports blind and screened call transfers of single line and Dterm stations to a conference monitored number. The applicationprohibits the transfer of trunks to a monitored number.
Blind Call Transfers
A caller initiates a blind transfer by placing the connected party on hold, dialing the monitored number, and releasing before receiving an answer from the conference application. If the held party is a single line station or Dterm, it becomes the new
calling party after the transferring party releases. Otherwise, the conference application attempts to reconnect the held party with the transferring party. If this connection fails, the application attempts to connect the held party to a
configurable error destination, which is usually the operator (“0”). If this connection fails, the application releases the held party.
Screened Call Transfers
A caller initiates a screened transfer by placing the connected party on hold, dialing the monitored number, and waiting for an answer. If the caller does not receive an answer, the transferring party may cancel the transfer and reconnect to the held party. When the transferring party receives an answer, it is connected to the conference card set, and the held party remains on hold. When the transferring party releases, the held party is immediately connected to the conference card set if it is a single line station or Dterm. Otherwise, the conference application attempts
to reconnect the held party with the transferring party. If this connection fails, the application will attempt to connect the held party to a configurable error
Procedure
To use the Emergency Conference program, just dial the emergency number for the agency or department you want to reach. You will be connected to the emergency conference and will be able to listen and talk to other parties. If any of the extension lines are busy or the conference is full, the Emergency Conference program acts according to how your administrator has set it up. The following table illustrates the possible situations you may encounter.Table 3-1
Conference Condition
Override Setting
Not Busy/
Busy Action
Idle
Enabled Destination not busy
The caller dials the emergency number and hears ringing until connected to the conference call. All parties are included in the conference call since no destination extensions are busy. Destination
busy
The caller dials the emergency number and hears ringing until connected to the conference call. Busy destinations will be included in the conference when the Override feature connects them.
When destination extensions are busy, the parties on the busy extension hear a tone and are disconnected, then the destination party is connected to the emergency conference.
Disabled Destination not busy
The caller dials the emergency number and hears ringing until connected to the conference call. All parties are included in the conference call since no destination extensions are busy. Destination
busy
If any of the destination extensions are busy when the emergency call is placed, those extensions are not connected to the
Active, Not Full
Enabled Destination not busy
The caller dials the emergency number, hears ringing, and is connected to the conference call. All parties are included in the conference call since no destination extensions are busy.
Note: When a call is placed to an active conference, destination parties that were previously connected to the active confer-ence, but have hung up, are not connected until a new con-ference is initiated.
Destination busy
The caller dials the emergency number, hears ringing, and is connected to the conference call. Busy destinations will be included in the conference when the Override feature connects them.
When a destination extension is busy, the parties on the busy extension hear a tone and are disconnected, then the destination party is connected to the emergency conference.
An optional “beep” can be sent to signal the active conference parties that a new party has joined the conversation.
Note: When a call is placed to an active conference, destination parties that were previously connected to the active confer-ence, but have hung up, are not connected until a new con-ference is initiated.
Disabled The caller dials the emergency number, hears ringing, and is connected to the conference call.
If any of the destination extensions are busy when the emergency call is placed, those extensions are not connected to the
conference call.
Note: When a call is placed to an active conference, destination parties that were previously connected to the active confer-ence, but have hung up, are not connected until a new con-ference is initiated.
Active, Full
Not applicable
Not applicable
Chapter 4
Annoyance Trap
Overview
This chapter describes the Annoyance Trap feature, which can be monitored on the Sentry Alarm Control Terminal. If you need more information about the Alarm Control Terminal, See “Using Sentry Alarm Control Terminal” on page 3.
How Annoyance
Trap Works
Annoyance trap allows the receiver of a prank call to “trap” the caller. For example, a prisoner with access to a phone may repeatedly dial an emergency number, such as the prison fire station, just for entertainment.
When the person answering the fire station’s phone realizes that the calls are a prank, he or she can dial a short series of numbers (during the call) to identify the caller.
If the phone display is set up to show caller extension numbers, the receiver of the call sees the prank caller’s extension number on the phone display. The caller’s extension is also displayed on the Sentry Alarm Control Terminal, as described in the following paragraphs.
Annoyance Trap
with Sentry Alarm
Control Terminal
If Annoyance Trap is used with Alarm Control Terminal, an alarm can be set off to alert the operator that Annoyance Trap is being used to catch a caller. The operator then can see the extension numbers (displayed on the terminal screen) for the annoying caller and the receiver of the call.
Using Annoyance Trap
The following procedures describe how both a person who receives an annoying call and an Alarm Control Terminal operator can use Annoyance Trap.
When You
Receive an
Annoying Call
When you receive an annoying call, follow these steps to use Annoyance Trap: Annoyance Trap works only if the annoying caller is still on the line. Before the annoying caller hangs up, do one of the following, depending on the type of phone you have:
D
termphone
1. Press the TRF key. You will hear a beeping sound.
2. Dial the number assigned for Annoyance Trap. This number is usually *69, but your administrator may have assigned a different number. Check with your administrator to be sure.
Analog (single line) phone
1. Flash hook to place the annoying caller on hold. You will hear a beeping sound. 2. Dial the number assigned for Annoyance Trap. This number is usually *69, but your
administrator may have assigned a different number. Check with your administrator to be sure.
If the caller is still on the line when you perform the above steps, the Sentry Alarm Control Terminal will show where the annoying call originated. For more
Annoyance
Trap with Alarm
Control
Terminal
The operator for the Sentry Alarm Control Terminal can view Annoyance Trap activity and also conference with the annoying caller and the receiver of the call. Following is the procedure for the Alarm Control Terminal operator.
For general information about using the Alarm Control Terminal functions, See “Using Sentry Alarm Control Terminal” on page 3. For information on showing the status window, See “Showing the Status Window” on page 12. For information on showing the Annoyance Trap feature window, See “Showing Feature Windows” on page 15.
1. If Annoyance Trap is not configured to set off an alarm when an annoying caller is trapped, go to the next step. If it is configured to set off an alarm, press F10 (or the key assigned by your administrator) to turn off the alarm. See your administrator if you are not sure whether an alarm will sound.
2. When an annoying caller is trapped, information about the call is displayed in the Annoyance Trap feature window and the status window, as in Figure 4-1 on page 29. Bring the Annoyance Trap feature window into focus to view information about the call. You will see extension numbers and locations for both parties in the call. The Class field describes the people on the Annoyance Trap call:
• caller - the person who dialed *69 (or the key assigned by your administrator) to trap the annoying caller.
• source - the annoying caller.
• operator - the Alarm Control Terminal operator, if he or she is conferenced into the Annoyance Trap call.
The Link field shows the extension with which the party is linked. This is helpful if there is more than one Annoyance Trap call.
If your system is configured to include you in a conference with the Annoyance Trap call, See “Emergency Conference” on page 23.
Default Operator ***NEC SENTRY*** 05/01/96 14:25:46
Date Time Ext Location Status
01/01/96 09:40:10 2400 Administration Released
01/01/96 09:40:15 4477 Building A Released
Annoyance Trap (*69) 2 Callers
Security Feature Ext Ring Answer Release Queue Abandon Total
Watch Call 333 0 0 0 0 0 0
No Dial Alarm 0 0 0 0 0 0 Administrative 211 1 1 0 0 0 2 Fire/Emergency 222 0 0 2 0 0 2
Administrative (211) 2 Callers
01 02
01/01/96 09:40:10 2600 Administration Answered
01/01/96 09:40:15 4475 Building B Answered
01 02 Annoyance Trap Information. The status bar shows summary Information.
Annoyance Trap *69 2 2 0 0 0 2
Caller Source
2600 4475
Chapter 5
Executive Override
Overview
This chapter describes the Executive Override application.
How Executive
Override Works
Executive Override is a versatile application that allows you to “override” a two-party phone conversation to monitor and/or join the conversation from a Dterm telephone.
To use Executive Override, you simply press a Dterm function key. Depending on how the software is configured, you may also enter a brief access code.
Note: Your system may be configured with more than one function key, and you might also have more than one access code. Sometimes a combination of the function code and access key determine which features of Executive Override you want to use.
After you press a function key and any required access codes, you are prompted for the extension number for the person whose call you want to monitor and/or join, and are connected to the extension. For more information on using Executive Override, see Using Executive Override on page 33.
The following paragraphs briefly describe the various features of Executive Override.
Note: These features are configured and assigned to function keys/access codes by your system administrator. If you are not sure which features are available, see your system administrator for feature availability and function key/access code as-signments.
Override Type
There are three ways to “override” a call after you initiate Executive Override: • Basic - You immediately are connected with the desired extension, regardless
of whether that extension is busy or not.
• Automatic - You are connected to the extension immediately if it is not busy. If it is busy, Executive Override waits for a set period of time. If the time expires and the extension is still busy, Executive Override interrupts the call and connects you to the extension. If the extension becomes idle before the time expires, Executive Override connects you immediately.
• Monitor - You can silently listen to a conversation, with the option of joining the conversation at any time.
Warning Tone
Join Method
• Three Way - When you “override” an extension, you join the conversation for a three-way call.
• Two Way - When you “override” an extension, you are on a two-way call with the person whose extension you dialed. The other party is disconnected.
Figure 5-1 lists the possible feature combinations for Executive Override. Your system can be configured to use one or more of these feature combinations. A unique function key (or function key and access code) is assigned for each feature combination.
Figure 5-1 Executive Override Options
Override Security
Executive Override contains special security features which limit who may use it and how it may be used.
• Authorization Code - This is a unique value (up to 10 digits) assigned to individuals who are authorized to use Executive Override. Enter this code on the Dterm when performing an Executive Override.
• Protected Station - A station (telephone) that is designated protected cannot be monitored or joined using Executive Override.
• Secure Station - A station (telephone) that is secure does not require an Authorization Code to use Executive Override.
History Logging
Executive Override provides the ability to log events to UNIX files and/or printers. See your system administrator and the Sentry Alarm Control Terminal Installation Guide for more information.
Override Type Warning Tone Join Method
Basic Yes Three Way
Basic Yes Two Way
Basic No Three Way
Basic No Two Way
Automatic Yes Three Way
Automatic Yes Two Way
Automatic No Three Way
Automatic No Two Way
Using Executive Override
The following procedures are examples of how you can use Executive Override.
Basic Override
In this example, you are using a non-secure phone that requires an authorization code. You will use the Basic Override feature to join a conversation for a three-way call. The person at the destination extension is already in conversation with another party. A warning tone will let the parties know you are joining their conversation.From a D
termphone
1. Press the function key assigned for a basic three-way override with warning tone. The function key lights up and the LCD display gives the following prompt:
ENTER AUTH #
2. Use the Dterm keypad to enter your authorization code, and press #. The LCD display gives the following prompt:
ENTER DEST #
3. Use the Dterm keypad to enter the destination extension number, and press #. The LCD display gives the following prompt:
PLEASE ANSWER
4. Answer your phone. The parties you are joining hear the warning tone, and you are connected with the call. The LCD display will show the following to indi-cate the conference call:
Automatic
Override
In this example, you are using a non-secure phone that requires an authorization code. You will use the Automatic Override feature to join a conversation for a two-way call. The person at the destination extension is already in conversation with another party, but you wish to speak only with the person at the destination extension. There is no warning tone.
From a D
termphone
1. Press the function key assigned for an automatic two-way override with no warning tone. The function key lights up and the LCD display gives the follow-ing prompt:
ENTER AUTH #
2. Use the Dterm keypad to enter your authorization code, and press #. The LCD display gives the following prompt:
ENTER DEST #
3. Use the Dterm keypad to enter the destination extension number, and press #. The LCD display shows this message:
CAMP ON
4. Since the destination extension is busy, Executive Override waits a designated number of seconds and repeatedly calls the extension. After the designated number of seconds, the destination extension is disconnected from its current call (with no warning tone) and you are connected to the destination extension. The LCD display gives the following prompt:
PLEASE ANSWER
Monitor
In this example, you are using a secure phone that does not require an authorization code. You will use the Monitor feature to listen to a conversation. The caller at the destination extension is already in conversation with another party. There is no warning tone.From a D
termphone
1. Press the function key assigned for a monitored call. The LCD display gives the following prompt:
ENTER DEST #
2. Use the Dterm keypad to enter the destination extension number, and press #. The LCD display gives the following prompt:
PLEASE ANSWER
3. Answer your phone. You are connected with the call. The parties do not hear a warning tone. The LCD display will show MON in the upper left corner and the destination number in the upper right corner to indicate the extension being monitored.