by Damon Dean, Andy Cowitt,
Jennifer Smith, Christopher Smith
Creative Suite
®
3
Web Premium
A L L - I N - O N E D E S K R E F E R E N C E
FOR
DUMmIES
‰by Damon Dean, Andy Cowitt,
Jennifer Smith, Christopher Smith
Creative Suite
®
3
Web Premium
A L L - I N - O N E D E S K R E F E R E N C E
FOR
DUMmIES
‰About the Authors
Damon Deanleads the client services group for Revcube, a cross-channel marketing optomization company based in San Francisco. His team is respon-sible for producing all client integrations on the Revcube platform, as well as the Revcube product integration with search, display, e-mail, and other channels. Damon came to Revcube after 12 years of managing, designing, and delivering consumer and enterprise Internet applications and software on the both the client and agency side. Previous to his time at Revcube, Damon spent five years as the Director of Product Development for the California HealthCare Foundation, a $1 billion philanthropy. His team was responsible for the design and development all of CHCF’s online properties, which included some 10 Web properties, as well as a whole suite of CRM, content management, and grant-making applications. CHCF is considered a leader among philanthropies in its use of innovative technology to promote social change in the health care market. Before joining CHCF, Damon was employee number six at 415, a San Francisco Web design and development agency. As the Solutions Director, Damon led 415’s professional services efforts for Fortune 1000 firms on strategic marketing, product design, and development and business process engineering. Damon’s successful track record includes work with Credit Suisse, Schwab, Robert Mondavi, BART, Hasbro, Levi’s, and others. Damon also led the development of 415’s technology assets. Before his time at 415, Damon spent the previous three years leading software devel-opment teams at AnyRiver Entertainment (an Electronic Arts Spinoff). He began his career in marketing for PC World magazine. Damon is also the author five books, all published by John Wiley & Sons.
Andy Cowittis a Web Producer at the California HealthCare Foundation, where he engages in Web development in multiple capacities. He spent his formative Web years at the award-winning firm 415, Inc. While at 415, Andy worked on multimedia presentations and Web sites for Apple, Oracle, Macromedia, the San Francisco Symphony, KQED and others. In his spare time, Andy uses his computer to make music and videos. He lives in Oakland with illustrator Michael Wertz and their dog, Olive.
apparel. Her teaching and writing style shows the clear direction of a prac-ticed designer with in-depth knowledge of the Adobe Creative Suite applica-tions. When she’s not speaking or teaching, she can be found in suburban Boston, Massachusetts with her husband and children. You can learn about Jennifer’s seminar and conference appearances at agitraining.com. Christopher Smithis co-founder and President of Aquent Graphics Institute (AGI), the training and professional development division of Aquent that serves creative and marketing organizations. An Adobe Certified Expert for multiple Adobe products, he has worked as part of the Adobe Creative Team to develop many of the Adobe Classroom in a Book series and has authored numerous books on both InDesign and Acrobat. Christopher manages con-tent for the CRE8 Conference for creative professionals and also the Adobe Acrobat & PDF Conference. He has also served as an elected member of the school board in his hometown in suburban Boston, Massachusetts, where he lives with his wife and children.
Dedication
Damon Dean: Chris, between the dog and cat, it’s amazing that we’re still a family. Nah, maybe not so much! Much love, Damon.
Andy Cowitt:For Michael, as always.
Authors’ Acknowledgments
Damon Dean:Every book requires the hard work of a large number of folks, the vast majority of which we never see. Revisions are even more challenging because as an author, you’re constantly trying to remember what it was you wrote back in the first version of a product and whether it’s still relevant. There is, however, a team of folks that are there to keep you on the ball, and for that I’m always grateful. Steve Hayes, our acquisition editor, continues to ask me and Andy to do these books, so a big thank you there! On this revi-sion, Susan Christophersen was a tremendous shepherd of the book and my general lazy tendencies. Without her cheerful e-mails, we’d be late, or later, if you prefer! And a fine thank you to Ron Rockwell for all his vigilance in keep-ing us accurate. And to all the other production folks, thank you for makkeep-ing us all look good.
Andy Cowitt:Thanks to the Cowitts, Wertzes, and Saraccos, with special nods to Michael and to Damon. Also, props to Mike and all my other col-leagues past and present at the California HealthCare Foundation.
Jennifer and Christopher Smith:Thanks to all our friends and colleagues at Adobe Systems for their support, encouragement, and faith in all our work, especially surrounding the Creative Suite 3 launch: Jane, Joe, Ron, Dave, Donna, Ali, Noha, Lynn, Adam, Jeffrey, Lori, Richard, and the many product team members who responded to our questions throughout the writing process.
A special thank you also to Fred Gerantabee, the master of all things Flash. Thanks for your significant contributions to this book.
Thank you also to Yvette Grimes for assistance in updating information.
To the highly professional instructional staff at Aquent Graphics Institute (AGI), we appreciate your great insight into the best ways to help others learn creative software applications.
Thanks to all at Wiley Publishing. This book involves a lot of detail and infor-mation, and it was up to Melody Lane, acquisitions editor for our three mini-books in this book, and her “tough love” to make sure that it got to the state it is now. Thanks to Kelly Ewing and technical editor Cathy Auclair for the great insight.
Grant, Elizabeth, and Edward — thanks for putting up with our long hours in front of the keyboard night after night.
Publisher’s Acknowledgments
We’re proud of this book; please send us your comments through our online registration form located at www.dummies.com/register/.
Some of the people who helped bring this book to market include the following:
Acquisitions, Editorial, and Media Development
Project and Copy Editors:Susan Christophersen and Kelly Ewing
Previous edition: Christopher Morris
Executive Editor:Steve Hayes
Technical Editors:Ron Rockwell and Cathy Auclair
Editorial Manager:Jodi Jensen
Media Development Manager:
Laura VanWinkle
Editorial Assistant:Amanda Foxworth
Cartoons:Rich Tennant (www.the5thwave.com)
Composition Services
Project Coordinator: Erin Smith
Layout and Graphics:Carl Byers, Denny Hager, Joyce Haughey, Christine Williams
Proofreaders: Aptara, Cynthia Fields, John Greenough, Brian Walls
Indexer: Aptara
Publishing and Editorial for Technology Dummies
Richard Swadley,Vice President and Executive Group Publisher
Andy Cummings,Vice President and Publisher
Mary Bednarek,Executive Acquisitions Director
Mary C. Corder,Editorial Director
Publishing for Consumer Dummies
Diane Graves Steele,Vice President and Publisher
Joyce Pepple,Acquisitions Director
Composition Services
Gerry Fahey,Vice President of Production Services
Contents at a Glance
Introduction ...1
Book I: Dreamweaver CS3 ...7
Chapter 1: Introduction to Dreamweaver CS3 ...9
Chapter 2: Creating Basic Web Pages ...21
Chapter 3: Creating and Using Dreamweaver Sites...43
Chapter 4: Punching Up Your Pages with Forms and Frames ...59
Chapter 5: Laying Out Pages with AP Divs and AP Elements ...77
Chapter 6: Advanced Web Page Design Techniques...91
Chapter 7: Adding Interactivity with Spry ...113
Book II: Photoshop CS3...147
Chapter 1: Exploring New Features in Photoshop CS3...149
Chapter 2: Getting into Photoshop CS3 Basics...157
Chapter 3: Messing with Mode Matters...167
Chapter 4: Creating a Selection ...175
Chapter 5: Using the Photoshop Pen Tool ...189
Chapter 6: Thinking about Resolution Basics...199
Chapter 7: Creating a Good Image...205
Chapter 8: Working with Painting and Retouching Tools...219
Chapter 9: Using Layers...235
Chapter 10: Saving Photoshop Images for Print and the Web ...249
Book III: Fireworks CS3 ...261
Chapter 1: Introduction to Fireworks CS3...263
Chapter 2: Fireworks CS3 Basics ...283
Chapter 3: Working with Text, Shapes, and Images ...299
Chapter 4: Transforming Text, Shapes, and Images...329
Chapter 5: The Power of Layers and Frames...363
Chapter 6: Slicing Up Content for the Web ...391
Chapter 7: Advanced Fireworks CS3 Tools ...413
Book IV: Illustrator CS3 ...441
Chapter 1: What’s New in Adobe Illustrator CS3? ...443
Chapter 2: Discovering Illustrator CS3 ...449
Chapter 3: Using the Selection Tools ...461
Chapter 5: Using the Pen Tool and Placing Images...479
Chapter 6: Using Type in Illustrator...493
Chapter 7: Organizing Your Illustrations ...517
Chapter 8: Using Layers...527
Chapter 9: Livening Up Illustrations with Color ...533
Chapter 10: Using the Transform and Distortions Tools...553
Chapter 11: Working with Transparency and Special Effects Tools ...563
Chapter 12: Using Filters and Effects ...575
Chapter 13: Using Your Illustrator Images ...587
Book V: Flash CS3 ...603
Chapter 1: Introduction to Adobe Flash CS3 ...605
Chapter 2: Using the Graphics Tools ...623
Chapter 3: Working with Symbols ...647
Chapter 4: Making Your Life Easier with Layers...657
Chapter 5: Creating Animation ...669
Chapter 6: Adding Sound and Video ...683
Chapter 7: Publishing Movies ...691
Chapter 8: Using Flash’s Components ...705
Book VI: Contribute CS3...713
Chapter 1: Introduction to Contribute CS3 ...715
Chapter 2: Basics for Contributors ...731
Chapter 3: Contribute CS3 Administration ...757
Book VII: Acrobat 8 ...793
Chapter 1: Discovering Essential Acrobat Information ...795
Chapter 2: Creating PDF Files ...803
Chapter 3: Adding Interactivity to PDF Files...813
Chapter 4: Editing and Extracting Text and Graphics ...821
Chapter 5: Using Commenting and Annotation Tools ...829
Chapter 6: Securing Your PDF Files...841
Table of Contents
Introduction...1
About This Book...1
How to Use This Book ...1
Three Presumptuous Assumptions ...2
Macintosh versus Windows...2
How This Book Is Organized...3
Book I: Dreamweaver CS3...3
Book II: Photoshop CS3 ...3
Book III: Fireworks CS3 ...3
Book IV: Illustrator CS3...4
Book V: Flash CS3 ...4
Book VI: Contribute CS3 ...4
Book VII: Acrobat CS3 ...4
Conventions Used in This Book ...4
Icons Used in This Book...5
Where to Go from Here...6
Book I: Dreamweaver CS3 ...7
Chapter 1: Introduction to Dreamweaver CS3 . . . .9
Activating Dreamweaver CS3...9
Exploring the Dreamweaver CS3 Interface ...10
Selecting a workspace ...10
Introducing the Start page ...10
Introducing the Document Window...12
Choosing among Standard, Expanded Table, and Layout Modes...13
Examining Your Web Site with the Files Panel...14
Exploring Toolbar Buttons...15
Using Panels and Inspectors...17
Understanding the role of panels ...18
Working with the Properties panel ...18
Getting Help ...19
Chapter 2: Creating Basic Web Pages . . . .21
Setting Ruler and Grid Options in the Document Window ...21
Creating and Opening Pages...23
Establishing Page Properties...23
Working with Text ...25
Adding, editing, and deleting text ...26
Table of Contents
xv
Using Layer Masks ...240
Creating a layer mask from a selection...240
Creating a vector mask from a pen path ...241
Organizing Your Layers ...242
Activating multiple layers simultaneously...242
New Auto-Align Layers tool...242
Layer groups ...243
Duplicating a layer group ...244
Using Layer Styles ...244
Applying a style ...245
Creating and saving a style ...246
Thinking about opacity versus fill...246
Smart, Really Smart! Smart Objects...246
Merging and Flattening the Image...247
Merging ...248
Flattening...248
Chapter 10: Saving Photoshop Images for Print and the Web . . . .249
Choosing a File Format for Saving ...249
Wonderful and easy Photoshop PSD...250
Photoshop EPS ...250
Photoshop PDF ...251
TIFF...251
DCS ...251
Saving for the Web and Devices ...251
GIF...252
JPEG ...255
PNG...257
WBMP...258
Matte ...259
Saving Settings...259
Book III: Fireworks CS3 ...261
Chapter 1: Introduction to Fireworks CS3 . . . .263
Understanding the Power of Fireworks...263
Making designing easier with layers ...264
Creating slices...264
Taking a Quick Tour of the Fireworks Interface ...266
The Tools panel: A bird’s-eye view...267
The Tools panel: A bug’s-eye view ...268
Across the aisle: The right-side panels...272
The Property inspector ...273
Table of Contents
xix
Book IV: Illustrator CS3...441
Chapter 1: What’s New in Adobe Illustrator CS3? . . . .443
Integrated Interface ...443 Live Color ...444 Flash Integration ...445 Improved Drawing Controls...446 Erase It Away ...447 Isolation Mode ...447 New Cropping Tool ...448Chapter 2: Discovering Illustrator CS3 . . . .449
Deciding When to Use Illustrator CS3 ...449 Opening an Existing Document ...450 Creating a New Document...450 Taking a Look at the Document Window...451 Becoming Familiar with the Tools ...453 Checking Out the Panels ...455 Changing Views ...457 Navigating the Work Area with Zoom Controls...459Chapter 3: Using the Selection Tools . . . .461
Getting to Know the Selection Tools ...461 Anchor points ...461 Bounding box ...462 Selection tools ...462 Working with Selections ...463 Creating a selection...463 Selecting an anchor point...465 Using a marquee to select an object ...465 Selecting multiple objects ...466 Saving a selection ...467 Grouping and Ungrouping...467 Using the Isolation mode...468 Manipulating Selected Objects...469Table of Contents
xxi
Chapter 7: Organizing Your Illustrations . . . .517
Setting Ruler Increments...517 Using Guides ...518 Creating a ruler guide ...518 Creating a custom guide ...519 Using the Transform Panel for Placement ...519 Changing the Ruler Origin...520 Thinking about Object Arrangement...520 Hiding Objects ...521 Locking Objects...524 Creating a Clipping Mask...524Chapter 8: Using Layers . . . .527
Creating New Layers ...528 Using Layers for Selections...530 Changing the Layer Stacking Order ...531 Moving and Cloning Objects...531 Hiding Layers...532 Locking Layers...532Chapter 9: Livening Up Illustrations with Color . . . .533
Choosing a Color Mode ...533 Using the Swatches Panel ...534 Applying Color to the Fill and Stroke ...535 Changing the Width and Type of a Stroke...536 Using the Color Panel ...538 Saving Colors ...539 Building and using custom libraries ...540 Using the Color Guide and Color Groups ...540 Adding Pantone colors ...542 Editing Colors ...543 Building and Editing Patterns...544 Working with Gradients...546 Copying Color Attributes ...547 The Live Trace feature...548 The Live Paint Feature...549 Got Gaps? ...550ACS 3 Web Premium All-in-One Desk Reference For Dummies
xxii
Chapter 11: Working with Transparency
and Special Effects Tools . . . .563
The Mesh Tool ...563 The Blend Tool ...566 The Symbol Sprayer Tool...568 Transparency...571 Blend modes ...571 Opacity masks ...572Chapter 12: Using Filters and Effects . . . .575
Working with Filters and Effects ...575 Understanding the Appearance panel ...576 Applying a filter ...577 Applying an effect...578 Saving Graphic Styles ...580 Creating 3D Artwork ...581Chapter 13: Using Your Illustrator Images . . . .587
Saving and Exporting Illustrator Files ...587 The native Adobe Illustrator file format...588 Saving Illustrator files back to previous versions ...590 The EPS file format ...590 The PDF file format ...592 Saving Your Artwork for the Web...593 Flattening Transparency ...596 Flattening a file ...597 Using the Flattener Preview panel ...599 Printing from Illustrator ...600Book V: Flash CS3...603
ACS 3 Web Premium All-in-One Desk Reference For Dummies
xxiv
Editing fills...645 Working with bitmap fills ...646
Chapter 3: Working with Symbols . . . .647
Appreciating the Importance of Symbols ...647 Working with Graphic Symbols ...648 Working with instances of symbols ...648 Creating graphic symbols ...649 Using graphic symbols ...650 Editing graphic symbols ...650 Creating and Working with Movie Clip Symbols ...651 Working with Button Symbols ...653 Creating simple button symbols ...654 Adding pizzazz to buttons...655 Testing buttons...656Chapter 4: Making Your Life Easier with Layers . . . .657
Working with the Layer List...658 Working with Layers ...659 Creating layers ...659 Using layers...659 Editing layers ...659 An introduction to guide layers...662 Using mask layers...662 Changing Layer Options...665 Altering the visibility of objects ...665 Locking and unlocking layers ...666 Setting layer properties ...666 Using Folders to Manage Layers ...667Table of Contents
xxv
Adding Basic Interactivity to Animation ...680 Go To ...680 Stop ...681 Play...681 On (mouse event)...681 Working with Scenes...681
Chapter 6: Adding Sound and Video . . . .683
Exploring Sound and Video Formats ...683 Sound file formats ...683 Video file formats ...684 Working with Sounds ...684 Importing sounds ...684 Placing a sound in a movie...685 Editing sounds ...686 Setting sound properties ...687 Working with Video Clips ...689Chapter 7: Publishing Movies . . . .691
Publishing Movies the Simple Way ...691 Optimizing Movies for Speed...694 Simplifying graphics...694 Optimizing text ...695 Minimizing the size of sound files ...695 Testing download time ...696 Generating HTML and Graphics...697 Creating HTML code ...697 Creating graphic files ...699 Creating QuickTime movies ...701 Creating self-playing movies ...702 Exporting movies and images...702ACS 3 Web Premium All-in-One Desk Reference For Dummies
xxvi
NumericStepper...712 Window ...712 Setting component properties...712
Book VI: Contribute CS3 ...713
Chapter 1: Introduction to Contribute CS3 . . . .715
Why Contribute? ...715 Exploring the Contribute Interface ...716 Panel basics ...716 Menus...721 Setting Preferences ...727 Setting Blog Defaults preferences ...727 Setting Editing preferences ...728 Setting File Editors preferences...728 Setting FTP Proxy preferences...729 Setting Invisible Elements preferences...729 Setting PDF Documents preferences...729 Setting Ping Servers preferences...730 Setting Security preferences ...730 Setting Tagging preferences ...730Table of Contents
xxvii
Chapter 3: Contribute CS3 Administration . . . .757
Setting Yourself Up as Site Administrator...757 Creating General Settings...761 Changing the administrator’s e-mail address ...761 Changing the Administrator password...762 Setting up Contribute Publishing Services (CPS)...763 Establishing Web server settings ...763 Using the Rollback feature to save file backups...766 Setting New Pages defaults ...768 Deleting all permissions and settings at one time ...768 Setting Up Users and Roles...769 Opening the Administer Website dialog box ...769 Setting up a new role...769 Deleting roles ...770 Editing Role Settings ...771 Making general settings ...771 Granting access to folders and files...772 Extending file deletion privileges ...774 Customizing editing settings...774 Granting styles and fonts permissions ...777 Granting permission to create new pages...779 Setting file placement rules...782 Working with shared assets ...784 Customizing options for adding new images...787 Creating Connection Keys to Provide Access to Contributors ...789Book VII: Acrobat 8...793
Chapter 1: Discovering Essential Acrobat Information . . . .795
Working with PDF Files ...795 Knowing When to Use Adobe PDF Files ...797 Introducing the Adobe Acrobat Workspace and Tools ...798 The Zoom tools...799 Toolbars...799 Viewing modes...800 Additional viewing options ...801 Navigation panels ...802ACS 3 Web Premium All-in-One Desk Reference For Dummies
xxviii
Creating PDF Files from Adobe Creative Suite Applications ...806 Converting Photoshop and Illustrator files to PDF ...807 Converting InDesign Documents to PDF ...807 Converting Other Electronic Documents to PDF ...808 Creating PDF Files from Paper Documents and the Web ...809 Converting paper documents to PDF ...809 Converting Web pages to PDFs...810
Chapter 3: Adding Interactivity to PDF Files . . . .813
Adding Bookmarks to Ease PDF Navigation ...813 Creating bookmarks that link to a page...814 Creating bookmarks that link to external files ...815 Using bookmarks ...815 Editing bookmarks ...816 Adding Interactive Links ...817 Adding Buttons to Simplify Your PDF Files...818Chapter 4: Editing and Extracting Text and Graphics . . . .821
Editing Text ...821 Using the TouchUp Text tool to manipulate text ...822 Using the TouchUp Object tool to edit graphics...824 Exporting Text and Graphics ...825 Exporting text using Select, Copy, and Paste...825 Exporting text using Save As ...826 Snapshot tool ...828Chapter 5: Using Commenting and Annotation Tools . . . .829
Creating Comments ...829 The Comment & Markup toolbar ...829 Managing Comments ...836 Viewing comments ...836 Changing a comment’s review status ...836 Replying to a comment ...837 Collapsing or hiding comments...837 Sharing comments...838 Summarizing comments ...838 Enabling commenting in Adobe Reader ...839Chapter 6: Securing Your PDF Files . . . .841
Understanding Password Security...841 Applying password security to your PDF documents ...843 Limiting editing and printing ...844Introduction
W
hen creative juggernaut Adobe announced that it had acquired Macromedia in 2006, long-time Macromedia users wondered what it would mean for their preferred suite of Web development tools, Studio. Would Photoshop’s superior power and depth spell the end of Fireworks, despite the fact that Fireworks has more user-friendly image-optimizing and -exporting capabilities? Would FreeHand survive? Would ColdFusion get lost in the shuffle? For those of us who always used Photoshop and Acrobat as well as the applications in the Studio suite, the question was, How long do we have to wait for better integration of Adobe’s software with Dreamweaver, Flash, and Fireworks? With Adobe Creative Suite 3 Web Premium, we have our answers, and the future looks bright for Web developers!About This Book
Adobe Creative Suite 3 Web Premium All-in-One Desk Reference For Dummies (we know, it’s a mouthful) is designed to be a hands-on, easy-to-understand guide to the main features in all the CS3 Web development products. The no-nonsense approach will help you begin to build Web sites by covering the basics in a clear and concise fashion. The way we see it, you’ve got things to do, and reading a book, even a clever one, takes up valuable time. The faster we can help you do something or answer a question, the better.
How to Use This Book
You can use this book in a few different ways:
✦ As a reference: If you already have a Web site and use Creative Suite 3, this book can be a handy refresher for that thing you couldn’t quite remember how to do. Whether it’s finding out how to export graphics to Flash from Illustrator, or how to add a behavior to a button graphic in Fireworks, you can use this book to fill in those gaps that we all have . . . especially as we get older.
Three Presumptuous Assumptions
2
✦ To find out more about the tools: In this All-in-One Desk Reference,each minibook has a limited number of pages to cover a product or topic, which means that we get right to the point and make the topics covered easy to understand. We believe that this approach makes figuring out these products easier.
Three Presumptuous Assumptions
Before you dive into the book, we thought we should give you some advance warning of our expectations. We know, you’re the audience, so we shouldn’t assume anything! But, just so you know where we’re coming from, here are our three basic assumptions about you, the reader:
✦ You’re in a hurry. Frankly, if you wanted a more in-depth book, you’d have picked up a regular For Dummies book on one or all of these prod-ucts. Hence the no-nonsense, get-it-done, and keep-on-moving approach that you find inside this book.
✦ You know something about Web development. This isn’t a book in which we spend a lot of time talking about HTML and how it works. So you won’t find a chapter anywhere in this book titled, “What the Internet Is and How It Works.”
✦ You’ll experiment on your own. The approach here is to give you quick, useful examples of how things work across all these products. In some cases, the examples can be fairly sophisticated. In most cases, though, the book presents the basics. Our hope is that you’ll take those basic examples and build your own, more complex ones on top of that, according to the complexity of your site.
Macintosh versus Windows
Adobe Creative Suite 3 is both a Windows and a Macintosh product. In this book, you see us use the Windows commands, and most of the figures show Windows XP.
In general, you can convert between Windows (PC) and Macintosh key com-mands by using the following equivalencies:
✦ The Ctrl key on a PC is equivalent to the Command (Ô) key on a Mac. ✦ The Alt key on a PC is equivalent to the Option key on a Mac.
✦ The Enter key on a PC is equivalent to the Return key on a Mac.
How This Book Is Organized
3
The Mac operating system uses several of the F keys to operate various elements such as hiding windows, opening the Dock, closing or opening windows and applications, and so on. To override the Mac OS defaults and enable an application’s default key commands, open System Preferences (in the Dock) and then open Keyboard & Mouse. Select Keyboard Shortcuts from the three menu choices and scroll through the various shortcuts. If you wish to change F12 from opening or closing the Dashboard, for example, select it and click the plus sign button at the bottom of the window. Doing so brings up a new window headed by an Application menu. Select the applica-tion in which you wish to use F12, give it a name in the Menu Title box, and click the F12 in the Keyboard Shortcut window. Then, pressing F12 will do whatever the selected application wants to do instead of opening the Dashboard. Other applications will continue to use F12 as defaulted by the operating system, but you can change them just as easily.
How This Book Is Organized
As with all the All-in-One Desk References For Dummies,this book’s chapters are organized into minibooks. Most of the minibooks revolve around prod-ucts, but one is geared toward the Web development process. The following sections describe each minibook in more detail.
Book I: Dreamweaver CS3
Dreamweaver CS3 is the crux of any Web development effort with Creative Suite 3, so naturally, this is a good place to start. In this minibook, you get a hands-on look at how you can use Dreamweaver to create and manage your Web sites.
Book II: Photoshop CS3
Long the premier software for 2-D bitmap image creation and manipulation, Photoshop is the gold standard of Web design tools. This minibook aims to help you achieve good imagery, starting with basics that even advanced users may have missed along the way. We show you how to color correct images like a pro and use tools to keep images at the right resolution and size, no matter whether the image is intended for print or for the Web.
Book III: Fireworks CS3
Conventions Used in This Book
4
Book IV: Illustrator CS3
Book IV starts with the fundamentals of Adobe Illustrator CS3 to put you on your way to creating useful and interesting illustrations. Check out this mini-book to discover how to take advantage of features that have been around for many versions of Illustrator, such as the Pen tool, as well as new and exciting advances, such as the Live Trace feature. See how to take advantage of the Appearance palette and save time by creating graphics styles, tem-plates, and symbols. Pick up hard-to-find keyboard shortcuts that can help reduce the time spent mousing around for menu items and tools.
Book V: Flash CS3
Adobe Flash CS3 delivers animation, sound, video, and interactivity to the Web as no other product ever has. If you’ve ever wanted to find out how to use this tool to add some new zip to your Web site, this is the minibook for you!
Book VI: Contribute CS3
Designed as a collaborative tool that turns your hard development work into an easy interface for nontechies to update and publish content to the Web, Contribute puts the power of maintaining Web sites in the hands of the people you work with. In this minibook, you find everything you need to know to get you and your collaborators up and running with Contribute in no time flat.
Book VII: Acrobat CS3
Adobe Acrobat CS3 is a powerful viewing and editing application that allows you to share documents with colleagues, clients, and production personnel such as printers and Web page designers. Book VII shows you how you can save time and money previously spent on couriers and overnight shipping by taking advantage of annotation capabilities. Discover features that even advanced users may have missed along the way, and see how you can feel comfortable about using PDF as a file format of choice.
Conventions Used in This Book
Icons Used in This Book
5
Whenever we tell you to click something (most likely it’s a button or an icon), you use the left mouse button and click just once. On those rare occasions when clicking twice is required to get the job done, we tell you to double-click, or, if you need to use the right mouse button, we tell you to right-click.
To selectan item, you either highlight it or click in a check box or radio button, depending on the item. Text that we tell you to enter (that is, type) into the program, such as in a text box, appears in boldfacetype. Web site addresses and on-screen messages show up in monofonttype. And finally, to avoid confusion, we use title-style capitalization for option names and links, even when the program doesn’t.
Icons Used in This Book
Along the way, when there’s something of interest to point out, we toss in one of the icons you see in the left margin. When you see one, slow down for a moment to check it out to see what’s up!
If there’s a way to make something easier, or a more commonly accepted way of doing something, we tell you about it. This is the icon to look for!
When we really want to reinforce something, we throw in a Remember icon.
Pitfall ahead! That’s what this icon is all about. If something could cause trouble, we let you know.
Because we love technology, you have to forgive us for geeking out every now and then. When we do, though, we let you know with this icon.
This icon highlights new features in the products that make up the Adobe Creative Suite 3 Web Premium package.
Where to Go from Here
6
Where to Go from Here
Book I
Book I: Dreamweaver CS3 ...7
Chapter 1: Introduction
to Dreamweaver CS3
In This Chapter
Exploring the Dreamweaver CS3 interface
Choosing between Design view and Code view
Choosing among Standard, Expanded Table, and Layout modes
Examining your site with the Files panel
Exploring toolbar buttons
Using panels and inspectors
Getting help
I
f you’re looking for a Web design tool that’s both easy enough for beginners and sophisticated enough for Web design gurus, you’ve come to the right place. Dreamweaver CS3 from Adobe is a powerful program that enables you to create almost any type of Web page. This chapter covers the Dreamweaver basics and introduces you to some of the program’s essential tools.Dreamweaver is the industry standard for Web site design and production. Whether you’re interested in creating a site for fun, such as an online photo album or a site devoted to one of your hobbies, or for business, such as an online store, Dreamweaver’s flexible interface provides simultaneous graphi-cal and HTML editing. In other words, using Dreamweaver, you can not only lay out pages like an artist but also fine-tune the associated code as a pro-grammer would. Additionally, Dreamweaver’s built-in FTP features enable you to upload your site to the Web in a snap so that you can share your masterpieces with the world.
Activating Dreamweaver CS3
Exploring the Dreamweaver CS3 Interface
10
Exploring the Dreamweaver CS3 Interface
With Dreamweaver CS3, Adobe continues the tradition of allowing you to choose from two versions of the Dreamweaver workspace — Designer style and Coder style — that debuted with Dreamweaver MX 2004. This selection allows you, the developer, to work in an environment that is best suited to your personal development taste: one geared toward WYSIWYG (What You See Is What You Get) development and one that is more code oriented.
Selecting a workspace
Dreamweaver offers two workspace options:
✦ Designer: The WYSIWYG (What You See Is What You Get) interface, which shows the page you are working on much like it would be in a Web browser. This style is more appropriate for Web design novices working on basic HTML pages.
✦ Coder: The style that shows the page you are working on as an editable text document, which is appropriate for experienced coders and for pages on which you’re editing CSS (Cascading Style Sheets), XML, or dynamic code such as CFML (ColdFusion Markup Language) or ASP (Active Server Pages).
You can switch between the two styles, or even combine them, at the click of a button. See the “Introducing the Document Window” section, later in this chapter, for details. You might even consider switching back and forth between modes as you’re learning HTML because doing so is a good way to see the underlying HTML as it’s being generated.
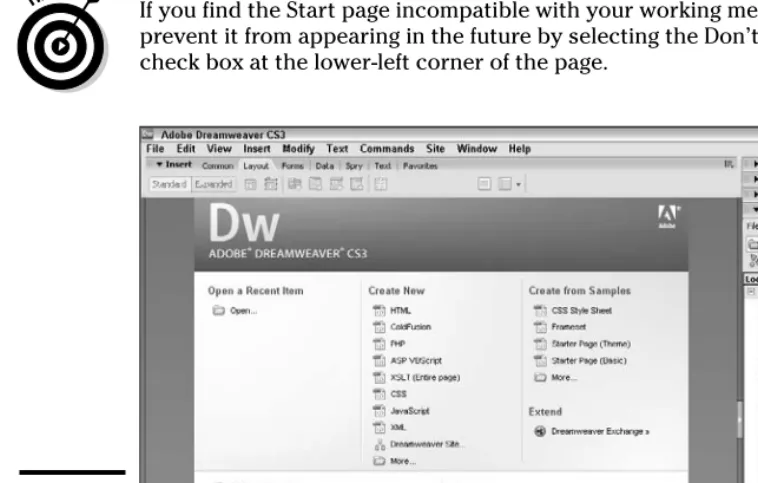
Introducing the Start page
After you’ve selected a workspace, when you launch Dreamweaver by double-clicking its icon on the desktop or by selecting it from the Windows Start menu, you’ll see a Start page, as shown in Figure 1-1. The Start page allows you to perform the following tasks with a single click of your mouse:
✦ Open pages you’ve recently edited: Simply click the filename of the page you want to open.
Book I Chapter 1
Introduction to
Dreamweaver CS3
Exploring the Dreamweaver CS3 Interface
11
✦ Create a new Dreamweaver Site: Click the Dreamweaver Site icon (in the Create New column) to open the Site Definition Wizard, which guides you through the process of setting up the directory location, FTP infor-mation, server technology (if applicable), and more for your Web site. A “site” in Dreamweaver is a collection of Web pages, images, and tools that allow you to more easily manage your Web sites. See Book I, Chapter 3 for more in-depth details on Dreamweaver Sites.
✦ Create a new page based on Dreamweaver’s built-in samples: Click an option in the Create from Samples column to open the New Document dialog box and choose from the preset formatting options for that type of page.
The Start page also gives you fast access to a quick tour and set of tutorials for Dreamweaver, and to Adobe’s Dreamweaver Exchange page, where you can find lots of nifty objects that extend Dreamweaver’s capabilities.
If you find the Start page incompatible with your working methods, you can prevent it from appearing in the future by selecting the Don’t Show Again check box at the lower-left corner of the page.
Figure 1-1:
Introducing the Document Window
12
Introducing the Document Window
Your primary workspace in Dreamweaver is the Document window, which appears automatically when you open a page in Dreamweaver. In the Document window, you construct your individual Web pages using panels and dialog boxes to format your work. The three primary views in
Dreamweaver are as follows:
✦ Design view: The graphical view of your document, as shown in Figure 1-2. You can select this view by choosing View➪Design or simply clicking the Design button near the top left of the Document window.
✦ Code view: This view shows the underlying code of your document. You can select this view by choosing View➪Code or clicking the Code button.
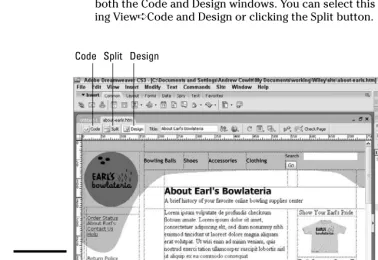
✦ Split view: As you may expect, this is a split-screen view that includes both the Code and Design windows. You can select this view by choos-ing View➪Code and Design or clickchoos-ing the Split button.
Code Split Design
Document window
Figure 1-2:
Book I Chapter 1
Introduction to
Dreamweaver CS3
Choosing among Standard, Expanded Table, and Layout Modes
13
You can toggle between these views easily at any time by clicking their cor-responding buttons at the top left of the Document window.
When you have several documents open in a site, you can select which doc-ument you want to work on by clicking the docdoc-ument’s name at the top of the Dreamweaver Document window. You can also click the Site tab in the Files panel to work on an entire site.
The Insert bar sits directly underneath Dreamweaver’s main menu. It gives you quick access to seven tabs you can use to insert everything from tables to Flash movies to form elements in your page. To select one of the seven categories, click the Insert bar’s name (Common, Layout, and so on) and choose a new category from the drop-down list.
Choosing among Standard, Expanded
Table, and Layout Modes
When viewing your document in either Split or Design view, you can view content using the Standard mode, the Expanded Table mode, or the Layout mode. The Standard mode is the default. (Figure 1-2, in the previous section, shows a page in Standard mode in the Design view, with the Insert bar set to Common.) The Expanded Table mode makes it easier for you to select tables and cells (though if you want to resize the table or row or column, you need to do so in Standard mode). The Expanded Table mode is most useful for editing existing tables. The Layout mode provides a simpler interface for drawing and editing tables and table cells.
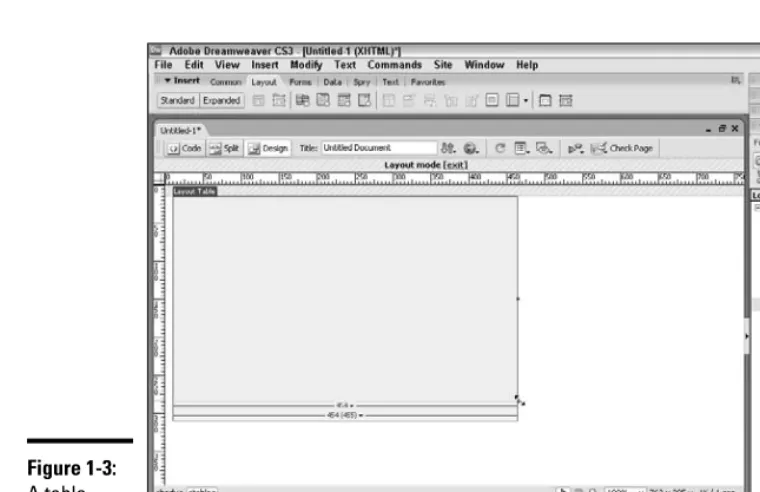
Two special tools are available only when working in Layout mode: the Draw Layout Cell button and the Draw Layout Table button. A table created with the Draw Layout Table tool is shown in Figure 1-3. Both of these tools can help you generate tables or table cells quickly and easily in Dreamweaver, and are described in more detail in Book I, Chapter 2.
To change to the Layout mode, select the Layout Insert bar at the top left of the Document window and click the Layout Mode button, or choose View➪ Table Mode➪Layout Mode, or press Alt+F6. When you’re in Layout mode, press Alt+F6 (Opt+F6 on a Mac) to return to Standard mode.
Examining Your Web Site with the Files Panel
14
Examining Your Web Site with the Files Panel
Dreamweaver offers Web developers the opportunity to work on individual files that make up a Web site, as well as to manage their entire Web site, all through the Dreamweaver interface. This concept is called, not surprisingly, a Site; to avoid confusion, we call them Dreamweaver Sites.Dreamweaver Sites can include the following elements:
✦ HTML, CFM, ASP, and other files that make up the code of the site ✦ Graphics, such as GIF and JPEG files
✦ Documents, such as PDF and DOC files
✦ Directories (folders that might contain any of the above)
Dreamweaver Sites are initially viewable within the Files panel (which is open by default; if the Files panel is not open, you can open it by pressing F8). To expand the Files panel so that it fills your screen, or to collapse the panel back to panel size, click the Expand/Collapse button (the icon of the two-row, two-column box with an arrow in the middle, at the right of the panel).
Figure 1-3:
Book I Chapter 1
Introduction to
Dreamweaver CS3
Exploring Toolbar Buttons
15
The Web site management tools for Dreamweaver Sites are designed to give you total control over the way in which your Web site is built and main-tained from your local computer. The key features of the Dreamweaver Site tools include
✦ Asset management tools that help you manage all the files that make up your site. For example, these tools keep track of all your files and the links between files. Anytime you move a file, the tools will change the related links in other files.
✦ Basic source control to ensure that files don’t get overwritten. These tools lock files so that when you’re working on a particular file, others on your team can’t edit that same file.
✦ Publishing tools that allow you to use FTP to upload the content from your site locally to the remote server where the site is housed.
✦ Utilities that create site maps, check links, check the HTML code, and run reports on who’s been working on what.
Dreamweaver Sites are covered in more detail in Book I, Chapter 3.
Exploring Toolbar Buttons
Dreamweaver provides you with a number of useful view buttons (shown in Figure 1-4 and Figure 1-5) that you can use to see different views of your site or to perform various functions. You can easily switch among views to exam-ine your site in different ways. Each Dreamweaver view offers specialized menus and tools to help you perform your work in that view. Certain views are available for an individual document or page, whereas other views are available for the entire site. At any time while you work, you can choose to preview your site in target Web browsers, which enables you to see your site from the user’s perspective.
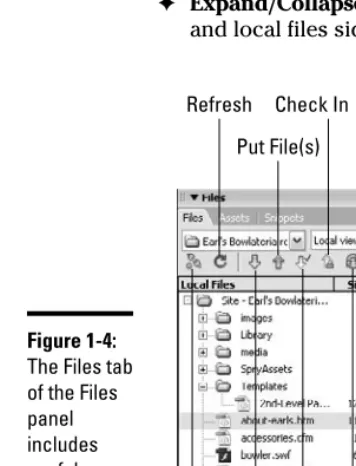
Figure 1-4 shows the following Site-related buttons from the Files panel:
✦ Connect to Remote Host button: Connects your local computer and your Web host, allowing you to transfer files between the two computers.
✦ Refresh button: Refreshes the panel’s view of files in the Site if you’ve made a change to filenames or file structures outside of Dreamweaver while the program was open.
Exploring Toolbar Buttons
16
✦ Put File(s) button: Uploads (sends) documents and files to the host. ✦ Check Out File(s) button: Locks files for editing by a single individual. ✦ Check In button: Replaces files on the server and makes them available
for editing by unlocking them.
✦ Synchronize button:Upload or download files to synch the assets on your local site with those on your remote site.
✦ Expand/Collapse button: Enlarges the Site tab to full screen, with remote and local files side by side (or, conversely, collapses the full-screen view).
Figure 1-5 shows the following document-related buttons from the top of the Document window:
✦ Code: Enables you to view the HTML page code full-screen.
✦ Split: Allows you to view the HTML page code and the graphical view of your document at the same time.
✦ Design: Enables you to view the WYSIWIG graphical representation of your page full-screen.
Expand/ Collapse Check In
Put File(s) Refresh
Connect to Remote
Host Synchronize
Check Out
Get File(s)
Figure 1-4:
Book I Chapter 1
Introduction to
Dreamweaver CS3
Using Panels and Inspectors
17
✦ File Management button: Click and then select Get to retrieve files from the Web site host, or select Put to send files to the host.
✦ Preview/Debug in Browser button: Click and select to preview or debug in your browser(s).
✦ Refresh button: Reloads your page so that changes to the code are reflected in the Design view.
✦ View Options button: Click to select options (such as Word Wrap in Code view and the Ruler in Design view) to assist you in viewing your page.
✦ Visual Aids: Hides and shows the various visual cues available to you in the Split and Design views.
✦ Validate Markup: Allows you to run a check on your code to see whether the HTML code is well formed.
✦ Check Browser Compatibility button: Allows you to run a check on your code for browser compatibility.
Some of these items may be unavailable, depending on what view you’re in and what you have selected in a document or panel.
Using Panels and Inspectors
You can use Dreamweaver panels and inspectors to enter details about all aspects of your Web site. These interfaces offer areas where you can add and format page features, set up navigation and behaviors, and manage the workflow of building your site.
Visual Aids
Refresh Check Page File Management
View Options Preview/Debug
in Browser
Validate Markup
Figure 1-5:
Using Panels and Inspectors
18
Understanding the role of panels
A panel typically provides information about all instances of a particular fea-ture on a page. For example, the Layers panel lists information about all the layers on the current page.
The Tag Inspector panel gives you easy access to various properties and behaviors specific to a selected object. The Tag Inspector panel updates continually, depending on what you have selected on your page. (If you have nothing selected on the page, the panel displays properties and behaviors of the whole page itself, as shown in Figure 1-6.) Note that the Tag Inspector panel’s name reflects the HTML or CFML tag being inspected.
To switch among tabs in a panel, just click the tab names.
Working with the Properties panel
The Properties panel changes, as does the Tag Inspector panel, based on the individual document object you have selected on your page, and it contains details on attributes of the object. For example, selecting text on a page opens the Text Property inspector in the Properties panel, where you can format the size, font, color, link, and other attributes of the text. (Figure 1-3 shows the Properties panel with a Layout Table selected.) To make certain that the Properties panel is shown below the Document window, choose Window➪Properties or press Shift+F3.
The Properties panel has a small down arrow in the lower-right corner, called an Expander button. Click the button to enlarge the Properties panel to view additional formatting options. In an expanded Properties panel, click the small up arrow in the lower-right corner to collapse the panel.
Figure 1-6:
Book I Chapter 1
Introduction to
Dreamweaver CS3
Getting Help
19
Getting Help
Dreamweaver offers a variety of tools to help you find the answer to virtually any question you have about the program. The Help tools provide basic information for beginners, as well as advanced references detailing HTML and JavaScript code.
You can get help by clicking the Help button — the small question mark — in the top-right corner of some panels. Similarly, you can open the Options menu in the top-right corner of any panel and select Help from the list.
You can also access help by using the Help menu located on the main menu. Just choose Help and then you can select from a host of options. Some of the more popular ones include
✦ Dreamweaver Help: Provides definitions and itemized steps in perform-ing routine Dreamweaver tasks. It contains Help Contents, Index, and Search categories.
✦ Spry Framework Help:Launches a Web browser and loads a page from the Adobe Web site, where you can find information about the Spry framework. See Book I, Chapter 7 for step-by-step instructions on using Dreamweaver to place smart Spry widgets on a page.
✦ Using ColdFusion: Provides information about coding dynamic sites using ColdFusion technology.
✦ Reference: Opens the Reference tab of the Results panel, offering a dictionary-style reference on CSS, HTML, Accessibility requirements, Sitespring tags, and JavaScript. You can also access the Reference tab of the Results panel by clicking the Reference button in the Document window.
✦ Extensions: Provides assistance in performing more advanced
Dreamweaver tasks, especially tasks involving the integration of adjunct programs, such as Adobe Flash, with Dreamweaver. This help option contains nitty-gritty information about application programming inter-faces (APIs) — specific software interinter-faces that allow you to integrate Dreamweaver with databases, the C and Java programming languages, and much more.
Chapter 2: Creating
Basic Web Pages
In This Chapter
Setting ruler and grid options in the Document window
Creating and opening pages
Establishing page properties
Working with text
Working with images
Adding links
Working with tables
Previewing your work
Checking browser compatibility
T
he most significant (and, fortunately, the easiest) process in building a Web site is creating the individual pages that convey the site’s content. Even if you plan on creating an ultrahip site chock full of animation and interactive forms, you spend the vast majority of your site-building effort constructing basic Web pages comprised of words and images. This chapter shows you how to set up, add color to, and name individual Web pages. You also discover how to add basic elements such as text, graphics, and tables, to your pages.Setting Ruler and Grid Options
in the Document Window
Setting Ruler and Grid Options in the Document Window
22
Here’s a brief look at all your options with rulers and grids:
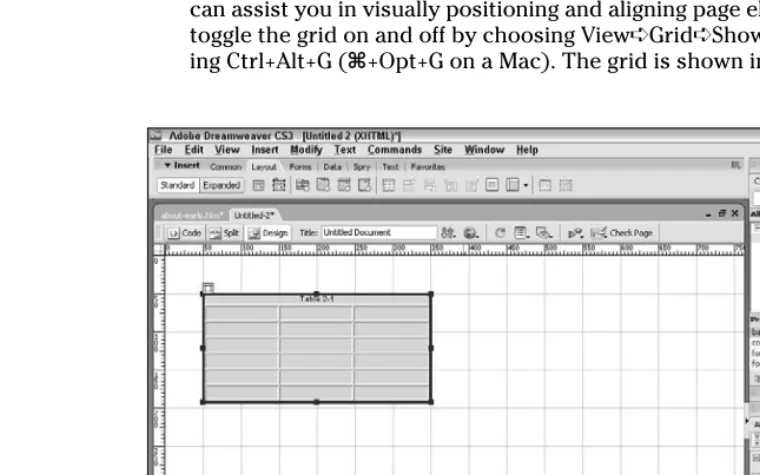
✦ Turning rulers on and off: Using rulers — both horizontal and vertical — in the Document window can help you measure and position page elements. Toggle the rulers on and off by choosing View➪Rulers➪ Show or by pressing Ctrl+Alt+R (Ô+Opt+R on a Mac).
✦ Moving and resetting the origin: By default, the origin, or (0,0) coordinate, of a Dreamweaver ruler is set to the upper-left corner of the Document window. You can reposition it to any coordinate in the Document window by clicking the origin cross hairs and dragging them to new coordinates, which can be useful if you want to use the rulers to position elements of a table whose upper-left corner doesn’t sit at (0,0) in the Document window. Reset the origin to its default position by choosing View➪ Rulers➪Reset Origin.
✦ Changing ruler measurement units: You can change the ruler’s measur-ing increment by choosmeasur-ing View➪Rulers and then choosmeasur-ing Pixels, Inches, or Centimeters.
✦ Viewing the grid: Dreamweaver provides a Document window grid that can assist you in visually positioning and aligning page elements. You can toggle the grid on and off by choosing View➪Grid➪Show Grid or press-ing Ctrl+Alt+G (Ô+Opt+G on a Mac). The grid is shown in Figure 2-1.
Figure 2-1:
Book I Chapter 2
Creating Basic
W
eb Pages
Establishing Page Properties
23
✦ Activating and deactivating grid snapping: The Document window grid offers a snapping feature that causes a div or Layout table or cell to automatically align precisely with the snap-to points you define, which can be useful when you draw, resize, or move a div (see Book I, Chapter 5 for the skinny on divs). You can toggle grid snapping on and off by choosing View➪Grid➪Snap to Grid.
You can adjust how the grid appears in the Document window in the Grid Settings dialog box. To do so, open the Grid Settings dialog box by choosing View➪Grid➪Grid Settings and change any (or all) of the attributes that appear. When you finish, click the Apply button to view the effect of your changes. Click OK to accept the changes and close the dialog box.
Creating and Opening Pages
You have several ways to create a new page in Dreamweaver:
✦ On the Start page, scan through the Create New column and click the type of page you want to create from scratch.
✦ On the Start page, click one of the options in the Create from Samples column to open the New Document dialog box and make a new page with many common settings precoded.
✦ Choose File➪New or use the keyboard shortcut Ctrl+N to open the New Document dialog box, from which you can create pages from scratch or from templates.
To open an existing page, do any of the following:
✦ On the Start page, click the name of the page in the Open Recent column. ✦ Double-click the page’s filename in the Files tab of the Files panel. ✦ Choose File➪Open or press Ctrl+O to summon the Open dialog box,
which you can use to browse to the page you want to open.
Establishing Page Properties
Establishing Page Properties
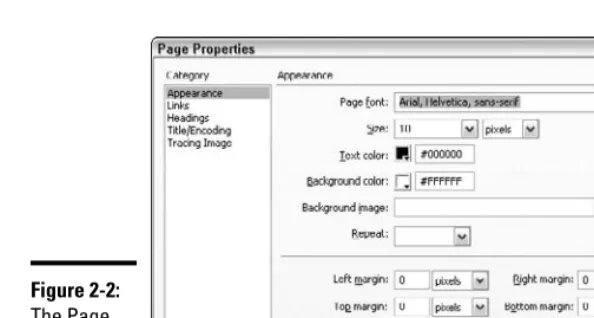
24
✦ Page Font, Size, Text Color, Background Color, Background Image: Choose a font or set of fonts from the Page Font drop-down list; add a style (bold or italic) if desired. Click the Color box next to each property and pick a color from the Web-safe color palette that appears, or enter a hexadecimal color code directly in any Color Code text field. You can also customize your own colors by selecting the color wheel and entering either RGB values or Hue, Saturation, and Luminosity values. For more information about using colors for the Web, see Book III, Chapter 2. Book III, Chapter 3 includes information on how to use the color picker to select colors in both Dreamweaver and Fireworks. For Background Image, click the Browse button to locate the image file that you want to appear as the Document window background. If the image is smaller than the available background area, the image is tiled (repeated in a checkerboard fashion, like floor tiles) to fill the background.
Even if you choose to use a background image, select a complementary background color; the color shows while the background image is downloading.
✦ Left Margin, Right Margin, Top Margin, and Bottom Margin: Enter numbers (in pixels) in these text fields to set up margins that affect how your page appears in modern browsers. Enter a whole number for the number of pixels of buffer space you want between the left, right, top, and bottom edges of your document and the content of the document.
✦ Link Font and Size, Color for Links, Rollover Links, Visited Links, and Active Links: Choose a font or set of fonts from the drop-down list; add a style (bold or italic) if desired. Click the Color box next to each property and pick a color from the Web-safe color palette that appears, or enter a
Figure 2-2:
Book I Chapter 2
Creating Basic
W
eb Pages
Working with Text
25
hexadecimal color code directly in any Color Code text field. You can also customize your own colors (see the first bullet on Text Color).
✦ Underline Style: Select an option from the drop-down list.
✦ Heading Font, Sizes, and Colors: Choose a font or set of fonts from the drop-down list; add a style (bold or italic) if desired. For as many of the six standard HTML heading levels as necessary, select a font size. If you choose a numeric value, the unit-of-measurement drop-down list to the right becomes active so that you can select an option. Click the Color box next to each heading and pick a color from the Web-safe color palette that appears, or enter a hexadecimal color code directly in any Color Code text field. You can also customize your own colors (see the first bullet point on Text Color).
✦ Title/Encoding: Enter a page title in the text field. This title appears in the title bar area of the window both during construction in Dreamweaver and when the page is viewed in a Web browser. Select an Encoding format if your site requires the use of non-Western fonts (Japanese or Cyrillic, for example). If your site is in English, you can leave the setting at the default, Western European.
✦ Tracing Image: Click the Browse button to locate the image file you want to use as a guide for laying out your Web page in the Document window. This feature is handy for developers who prefer to mock up a portion of their Web page design in a graphics program and then re-create that design in their Web pages. Tracing images appear in Dreamweaver only as a pattern to help guide you in creating an actual Web page; the tracing image never appears on the finished Web page.
✦ Image Transparency: Drag the slider to adjust the visibility level of the tracing image. At 0 percent, the tracing image is invisible; at 100 percent, the image is completely opaque.
Click the Apply button to view the effect of any property you change. Click OK to accept your changes and close the Page Properties dialog box.
Working with Text
Working with Text
26
Adding, editing, and deleting text
To enter text on a page, click in the Document window and begin typing. Your mouse pointer appears as a blinking cursor that moves along with the text you enter. When you reach the end of a line, the text automatically wraps to the next line. Dreamweaver automatically adds the associated code for your new text in the HTML for the page.
To delete text from a page, in the Document window, select the chunk that you want to delete and press Backspace or Del on your keyboard.
You can also modify how text appears on a page by editing its font, size, color, alignment, and other attributes. To modify text in the Document window, click and drag to select the text you want to modify. The Properties panel loads the Text Property inspector, as shown in Figure 2-3 (the Tag Inspector panel also reflects the selection). If the Text Property inspector is not open, choose Window➪Properties or press Ctrl+F3 to open it. In the Text Property inspector, modify any of the following properties:
✦ Format: From the Format drop-down list, select a default text style. Heading 1 is the largest style and Heading 6 is the smallest, but none of the headings correlates with a specific pixel size unless you set it to do so. Select Paragraph for the basic body text of your pages. Select Preformatted if you want spaces, tabs, and new lines in a paragraph to show up in a browser. (Ordinarily, when you add multiple spaces in a row or tabs to your HTML — this is particularly obvious in the Dreamweaver docu-ment’s Code view — they appear as single spaces in a browser.)
✦ Font: Select a font face from the Font drop-down list. Browsers show your text formatted as the first font in your selection that resides on the user’s computer. Choosing Edit Font List allows you to add more fonts that you may have installed on your computer to the Font drop-down list.
Most computers will have standard fonts such as Arial and Helvetica and won’t have less common fonts such as, say, Univers or Futura. If you use a nonstandard font and it’s not on the user’s machine, the layout could look very different from what you planned.
Figure 2-3:
Working with Text
28
✦ Target: If you are linking the selected text, you can specify how the linked page will open when the user clicks the link; you do so by select-ing one of the followselect-ing options from the drop-down list:
• _blank: Opens the link in a new window.
• _parent: Opens the link in the parent of the window that is cur-rently open. If the window with the link in it is not in a frame, the linked page opens in the same window as the link. If the link is in a frame, the linked window will open in the parent frame or in the parent window of the frame with the link. See Book I, Chapter 4 for more information about frames.
• _self: Opens the link in the currently opened window; this is the default target.
• _top: Opens the link in the top-level window, replacing any existing frames.
✦ List: Click the Unordered List button next to the Target field to transform text into an unordered (bulleted) list; click the Ordered List button to transform text into an ordered (numbered) list.
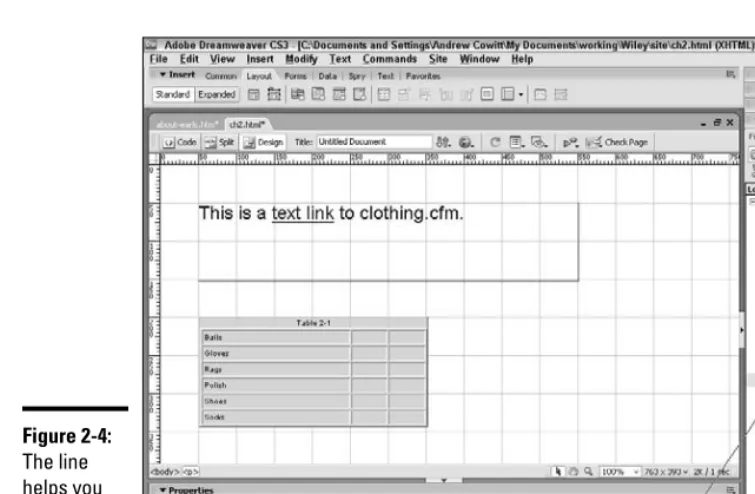
Figure 2-4:
Book I Chapter 2
Creating Basic
W
eb Pages
Working with Images
29
✦ Placement: Click the Text Outdent button, which you find next to the Ordered List button, to outdent (decrease the indent) the selected text; click the Text Indent button to indent the selected text. If you outdent an item in a bulleted or numbered list, the item will no longer be a list item.
Inserting a line break
When you want to start a new line in a word-processing program, you press the Enter key. If you press Enter in Dreamweaver, you create a para-graph break, which starts a new parapara-graph and creates a blank space between paragraphs. If you want to start a new line directly under another line of text and without the big space between lines, you need to insert a line break. In Dreamweaver, you create a line break by choosing
Insert➪HTML➪Special Characters➪Line Break or by pressing Shift+Enter. Alternatively, you may click the Insert Line Break button from the HTML category of the Insert bar. Dreamweaver places the cursor at the start of the next line and inserts the line-break HTML code.
Working with Images
Aside from entering text, manipulating images on a Web page is probably the most common Dreamweaver function you perform. You can add or delete an image and modify its properties to create an aesthetically
pleasing layout that effectively conveys the information you want to deliver to the user.
To see how to place an image on the background of your page, check out the “Establishing Page Properties” section, earlier in this chapter.
Inserting an image
To insert an image on a page, follow these steps:
1.
Choose Insert➪Image.Alternatively, you can click the Insert Image button in the Common cate-gory of the Insert bar.
2.
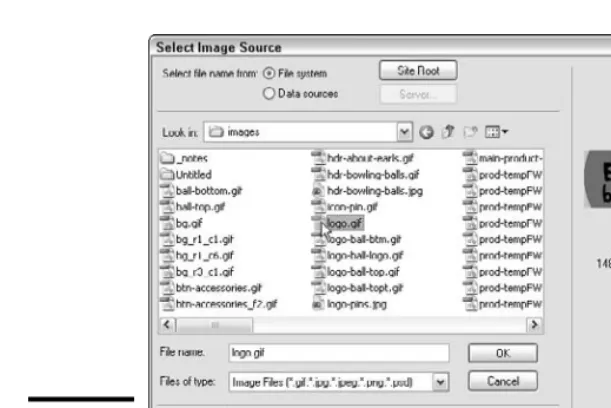
In the Select Image Source dialog box that appears (shown in Figure 2-5), click the image you want to insert.Working with Images
30
3.
If desired, enter Alternate text in the Alternate Text field of the Image Tag Accessibility Attributes window.Specifying alternate text ensures that when viewers’ browsers don’t — or can’t — display the image, some meaningful text appears instead; it also serves as an alternative for sight-impaired visitors to your page. Alternate text should be limited to a few words. You can also add more details about the image in the Long description field.
4.
Click OK to insert the image.Note: Every image you want to include on a Web page should reside within the root folder of the current site. (Typically, you should have your HTML files in the site root folder — the master folder that holds everything on your site — and all your images in an images folder that’s also in the site’s root folder.) If you attempt to insert an image from another location, Dreamweaver asks whether you want to copy the image to the current site root folder. Click Yes. In the Copy File As dialog box, you can enter a new name for the image in the File Name text field, or you can accept the current name and click the Save button.
Always be sure that you have saved your HTML file at least once before you insert an image into it. If your file isn’t saved, Dreamweaver won’t know where to place the image in relation to the file. After you’ve saved the file in a particular folder, the location is known and Dreamweaver can include the correct relative location of the image.
Figure 2-5:
Book I Chapter 2
Creating Basic
W
eb Pages
Working with Images
31
Select the Preview Images check box at the bottom of the Select Image Source dialog box to view a thumbnail of the image before you select it for insertion. The preview area also tells you the size of the image and the expected download time.
Deleting or moving an image
To delete an image from a page, click the image in the Document window and press the Delete key on your keyboard.
If you want to move the image from one place on the page to another, you can click the image in the Document window, press Ctrl+X to cut the image, click the spot on the page where you want to move the image, and press Ctrl+V to paste the image. You can also move an image by clicking and drag-ging it to a new location.
Modifying an image
You can modify how an image appears on a page by editing its size and align-ment, adding a border, and changing other attributes.
To modify an image, click the image in the Document window to select it. If the Image Property inspector does not appear, choose Window➪Properties to open it.
To see all the options the Image Property inspector offers, click the down arrow in the bottom-right corner of the Image Property inspector. (Clicking the up arrow displays fewer options.)
You can do any of the following things to modify the way an image appears:
✦ Resize the image: Click and drag a sizing handle to change the dimen-sions of the image. To resize the image maintaining the same propor-tions, hold down the Shift key as you drag a sizing handle. You can also resize the image by typing new pixel dimensions in the W and H text fields in the Image Property inspector. Click the Resample button to con-form the resized image to the new dimensions. (Otherwise, resizing in Dreamweaver changes the dimensions in which the browser draws the image but leaves the image file itself untouched — and image quality suf-fers when the browser resizes the image.)
Working with Images
32
✦ Align the image: In the Image Property inspector, click an alignment button to position the image on the page (or within a cell if the image is located in a table cell). Alignment button choices are Left, Center, and Right. To align an image with special word wrapping, select one of the alignment options, which are detailed in Table 2-1, from the Align drop-down list that appears when you position your image near a bunch of text.
✦ Add a border to the image: In the Image Property inspector, enter a number in the Border text field to add a border of that thickness to the image. Border thickness is measured in pixels.
✦ Pad an image with spaces: In the Image Property inspector, enter a number in pixels in the V Space (V for vertical) text field for the space you want to appear between the top and bottom of the image and other page elements; then, enter a number in pixels in the H Space (H for hori-zontal) text field for the space you want to appear between the image and page elements on either side of the image.
✦ Make the image a link: In the Image Property inspector, enter a URL in the Link text field.
✦ Specify alternate text for the image: In the Image Property inspector, enter alternative text in the Alt field. (Specifying alternate text ensures that when viewers’ browsers don’t — or can’t — display the image, some meaningful text appears instead, and also serves as an alternative for sight-impaired visitors to your page.)
✦ Name the image: In the Image Property inspector, enter a name in the text field next to the thumbnail image. (Naming an image is important if you want to refer to that image using a behavior or scripting language, such as JavaScript, but is otherwise unnecessary.)
✦ Edit the image: In the Image Property inspector, click the Edit button.
Book I Chapter 2
Creating Basic
W
eb Pages
Working with Links
33
✦ Change the image file: In the Image Property inspector, enter a different filename in the Src (source) text field (or click the File Folder button to browse for image files).
✦ Add an image map: In Dreamweaver, you can add multiple hyperlinked hotspots to images to create an image map. In the bottom left of the Image Property inspector, you see an arrow pointer and some image tools (a rectangle, circle, and free-form hotspot creator). With these tools, you can create hotspots on your images, and you can specify the following for each hotspot:
• The link location for the hotspot
• The target window for