Fast Track to Web / Database
Applications for Programmers
A Comprehensive Guide to Web Development Using Microsoft IIS, SQL
Server, and Macromedia ColdFusion MX
David M. Chandler TurboManage Corp.
All rights reserved.
Printed in the United States of America.
No part of this publication may be reproduced, transmitted, or translated in any form or by an means, electronic, mechanical, manual, optical or otherwise, without the prior written permission of David M. Chandler.
ColdFusion and the ColdFusion logo are trademarks of Allaire Corporation. Internet Information Server and SQL Server are trademarks of Microsoft.
All other trademarks are property of their respective owners.
February 2000
David M. Chandler 109 Lanyard Bend
UNIT 1 GETTING STARTED WITH WEB APPLICATIONS
Lesson 1 Web Development Background In the Beginning…
How the Web Works
Demonstration 1-1 HTTP GET The CGI Model
The API Model Server-Side Includes Application Servers The n-Tier Model
Java Servlets and Java Server Pages (JSP) Enterprise Web Development Trends Choices, Choices
Where to Go from Here Lesson 2 Introducing IIS
How to Get It Getting Started What Is a Web Site?
Walkthrough 2-1 Exploring IIS What Is a Virtual Directory?
Understanding Hierarchical Properties
Walkthrough 2-2 Create a New Virtual Directory in Internet Service Manager Walkthrough 2-3 Create a New Virtual Directory in Windows Explorer
Directory Options File Options Server Monitoring
Programmatic Administration Where to Go from Here
Lesson 3 Introducing SQL Server Why SQL Server?
Getting Started
Walkthrough 3-1 Exploring Enterprise Manager Understanding SQL Server Security
Walkthrough 3-2 Create a New Login and User Account Using Query Analyzer
Walkthrough 3-3 Query Analyzer SQL Server Profiler
Programmatic Administration Data Transformation Services
Walkthrough 3-4 Data Transformation Services Walkthrough 3-5 Import Text File
Lesson 4 Getting Started with ColdFusion Why ColdFusion?
How Does ColdFusion Work? Exploring ColdFusion Studio Getting the Most from Studio Administering ColdFusion Server
Working with Servers in ColdFusion Studio Walkthrough 4-1 Add a Remote Server Working with Projects
Walkthrough 4-2 Create a ColdFusion Project Starting and Stopping ColdFusion
Where to Go from Here Lesson 5 Querying Data
Understanding Data Sources
Creating an ODBC Data Source on Windows NT
Walkthrough 5-1 Create a Data Source in the ODBC Control Panel Walkthrough 5-2 Modify a Data Source in ColdFusion Administrator Creating an ODBC Data Source on Unix
Creating an OLE DB Data Source (Windows NT Only) Configuring Native Drivers
Modifying a Data Source
Programmatically Creating a Data Source Working with Databases in Studio
Walkthrough 5-3 Explore the Studio Database Resource Tab Working with Queries
Walkthrough 5-4 Create a New Query with Query Builder Displaying Query Results
Walkthrough 5-5 Build an HTML Table from a Query Introduction to Style Sheets
Walkthrough 5-6 Creating a Style Sheet with the Allaire Style Editor Where to Go From Here
UNIT 2 LEARNING COLDFUSION
Lesson 6 Creating Forms Introduction to Forms How Forms Work Reading Form Data Form Elements Displaying Form Data
Lab 6-1 Create a Simple Form Using JavaScript with Forms
Lesson 7 Creating Dynamic Queries Using Dynamic Query Parameters
Walkthrough 7-1 Create a Search Form and Drill-Down Application Using Form Fields in Queries
Using Dynamic Query Structure
Walkthrough 7-2 Expand the Customer Search Application Using Query Results
Where to Go From Here
Lesson 8 Creating Dynamic Forms Building Dynamic HTML Forms Building Dynamic ColdFusion Forms
Walkthrough 8-1 Create a Group of Checkboxes from a Query Where to Go from Here
Lesson 9 Validating Form Data Why Validate?
Client-Side Validation Server-Side Validation Using ColdFusion Validation
Lab 9-1 Experiment with Data Validation Where to Go from Here
Lesson 10 Beyond Queries: Modifying Data Inserting Data
Walkthrough 10-1 Add a New Employee Using CFINSERT Updating Data
Walkthrough 10-2 Create an Employee Update Form Deleting Data
Walkthrough 10-3 Delete an Employee Record with Validation Where to Go from Here
UNIT 3 DEVELOPING REAL-WORLD APPLICATIONS
Lesson 11 The ColdFusion Language ColdFusion Variables
Controlling Page Flow Expression Terms Operators
Functions
Using Pound Signs Dynamic Expressions
Regular Expressions (Pattern Matching) Lists
Arrays Structures
Nested Data Structures Where to Go from Here
Lesson 12 Debugging
Debugging with ColdFusion Server
Walkthrough 12-1 Enable Debugging in ColdFusion Server Debugging with ColdFusion Studio
Walkthrough 12-2 Using ColdFusion Studio Debugger Where to Go from Here
Lesson 13 Using the Application Framework Creating the Application Environment
Persistent Variables
Walkthrough 13-1 Creating a Data Store for Client Variables Enabling Persistent Variables in Application Pages
Locking Application, Session, and Server Variables Advanced Session Data Management
Generating Custom Error Messages
Walkthrough 13-2 Use Persistent Variables for Authentication Where to Go from Here
Lesson 14 Creating Custom Tags and Functions What is a Custom Tag?
Writing Custom Tags Calling Custom Tags
Lab 14-1 Create a Custom Tag to Display a Table from a Query Encoding Custom Tags
Nested Custom Tags Advanced Nested Tags
User-Defined Functions (UDFs) Where to Go from Here
Lesson 15 Structured Exception Handling Exception Handling
Using CFTRY / CFCATCH Raising Errors with CFTHROW Using Custom Exception Types Processing Flow
Error Handling Architecture
Creating a Centralized Exception Handling Framework Lab 15-1 Practice Exception Handling
UNIT 4 DATA AND APPLICATIONS ARCHITECTURE
Lesson 16 Extending Your SQL Toolbox The SELECT Statement
Lab 16-1 Create a Complex Query Using ColdFusion Query Builder Temporary Tables
Views
Deleting Rows Updating Rows Inserting Rows
Online Analytical Processing (OLAP) Where to Go from Here
Lesson 17 Building Distributed Applications Sending Mail with CFMAIL
Retrieving Mail with CFPOP
Using Directory Services with CFLDAP Transferring Files with CFFTP
Building Distributed Web Applications with CFHTTP Exchanging Data with WDDX
Where to Go from Here
Lesson 18 Working with Legacy Data The ColdFusion Connectivity Toolbox Working with Files and Directories
Creating a Query from a Text File using ODBC Parsing a Text File Using ColdFusion Lists Creating a Delimited Text File with CFOUTPUT Where to Go from Here
Lesson 19 Database Design and Integrity Databases in a Nutshell
Modeling Relationships Principles of Good Design Common Design Mistakes Using Transactions
Using Stored Procedures Using Triggers
Lesson 20 Optimizing Performance Performance by Design
Use Indexes
Database Server Considerations Programming for Performance Maintain Database Connections Use Block Factor
Cache Queries in Persistent Variables Use Query-Based Caching
Page-Based Caching Template Caching Where to Go from Here
UNIT 5 CONSTRUCTING ROBUST APPLICATIONS
Lesson 21 Web Applications Challenges Load Balancing
Designing Applications for Load Balancing Paging Through Results Without Caching Other Database Caching Options
Bookmarks and Reload Browser Challenges
Sharing Data in Multi-user Applications Collecting Usage Statistics
Where to Go from Here
Lesson 22 User Authentication Authenticating Users
Password Security Where to Go from Here
Lesson 23 Designing Secure Applications Common Attacks
Defensive Programming Practices Files and Directories
Typical Application Layout Database Security
Where to Go from Here
Lesson 24 Securing Your Servers Network Security
Web Server Security
Secure Your ColdFusion Server Secure Your Database Server
Unit 1
Getting Started with Web
Applications
Lesson 1 Web Development Background
Lesson 2 Introducing IIS
Lesson 3 Introducing Microsoft SQL Server
Lesson 4 Getting Started with ColdFusion
Lesson 5 Querying Data
Unit Overview
Web programming with modern tools is fun and productive. In this unit, you will get your feet wet in a typical Web applications environment using Microsoft Internet Information Server (IIS), Microsoft SQL Server, and ColdFusion.
Goals
Upon completion of this unit, you should be able to
• Make intelligent choices regarding Web tools and platforms • Configure IIS for a typical Web application
• Create databases and run queries in SQL Server • Feel comfortable working with ColdFusion Studio • Write simple ColdFusion applications
Lesson 1
Web Development Background
Introduction
In five short years, Web technology has emerged as the leading paradigm for network applications development. A brief survey of current
development methodologies will help you better understand which tools and languages are well-suited to various types of applications.
Objectives
By the end of this lesson, you should be able to
• Understand the nature and limitations of server-side Web applications • Explain the advantages and disadvantages of the CGI, API,
application server, and Java servlet models
• Understand the n-tier model of applications development • Explain the distinctions between front-end and back-end Web
programming
• Make informed choices regarding operating systems, application servers, and development tools
In the Beginning…
There was the HyperText Markup Language, or HTML. The key features of HTML were
1) content is separate from presentation 2) hyperlinks
HTML is static. In fact, to build an intranet of static HTML pages, you do not even need a Web server—just a network drive.
Web servers offer two principal advantages over a network drive: 1) speed
2) no requirement to log in
3) ability to process dynamic pages
How the Web Works
Web browsers and servers speak the HyperText Transfer Protocol (HTTP). HTTP is
1) lightweight
2) stateless (no permanent connection is established) 3) request-response oriented
HTTP supports various methods. The most familiar is the GET method, which retrieves a document. The POST method is commonly used to post form data, and the PUT method is used to place files on the server (Web servers and browsers have not implemented PUT until recently with the introduction of WebDAV in IE 5 and IIS 5).
Demonstration 1-1 HTTP GET
1. Telnet to localhost port 80
2. Type “GET /” and hit RETURN twice 3. Notice the MIME type
The CGI Model
At the heart of the Web’s early interactive capabilities was the Common Gateway Interface, or CGI. The CGI mechanism is relatively simple: the browser encodes data from fill-in forms into an HTTP GET or POST request and sends it to the server. The server looks at the URL request and determines what to send back based on the filename.
If the file extension is HTML or another static document type, the server READS the requested file and sends it to the browser.
If the file extension is CGI or some other configured application type, the server EXECUTES the requested file and returns the output to the browser. In this case, the CGI program specifies the MIME type of the output so the browser will know what to do with it.
In the CGI model, the server makes the HTTP request available to the CGI program through server environment variables. Frequently-used environment variables include
SCRIPT_NAME REMOTE_HOST REMOTE_ADDR REMOTE_USER CONTENT_LENGTH QUERY_STRING
For a complete list of environment variables available for CGI programming, check your Web server’s documentation. CGI programs are relatively hard to write because
1) CGI programs must parse environment variables to get form data from the browser (although there are libraries of CGI functions for common languages).
2) Every line of output must come from a print statement (perl’s “here document” feature helps).
3) Connecting to databases from native languages is relatively complex (perl’s DBI module eases some of the pain).
In addition, the CGI model has several disadvantages: 1) Every request forks a new process.
The API Model
In order to address these limitations, the major Web server vendors created APIs which allow a Web “program” to reside in process with the Web server. Thus, the overhead of forking a new process is replaced by the lower overhead of making a function call in a dynamically-linked library. Database connections remain open once initialized, and applications can store user information in memory.
However, the API model has one glaring problem: if your application crashes, the whole Web server crashes. Even without this risk, writing Web applications as functions in DLLs requires significant programming skill. The API model is used primarily
1) when you want to replace a Web server’s built-in function (say, browser authentication or logging) with your own
2) to implement scripting engines like Active Server Pages or ColdFusion
Server-Side Includes
One of the earliest methods of making Web pages more dynamic was called server-side includes. Server-side includes are special instructions to the server which are embedded in HTML pages. These instructions allow you to display the current date, include the contents of another file, or even include the output of a program executed on the Web server. For example, the following HTML snippet demonstrates a server-side include to display the current date on the page:
<HTML>
<TITLE>SSI Demonstration</TITLE> <BODY>
This page demonstrates server-side includes. <!-- #echo var="DATE_LOCAL" -->
</BODY> </HTML>
When a document contains server-side includes, the server must read the document and insert the included information first. This is called parsing. When a document ending in a server-side include extension is requested, the server parses it before sending it back to the browser.
Typically, documents containing server-side includes are named .shtml, .shtm, or .stm (IIS). These extensions alert the Web server to parse the file first.
While server-side includes are simple to use, they only support a handful of operations and are not intended to be used as a programming
language. They may be useful for simple tasks like including a standard footer in every document if no other dynamic features are required, but are otherwise rarely used.
Caution
Server-side includes are potentially dangerous because the #exec directive allows arbitrary programs to be executed on the server.
Application Servers
Web application servers solve all the aforementioned problems. The application server itself runs in a separate process and communicates with the Web server using the lightweight API model. The actual Web programs are written in the application server scripting language. Application servers provide capabilities not otherwise available such as debugging and database connection pooling.
Application servers support server-side scripting languages, which are typically easier to learn than native languages and provide a number of important features:
1) No URL parsing is required. 2) Database access is much simpler.
3) Scripts run in the context of an application framework with persistent variables to overcome statelessness.
4) Scripts can easily call pre-built routines to do common things like send mail or receive an uploaded file.
Microsoft Jscript and VBScript are object-oriented server-side scripting languages used to create Active Server Pages. ASP scripting is easier to learn than writing C functions in DLLs and not as likely to crash the Web server (although it is possible to introduce memory leaks).
The real power of application server scripts is that you embed scripts right in Web pages. For most people, this is easier than writing an entire program to create a dynamic Web page. Here is a typical ASP script to query a database and display a list of names:
<%
'Establish a connection with data source.
strConnectionString =
"Provider=Microsoft.Jet.OLEDB.4.0;Data Source=C:\Data\Employees.mdb"
Set cnn = Server.CreateObject("ADODB.Connection") cnn.Open strConnectionString
'Instantiate a Recordset object. Set rstCustomers =
Server.CreateObject("ADODB.Recordset") 'Open a recordset using the Open method
'and use the connection established by the Connection object.
strSQL = "SELECT FirstName, LastName FROM Customers WHERE LastName = 'Smith' "
rstCustomers.Open strSQL, cnn
'Cycle through record set and display the results 'and increment record position with MoveNext method. Set objFirstName = rstCustomers("FirstName")
Set objLastName = rstCustomers("LastName") Do Until rstCustomers.EOF
Response.Write objFirstName & " " & objLastName & "<BR>" rstCustomers.MoveNext
Loop %>
ColdFusion is tag-oriented rather than program-oriented. As a result, ColdFusion code is generally easier to create and maintain than ASP. Here is the same query in ColdFusion:
<CFQUERY name=”qListSmiths” datasource=”Employees”> SELECT FirstName, LastName
FROM Customers
WHERE LastName = ‘Smith’ </CFQUERY>
<CFOUTPUT query=”qListSmiths”> #qListSmiths.FirstName#
#qListSmiths.LastName#<BR> </CFOUTPUT>
The n-Tier Model
The application server model is frequently referred to as the three-tier or n-tier model. The main components are
1) Database layer
2) Business logic layer (application server) 3) Presentation layer (browser)
The primary benefit of the tiered development approach is that it is possible to run each piece on a separate server, thereby harnessing the power of parallel computing. In addition, the n-tier model simplifies application development effort by separating the three layers.
Java Servlets and Java Server Pages (JSP)
The newest technology for developing Web applications is Java servlets. As the name implies, each servlet is a miniature server. The servlet stays in memory waiting for a request and then processes the request. Servlets are written in Java and offer high performance; however, by themselves they offer none of the Web application framework inherent in scripting languages like ASP and ColdFusion.
Writing Java servlets in native Java is even more difficult than writing CGI programs because servlets must handle the low-level HTTP request-response sequence. However, servlets can also be created with JavaServer Pages (JSP).
JavaServer Pages consist of snippets of Java code embedded between script tags in an HTML document. When a .jsp page is requested, a server such as Allaire’s JRun compiles the JSP page into a Java servlet and executes the resulting code. JSP pages provide an application framework similar to ASP or ColdFusion. However, JSP, like ASP, still requires more lines of code to do any given task than a tag-oriented language like ColdFusion.
Enterprise Web Development Trends
Web application servers and scripting languages are ideal for Web application front-end programming. However, complex applications like e-commerce systems frequently require interaction with legacy databases
Data-intensive tasks can be done in the database using stored procedures, as this approach offers performance advantages and
programming constructs such as cursors and transactions which are most appropriate for data-oriented tasks.
Transaction-oriented applications typically require a transaction monitor or some sort of middleware which ensures end-to-end data integrity. A popular middleware object server is WebLogic, which hosts Enterprise JavaBeans (EJB) components. Among other things, object servers like WebLogic map relational database tables into Java objects, making it relatively easy to extract and process data from heterogeneous sources. Java servlets and JSP would not be appropriate as back-end tools because they are request-response oriented.
Because of the requirement to interface with middleware or legacy systems, back-end programming is typically done in a lower level
language like Visual Basic, C++, or Java. Java has the most performance overhead, but offers a much richer set of basic data types (such as hashes and linked lists) than C++, is easier to use for TCP/IP-based communication, and its object orientation is less complex than that of C++. In addition, the cross-platform nature of Java means you won’t have as much of the Windows programming learning curve. For this reason, Java is rapidly becoming the most popular language for Web back-end development.
Front-End and Back-End Integration
The Web front end will more than likely require a way to tap into certain back-end functionality. The ColdFusion Application Server provides a variety of ways to do this. ColdFusion programs can instantiate CORBA and COM objects. CORBA objects require a CORBA middleware server. COM objects are simply DLLs hosted on the server. With version 4.5, ColdFusion programs can also instantiate Enterprise JavaBeans (EJB) objects hosted by any major EJB server and call Java servlets hosted by a servlet engine such as Allaire’s JRun. In addition, you can create custom ColdFusion tags in Java.
Large-scale applications typically wrap up core functionality into CORBA, COM, or EJB containers so that they can be called from front-end and back-end programs alike. Of these technologies, EJB is the most in vogue. Alternatively, Visual Basic and Visual C++ both make it relatively easy to create COM objects.
Choices, Choices
Which is the best platform for your Web application? The answer depends largely on
1) The nature of your application (data-intensive, transaction-based, real-time).
2) Your organization’s experience with various languages and operating systems.
3) The need for scalability.
Operating Systems
Unix is a highly robust, scalable applications platform. However, as companies have adopted Windows NT as their network operating system, Windows NT has become more attractive as an applications platform for several reasons:
1) The Intel-based hardware required to run Windows NT is relatively inexpensive compared to Unix vendors’ RISC-based solutions. 2) The software tools investment required to develop in the Windows NT
environment is significantly less than that required in a Unix environment.
3) Unix administration expertise is hard to find, and is difficult to justify for a single application server.
4) With version 4.0, Windows NT has emerged as a robust platform for application servers.
5) With proper application design and load balancing software, NT is highly scalable for Web-based applications.
The preferred platform for high-end applications is still Unix, however, for a variety of reasons:
1) Unix servers can be run without the overhead of a windowing environment, thereby increasing performance.
2) Unix is famously robust.
3) Because much Unix development has taken place in the open source community, it is a more secure environment than NT for Web
applications.
Web Servers
On NT, it’s IIS, Apache, or Netscape. Both Netscape and Microsoft have higher-end servers for catalog publishing and e-commerce applications. Microsoft Site Server is a nice tool for managing the process of authoring and deploying content to server farms.
On Unix, Apache and Netscape are running the show. Apache
(www.apache.org) is open source, free, reliable, and very popular. For content management capabilities or GUI administration, though, you’ll have to look to Netscape.
Application Servers / Scripting Languages
The most popular commercial application server environments are ColdFusion and Active Server Pages. In the open source world, the most popular environments are PHP3, ZOPE (based on the Python language), and Apache’s mod_perl.
The only commercial cross-platform application server is ColdFusion, which runs on NT, Solaris, and Linux.
Development Tools
The leading Web applications development tools are Microsoft Visual Interdev, Allaire’s ColdFusion Studio, and Macromedia Drumbeat. Visual Interdev and Drumbeat are used to create ASP applications, whereas ColdFusion Studio is used primarily to create ColdFusion applications.
As you will come to appreciate, ColdFusion Studio is an extremely rich and powerful Integrated Development Environment (IDE).
Where to Go from Here
Online Resources
Check out the MSDN Library at msdn.microsoft.com. This is an extremely useful site. The Web Workshop at msdn.microsoft.com contains a
plethora of reference materials and tutorials on the Web a la Microsoft. You can find Netscape’s version of the world at developer.netscape.com. The Web Building category at www.cnet.com is chock full of great
tutorials and reviews. This is a great place to keep up with what’s current.
Books
CGI Programming on the World-Wide Web (O’Reilly) is now out of print, but you can find it online at www.oreilly.com/openbook. This is still a fantastic resource for CGI programming, both as an excellent tutorial and a CGI cookbook. Most examples are written in perl.
Dynamic HTML: The Definitive Reference (O’Reilly) is an indispensable compendium for Web content developers. It contains complete reference material for all of the HTML tags, CSS style attributes, browser document objects, and JavaScript objects supported up to version 4 of Netscape Navigator and Microsoft Internet Explorer.
Apache: The Definitive Guide, 2nd Edition (O’Reilly). Like it sounds. O’Reilly has a ton of other Web books in the Web & Internet Resource Center at www.oreilly.com.
Lesson 2
Introducing IIS
Introduction
Microsoft Internet Information Server is an easy-to-learn and powerful Web server. In this lesson, you will learn the basics of setting up Web sites in IIS.
Objectives
By the end of this lesson, you should be able to
• Understand the difference between Web sites and virtual directories • Create a new Web site
• Create a new virtual directory
• Understand shares, redirects, and directory indexing • Enable default documents
• Configure directory security • Monitor performance
How to Get It
Microsoft Internet Information Server is a popular and free Web server for the Windows NT operating system. IIS 4 is part of the NT Option Pack, which ships with Windows NT 4. You can also download it from
Microsoft’s Web site.
IIS runs on Windows NT Workstation or Windows NT Server. On NT Workstation, it is called Personal Web Server, but is identical to the NT Server version with one important difference: Personal Web Server can handle only ten simultaneous connections. Microsoft built in this artificial limitation to prevent people from using the cheaper Windows NT
Workstation as a production Web server.
There is also a stripped-down version for Windows 95/98 called Peer Web Services. Peer Web Services does not have the Internet Service Manager and is not intended for production use.
Tip
When you install NT Option Pack, make sure you select the custom installation and check the Internet Management Console. Some versions of Option Pack do not install this by default.
Getting Started
You can start and stop IIS from one of two places:
1) Control Panel | Services | World Wide Web Publishing Service. This is the place to configure automatic or manual startup.
2) Internet Services Manager. The IIS Admin service must be running in order to access the Internet Services Manager.
What Is a Web Site?
In Microsoft lingo, a Web site is a collection of resources which can be accessed through a single IP address and port. The default Web site runs on port 80. IIS allows you to configure multiple Web sites, each running on its own address-port combination.
Walkthrough 2-1 Exploring IIS
Setup
In this walkthrough, we’ll explore the Internet Services Manager. You must have previously installed Internet Information Server from the NT Option Pack and chosen to install the Internet Services Manager during the installation.
Steps
1. Open Internet Service Manager.
2. Expand the icons down to the virtual directory level. 3. Right-click on the computer and select Properties. 4. Explore the MIME types and WWW Service properties. 5. Notice that the IP address and port boxes are grayed out.
What Is a Virtual Directory?
A virtual directory is a mapping between a URL root path (http://127.0.0.1/somewhere) and a physical directory (C:\Inetpub\Wwwroot). A virtual directory can also be a redirect mapping to point to another URL on the same or another Web server. A Web site can have multiple virtual directories, and there is no need for the directories to be related or even on the same server.
To access a subdirectory of a virtual directory, simply append the relative directory path to the URL. For example, if
http://localhost/myweb è D:\MyWeb, then http://localhost/myweb/sandbox/play.htm è D:\MyWeb\sandbox\play.htm.
Tip
On Windows NT, URLs and filenames are not case-sensitive. However, on Unix, they are. On Unix, the above example would not work because myweb and MyWeb are of different case. Also note that virtual directories cannot contain spaces.
Understanding Hierarchical Properties
In IIS, properties are automatically inherited at each level from the parent container. If you set a property at the parent level which overrides a property further down in the hierarchy, you will get a warning which asks you how you want to resolve the conflict.
IIS lets you configure the properties of any virtual directory or subdirectory individually. This is very handy for restricting access to directories or directory trees on an individual basis.
Walkthrough 2-2 Create a New Virtual Directory in Internet Service Manager
Setup
In this walkthrough, we’ll create a new virtual directory under the default Web site.
Steps
1. In Internet Service Manager, click on Default Web Site. 2. Right-click on New | Virtual Directory.
3. Type “wft” and click Next.
4. Find the WebFastTrack directory which was created when you installed the courseware. Click Next.
5. Check the Read and Script boxes (not Execute!) and click Finish. 6. Right-click on the newly-created virtual directory and explore
Walkthrough 2-3 Create a New Virtual Directory in Windows Explorer
Setup
One of the most convenient features of IIS is the ability to create a new virtual directory right from Windows Explorer.
Steps
1. Open Windows Explorer and navigate to the WebFastTrack directory. 2. Right-click on the directory and click Sharing.
3. Click the Web Sharing tab. You should see the alias (virtual directory) you just created in Internet Service Manager.
Directory Options
IIS provides a variety of powerful options for building production Web sites. These are discussed briefly in conjunction as we walk through the directory properties interface accessed by right-clicking on any virtual directory.
Virtual Directory Settings
Use this tab to set up a redirect URL, directory permissions (not to be confused with NT access control), and application settings (primarily ASP settings). Default directory permissions and application settings are also configurable at the site and computer level.
Directory permissions are straightforward. Note that you can turn off logging. This is especially useful for directories containing images, as there is no reason to log image hits.
The “Directory browsing allowed” checkbox allows users to see a listing of all the files in a directory. This is not recommended for production sites. The “Index this directory” checkbox works with Microsoft Index Server to create a full-text index of the directory contents. This is especially useful for intranet or Internet search applications, and is only available on Windows NT Server.
Did You Know?
Besides HTML and PDF files, Microsoft Index Server will also work with most popular document formats (Word, Excel, PowerPoint, etc.)
Redirects
Redirects deserve a bit of attention because the language is somewhat confusing.
“The exact URL entered above”
This checkbox controls whether the redirect is to a specific URL or to a URL path.
For example, suppose you create a virtual directory named “stuff” which maps to http://localhost/newstuff. Now suppose the browser requests /stuff/mystuff.htm.
If the box is checked, the browser will be sent to http://localhost/newstuff/. If the box is not checked, the browser will be sent to
http://localhost/newstuff/mystuff.htm.
If you’ve moved a tree of files to another directory, don’t check the box. If there is no longer any correlation between the old and new filenames, or you want to send browsers to another site, check the box.
“A directory below this one”
This checkbox is used in the special case where you want to redirect to a physical directory beneath the present physical directory (which is the directory you specified before you clicked the radio button to make this virtual directory a redirect). It’s a little confusing because the physical directory doesn’t show up anywhere, but it’s still there.
Caution
If you don’t check this box and you redirect to a subdirectory, you will generate an infinite loop of redirects. This can be an interesting way to test server load capacity.
Documents
Use this tab to enable a default document and/or document footer. A default document is the resource which will be returned if the URL specifies only a directory path.
A document footer is appended to each file as it is sent to the browser.
Design Tip
When using a directory path in a URL to reference a directory index or default document, you should always include the trailing slash.
Otherwise, the Web server will look for a file with the directory name and send a redirect to the browser with the trailing slash. This causes an unnecessary round trip to the server.
Directory Security
Directory security can be configured three ways. Anonymous Access and Authentication Control
The HTTP protocol allows the browser to supply authentication
credentials with each request to the server. Typically, the first time the browser encounters a protected resource, it will pop up a password dialog box for the user. Thereafter, the browser automatically sends the same information with each request in the same URL tree.
The Anonymous Access and Authentication Control tab lets you specify users who can access content in the directory tree. Unfortunately, the only authentication choices available without the use of third-party software are anonymous and Windows NT authentication. For Internet applications which require password security, it is obviously impractical to use Windows NT authentication, so these applications must either
1) Write a custom authentication function for ISAPI, 2) Use a third-party solution like Authentix, or
3) Use a login screen which authenticates against a user database. Anonymous access lets anyone connect to the resource. The Web server reads or executes the requested file as the user specified in this section.
Note
In order for anonymous access to work, the Web server must have permission to read files in the directory. Therefore, the Windows NT permission for the directory and files must include read access for the Web server user specified in the directory security properties.
Normally, this is IUSR_machinename.
Basic authentication requires a username and password for a valid NT user. When a browser (IE or Netscape) encounters a resource protected by basic authentication, the browser will pop up a dialog box requesting a username and password. If no NT domain is specified in the basic
authentication properties, the user must enter this as part of the username, like this:
Secure Communications
This tab lets you create an SSL key for your Web site so you can encrypt all traffic and conduct secure transactions. You can enable or disable SSL at the directory level; however, an SSL key applies to an entire Web site. Before you can actually use SSL, you must obtain a valid certificate from a certification authority. Leading certificate authorities are VeriSign and Thawte Consulting. The SSL Key Manager built into IIS makes it quite easy to apply for and obtain a certificate.
Tip
When setting up SSL, don’t forget to configure the SSL port at the Web site level.
Designing an SSL-enabled application requires careful planning. Here are a couple things to remember:
1) SSL is resource-intensive due to the extensive key calculations required during each request. You should turn on SSL for only those parts of your application which actually need it.
2) You cannot mix SSL and non-SSL resources on the same page. Therefore, you must typically mirror files such as images which are common to both the secure and non-secure parts of your application. 3) SSL-enabled resources use the URL prefix https instead of http. It is
always a good idea to use relative rather than absolute URLs, but this is especially true if you are building an application and plan to turn on SSL later.
IP Address and Domain Name Restrictions
This tab allows you to restrict access to a directory on the basis of an IP address range or domain name. This tab is only available with IIS running on Windows NT Server.
Caution
Protecting resources by domain name is not secure because the reverse DNS lookups used to map an IP address to a domain name are easily spoofed. IP addresses themselves can also be spoofed, so neither of these capabilities should be trusted 100%.
When authentication is required in a directory, the domain and username of the authenticated user are stored in the CGI environment variable
HTTP Headers
The HTTP headers tab allows you to configure various aspects of server operation.
Content Expiration
Normally, you want your dynamic pages to expire immediately, and this is the default. But static HTML and images can have longer expiration periods. Otherwise, the browser and any proxy servers along the way have to continually hit the server to see if there is a new version, even if the image is only two seconds old.
Performance Tip
Setting expiration dates on content is probably one of the most commonly overlooked ways to reduce network and server load. It requires a little planning, but the results are well worth it.
Setting a content expiration period even fifteen minutes into the future helps reduce load because most Web sites use many of the same images and static content (like Cascading Style Sheets) on every page.
A good application design will take into account content expiration right from the start. This will typically mean that you put your static content (images, HTML, CSS) in a different directory than your dynamic content. This makes it very easy to set appropriate expiration periods for each kind of content.
You can also programmatically set an expiration period for a document using the HTML META tag in the document HEAD. The format is <META HTTP-EQUIV=”Expires”
CONTENT=”Tuesday, 29-Feb-00 17:00:00 GMT”> This simulates the HTTP Expires header.
Custom headers
HTTP supports a number of headers, most of which are more easily modified by other means. However, if you are working with a custom browser or proxy server and need to send special headers, this is the place to configure them. The standard HTTP headers are
Content-length Set automatically by the server
Content-type Set automatically by the server or CFCONTENT Expires Set in this tab or META tag
Location For redirects; set in the directory properties tab Pragma Set in custom headers or META tag
Status Set automatically by the server
Refresh Can set in META tag to implement polling Set-Cookie Set with CFCOOKIE
Content Rating
Use this section to enable content rating for your site or directory. Some browsers are set to ignore all sites unless they have a rating, so you might want to rate your site appropriately to avoid inconveniencing these users.
MIME Map
The default MIME types for the server do not show up here. If you wish to add new types for this directory only, this is the place.
Custom Errors
The custom errors tab provides a way to create better-looking and more meaningful error pages than the default messages. This is a nice touch, although very few people judge a site by its error pages.
File Options
Many of the directory properties can also be set for individual files. To access these properties, simply right-click on a file in the right pane. You might use this capability to
• Indicate that a file has moved (redirect).
• Control read or write access to only one file in a directory. • Not log hits for a cascading style sheet.
• Require authentication for a single file only. • Set an expiration time for a file.
• Create a custom error page for a frequently-requested file which no longer exists on the server.
Server Monitoring
There are three primary ways to monitor your server. In the event you should ever need to restart IIS, you can do so either from the Internet Service Manager toolbar or the Windows NT Services Control Panel.
Log Files
Logging properties are configured at the Web site container level. You can use a third-party usage analysis utility like WebTrends to generate useful graphs and statistics from the logs.
Event Log
IIS writes many events into the Windows NT event log. You can quickly access the Event Log Viewer by clicking on its icon on the Internet Service Manager toolbar.
Performance Monitor
IIS defines many useful measurements for the Windows NT Performance Monitor. You can quickly access the Web-related parameters by clicking on the icon in the Internet Service Manager toolbar.
Programmatic Administration
If you’re developing a commercial Web-based application which will be installed on many Web servers, you may want to create an installation script which creates a Web site and/or virtual directories for your application. IIS provides a way to do this in the IISAdmin object, which you can access with any COM-capable language such as C++, VBScript, or JScript. Either of the scripting languages may be run in the Windows Scripting Host, which is part of the NT Option Pack.
You can find more information on the IISAdmin object in the MSDN Library under Platform SDK | Web Services | Internet Information Services SDK | Programmer’s Guide | Advanced Programmatic Administration.
Where to Go from Here
Application Help
The Help menu in Internet Services Manager is the starting point for all IIS issues. The online documentation contains a variety of articles on Web programming, security, etc.
Online Resources
Check out the MSDN Library, Web Workshop, and Microsoft Knowledge Base at http://msdn.microsoft.com. This is an extremely useful site. IIS information is available in the MSDN Library under Platform SDK | Web Services.
Lesson 3
Introducing SQL Server
Introduction
Microsoft SQL Server is a powerful and easy-to-use relational database engine. Using the SQL Server Enterprise Manager, you can quickly and easily create high-performance databases for your applications.
Objectives
By the end of this lesson, you should be able to
• Create a new database using SQL Server Enterprise Manager • Create new tables, fields, and relationships
• Understand SQL Server logins and database security • Use the SQL Query Analyzer to interact with the database
• Import data from other sources using Data Transformation Services • Optimize performance using the SQL Server Profiler
Why SQL Server?
1) Robust and scalable
2) SQL Server Enterprise Manager 3) Inexpensive
4) Data Transformation Services 5) Transact-SQL
Getting Started
You can start and stop SQL Server from one of four places: 1) Control Panel | Services | MSSQLServer
2) SQL Server Service Manager in the system tray
3) SQL Server Service Manager in Start | Programs | Microsoft SQL Server 7.0
4) SQL Server Enterprise Manager
SQL Server Enterprise Manager is home base for everything to do with SQL Server. We’ll begin by walking through it to see what’s available.
Walkthrough 3-1 Exploring Enterprise Manager
Setup
In order to complete this walkthrough, you must have previously installed Microsoft SQL Server 7.0
Steps
1. Open Start | Programs | Microsoft SQL Server 7.0 | Enterprise Manager.
2. Right-click on SQL Server Group and create a new SQL Server Registration for the local server.
3. Explore all the hierarchical folders.
4. Right-click on the local server and create a new database named WebFastTrack.
Tip
You can make the display less cluttered by editing the server registration properties and unchecking the box “Show system databases and system objects.”
Understanding SQL Server Security
SQL Server security is based on the concept of SQL Server logins. A login is a username and password pair necessary to establish a connection to the database.
Logins
SQL Server logins can be one of two types: 1) Windows NT user
2) SQL Server login
When you set up SQL Server, you can configure it to use Windows NT logins only or to also allow SQL server logins. For most Internet
applications, you must allow SQL Server logins since Internet users will most likely not have NT accounts on your network. To see how SQL Server is currently configured, right-click on the computer name in Enterprise Manager and select Properties | Security.
A login is always required to establish a connection to the database, whether it’s from Enterprise Manager, Query Analyzer, or another application via ODBC or OLE DB. However, a login by itself does not establish privileges to access any database.
Warning
The default login for the SQL Server system administrator is “sa” and the password is blank. Do change the password or anyone on your network can administer your database for you.
User Accounts
To obtain access to a database, a login must have a corresponding user account in each database, to which permissions are applied. When you create a new login in the SQL Server Security folder, Enterprise Manager will automatically create user accounts in the databases you specify in the Database Access tab.
Roles
If you wish to create a group of user accounts with the same permissions, use a database role. Roles specify permissions for each object in the database and contain database user accounts.
Depending on the nature of your application, you may want to create one or more logins or roles to be used by the application. For example, you might define
• an application guest login or role with permissions to query tables only • an application user login or role with permissions to query and update
data
• an application administrator login or role with permissions to query, update, and delete data
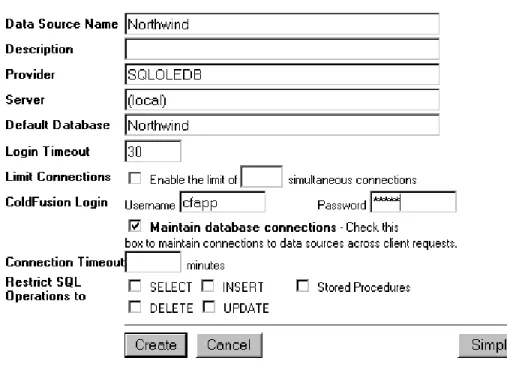
Walkthrough 3-2 Create a New Login and User Account
Setup
In this walkthrough, we’ll create a login with permission to access the Northwind sample database.
Steps
1. In Enterprise Manager, click on the Logins folder under the Security folder.
2. Right-click to create a new login named “cfapp” with access to the Northwind database as the “public” role.
3. Click on the Users folder in the Northwind database.
4. Right-click on the newly-created user and select Properties.
5. Click the Permissions button. Notice that the user has no permissions. 6. Observe that the user is a member of the “public” role.
7. Click the Properties button to access the properties for the “public” role. Click the Permissions button to see what privileges are defined for role members.
Using Query Analyzer
SQL Server Query Analyzer is an interactive tool for running SQL statements and viewing results. In addition to executing queries, Query Analyzer can also show you the query execution plan with the relative cost for each operation.
There are two ways to launch Query Analyzer: 1) From Start | Programs | Microsoft SQL Server 7.0 2) From the Tools menu in Enterprise Manager
The latter is the easiest, as it will automatically establish a connection using the login information associated with the server registration in Enterprise Manager.
Walkthrough 3-3 Query Analyzer
Setup
Open SQL Server Enterprise Manager.
Steps
1. In Enterprise Manager, click on the Northwind database. 2. Click Tools | SQL Server Query Analyzer.
3. Select the Northwind database.
4. Turn on Results in Grid and Show Execution Plan. 5. In the query window, type in “SELECT * FROM Orders”. 6. Press F5 or the green triangle to execute the query. 7. Click the Execution Plan tab.
8. In the query window, add “ORDER BY CustomerID”. 9. Execute the query again.
10. Review the execution plan. Notice the sort.
11. Click in the query window, then click the Save button to save your query.
12. Click in the results window, then click the Save button to save the results.
13. Click on the Connection properties. In the General tab, turn on stats time and I/O stats.
14. Execute the query again.
15. Click on Connection properties. In the Advanced tab, change the results format to “Other delimited” and specify the vertical bar (|) as the delimiter.
SQL Server Profiler
SQL Server Profile is a window into database operation and performance. Using Profiler, you can
• Identify and trace the worst performing queries • Identify the cause of a deadlock
• Trace the performance of a stored procedure • Trace activity by user
Programmatic Administration
If you’re developing a commercial application which will be installed on many servers, you may want to write a program which automatically creates the database needed by your application.
The most straightforward way to do this is to use the subset of ANSI-standard SQL known as the Data Definition Language. DDL includes SQL commands such as CREATE TABLE and CREATE INDEX.
Fortunately, SQL Server has the capability to create DDL automatically. This is known as database scripting, and is available through Enterprise Manager. Simply right-click on a database and select All Tasks |
Generate SQL Scripts.
Data Transformation Services
DTS is an extremely powerful tool for importing and exporting data from other sources. DTS gives you the ability to create import and export packages so you can use the same script many times. In addition, you can schedule import/export tasks to run at scheduled times.
Walkthrough 3-4 Data Transformation Services
Setup
Open SQL Server Enterprise Manager.
Steps
1. In Enterprise Manager, right-click on Northwind | All Tasks | Export Data. Click Next.
2. Choose the Northwind database and a valid login. Click Next. 3. On the Choose a Destination Screen, select Microsoft Excel 8.0 and
the filename WebFastTrack\Lab\Northwind.xls. Click Next. 4. Select “Copy tables from the source database.” Click Next.
5. Select the Orders and Order_Details tables. Explore the Transform and Preview options. Click Next.
6. Check “Save DTS package” with the “SQL Server” option. Click Next. 7. Name the package “Export Orders.” Click Next.
8. Click Finish. The task will now run and display results. When all steps are marked complete, click Done.
9. Open WebFastTrack\Lab\Northwind.xls.
10. In Enterprise Manager, click on “Local Packages” in the Data Transformation Services folder.
11. Right-click on the “Export Orders” package and select “Design Package.”
12. Review the properties for each item in the diagram.
13. Click “Save As” on the Package menu to save the package as a file. This way, you can copy the package to other servers for later use.
Walkthrough 3-5 Import Text File
Setup
One of the most timesaving capabilities of Data Transformation Services is the ability to import from text files. In this walkthrough, we will import the results of the Orders query we saved in Walkthrough 3-3.
Steps
1. In Enterprise Manager, right-click on Data Transformation Services and select “New Package.”
2. From the Data menu on the left side, click the “Text File (Source)” icon.
3. Name the data source “Northwind Orders” and find the file WebFastTrack\Lab\Orders.rpt. Click OK.
4. In the Text File Properties dialog box, select the “Delimited” option and check “First row has column names.” Click Next.
5. Type in the vertical bar (|) in the field labeled “Other.” This is the field delimiter. Click Finish, then OK. You should see the text source icon appear in the diagram window.
6. On the Data menu, click on the “OLE DB Provider for SQL Server” icon. Enter a valid username and password and select the
WebFastTrack database. Click OK.
7. Click the “Northwind Orders” icon, hold down the CTRL key, and click the other icon. Now go to the Workflow menu and select “Add
Transform.”
8. Double-click the arrow and review the settings in all the tabs. Click OK when finished.
9. On the Package menu, select “Execute”. You can also press F5 to do the same thing.
10. When the package finishes, close the window. You will be prompted to save the package. Click “Yes” and name it “Import Orders.” 11. Click on “Tables” under the WebFastTrack database. You may need
to press F5 to refresh the display. You should see the newly-created Orders table.
Where to Go from Here
Application Help
Start | Programs | Microsoft SQL Server 7.0 | Books Online is the starting point for all local documentation.
The Query Analyzer Help menu has a useful shortcut to Transact-SQL Help, which is a pretty good SQL reference.
Online Resources
Check out the MSDN Library and Microsoft Knowledge Base at http://msdn.microsoft.com. This is an extremely useful site.
SQL Server information is available in the MSDN Library under Platform SDK | Data Access Services | Microsoft SQL Server Programmer’s Guide.
Books
Inside SQL Server 7.0, Microsoft Press. This book comes with a 120-day evaluation copy of SQL Server 7.0. It is an advanced book, not an SQL Tutorial, and is very valuable for serious SQL Server development.
Other
The Microsoft BackOffice Resource Kit, which is included with an MSDN subscription, has additional SQL Server information.
Lesson 4
Getting Started with ColdFusion
Introduction
ColdFusion is simply the fastest way on earth to build dynamic, scalable production Web sites across multiple platforms. As you learn the
ColdFusion environment, you will begin to appreciate the power and simplicity of the ColdFusion model.
Objectives
By the end of this lesson, you should be able to • Understand the benefits of ColdFusion
• Explain the various components of ColdFusion development • Configure ColdFusion with the ColdFusion Administrator
Why ColdFusion?
Rapid Development
• Round-trip code editing
• Tag wizards, inspectors, and helpers save typing, increase accuracy, and save time looking up attributes
• Interactive debugger • One-step deployment • Total customization
• Reusable code (snippets, custom tags) • Speedy query builder
Scalable Deployment
• Cross-platform
• Load balancing and clustering
• Superb caching and optimization support • Web servers thread pooling
• Database server connection pooling
Open Integration
• Connect to servers running SMTP, POP3, FTP, HTTP, and LDAP • Connect to COM, CORBA, and EJB objects
• ColdFusion Extensions (CFX) let you create your own tags in C/C++ • Connect to any ODBC database
• Native database drivers boost performance • Schedule pages to run regularly
• Use built-in Verity full-text search engine
Total Security
• Authenticate users using NT users and groups, LDAP directories, or custom databases
• Authenticate developers before receiving access to protected resources
• Server Sandbox Deployment prevents multiple applications on the same server from accidentally stepping on each other
• Pass through user logins to database • Restrict database operations
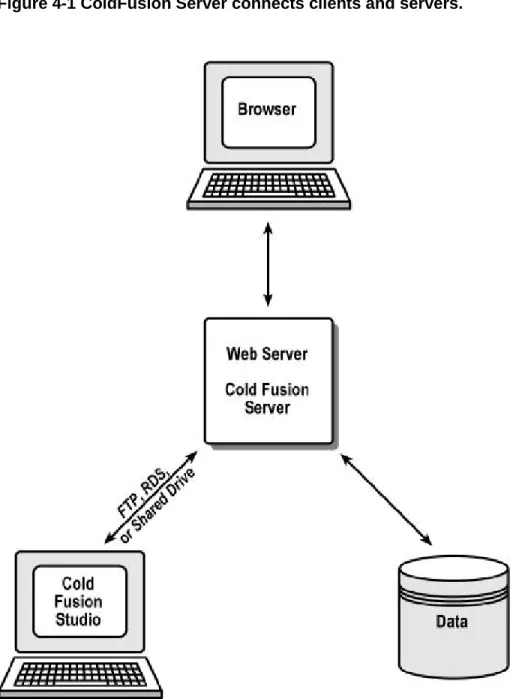
How Does ColdFusion Work?
ColdFusion applications run on the ColdFusion Application Server. You administer the server using the ColdFusion Administrator.
ColdFusion Studio is the fastest way to create ColdFusion applications, although any text editor will do.
Exploring ColdFusion Studio
Menus
File New
Open from Web Insert File
Convert from Text File Edit
Indent
Bookmarks and Goto Convert case
Search
Extended Find / Replace Replace Special Characters Tools
Tag Chooser & Expression Builder Validation & verification
Document weight Image map Project Reopen project Options Debug Tags
Start Tag, End Tag Matching Tag Tag Tip F2 Inspect Tag F4 Edit Tag Ctrl+F4 View Full-screen Ctrl+F12 Toggle Edit/Browse F12
Main toolbar
Look – it floats! Special characters External browsers CodeSweeper Palette Thumbnails Style editor Image mapResource window
Explorer Filter Favorites Link awayAllaire FTP & RDS (in Windows Explorer, too) Web folders Data Sources Projects New Deploy Site view Snippets Help Search Bookmarks Tag Inspector
Editor toolbar
Numbers Word wrap Tag completion Tag insight Tag validation Split editorBrowser toolbar
Size RulersQuickbar
Look – it floats! Right-click to customizeCommon: Quick Start, Body, Image, Comment Tables: Wizard, Quick
Frames: Wizard
CFML Basic: Comment Script: ActiveX
Debugging toolbar
Results pane
Getting the Most from Studio
Templates
Templates can be great time-savers. They are especially useful when you will create many documents with a common structure, or when you want to include standard information in every document, such as revision history.
ColdFusion Studio stores templates in Program Files\Allaire\ColdFusion Studio\Wizards. You can create your own directories here to show up in the File | New dialog.
You can also change the default template location in Options | Settings | Locations.
Snippets
Snippets are most useful for
1) Saving time re-entering code, and
2) Storing code segments for later reference.
Snippets can also be shared with other developers on a common network drive. To set this up, see Options | Settings | Locations.
Shortcuts
Keyboard shortcuts can be assigned to any tag or action in ColdFusion Studio. They can even be assigned to snippets. Some of the most useful shortcuts are
Ctrl+comma Start tag
Ctrl+period End tag
Ctrl+3 Surround with #
Ctrl+Shift+> Indent Ctrl+Shift+< Unindent
Ctrl+Shift+M HTML comment
Ctrl+M Find matching tag
Ctrl+Shift+double-click Select tag
There is no default shortcut for a CFML comment, but you can easily set one up.
If you select text in the editor window and right-click, there are many useful options.
Administering ColdFusion Server
Running ColdFusion Administrator
To run ColdFusion Administrator to administer the local server, use Start Menu | Programs | ColdFusion Server 4.5 | ColdFusion Administrator. To run ColdFusion Administrator on a remote server, use this URL:
http://server_name/CFIDE/Administrator/index.cfm
You must know the ColdFusion Administrator password on the remote machine.
Exploring ColdFusion Administrator
Server Data Sources Extensions Logging Automated Tasks Miscellaneous
Working with Servers in ColdFusion Studio
ColdFusion Studio allows you to work with files and databases on remote servers using ColdFusion Remote Development Services (RDS). The Remote Files and Databases tabs on the Studio resource pane let you set up remote servers.
In order for RDS to work, the ColdFusion server must be running the ColdFusion RDS service. By default, this is installed with ColdFusion Server. On production servers, it is recommended that you disable the ColdFusion RDS service in the Windows NT Services Control Panel in order to prevent someone from gaining access to files and data on the server.
Security Tip
The default installation of ColdFusion server installs basic security, which uses only a password to protect all RDS resources. To assign different access levels to resources by user, you must install Advanced Security Services with ColdFusion Server. To do this, simply rerun the ColdFusion Server installation program.
Walkthrough 4-1 Add a Remote Server
Setup
In this walkthrough, we’ll add the local machine as an RDS server. ColdFusion Server must be running.
Steps
1. In ColdFusion Studio, click the Explorer resource tab. 2. From the pull-down menu, select Allaire FTP & RDS. 3. Right-click on the icon and choose “Add RDS Server.” 4. In the Description and Hostname fields, type “localhost.”
5. Enter the ColdFusion Studio password for the local ColdFusion server. If you are not using Advanced Security Services on the ColdFusion server, you do not need a username.
6. Uncheck the “Prompt for password” box. Click OK.
7. Expand the “localhost” icon to verify that you can see the directory tree. This is not terribly exciting on the local server, but very powerful (and dangerous) on development or production servers.
Working with Projects
What Is a Project?
A ColdFusion project is a collection of files in a single directory tree which are managed as a group. A project normally corresponds to an
application or Web site.
Why use Projects?
• Deployment—upload a project to one or more remote server locations with a single command.
• Maintenance—conduct extended search and replace operations on an entire project, including files from different directory trees
• Source control—map a project into source control to better track your code
• Filtering—directory filters let you see just the project files without artifacts such as log files or source control files
Project Source Control
ColdFusion Studio supports very convenient integration with Microsoft Visual SourceSafe in ColdFusion projects. When this integration is enabled, you can check in and out files right from the ColdFusion resource pane.
To set up source control integration in a project,
1) Right-click on the project and select Source Control | Choose Source Control Provider.
2) Right-click on the project and select Source Control | Map Project to Source Control.
Once the project is mapped, you can perform most source control operations right in ColdFusion.
About Development Mappings
In order to “run” your code in the internal browser, you must create a development mapping which tells ColdFusion where to find files in URL space. Set up development mappings in Options | Settings | Browse | Development Mappings.
Walkthrough 4-2 Create a ColdFusion Project
Setup
In this walkthrough, you will create a new project to be used throughout the course. You should already have a directory named WebFastTrack.
Steps
1. In ColdFusion Studio, click the Projects resource tab. 2. Click the New Project Wizard icon.
3. Enter the name WebFastTrack and find the WebFastTrack directory. Click OK.
4. Create a new file from the default template. Change the title and enter some text between the BODY tags.
5. Save it as FirstPage.cfm in the WebFastTrack\Lab directory. Notice that it automatically appears in the project window.
6. Create a development mapping for the new project. Click Options | Settings | Browse | Development Mappings.
7. Find the WebFastTrack directory and use the URL http://127.0.0.1/wft. 8. Click Add, then OK.
9. Press F12 to run FirstPage.cfm.
10. In the Project pane, right-click on the WebFastTrack folder and select Properties. Explore the project folder and deployment options.