Making PDF documents accessible
with Adobe Acrobat Pro
Date Version Author Status / comments
31/01/11 1.0 Atalan Document available on www.accede.info/en/manuals/.
In partnership with:
Air Liquide – AREVA – BNP Paribas – Capgemini – LVMH – SNCF – Société Générale – SPIE – Thales
With the cooperation of:
Association des Paralysés de France (APF) – Association Valentin Haüy (AVH) – Coopérative AccessibilitéWeb (Québec) – Institut Nazareth et Louis Braille (Québec) – ParisTech – Télécom ParisTech
Acknowledgements
We would like to thank the following nine AcceDe partners for their commitment and confidence in us.
For the purpose of this project, these companies got their communication agencies and teams to work on tagging a sample of 28 published documents. This work, carried out by each partner company on its own PDF documents, was essential to ensure that this guide covers all the tagging needs of published documents, and to validate the clarity and educational quality of the manuals.
Atalan also wishes to thank the following organizations which contributed their organizational support and for their actions in increasing awareness of the AcceDe manuals and encouraging their
circulation: Association des Paralysés de France (APF), Association Valentin Haüy (AVH), Coopérative AccessibilitéWeb (Québec), Institut Nazareth et Louis Braille (Québec), ParisTech et Télécom ParisTech.
Special thanks to Edwin Tudsbery who translated this guide.
Finally, Atalan would like to thank the members of the proofreading committee for their helpful and judicious feedback: Greg Pisocky and Matt May (Adobe), Sophie Schuermans (AnySurfer) and Christophe Strobbe (Katholieke Universiteit Leuven).
Sébastien Delorme Sylvie Goldfain
AcceDe project – www.accede.info/en/
Making PDF documents accessible with Adobe Acrobat Pro
Page 3
Directed by Atalan – [email protected] January 2011
Contents
1 - Introduction ... 5
1.1 Background and objectives ... 5
1.2 Who should read this guide? ... 6
1.3 Required skills for learning how to tag ... 6
1.4 How should you use this guide and the accompanying exercise book ... 6
1.4.1 Introductory note: Adobe Acrobat Pro is required ... 6
1.4.2 Organization of this guide and overview of the related exercise book ... 7
1.4.3 Other associated documents ... 7
1.5 Use licence ... 7
1.6 Contact ... 8
1.7 Credits ... 8
2 - Introduction to tagging ... 9
2.1 What is tagging? ... 9
2.2 Main accessibility problems of a non-tagged document ... 9
3 - Getting to know Adobe Acrobat Pro ... 12
3.1 Content, Order and Tags navigation panels ... 12
3.2 Document pane ... 13
3.3 TouchUp Reading Order dialog box ... 14
3.4 Content reflow ... 15
4 - Getting started with tagging ... 16
4.1 Checking for the presence of tags in the document ... 16
4.2 Tagging techniques... 16
4.2.1 Tagging a document manually with Adobe Acrobat Pro ... 16
4.2.2 Editing existing tags ... 16
4.2.3 Tagging a document automatically with Acrobat Pro ... 17
4.3 Proposed method: manual tagging ... 19
5 - Adding the title, document language, and tags root ... 20
5.1 Adding a document title ... 20
5.2 Adding the main document language ... 22
5.3 Creating the tags root ... 23
6 - Manually tagging a page of the document ... 24
6.1 Important: Save your changes frequently! ... 24
6.2 Editing the tags ... 24
6.2.1 Creating an empty tag ... 24
6.2.2 Associating content with the tag (3 possible methods) ... 26
6.2.3 Finding tagged content ... 34
6.2.4 Changing the tag type ... 36
6.2.5 Moving a tag ... 39
6.2.6 Moving tagged content ... 40
6.2.7 Providing alternate text ... 40
6.2.8 Specifying a change of language ... 42
6.2.9 Deleting a tag ... 42
6.2.10 Marking content as an artifact (2 possible methods) ... 43
6.3 Screen actions: tagging the cover page of the exercise book ... 45
7 - Defining the reading order ... 46
7.1 Why you should not use the Order panel ... 46
7.2 Defining the reading order from the Tags panel ... 47
7.2.1 Analysing the content and defining the reading order ... 47
7.2.2 Arranging the tags in a logical reading order ... 47
AcceDe project – www.accede.info/en/
Making PDF documents accessible with Adobe Acrobat Pro
Page 4
Directed by Atalan – [email protected] January 2011
8 - Identifying the tag type for each content item ... 50
8.1 Introduction ... 50
8.2 Document title ... 50
8.3 Section headings ... 50
8.4 Paragraphs ... 52
8.5 Images and captions ... 52
8.6 Lists and list items ... 55
8.7 Contents ... 56
8.8 Tables ... 57
8.8.1 Tagging rows, cells and headers ... 57
8.8.2 Link the headers with their corresponding cells (2 possible methods) ... 60
8.9 Quotes and block quotes ... 66
8.10 Links ... 67
8.11 Spans ... 68
8.12 Footnotes ... 69
8.13 Document, parts, divisions, articles and sections ... 70
8.14 Other tags (references, formulas, bibliography entries…) ... 71
9 - Checking the content reflow ... 72
9.1 Content tab overview ... 72
9.1.1 Highlight the content ... 72
9.1.2 Content tab overview ... 72
9.2 Placing items which do not convey information in artifacts ... 73
9.3 Content reflow ... 75
9.3.1 Checking the reflow order of a page with the Order navigation panel ... 75
9.3.2 Improving the reflow of a page with the Content navigation panel ... 76
9.4 Using the content panel to resolve visual overlay problems ... 78
10 - Completing the document ... 80
10.1 Generating bookmarks (if required) ... 80
10.2 Indicating the link tab order ... 82
10.3 Marking the document as tagged ... 82
10.4 Providing an explicit title to the file (best practice) ... 84
10.5 Defining the initial view of the document (best practice) ... 84
11 - Checking the accessibility ... 85
11.1 Using the Acrobat accessibility check... 85
11.1.1 Overview of the accessibility full check ... 85
11.1.2 Examples of error messages ... 87
11.2 Exporting the PDF in text format ... 88
11.3 Jaws / NVDA ... 89
11.4 PDF-Accessibility-Checker (PAC) ... 90
12 - Appendix ... 91
12.1 Specific cases ... 91
12.1.1 Lines that straddle two pages ... 91
12.1.2 Text with shadow effects ... 92
12.1.3 Other specific cases ... 92
12.2 Security parameters ... 92
12.3 Role maps ... 93
12.4 Character recognition in scanned documents ... 94
AcceDe project – www.accede.info/en/
Making PDF documents accessible with Adobe Acrobat Pro
Page 5
Directed by Atalan – [email protected] January 2011
1 -
Introduction
1.1
Background and objectives
By default PDF documents are not accessible to certain users with disabilities. Among the users affected, there are, for example:
- Blind users:
Blind people use their computers with screen readers. These devices use software which either read the information displayed on the screen (with a voice synthesizer) or convert it to Braille (with a Braille terminal). With this type of software, it is difficult to understand the contents of a PDF file if it is not structured with tags. The reading order is not always logical, the information contained in images is not read, and the absence of a title structure makes navigating such a document long and complicated.
- Partially sighted users:
Customizing the display of a PDF document in Adobe Reader often poses difficulties. Changing the text or background colour in order to improve readability does not always work. For example, some background colours cannot be modified.
- Users with a motor disability:
The rigid linear navigation imposed on those who read PDF documents exclusively with the aid of a keyboard makes it difficult to navigate in the document. For example, the tab order of links or form fields is not always logical.
The solution for making PDF documents accessible is to structure them with the appropriate tags. Currently, this solution is rarely implemented, specifically for the following reasons:
- The concept of a structured or tagged document is not widely known by those who produce PDF files.
- There is no good quality documentation for learning how to tag documents.
In France, as part of their policy for people with disabilities, more and more large companies want the PDF documents they publish to be accessible. For this reason nine French companies came together to form the AcceDe project to increase the accessibility of PDF documents.
One of the objectives of AcceDe1 was to create educational guides and manuals for those who want to
make their PDF documents accessible.
The aim of this guide, “Making PDF documents accessible with Adobe Acrobat Pro”, is to provide all the practical information you need to learn how to tag a PDF document2. Currently, tagging requires the use of Adobe Acrobat Pro. This guide also provides the necessary information to check the tagging of a PDF document.
1 The three objectives of the AcceDe project are to:
1. Create, and freely distribute, guides and manuals for those who wish to make their PDF documents accessible. 2. Increase awareness about PDF document accessibility and the growing interest of companies in this area among
communication professionals.
3. Offer an initial directory of communication professionals who are committed to and capable of producing tagged PDFs from the documents they create.
AcceDe project – www.accede.info/en/
Making PDF documents accessible with Adobe Acrobat Pro
Page 6
Directed by Atalan – [email protected] January 2011
1.2
Who should read this guide?
This guide is aimed at:
- all those who want to learn how to tag PDF documents,
- project managers who want to integrate tagging when creating their PDF documents3.
1.3
Required skills for learning how to tag
Tagging does not require any technical skills (knowledge of computer languages, DTP software, etc.), nor an in-depth knowledge of Adobe Acrobat Pro (all the functionalities used for tagging are presented and described in this document).
Tagging does however require a great deal of rigour and logic.
While knowing the basics of HTML may speed up the tagging learning process, it is by no means indispensible.
In the framework of the AcceDe project, for example, we have trained people with the following profiles to tag PDF documents:
- lay-out artists / graphic designers / DTP operators, - HTML developers and webmasters,
- marketing assistants, - project managers,
- editors and documentation managers, - managers of graphic design departments,
1.4
How should you use this guide and the accompanying
exercise book
1.4.1 Introductory note: Adobe Acrobat Pro is required
All the tagging procedures described in this document require the use of Adobe Acrobat (Pro or Pro Extended4version). To use this software you need to acquire the corresponding license.
For the descriptions of procedures, examples and screenshots, this guide is based on Adobe Acrobat 9 Pro (version 9.3.0).
It is also possible to use the older versions 7 and 8 of Adobe Acrobat or the new Adobe Acrobat X. Certain functionalities may, however, have different names or be presented differently. In this case, it is a good idea to use the online help supplied with the software for any difficulties (press F1 in Acrobat).
3 By following this guide you can communicate to a third party the level of tagging you require and the procedures that need to be followed. In addition section “11 - Checking the accessibility” (page 86) enables project managers to carry out quality checks so that they can assess the quality of tagging carried out by a third party.
AcceDe project – www.accede.info/en/
Making PDF documents accessible with Adobe Acrobat Pro
Page 7
Directed by Atalan – [email protected] January 2011
1.4.2 Organization of this guide and overview of the related exercise book
Learning how to tag demands practice. This guide is illustrated with examples from a PDF document entitled “Exercise book”.Both a tagged and an untagged version of this exercice book are available, so that users of this manual can carry out the tagging procedures explained therein in Adobe Acrobat Pro. The two versions of this document are:
- Untagged exercise book: untagged-exercise-book.pdf - Tagged exercise book: tagged-exercise-book.pdf
These two exercise books are available on www.accede.info/en/manuals/. This guide includes two types of content:
1. theoretical information,
2. procedures for the user to perform on the untagged exercise book.
Screen actions:
All the procedures presented in this guide for the user to follow are displayed in a greyed inset entitled “Screen actions”.
1.4.3 Other associated documents
This guide is part of a set of two documents:
- Making PDF files accessible: Guidelines for the DTP creation phase (available on www.accede.info/en/manuals/)
- Making PDF documents accessible with Adobe Acrobat Pro
(this document)
1.5
Use licence
This document is subject to the terms of the Creative Commons BY-NC-SA license. You are free to:
- Copy, distribute, display, and perform the work - Make derivative works
Under the following conditions:
- Mention of the authorship if the document is modified:
On the cover of the document you must include the Atalan and AcceDe logos and references, indicate that the document has been modified, and add a link to the original work at
www.accede.info/en/manuals/.
You must specify the reuse of the document by sending an email to [email protected] including the link to download the modified document.
You must not in any circumstances cite the name of the original author in a way that suggests that he or she endorses you or supports your use of the work.
You must not in any circumstances cite the name of the partner companies (Air Liquide, AREVA, BNP Paribas, Capgemini, LVMH, SNCF, Société Générale, SPIE et Thales), or the organizations which have supported this initiative (Association des Paralysés de France (APF), Association
AcceDe project – www.accede.info/en/
Making PDF documents accessible with Adobe Acrobat Pro
Page 8
Directed by Atalan – [email protected] January 2011
Valentin Haüy (AVH), Coopérative AccessibilitéWeb, Institut Nazareth et Louis Braille, ParisTech, Télécom ParisTech).
- No commercial use: you may not use this work for commercial purposes.
- Share alike: if you alter, transform, or build upon this work, you may distribute the resulting work
only under a licence identical to this one.
The Atalan and AcceDe logos and trademarks are registered and are the exclusive property of Atalan.
1.6
Contact
For any comment about this document, please contact Atalan, the coordinator of the AcceDe project, at the following email address: [email protected].
You can also find more information about the AcceDe project manuals at
www.accede.info/en/manuals/.
1.7
Credits
The icons used in this document for important notes and tips were designed by www.icojoy.com and can be used free of charge.
AcceDe project – www.accede.info/en/
Making PDF documents accessible with Adobe Acrobat Pro
Page 9
Directed by Atalan – [email protected] January 2011
2 -
Introduction to tagging
2.1
What is tagging?
Users with disabilities experience many problems with a PDF document, especially users of screen readers or partially sighted people. Many of these problems can be fixed by a technique which is called tagging (adding labels that are not visible to the readers of a document but which are used by suitable reading tools such as screen readers).
Tagging involves adding semantic information called a tag to each content item of a document in order to specify its characteristics. So there are specific tags for defining, for example, titles, subtitles, paragraphs, annotations, and lists. It is also possible to tag images to add alternate text, to tag tables containing data in order to specify the row and column headings, etc.
When the content of a document is identified with the help of tags, screen readers can convey the characteristics of the elements to users. It is possible, for example, for users of this software to
navigate from title to title so that they can quickly access the content they require, or to navigate within a table containing data.
2.2
Main accessibility problems of a non-tagged document
Main accessibility problems
of a non-tagged PDF Solutions to resolve problem
Absence of document title
The title of a document enables users to identify the document, which is especially useful, for example, when several documents are open. The title is the first information read by screen readers when opening the document.
Define the title in the document properties
Absence of language indication in the document
The language is an important factor. It enables the voice synthesizer in screen readers to pronounce words with the correct accent.
Define the main language in the document properties
Absence of content structure
Titles and, more generally, the structure of a document are normally identified visually on the page (position on the page, size, text colour…), but this information cannot be conveyed by screen readers.
Semantic tagging
Tagging makes it possible for screen readers to identify paragraphs, titles, hyperlinks, lists, and tables.
Blind and partially sighted users can then
discover the characteristics and structure of texts which are read, and use this information to navigate from item to item and get an overall view and a better understanding of the document.
AcceDe project – www.accede.info/en/
Making PDF documents accessible with Adobe Acrobat Pro
Page 10
Directed by Atalan – [email protected] January 2011
Main accessibility problems
of a non-tagged PDF Solutions to resolve problem
Incorrect reading order
The reading order of different content items in a document is sometimes incorrect when the document is read with a screen reader.
By default, screen reader software usually reads information from left to right and from top to bottom of the page. According to the documents and the page layout adopted (columns, insets, footnotes…), the visual order of different content items in a document does not always correspond to the reading order.
Correct the reading order
By rearranging the reading order you can choose the sequence tagged elements are read by screen reader software.
Missing a navigation summary
By default, it is difficult to navigate in a PDF file apart from scrolling from page to page.
With screen reader software, it is not possible to directly go to a precise spot on the page without having listened to all the preceding content.
Addition of bookmarks
A clickable summary of the document can be created and displayed beside the pages. It means you can go directly to the main sections of the document using links known as bookmarks
Adding internal links
Links and cross-references can be directly added to page content so that users can navigate more easily between sections.
These two solutions mean that people with motricity disabilities can navigate more easily in a PDF document solely by using the keyboard.
Missing alternate text for graphical elements
Graphical items such as images, pie charts, or illustrations cannot be interpreted by screen readers.
Tagging of graphical elements
Tagging makes it possible to associate alternate text with images. In this way you can
communicate all the information conveyed in the images.
The reading order of complex images such as line charts can also be defined.
Missing structure in tables
The relationships between the elements of a table, the column headings, the cells, the scope of the headings are not defined and users of screen readers cannot take advantage of their screen reader’s ability to navigate the table according to these relationships.
Tagging of tables
Tagging makes it possible to identify the heading cells of a table and link them with the
corresponding table cells containing data. This enables users of screen readers to navigate within the table.
AcceDe project – www.accede.info/en/
Making PDF documents accessible with Adobe Acrobat Pro
Page 11
Directed by Atalan – [email protected] January 2011
Main accessibility problems
of a non-tagged PDF Solutions to resolve problem
Poor content reflow
Reflow is an integrated functionality in Adobe Reader, which changes the display of the document to lines displayed in a single column. This feature optimizes both text magnification on the screen and changes to text and background colour.
When a document is not tagged, various items may no longer be readable, and there is a risk that decorative items are displayed in the middle of text following reflow.
Define the reflow order and identify the artefacts
The reflow order makes it possible to define the order of text is displayed when it is reflowed. Decorative content can be defined as artefacts, in which case it is not displayed when you reflow the text and screen readers can safely ignore these artefacts.
AcceDe project – www.accede.info/en/
Making PDF documents accessible with Adobe Acrobat Pro
Page 12
Directed by Atalan – [email protected] January 2011
3 -
Getting to know Adobe Acrobat Pro
3.1
Content, Order and Tags navigation panels
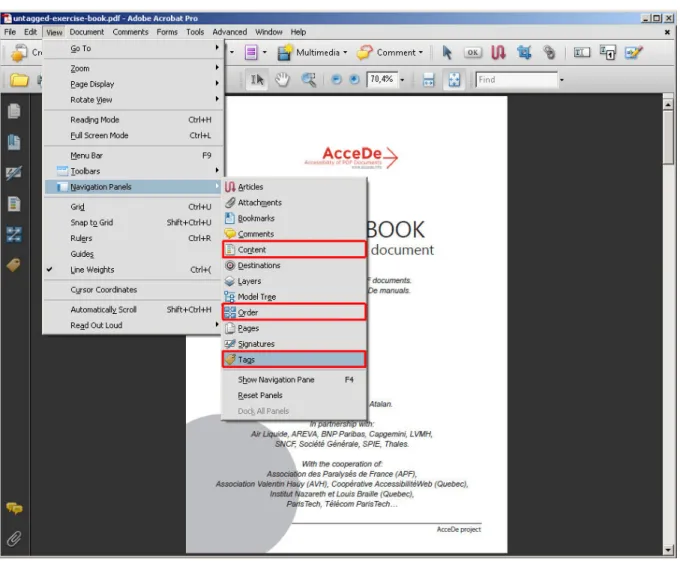
You can display the navigation panels in Acrobat Pro by selecting the required option in the menu
View> Navigation Panels.
The three navigation panels used for tagging are:
- Content – change the visual order objects are superimposed in reflow view
- Order – indicates the order in which content is shown in reflow view
- Tags – view and edit the tags that are present in the document
We will mainly work with the Content and Tags navigation panels. In this manual we do not
recommend using the Order panel.
Figure 1: open the Content, Order and Tags navigation panels by selecting the corresponding option in the menu.
AcceDe project – www.accede.info/en/
Making PDF documents accessible with Adobe Acrobat Pro
Page 13
Directed by Atalan – [email protected] January 2011
Note:
To make it easier to use Acrobat Pro, you can dock the navigation panels in the navigation pane on the left.
To do this for each of the three aforementioned navigation panels, display the panel by clicking
View > Navigation panels, and then select
the required one.
Then drag the tab of the displayed panel to the navigation pane to the left of the screen. See figure 2 or use the menu View > Navigation Panels > Dock All Panels (Alt + V, N, K).
The button which corresponds to this panel is then displayed in the toolbar, so you can access it more quickly.
Figure 2: Drag a navigation panel to the toolbar on the left by selecting the tab.
It is also possible to use keyboard shortcuts to open the navigation panels.
For example, use Alt + V, N, G for the “Tags” navigation panel (replace the last letter with O for “Order” and N pour “Content”).
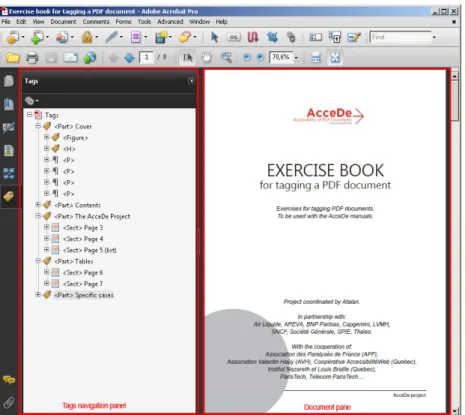
3.2
Document pane
As its name suggests, the document pane is the area where the document is displayed. It is, for example, possible to select text in this pane in order to tag it, or to highlight an object that was previously tagged in order to visualize it.
Figure 3: The Tags navigation panel is shown on the left; on the right you can see the document pane of the file “tagged-exercises-book.pdf”.
AcceDe project – www.accede.info/en/
Making PDF documents accessible with Adobe Acrobat Pro
Page 14
Directed by Atalan – [email protected] January 2011
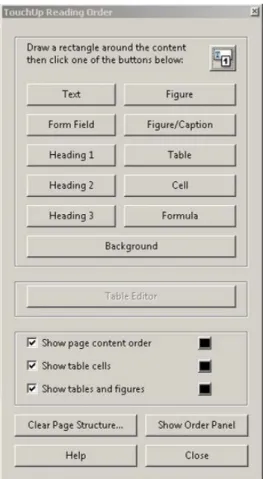
3.3
TouchUp Reading Order dialog box
Not to be confused with the “ Order” navigation panel, this dialog box makes it possible to assign tags to content and to tag figures and tables containing data.
To display this dialog box, open the Advanced menu, and then select Accessibility > TouchUp
Reading order.
Figure 4: TouchUp Reading Order dialog box
Notes:
- Unlike the navigation panels, it is not possible to dock this dialog box in the navigation pane on the left of the screen.
- You can, however, access this dialog box by clicking on a button in the Advanced Editing toolbar. To display this toolbar, click View > Toolbars > Advanced Editing.
Figure 5: TouchUp Reading Order button in the “Advanced Editing” toolbar. You can drag this toolbar to the top of the screen in order to dock it in the main toolbar or use
AcceDe project – www.accede.info/en/
Making PDF documents accessible with Adobe Acrobat Pro
Page 15
Directed by Atalan – [email protected] January 2011
3.4
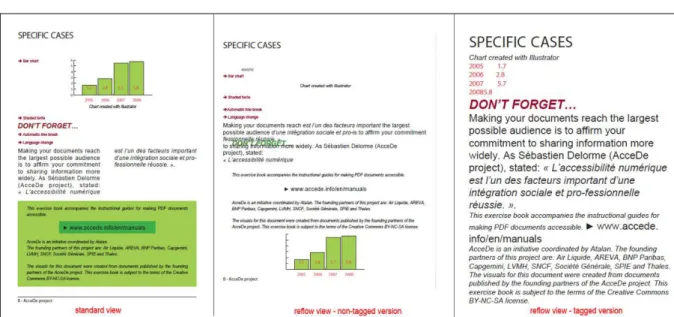
Content reflow
Reflow is a temporary view that shows the content of a PDF document in a single column taking up the entire width of the document pane. In this view, you can magnify text size and it will wrap to the next line as it gets larger remaining in the document pane, so you do not need to use the horizontal scroll bar to read it. It also improves readability on mobile devices.
When this view is selected in a non-tagged document, Adobe Reader or Adobe Acrobat temporarily tags the document. However, the Acrobat user guides recommend that you tag the document yourself in order to optimize the reflow.5
To activate the reflow, select View > Zoom > Reflow or use the keyboard shortcut Ctrl + 4 on a PC
or Cmd + ’ on a Mac.
Figure 6: on the left is page 8 of the exercise book in the standard view. In the middle, a non-tagged version of page 8 of the exercise book is shown in reflow view. Note that the chart is no longer in the correct position, and the page layout is preserved so if you magnify the text size the document will overflow the screen. On the right a tagged version of page 8 of the exercise book is shown in reflow view. Note that only the data in the chart is shown, and the information is displayed in a logical order.
5 “Acrobat temporarily tags an untagged document before reflowing it. As an author, you can optimize your PDFs for reflow by tagging them yourself. Tagging ensures that text blocks reflow and that content follows the appropriate sequences, so readers can follow a story that spans different pages and columns without other stories interrupting the flow.” Source “Reflow a PDF”, Adobe (http://help.adobe.com/en_US/Acrobat/9.0/Standard/WS58a04a822e3e50102bd615109794195ff-7d19.w.html).
AcceDe project – www.accede.info/en/
Making PDF documents accessible with Adobe Acrobat Pro
Page 16
Directed by Atalan – [email protected] January 2011
4 -
Getting started with tagging
4.1
Checking for the presence of tags in the document
Some PDF documents already have tags that were generated when the PDF file was created from the original document. According to whether there are tags or not, the procedure for tagging using Adobe Acrobat Pro may be different.
To check for the presence of tags in a PDF, open the Tags navigation panel. If there are tags, the tree
structure of the tags can be seen in the navigation panel. If there are no tags, the message “No Tags available” is displayed.
Figure 7: the “Tags” panel displays the tree structure of tags in the document.
Figure 8: the “Tags” panel indicates that no tag is available.
4.2
Tagging techniques
4.2.1 Tagging a document manually with Adobe Acrobat Pro
You can tag an untagged document entirely using Adobe Acrobat Pro.
This is the method taught in this guide and the two accompanying exercise books. It is important to understand and master tagging before editing the tags in documents that are already tagged.
4.2.2 Editing existing tags
It is always advisable to consider accessibility requirements from the beginning, when you create the original source document (for example, in Microsoft Word or Open Office6). Tags can
then be generated automatically when exporting the document to PDF format.
6 The AcceDe web site offers resources for adding accessibility to documents created in authoring tools such as Microsoft Word, Open Office or Adobe InDesign: www.accede.info/en/ressources/.
AcceDe project – www.accede.info/en/
Making PDF documents accessible with Adobe Acrobat Pro
Page 17
Directed by Atalan – [email protected] January 2011
If you do this, you will often need to make some limited changes in Acrobat Pro, but you will reduce the total time needed to tag the document.
Nevertheless, for learning purposes, we recommend that you tag the first accessible PDFs you create entirely from scratch. When you have successfully learned how to tag an untagged document, you can easily edit a document that already has tags.
Note:
When you create a PDF from some authoring tools, the generated tags have the name of styles used in the original document rather than standard tag names. This is notably the case with Adobe
InDesign. For more information, refer to the appendix “12.3 Role map” (page 93).
4.2.3 Tagging a document automatically with Acrobat Pro
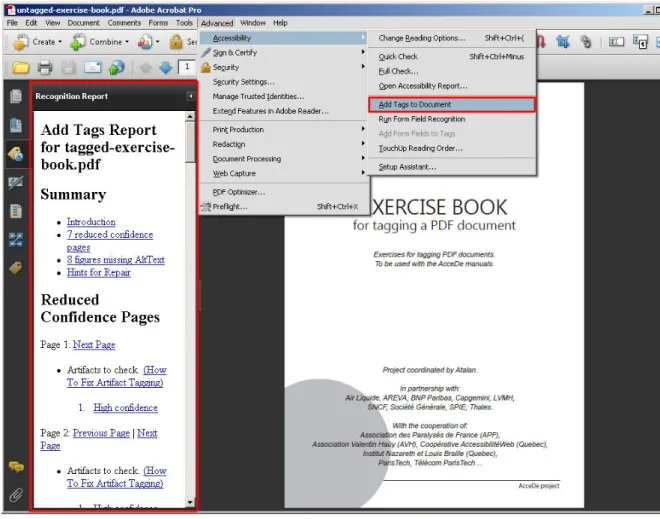
Acrobat Pro has a functionality for automatically tagging an untagged PDF document. You can run this tool by selecting the option Advanced > Accessibility > Add tags to document.
With this functionality, Acrobat Pro automatically inserts tags into the document, and generates a report (called a Recognition Report) including a confidence rating of the generated tags and the tasks you must perform manually (like, for example, adding alternative text to images).
Note:
You can also use this to overwrite existing tags, by unchecking the option Document is Tagged PDF
AcceDe project – www.accede.info/en/
Making PDF documents accessible with Adobe Acrobat Pro
Page 18
Directed by Atalan – [email protected] January 2011
Figure 9: the Add tags to document functionality and the recognition report generated by Acrobat Pro.
Tests show that tagging created in this way is usually of a very poor quality, and subsequently
requires a great deal of manual fixes. Moreover, in some documents there are display problems, when background and foreground elements are inverted. These must be identified and corrected manually. For these reasons, we recommend that you do not use this functionality but do one of the following:
1. either modify the tags generated when exporting the document to PDF format (see section “4.2.2 Editing existing tags” on page 16);
2. or tag the document entirely manually (see section “4.2.1 Tagging a document manually with Acrobat Pro” on page 16).
However, in some cases automatic tagging in Adobe Acrobat may be useful with simple documents, composed mainly of text and images that cannot be made accessible in the authoring software. With experience of tagging PDF documents, you can rapidly assess the quality of the generated tagging (the confidence rating detailed in the Acrobat report also gives an idea of the quality of the automatic tagging).
Note:
When a user of a screen reader opens an untagged PDF in Adobe Reader, the document is
automatically tagged. The user is then asked to choose a reading mode, with, for example, a reading order from top to bottom and left to right, or an order determined by Adobe Reader. The automatic tagging system used by Adobe Reader when it detects the presence of a screen reader is the same as that of Adobe Acrobat, with the same limitations we have just mentioned.
AcceDe project – www.accede.info/en/
Making PDF documents accessible with Adobe Acrobat Pro
Page 19
Directed by Atalan – [email protected] January 2011
4.3
Proposed method: manual tagging
This manual describes a step-by-step method for tagging documents.
To begin with, we will work on an untagged document, untagged-exercise-book.pdf. We will consider the properties that need to be defined for the document as a whole. Then, page by page, we will tag the content and define the reading order. When all the pages are tagged, we will test the content reflow (used to optimize text magnification on the screen or to improve readability on mobile telephones). We will finish by carrying out several tasks to finalize the document.
The last section of this manual describes some techniques used for checking the quality of the tags created in the PDF document.
Add the title, document language, and root tag
(section 5)
Manually tag page contents following the analysis
(section 6)
Define the reading order
of the page
(section 7)
Analyse the page contents and define the tags to associate
with each content item
(section 8)
For each page of the document Test the reflow (section 9) Finalize the document (section 10) Check accessibility (section 11) For each
page of the document
AcceDe project – www.accede.info/en/
Making PDF documents accessible with Adobe Acrobat Pro
Page 20
Directed by Atalan – [email protected] January 2011
5 -
Adding the title, document language, and tags root
5.1
Adding a document title
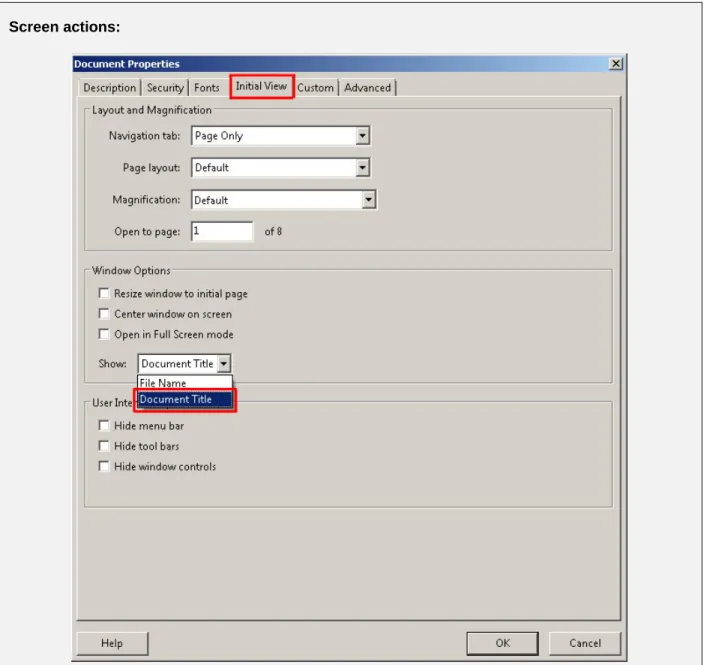
A meaningful title must be given to the document. This title must be representative of the content of the PDF file. It is usually the same as the title which appears on the cover of the document. To add a title, open the File menu, and then select Properties to open the Document Properties
dialog box. Then, on the Description tab, enter the required value in the Title field (you can also open
this dialog box by using the keyboard shortcut Ctrl + D on a PC or Cmd + D on a Mac
Screen actions:
Fill in the Title field in the Document Properties dialog box. For the exercise book, you could enter
“Exercise book for tagging a PDF document”.
Then, on the Initial View tab, change the value in the Show drop-down list from File Name to Document title. This modification means that the title rather than the file name is displayed in the title
AcceDe project – www.accede.info/en/
Making PDF documents accessible with Adobe Acrobat Pro
Page 21
Directed by Atalan – [email protected] January 2011
Screen actions:
Select the option to show the document title by default in the title bar when the file is opened.
Note:
To apply the change, you need to save the PDF file (CTRL + S on PC or CMD + S on Mac).
Figure 11: The document title is shown in the title bar.
For users of screen readers, this is the first information that is read when opening the document. It is also the first information displayed in search engines results, and in computer navigation windows.
AcceDe project – www.accede.info/en/
Making PDF documents accessible with Adobe Acrobat Pro
Page 22
Directed by Atalan – [email protected] January 2011
5.2
Adding the main document language
Indicate the main document language in the document properties. By providing this information, voice synthesisers in screen readers are able to correctly pronounce the document content.
Remaining in the Document Properties dialog box (File > Properties via the menu bar), select the Advanced tag, and then select the language in the Language drop-down list near the bottom of the
dialog box.
Screen actions:
Select the language in the Document Properties dialog box. The Exercise Book is in English.
Note:
If the document to be tagged is written in several languages, it is then possible to indicate the
language for each page or each content block (see section “6.2.8 Specifying a change of language” on page 42). For our purposes, in the Document Properties indicate the same language as that used for
AcceDe project – www.accede.info/en/
Making PDF documents accessible with Adobe Acrobat Pro
Page 23
Directed by Atalan – [email protected] January 2011
5.3
Creating the tags root
For a non-tagged document, you need to create a tags root before you can begin tagging. The tags you create are attached to this root.
To do this, open the options drop-down list (represented by the icon in the Tags navigation
panel, and select Create tags root. (see screen action (1/2).
The text “No tags available” is then replaced by “Tags”. This is the tags root in the Tags navigation
panel (see screen action 2/2).
Screen action(1/2) :
Select Create tags root in the Tags navigation
panel.
Screen action (2/2) :
The tags root replaces the text “No tags available” in the Tags navigation panel.
AcceDe project – www.accede.info/en/
Making PDF documents accessible with Adobe Acrobat Pro
Page 24
Directed by Atalan – [email protected] January 2011
6 -
Manually tagging a page of the document
6.1
Important: Save your changes frequently!
Some simple functionalities that are standard in authoring tools do not exist in Adobe Acrobat Pro 9 (and prior versions). For example, there is no history palette which enables you to undo or redo actions in the navigation panels.
So, to make sure you do not lose your work, you are advised to regularly save the document (for example, each time you finish tagging a page and defining its reading order), and to make new versions of the document for each major change (each time you save the document, save it with a new name, such as tags-exercise-book-3.pdf).
6.2
Editing the tags
In this section we look at the standard actions which you can carry out on all tags. We will perform these actions on the cover page of the file untagged-exercise-book.pdf.
Each tag and its characteristics are then presented in section “8 - Identifying the tag type for each content item” (page 50).
6.2.1 Creating an empty tag
To create an empty tag, open the Tags navigation panel.
1. In the Tags navigation panel options , select New Tag. (You can also display the options
AcceDe project – www.accede.info/en/
Making PDF documents accessible with Adobe Acrobat Pro
Page 25
Directed by Atalan – [email protected] January 2011
Screen actions:
Select New Tag… from the options in the Tags navigation panel.
2. A dialog box is displayed for choosing the type of tag. You can choose the required tag type either by selecting it from the drop-down list or by typing it (make sure you respect the case). You can also give a name to the tag. The tag title makes it easier to identify the tag in the tags tree in the navigation panel. This information is not conveyed by screen readers when the document is consulted but is solely used as a label for the tag.
The list of tag types and their specific uses are presented in section “8 - Identifying the tag type for each content item” (page 50).
AcceDe project – www.accede.info/en/
Making PDF documents accessible with Adobe Acrobat Pro
Page 26
Directed by Atalan – [email protected] January 2011
Screen actions:
In the New Tag dialog box, create a Paragraph type tag (without title).
3. Finally, click OK to confirm. The tag is then created and added to the tag tree. Screen actions:
An empty <P> (Paragraph) tag is now displayed in the tag tree
Note:
When you select a tag in the tag tree, a tag created by the above method will always be added to the tree just after the selected tag. If no tag is selected, the new tag will be added to the end of the tag tree.
6.2.2 Associating content with the tag (3 possible methods)
To be useful, each tag must incorporate some content, or other tags which contain content. There are three methods for associating content with a tag:
- Method n°1: insert content in an existing tag
- Method n°2: create a tag and insert content in a single procedure (in the Tags navigation panel) - Method n°3: insert content from the TouchUp Reading Order dialog box
Note:
We recommend using the first two tagging methods because they make it easier to control where the tags are created in the tag tree.
AcceDe project – www.accede.info/en/
Making PDF documents accessible with Adobe Acrobat Pro
Page 27
Directed by Atalan – [email protected] January 2011
6.2.2.1 Method n°1: insert content in an existing tag
To add content in an existing tag:
1. In the Tags navigation panel, select the tag in the tag tree. Screen actions:
AcceDe project – www.accede.info/en/
Making PDF documents accessible with Adobe Acrobat Pro
Page 28
Directed by Atalan – [email protected] January 2011
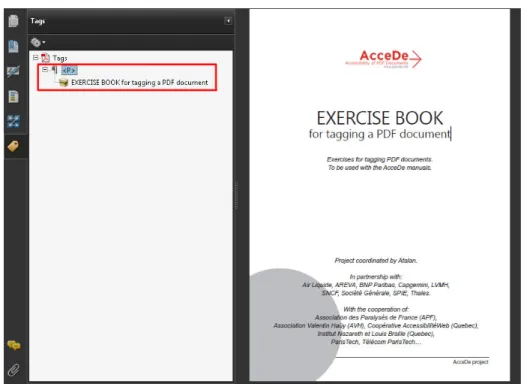
2. In the document pane, then select the text you want to tag by highlighting it.
(to select the text you need to activate the Select tool by clicking it in the toolbar
or from the menu by clicking Tools > Select & Zoom > Select Tool.) Screen actions:
On the cover page, in the document pane, highlight the text “Exercise book for tagging a PDF document”.
AcceDe project – www.accede.info/en/
Making PDF documents accessible with Adobe Acrobat Pro
Page 29
Directed by Atalan – [email protected] January 2011
3. Then in the Tags navigation panel, right-click the previously selected tag and select Create Tag from Selection.
Screen actions:
Right-click the empty <P> tag and select Create Tag from Selection.
Note:
In this instance, the term “Create” is somewhat inaccurate as the tag has already been created. This command really means “Fill the tag with the selection” or “Associate the tag with the selection”.
AcceDe project – www.accede.info/en/
Making PDF documents accessible with Adobe Acrobat Pro
Page 30
Directed by Atalan – [email protected] January 2011
4. The content of the selection is then associated with the tag.
Figure 12 : In the tag tree, the <P> tag now contains “Exercise book for tagging a PDF document” (symbolised by a cardboard box icon).
With this method, you can first create the list of required tags, and then associate them with content afterwards.
Tip:
You can select a graphic using the TouchUp Object (Tool Tools > Advanced Editing > TouchUp Object via the menu bar).
AcceDe project – www.accede.info/en/
Making PDF documents accessible with Adobe Acrobat Pro
Page 31
Directed by Atalan – [email protected] January 2011
6.2.2.2 Method n°2: create a tag and insert content in a single procedure (in the Tags navigation panel)
You can also create tags and associate text with them in a single procedure. To do this, you first need to select the tags root. Secondly, select the text to be tagged in the document pane. Then, from the options, select Create Tag from Selection.
Screen actions:
Select the tags root in the tag tree in the Tags navigation panel (1).
Select the text “Exercises for tagging PDF documents. To be used with the AcceDe manuals” (2). Right-click the tags root to open the options, and then select Create Tag from Selection (3). The New Tag dialog box is displayed, from which you can create, for example, a “Paragraph” tag (4).
AcceDe project – www.accede.info/en/
Making PDF documents accessible with Adobe Acrobat Pro
Page 32
Directed by Atalan – [email protected] January 2011
Screen actions (continued):
The document now has two <P> tags.
Tip:
You can select a graphic using the TouchUp Object (Tool Tools > Advanced Editing > TouchUp Object via the menu bar).
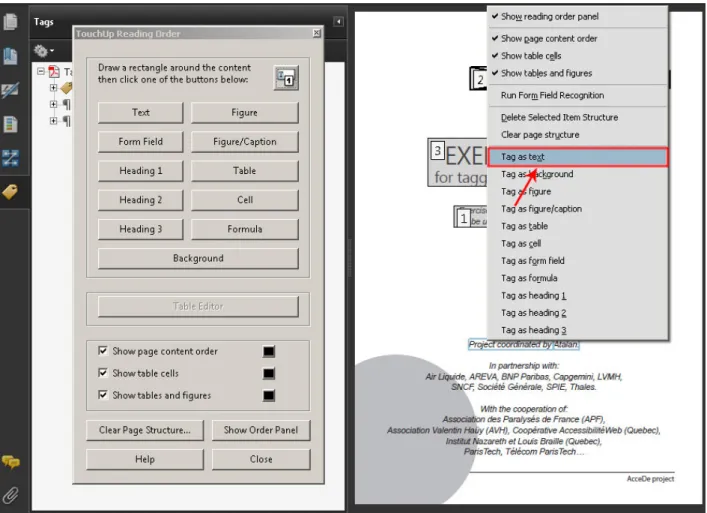
6.2.2.3 Method n°3: insert content from the TouchUp Reading Order dialog box
To tag content with this method, open the TouchUp Reading Order dialog box.7. The cursor then
changes from an arrow to crosshairs.
In the document pane, use the cursor to select the zone by holding down the left mouse button and drawing a box that surrounds the desired zone to tag and in the TouchUp Reading Order dialog box
select the appropriate tag (or right-click on the selected area).
Notes:
- The TouchUp Reading Order dialog box only offers a limited choice of tags from all the available
tag types.
- When a tag is created by this method on a tagged document, it is added to the tag tree, but is sometimes difficult to find because it is not inserted into the selected spot in the tag tree.
AcceDe project – www.accede.info/en/
Making PDF documents accessible with Adobe Acrobat Pro
Page 33
Directed by Atalan – [email protected] January 2011
Screen actions:
Open the TouchUp Reading Order dialog box, and then select the logo at the top of the cover page
(1) with the cursor.
In the TouchUp Reading Order dialog box, then click the Figure button (2).
The document now has two <P> tags and one <Figure> tag.
When the TouchUp Reading Order dialog box is open, you can also tag content by right-clicking
content you have selected in the document pane. A context menu proposes several Tag as… options.
AcceDe project – www.accede.info/en/
Making PDF documents accessible with Adobe Acrobat Pro
Page 34
Directed by Atalan – [email protected] January 2011
Figure 13: From the context menu you can select content in the document pane and then, for example, Tag as text. In this case, the selected content will be tagged in a paragraph. When the context menu is open, you can use a keyboard shortcut for each proposed action. Press the X key to
tag as text (because the x character is underlined).
Important note:
Using this method with graphic items, or with text displayed on top of an image, or with a background colour may lead to problems in the way the different elements overlay each other visually on the page. Sometimes, tagged text is inversed with the background image and can no longer be read. To correct these problems, refer to appendix « 9.4 Using the content panel to resolve visual overlay problems » on page 78.
6.2.3 Finding tagged content
When a document has a great deal of tags, it is sometimes difficult to find which content belongs to which tag and vice versa. Two features can help to find tags or tagged content.
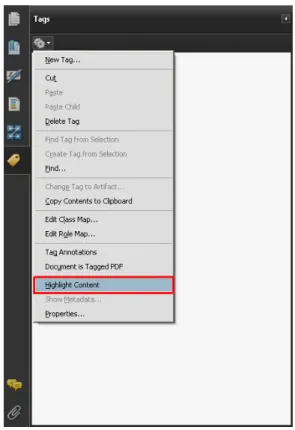
6.2.3.1 Finding tagged content from the tag tree (highlight the content)
From the tag tree in the Tags navigation panel, select the Highlight Content option. When you select
a tag in the navigation panel, the corresponding content is shown surrounded with a blue frame in the document pane.
AcceDe project – www.accede.info/en/
Making PDF documents accessible with Adobe Acrobat Pro
Page 35
Directed by Atalan – [email protected] January 2011
Note:
This option is automatically disabled when you close Acrobat. You are advised to systematically activate this option each time you open or re-open a document.
Figure 14: Highlight Content option in the Tags navigation panel options
Figure 15: with the Highlight Content option selected, when you select a tag in the tag tree, a blue frame indicates the corresponding content in the document pane.
AcceDe project – www.accede.info/en/
Making PDF documents accessible with Adobe Acrobat Pro
Page 36
Directed by Atalan – [email protected] January 2011
6.2.3.2 Finding tagged content from the document pane
Alternatively, it is possible to find the tag which corresponds to specific content in the document pane. To do this, highlight the required text with the cursor. Then, in the Tags navigation panel options,
select Find tag from selection. The tag which corresponds to the selection is then opened and
highlighted.
Figure 16: Find tag from selection option to highlight the tag corresponding to a selection in the navigation panel.
6.2.4 Changing the tag type
If you need to correct an error or edit a PDF which is already tagged, you may often need to change the tag type (for example, change a Paragraph tag to a Heading tag). To do this, select the
required tag, and then in the Tags navigation panel, select Properties.
To change the tag type in the Properties dialog box, select the Tag tab, and then select the required
AcceDe project – www.accede.info/en/
Making PDF documents accessible with Adobe Acrobat Pro
Page 37
Directed by Atalan – [email protected] January 2011
Screen actions:
Right-click the <P> tag containing “Exercise book for tagging a PDF document” and then select
Properties.
AcceDe project – www.accede.info/en/
Making PDF documents accessible with Adobe Acrobat Pro
Page 38
Directed by Atalan – [email protected] January 2011
Screen actions (continued) :
The tag containing “Exercise book for tagging a PDF document” is now a Heading Level 1
(<H1>).
It is also possible to change the tag type directly in the tag tree in the Tags navigation panel by
replacing the abbreviated name of the tag with the abbreviated name of the new tag. To do this, select the tag you want to edit, then click the tag again (or press F2 on the keyboard), and type the new name.
Screen actions:
Change of the <H1> tag to <H>.
Important note:
There is no warning when you mistype an entry using this method. Make sure you use this shortcut carefully. Any tag which is wrongly spelt will be considered as a simple paragraph. If you write <T1>
instead of <H1> for example, the text will not be considered as a heading. The abbreviated name is
AcceDe project – www.accede.info/en/
Making PDF documents accessible with Adobe Acrobat Pro
Page 39
Directed by Atalan – [email protected] January 2011
6.2.5 Moving a tag
You can move tags in the tag tree in the Tags navigation panel. To move a tag (the item between <
and >) in the tag tree, drag it with the mouse. To place a tag exactly where you want it is quite tricky but you can use the visual indicators to drop the tag in the precise position required.
Step actions (1/4) :
Drag the <Figure> tag onto the icon of the
collapsed <P> tag. The Figure tag will be
placed after the <P> tag.
Step actions (2/4) :
Drag the <Figure> tag onto the title <P> of the
collapsed tag. The Figure tag will be placed within the <P> tag.
Step actions (3/4) :
Drag the <Figure> tag onto the title<H> of
the collapsed tag. The Figure tag is placed within the <H> tag.
Step actions (4/4) :
Drag the <Figure>tag onto the icon of the
collapsed <H> tag. The Figure tag is placed after
the <H> tag.
When tagging a document, you will need to move many tags, usually to sort them according to the reading order you want to give to screen readers.
AcceDe project – www.accede.info/en/
Making PDF documents accessible with Adobe Acrobat Pro
Page 40
Directed by Atalan – [email protected] January 2011
6.2.6 Moving tagged content
You can also move the content of a tag to another tag. To do this, drag the content (symbolized by a box ) in the tag tree to the required tag.
Screen actions:
Drag the content of a paragraph to place it in the <H> tag following “Exercise book for tagging a PDF
document”. The <P> tag is then empty and can be deleted.
6.2.7 Providing alternate text
It is possible to provide alternate text to all the tags created in the document8. The alternate text is the
text read by the screen reader instead of the text actually contained in the tag.
To provide an alternate text, fill in the Alternate text field in the Tag tab of the TouchUp Properties
dialog box (right-click on the tag, and then select Properties).
8 The tags for the table heading cells <TH> are the only tags which must not have alternate text because they are not read by screen readers. See the note of the section « 8.8.1 Tagging rows, cells and headers ».
AcceDe project – www.accede.info/en/
Making PDF documents accessible with Adobe Acrobat Pro
Page 41
Directed by Atalan – [email protected] January 2011
Screen actions:
Right-click the tag, open the tag properties of the <Figure> tag and add alternate text with the
information present in the image “AcceDe, accessibility of documents in PDF format”
Important note:
It is essential to provide alternate text to all the images (<Figure> tags) which convey information
in the document.
Tips:
- It is a good idea to end the alternate text with a strong punctuation mark (full stop, colon…) so that voice synthesisers pause for short time and therefore help comprehension.
- Alternate text is not limited to a specific number of characters.
- Alternate text can also be given to a tag containing text. This makes it possible to re-write content which cannot be correctly read by a screen reader, such as a title which straddles two pages (see “12.1.1 Lines that straddle two pages” on page 91) or text which cannot be understood
independently of its position or its colour on the page (such as the number “4” referring to a page number which could have as alternate text “page 4”).
AcceDe project – www.accede.info/en/
Making PDF documents accessible with Adobe Acrobat Pro
Page 42
Directed by Atalan – [email protected] January 2011
6.2.8 Specifying a change of language
In the TouchUp Properties dialog box for a tag, it is possible to indicate the language of the content
of a tag if this is different from the main document language (if an image or text, for example, is in French in an English document).
Figure 17: Language property in the TouchUp Properties dialog box.
6.2.9 Deleting a tag
To delete a tag in the tag tree, you need to select it and then select Delete Tag in the Tags navigation
panel (you can also use the Delete key on Windows or the Backspace key on a Mac.
When a tag is deleted the content remains visible on the page, but is no longer associated with a tag and therefore is not read by screen readers.
During the final stage of the automatic full accessibility check on the document (section “11.1 Using the Acrobat accessibility check”, a non-tagged content will be considered as potentially having been forgotten. To explicitly indicate that a content must not be read by screen readers, you need to transform it into an artifact (see the following section).
Important note:
When you delete a tag in the tag tree, it is not possible to undo the action: you need to recreate the tag and associate content with it again. In general, in the Order and Tags navigation panels, Adobe
AcceDe project – www.accede.info/en/
Making PDF documents accessible with Adobe Acrobat Pro
Page 43
Directed by Atalan – [email protected] January 2011
6.2.10 Marking content as an artifact (2 possible methods)
A content labelled as an artifact is an item which is not to be read by screen readers. Two methods let you identify content as an artifact.
- Method n°1: using the TouchUp Reading Order dialog box ;
- Method n°2: using the Tags navigation panel for content which is already tagged.
6.2.10.1 Method n°1: using the TouchUp Reading Order dialog box
Open the TouchUp Reading Order dialog box, and then select in the document pane the items you
want to label as artifact. Select Background in the TouchUp Reading Order dialog box (or right-click
the selection and select Tag as background. Screen actions:
Select the text “AcceDe Project” in the footer on the cover page (1), and then in the TouchUp Reading Order dialog box, select Background.
“AcceDe Project”, which is already present on the cover page with the logo, will not be read by screen readers.
Note:
AcceDe project – www.accede.info/en/
Making PDF documents accessible with Adobe Acrobat Pro
Page 44
Directed by Atalan – [email protected] January 2011
Tip:
With this first method, it is possible to create in a single procedure all the artifacts on a page. To do this, Shift-click the required items one by one. To remove items from the selection, Ctrl-click the items.
6.2.10.2 Method n°2: using the Tags navigation panel for content which is already tagged
It is also possible to tag as artifact all content which has already been tagged. This is often required for documents which have been automatically tagged and then require manual editing.
To do this, right-click the content to label as an artifact in the tag tree, and then select Change Tag to Artifact….Alternatively, you can select the content to tag as an artifact and then select this option in
the Tags navigation panel options Note:
To change a tag to artifact, you need to select the content of a tag and not the tag itself.
Figure 18: in this screenshot, the text “Exercises for tagging PDF documents…” is converted to an artifact by selecting the content in the tag tree.
AcceDe project – www.accede.info/en/
Making PDF documents accessible with Adobe Acrobat Pro
Page 45
Directed by Atalan – [email protected] January 2011
6.3
Screen actions: tagging the cover page of the exercise
book
To put into practice the different procedures explained above, you can now proceed with tagging the cover page.
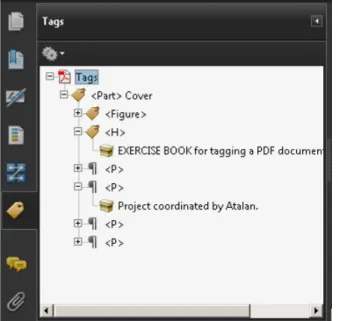
When you have finished, you should have the following tags: - A <Figure> tag with alternate text for the AcceDe logo;
- A Heading tag <H> for the text “Exercise book for tagging a PDF document”;
- A Paragraph tag <P> for the text “Exercises for tagging PDF documents. To be used with the
AcceDe manuals”;
- A Paragraph tag <P> for the text “Project coordinated by Atalan”;
- A Paragraph tag <P> for the text “In partnership with…”;
- A Paragraph tag <P> for the text “With the cooperation of…”;
- “AcceDe Project” in the page footer is to be marked as an artifact.
AcceDe project – www.accede.info/en/
Making PDF documents accessible with Adobe Acrobat Pro
Page 46
Directed by Atalan – [email protected] January 2011
7 -
Defining the reading order
When you have tagged the page content, it is important, before going on to the next page, to check and correct, if necessary, the reading order followed by screen readers.
7.1
Why you should not use the Order panel
The Order navigation panel in Acrobat Pro is designed for checking and correcting the reading order
of tagged content on a page. However, in Acrobat Pro 9 (and previous versions), this tool is very difficult to use as it manages both the reading order of content and the order objects visually overlay each other on the page.
The main disadvantages of this double functionality are the following:
- When you change the reading order of content from the Order panel, the tags in the Tags panel
are automatically moved. It sometimes happens that they are inadvertently moved inside other tags, when you don’t want to move them there.
- When you change the reading order from the Order panel, the order objects are overlaid on the
page is also changed. Sometimes when you edit content in the Order panel, an object which
should be in front of another ends up behind it, and therefore adversely affects the layout. You then need to manually correct it.
- The numbering used on the Order navigation panel does not correspond to the reading order but to the order the different content layers on the page overlay each other. So, when you
want to check the reading order of content by a screen reader, the displayed numbering may be inaccurate.
- The content blocks you need to sort may incorporate several tags. It is therefore sometimes impossible in this panel to manage the reading order of two tags which are next to each other.
Figure 19: When the Order panel is displayed, numbers identify the order different content is visually superimposed on the page. In this example, it is not possible to manage the reading order of the three
AcceDe project – www.accede.info/en/
Making PDF documents accessible with Adobe Acrobat Pro
Page 47
Directed by Atalan – [email protected] January 2011
As a result of the difficulties associated with the Order panel, we do not recommend you use it to define the reading order of content.
In this section we follow a method based on solely on the Tags panel.
7.2
Defining the reading order from the Tags panel
7.2.1 Analysing the content and defining the reading order
Before you define the reading order, you need to analyse the different content and define the logical reading order. For example:
- A heading, even if it is placed in the middle or at the bottom of the page, must be read before the content associated with it.
- In a long quote, even if the name of the speaker appears afterwards in the text, it is preferable to read it first so that users of screen readers know who is talking.
- In a page with an inset, it is better that it is not read between two paragraphs of the same subject. The inset can be read at the start or the end of the page, so that the reading of the main content of the page is not interrupted.
- etc.
When you have finished this analysis, change the reading order of content if required.
7.2.2 Arranging the tags in a logical reading order
The reading order of a page by a screen reader corresponds to the sequence in which the tags are ordered in the tag tree.
To change the reading order of items on a page, you just need to move the tags in the tag tree on the
AcceDe project – www.accede.info/en/
Making PDF documents accessible with Adobe Acrobat Pro
Page 48
Directed by Atalan – [email protected] January 2011
Screen actions
If you want the logo to be read first, and then the title and the subtitle, and finally the text block at the bottom of the page, the tags which correspond to this content must be placed in this order.
Move the tags in order to obtain the following order: <Figure>, <H>, <P> (corresponding to the
subtitle under the title), and then the last three <P> tags (corresponding to the text block at the bottom
of the page.
Tip:
Since tags are added one after the other when you create them, you are advised to create the tags in the order you want the content to be. This will minimize the amount of manual re-arranging you need to do afterwards.
7.2.3 Regrouping tags under “parts”
When all the tags on a page of a document are created and assigned to content, we recommend that you place them in a single tag which encloses all of them (while preserving the order). To do this, you can use the <Part> tag.
A part may contain the tags of one or more pages. We recommend that you define the parts according to the main divisions of the document. These tags will then be used to automatically generate a contents summary of the PDF (see section “10.1 Generating bookmarks (if ” on page 80).
AcceDe project – www.accede.info/en/
Making PDF documents accessible with Adobe Acrobat Pro
Page 49
Directed by Atalan – [email protected] January 2011
Screen actions:
Create a Part tag, with the title “Cover”
Select all the tags for the cover page (Shift-click from the first tag to the last tag) and then drag these tags to the new Part tag.
Note:
When the content of a document requires it, you can insert several parts nested within the same part. This makes it possible to produce a detailed summary of the document and easily generate the document bookmarks (“10.1 Generating bookmarks (if required)” on page 80).
See the tagging exercise book to see a preview of the final tag tree with the different parts.
When you have defined the reading order of a page, you can start tagging the following page, and continue in this way, until you reach the end of the document.