Global VPN Client 4.9
Administrator’s Guide
Notes, Cautions, and Warnings
© 2013 Dell Inc.
Trademarks: Dell™, the DELL logo, SonicWALL™, and all other SonicWALL product and service names and slogans are trademarks of Dell Inc.
2013 – 12 P/N 232-002356-00 Rev. A
NOTE: A NOTE indicates important information that helps you make better use of your system.
CAUTION: A CAUTION indicates potential damage to hardware or loss of data if instructions are not followed.
Table of Contents
Dell SonicWALL Global VPN Client Overview . . . 7
Dell SonicWALL Global VPN Client Features . . . 7
Global VPN Client Enterprise . . . 9
About this Guide . . . 9
Conventions Used in this Guide . . . 9
Icons Used in this Guide . . . 9
Limited Warranty . . . 10
Getting Started with the Global VPN Client. . . 11
Installing the Global VPN Client . . . 11
Installing the Global VPN Client with a Ghost Application . . . 14
Command Line Options for Installation . . . 15
Launching the Global VPN Client . . . 15
Specifying Global VPN Client Launch Options . . . 17
Managing the Global VPN Client System Tray Icon . . . 18
Adding VPN Connections . . . 18
Understanding VPN Connections . . . 19
Creating a VPN Connection Using the New Connection Wizard . . . 20
Importing a VPN Configuration File. . . 22
Configuring a Dial-Up VPN Connection . . . 22
Using Global VPN Client from a Different Workstation . . . 24
Making VPN Connections . . . 25
Accessing Redundant VPN Gateways . . . 26
Enabling a VPN Connection . . . 26
Establishing Multiple Connections . . . 27
Entering a Pre-Shared Key . . . 28
Selecting a Certificate . . . 29
Username and Password Authentication . . . 29
Creating a Connection Shortcut . . . 30
Connection Warning . . . 30
Managing Current VPN Connections . . . 30
Checking the Status of a VPN Connection . . . 30
Managing VPN Connection Properties . . . 32
General . . . 32
User Authentication . . . 34
Peers . . . 35
Status . . . 38
Managing VPN Connections . . . 40
Arranging Connections . . . 40
Renaming a Connection . . . 40
Deleting a Connection . . . 40
Selecting All Connections . . . 40
Using Certificates . . . 40
Managing Certificates . . . 41
Troubleshooting the Global VPN Client. . . 42
Understanding the Global VPN Client Log . . . 42
Configuring the Log . . . 44
Generating a Help Report . . . 45
Accessing Dell SonicWALL Global VPN Client Technical Support . . . 46
Viewing Help Topics . . . 47
Uninstalling the Dell SonicWALL Global VPN Client . . . 47
Configuring Dell SonicWALL Appliances for Global VPN Clients . . . 47
Dell SonicWALL Global VPN Client Licenses . . . 48
Group VPN Connections Supported by Each Appliance Model . . . 48
Activating Your Dell SonicWALL Global VPN Clients . . . 48
Downloading Global VPN Client Software and Documentation . . . 48
SOFTWARE LICENSE AGREEMENT . . . 49
LICENSE . . . 49
EXPORTS LICENSE . . . 50
SUPPORT SERVICES . . . 50
UPGRADES . . . 50
COPYRIGHT . . . 50
U.S. GOVERNMENT RESTRICTED RIGHTS . . . 51
MISCELLANEOUS . . . 51
TERMINATION . . . 51
LIMITED WARRANTY. . . 51
CUSTOMER REMEDIES . . . 51
NO OTHER WARRANTIES. . . 52
LIMITATION OF LIABILITY . . . 52
Appendix A - Using the Default.rcf File for Global VPN Clients. . . 52
How the Global VPN Client Uses the Default.rcf File . . . 52
Deploying the Default.rcf File . . . 53
Sample default.rcf File. . . 57
Troubleshooting the Default.rcf File. . . 60
Appendix B - Running the Global VPN Client from the CLI. . . 60
Command Line Options. . . 60
Command Line Examples . . . 61
Appendix C - Log Viewer Messages . . . 61
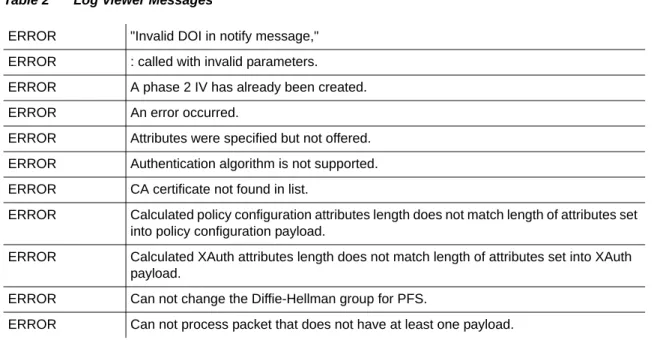
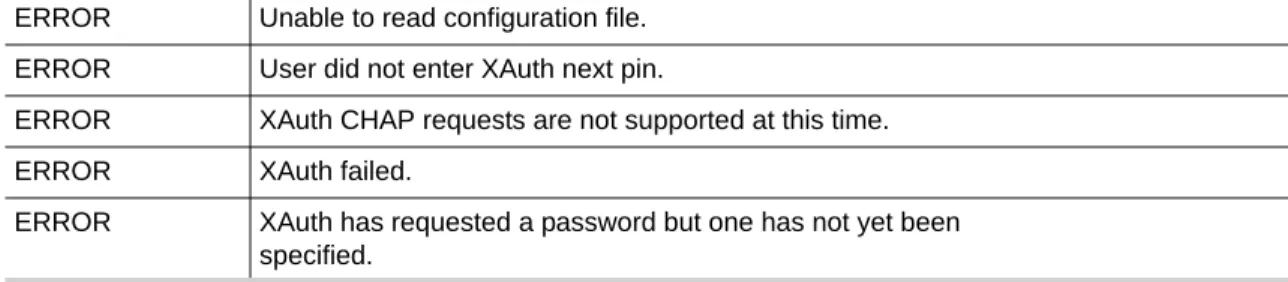
Log Viewer Error Messages . . . 61
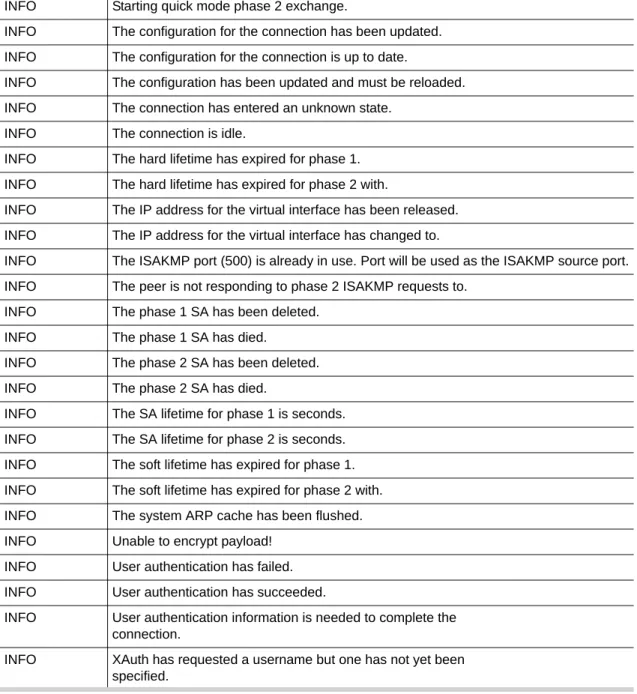
Log Viewer Info Messages . . . 67
Dell SonicWALL Global VPN Client Overview
The Dell SonicWALL Global VPN Client creates a Virtual Private Network (VPN) connection between your computer and the corporate network to maintain the confidentiality of private data. The Global VPN Client provides an easy-to-use solution for secure, encrypted access through the Internet or corporate dial-up facilities for remote users as well as secure wireless networking for Dell SonicWALL Secure Wireless appliance clients using Dell SonicWALL’s WiFiSec technology.
Custom developed by Dell SonicWALL, the Global VPN Client combines with GroupVPN on Dell SonicWALL Internet Security Appliances to dramatically streamline VPN deployment and management. Using Dell SonicWALL’s Client Policy Provisioning technology, the SonicOS administrator establishes the VPN connections policies for the Global VPN Clients. The VPN configuration data is transparently downloaded from the Dell SonicWALL VPN Gateway (Dell SonicWALL Internet Security Appliance) to Global VPN Clients, removing the burden of provisioning VPN connections from the user.
Dell SonicWALL Global VPN Client Features
The Dell SonicWALL Global VPN Client delivers a robust IPsec VPN solution with these features:
• Easy to Use - Provides an easy-to-follow Installation Wizard to quickly install the product, an easy-to-follow Configuration Wizard with common VPN deployment scenarios, point-and-click activation of VPN connections, and streamlined management tools to minimize support requirements.
• Client Policy Provisioning - Using only the IP address or Fully Qualified Domain Name (FQDN) of the Dell SonicWALL VPN gateway, the VPN configuration data is automatically downloaded from the Dell SonicWALL VPN gateway via a secure IPsec tunnel, removing the burden from the remote user of provisioning VPN connections.
• XAUTH Authentication with RADIUS - Provides added security with user authentication after the client has been authenticated via a RADIUS server.
• VPN Session Reliability - Allows automatic redirect in case of a Dell SonicWALL VPN gateway failure. If a Dell SonicWALL VPN gateway is down then the Global VPN Client can go through another Dell SonicWALL VPN gateway.
• Multiple Subnet Support - Allows Global VPN Client connections to more than one subnet in the configuration to increase networking flexibility.
• Third-Party Certificate Support - Supports VeriSign, Entrust, Microsoft, and Netscape Certificate Authorities (CAs) for enhanced user authentication.
• Tunnel All Support - Provides enhanced security by blocking all traffic not directed to the VPN tunnel to prevent Internet attacks from entering the corporate network through a VPN connection.
• DHCP over VPN Support - Allows IP address provisioning across a VPN tunnel for the corporate network while allowing WAN DHCP for Internet Access from the ISP.
• Secure VPN Configuration - Critical Global VPN Client configuration information is locked from the user to prevent tampering.
• AES and 3DES Encryption - Supports 168-bit key 3DES (Data Encryption Standard) and AES (Advanced Encryption Standard) for increased security. AES requires SonicOS 2.0 or higher on the Dell SonicWALL VPN gateway appliance.
• GMS Management - Allows Global VPN Client connections to be managed by Dell SonicWALL’s award-winning Global Management System (GMS).
• NAT Traversal - Enables Global VPN Client connections to be initiated from behind any device performing NAT (Network Address Translation). The Dell SonicWALL Global VPN Client encapsulates IPsec VPN traffic to pass through NAT devices, which are widely deployed to allow local networks to use one external IP address for an entire network. • Automatic Reconnect When Error Occurs - Allows the Global VPN Client to keep retrying
a connection if it encounters a problem connecting to a peer. This feature allows the Global VPN Client to automatically make a connection to a Dell SonicWALL VPN gateway that is temporarily disabled, without manual intervention.
• Ghost Installation for Large Scale Installations - Enables the Global VPN Client’s virtual adapter to get its default address after installation and then create a ghost image.
• NT Domain Logon Script Support - Allows Global VPN Clients to perform Windows NT domain authentication after establishing a secure IPsec tunnel. The Dell SonicWALL VPN gateway passes the logon script as part of the Global VPN Client configuration. This feature allows the VPN user to have access to mapped network drives and other network services. • Dual Processor Support - Enables the Global VPN Client to operate on dual-processor
computers.
• Group Policy Management - Global VPN Clients access can be customized and restricted to specific subnet access (Requires SonicOS Enhanced).
• Hub and Spoke VPN Access - Allows IP addressing from Dell SonicWALL VPN gateway’s DHCP Server to Global VPN Client for configuring a different subnet for all remote Global VPN Clients than the subnet of the LAN. Makes hub-and-spoke VPN access simpler. When a Global VPN Client successfully authenticates with the central site, it receives a virtual IP address that also grants it access to other trusted VPN sites.
• Default VPN Connections File - Enables the SonicOS administrator to configure and distribute the corporate VPN connections with the Global VPN Client software to streamline VPN client deployment.
• Integration with Dial-Up Adapter - Allows Global VPN Client connections using Microsoft Dial-Up Networking or third-party dial-up applications either as an automatic backup to a broadband connection or as the primary connection.
• Single VPN Connection to any Dell SonicWALL Secure Wireless Appliance for Roaming - Allows users to use a single VPN connection to access the networks of multiple Dell SonicWALL Secure Wireless appliances.
• Automatic Configuration of Redundant Gateways from DNS - When an IPsec gateway domain name resolves to multiple IP addresses, the Global VPN Client (version 2.1.0.0 or higher) uses the IP addresses in the list as failover gateways.
• Tunnel State Display Enhancement - The Global VPN Client provides information about the state of VPN tunnels. In addition to the states of enabled, disabled, and connected, the Global VPN Client indicates when tunnels are authenticating, provisioning, and connecting. • Tunnel Status Pop-Up Window - The Global VPN Client alerts users when tunnels are
connected or disconnected by displaying a small pop-up window.
• Smart Card and USB Token Authentication - The Global VPN Client is integrated with the Microsoft Cryptographic Application Program (MS CryptoAPI or MSCAPI), which enables the Global VPN Client to support user authentication using digital certificates on Smart cards and USB tokens.
• NAT-T RFC 3947 Support - Allows for automatic detection of NAT along the path between two IKE peers during IKE Phase 1 negotiation. On detection of NAT in middle, packets are UDP encapsulated using port 4500.
• DNS Redirect - DNS queries to DNS suffix associated with Virtual Adapter are not sent on the physical adapter.
• Tunnel All Support Enhancement - Provides the ability to route clear traffic to directly connected network interfaces that are configured with the Route All policy, which is generally used in the WLAN zone.
• Program Auto-Start on VPN Connection - Automatically launches a program, with optional arguments, when successful VPN connections are established, as specified in the
Connection Properties dialog box.
Global VPN Client Enterprise
Global VPN Client Enterprise provides the same functionality as the Global VPN Client with the added feature of license sharing.
About this Guide
The Dell SonicWALL Global VPN Client Administrator’s Guide provides complete
documentation on installing, configuring, and managing the Dell SonicWALL Global VPN Client. This guide also provides instructions for Dell SonicWALL Global VPN Client Enterprise. For configuring your Dell SonicWALL security appliance to support Global VPN Clients using SonicOS GroupVPN, see the SonicOS Administrator’s Guide for the firmware version running on your Dell SonicWALL security appliance (your VPN gateway appliance).
Tip Always check http://www.sonicwall.com/us/en/support/3776.html for the latest version of
this manual and other manuals.
Conventions Used in this Guide
Conventions used in this guide are as follows:
Icons Used in this Guide
Caution Important information that indicates potential damage to hardware or loss of data if instructions are not followed.
Tip Useful information about security features and configurations.
Related information that helps you make better use of your system.
Convention Use
Bold Highlights items you can select on the Global VPN Client interface or the SonicOS management interface.
Italic Highlights a value to enter into a field. For example, “type
192.168.168.168 in the IP Address field.”
> Indicates a multiple step menu choice. For example, “select File > Open” means “select the File menu, then select the Open item from the File menu.
Copyright Notice
© 2013 Dell, Inc. All rights reserved.
Under the copyright laws, this manual or the software described within, can not be copied, in whole or part, without the written consent of the manufacturer, except in the normal use of the software to make a backup copy. The same proprietary and copyright notices must be affixed to any permitted copies as were affixed to the original. This exception does not allow copies to be made for others, whether or not sold, but all of the material purchased (with all backup copies) can be sold, given, or loaned to another person. Under the law, copying includes translating into another language or format.
SonicWALL is a registered trademark of Dell, Inc. Other product and company names mentioned herein can be trademarks and/or registered trademarks of their respective companies.
Specifications and descriptions subject to change without notice.
Limited Warranty
Dell, Inc. warrants that commencing from the delivery date to Customer (but in any case commencing not more than ninety (90) days after the original shipment by Dell), and continuing for a period of twelve (12) months, that the product will be free from defects in materials and workmanship under normal use. This Limited Warranty is not transferable and applies only to the original end user of the product. Dell and its suppliers' entire liability and Customer's sole and exclusive remedy under this limited warranty will be shipment of a replacement product. At Dell’s discretion the replacement product may be of equal or greater functionality and may be of either new or like-new quality. Dell’s obligations under this warranty are contingent upon the return of the defective product according to the terms of Dell’s then-current Support Services policies.
This warranty does not apply if the product has been subjected to abnormal electrical stress, damaged by accident, abuse, misuse or misapplication, or has been modified without the written permission of Dell.
DISCLAIMER OF WARRANTY. EXCEPT AS SPECIFIED IN THIS WARRANTY, ALL EXPRESS OR IMPLIED CONDITIONS, REPRESENTATIONS, AND WARRANTIES INCLUDING, WITHOUT LIMITATION, ANY IMPLIED WARRANTY OR CONDITION OF MERCHANTABILITY, FITNESS FOR A PARTICULAR PURPOSE, NONINFRINGEMENT, SATISFACTORY QUALITY OR ARISING FROM A COURSE OF DEALING, LAW, USAGE, OR TRADE PRACTICE, ARE HEREBY EXCLUDED TO THE MAXIMUM EXTENT ALLOWED BY APPLICABLE LAW. TO THE EXTENT AN IMPLIED WARRANTY CANNOT BE EXCLUDED, SUCH WARRANTY IS LIMITED IN DURATION TO THE WARRANTY PERIOD. BECAUSE SOME STATES OR JURISDICTIONS DO NOT ALLOW LIMITATIONS ON HOW LONG AN IMPLIED WARRANTY LASTS, THE ABOVE LIMITATION MAY NOT APPLY TO YOU. THIS WARRANTY GIVES YOU SPECIFIC LEGAL RIGHTS, AND YOU MAY ALSO HAVE OTHER RIGHTS WHICH VARY FROM JURISDICTION TO JURISDICTION. THIS DISCLAIMER AND EXCLUSION SHALL APPLY EVEN IF THE EXPRESS WARRANTY SET FORTH ABOVE FAILS OF ITS ESSENTIAL PURPOSE.
DISCLAIMER OF LIABILITY. DELL'S SOLE LIABILITY IS THE SHIPMENT OF A
REPLACEMENT PRODUCT AS DESCRIBED IN THE ABOVE LIMITED WARRANTY. IN NO EVENT SHALL DELL OR ITS SUPPLIERS BE LIABLE FOR ANY DAMAGES WHATSOEVER, INCLUDING, WITHOUT LIMITATION, DAMAGES FOR LOSS OF PROFITS, BUSINESS INTERRUPTION, LOSS OF INFORMATION, OR OTHER PECUNIARY LOSS ARISING OUT OF THE USE OR INABILITY TO USE THE PRODUCT, OR FOR SPECIAL, INDIRECT, CONSEQUENTIAL, INCIDENTAL, OR PUNITIVE DAMAGES HOWEVER CAUSED AND REGARDLESS OF THE THEORY OF LIABILITY ARISING OUT OF THE USE OF OR
INABILITY TO USE HARDWARE OR SOFTWARE EVEN IF DELL OR ITS SUPPLIERS HAVE BEEN ADVISED OF THE POSSIBILITY OF SUCH DAMAGES. IN NO EVENT SHALL DELL OR ITS SUPPLIERS' LIABILITY TO CUSTOMER, WHETHER IN CONTRACT, TORT
(INCLUDING NEGLIGENCE), OR OTHERWISE, EXCEED THE PRICE PAID BY CUSTOMER. THE FOREGOING LIMITATIONS SHALL APPLY EVEN IF THE ABOVE-STATED WARRANTY FAILS OF ITS ESSENTIAL PURPOSE. BECAUSE SOME STATES OR JURISDICTIONS DO NOT ALLOW LIMITATION OR EXCLUSION OF CONSEQUENTIAL OR INCIDENTAL
DAMAGES, THE ABOVE LIMITATION MAY NOT APPLY TO YOU.
Getting Started with the Global VPN Client
This section provides information about installing and launching the Dell SonicWALL Global VPN Client.
Installing the Global VPN Client
The Dell SonicWALL Global VPN Client uses an easy-to-use wizard to guide you through the installation process.
Note If you are upgrading Dell SonicWALL Global VPN Client from an earlier version to the
current version, you must uninstall the earlier version before installing the current Global VPN Client.
Note Installing the Global VPN Client on Windows XP or later requires Administrator rights.
The Dell SonicWALL Global VPN Client operates on 32-bit and 64-bit versions of Windows 8.1, Windows 8, Windows 7, Windows XP, and Windows Vista client operating systems. The Global VPN Client is supported on all Dell SonicWALL security appliances running Gen3 (6.6 and higher), Gen4 (1.0 and higher), Gen5 (5.0 and higher), and Gen6 (6.1 and higher) SonicOS firmware versions.
Tip For information on the number of Dell SonicWALL Global VPN Client connections supported by your Dell SonicWALL appliance and Global VPN Client licensing for your appliance, see Dell SonicWALL Global VPN Client Licenses on page 48.
Using the Setup Wizard
This section explains how to install the Dell SonicWALL Global VPN Client program using the Setup Wizard.
Note Remove any installed 3rd Party VPN client program or previous version of Global VPN Client
To use the Setup Wizard, perform the following steps:
1. After downloading the self extracting installer, GVCSetupXX.exe (where XX is either 32 for 32-bit Windows platforms or 64 for 64-bit Windows platforms), from MySonicWALL, double-click GVCSetupXX.exe. The Setup Wizard launches.
2. Click Next to continue installation of the VPN Client.
4. In the installation folder selection screen, optionally click Browse to specify a custom installation location.
5. Click the Disk Cost button to see the disk space requirements.
6. Under Install SonicWALL Global VPN Client for yourself, or for anyone who uses this computer, select either Everyone or Just me, and then click Next.
7. The next screen indicates that the installer is ready to begin installation. Click Next. 8. Wait while the Dell SonicWALL Global VPN Client files are installed on your computer.
9. The next screen indicates the status of the installation. After a successful installation, optionally select the following checkboxes:
– Select Start Global VPN Client every time I log in to automatically launch the VPN Global Client when you log onto the computer.
– Select Start Global VPN Client when the installer finishes to automatically launch the Global VPN Client after finishing the installation.
10. Click Close.
You might see a dialog box regarding the restart of your system at the end of the
installation. If you see this message, then you need to reboot your system in order for the installation to complete.
Installing the Global VPN Client with a Ghost Application
The installation process is the same when using a ghost application as it is for normal installation. DO NOT OPEN the Global VPN Client application after installing it and BEFORE you ghost it. The FIRST time that the Global VPN Client is started after a ghost install, it randomly creates a unique MAC address for the Dell SonicWALL VPN Adapter.
Caution If you open the Global VPN Client BEFORE using ghost, you receive the same MAC address on each ghosted installation for the Dell SonicWALL VPN Adapter, resulting in network conflicts.
Command Line Options for Installation
There are several command line options available for Dell SonicWALL Global VPN Client installation.
All options are case-insensitive and must be preceded by a forward slash (/). The following options are available:
• Q – Quiet mode. A normal (non-silent) installation of the Dell SonicWALL Global VPN Client receives the necessary input from the user in the form of responses to dialog boxes. However, a silent installation does not prompt the user for any input, but instead, uses the defaults for every option. Simply type in the following where XX is either 32 for 32-bit Windows platforms or 64 for 64-bit Windows platforms:
GVCSetupXX.exe /q
• T – Specify a temporary working folder in which to place any temporary files generated during the installation process. The T option must be followed by a colon (:) and the full path to the folder that you want to use. For example, type in the following:
GVCSetupXX.exe /t:C:\TemporaryFiles
• C – Place all files extracted (MSI Installer file) from the install package into the folder specified in the T option. The C option is only valid when used together with the T option. For example, type one of the following:
GVCSetupXX.exe /c /t:C:\TemporaryFiles GVCSetupXX.exe /T:C:\TemporaryFiles /c
Launching the Global VPN Client
To launch the Dell SonicWALL Global VPN Client, choose Start > Programs > Global VPN Client.
If you click X, press Alt+F4 or choose File > Close, the Global VPN Client window closes but your established VPN connections remain active. A message dialog box appears notifying you that the Global VPN Client program and any enabled connections will remain active after the window is closed. If you don’t want this notification message to display every time you close the Global VPN Client window, select Don’t show me this message again and then click OK.
You can open the Global VPN Client window by double-clicking the Global VPN Client icon in the system tray or right-clicking the icon, and selecting Open Global VPN Client.
Caution Exiting the Dell SonicWALL Global VPN Client from the system tray icon menu disables any active VPN connections.
Tip You can change the default launch setting for Dell SonicWALL Global VPN Client, see Specifying Global VPN Client Launch Options on page 17 for more information.
Tip You can create a shortcut to automatically launch the Global VPN Client window and make the VPN connection from the desktop, taskbar, or Start menu. See Creating a Connection Shortcut
on page 30 for more information.
Tip You can launch the Global VPN Client from the command line, See Appendix B - Running the Global VPN Client from the CLI on page 60 for more information.
Specifying Global VPN Client Launch Options
You can specify how the Dell SonicWALL Global VPN Client launches and what notification windows appear using the controls in the General tab of the Options dialog box. Choose View > Options to display the Options dialog box.
The General tab includes the following settings to control the launch of the Global VPN Client: • Start this program when I log in - Launches the Dell SonicWALL Global VPN Client when
you log into your computer.
• Warn me before enabling a connection that will block my Internet traffic. Activates a
Connection Warning message notifying you that the VPN connection will block local Internet and network traffic.
• Remember the last window state (closed or open) the next time the program is started - Allows the Global VPN Client to remember the last window state (open or closed) the next time the program is started. For example, a user can launch the Global VPN Client from the system tray without opening a window on the desktop.
• When closing the connections window - Specifies how the Global VPN Client behaves when the window is closed. The three options include:
– Minimize the window (restore it from the task bar) - Minimizes the window to taskbar and restores it from the taskbar.
– Hide the window (re-open it from the tray icon) - The default setting that hides the Global VPN Client window when you close it. You can open the Global VPN Client from the program icon in the system tray. Enabling this setting also displays the Show the notification when I hide the connections window checkbox.
– Show the notification when I hide the connections window -Checking this box activates the SonicWALL Global VPN Client Hide Notification window whenever you close the Global VPN Client window while the program is still running. The message tells you that the Global VPN Client program continues to run after you close (hide) the window.
Managing the Global VPN Client System Tray Icon
When you launch the Global VPN Client window, the program icon appears in the system tray on the taskbar.
This icon provides program and VPN connection status indicators as well as a menu for common Dell SonicWALL Global VPN Client commands. Right-clicking on the Global VPN Client icon in the system tray displays a menu of options for managing the program.
• Open Global VPN Client - Opens the program window.
• Enable - Displays a menu of VPN connections that can be enabled. • Disable - Displays a menu of VPN connections that can be disabled.
• Open Log Viewer - Opens the Log Viewer to view informational and error messages. See
Understanding the Global VPN Client Log on page 42 for more information on the Log Viewer.
• Open Certificate Manager - Opens the Certificate Manager. See Managing Certificates on page 41 for more information on the Certificate Manager.
• Exit - Exits the Global VPN Client window and disables any active VPN connections. Moving the mouse pointer over the Global VPN Client icon in the system tray displays the number of enabled VPN connections.
The Global VPN Client icon in the system tray also acts as a visual indicator of data passing between the Global VPN Client and the Dell SonicWALL gateway.
Adding VPN Connections
Adding a new VPN connection is easy because Dell SonicWALL’s Client Policy Provisioning automatically provides all the necessary configuration information to make a secure connection to the local or remote network. The burden of configuring the VPN connection parameters is removed from the Global VPN Client user. VPN connections can be created using three methods:
• Download the VPN policy from the Dell SonicWALL VPN Gateway to the Global VPN Client using the New Connection Wizard. This wizard walks you through the process of locating the source of your configuration information and automatically downloads the VPN configuration information over a secure IPsec VPN tunnel.
• Import a VPN policy file into the Dell SonicWALL Global VPN Client. The VPN policy is sent to you as a .rcf file, which you install using the Import Connection dialog box.
• Install the default.rcf file as part of the Global VPN Client software installation or add it after installing the Global VPN Client. If the Dell SonicWALL VPN Gateway administrator included the default.rcf file as part of the Global VPN Client software, one or more preconfigured VPN connections are automatically created when the program is installed.
Note Creating a default.rcf file and distributing it with the Global VPN Client software allows the Dell SonicWALL VPN Gateway administrator to streamline VPN client deployment and allow users to quickly establish VPN connections. If a default.rcf file is included with the downloaded Global VPN Client software, the VPN policy configured by the Dell SonicWALL VPN Gateway
administrator is used to automatically create a connection when the client software is installed. For more information on creating the default.rcf file, see Appendix A - Using the Default.rcf File for Global VPN Clients on page 52.
Note Your Dell SonicWALL appliance be configured with GroupVPN to facilitate the automatic provisioning of Global VPN Clients. For instructions on configuring your appliance with GroupVPN, see your SonicOS Administrator’s Guide.
Note For instructions on importing a certificate into the Global VPN Client, see Using Certificates on
page 40.
Understanding VPN Connections
The Global VPN Client allows multiple connections to be configured at the same time, whether they are provisioned from multiple gateways or imported from one or more files. Because connections may be provisioned from multiple gateways, each connection explicitly states allowed behavior in the presence of any connection policy conflicts. You may have VPN connections that don’t allow other VPN connections or Internet and network connections while the VPN policy is enabled.
The VPN connection policy includes all the parameters necessary to establish secure IPsec tunnels to the gateway. A connection policy includes Phase 1 and Phase 2 Security
Associations (SA) parameters, including: • Encryption and authentication proposals • Phase 1 identity payload type
• Phase 2 proxy IDs (traffic selectors) • Client Phase 1 credential
• Allowed behavior of connection in presence of other active connections • Client caching behavior
Creating a VPN Connection Using the New Connection Wizard
The following instructions explain how to use the New Connection Wizard to automatically download a VPN connection policy for the Global VPN Client from a local or remote Dell SonicWALL VPN gateway.
1. Choose Start > Programs > Global VPN Client. The first time you open the Dell SonicWALL Global VPN Client, the New Connection Wizard automatically launches.
2. If the New Connection Wizard does not display, click theNew Connection button to launch the New Connection Wizard.
4. In the next screen, type the IP address or FQDN of the gateway in the IP Address or Domain Name field. The information you type in the IP Address or Domain Name field appears in the Connection Name field. If you want a different name for your connection, type the new name for your VPN connection in the Connection Name field. Click Next.
5. In the Completing the New Connection Wizard page select any or none of the following options:
– Select Create a desktop shortcut for this connection if you want to create a shortcut icon on your desktop for this VPN connection.
– Select Enable this connection when the program is launched if you want to automatically establish this VPN connection when you launch the Dell SonicWALL Global VPN Client.
Importing a VPN Configuration File
A VPN connection can be created as a file and sent to you by the Dell SonicWALL VPN gateway administrator. This VPN configuration file has the filename extension .rcf. If you received a VPN connection file from your administrator, you can install it using the Import Connection dialog box.
The VPN policy file is in the XML format to provide more efficient encoding of policy information. Because the file can be encrypted, pre-shared keys can also be exported in the file. The encryption method is specified in the PKCS#5 Password-Based Cryptography Standard from RSA Laboratories and uses Triple-DES encryption and SHA-1 message digest algorithms.
Note If the .rcf file exported from the Dell SonicWALL appliance is encrypted, you must have the
password to import the configuration file into the Global VPN Client.
The following instructions explain how to add a VPN connection by importing a connection file provided by your gateway administrator.
1. Choose Start > Programs > Global VPN Client.
2. Select File > Import. The Import Connection dialog box is displayed.
3. Type the file path for the configuration file in the Specify the name of the configuration file to import field or click the browse ... button to locate the file.
4. If the file is encrypted, enter the password in the If the file is encrypted, specify the password field.
5. Click OK.
Configuring a Dial-Up VPN Connection
You can use a dial-up Internet connection to establish your VPN connection. You can configure the VPN connection to use a Microsoft Dial-Up Networking phone book entry or a third-party dial-up application. You can also use a dial-up connection as an automatic backup for your VPN connection in the event your broadband Internet connection is disabled.
Note Make sure you create your dial-up connection profile using Microsoft Dial-up Networking or
your third-party dial-up application before configuring your dial-up VPN connection.
1. Create a VPN connection using the New Connection Wizard or use an existing VPN connection.
2. Right-click the VPN connection and select Properties from the menu. The Properties
dialog box is displayed. 3. Click the Peers tab.
4. Click Edit. The Peer Information dialog box is displayed.
5. Use the default Automatic option in the Interface Selection menu, if you want the Global VPN Client to automatically determine whether to use the LAN or Dial-Up interface based on availability. If the LAN interface is active, the Global VPN Client uses this interface first. If the LAN interface is not available, the Global VPN Client uses the dial-up connection. If you want this VPN connection to use a dial-up connection, select Dial-Up Only from the
Interface Selection menu.
6. Click Dial-Up Settings. The Dial-Up Settings dialog box is displayed.
7. If you are using Microsoft Dial-Up Networking, select Use Microsoft dial-up networking
8. Select Do not hang up the modem when disabling this connection, if you want to remain connected to the Internet after disabling the Global VPN Client connection. 9. If you are using a third-party dial-up application, select Use a third-party dial-up
application, and then enter the path for the program in the Application field or click browse ... to locate the program.
10. Click OK three times to return to the Global VPN Client window.
Using Global VPN Client from a Different Workstation
Using the Dell SonicWALL Global VPN Client to connect to a Microsoft Network has certain limitations. Typically, when a computer is attached to a Microsoft Network it has a persistent network connection to the domain controller that is used to verify the user credentials. When the user credentials have been verified by the domain controller, the computer then creates a locally cached profile that is used when the domain controller is not available. However, the Dell SonicWALL Global VPN Client provides an ad hoc secure network connection over the Internet back to the Microsoft Network containing the domain controller and thus is not a persistent connection. Since the remote computer cannot connect to the domain controller to verify the logon credentials until the connection is provided by the Dell SonicWALL Global VPN Client, the logon fails unless a locally cached profile is available.
The following steps illustrate the classic problem:
1. A Global VPN Client session must be established to communicate remotely with a Microsoft domain controller.
2. Global VPN Client can only be launched after you have logged on to the workstation. Because there is no way for the Global VPN Client to connect before you log on, you cannot use it for domain logon when initially logging on.
3. If you have logged on to the workstation before, there will be a locally cached profile that is used to log on.
a. You can then start the Global VPN Client, and a connection to the domain is established.
b. After connecting to the domain, you can run logon scripts, change password, access domain resources, etc.
c. When you log off, the Global VPN Client terminates, preventing domain communications.
4. If you have never logged on to the workstation before, there will not be a locally cached profile, so logon will not be possible.
Because logging off (step 3c) terminates the Dell SonicWALL Global VPN Client, it has historically precluded a different user from logging on and creating a new locally cached profile. This has the undesirable effect that only a user with a pre-existing (locally cached) profile can log on over the Global VPN Client.
The standard workaround for this is to first connect locally to the domain controller and logon with each account expected to use the Dell SonicWALL Global VPN Client. This creates a locally cached profile for each account and enables client logon without connection to the Domain Controller.
The unfortunate result of this workaround is that a user without a cached profile on the computer cannot logon without a sojourn to the network containing the domain controller. This can be extremely cumbersome in certain situations such as being located at the Dumont d' Urville research station and trying to get back to your main office in Svalbard.
Workaround – Forced Creation of a New Locally Cached Profile
The workaround is to create an induced local profile, and then log on to the Microsoft domain using the Dell SonicWALL Global VPN Client. To do this, perform the following steps:
1. Log on to the workstation with any locally cached profile (e.g. mydomain\user1, or a local machine account). The locally cached profiles are usually stored in the C:\Documents and Settings directory. You should see a folder called user1 in this path containing user1’s profile.
2. Launch the Dell SonicWALL Global VPN Client.
3. After the Dell SonicWALL Global VPN Client establishes a connection and the workstation can communicate with the domain controller, you can create another locally cached profile. You can use the runas command to create a locally cached profile for a new user (e.g. mydomain\user2) while using the Global VPN Client connection provided by user1. 4. From a command prompt, type: runas /user:mydomain\user2 explorer.exe (substitute
your actual domain for mydomain and actual username for user2). You can use notepad.exe instead of explorer.exe if you prefer.
5. At the prompt, enter the domain password for user2.
6. It will take anywhere from a few seconds to a few minutes to create the local profile for user2, and to launch the explorer.exe program. You may quit the explorer.exe program after it launches.
7. The C:\Documents and Settings directory should now contain a folder for user2.
8. Close the Global VPN Client, and log off as user1 from the workstation. You will see the familiar Log On to Windows dialog box.
9. Log onto the workstation as user2 using the newly created locally cached profile. 10. Launch the Dell SonicWALL Global VPN Client. The user2 profile will now provide the
credentials for all domain access (including running logon scripts).
11. You can repeat this procedure as many times as necessary to create additional profiles. 12. It is also possible to change an expired user password with this procedure if you have
another account available to make the Global VPN Client connection back to the domain controller. A simple way to change passwords is from the Windows Security dialog box, accessed by pressing Ctrl+Alt+Delete. In the dialog box, click Change Password…. This brings up the Change Password dialog box, from which you can change the expired password.
Making VPN Connections
Making a VPN connection from the Global VPN Client is easy because the configuration information is managed by the Dell SonicWALL VPN gateway. The SonicOS (VPN gateway) administrator sets the parameters for what is allowed and not allowed with the VPN connection. For example, for security reasons, the administrator may not allow multiple VPN connections or the ability to access the Internet or local network while the VPN connection is enabled. The Global VPN Client supports two IPsec authentication modes:
• IKE using Preshared Secret • IKE using 3rd Party Certificates.
Preshared Secret is the most common form of the IPsec authentication modes. If your VPN connection policy uses 3rd party certificates, you use the Certificate Manager to configure the Global VPN Client to use digital certificates.
A Pre-Shared Key (also called a Shared Secret) is a predefined password that the two endpoints of a VPN tunnel use to set up an IKE (Internet Key Exchange) Security Association. This field can be any combination of alphanumeric characters with a minimum length of 4 characters and a maximum of 128 characters. Your Pre-Shared Key is typically configured as part of your Global VPN Client provisioning. If it is not, you are prompted to enter it before you log on to the remote network.
Accessing Redundant VPN Gateways
The Global VPN Client supports redundant VPN gateways by manually adding the peer in the
Peers page of the VPN connection Properties window. The Global VPN Client adds automatic support for redundant VPN gateways if the IPsec gateway’s domain name resolves to multiple IP addresses. For example, if gateway.yourcompany.com resolves to 67.115.118.7,
67.115.118.8 and 67.115.118.9, the Global VPN Client cycles through these resolved IP addresses until it finds a gateway that responds, allowing multiple IP addresses to be used as failover gateways. If all the resolved IP addresses fail to respond, Global VPN Client switches to the next peer, if another peer is specified in the Peers page of the VPN connection
Properties dialog box. See Peers on page 35 for more information.
Note When configuring redundant VPN gateways, the Group VPN policy attributes (such as
pre-shared keys and the attributes on the Peer Information window) must be the same for every gateway if the gateway’s FQDN resolves to multiple IP addresses. However, if you set up multiple peers on the Peers page, then each peer gateway can have its own settings.
Enabling a VPN Connection
Enabling a VPN connection with the Dell SonicWALL Global VPN Client is a transparent two phase process. Phase 1 enables the connection, which completes the ISAKMP (Internet Security Association and Key Management Protocol) negotiation. Phase 2 is IKE (Internet Key Exchange) negotiation, which establishes the VPN tunnel for sending and receiving data. When you enable a VPN connection, the following information is displayed in the Status column of the Global VPN Client window:
1. Disabled changes to Connecting.
2. Connecting changes to Authenticating when the Enter Username/Password dialog box is displayed.
3. Authenticating changes to Connecting when the user enters the username and password.
4. Connecting changes to Provisioning.
5. Provisioning changes to Connected once the VPN connection is fully established. A green checkmark is displayed on the VPN connection icon.
Once the VPN connection is established, a pop-up notification is displayed from the Global VPN Client system tray icon. It displays the Connection Name, Connected to IP address and the
Virtual IP Address.
If an error occurs during the VPN connection, Error appears in the Status column and an error mark (a red X)appears on the VPN connection icon. A VPN connection that does not
successfully complete all phase 2 connections displays a yellow warning symbol on the connection icon.
Note If the Global VPN Client does not establish the VPN connection, you can use the Log Viewer
to view the error messages to troubleshoot the problem. See Understanding the Global VPN Client Log on page 42 for more information.
To establish a VPN connection using the Global VPN Client, follow these instructions. 1. Enable a VPN connection using one of the following methods:
• If you selected Enable this connection when the program is launched in the New Connection Wizard, the VPN connection is automatically established when you launch the Dell SonicWALL Global VPN Client.
• If your VPN connection is not automatically established when you launch the Global VPN Client, choose one of the following methods to enable a VPN connection:
– Double-click the VPN connection.
– Right-click the VPN connection icon and select Enable from the menu. – Select the VPN connection and press Ctrl+B.
– Select the VPN connection, and click the Enable button on the toolbar – Select the VPN connection, and then choose File > Enable.
• If the Global VPN Client icon is displayed in the system tray, right-click the icon and then select Enable > connection name. The Global VPN Client enables the VPN connection without opening the Global VPN Client window.
2. Depending on how the VPN connection is configured, the Cannot Enable Connection,
Enter Pre-Shared Secret, Enter Username and Password, and Connection Warning
dialog boxes may be displayed, which are explained in the following sections.
Establishing Multiple Connections
You can have more than one connection enabled at a time but it depends on the connection parameters established at the VPN gateway. If you attempt to enable a subsequent VPN connection with a currently enabled VPN connection policy that does not allow multiple VPN connections, the Cannot Enable Connection message appears informing you the VPN
connection cannot be made because the currently active VPN policy does not allow multiple active VPN connections. The currently enabled VPN connection must be disabled before enabling the new VPN connection.
Entering a Pre-Shared Key
Depending on the attributes for the VPN connection, if no default Pre-Shared Key is used, you must have a Pre-Shared Key provided by the gateway administrator in order to make your VPN connection. If the default Pre-Shared Key is not included as part of the connection policy download or file, the Enter Pre-Shared Key dialog box appears to prompt you for the Pre-Shared key before establishing the VPN connection.
1. Type your Pre-Shared Key in the Pre-shared Key field. The Pre-Shared Key is masked for security purposes.
2. If you want to make sure you are entering the correct Pre-Shared Key, select Don’t hide the pre-shared key. The Pre-Shared Key you enter appears unmasked in the Pre-shared Key field.
Selecting a Certificate
If the Dell SonicWALL VPN Gateway requires a Digital Certificate to establish your identity for the VPN connection, the Select Certificate dialog box appears. This dialog box lists all the available certificates installed on your Global VPN Client. Select the certificate from the menu, then click OK. If you have a certificate that has not been imported into the Global VPN Client using Certificate Manager, click Import Certificate.
Note See Managing Certificates on page 41 for more information on using the Certificate Manager.
Username and Password Authentication
The VPN gateway typically specifies the use of XAUTH for determining GroupVPN policy membership by requiring a username and password either for authentication against the gateway’s internal user database or via an external RADIUS service.
If the Dell SonicWALL VPN gateway is provisioned to prompt you for the username and password to enter the remote network, the Enter Username and Password dialog box appears. Type your username and password. If permitted by the gateway, select Remember Username and Password to cache your username and password to automatically log in for future VPN connections. Click OK to continue with establishing your VPN connection.
Creating a Connection Shortcut
To streamline enabling a VPN connection, you can place a VPN connection on the desktop, taskbar, or Start menu. You can also place the connection at any other location on your system. To create a shortcut:
1. Select the VPN connection for which to create a shortcut in the Global VPN Client window. 2. Choose File > Create Shortcut and select the shortcut option you want. You can select
from On the Desktop, On the Task Bar, In the Start Menu, or Select a Location. You can also right-click the VPN connection and then choose Create Shortcut > shortcut option.
Tip You can create a Desktop shortcut for the Dell SonicWALL Global VPN Client program for easy
access to all your connections.
Connection Warning
If the VPN connection policy allows only traffic to the gateway, the Connection Warning
message appears, warning you that only network traffic destined for the remote network at the other end of the VPN tunnel is allowed. Any network traffic destined for local network interfaces and the Internet is blocked.
You can disable the Connection Warning message from displaying every time you enable the VPN connection by checking If yes, don’t show this dialog box again. Click Yes to continue with establishing your VPN connection.
Managing Current VPN Connections
The Dell SonicWALL Global VPN Client allows you to check the status of current VPN connections or to disable a current VPN connection.
Checking the Status of a VPN Connection
The Dell SonicWALL Global VPN Client includes a variety of indicators to determine the status of your VPN connections. The main Global VPN Client window lists your VPN connections and their respective status: Disabled, Enabled, Connected, or Error.
• A VPN policy that doesn’t successfully complete all phase 2 connections displays a yellow warning on the policy icon.
• A VPN policy that cannot be successfully connected displays an error mark (red X) on the policy icon.
• The Global VPN Client icon in the system tray displays a visual indicator of data passing between the Global VPN Client and the gateway.
• The Status page in the Properties dialog box displays more detailed information about the status of an active VPN connection. To display the Status tab for any VPN connection, use one of the following methods:
– Double-click the active VPN connection. – Select the VPN connection, then press Ctrl+T.
– Select the VPN connection, then click the Status button on the toolbar.
– Right-click the VPN connection in the Global VPN Client window and select Status.
Tip For more information on the Status page, see Status on page 38.
Disabling a VPN Connection
Disabling a VPN connection terminates the VPN tunnel. You can disable a VPN connection using any of the following methods:
• Right-click the Global VPN Client icon on the system tray, and choose
Disable > connection.
• Select the connection, then press Ctrl+B.
• Select the connection, and click the Disable button on the toolbar in the Global VPN Client window.
Managing VPN Connection Properties
The Connection Properties dialog box includes the controls for configuring a specific VPN connection profile. To open the Connection Properties dialog box, choose one of the following methods:
• Select the connection and choose File > Properties. • Right click the connection and select Properties.
• Select the connection and click the Properties button on the Global VPN Client window toolbar.
The Connection Properties dialog box includes the General, User Authentication, Peers
and Status tabs.
General
The General tab in the Connection Properties dialog box includes the following settings:
• Name - Displays the name of your VPN connection.
• Description - Displays a pop-up text about the connection. The text appears when your mouse pointer moves over the VPN connection.
• Peer Defined Network Settings - Defines the status of Tunnel All support. These settings are controlled at the Dell SonicWALL VPN gateway.
– Other traffic allowed - If enabled, your computer can access the local network or Internet connection while the VPN connection is active.
– Default traffic tunneled to peer - If activated, all network traffic not routed to the Dell SonicWALL VPN gateway is blocked. When you enable the VPN connection with this feature active, the Connection Warning message appears.
– Use virtual IP address - Allows the VPN Client to get its IP address via DHCP through the VPN tunnel from the gateway.
• Enable this connection when the program is launched - Establishes the VPN connection as the default VPN connection when you launch the Dell SonicWALL Global VPN Client.
• Immediately establish security when connection is enabled - Negotiates the first phase of IKE as soon as the connection is enabled instead of waiting for network traffic
transmission to begin. This setting is enabled by default.
• Automatically reconnect when an error occurs - With this feature enabled, if the Global VPN Client encounters a problem connecting to the peer, it keeps retrying to make the connection. This feature allows a Global VPN Client to make a connection to a VPN connection that is temporarily disabled, without manual intervention. If the connection error is due to an incorrect configuration, such as the DNS or IP address of the peer gateway, then the connection must be manually corrected. Check the Log Viewer to determine the problem and then edit the connection. This option is enabled by default. If an error occurs with this option disabled during an attempted connection, the Global VPN Client logs the error, displays an error message dialog box, and stops the connection attempt.
• Automatically reconnect when waking from sleep or hibernation - Automatically re-enables the VPN connection after the computer wakes from a sleep or hibernation state. This setting is disabled by default.
• Execute logon scriptwhen connected - After logging into the Dell SonicWALL VPN Gateway and establishing a secure tunnel, performs any action configured in the logon script.
• Run the following command when connection is established - Allows a program to be automatically executed, with optional arguments, when successful VPN connections are established.
User Authentication
The User Authentication page allows you to specify a username and password when user authentication is required by the gateway. If the Dell SonicWALL VPN gateway does not support the saving (caching) of a username and password, the settings in this page are not active and the message The peer does not allow saving of username and password
appears at the bottom of the page.
• Remember my username and password - Enables the saving of your username and password for connecting to the Dell SonicWALL VPN gateway.
• Username - Enter the username provided by your gateway administrator. • Password - Enter the password provided by your gateway administrator.
Peers
The Peers page allows you to specify an ordered list of VPN gateway peers that this connection can use (multiple entries allow a VPN connection to be established through multiple VPN gateways). An attempt is made to establish a VPN connection to the given VPN gateway peers in the order they appear in the list.
• To add a peer, click Add. In the Peer Information dialog box, enter the IP address or DNS Name in the IP Address or DNS Name box, then click OK.
• To edit a peer entry, select the peer name and click Edit. In the Peer Information dialog box, make your changes, then click OK.
• To change the order of the peer list, select a peer name and then click Move Up or Move Down.
Peer Information Dialog Box
The Peer Information dialog box allows you to add or edit peer information.
• IP Address or DNS Name - Specifies the peer VPN gateway IP address or DNS name. • Use the default gateway as the peer IP address - Specifies the default gateway as the
peer IP address. The Global VPN Client gets the default gateway from the routing table. • Response Timeout - Specifies the maximum amount of time to wait for a response to a
sent packet. After this time expires, the sent packet will be considered to be lost and the packet will be retransmitted. The valid range is 1-10 seconds.
• Maximum Attempts - Specifies the maximum number of times the same packet will be sent before determining that the peer is not responding. The valid range is 1-10 attempts.
• Dead Peer Detection - Three settings are available:
– Automatic - This is traffic based DPD. If Global VPN Client does not receive response data (one way traffic), then Global VPN Client exchanges heartbeat packets to detect if the peer gateway is alive. If there is no heartbeat packet response for the configured number of failed checks in DPD Settings, then Global VPN Client will try to re-initiate IKE negotiations. This setting is enabled by default.
– Forced On - Performs DPD periodically. The Global VPN Client exchanges heartbeat packets to detect if the peer gateway is alive. If there is no heartbeat packet response for the configured number of failed checks in DPD Settings, then Global VPN Client will try to re-initiate IKE negotiations.
– Disabled - DPD is disabled. No heartbeat packets are exchanged. This will prevent Global VPN Client from detecting when the gateway is unavailable.
• DPD Settings - Displays the Dead Peer Detection Settings dialog box.
– Check for dead peer every - choose from 3, 5, 10, 15, 20, 25, or 30 seconds. – Assume peer is dead after - choose from 3, 4, or 5 Failed Checks.
• NAT Traversal - Choose one of the following three menu options:
– Automatic - Automatically determines whether or not to use UDP encapsulation of IPsec packets between the peers.
– Forced On - Forces the use of UDP encapsulation of IPsec packets even when there is no NAPT/NAT device in between the peers.
– Disabled - Disables use of UDP encapsulation of IPsec packets between the peers. • Interface Selection - Defines the interface used by this VPN connection.
– Automatic - Automatically determines the availability of each interface beginning with the LAN interface. If the LAN interface is not available, the Global VPN Client uses the Dial-Up interface.
– LAN Only - Defaults to the LAN interface only. – Dial-Up Only - Defaults to the Dial-Up interface only.
• LAN Settings - Displays the LAN Settings dialog box for specifying the setting used when this connection is enabled over the LAN. Type the IP address in the Next Hop IP Address
fieldto specify the next hop IP address of a different route than the default route. Leaving the setting as zeros instructs the Global VPN Client to use the default route.
• Dial-Up Settings - Displays the Dial-Up Settings dialog box, which allows you to select the dial-up profile to use making a dial-up VPN connection.
– Use Microsoft dial-up networking - Uses the Microsoft dial-up networking profile you specify for making the VPN connection. Select the Dial-up networking profile from the
Phonebook Entry list. Select the Do not hang up the modem when disabling this connection to keep the dial-up network connection active after disabling the VPN connection.
– Use a third-party dial-up application - Select this option to use a third party dial-up program. Type the path in the Application field or use the browse ... button to locate the program.
Status
The Status page shows the current status of the connection.
• Connection
– Status - Indicates whether VPN connection is enabled or disabled. – Peer IP Address - Displays the IP address of the VPN connection peer. – Duration - Displays connection time.
– Details - Displays the Connection Status Details dialog box, which specifies the negotiated phase 1 and phase 2 parameters as well as the status of all individual phase 2 SAs.
• Activity
– Packets - Displays number of packets sent and received through the VPN tunnel. – Bytes - Displays number of bytes sent and received through the VPN tunnel. – Reset - Resets the Packets and Bytes values to zero, from which these counts
immediately resume. • Virtual IP Configuration
– IP Address - The IP address assigned via DHCP through the VPN tunnel from the VPN gateway.
– Subnet Mask - The subnet mask for the virtual IP address. – Renew - Renews the DHCP lease.
Managing VPN Connections
The Dell SonicWALL Global VPN Client supports as many VPN connections as you need. To help you manage these connections, the Global VPN Client provides the connection
management tools described in this section.
Arranging Connections
Over time, as the number of VPN connections can increase in the Global VPN Client window, you may want to arrange them for quicker access. You can arrange your VPN connections in the Global VPN Client window by choosing View > Sort by. You can arrange VPN connection profiles by:
• Name - Sorts the connections by connection name. • Peer - Sorts the connections by peer name.
• Status - Sorts the connections by connection status.
• Ascending - Sorts the connections in ascending order, such as A-Z, if enabled, and in descending order, such as Z-A, if disabled. The default sorting is by Name in Ascending
order.
Renaming a Connection
To rename a connection, select the connection and choose File > Rename, then type in the new name. You can also right-click the connection and choose Rename from the menu.
Deleting a Connection
To delete a connection, select the connection and then press the Delete key or choose File > Delete. You can also right-click the connection name and choose Delete. You cannot delete an active VPN connection. Disable the VPN connection first, then delete it.
Selecting All Connections
Choosing View > Select All or pressing Ctrl+A selects all the connections in the Global VPN Client window.
Using Certificates
If digital certificates are required as part of your VPN connection policy, your gateway
administrator must provide you with the required information to import the certificate. You then need to import the certificate in the Global VPN Client using the Certificate Manager.
Caution If digital certificates are required as part of your VPN connection policy, your VPN gateway
Managing Certificates
The Certificate Manager allows you to manage digital certificates used by the Dell SonicWALL Global VPN Client for VPN connections. If your VPN gateway uses digital certificates, you must import the CA and Local Certificates into the Certificate Manager.
To open the Certificate Manager, click the View menu and select Certificates in the Global VPN Client window.
In the Select Certificate Group drop-down list, you can select User, CA, or Trusted Root CA
to display the list of each type of certificate currently available for your VPN policies. User Certificates are the local digital certificates used to establish the VPN Security Association. CA Certificates are the digital certificates used to validate the user certificates. A Trusted Root CA certificate is used to validate the CA Certificates.
Select the certificate in the list and then:
• Click the Import button in the Certificate Manager window to display the Import Certificate window to import a certificate file.
• Click the Remove button to delete the selected certificate. • Click the Details button to view the selected certificate details.
Tip For more information on using certificates for your VPN on the Dell SonicWALL appliance, see
Troubleshooting the Global VPN Client
The Dell SonicWALL Global VPN Client provides tools for troubleshooting your VPN
connections. This section explains using Log Viewer, generating a Help Report, accessing Dell SonicWALL’s Support site, using the Dell SonicWALL Global VPN Client help system, and uninstalling the Global VPN Client.
Understanding the Global VPN Client Log
The Global VPN ClientLog window displays messages about Global VPN Client activities. To open the Log Viewer window, click the Log Viewer button on the Global VPN Client window toolbar, or choose View > Log Viewer, or press Ctrl+L.
Type - The icon indicating the type of message (Information, Warning, or Error). The icons for the three types are:
– Information - A blue ‘i’ in a bubble
– Warning - An exclamation point in a yellow triangle – Error - A white ‘X’ in a red circle
Time - Date and time the message was generated.
Peer - The IP address or FQDN of the peer.
Message - Text of the message describing the event.
Click the Save button to save the current log to a .txt file. When you save the current log to a file, the Global VPN Client automatically adds a Help Report containing useful information regarding the condition of the Dell SonicWALL Global VPN Client as well as the system it’s running on for troubleshooting. The Help Report information is inserted at the beginning of the log file. See Generating a Help Report on page 45 for more information.
Tip See Appendix C - Log Viewer Messages on page 61 for a complete listing of Log Viewer
messages.
The Log Viewer provides the following features to help you manage log messages:
• To save a current log to a .txt file, click the Save button on the toolbar, press Ctrl+S, or choose File > Save. When you save a Log Viewer file, the Global VPN Client automatically adds a report containing useful information regarding the condition of the Dell SonicWALL Global VPN Client as well as the system it is running on.
• To select all messages, press Ctrl+A or choose Edit > Select All.
• To copy log contents for pasting into another application, select the messages you want to copy, then press Ctrl+C or choose Edit > Copy.
• To display less detailed information in the log viewer, click the Filter Messages button on the toolbar or choose View > Filter Messages.
• To search the log messages for a character string, click the Find button on the toolbar or choose Edit > Find and enter the string in the Find dialog box. In the dialog box, you can select Match Whole Word Only, Match Case, and Up or Down for the search direction. Click the Find Next button to search. Once a string is entered in the Find dialog box, you can click the X to close the dialog box, then use the Find Next and Find Previous buttons in the toolbar.
• To clear current log information, click the Clear button on the toolbar, press Crtl+X, or choose Edit > Clear.
• To hide or show the toolbar in the Log Viewer window, choose View > Toolbar to toggle the toolbar on or off.
• To hide or show the status bar in the Log Viewer window, choose View > Status Bar to toggle the status bar on or off.