Copyright
Copyright
© 2009 BBS Technologies
ALL RIGHTS RESERVED. No part of this work covered by the copyright herein may be reproduced, transmitted, stored, or used in any form or by any means graphic, electronic, or mechanical, including but not limited to photocopying, recording, scanning, digitizing, taping, Web distribution, information networks, or information storage and retrieval systems except as permitted under Section 107 or 108 of the 1976 United States Copyright Act without the prior written permission of the publisher.
For permission to use material from the text please contact Idera at [email protected].
About the Author
About the Author
Dr. Tobias Weltner is one of the most visible PowerShell MVPs in Europe. He has
published more than 80 books on Windows and Scripting Techniques with Microsoft
Press and other publishers, is a regular speaker at conferences and road shows and
does high level PowerShell and Scripting trainings for companies throughout
Europe. He created the powershell.com website and community in an effort to help
people adopt and use PowerShell more efficiently. As software architect, he created
a number of award-winning scripting tools such as SystemScripter (VBScript), the
original PowerShell IDE and PowerShell Plus, a comprehensive integrated
Acknowledgments
Acknowledgments
First and foremost, I’d like to thank my family who is always a source of inspiration
and encouragement. A special thanks to Idera, Rick Pleczko, David Fargo, Richard
Giles, Conley Smith and David Twamley for helping to bring this book to the English
speaking world. It has been a pleasure working with you all. You are all great
friends and partners. For Aleksandar Nikolic, our technical editor and very good
friend, I thank you very much for all your hard work. You not only edited the book,
but many times your insight and attention to detail improved the overall value as
well. Finally, I'd like to thank my dog and close companion Cofi for his loyal faith
and for pulling me away from work from time to time to enjoy life.
Sincerely,
Dr. Tobias Weltner
Mastering PowerShell
Mastering PowerShell
Chapters
1. The PowerShell Console 11. Finding and Avoiding Errors
2. Interactive PowerShell 12. Command Discovery and Scriptblocks
3. Variables 13. Text and Regular Expressions
4. Arrays and Hashtables 14. XML
5. The PowerShell Pipeline 15. The File System
6. Using Objects 16. The Registry
7. Conditions 17. Processes, Services, Event Logs
8. Loops 18. Windows Management Instrumentation
9. Functions 19. User Management
10. Scripts 20. Your Own Cmdlets and Extensions
Extras
Copyright Notice About the Author
Acknowledgments About Idera's PowerShell Plus
CHAPTER 1.
The PowerShell Console
The PowerShell Console
Welcome to PowerShell! This chapter will introduce you to the PowerShell console and show you how to configure it, including font colors and sizes, editing and display options.
Topics Covered:
• Starting PowerShell
• Figure 1.1: How to always open PowerShell with administrator rights • First Steps with the Console
• Figure 1.2: First commands in the PowerShell console • Incomplete and Multi-line Entries
• Important Keyboard Shortcuts • Deleting Incorrect Entries • Overtype Mode
• Command History: Reusing Entered Commands • Automatically Completing Input
• Scrolling Console Contents • Selecting and Inserting Text • QuickEdit Mode
• Figure 1.3: Marking and copying text areas in QuickEdit mode • Standard Mode
• Customizing the Console
• Opening Console Properties
• Figure 1.4: Opening console properties • Defining Options
• Figure 1.5: Defining the QuickEdit and Insert modes • Specifying Fonts and Font Sizes
• Figure 1.6: Specifying new fonts and font sizes • Setting Window and Buffer Size
• Figure 1.7: Specifying the size of the window buffer • Selecting Colors
• Figure 1.8: Select better colors for your console • Directly Assigning Modifications in PowerShell • Saving Changes
• Piping and Routing
• Piping: Outputting Information Page by Page • Redirecting: Storing Information in Files • Summary
Starting PowerShell
After you installed PowerShell, you'll find the PowerShell icon on the Start Menu in the program folder Windows PowerShell. Open this program folder and click on Windows PowerShell and the PowerShell console comes up. By the way, if you aren't able to find the program folder, PowerShell is probably not installed on your computer. It is an optional download from Microsoft for Windows XP, Server 2003, and Windows Vista.
You can also start PowerShell directly. Just press (Windows)+(R) to open the Run window and then enter powershell (Enter). If you use PowerShell often, you should open the program folder for
Windows PowerShell and right-click on Windows PowerShell. That will give you several options:
• Add to the start menu: On the context menu, click on Pin to Start Menu so that PowerShell
will be displayed directly on your start menu from now on and you won't need to open its program folder first.
• Quick Launch toolbar: Click Add to Quick Launch toolbar if you use Windows Vista and
would like to see PowerShell right on the Quick Launch toolbar inside your taskbar. Windows XP lacks this command so XP users will have to add PowerShell to the Quick Launch toolbar manually.
• Keyboard shortcuts: Administrators particularly prefer using a keyboard instead of a
mouse. If you select Properties on the context menu, you can specify a key combination in the hot-key field. Just click on this field and press the key combination intended to start PowerShell, such as (Alt)+(P). In the properties window, you also have the option of setting the default window size to start PowerShell in a normal, minimized, or maximized window.
• Autostart: If you use PowerShell daily, it makes sense to Autostart the application. Then, it
will automatically launch the PowerShell window when Windows starts up so all you have to do to bring it up is to click on its window button on the taskbar. If you want to set up a PowerShell autostart, open the Windows PowerShell 1.0 program folder and right-click on
Windows PowerShell on the All Programs menu of your start menu. On the context menu, select Copy. Next, open Startup folder, right-click on a blank area, and select paste on the context menu. This will place a PowerShell shortcut in the folder. All you have to do now is click on the shortcut with the right button of your mouse and choose Properties. Specify the window size as Minimized.
Here is a special note for Vista users: The default settings of Windows Vista start all programs without administrator privileges. This applies to the PowerShell console as well. So, even if you have administrator privileges, you will initially have no access to your administrator rights when using the PowerShell console. That's a new security feature that does make sense. You'd be surprised to see how many routine tasks can be performed without these powerful (and potentially dangerous) rights.
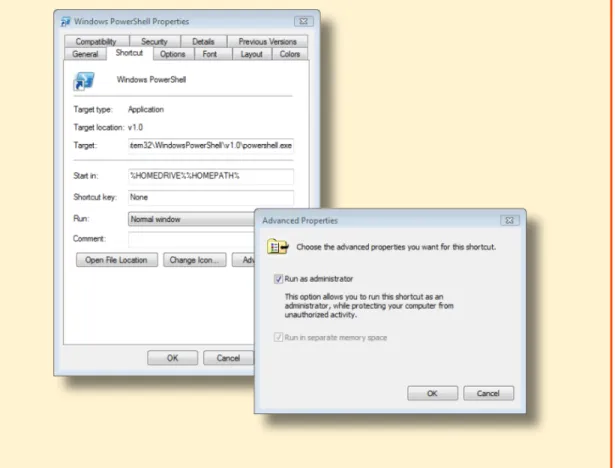
If you need more privileges because commands aren't working right or your system complains about lacking administrator rights, then request your full administrator privileges. To do so, right-click on the PowerShell entry on your start menu and select Run As Administrator on the context menu. The
If you'd like to always launch PowerShell with full administrator privileges, click on the shortcut on the start menu with the right button of your mouse and choose Properties. Then click below right on Advanced and activate the option Run As Administrator.
Figure 1.1: How to always open PowerShell with administrator rights
(Run without administrative privileges whenever possible)
First Steps with the Console
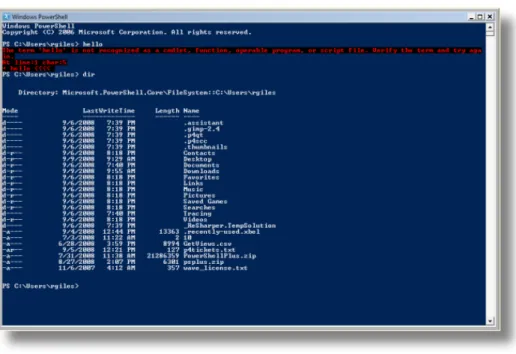
After PowerShell starts, its console window opens, and you see a blinking text prompt, asking for your input with no icons or menus. PowerShell is a command console and almost entirely operated via keyboard input. The prompt begins with "PS" and after it is the path name of the directory where you are located. Start by trying out a few commands. For example, type:
hello (Enter)
Figure 1.2: First commands in the PowerShell console
For example, if you'd like to see which files and folders are in your current directory, then type dir (Enter). You'll get a text listing of all the files in the directory. PowerShell's communication with you is always text-based. PowerShell can do much more than display simple directory lists. Just pick a different command as the next one provides a list of all running processes:
Get-Process(Enter)
PowerShell's advantage is its tremendous flexibility since it allows you to control and display nearly all the information and operations on your computer. The command cls deletes the contents of the console window and the exit command ends PowerShell.
Incomplete and Multi-line Entries
Whenever you enter something PowerShell cannot understand, you get a red error message,
explaining what went wrong. However, if you enter something that isn't wrong but incomplete (like a string with one missing closing quote), PowerShell gives you a chance to complete your input. You then see a double-prompt (">>"), and once you completed the line and pressed ENTER twice, PowerShell executes the command. You can also bail out at any time and cancel the current command or input by pressing: (Ctrl)+(C).
The "incomplete input" prompt will also appear when you enter an incomplete arithmetic problem like this one:
2 + (Enter)
>> 6 (Enter)
>> (Enter)
This feature enables you to make multi-line PowerShell entries:
"This is my little multiline entry.(Enter)
>> I'm now writing a text of several lines. (Enter)
>> And I'll keep on writing until it's no longer fun."(Enter)
>>(Enter)
This is my little multiline entry.
I'm now writing a text of several lines.
And I'll keep on writing until it's no longer fun.
The continuation prompt generally takes its cue from initial and terminal characters like open and closed brackets or quotation marks at both ends of a string. As long as the symmetry of these characters is incorrect, you'll continue to see the prompt. However, you can activate it even in other cases:
dir `(Enter)
>> -recurse(Enter)
>>(Enter)
So, if the last character of a line is what is called a "backtick" character, the line will be continued. You can retrieve that special character by pressing (`).
Important Keyboard Shortcuts
Shortcuts are important since almost everything in PowerShell is keyboard-based. For example, by pressing the keys (Arrow left) and (Arrow right), you can move the blinking cursor to the left or right. Use it to go back and correct a typo. If you want to move the cursor word by word, hold down
(Ctrl) while pressing the arrow keys. To place the cursor at the beginning of a line, hit (Home). Pressing (End) will send the cursor to the end of a line.
If you haven't entered anything, then the cursor won't move since it will only move within entered text. There's one exception: if you've already entered a line and pressed (Enter) to execute the line, you can make this line appear again character-by-character by pressing (Arrow right).
Deleting Incorrect Entries
If you've mistyped something, press (Backspace) to delete the character to the left of the blinking cursor. (Del) erases the character to the right of the cursor. And you can use (Esc) to delete your entire current line.
current position up to the end of the line. Both combinations are useful only after you've pressed
(Arrow left) to move the cursor to the middle of a line, specifically when text is both to the left and to the right of the cursor.
Overtype Mode
If you enter new characters and they overwrite existing characters, then you know you are in type-over mode. By pressing (Insert) you can switch between insert and type-over modes. The default input mode depends on the console settings you select. You'll learn more about console settings soon.
Command History: Reusing Entered Commands
For example, you don't have to re-type commands to edit them. Simply press (Arrow up) to re-display the command that you entered. Press (Arrow up) and (Arrow down) to scroll up and down your command history. Using (F5) and (F8) do the same as the up and down arrow keys.
This command history feature is extremely useful. Later, you'll learn how to configure the number of commands the console "remembers." The default setting is the last 50 commands. You can display all the commands in your history by pressing (F7) and then scrolling up and down the list to select commands using (Arrow up) and (Arrow down) and (Enter).
The numbers before the commands in the Command History list only denote the sequence number. You cannot enter a number to select the associated command. What you can do is move up and down the list by hitting the arrow keys.
Simply press (F9) to 'activate' the numbers so that you can select a
command by its number. This opens a menu that accepts the numbers and returns the desired command.
The keyboard sequence (Alt)+(F7) will clear the command history and start you off with a new list.
(F8) provides more functionality than (Arrow up) as it doesn't just show the last command you entered, but keeps a record of the characters you've already typed in. If, for example, you'd like to see all the commands you've entered that begin with "d", type:
d(F8)
Automatically Completing Input
An especially important key is (Tab). It will save you a great deal of typing (and typing errors). When you press this key, PowerShell will attempt to complete your input automatically. For example, type:
cd(Tab)
The command cd changes the directory in which you are currently working. Put at least one space behind the command and then press (Tab). PowerShell suggests a subdirectory. Press (Tab) again to see other suggestions. If (Tab) doesn't come up with any suggestions, then there probably aren't any subdirectories available.
This feature is called AutoComplete, which works in many places. For example, you just learned how to use the command Get-Process, which lists all running processes. If you want to know what other commands there are that begin with "Get-", then type:
Get-(Tab)
Just make sure that there's no space before the cursor when you press (Tab). Keep hitting (Tab) to see all the commands that begin with "Get-".
A more complete review of the AutoComplete feature is available in
Chapter 9.
AutoComplete works really well with long path names that require a lot of typing. For example:
c:\p(Tab)
Every time you press (Tab), PowerShell will prompt you with a new directory or a new file that begins with "c:\p." So, the more characters you type, the fewer options there will be. In practice, you should type in at least four or five characters to reduce the number of suggestions.
When the list of suggestions is long, it can take a second or two until PowerShell has compiled all the possible suggestions and displays the first one.
Wildcards are allowed in path names. For example, if you enter c:\ pr*e (Tab) in a typical Windows system, PowerShell will respond with "c:\Program Files".
Scrolling Console Contents
The visible part of your console depends on the size of your console window, which you can change with your mouse. Drag the window border while holding down your left mouse button until the window is the size you want. Note that the actual contents of the console, the "screen buffer," don't change. So, if the window is too small to show everything, you should use the scroll bars.
Selecting and Inserting Text
Use your mouse if you'd like to select text inside the PowerShell window and copy it onto the clipboard. Move the mouse pointer to the beginning of the selected text, hold down the left mouse button and drag it over the text area that you want to select.
QuickEdit Mode
QuickEdit is the default mode for selecting and copying text in PowerShell. Select the text using your mouse and PowerShell will highlight it. After you've selected the text, press (Enter) or right-click on the marked area. This will copy the selected text to the clipboard. which you can now paste into other applications. To unselect press (Esc).
You can also insert the text in your console at the blinking command line by right-clicking your mouse.
Standard Mode
If QuickEdit is turned off and you are in Standard mode, the simplest way to mark and copy text is to right-click in the console window. If QuickEdit is turned off, a context menu will open.
Select Mark to mark text and Paste if you want to insert the marked text (or other text contents that you've copied to the clipboard) in the console.
It's usually more practical to activate QuickEdit mode so that you won't have to use to the context menu.
Customizing the Console
You can customize a variety of settings in the console including edit mode, screen buffer size, font colors, font sizes etc.
Opening Console Properties
The basic settings of your PowerShell console are configured in a special Properties dialog box. Click on the PowerShell icon on the far left of the title bar of the console window to open it.
Figure 1.4: Opening console properties
That will open a context menu. You should select Properties and A dialog box will open.
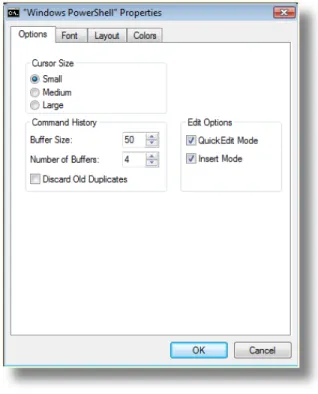
Defining Options
Under the heading Options are four panels of options:
Figure 1.5: Defining the QuickEdit and Insert modes
• Edit options: You should select the QuickEdit mode as well as the insert mode. We've
already discussed the advantages of the QuickEdit mode: it makes it much easier to select, copy, and insert text. The insert mode makes sure that new characters don't overwrite existing input so new characters will be added without erasing text you've already typed in when you're editing command lines.
• Cursor size: Here is where you specify the size of the blinking cursor.
• Display options: Determine whether the console should be displayed as a window or full
screen. The "window" option is best so that you can switch to other windows when you're working. The full screen display option is not available on all operating systems.
• Command history: Here you can choose how many command inputs the console
"remembers". This allows you to select a command from the list by pressing (Arrow up) or
(F7). The option Discard Old Duplicates ensures that the list doesn't have any duplicate entries. So, if you enter one command twice, it will appear only once in the history list.
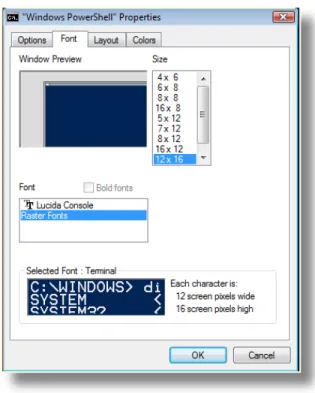
Specifying Fonts and Font Sizes
On the Font tab, you can choose both the font and the font size displayed in the console.
Figure 1.6: Specifying new fonts and font sizes
You should also try experimenting with TrueType fonts by using the "bold fonts" option. TrueType fonts are often more readable if they're displayed in bold.
Your choice of fonts may at first seem a bit limited. To get more font choices, you can add them to the console font list. The limited default font list is supposed to prevent you from choosing
unsuitable fonts for your console.
One reason for this is that the console always uses the same width for each character (fixed width fonts). This restricts the use of most Windows fonts because they're proportional typefaces: every character has its own width. For example, an "" is narrower than an "m". If you're sure that a certain font will work in the console, then here's how to add the font to the console font list.
Open your registry editor. In the key
HKEY_LOCAL_MACHINE\SOFTWARE\Microsoft\Windows NT\
CurrentVersion\Console\TrueTypeFont insert a new "string value" and give this entry the name "00" (numbers, not letters).
If there's already an entry that has this name, then call the new entry "000" or add as many zeroes as required to avoid conflicts with existing entries. You should then double-click your new entry to open it and enter the name of the font. The name must be exactly the same as the official font name, just the way it's stated under the key
The newly added font will now turn up in the console's option field. However, the new font will work only after you either log off at least once or restart your computer. If you fail to do so, the console will ignore your new font when you select it in the dialog box.
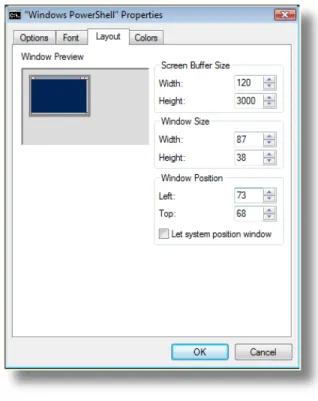
Setting Window and Buffer Size
On the Layout tab, you can specify how large the screen buffer should be, meaning how much information the console should "remember" and how far back you can scroll with the scroll bars.
You should select a width of at least 120 characters in the window buffer size area with the height should be at least 1,000 lines or larger. This gives you the opportunity to use the scroll bars to scroll the window contents back up so that you can look at all the results of your previous commands.
Figure 1.7: Specifying the size of the window buffer
You can also set the window size and position on this tab if you'd like your console to open at a certain size and screen position on your display. Choose the option Let system position window and Windows will automatically determine at what location the console window will open.
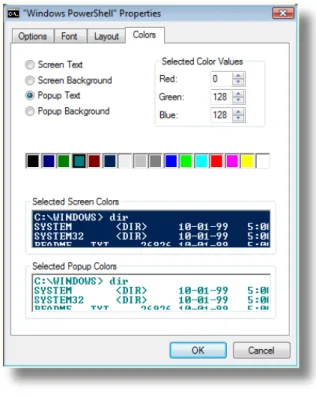
Selecting Colors
• Screen text: Console font
• Screen background: Console background color
• Popup text: Popup window font, such as command history's (F7) • Popup background: Popup window background color
You have a palette of 16 colors for these four areas. So, if you want to specify a new font color, you should first select the option Screen Text and click on one of the 16 colors. If you don't like any of the 16 colors, then you can mix your own special shade of color. Just click on a palette color and choose your desired color value at the upper right from the primary colors red, green, and blue.
Figure 1.8: Select better colors for your console
Directly Assigning Modifications in PowerShell
Some of the console configuration can also be done from within PowerShell code. You'll hear more about this later. To give you a quick impression, take a look at this:
$host.ui.rawui (Enter)
$host.ui.rawui.ForegroundColor = "Yellow" (Enter) $host.ui.rawui.WindowTitle = "My Console" (Enter)
Saving Changes
Once you've successfully specified all your settings in the dialog box, you can close the dialog box. If you're using Windows Vista, all changes will be saved immediately, and when you start PowerShell the next time, your new settings will already be in effect. You may need Admin rights to save settings if you launched PowerShell with a link in your start menu that applies for all users.
If you're using Windows XP, you'll see an additional window and a message asking you whether you want to save changes temporarily (Apply properties to current window only) or permanently (Modify shortcut that started this window).
Piping and Routing
You may want to view the information page by page or save it in a file since some commands output a lot of information.
Piping: Outputting Information Page by Page
The pipe command more outputs information screen page by screen page. You will need to press a button (like Space) to continue to the next page.
Piping uses the vertical bar (|). The results of the command to the left of the pipe symbol are then fed into the command on the right side of the pipe symbol. This kind of piping is also known in PowerShell as the "pipeline":
Get-Process | more (Enter)
You can press (Ctrl)+(C) to stop output. Piping also works with other commands, not just more. For example, if you'd like to get a sorted directory listing, pipe the result to Sort-Object and specify the columns you would like to sort:
dir | Sort-Object -property Length, Name (Enter)
You'll find more background information on piping as well as many useful examples in Chapter 5.
Redirecting: Storing Information in Files
If you'd like to redirect the result of a command to a file, you can use the redirection symbol ">":
Help > help.txt (Enter)
The information won't appear in the console but will instead be redirected to the specified file. You can then open the file.
help.txt (Enter)
The term "help.txt" is not recognized as a cmdlet, function, operable program, or script file. Verify the term and try again. At line:1 character:8
+ help.txt <<<<
If you only specify the file name, PowerShell will look for it in all folders listed in the PATH
environment variable. So to open a file, you will have to specify its absolute or relative path name. For example:
.\help.txt (Enter)
Or, to make it even simpler, you can use AutoComplete and hit (Tab) after the file name:
help.txt(Tab)
The file name will automatically be completed with the absolute path name, and then you can open it by pressing (Enter):
& "C:\Users\UserA\help.txt" (Enter)
You can also append data to an existing file. For example, if you'd like to supplement the help information in the file with help on native commands, you can attach this information to the existing file with the redirection symbol ">>":
Cmd /c help >> help.txt (Enter)
If you'd like to directly process the result of a command, you won't need traditional redirection at all because PowerShell can also store the result of any command to a variable:
$result = Ping 10.10.10.10
$result
Reply from 10.10.10.10: bytes=32 time<1ms TTL=128 Reply from 10.10.10.10: bytes=32 time<1ms TTL=128 Reply from 10.10.10.10: bytes=32 time<1ms TTL=128 Reply from 10.10.10.10: bytes=32 time<1ms TTL=128 Ping statistics for 10.10.10.10:
Packets: Sent = 4, Received = 4, Lost = 0 (0% loss), Approximate round trip times in milli-seconds:
Minimum = 0ms, Maximum = 0ms, Average = 0ms
Summary
PowerShell is an optional component for Windows XP and better. You will have to download and install PowerShell before using it. Beginning with Windows Server 2008, PowerShell is included with Windows by default. It still needs to be enabled in Windows software feature list. You will find PowerShell, like any other program, in the start menu below "All Programs." It is located in the program folder Windows PowerShell 1.0. The program file name is "powershell.exe."
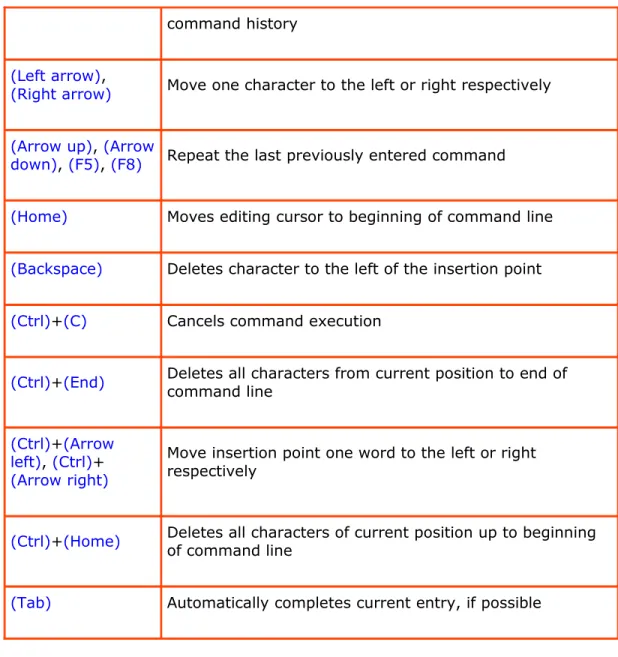
PowerShell is a basic console program that relies heavily on text input. There are plenty of special keys listed in Table 1.1.
Key Meaning
(Alt)+(F7) Deletes the current command history
(PgUp), (PgDn) Display the first (PgUp) or last (PgDn) command you used in current session
(Enter) Send the entered lines to PowerShell for execution
(End) Moves the editing cursor to the end of the command line
(Del) Deletes the character to the right of the insertion point
(Esc) Deletes current command line
(F2) Moves in current command line to the next character corresponding to specified character
(F4) Deletes all characters to the right of the insertion point up
to specified character
(F7) Displays last entered commands in a dialog box
(F8) Displays commands from command history beginning with the character that you already entered in the command line
command history
(Left arrow),
(Right arrow) Move one character to the left or right respectively
(Arrow up), (Arrow
down), (F5), (F8) Repeat the last previously entered command
(Home) Moves editing cursor to beginning of command line
(Backspace) Deletes character to the left of the insertion point
(Ctrl)+(C) Cancels command execution
(Ctrl)+(End) Deletes all characters from current position to end of command line
(Ctrl)+(Arrow left), (Ctrl)+
(Arrow right)
Move insertion point one word to the left or right respectively
(Ctrl)+(Home) Deletes all characters of current position up to beginning of command line
(Tab) Automatically completes current entry, if possible
Table 1.1: Important keys and their meaning in the PowerShell console
You will find that the keys (Arrow up), which repeats the last command, and (Tab), which completes the current entry, are particularly useful. By hitting (Enter), you complete an entry and send it to PowerShell. If PowerShell can't understand a command, an error message appears highlighted in red stating the possible reasons for the error. Two special commands are cls (deletes the contents of the console) and exit (ends PowerShell).
You can use your mouse to select information in the console and copy it to the Clipboard by pressing
(Enter) or by right-clicking when you have turned on the QuickEdit mode. With QuickEdit mode turned off, you will have to right-click inside the console and then select Mark in a context menu.
Along with the commands, a number of characters in the console have special meanings as you have already become acquainted with three of them:
• Piping: The vertical bar "|" symbol pipes the results of a command to the next. When you
pipe the results to the command more, the screen output will be paused once the screen is full, and continued when you press a key.
• Redirection: The symbol ">" redirects the results of a command to a file. You can then open
CHAPTER 2.
Interactive PowerShell
Interactive PowerShell
PowerShell has two faces: interactivity and script automation. In this chapter, you will first learn how to work with PowerShell interactively. Then, we will take a look at PowerShell scripts.
Topics Covered:
• PowerShell as a Calculator
• Calculating with Number Systems and Units • Table 2.1: Arithmetic operators
• Executing External Commands • Starting the "Old" Console
• Discovering Useful Console Commands • Figure 2.1: Run PowerShell as administrator • Security Restrictions at Program Start • Trustworthy Subdirectories
• Cmdlets: "Genuine" PowerShell Commands
• Table 2.2: The most important standard actions and their descriptions • Using Parameters
• Using Named Parameters • Switch Parameter
• Positional Parameters • Common Parameters
• Table 2.3: Common parameters in effect for (nearly) all cmdlets • Aliases: Giving Commands Other Names
• Resolving Aliases
• Creating Your Own Aliases
• Removing—or Permanently Retaining—an Alias
• Overwriting Alias Definitions and Deleting Them Manually • Functions: "Expanded" Aliases
• Calling Commands with Arguments • Creating Shortcut Commands • Invoking Files and Scripts
• Starting Scripts • Running Batch Files • Running VBScript Files • Running PowerShell Scripts • Summary
PowerShell as a Calculator
You can use the PowerShell console to execute arithmetic operations the same way you would with a calculator. Just enter a math expression and PowerShell will give you the result:
6
You can use all of the usual basic arithmetic operations. Even parentheses will work just the way they do when you use your pocket calculator:
(12+5) * 3 / 4.5 (Enter)
11.3333333333333
Parentheses play a special role in PowerShell as they always works from the inside out: the results inside the parentheses are
produced before evaluating the expressions outside of the parentheses, i.e. (2*2)*2 = 4*2. For example, operations performed within parentheses have priority and ensure that multiplication operations do not take precedence over addition operations. Parentheses are also important when using PowerShell commands, as you'll discover in upcoming chapters. For example, you could list the contents of subdirectories with the dir command and then determine the number of files in a folder by enclosing the dir command in parentheses.
(Dir *.txt).Count (Enter)
12
Using a comma instead of a decimal point seems to return the wrong result:
4,3 + 2 (Enter)
4 3 2
In the example above, PowerShell simply displayed the numbers again. The comma always creates an array. The important thing to remember is that the decimal point is always a point and not a comma in PowerShell.
Calculating with Number Systems and Units
The next arithmetic problem is a little unusual.
4GB / 720MB (Enter)
The example above calculates how many CD-ROMs can be stored on a DVD. PowerShell supports units like kilobyte, megabyte, and gigabyte. Just make sure you do not use a space between number and unit.
1mb (Enter)
1048576
The units KB, MB, and GB can be upper or lower case—how you write them doesn't matter to PowerShell. However, white space characters do matter. Units of measure must directly follow the number and must not be separated from it by a space. Otherwise, PowerShell will interpret the unit as a new command.
Take a look at the following command line:
12 + 0xAF (Enter)
187
PowerShell can easily understand hexadecimal values: simply prefix the number with "0x":
0xAFFE (Enter)
45054
Here is a quick summary:
• Operators: Arithmetic problems can be solved with the help of operators. Operators evaluate
the two values to the left and the right. For basic operations, a total of five operators are available, which are also called "arithmetic operators" (Table 2.1).
• Brackets: Brackets group statements and ensure that expressions in parentheses are
evaluated first.
• Decimal point: Fractions use a point as decimal separator (never a comma).
• Comma: Commas create arrays and so are irrelevant for normal arithmetic operations. • Special conversions: Hexadecimal numbers are designated by the prefix "0x", which
ensures that they are automatically converted into decimal values. If you add one of the KB, MB, or GB units to a number, the number will be multiplied by the unit. White space
characters aren't allowed between numbers and values.
• Results and formats: Numeric results are always returned as decimal values. If you'd like
to see the results presented in a different way, use a format operator like -f, which will be discussed in detail later in this book.
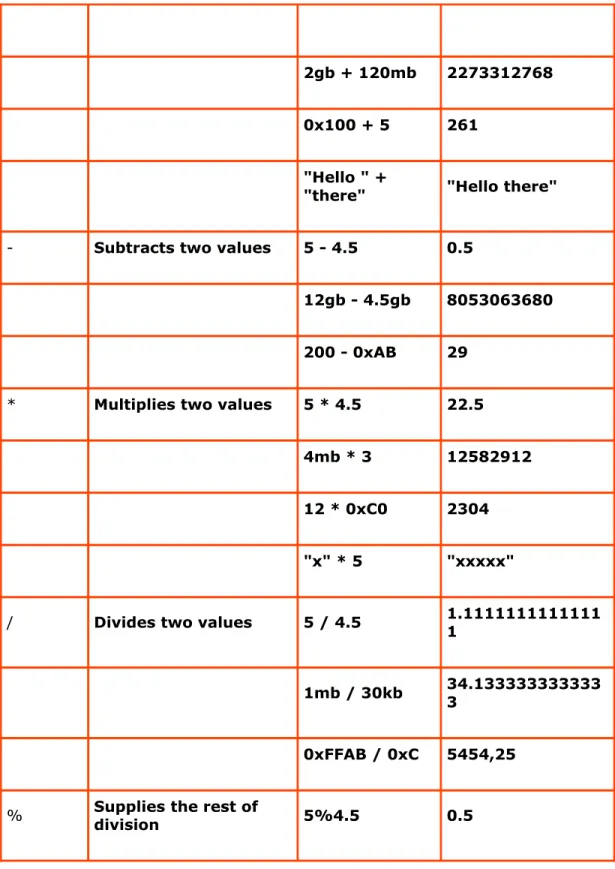
Operator Description example result
2gb + 120mb 2273312768
0x100 + 5 261
"Hello " +
"there" "Hello there"
- Subtracts two values 5 - 4.5 0.5
12gb - 4.5gb 8053063680
200 - 0xAB 29
* Multiplies two values 5 * 4.5 22.5
4mb * 3 12582912
12 * 0xC0 2304
"x" * 5 "xxxxx"
/ Divides two values 5 / 4.5 1.11111111111111
1mb / 30kb 34.1333333333333
0xFFAB / 0xC 5454,25
% Supplies the rest of division 5%4.5 0.5
Executing External Commands
PowerShell can also launch external programs in very much the same way the classic console does. For example, if you want to examine the settings of your network card, enter the command ipconfig
—it works in PowerShell the same way it does in the traditional console:
Ipconfig
Windows IP Configuration
Wireless LAN adapter Wireless Network Connection: Connection-specific DNS Suffix:
Connection location IPv6 Address . : fe80::6093:8889:257e:8d1%8 IPv4 address . . . : 192.168.1.35
Subnet Mask . . . : 255.255.255.0 Standard Gateway . . . : 192.168.1.1
This following command enables you to verify if a Web site is online and tells you the route the data packets are sent between a Web server and your computer:
Tracert powershell.com
Trace route to powershell.com [74.208.54.218] over a maximum of 30 hops: 1 12 ms 7 ms 11 ms TobiasWeltner-PC [192.168.1.1]
2 15 ms 16 ms 16 ms dslb-088-070-064-001.pools.arcor-ip.net 3 15 ms 16 ms 16 ms han-145-254-11-105.arcor-ip.net
(...)
17 150 ms 151 ms 152 ms vl-987.gw-ps2.slr.lxa.oneandone.net 18 145 ms 145 ms 149 ms ratdog.info
You can execute any Windows programs. Just type notepad(Enter)
or explorer(Enter).
There's a difference between text-based commands like ipconfig
and Windows programs like Notepad. Text-based commands are executed synchronously, and the console waits for the commands to complete. Windows-based programs are executed asynchronously. Press (Ctrl)+(C) to cancel a text-based command, which may take longer than expected and is blocking the console.
Starting the "Old" Console
To temporarily switch back to the "old" console, simply enter cmd(Enter). Since the old console is just another text-based command, you can easily launch it from within PowerShell. To leave the old console, type exit(Enter). Even PowerShell can be closed by entering exit. Most text-based
commands use exit to quit. Occasionally, the command quit is required in commands instead of exit.
Discovering Useful Console Commands
The cmd command can be used for just one command when you specify the parameter /c. This is useful for invoking an old console command like help. This command has no external program that you can access directly from PowerShell, it's only available inside the classic console. Using this command will return a list of many other useful external console commands.
Cmd /c Help
For more information on a specific command, type HELP command-name ASSOC Displays or modifies file extension associations.
AT Schedules commands and programs to run on a computer. ATTRIB Displays or changes file attributes.
BREAK Sets or clears extended CTRL+C checking.
CACLS Displays or modifies access control lists (ACLs) of files. CALL Calls one batch program from another.
CD Displays the name of or changes the current directory. CHCP Displays or sets the active code page number.
CHDIR Displays the name of or changes the current directory. CHKDSK Checks a disk and displays a status report.
CHKNTFS Displays or modifies the checking of disk at boot time. CLS Clears the screen.
CMD Starts a new instance of the Windows command interpreter. COLOR Sets the default console foreground and background colors. COMP Compares the contents of two files or sets of files.
COMPACT Displays or alters the compression of files on NTFS partitions.
CONVERT Converts FAT volumes to NTFS. You cannot convert the current drive.
COPY Copies one or more files to another location. DATE Displays or sets the date.
DEL Deletes one or more files.
DIR Displays a list of files and subdirectories in a directory. DISKCOMP Compares the contents of two floppy disks.
DISKCOPY Copies the contents of one floppy disk to another.
DOSKEY Edits command lines, recalls Windows commands, and creates macros.
ECHO Displays messages, or turns command echoing on or off. ENDLOCAL Ends localization of environment changes in a batch file. ERASE Deletes one or more files.
EXIT Quits the CMD.EXE program (command interpreter).
FC Compares two files or sets of files, and displays the differences between them.
FINDSTR Searches for strings in files.
FOR Runs a specified command for each file in a set of files. FORMAT Formats a disk for use with Windows.
FTYPE Displays or modifies file types used in file extension associations.
GOTO Directs the Windows command interpreter to a labeled line in a batch program.
GRAFTABL Enables Windows to display an extended character set in graphics mode.
HELP Provides Help information for Windows commands. IF Performs conditional processing in batch programs.
LABEL Creates, changes, or deletes the volume label of a disk. MD Creates a directory.
MKDIR Creates a directory.
MODE Configures a system device.
MORE Displays output one screen at a time.
MOVE Moves one or more files from one directory to another directory.
PATH Displays or sets a search path for executable files.
PAUSE Suspends processing of a batch file and displays a message. POPD Restores the previous value of the current directory saved by PUSHD.
PRINT Prints a text file.
PROMPT Changes the Windows command prompt.
PUSHD Saves the current directory then changes it. RD Removes a directory.
RECOVER Recovers readable information from a bad or defective disk. REM Records comments (remarks) in batch files or CONFIG.SYS. REN Renames a file or files.
RENAME Renames a file or files. REPLACE Replaces files.
RMDIR Removes a directory.
SET Displays, sets, or removes Windows environment variables. SETLOCAL Begins localization of environment changes in a batch file. SHIFT Shifts the position of replaceable parameters in batch files.
SORT Sorts input.
START Starts a separate window to run a specified program or command.
SUBST Associates a path with a drive letter. TIME Displays or sets the system time.
TITLE Sets the window title for a CMD.EXE session.
TREE Graphically displays the directory structure of a drive or path.
TYPE Displays the contents of a text file. VER Displays the Windows version.
VERIFY Tells Windows whether to verify that your files are written correctly to a disk.
VOL Displays a disk volume label and serial number. XCOPY Copies files and directory trees.
Cmd /c help vol
As an added safety net, you should run PowerShell without
administrator privileges when experimenting with new commands. That will protect you against mistakes, because most dangerous commands can no longer be executed without administrator rights:
defrag c:
You must have Administrator privileges to defragment a volume.
Use an administrator command line and then run the program again.
If you must use admin privileges and have enabled User Account Control on Windows Vista, remember to start your PowerShell explicitly with
administrator rights. To do this, right-click PowerShell.exe and in the context menu, select Run as Administrator.
Figure 2.1: Run PowerShell as administrator.
Security Restrictions at Program Start
Strangely enough, it seems that some programs can't be launched from PowerShell. While you can launch notepad, you cannot launch wordpad:
wordpad
The term "wordpad" is not recognized as a cmdlet, function, operable program or script file. Verify the term and try again. At line:1 char:7
+ wordpad <<<<
PowerShell always needs to know where the program is stored. So, if you know the exact path name of Wordpad, PowerShell launches Wordpad after all - almost:
C:\programs\Windows NT\accessories\wordpad.exe
The term "C:\programs\Windows" is not recognized as a cmdlet, function, operable program or script file. Verify the term and try again.
At line:1 char:21
+ C:\programs\Windows <<<< NT\accessories\wordpad.exe
Because the path name includes white space characters and because PowerShell interprets white space characters as separators, PowerShell is actually trying to start the program
C:\programs\Windows. An error message is generated because this path doesn't exist. If path names include spaces, the path must be enclosed in quotation marks. But that causes another problem:
"C:\programs\Windows NT\accessories\wordpad.exe"
C:\programs\Windows NT\accessories\wordpad.exe
PowerShell treats text in quotation marks as a string and immediately returns this string. To ensure that PowerShell executes the text in the quotation marks, type an ampersand in front of it:
& "C:\programs\Windows NT\accessories\wordpad.exe"
Finally, WordPad successfully starts. Hmmm. Wouldn't it be easier to switch from the current subdirectory to the subdirectory where the program we're looking for is located?
Cd "C:\programs\Windows NT\accessories"
wordpad.exe
The term "wordpad" is not recognized as a cmdlet, function, operable program or script file.
Verify the term and try again. At line:1 char:11
This results in another error because PowerShell requires a relative or absolute path. The absolute path name is the complete path while a relative path name always refers to the current directory. To launch a program in your current subdirectory, you use this relative path:
.\wordpad.exe
Trustworthy Subdirectories
PowerShell distinguishes between trustworthy folders and all other folders. You won't need to provide the path name or append the file extension to the command name if the program is located in a trustworthy folder. Commands like ping or ipconfig work as-is because they are in located a trustworthy folder, while the program in our last example, WordPad, is not.
The Windows environment variable Path determines whether a folder is trustworthy or not. All folders listed in this environment variable are treated as "trustworthy" by PowerShell. You could put all your important programs in one of the folders listed in the environment variable Path. You can find out this list by entering:
$env:Path
C:\Windows\system32;C:\Windows;C:\Windows\System32\Wbem;C:\program Files\Softex\OmniPass;C:\Windows\System32\WindowsPowerShell\v1.0\;c :\program Files\Microsoft SQL Server\90\Tools\binn\;C:\program File s\ATI Technologies\ATI.ACE\Core-Static;C:\program Files\MakeMsi\;C: \program Files\QuickTime\QTSystem\
You'll find more on variables as well as special environment variables in the next chapter.
As a clever alternative, you can add other folders containing important programs to your Path
environment variables, such as:
$env:path += ";C:\programs\Windows NT\accessories"
wordpad.exe
After this change, you can suddenly launch WordPad just by entering its program name. Note that your change to the environment variable Path is valid only as long as PowerShell is running. Once you end PowerShell, your modification is discarded. So, if you'd like to permanently extend Path, you need to add the line for the extension to one of your profile scripts. Profile scripts start automatically when PowerShell starts and their purpose is to customize your PowerShell environment. You read more about profile scripts in Chapter 10.
• Programs in special subdirectories: You can simply enter the program name to launch the
program if the program is located in one of the special folders specified in the Path
• Specifying a path: You must tell the console where it is if the program is located somewhere
else. To do so, specify the absolute or relative path name of the program.
• Watch out for white space characters: if white space characters occur in path names,
enclose the entire path in quotes so that PowerShell doesn't interpret white space characters as separators. It doesn't matter whether you use double quotation marks ("") or single quotation marks ( ' ' ); you just have to be consistent. Stick to single quotes. For example, PowerShell "resolves" text in double quotation marks, replacing variables with their values.
• The "&" changes string into commands: PowerShell doesn't treat text in quotes as a
command. Prefix string with "&" to actually execute it. The "&" symbol allows you to execute any string just as if you had entered the text directly on the command line.
& ("note" + "pad")
If you have to enter a very long path names, remember (Tab), the key for automatic completion:
C:\(Tab)
Press (Tab) again and again until the suggested subdirectory is the one you are seeking. Add a "\" and press (Tab) once again in order to specify the next subdirectory.
The moment a white space character turns up in a path, AutoComplete also puts the path in quotation marks and inserts an "&" before it. However, if you want to add further subdirectories, you must first remove the last quotation mark with (Backspace).
Cmdlets: "Genuine" PowerShell Commands
PowerShells internal commands are called 'cmdlets'. The "mother" of all cmdlets is called
Get-Command:
Get-Command -commandType cmdlet
It retrieves a list of all available cmdlets. Cmdlet names always consist of an action (verb) and something that is acted on (noun). This naming convention helps you to find the right command. Let's take a look at how the system works.
If you're looking for a command for a certain task, you should first select the action that best describes the task. There are relatively few actions that the strict PowerShell naming conditions permit (Table 2.2). If you know that you want to obtain something, the proper action is "get." That already gives you the first part of the command name, and all you have to do now is to take a look at a list of commands that are likely candidates:
- ----
---cmdlet Get-Acl Get-Acl [[-Path] <String[]>] [-A... cmdlet Get-Alias Get-alias [[-Name] <String[]>] [... cmdlet Get-Authenticode Get-AuthenticodeSignature [-File... Signature
cmdlet Get-ChildItem Get-ChildItem [[-Path] <String[]... cmdlet Get-Command Get-Command [[-ArgumentList] <Ob... cmdlet Get-Content Get-Content [-Path] <String[]> [... cmdlet Get-Credential Get-Credential [-Credential] <PS... cmdlet Get-Culture Get-Culture [-Verbose] [-Debug] ... cmdlet Get-Date Get-Date [[-Date] <DateTime>] [-... cmdlet Get-EventLog Get-EventLog [-LogName] <String>... cmdlet Get-Execution Get-ExecutionPolicy [-Verbose] [... Policy
cmdlet Get-Help Get-Help [[-Name] <String>] [-Ca... cmdlet Get-History Get-History [[-Id] <Int64[]>] [[... cmdlet Get-Host Get-Host [-Verbose] [-Debug] [-E... cmdlet Get-Item Get-Item [-Path] <String[]> [-Fi... cmdlet Get-ItemProperty Get-ItemProperty [-Path] <String... cmdlet Get-Location Get-Location [-PSProvider <Strin... cmdlet Get-Member Get-Member [[-Name] <String[]>] ... cmdlet Get-PfxCertificate Get-PfxCertificate [-FilePath] <... cmdlet Get-Process Get-Process [[-Name] <String[]>]... cmdlet Get-PSDrive Get-PSDrive [[-Name] <String[]>]... cmdlet Get-PSProvider Get-PSProvider [[-PSProvider] <S... cmdlet Get-PSSnapin Get-PSSnapin [[-Name] <String[]>... cmdlet Get-Service Get-Service [[-Name] <String[]>]... cmdlet Get-TraceSource Get-TraceSource [[-Name] <String... cmdlet Get-UICulture Get-UICulture [-Verbose] [-Debug... cmdlet Get-Unique Get-Unique [-InputObject <PSObje... cmdlet Get-Variable Get-Variable [[-Name] <String[]>... cmdlet Get-WmiObject Get-WmiObject [-Class] <String> ...
As you see, the relevant cmdlet Get-Command comes from the "get" group.
Action Description
Add Add
Clear Delete
Compare Compare
Convert Convert
Export Export
Format Format
Get Acquire
Group Group
Import Import
Measure Measure
Move Move
New Create new
Out Output
Read Read
Remove Remove
Rename Rename
Resolve Resolve
Restart Restart
Resume Resume
Select Select
Set Set
Sort Sort
Start Start
Stop Stop
Suspend Suspend
Tee Split up
Test Test
Trace Trace
Update Update
Write Write
Table 2.2: The most important standard actions and their descriptions
You can look up help for any cmdlet using Get-Help:
Get-Help Get-Command -detailed
You can easily discover commands for certain actions because Get-Command also allows wildcards:
Get-Command *help* -CommandType cmdlet
CommandType Name Definition - ----
---cmdlet Get-Help Get-Help [[-Name] <String>] [-Category...
Using Parameters
Parameters add information so a cmdlet knows what to do. Once again, Get-Help will show you which parameter are supported by any given cmdlet. For example, the cmdlet Get-ChildItem lists the contents of the current subdirectory. The contents of the current folder will be listed if you enter the cmdlet without additional parameters:
Get-ChildItem
Get-ChildItem c:\windows
You can use Get-Help to output full help on Get-ChildItem to find out which parameters are supported:
Get-Help Get-ChildItem -full
This will give you comprehensive information as well as several examples. Of particular interest is the "Parameters" section:
-path <string[]>
Specifies a path to one or more locations. Wildcards are permitted. The default location is the current directory (.).
Required? false
Position? 1
Default value <NOTE: if not specified uses the Current location>
Accept pipeline input? true (ByValue, ByPropertyName)
Accept wildcard characters? true
-include <string[]>
Retrieves only the specified items. The value of this parameter qualifies the Path parameter. Enter a path element or pattern, such as "*.txt". Wildcards are permitted.
The Include parameter is effective only when the command includes the Recurse parameter or the path leads to the contents of a directory, such as C:\Windows\*, where the wildcard character specifies the contents of the C:\Windows directory.
Required? false
Position? named
Default value
Accept wildcard characters? true
-exclude <string[]>
Omits the specified items. The value of this parameter qualifies the Path parameter. Enter a path element or pattern, such as "*.txt". Wildcards are permitted.
This parameter does not work properly in this cmdlet.
Required? false
Position? named
Default value
Accept pipeline input? false
Accept wildcard characters? true
-filter <string>
Specifies a filter in the provider's format or language. The value of this parameter qualifies the Path parameter. The syntax of the filter, including the use of wildcards, depends on the provider. Filters are more efficient than other parameters, because the provider applies them when retrieving the objects, rather than having Windows PowerShell filter the objects after they are retrieved.
Required? false
Position? 2
Default value
Accept pipeline input? false
-name <SwitchParameter>
Retrieves only the names of the items in the locations. If you pipe the output of this command to another command, only the item names are sent.
Required? false
Position? named
Default value False
Accept pipeline input? false
Accept wildcard characters? false
-recurse <SwitchParameter>
Gets the items in the specified locations and in all child items of the locations.
Recurse works only when the path points to a container that has child items, such as C:\Windows or C:\Windows\*, and not when it points to items that do not have child items, such as
C:\Windows\*.exe.
Required? false
Position? named
Default value False
Accept pipeline input? false
Accept wildcard characters? false
-force <SwitchParameter>
Overrides restrictions that prevent the command from succeeding, just so the changes do not
Required? false
Position? named
Default value False
Accept pipeline input? false
Accept wildcard characters? false
-codeSigningCert <SwitchParameter>
Retrieves only the certificates that have code signing authority. This parameter is valid only when using the Windows PowerShell Certificate provider. For more information, type "get-help
about_provider" and "get-help about_signing".
Required? false
Position? named
Default value
Accept pipeline input? false
Accept wildcard characters? false
-literalPath <string[]>
Specifies a path to one or more locations. Unlike Path, the value of LiteralPath is used exactly as it is typed. No characters are interpreted as wildcards. If the path includes escape characters, enclose it in single quotation marks. Single quotation marks tell Windows PowerShell not to interpret any characters as escape sequences
Required? true
Position? 1
Accept pipeline input? true (ByPropertyName)
Accept wildcard characters? false
<CommonParameters>
This cmdlet supports the common parameters: Verbose, Debug, ErrorAction, ErrorVariable, and -OutVariable. For more information, type, "get-help about_commonparameters".
Get-ChildItem supports a total of its own eight parameters as well as several CommonParameters. Every parameter has a specific name that begins with a hyphen.
Using Named Parameters
Named parameters really work like key-value pairs. You specify the name of a parameter (which always starts with a hyphen), then a space, then the value you want to assign to the parameter. If you ever used VBA (Visual Basic for Applications), it is similar to named parameters there. Let's say you'd like to list all files with the extension *.exe that are located somewhere in the folder
c:\windows or in one of its subdirectories, you could use this command:
Get-ChildItem -path c:\windows -filter *.exe -recurse -name
There are clever tricks to make life easier. You don't have to specify the complete parameter name as it is OK to type out just enough to make clear which parameters you mean:
Get-ChildItem -pa c:\windows -fi *.exe -r -n
Don't worry: If you are getting too lazy and shorten parameter names too much, PowerShell will report ambiguities and specify the parameter it can no longer assign clearly:
Get-ChildItem -pa c:\windows -f *.exe -r -n
Get-ChildItem : Parameter cannot be processed because the parameter name 'f' is ambiguous. Possible matches include: -Filter -Force.
At line:1 char:14
+ Get-ChildItem <<<< -pa c:\windows -f *.exe -r -n
with Write-Host, this will likely result in a conflict. PowerShell would assume that you meant -BackgroundColor and notify you that the argument for this parameter is missing.
Write-Host -BackgroundColor
Write-Host : Missing an argument for parameter 'BackgroundColor'. Specify a parameter of type "System.consoleColor" and try again.
At line:1 char:27
+ Write-Host -BackgroundColor <<<<
You always have the choice of including the text in quotes. Or you can expressly turn off parameter recognition by typing "--". Everything following these two symbols will no longer be recognized as a parameter:
Write-Host "-BackgroundColor"
-BackgroundColor
Write-Host -- -BackgroundColor
-BackgroundColor
Switch Parameter
Sometimes, parameters really are no key-value pairs. Whenever a parameter represents a boolean value (true or false), most often it is used as a switch parameter (present or not). So, switch parameters stand for themselves, no values follow. If they're specified, they turn on a certain function. If they're left out, they don't turn on the function. For example, the parameter -recurse
ensures that Get-ChildItem searches not only the -path specified subdirectories but all
subdirectories. And the switch parameter -name makes Get-ChildItem output only the names of files (as string rather than rich file and folder objects).
The help on Get-ChildItem clearly identifies switch parameters. "<SwitchParameter>" follows the parameter names:
-recurse <SwitchParameter>
Gets the items in the specified locations and all child items of the locations.
Positional Parameters
Some parameters have fixed positions while others are "named" - you can find out in Help when you look at the cmdlet parameters and check out their "Position" property. Named parameters are easy: they always need to be named so you always have to specify the parameter name, a space, and then the parameter value. Positional parameters work the same but you can also specify them as positional. So when a parameter has a position of 1, the first "unnamed" parameter is assigned to it.
That's why you could have expressed the command we just discussed in one of the following ways:
Get-ChildItem c:\windows *.exe -recurse -name Get-ChildItem -recurse -name c:\windows *.exe Get-ChildItem -name c:\windows *.exe -recurse
In all three cases, PowerShell identifies and eliminates the named arguments -recurse and -name
first because they are clearly specified. The remaining are arguments are "unnamed" and need to be assigned based on their position:
Get-ChildItem c:\windows *.exe
The parameter -path has the position 1, and no value has yet been assigned to it. So, PowerShell attaches the first remaining argument to this parameter.
-path <string[]>
Specifies a path to one or more locations. Wildcards are permitted. The default location is the current directory (.). Required? false
Position? 1
Standard value used <NOTE: if not specified uses the Current location>
Accept pipeline input? true (ByValue, ByPropertyName) Accept wildcard characters? true
The parameter -filter has the position 2. Consequently, it is assigned the second remaining argument. The position specification makes it easier to use a cmdlet because you don't have to specify any parameter names for the most frequently and commonly used parameters.
Here is a tip: In daily interactive PowerShell scripting, you want short and fast commands so use aliases, positional parameters, and abbreviated parameter names. Once you write PowerShell scripts, you should not use these shortcuts and instead use the true cmdlet names and stick to fully named parameters. One reason is that scripts should be portable and not depend on specific aliases you may have defined. Second, scripts are more complex and need to be as readable and
understandable as possible. Named parameters help other people better understand what you are doing.
Common Parameters
Cmdlets also support a set of generic "CommonParameters":
This cmdlet supports the common parameters: -Verbose, -Debug, -ErrorAction, -ErrorVariable, and -OutVariable. For more information, type "get-help about_commonparameters".
These parameters are called "common" because they are permitted for (nearly) all cmdlets and behave the same way.
Common
Parameter Type Description
-Verbose Switch Generates as much information as possible. Without this switch, the cmdlet restricts itself to displaying only essential information
-Debug Switch Outputs additional warnings and error messages that help programmers find the causes of errors. You can find more information in Chapter 11.
-ErrorAction Value
Determines how the cmdlet responds when an error occurs. Permitted values:
NotifyContinue: reports error and continues (default)
NotifyStop: reports error and stops
SilentContinue: displays no error message, continues
SilentStop: displays no error message, stops
Inquire: asks how to proceed
You can find more information in Chapter 11.
-ErrorVariable Value Name of a variable in which in the event of an error information about the error is stored. You can find more information in Chapter 11.
-OutVariable Value
Name of a variable in which the result of a cmdlet is to be stored. This parameter is usually superfluous because you can directly assign the value to a variable. The difference is that it will no longer be displayed in the console if you assign the result to a variable.
$result = Get-ChildItem
It will be output to the console and stored in a variable if you assign the result additionally to a variable:
Table 2.3: Common parameters in effect for (nearly) all cmdlets
Aliases: Giving Commands Other Names
Cmdlet names with their verb-noun convention are very systematic, yet not very practical. In every day admin life, you want short and familiar commands. This is why PowerShell has a built-in alias system as it comes with a lot of predefined aliases. This is why in PowerShell, both Windows admins and UNIX admins can list folder contents. There are predefined aliases called "dir" and "ls" which both point to the PowerShell cmdlet Get-ChildItem.
Get-ChildItem c:\ Dir c:\
ls c:\
So, aliases have two important tasks in PowerShell:
• Historical: New commands are designed to be accessed under old conventional names to
facilitate the transition to PowerShell
• Comfort: Frequently used commands are meant to be accessed over short and concise
commands
Resolving Aliases
Use these lines if you'd like to know what "genuine" command is hidden in an alias:
$alias:Dir
Get-ChildItem
$alias:ls
Get-ChildItem
$alias:Dir lists the element Dir of the drive alias:. That may seem somewhat surprising because there is no drive called alias: in the classic console. In contrast, PowerShell works with many different virtual drives, and alias: is only one of them. If you want to know more, the cmdlet Get-PSDrive lists them all. You can also list alias: like any other drive with Dir. The result would be a list of aliases in their entirety:
Dir alias: