Microsoft
®
Business Solutions–Navision
®
Database Server
M
ICROSOFT
®
B
USINESS
S
OLUTIONS
–N
AVISION
®
disclaims all warranties and conditions with regard to use of the material for other purposes. Microsoft Business Solutions ApS shall not, at any time, be liable for any special, direct, indirect or consequential damages, whether in an action of contract, negligence or other action arising out of or in connection with the use or performance of the material. Nothing herein should be construed as constituting any kind of warranty.
The example companies, organizations, products, domain names, email addresses, logos, people and events depicted herein are fictitious. No association with any real company, organization, product, domain name, e-mail address, logo, person, or event is intended or should be inferred. The names of actual companies and products mentioned herein may be the trademarks of their respective owners.
COPYRIGHT NOTICE
Copyright © 2004 Microsoft Business Solutions ApS, Denmark. All rights reserved.
TRADEMARK NOTICE
Microsoft, Great Plains, Navision, FRx, AssistButton, C/AL, C/FRONT, C/ODBC, C/SIDE, FlowField, FlowFilter, Navision Application Server, Navision Database Server, Navision Debugger, Navision Financials, Microsoft Business
Solutions–Navision, SIFT, SIFTWARE, SQL Server, SumIndex, SumIndexField, Windows, Windows 2000, Windows 2000 Server, Windows XP are either registered trademarks or trademarks of Microsoft Corporation or Great Plains Software, Inc., FRx Software Corporation, or Microsoft Business Solutions ApS or their affiliates in the United States and/or other countries. Great Plains Software, Inc., FRx Software Corporation, and Microsoft Business Solutions ApS are subsidiaries of Microsoft Corporation.
This book is a manual for Microsoft® Business Solutions–Navision®. This program is designed to run on Navision Database Server This book is part of a comprehensive set of documentation and Help materials for the Navision enterprise business solution.
The manual describes how to install and maintain Navision. However, we recommend that the installation and customization process is carried out with the assistance of a Microsoft Certified Business Solutions Partner representative.
You should also be familiar with the symbols and typographical conventions used in the Navision Financials manuals. In the list below, you can see how various elements of the program are distinguished by special typefaces and symbols:
Appearance Element
Ctrl Keys on the keyboard. They are written in small capitals.
Design Menu items and buttons in windows. They always start with a capital letter, and the access key is underlined.
Address Field names. They appear in medium bold and start with a capital letter.
Department Names of windows, boxes and tabs. They appear in medium bold italics and start with a capital letter.
Hansen Text that you must enter, for example: "...enter Yes in this field." It is written in italics.
fin.flf File names. They are written with the Courier font and lowercase letters.
pohbk The special symbols that can be seen in the windows on the screen.
Chapter 1 Installing Navision . . . 1
Choosing the Installation Type and Equipment . . . 2
Installing, Maintaining and Removing Single-Users and Clients . . . 4
Installing Navision Database Server . . . 13
License Files . . . 19
Importing a Database into Navision Database Server. . . 20
Running More than One Server. . . 21
Chapter 2 System Setup . . . 25
Navision Installations. . . 26
Single-User and Client Setup Properties. . . 29
Navision Database Server Setup Properties . . . 39
Setting the Program Properties . . . 46
Chapter 3 Working with Databases . . . 49
The Standard Database . . . 50
Creating and Maintaining Databases . . . 51
Testing the Database . . . 61
Deleting the Database . . . 65
Database Information . . . 66
Database Efficiency. . . 70
License Files . . . 80
Expanding a Working Database . . . 82
Advanced Database Information . . . 83
Standby and Hibernation . . . 88
Chapter 4 Security. . . 89
Authentication in Navision . . . 90
Active Directory and Navision . . . 92
Security within Navision. . . 93
Setting Up Logins, Passwords and Permissions . . . 95
Changing Passwords. . . 105
User Time Limits and the Time Register . . . 107
Selecting a Printer . . . 110
Chapter 5 Making Backups. . . 111
Why, When and How to Make Backups . . . 112
Using the Navision Backup Function. . . 114
Testing before Using Other Backup Methods . . . 117
Restoring Backups . . . 118
Advanced Backup and Restore Information . . . 120
Chapter 6 Advanced Performance Issues. . . 129
Checklist for Optimizing Hardware . . . 130
Selecting Hardware, Operating System and Protocols . . . 131
Detecting Bottlenecks . . . 136
Appendix A Glossary . . . 141
Glossary . . . 142
Appendix B Network Communications . . . 149
Setting Up Network Communications . . . 150
Before installing Microsoft® Business Solutions–Navision®, you should give some consideration to the kind of
installation that you want and the equipment that it requires.
When you have decided which type of installation you want and you understand the hardware and communication requirements, you can install the program.
The chapter contains the following sections:
· Choosing the Installation Type and Equipment
· Installing, Maintaining and Removing Single-Users and Clients
· Installing Navision Database Server · License Files
· Importing a Database into Navision Database Server · Running More than One Server
1.1 C
HOOSING THEI
NSTALLATIONT
YPE ANDE
QUIPMENTBefore installing Navision, you should carefully consider the needs of your
organization as this will greatly influence the type of installation you will require and the hardware that this will involve.
Single-User and Multiuser Installations
Navision can be used in single-user or multiuser installations.
Single-User In single-user installations, all the work is done on one computer and all the information (the database) is stored on this computer. Even if you purchase several single-user installations and run each on its own computer, the entire installation is still called "single-user" because the information is stored on each individual computer and not in one centrally located database.
Multiuser In a multiuser installation, many users share common information that is stored in one or more databases on a server. The computers that work with the data are called clients, and the way the server and the computers work together is called a client/server installation.
What You Should Know Before Installing the Program
Regardless of whether you have chosen to work in a single-user or multiuser environment, you start by purchasing the same package. The program is installed from the same CD and with the same installation wizard for both single-users and clients.
For a multiuser installation, the CD contains a Navision Database Server package that is installed only on the server computer. However, the demonstration database that comes with a single-user installation is not included in the server package. You need some of the data in the demonstration database (and you need a client or single-user to modify a database), so you must always install a single-user somewhere in the network in a multiuser installation. The simplest way to do this is to install a single-user on the same computer as the server. You can read about this on page 20. The single-user can later be converted to a client by connecting it to the server’s database.
Once the program has been installed, you must customize it for your particular situation. Not all installations need the same size database. For example, a database server, which serves many users, probably needs a larger database than a single-user installation.
With Navision, you do not need to plan for the distant future when you purchase your installation or set it up. You can change or expand the installation whenever you like. To switch from a single-user to a multiuser installation, you purchase a server package and the number of session licenses that you need. You can place the database that you already have on a server so that several people can work with it. If,
Choosing Equipment
Navision does not require particularly sophisticated equipment, but as with all programs, the better your equipment, the better the results. You get the best solution with the optimal equipment and with the program settings optimized for that
equipment.
This section contains a brief description of the equipment we recommend for your Navision installation. For more detailed information on the best choice of equipment, see the chapter called "Advanced Performance Issues" on page 129.
You cannot specify the optimal settings until after you have installed the program. For more information see the chapter called "System Setup" on page 25.
Choice of Computers
In a multiuser installation, you can, in principle, use the same type of computer for both the clients and the server, but there is a difference in how much CPU power, memory and disk space each will need. Details about required and recommended hardware and software, including operating system requirements, can be found in the chapter called "Advanced Performance Issues" on page 129.
Computers for Clients and Single-User Installations
Computers for clients or a single-user installation that run Windows XP or Windows 2000 must comply with the requirements specified by Microsoft. Because the client computers process the data they retrieve, they need a relatively large amount of computing power. If the client computers are too slow, they will take a long time to finish the calculations for a transaction. A slow computer working on a transaction that must update the database can delay all the other clients until it finishes.
Computers for Servers
Computers for servers that run Windows 2000 or Windows Server 2003 must comply with the requirements specified by Microsoft. For more information, see page 131.
1.2 I
NSTALLING, M
AINTAINING ANDR
EMOVINGS
INGLE-U
SERS ANDC
LIENTSYou use the setup program to install maintain and remove Navision. Navision can be installed as either single-user installations or as client installations in a network.
The Navision installation program also installs Commerce Portal automatically and allows you to determine whether or not the Commerce Gateway connectivity components are installed. These components must be installed with the Navision client in order for it to connect with a BizTalk server.
For more information about installing the E-commerce products see the manual, Installation & System Management: E-Commerce Products.
Installing Navision
Make sure that the operating system on which you will run Navision (Microsoft Windows XP or Windows 2000) is installed on the computer. If it is not, you will have to install it before you can install Navision. If you are installing Navision from a network drive, make sure that you are connected to the network server.
Navision supports the Microsoft AutoPlay feature, so it is not necessary to click the Start button. A menu appears automatically when the CD is inserted. If you install from a network drive, type the path and name of the installation wizard on the network. Click OK to start the installation wizard. Windows XP and Windows 2000 allow you to use the Add/Remove Programs function under Settings, Control Panel.
Earlier version If you have an earlier version of the program installed on the computer you can upgrade the old installation. For more information about upgrading, see page 11.
Cancelling the installation
The installation can be cancelled at any time. If you choose to cancel the installation, a dialog box appears asking you to confirm your decision. If you click No, the installation process will continue. If you click Yes, Microsoft Installer will perform a full rollback and restore the computer to the state it was in before the installation process began. This rollback functionality is a new feature provided by Microsoft Installer.
When the installation program starts the Welcome window appears informing you that you have started the installation wizard for Navision.
Customer information
If you do not want to continue with the installation, click Cancel. To continue, click Next, and the Customer Information window appears:
You can enter your name and the name of your organization in this window. You can also specify to whom this installation belongs. The installation will also continue if you leave these fields blank. You can choose between the person who installed it and any user who logs onto this computer. This determines who is allowed to see the
installation and therefore able to modify or uninstall it. It does not determine who is able to use the program from this computer.
Selecting the installation type
Click Next and the Setup Type window appears:
This window allows you to specify the type of installation that you want to install. You can choose between three types of installation:
· Minimum: this installation will only install a minimum of features (the demo database and the backup of the demo database will not be installed). This is the
recommended installation, if you want to run Navision as a client in a network. This installation includes the online Help.
A client can be installed as a single-user, that is, with its own database, but this is not normally done because it takes up so much extra space on the client computer.
· Complete: this installation will install all of the program features except the
Commerce Gateway connectivity components. This installation is recommended if you want to run Navision in a single-user environment with a local database. · Custom: this installation allows you to choose which program features will be
installed. This option is only recommended for advanced users.
. . .
NoteIn a multiuser installation, you must always install one single-user installation in the network because the server package does not include the standard database that is part of the single-user installation. You need some of the data contained in the backup of the standard database when you create a new database. You can always turn a single-user into a client by allowing it to access the database on the server. The simplest thing to do is to install a single-user installation on the same computer as the
. . .
server package. This procedure is described on page 20.Customized installation
If you select a complete or a minimum installation, the installation runs automatically. If you select Custom, the following window appears:
In the Custom Setup window, you can decide how and where each feature and sub-feature will be installed. This window is divided into three sections:
· A feature selection area where you can select the individual features and specify how each feature will be installed.
· A feature description area that displays a short description of each feature as it is selected and an estimate of how much disk space the feature requires. It also gives
· An installation location area that tells you where each feature will be installed. You are able to change the location where the installation will be installed by clicking Browse.
The Custom Setup window lists all the features that you can install: · Help – the online Help for Navision.
· Demo Database – a Navision database that contains a demonstration company. This database will be opened automatically the first time you start Navision. · Backup of Demo Database – a Navision backup of the demonstration database.
You can restore this backup into a new database.
· Commerce Integration – the Commerce Gateway and Commerce Portal components. You must install these components if you want to run either
Commerce Gateway or Commerce Portal. If you select this feature, the Microsoft .NET Framework is also installed. The .NET Framework is not removed when you uninstall the Navision client. It is given an entry of its own in the Add or Remove Programs window and you can uninstall it from there.
· Navision Toolbar for Outlook – this feature creates a toolbar in Outlook that allows you to open a Navision Contact or a Navision To-do from the corresponding Outlook item.
· Navision Gantt Server – an ActiveX component that allows production managers to plan shop floor production with the help of Gantt charts and update their schedules in Navision.
· Business Notification Manager – this feature allows you to automatically send e-mails to your employees and business partners informing them of business events. · MDAC – the Microsoft Data Access Components. These are operating system
components that allow you to access data in the database with third-party tools. · MSDE – the Microsoft SQL Server 2000 Desktop Engine. This a small version of
SQL Server and installing it allows you to run the SQL Server Option for Navision as a stand-alone installation. This will be the local instance of SQL Server to which the demonstration database is attached.
Furthermore, MSDE:
· is not installed if SQL Server is already installed on the client computer.
· is not removed when you uninstall the Navision client. It is given an entry of its own in the Add or Remove Programs window and you can uninstall it from there.
If you do not install MSDE with the client, you can install it later. However, if you then want to use the demonstration database, you must attach it manually.
. . .
NoteIf you select one of the features, and the estimated space required is given as zero (or less than the original amount of space required), the file will not be copied to the target folder. This occurs because this feature or some of its subfeatures already exist in the target folder. This happens when you have had Navision installed before and this feature was not removed when you uninstalled the program. No database files,
. . .
database backup files or license files are removed when you uninstall Navision.When you click Browse, the following dialog box appears:
This window allows you to locate the folder you want or to create a new folder.
You can also get an overview of your disk configuration. In the Custom Setup
window, click Disk Space and the following window appears informing you of how much space is available on your hard disk(s):
When you click one of the feature icons in the Custom Setup window, the following drop-down list appears displaying the options that are available for that feature:
The options are:
· This feature will be installed on your local hard drive.
· This feature and all of its subfeatures will be installed on your local hard drive. · This feature and all of its subfeatures will be installed when it is required. Note that
its subfeatures will automatically have the same option.
· The current feature and all of its subfeatures will not be installed.
If you click Help, a window containing a short explanation of the options appears.
The most common installations are Stand-alone installation and Client installation.
· A Stand-alone installation requires you to install the demo database. To do this, click the icon next to Demo Database and select the option in the drop-down menu. The backup of the Demo Database is optional. The online Help is also optional.
· In a normal client installation you will install the online Help and ignore the other subfeatures.
Ready to install The Ready to Install the Program window confirms that the installation wizard now has all the information that it requires to carry out the installation process.
Click Install to start the installation. The Installation Progress window allows you to monitor the installation process and displays an overall status message that tells you what kind of action is currently being performed. Below that is a more specific description of the particular action that is being carried out, for example, the name of the file that is currently being copied. Finally, there is a progress bar that shows you the status of the installation process.
After a few minutes, the Installation Complete window appears. This window informs you that the installation has been completed successfully.
Maintaining Navision
Microsoft Installer is also used for changing, repairing and removing Navision.
1 Open the Control Panel and select Add/Remove Programs. 2 Select Navision.
3 Click Change and the Installation Wizard opens.
The Maintenance Welcome window is similar to the Installation Welcome
window and informs the user that they can now change, repair or remove the program.
4 Click Next in the Maintenance Welcome window and the Program Maintenance
window appears:
This window allows you to choose between changing, repairing or removing the product installation.
Changing the installation
If you select Change, the Custom Setup window appears. You are now able to select the features and subfeatures that you want to install. You are also able to uninstall all the features and subfeatures. You are not able to change the target path of the installation. You can only change the features that have been installed.
Repairing the installation
If you select Repair, the Installation Wizard updates, installs or reinstalls any missing files, corrupt files, shortcuts, and registry entries. Windows Installer protects any license files, databases and database backups and will therefore not overwrite these files.
Removing the installation
If you select Remove, a window appears prompting you to confirm that you want to uninstall the product.
If you choose to uninstall the product, a progress window similar to the Installation Progress window appears. You are able to cancel the uninstallation at any time. If
When you remove the program, any databases or database backups that are stored locally will not be deleted.If you store a copy of your license file locally, it will not be deleted but the demonstration license file will be. If you want to remove these files, you will have to do it manually.
A progress window appears when you are changing, repairing or removing the program. When the process is finished an Installation Finished window appears informing you whether or not Navision has been successfully changed, repaired or removed.
. . .
NoteWe recommend that you make a backup of any license files, databases and database backups that are stored locally before changing, repairing or removing the client
. . .
installation.The installation program creates a log file (an ASCII file called delfin.log that lists the changes made by the installation program) in the Navision folder. If you need to uninstall Navision manually, you can look in the log file to see what must be removed or changed.
Upgrading an Old Installation
If you have Navision Financials® 2.50 or earlier installed on the computer, the Installation Wizard will ask you to uninstall the old version before you can install Navision.
If you have Navision Financials 2.60 installed on the computer, the Installation Wizard will ask you if you want to upgrade the old installation or install Navision without upgrading the old installation.
. . .
AttentionThe upgrade program only upgrades the client installation and not the database. To upgrade your database you must use the Upgrade Toolkit that is located on the product CD. We recommend that you do not upgrade your database without first
. . .
consulting your local Microsoft Certified Business Solutions Partner.If you have Navision Financials 2.60 installed on the computer, the Installation Upgrade Wizard will open. This wizard will guide you through the process of
upgrading your installation. You can choose between three different types of upgrade:
· Typical: this upgrade will uninstall the old version of the program and install a new version. It will transfer any custom selections that you made in the earlier
installation to the new installation. Any databases or database backups that are stored locally will not be deleted. If you store a copy of your license file locally, it will not be deleted.
· Custom: this upgrade will uninstall the old version of the program and install a new version. Any databases or database backups that are stored locally will not be deleted. If you store a copy of your license file locally, it will not be deleted. When the new version is being installed the installation program will stop at the Custom Setup window. This window allows you to specify which features are installed and how they are installed. For more information about the Custom Setup window, see page 6.
· New: this upgrade will install Navision. It will not uninstall the old version of the program or make any changes to it.
For more information about upgrading to Navision, see the Upgrade Toolkit
documentation on the product CD or contact your local Microsoft Certified Business Solutions Partner.
1.3 I
NSTALLINGN
AVISIOND
ATABASES
ERVERThe installation wizard for Navision Database Server is like the installation wizard for Navision.
The installation process starts with a window informing you that the installation wizard has been initiated. After the Welcome window, the Customer Information window appears:
You can enter your name and the name of your organization in this window. You can also specify to whom this installation belongs. You can choose between the person who installed it and any user who logs onto this computer. This determines who is allowed to see the installation and therefore able to uninstall it. It does not determine who is able to log on to the server via the network.
Click Next and the Setup Type window appears:
In the Setup Type window, you can choose between a typical installation and a custom installation. A custom installation allows you to specify which features will be installed and how they will be installed.
If you select Custom, the following window appears:
In the Custom Setup window, you can select the features that you want to install. This is a standard Windows Installer dialog box where you can select to install or not to install the Navision Database Server Snap-In for Microsoft Management Console. The snap-in allows you to supervise Navision Database Servers across the domain.
For more information about the Snap-In for Microsoft Management Console, see the section "Navision Database Server Manager" on page 43.
If you want to install Navision Database Server in a different folder, click Browse. The following dialog box will appear:
If you click Disk Space in the Custom Setup window, the following window will appear informing you of how much space is available on the various drives to which you have access:
Naming the server Click Next in the Custom Setup window, and the Server Name window appears:
In the Server Name window, you can type in a name for the server. By default it will select the name that the computer has in the network. This name must not contain any spaces.
If you select Typical in the Setup Type window, the installation will use the computer name as the server name. If this name already exists, it will insert #1 at the end of the computer name. If this name also exists, it will try with #2, and so on. That means if the computer name is PC0515 and this server name already exists, the installation will try PC0515#1.
Selecting the network protocol
Click Next after you have named the server and the Network Type window appears:
In the Network Type window, you can select which network protocol will be used for communication between the clients and the server (TCP/IP or NetBIOS). If you have chosen Typical in the Setup Type window, TCP/IP will be selected as the network protocol. TCP/IP is the default setting.
Cache settings Click Next after you have selected the network protocol and the Cache Settings
window appears:
This window allows you to determine the amount of space that will be reserved on the server used for both the Cache and the Commit Cache. You can accept the default settings or adjust them to suit your needs.
License file Click Next after you have specified the cache settings and the License File window appears:
In the License File window, you specify which kind of license file you want to install. You can choose between installing the demo license file or your personal license file. Install demo license is the default value.
When you choose the Select personal license option the Browse button and the License file field will be enabled. You are now able to use the Browse button to locate your license file. If you have chosen to install a Typical installation in the Setup Type window, the Install demo license option is automatically selected.
For more information about license files, see the section called "License Files" on page 19.
Selecting the database
Click Next after you have selected the license file you want to install, and the
Database File window appears:
This window allows you to specify whether you want to select a database now or wait until the first client connects to the server. If you choose to select the database now,
the Browse button and the Database File field become enabled and you can use them to locate the database that you want to be opened when Navision is started.
Click Next and the installation process will continue. It will display a progress bar that allows you to monitor the installation. The installation program will also inform you when the installation is complete and whether it has been successful or not.
Publishing Navision Database Server in a Network
In order for other server and client computers to be able to identify and connect with your Navision Database Server, you must publish it in the network. Before you can publish a Navision Database Server in the network, you must add a definition of a Navision service connection point to the Active Directory. Navision Database Server uses this service connection point to publish itself in the network and the clients use this information to locate the server and to find out how to connect to it. Only servers that have been installed as a service can be published in the network.
To add a definition of a Navision Database Server to the Active Directory, you must add a Schema Extension to Active Directory. This must only be done once for each forest of domains and domain trees, regardless of how many Navision Database Server are in that forest.
When you install Navision Database Server, a file called schemaXt.exe is copied into the folder that contains Navision Database Server. Run this file to add a definition of a Navision service connection point to the Active Directory. Starting up a Navision Database Server (running as a service) will publish a service connection point using the definition that has been added to Active Directory.
Maintaining Navision Database Server
The Maintenance Setup Type window for Navision Database Server differs from that of Navision in that you are not able to modify the server installation. If you need to change the server name, for example, you must uninstall the program first and then install it again and give it the new server name.
If you install the server again in the same folder (for example, if you install an update), any existing database files, database backup files and license files will not be
overwritten by the new installation. This means that if you want a new database or a new license file to be installed when you reinstall the program, you must delete these two existing files from the Navision folder before you start.
. . .
NoteWe recommend that you make a backup of any license files, databases and database backups that are stored on the server before modifying, repairing or removing the
. . .
server installation.1.4 L
ICENSEF
ILESA single-user installation comes with a demonstration license file, cronus.flf, that allows you to see all the application areas in the demonstration company that is part of the accompanying standard database, database.fdb. To start working with Navision, you will need a license file that contains permissions for the desired application areas and functions. You obtain the license file from your Microsoft Certified Business Solutions Partner.
You can use your license file to work in the demonstration company as well as your own companies, but your permissions will be limited (even in the demonstration company) to those provided by the license file. On the other hand, your license file does not contain the restrictions of the demonstration license file, which are listed on page 50.
Your license file is always named fin.flf, and you receive it on a diskette by itself. In a single-user installation, copy the license from the diskette to your computer. In a multiuser installation, the license will be copied to the server during the installation process and does not need to be copied to the individual clients. The clients automatically work with the same license file as the server to which they are connected.
After you have copied your license file to your computer or the server, store the diskette in a safe place until you need to use it again.
The Final Adjustments
For both single users and clients, you may need to adjust the Navision setup to match your computer and the rest of the system. There are a number of system setup tools to help you. They are described in the chapters called "System Setup" and "Advanced Performance Issues."
1.5 I
MPORTING AD
ATABASE INTON
AVISIOND
ATABASES
ERVERIn a multiuser installation, in addition to installing one or more clients, you must install the server program and set up a database on the server. It is easier to start by setting up the database.
The server program does not come with a database. If you already have a Navision database, copy it to the same computer that your server will be installed on. If you do not already have a database, you can use the standard database, database.fdb, or a copy of it. For more information, see the section called "Using the Standard Database" on page 50.
You can also create a new database. To do this, you need some of the information in the standard database. A single-user version must therefore be installed somewhere in the network so that you can transfer the database that comes with it to the server.
To create a new database before you install the server:
1 Install a Navision single-user.
Remember to select the Complete Installation option. (See "Installing, Maintaining and Removing Single-Users and Clients" on page 4.)
The standard database will be installed as part of the complete installation and comes with a demonstration company. It is not a good idea to leave the demonstration company in your working database (see page 50 for details). If, however, you want to leave it in, skip to step 6.
2 Click File, Company, Open to open the demonstration company. 3 Click File, Company, Delete.
4 Click Yes when you are asked (twice) whether you want to delete CRONUS International Ltd.
5 Close the single-user program.
6 Start the Navision Database Server Setup program.
Starting the Server
When installed as a service the Navision Database Server starts automatically every time you start the server operating system.
. . .
NoteRemember to make a full backup of the database before deleting it from the hard disk.
. . .
For more information, see the chapter called "Making Backups" on page 111.1.6 R
UNNINGM
ORE THANO
NES
ERVERThe following sections describe the possibilities for running more than one server with the same database or with different databases. Appendix B gives more detailed information about network communications.
Two or More Servers, Same Database
It is possible to run two or more Navision Database Servers with the same database provided that:
· each server has a different server name. · all the servers are run from the same folder.
With this configuration you could, for example, have one server running TCP/IP and another one running NetBIOS on the same database. See "NetType – Selecting a Net Type" on page 34 for a description of TCP/IP and NetBIOS.
Two or More Servers, Different Databases
It is possible to run two or more Navision Database Servers with different databases provided that:
· each server has a different server name.
· the server programs are located in different folders.
This means that to use two databases on the same computer, you must install the server program twice, in two different folders.
The following examples describe how to configure your installation for running two servers with different databases, using TCP/IP and using NetBIOS.
Two Servers on the Same Computer, Both Using TCP/IP
To run two servers, both running TCP/IP, on the same computer, follow the procedure outlined below to configure the computer correctly.
Install the Navision Database Server in two different folders as follows:
The servers 1 Install the first server as described previously (page 13).
2 Make a copy of the folder where Navision Database Server was just installed and rename it. You must do this because you cannot install two versions of Navision Database Server on the same computer.
Once the two servers have been installed, proceed as follows:
1 Locate the SERVICES file. On Windows 2000 Server and on Windows Server 2003 the services file is stored in:
C:Windows\System32\drivers\etc\
2 Edit the SERVICES file to include statements such as:
The server names shown should be replaced with your actual server names.
3 Start the first server in the first folder, using the following parameters: server servername=servername1, nettype=tcp, cache=xxx, commitcache=yes, database=AAAA
4 Start the second server in the second folder, using the following parameters: server servername=servername2, nettype=tcp, cache=xxx, commitcache=yes, database=BBBB
In these examples, xxx represents the cache size, and AAAA and BBBB are the names of the databases. Remember to write out the full path for each database file.
5 Edit the SERVICES file on the client as follows:
6 Start the first client, using the following parameters: fin servername=servername1, nettype=tcp
7 Start the second client by using the following parameters: fin servername=servername2,
nettype=tcp ... ...
servername1 2407/tcp servername2 2408/tcp ...
...
... ...
servername1 2407/tcp servername2 2408/tcp ...
The system should now be up and running.
Two Servers on the Same Computer, Both Using NetBIOS
When you use NetBIOS, you do not have to configure the HOSTS and SERVICES files.
The servers 1 Install the two servers in two different folders.
2 Start the first server in the first folder using the following parameters: server servername=servername1, nettype=netb, cache=xxx, commitcache=yes, database=AAAA
3 Start the second server in the second folder using the following parameters: server servername=servername2, nettype=netb, cache=xxx, commitcache=yes, database=BBBB
In these examples, xxx represents the cache size, and AAAA and BBBB are the names of the databases. Again, remember to write out the full path for each database file.
The clients 4 Now that the servers are up and running, start the first client, using the following parameters:
fin servername=servername1, nettype=netb
5 Start the second client, using the following parameters: fin servername=servername2, nettype=netb The system should now be up and running.
Navision comes with a standard setup that enables it to be used immediately. However, different installations may require small variations in the setup. You can easily implement these changes yourself. Once you have
changed the settings, the program uses them until they are changed again.
There is no simple formula that specifies the setup selections that different users need or the order in which they must be defined.
The chapter contains the following sections:
· Navision Installations
· Single-User and Client Setup Properties · Navision Database Server Setup Properties · Setting the Program Properties
2.1 N
AVISIONI
NSTALLATIONSNavision can be installed in several different configurations. The various program properties can then be used to determine the way the different types of installations perform. However, the program properties do not all apply to the different
configurations and their effect can vary.
Navision can be configured to run as multiuser installations or as single-user installations.
Multiuser In a multiuser installation, many users use common information that is stored in one or more databases on a server. The computers that work with the data are called clients, and the way the server and the computers work together is called client/server.
There are, however, two different types of multiuser installation:
· A classic client/server installation, where the server is installed on one computer and the clients are installed on other computers in the network.
· A multiuser installation, where both the server and the client programs are installed on a file server and the clients are run remotely from other computers in the network.
Single-User In single-user installations, all the work is done on one computer and all the information (the database) is stored on this computer. Even if you purchase several single-user installations and run each on its own computer, the entire installation is still called single-user because the information is stored on each individual computer and not in one centrally located database.
Single-user installations are the easiest to set up and maintain.
The Setup File
Navision is able to remember the various settings that are used by different clients and single-users. This includes the server the client was connected to and the database and company the client was working with. It does this by saving these settings in a setup file. This setup file is called a zup file in Navision. The different clients can all share the same zup file and thereby use the same settings, or they can all have individual zup files and thereby use their own customized settings.
If the network administrator has decided to implement roaming users, you will not have to utilize setup IDs. With roaming users, Windows will save the personal settings of each individual user on the server, including their zup file. This file will be called fin.zup and will contain Navision information that is specific to that user.
If the network administrator has decided to implement local users, the zup file of each user will be saved on their local hard disk. Several users can also use the same computer and have their own zup files stored on the hard disk as long as they have individual windows accounts. The zup file of each individual user is stored in
You only have to implement setup IDs if the users are using the same Windows account.
If you do not enter a setup ID, the program will use the setup file called fin.zup when you start the program. You will be prompted to save any modifications that you have made during the session when you close the program. These changes will be saved as fin.zup and will be recreated the next time the program is started.
When several users are using the same zup file they will each be prompted to save the changes they have made in the fin.zup file when they close the program. The fin.zup file that was saved by the previous user who quit the program will be replaced.
If you delete the zup file on a client or single-user installation Navision will recreate the default zup file the next time the program is started.
You can also make a standard setup created for a particular type of user available to other users with similar needs. To do this, copy the appropriate setup file to the folder from which the user starts the program, and enter the setup ID (file name) in the Target field (see page 47).
Alternatively, you can store the setup file on a common drive in the network (but here it can be overwritten by other users). If you choose to place the setup file in a folder other than the one containing the program files, you must remember to specify the entire path name after id=.
The setup ID is not the same as the user IDs in Navision, but you can use the same names. In fact, it can be an advantage to do so because although you cannot see the name of the setup file in the program, you can always see the user ID on the status bar at the bottom of the program window.
The following table lists the different program properties and the type of installation to which they apply:
Property Client Server Described on
ID X page 29
Server Name X X page 30
Database X X page 30
Company X page 31
NT Authentication X page 32
Commit Cache X X page 33
Object Cache X page 33
Net Type X X page 34
TempPath X page 34
DB Test X page 35
TestTarget X page 35
Status Bar X page 36
Close Forms On ESC X page 37
Marquee Full Selection X page 37
Quick Find X page 38
DB Read-Only X page 38
DBMS Cache X X page 39
Stoptime X page 40
Sessions X page 41
Install As Service X page 42
2.2 S
INGLE-U
SER ANDC
LIENTS
ETUPP
ROPERTIESThis section describes all of the program properties that you can set for both clients and single-users.
ID – Saving the User Setup
Each user in a Navision multiuser installation can choose the setup of windows and program properties that they want to use. Each user must have a unique ID, in order for the program to be able to save and use the setup selections of the individual users. You can create a user setup by starting the program with an ID. The information about the users’ setup will be stored under this ID. Here is an example in which the program starts with an ID called SUPER:
c:\Program Files\Microsoft Business Solutions–Navision\Client\fin.exe id=SUPER
In a list of Navision program files, you can see that each time you have started with a new setup ID, a file has been created that has the ID as the first part of the file name and.zup as the file name extension (for example, super.zup). This is called a setup file.
Returning to the Original Setup
You can always return to the standard setup file, fin.zup, by starting the program without specifying a setup ID.
If you have previously worked without a setup ID and made changes in the setup, the fin.zup file will contain these changes. If you do not want to use this modified fin.zup file but would prefer to return to the original starting point of the program, delete the fin.zup file and start the program again without an ID. The program will create a new, clean setup file, named fin.zup.
For more information about zup files, see the section called "The Setup File" on page 26.
Program Property
Purpose Where Specified Default Value Value
ID (clients only) Saves the program setup
By entering
ID=alice in the Command line or the
Target field.
Fin Name of ID (including path if ID file is not located in Navision folder)
Server Name – Choosing the Server
This program property is used to specify the server that a particular client will connect to and does not apply in a single-user environment.
You can set up the connection to the server in the Target field by entering the name of the server after servername=.
You can connect to a server from within Navision by clicking File, Database, Open on the menu bar. For more information about connecting with a server and opening a database, see the section called "Opening the Database" on page 57.
Click File, Database, Information and click the Database tab to see which server you are currently connected to.
Database – Selecting a Database
The Database program property is used to make the program start with a particular database open. (The database must already exist.) In the Target field or on the
Program Property
Purpose Where Specified Default Value Value
Server Name Specifies which server to connect to
Can be selected by clicking File, Database, Open or by entering
servername=My Server in the Command line or the
Target field:
None Name of server
Program Property
Purpose Where Specified Default Value Value
Database Specifies which database to open. A Navision Database Server can only have one database open at a time.
File, Database, Open and Command line or by entering
database=My Database in the Command line or the
Target field. In a client/server installation this only works in combination with servername=
None Name of database (including path if database is not located in Navision folder)
command line that starts the program, type the name of the database immediately after database=.
To open a database from within Navision:
1 Click File, Database, Open.
2 In the window that appears, select the server and the database that you want to open.
Click File, Database, Information to see which database is being used. For more information about databases, see the chapter called "Working with Databases" on page 49.
Navision Database Server can only have one database open at a time. If a client wants to open a database other than the one that is currently open, they will have to wait until the first database is closed before they can open the desired database.
When you select a database for a client, you can also select the company you want to open automatically by using the Company program property.
Company – Selecting a Company
With this program property, you can select the company that will open automatically when a client starts Navision. You must also specify the server and the database that contain the company before you specify the company in the Target field.
Because Navision can only have one database open at a time, you must connect to a server that already has the appropriate database open. If no other clients are using the system, you can select the server, database and company that you want.
From within the program, you can select a company by clicking File, Company, Open. You can also select a company from the list displayed at the bottom of the File menu. You can see the current company on the title bar of the program window.
Program Property
Purpose Where Specified Default Value Value
Company Specifies which company to open
File, Company, Open or by entering
company=CRONUS International Ltd. in the Command line or the
Target field. In a client/server installation this only works in combination with servername=
and database=
Windows Authentication – Selecting the Authentication Mode
This program property is used to determine which type of authentication is to be used when logging on to a server and opening a database.
After selecting the server and the database in the Open Database window you must: 1 Select the type of authentication that is to be used.
2 Enter your user ID and your password, if database server authentication is being used. If Windows authentication is being used, you do not have to enter a password or user ID.
3 Click OK.
Alternatively, you can enter yes or no after ntauthentication= in the Target field or on the command line that starts the program.
If you are using Windows authentication, Navision will start, automatically connect to the server and open the database that you have specified.
If Database authentication is being used, Navision will start and prompt you to supply your user ID and password before connecting to the server and opening the database.
For more information about the types of authentication used in Navision, see chapter 4 "Security".
Program Property
Purpose Where Specified Default Value
Value
NTAuthentication Specifies which type of
authentication is to be used
File, Database, Open or by entering
ntauthentication =yes in the
Command line or the
Target field.
Commit Cache – Writing the Cache
The Commit Cache program property allows Navision to postpone writing the information stored in cache on the server to the database until later. Storing this information in cache allows Navision to work faster.
You must restart the program before any changes that you make to this parameter take effect.
Object Cache – Improving Response Times
The Object Cache property increases the speed of the program. Objects such as code, descriptions and windows that will be used on the client computer are stored in the object cache. This means that the client computer only needs to retrieve these objects once from the server, and then they will be stored in the object cache. The client computer must have enough memory to store the objects while they are being used in order to benefit from the object cache.
Running out of object cache (that is, setting too small a value) does not cause any problems. The total size of all the objects used in the standard application is approximately 20 MB. If you have enough memory, set the object cache to 20 MB. The size of the most important objects, such as the table descriptions, is 1 MB. You should therefore, as a minimum, set the object cache to 1 MB. The upper limit is 1 GB.
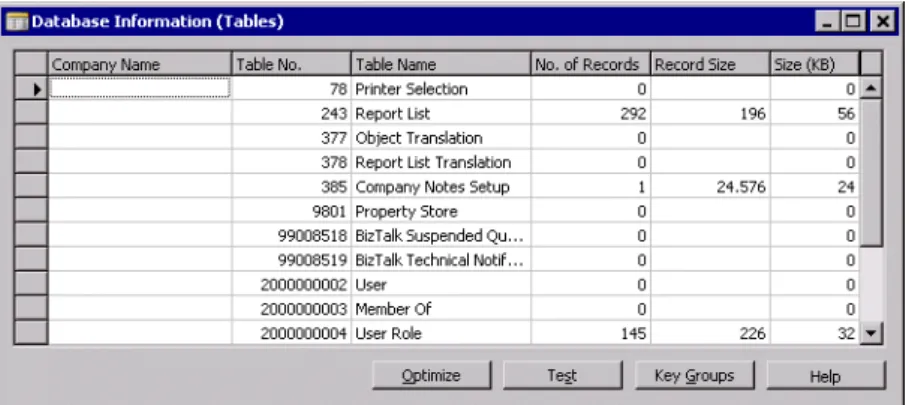
Click File, Database, Information to open the Database Information window and see how much space has been allocated in the Object Cache (KB) field. To change the amount of space allocated to the object cache, on the menu bar, click Tools, Options, and enter the setting in the Object Cache (KB) field.
Program Property
Purpose Where Specified Default Value Value
Commit Cache Makes the program run faster
Tools, Options or by entering
commitcache= in the Command line or the
Target field.
No Yes/No
Program Property
Purpose Where Specified Default Value Value
Object Cache (KB) (clients only)
Makes the program run faster
Tools, Options or by entering
objectcache=8000
in the Command line or the Target field.
8,000 KB More than 0 KB and less than 1,000,000 KB
NetType – Selecting a Net Type
To use Navision in a network, you must select the network protocol that is used for communication between the server and the clients. There are two possible values:
· nettype=tcp (for TCP/IP) · nettype=netb (for NetBIOS)
The same selection must be entered on all the client computers in the network as well as on the server. On the server, enter the net type you have selected in the Target field (see page 46) or on the command line after the start command. On the client computers, enter the selection in the Target field or click Tools, Options on the menu bar within Navision.
To check the setting when you are using the program, click File, Database, Information, and look at the Connection tab. For more information about the
Database Information window, see page 66.
TempPath – Location of Temporary Working Files Program
Property
Purpose Where Specified Default Value Value
NetType Permits choice of network protocol
Tools, Options or by entering NetType= in the Command line or the Target field.
TCP Netb, TCP
Program Property
Purpose Where Specified Default Value Value
TempPath Specifies location of temporary working files created automatically
Tools, Options or by entering Temppath=
in the Command line or the Target field.
Windows 2000: C:\Documents and Settings\User Name\Applicat ion Data\Local Settings\Temp Windows XP: <C:\Documents and Settings\User Name\Local Settings\Temp Path to temporary files
each individual user are stored in the location listed in the previous table unless you specify a different working folder. If you do so, this working folder will be the default location. You can specify the working folder in the Target field or by clicking Tools, Options. You must specify the full path, including the drive and all the folders.
DB Test – Testing the Database
You can use this program property to test the consistency and integrity of the database. You can also run the test from within the program by clicking File, Database, Test. You can specify exactly what you want to test in the dialog box that appears.
When you enter the DB Test program property in the Target field, the database will be tested before the program opens. You can specify one of the following options:
· dbtest=min
· dbtest=normal
· dbtest=max
You can read about the extent of these tests, as well as how to create a customized version of the database test, in the section called "Testing the Database" on page 61.
TestTarget
You use this program property to specify how any error messages that are generated during a database test are managed. They can be displayed on the screen or stored in the Event Log or in a text file.
Program Property
Purpose Where Specified Default Value Value
DB Test Tests the database
File, Database, Test or by entering
dbtest=min in the Command line or the
Target field.
None Min., Normal or Max.
Program Property
Purpose Where Specified Default Value Value
TestTarget To specify how error messages generated by the database test are managed.
File, Database, Test or by entering
testtarget=@scre en in the Command line or the Target
field.
@screen @screen, @eventlog, filepath
You can enter one of the following options:
· testtarget=@screen
· testtarget=@eventlog
· testtarget=filepath
You must enter the full path and the name of the text file. If you select event log, you can read the error messages that were generated during the database test in the
WindowsEvent Viewer. If you select screen, the error messages will be displayed on the screen and the database test will require interaction from the user if any errors are found. Selecting screen can make the database test quite time consuming.
For more information about testing the database, see Testing the Database on page 61.
Status Bar
On the menu bar, click Tools, Options, and in the Options window you can specify whether or not the status bar will be displayed at the bottom of the program window.
The status bar contains the following information:
· The complete name of the active field and its contents. · The work date.
· The current user ID.
· Whether or not any filters have been placed on the data (FILTER appears).
· Whether or not you are about to create something NEW (an account, for example). · Whether you are working in Insert (INS) or Overtype (OVR) mode.
When you make a visible change in the setup (such as making the status bar invisible), it is practical to use the ID program property and a setup file on your own computer. This makes the setup selections valid only for yourself. For more information, see the section called "ID – Saving the User Setup" on page 29.
This property can only be adjusted from within Navision. Program
Property
Purpose Where Specified Default Value Value
Status Bar Activates or deactivates the status bar
Close Forms On ESC
Click Tools, Options on the menu bar and you can choose whether or not the window you are working in will close when you press ESC.
It is practical to use the ID program property and have a setup file on your own computer if you change the setup. This makes the setup selections valid only for yourself. For more information, see the section called "ID – Saving the User Setup" on page 29.
This property can only be adjusted from within Navision.
Marquee Full Selection
With this setting, you can choose whether graphical objects must be completely within the frame in order to be selected, or whether it is sufficient for them just to touch the edges. This property is relevant for developers using the C/SIDE® development environment. To make this selection, on the menu bar click Tools, Options and make your selection in the Options window.
This property can only be adjusted from within Navision. Program
Property
Purpose Where Specified Default Value Value
Close Forms On ESC
Determines whether windows close when you press ESC
Tools, Options Yes Yes/No
Program Property
Purpose Where Specified Default Value Value
Marquee Full Selection
Determines how graphical objects are selected on the screen
Quick Find
This setting allows you to activate a quick search facility. When the Quick Find setting is enabled, you can search for an entry in any non-editable field, by typing a letter or number. You can also enter the entire name of the element you are looking for. When you enter a letter or number, the Find window opens automatically, and the first row that matches what you entered becomes the active row.
When the Quick Find property is disabled, you can open the Find window by clicking Edit, Find on the menu bar or by clicking Find on the toolbar.
This property can only be adjusted from within Navision.
DB Read-Only
This program property allows you to specify that the database has read access only. This prevents other users from entering data into the database.
Program Property
Purpose Where Specified Default Value Value
Quick Find Quick search by letter in all windows
Tools, Options Yes Yes/No
Program Property
Purpose Where Specified Default Value Value
DB Read-Only Determines that it is impossible to enter any data into the database
By entering
dbreadonly= in the Command line or the
Target field.
2.3 N
AVISIOND
ATABASES
ERVERS
ETUPP
ROPERTIESAlmost all the program properties for the server can be specified in the Target field or on the command line that is used to start the server.
The following four properties apply to both the server and the client and have been described in the previous section:
The server name is specified during the installation and the only way it can be changed is to uninstall the server and then install it again giving it a different name.
The remaining setup properties only apply to the server and are described in this section.
DBMS Cache
This property only applies to server and single-user installations.
DBMS Cache (Database Management System Cache or just Cache) is the name for a reserved space in the computer’s memory – where data is stored temporarily, until it has been processed completely. After this, the commit cache transfers it to the hard disk. This system quickly frees Navision for new work.
Program Property
Purpose Where Specified Default Value Value
Commit Cache Makes the program run faster
Command line,
Target field
No Yes/No
Server Name Sets the name of the server
During installation The name of the server computer
Server name
Database Selects an existing database
Command line,
Target field
None Name of database (including path if not located in Navision folder)
Net Type Selects network protocol
During installation, Command line,
Target field
TCP TCP or Netb
Program Property
Purpose Where Specified Default Value Value
DBMS Cache (KB)
Makes the program run faster
Tools, Options or by entering cache= in the Command line or the Target field.
8000 KB More than 100 KB and less than 1,000,000 KB
When the cache becomes full, old information in it is replaced with new. When you turn off the computer, everything in the cache is cleared from the memory. At that point, it has already been transferred from the cache to the database.
The cache requires a minimum of 100 KB memory. The upper limit is 1 GB. To see how much cache has been allocated, click File, Database, Information and check the DBMS Cache (KB) field in the Database Information window.
It is usually advantageous to specify as large a cache as possible. If the computer does not have enough memory, however, doing so can cause the operating system to "swap." Swapping means moving part of the cache to the hard disk to make more memory available. When this happens, the performance will be considerably slower because reading and writing take much longer when the hard disk is involved than when these operations are carried out in memory. To avoid swapping, you can add more memory to your computer, reduce the number of programs running
simultaneously, or you can make the cache smaller. See page 136 to learn how to adjust the cache size.
You must restart the program before any changes that you make to this parameter take effect.
Stoptime – Closing the Program Automatically
You can set the server Stoptime program property in the Target field (see page 46) or on the command line. Enter the property as follows: stoptime=hhmmss, with hhmmss replaced by a time in hours, minutes and seconds.
The server will stop automatically when the computer’s built-in clock reaches the specified time. You can use this function to make the database unavailable after a particular time. It is not necessary to stop Navision in order to make backups. For more information see the chapter called "Making Backups" on page 111.
Program Property
Purpose Where Specified Default Value Value
Stoptime Stops the server automatically at a particular time
By entering
stoptime= in the Command line or the
Target field.