Oracle® WebLogic Integration
Using the WebLogic Integration Administration Console
10g Release 3 (10.3.1)
may not use, copy, reproduce, translate, broadcast, modify, license, transmit, distribute, exhibit, perform, publish, or display any part, in any form, or by any means. Reverse engineering, disassembly, or decompilation of this software, unless required by law for interoperability, is prohibited.
The information contained herein is subject to change without notice and is not warranted to be error-free. If you find any errors, please report them to us in writing.
If this software or related documentation is delivered to the U.S. Government or anyone licensing it on behalf of the U.S. Government, the following notice is applicable:
U.S. GOVERNMENT RIGHTS Programs, software, databases, and related documentation and technical data delivered to U.S. Government customers are "commercial computer software" or "commercial technical data" pursuant to the applicable Federal Acquisition Regulation and agency-specific supplemental regulations. As such, the use, duplication, disclosure, modification, and adaptation shall be subject to the restrictions and license terms set forth in the applicable Government contract, and, to the extent applicable by the terms of the Government contract, the additional rights set forth in FAR 52.227-19, Commercial Computer Software License (December 2007). Oracle USA, Inc., 500 Oracle Parkway, Redwood City, CA 94065.
This software is developed for general use in a variety of information management applications. It is not developed or intended for use in any inherently dangerous applications, including applications which may create a risk of personal injury. If you use this software in dangerous applications, then you shall be responsible to take all appropriate fail-safe, backup, redundancy, and other measures to ensure the safe use of this software. Oracle Corporation and its affiliates disclaim any liability for any damages caused by use of this software in dangerous applications.
Oracle is a registered trademark of Oracle Corporation and/or its affiliates. Other names may be trademarks of their respective owners.
This software and documentation may provide access to or information on content, products and services from third parties. Oracle Corporation and its affiliates are not responsible for and expressly disclaim all warranties of any kind with respect to third-party content, products, and services. Oracle Corporation and its affiliates will not be responsible for any loss, costs, or damages incurred due to your access to or use of third-party content, products, or services.
Contents
Introducing the Oracle WebLogic Integration Administration
Console
Starting the Oracle WebLogic Integration Administration Console . . . 1-1 Common Logging and WebLogic Diagnostic Framework . . . 1-7
Process Configuration
About Process Configuration . . . 2-2 Managing Process Tracking Data . . . 2-3 Process Security Policies . . . 2-5 Service Level Agreements . . . 2-6 Process Versions . . . 2-6 Dynamic Controls . . . 2-7 Overview of the Process Configuration Module . . . 2-8 Listing and Locating Process Types . . . 2-11 Listing and Locating Dynamic Controls . . . 2-12 Viewing and Changing Process Details . . . 2-13 Viewing an Interactive or Printable Process Type Graph . . . 2-21 Managing Process Versions . . . 2-24 Adding and Changing Dynamic Client Callback Selectors . . . 2-26 Updating Security Policies. . . 2-30 Adding and Changing Dynamic Control Selectors . . . 2-32 Defining Process Control Properties for a Selector . . . 2-33
Process Instance Monitoring
Overview of the Process Instance Monitoring Module . . . 3-2 Requirements for the Interactive Graph . . . 3-4 Viewing Instance Statistics by Process Type . . . 3-8 Viewing System Health Statistics . . . 3-9 Listing and Locating Process Instances . . . 3-11 Constructing an Advanced Search. . . 3-13 Viewing Process Instance Details . . . 3-16 Parent-Child Navigation . . . 3-20 Viewing an Interactive or Printable Process Instance Graph . . . 3-22 Suspending, Resuming, Terminating, and Unfreezing Process Instances. . . 3-24
Message Broker
About Message Broker Channels . . . 4-2 Overview of the Message Broker Module. . . 4-3 Listing and Locating Channels . . . 4-3 Viewing Channel Details and Subscriptions . . . 4-4 Setting Channel Security Policies . . . 4-8 Viewing Global Message Counts . . . 4-10 Resetting Message Counts. . . 4-11
Event Generators
About Event Generators . . . 5-2 Overview of the Event Generator Module. . . 5-5 Creating and Deploying Event Generators . . . 5-15
Creating and Deploying a JMS Event Generator . . . 5-15 Creating and Deploying a File, Email, Timer, MQ Series, HTTP, or RDBMS Event
Generator . . . 5-18 Defining Channel Rules for a File Event Generator . . . 5-20 Defining Channel Rules for an Email Event Generator. . . 5-29 Defining Channel Rules for a JMS Event Generator . . . 5-32 Defining Channel Rules for a Timer Event Generator . . . 5-34 Overview of TibcoRV Event Generator . . . 5-38 Defining Channel Rules for TIBCORV Event Generator . . . 5-38 Defining Channel Rules for an MQ Series Event Generator . . . 5-40 Defining Channel Rules for an HTTP Event Generator . . . 5-48 Defining Channel Rules for a RDBMS Event Generator . . . 5-49 Listing and Locating Event Generators . . . 5-55 Listing Event Generators . . . 5-55 Locating Event Generators . . . 5-56 Viewing and Updating Event Generator Channel Rules . . . 5-57 Suspending and Resuming Event Generators . . . 5-59 Resetting Counters . . . 5-60 Deleting Channel Rules . . . 5-60 Deleting Event Generators . . . 5-61
Trading Partner Management
About Trading Partner Management . . . 6-2 Overview of the Trading Partner Management Module . . . 6-5 Configuring Trading Partner Management . . . 6-8 Configuring the Mode and Message Tracking . . . 6-8 Configuring a Proxy Host . . . 6-10 Configuring Secure Audit Logging . . . 6-10
Configuring Partner Profiles . . . 6-13 Adding Trading Partner Profiles. . . 6-13 Editing Trading Partner Profiles. . . 6-15 Viewing and Changing Trading Partner Profiles . . . 6-17 Listing and Locating Trading Partners . . . 6-20 Adding Certificates to a Trading Partner. . . 6-22 Add Certificates . . . 6-22 Viewing and Changing Certificates . . . 6-26 Adding Protocol Bindings to a Trading Partner . . . 6-29 Add Binding . . . 6-29 Defining Protocol Bindings . . . 6-30 Viewing and Changing Bindings . . . 6-43 Configuring Signature Transforms for ebXML Bindings . . . 6-52 Configuring PIP Notification of Failure Roles for RosettaNet Bindings. . . 6-53 Adding a Custom Extension to a Trading Partner . . . 6-55 Add Custom Extension. . . 6-56 Viewing and Changing a Custom Extension . . . 6-58 Adding Services. . . 6-59 Add Service . . . 6-59 Adding Service Profiles to a Service . . . 6-61 Listing and Locating Services . . . 6-70 Viewing and Changing Services. . . 6-71 Viewing and Changing Service Profiles. . . 6-74 Enabling and Disabling Trading Partner and Service Profiles . . . 6-76 Importing and Exporting Data . . . 6-79
Importing Management Data . . . 6-79 Exporting Management Data . . . 6-81 Deleting Trading Partner Profiles and Services Using Bulk Delete . . . 6-84 Deleting Trading Partner Profiles . . . 6-86 Deleting Certificates, Bindings, or Custom Extensions. . . 6-86 Deleting Services . . . 6-88 Deleting Service Profiles from a Service . . . 6-88 Viewing Statistics . . . 6-89 Monitoring Messages . . . 6-90 Listing and Locating Messages. . . 6-90 Filtering the Messages Displayed . . . 6-91 Viewing Message Detail . . . 6-93
System Configuration
About System Administration . . . 7-3 Process Tracking Data . . . 7-3 Reporting and Purging Policies for Tracking Data . . . 7-4 Password Aliases and the Password Store . . . 7-6 Overview of the System Configuration Module . . . 7-6 Viewing the Configuration for Tracking, Reporting, and Purging Data . . . 7-8 Configuring the Reporting Data and Purge Processes . . . 7-10 Configuring the Reporting Datastore . . . 7-12 Configuring the Default Data Policy and Tracking Level for Processes . . . 7-13 Manually Starting and Stopping the Purge Process . . . 7-14 Adding Passwords to the Password Store . . . 7-15 Listing and Locating Password Aliases . . . 7-16 Changing the Password for a Password Alias . . . 7-17 Deleting Passwords from the Password Store . . . 7-18
About the XML Cache. . . 8-2 Overview of the XML Cache Module . . . 8-2 Adding XML Documents to the XML Cache . . . 8-3 Updating an XML Document in the XML Cache . . . 8-4 Viewing the Code for an XML Document . . . 8-4 Deleting an XML Document from the XML Cache . . . 8-5 Viewing All XML Documents in the XML Cache . . . 8-6
C H A P T E R
1
Introducing the Oracle WebLogic
Integration Administration Console
The Oracle WebLogic Integration Administration Console allows you to manage and monitor the entities and resources required for your Oracle WebLogic Integration applications.
Starting the Oracle WebLogic Integration Administration
Console
Access to the Oracle WebLogic Integration Administration Console is password protected. Before you start the server, you need to create a WLI domain using the Configuration Wizard. For more information, see “Creating a new WebLogic Domain” in Creating WebLogic Domains Using the Configuration Wizard.
To start the WLI Administration console:
1. Open the following URL in your Web browser:
http://adminserver:port/wliconsole
Here, adminserver is the host name or IP address of the Oracle WebLogic Server administrative server, and port is the server listening port. For example type the following to open the WLI Administration Console: http://localhost:7001/wliconsole. 2. Enter the username and password in the WLI Administration Console window.
Note: The user must be a member of the Administrators, IntegrationAdministrators, IntegrationOperators, or IntegrationMonitors group. For more information, see “About WebLogic Integration Users, Groups, Roles, and Security Policies” in Using Worklist Console. If this is the sample integration domain, the default login is:
username: weblogic
password: weblogic
The Oracle WebLogic Integration Administration Console home page is displayed.
Figure 1-1 Oracle WebLogic Integration Administration Console - Home Page
The tool bar on top of the home page contains the following links:
z Home: To return to the home page at any time during the session. If the console is idle for a period of time, you are automatically logged off.
z WLS Console: To invoke the Oracle WebLogic Server Console in a new window.
z LOGOUT: To log out of the WLI Administration Console.
z Help: To access the online help at any time.
z Ask Oracle: To directly contact the Oracle Support team for any clarifications or questions you may have regarding the WLI Administration Console.
S t a r t i n g t h e O r a c l e W e b L o g i c I n t e g r a t i o n A d m i n i s t r a t i o n C o n s o l e
This tool bar is available on every page regardless of the module you are accessing in the WLI Administration Console.
The panel to the left side of the screen (left navigation menu) provides access to the modules of the console. The left navigation menu contains the following links:
z System Configuration
z Process Instance Monitoring
z Process Configuration
z Message Broker
z Event Generators
z Trading Partner Management
z XML Cache
This panel is available on every page regardless of the module you are accessing in the WLI Administration Console. You can use this panel to navigate to any of the modules whenever required.
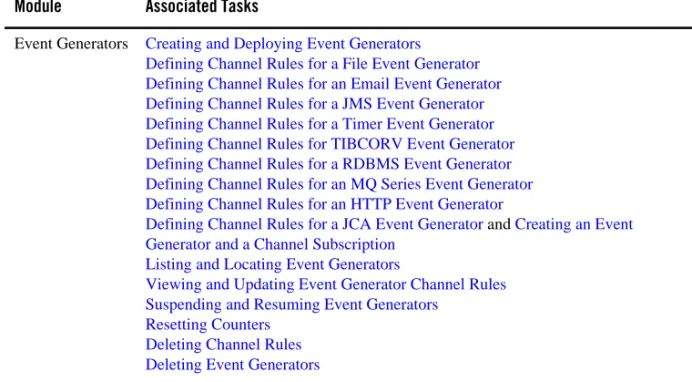
The following table lists the modules of the WLI Administration Console and summarizes the tasks associated with each module.
Table 1-1 Modules of Oracle WebLogic Integration Administration Console
Module Associated Tasks
System Configuration
Viewing the Configuration for Tracking, Reporting, and Purging Data Configuring the Reporting Data and Purge Processes
Configuring the Reporting Datastore
Configuring the Default Data Policy and Tracking Level for Processes Manually Starting and Stopping the Purge Process
Adding Passwords to the Password Store Listing and Locating Password Aliases Changing the Password for a Password Alias Deleting Passwords from the Password Store Configuring SFTP
Process Instance Monitoring
Viewing Instance Statistics by Process Type Viewing System Health Statistics
Listing and Locating Process Instances Constructing an Advanced Search Viewing Process Instance Details
Viewing an Interactive or Printable Process Instance Graph
Suspending, Resuming, Terminating, and Unfreezing Process Instances
Process Configuration
Listing and Locating Process Types Listing and Locating Dynamic Controls Viewing and Changing Process Details
Viewing an Interactive or Printable Process Type Graph Managing Process Versions
Adding and Changing Dynamic Client Callback Selectors Updating Security Policies
Adding and Changing Dynamic Control Selectors Defining Process Control Properties for a Selector Defining Service Broker Control Properties for a Selector Defining ALSB Control Properties for a Selector Deleting Dynamic Control Selectors
Message Broker Listing and Locating Channels
Viewing Channel Details and Subscriptions Setting Channel Security Policies
Viewing Global Message Counts Resetting Message Counts
S t a r t i n g t h e O r a c l e W e b L o g i c I n t e g r a t i o n A d m i n i s t r a t i o n C o n s o l e
Event Generators Creating and Deploying Event Generators Defining Channel Rules for a File Event Generator Defining Channel Rules for an Email Event Generator Defining Channel Rules for a JMS Event Generator Defining Channel Rules for a Timer Event Generator Defining Channel Rules for TIBCORV Event Generator Defining Channel Rules for a RDBMS Event Generator Defining Channel Rules for an MQ Series Event Generator Defining Channel Rules for an HTTP Event Generator
Defining Channel Rules for a JCA Event Generator and Creating an Event Generator and a Channel Subscription
Listing and Locating Event Generators
Viewing and Updating Event Generator Channel Rules Suspending and Resuming Event Generators
Resetting Counters Deleting Channel Rules Deleting Event Generators
Table 1-1 Modules of Oracle WebLogic Integration Administration Console
Trading Partner Management
Configuring Trading Partner Management Configuring Partner Profiles
Adding Certificates to a Trading Partner Adding Protocol Bindings to a Trading Partner Adding a Custom Extension to a Trading Partner Adding Services
Adding Service Profiles to a Service Editing Trading Partner Profiles Listing and Locating Trading Partners Listing and Locating Services
Viewing and Changing Trading Partner Profiles Viewing and Changing Certificates
Enabling and Disabling Trading Partner and Service Profiles Viewing and Changing a Custom Extension
Viewing and Changing Services Viewing and Changing Service Profiles Importing and Exporting Data
Importing Management Data Exporting Management Data
Deleting Trading Partner Profiles and Services Using Bulk Delete Deleting Trading Partner Profiles
Deleting Certificates, Bindings, or Custom Extensions Deleting Services
Deleting Service Profiles from a Service Viewing Statistics
Monitoring Messages
XML Cache Adding XML Documents to the XML Cache Updating an XML Document in the XML Cache Viewing the Code for an XML Document Deleting an XML Document from the XML Cache Viewing All XML Documents in the XML Cache
Table 1-1 Modules of Oracle WebLogic Integration Administration Console
C o m m o n L o g g i n g a n d W e b L o g i c D i a g n o s t i c F r a m e w o r k
Common Logging and WebLogic Diagnostic Framework
The Oracle WebLogic Administration Console uses the logging services of Oracle Weblogic Server. We can configure logging services using Oracle WebLogic Server. For more information, see Configuring WebLogic Logging Services in Configuring Log Files and Filtering Log Messages.
We can monitor the process instances with MBeans by configuring diagnostic services using Oracle Weblogic Server Administration Console. The Weblogic Logging and Diagnostic Framework (WLDF) is configured and monitored using configuration and runtime APIs. Both the configuration and runtime APIs are exposed as MBeans.
z The configuration MBeans and system module MBeans create and configure WLDF resources, and determine their runtime behavior.
z The runtime MBeans monitor the runtime state and the operations defined for the different components.
You can use WLDF to configure, activate, and deactivate data collection; to configure watches, notifications, alarms, and diagnostic image captures; and to access data. For more information on diagnostic services, see Configuring and Using the WebLogic Diagnostics Framework.
C H A P T E R
2
Process Configuration
The Process Configuration module allows you to:
z View process type information and locate specific processes for configuration.
z View or update process type properties, such as the display name, tracking level, and reporting data policy.
z View or update the security policies for a process.
z Activate or deactivate a non-versioned process.
z Configure the activation time for a newly deployed process version, or rollback to a previous version.
z View an interactive or printable process type graph.
z View or update the selectors used to dynamically set control attributes for a Process or Service Broker control.
Note: You must be logged in as a member of the Administrators, IntegrationAdministrators, or IntegrationOperators group to make changes to the configuration for a process or dynamic control. IntegrationOperators cannot modify process security policies. For more information, see “About WebLogic Integration Users, Groups, Roles, and Security Policies” in Using the Worklist Console.
The following topics are provided:
z About Process Configuration
z Overview of the Process Configuration Module
z Listing and Locating Process Types
z Listing and Locating Dynamic Controls
z Viewing and Changing Process Details
z Viewing an Interactive or Printable Process Type Graph
z Managing Process Versions
z Adding and Changing Dynamic Client Callback Selectors
z Updating Security Policies
z Adding and Changing Dynamic Control Selectors
z Defining Process Control Properties for a Selector
z Defining Service Broker Control Properties for a Selector
z Defining ALSB Control Properties for a Selector
z Deleting Dynamic Control Selectors
About Process Configuration
The following sections provide background information related to business process administration:
z Managing Process Tracking Data
z Process Security Policies
z Service Level Agreements
z Process Versions
A b o u t P r o c e s s C o n f i g u r a t i o n
Managing Process Tracking Data
The data generated as process instances execute is initially stored in the runtime database. The monitoring information provided in the console is based on this data. In order to optimize performance, it is important to keep the amount of tracking data stored in the runtime database to a minimum. This is accomplished by:
z Capturing only the necessary data.
z Transmitting the data to an offline database if required for later analysis.
z Purging the data from the runtime database when it is no longer needed for monitoring from the console.
A combination of system and process properties control the management of tracking data. The following table provides a summary of each property and its related configuration tasks. To learn how to carry out the configuration task, see the referenced topic.
Table 2-1 System Properties and Configuration tasks
Property Configuration Task Task Type and Reference
Default Tracking Level
Set the system default tracking level. System Configuration. For more information, see
“Configuring the Default Data Policy and Tracking Level for Processes” on page 7-13. Tracking Level Set or verify the tracking level for each process. The
administrator can set the level for a process to: • Default (the system default tracking level) • Full, Node, Minimum, or None (setting overrides
the system default tracking level)
Process Configuration. For more information, see
“Viewing and Changing Process Details” on page 2-13.
Reporting Data Stream
Enable or disable the reporting data stream. If the reporting data stream is enabled, the specified reporting database is populated by a near real-time data stream.
System Configuration. For more information, see
“Configuring the Reporting Data and Purge Processes” on page 7-10.
To learn more, see the following topics:
z “Process Tracking Data” on page 7-3.
z “Reporting and Purging Policies for Tracking Data” on page 7-4
Purge Schedule Enable or disable the purge process and set the regular intervals at which process runs to purge the data from the runtime database.
System Configuration. For more information, see
“Configuring the Reporting Data and Purge Processes” on page 7-10.
Purge Delay Set the amount of time after completion or termination before the instance data is subject to purge by the purge process.
System Configuration. For more information, see
“Configuring the Reporting Data and Purge Processes” on page 7-10.
Default Reporting Data Policy
Set the system default reporting data policy to On or Off.
System Configuration. For more information, see
“Configuring the Default Data Policy and Tracking Level for Processes” on page 7-13. Reporting Data
Policy
Set or verify the reporting data policy for each process: • On indicates that the instance data is transmitted to the reporting database if the reporting data stream is enabled. If the reporting data stream is disabled, no processes data is transmitted, regardless of the policy set.
• Off indicates that the instance data is not subject to transfer to the reporting database, even if the reporting data stream is enabled (that is, the data is only purged).
• Default indicates that the system default reporting data policy (described below) is used.
Process Configuration. For more information, see
“Viewing and Changing Process Details” on page 2-13
Table 2-1 System Properties and Configuration tasks (Continued)
A b o u t P r o c e s s C o n f i g u r a t i o n
Process Security Policies
To ensure process security, the administrator can configure the following security policies for a process:
z Execution policy for process operations
The execution policy specifies whether the operations in the process are run as the start user or the caller’s ID:
– If start user is specified, each operation assumes the identity of the user that started the process.
– If caller’s ID is specified, the operation after the call in assumes the identity of that interrupting call.
In addition, the administrator configures whether or not a single principal is required. If a single principal is required, then all incoming client requests must come from the same user.
Execution policy controls the identify used to access external or backend resources. It allows the administrator to specify whether a process accesses an external system as the invoking application or as an application that called into the process later. For example, suppose a process listens for a message on a channel and then waits for a client request. The administrator can set the execution policy to use the identity from the client request when the process subsequently accesses SAP.
z Process authorization policy
The role(s) authorized to invoke the process methods (client requests). All methods in the process inherit the role(s) specified in the process authorization policy.
Note: If the process authorization policy is not defined, everyone is authorized.
z Method authorization policy
The role(s) authorized to invoke the process methods (client requests). All methods inherit the role(s) specified in the process authorization policy. Additional roles can be added to the authorization policy for the method.
z Callback authorization policy
The roles authorized to invoke the process callback.
Note: If the callback authorization policy is not defined, everyone is authorized. To learn how to set the security policies, see “Updating Security Policies” on page 2-30.
Service Level Agreements
A service level agreement (SLA) specifies a performance target for a process. It is typically an internal or external commitment that a process will be executed within a specified period of time. To assist you in achieving the SLA for a process, the OracleWebLogic Integration Administration Console allows you to set the following thresholds:
z SLA threshold, which represents the commitment applicable to the process type (number of seconds, minutes, hours, or days).
z SLA warning threshold, which is a percent of the total SLA.
Process status relative to these thresholds is tracked for each process instance as follows:
z When the elapsed time for a process instance reaches the warning threshold, a warning is displayed on the Process Instance Summary and Detail pages. The amount of time remaining until the SLA threshold will be reached is also displayed.
z When the elapsed time exceeds the SLA set, a red flag is displayed. The amount of time the SLA threshold has been exceeded is also displayed.
This ability to set SLA thresholds allows you to easily identify processes that do not execute within the target time frame. You can then make the changes necessary to meet agreements between suppliers and customers, or to achieve your own performance goals. To learn how to set the SLA for a process, see “Viewing and Changing Process Details” on page 2-13.
Process Versions
When developers need to modify a deployed process, they must create a new process version and then release it into production along with older versions. To learn more about creating and deploying new versions, see the following topics in Guide to Building Business Processes:
z Versioning Business Processes
z Building and Deploying WebLogic Integration Applications
When multiple versions are deployed, the system determines which version to use when creating new instances. The administrator controls the release of a process version by:
z Enabling or disabling a version.
A b o u t P r o c e s s C o n f i g u r a t i o n
When creating a new instance, the system selects the version with the most recent activation time from among the enabled versions. (A disabled version is not available for selection.)
When an administrator activates a process by setting its activation time, instances currently running are not affected. Only instances that are created after the new version becomes active are created based on the new version.
If a newly activated version experiences problems, a rollback is easily accomplished by doing one of the following:
z Updating the activation time on the prior version.
z Disabling the problem version. In this case, the enabled version with the most recent activation date becomes the active version.
To learn more about how to enable or disable a version, or to configure the activation time, see “Managing Process Versions” on page 2-24.
Note: Processes that are not versioned can also be enabled and disabled. For more information, see “Viewing and Changing Process Details” on page 2-13. A process, whether versioned or not, is only executable if the Is Enabled property is set to true, and the current time is later than the Activation Date and earlier than the Deactivation Date.
Dynamic Controls
Dynamic controls, which currently include the Service Broker and Process controls, provide the means to dynamically set control attributes through a combination of look-up rules and look-up values. This process is known as dynamic binding. In dynamic binding, the process developer specifies look-up rules, and the administrator defines the look-up values. This design pattern allows control attributes to be reconfigured for a running application, without redeployment. The look-up or selector values are stored in the DynamicProperties.xml file, which is located in the wliconfig subdirectory of the domain root. You can manage the values stored in the
DynamicProperties.xml file from the View Dynamic Control Properties page of the Process Configuration module.
Dynamic binding changes made in the Oracle WebLogic Integration Administration Console override both configuration changes made in the Oracle Workshop for WebLogic development environment and static annotations.
To learn more about the dynamic controls, see the following topics in Using Integration Controls:
z Service Broker Control
z ALSB Control
Overview of the Process Configuration Module
The following table lists the pages you can access from the Process Configuration module. The tasks and help topics associated with each of the types are provided in Table 2-2.
Table 2-2 Elements of Process Configuration Module
Page Associated Tasks Help Topics
Process Types
Process Property Summary
View a list of process types. Display name, public URI, state (stateful or stateless), tracking level, architecture policy, and SLA.
“Listing and Locating Process Types” on page 2-11
Access the Process Type Details page.
Process Type Details
View process properties. Identifying information (such as service URI and application name), configurable properties (display name, tracking level, architecture policy, SLA), dynamic client callback properties, execution and authorization policies, variables, and active version are displayed.
“Viewing and Changing Process Details” on page 2-13
Access an interactive and printable graph of the process.
“Viewing an Interactive or Printable Process Type Graph” on page 2-21
Access one of the following pages to update settings: Edit Process Properties
Edit Process Versioning
Add New Client Callback Properties Edit Client Callback Properties Edit Process Execution Policy Edit Process Authorization Policy Edit Method Authorization Policy Edit Call Back Authorization Policy
O v e r v i e w o f t h e P r o c e s s C o n f i g u r a t i o n M o d u l e
Edit Process Properties
Update display name, SLA, SLA warning threshold, tracking level, and reporting data policy for the selected process type.
“Viewing and Changing Process Details” on page 2-13
Edit Process Versioning
Enable, disable, or set the activation date and time for the selected version.
“Managing Process Versions” on page 2-24
Add New Client Callback Properties
Add a selector value and properties, which can be used to dynamically configure the callback to the client.
“Adding and Changing Dynamic Client Callback Selectors” on page 2-26
Edit Client Callback Properties
Edit the properties used to dynamically configure the callback to the client.
“Adding and Changing Dynamic Client Callback Selectors” on page 2-26
Edit Process Execution Policy
Specify the run as identity for the process operations, and whether or not a single principal is required.
“Updating Security Policies” on page 2-30 “Process Security Policies” on page 2-5
Edit Process Authorization Policy
Set the minimum authorized roles for the methods (client requests) in the process.
“Updating Security Policies” on page 2-30 “Process Security Policies” on page 2-5
Edit Process Method Authorization Policy
Set additional authorized roles for the selected method. (Minimum authorized roles for all methods are set by the process authorization policy.)
“Updating Security Policies” on page 2-30 “Process Security Policies” on page 2-5
Edit Call Back Authorization Policy
Set the authorized roles for the selected callback. “Updating Security Policies” on page 2-30 “Process Security Policies” on page 2-5
Table 2-2 Elements of Process Configuration Module (Continued)
Dynamic Controls
View Dynamic Control Properties
View a list of dynamic controls. Control name, type, and selector value are displayed.
“Listing and Locating Dynamic Controls” on page 2-12
Delete a selector from the control. “Deleting Dynamic Control Selectors” on page 2-39
Access the Add New or Edit page for the control to define properties for a new selector, or edit properties for an existing selector.
“Adding and Changing Dynamic Control Selectors” on page 2-32
Add New Process Control Selector
Define the properties for a new selector. “Defining Process Control Properties for a Selector” on page 2-33
Edit Process Control Selector
Update the properties for an existing selector. “Defining Process Control Properties for a Selector” on page 2-33
Add New Service Broker Control Selector
Define the properties for a new selector. “Defining Service Broker Control Properties for a Selector” on page 2-35
Edit Service Broker Control Selector
Update the properties for an existing selector. “Defining Service Broker Control Properties for a Selector” on page 2-35
Add New ALSB Control Selector
Define the properties for a new selector. “Defining ALSB Control Properties for a Selector” on page 2-37
Edit ALSB Control Selector
Update the properties for an existing selector. “Defining ALSB Control Properties for a Selector” on page 2-37
Table 2-2 Elements of Process Configuration Module (Continued)
L i s t i n g a n d L o c a t i n g P r o c e s s T y p e s
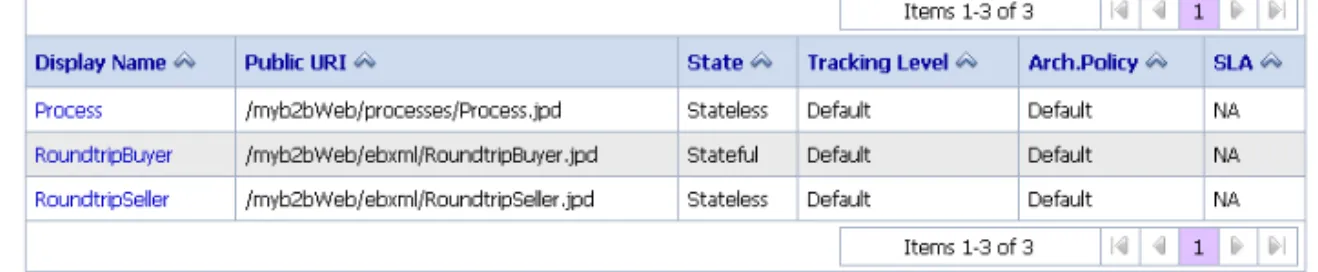
Listing and Locating Process Types
The Process Property Summary page displays the following information for each deployed process type. For a more detailed description of the properties, see “Viewing and Changing Process Details” on page 2-13.
Figure 2-1 Process Property Summary
Note: The process types are listed alphabetically by display name.
1. From the home page, select the Process Configuration module.
Table 2-3 Elements of Process Property Summary Page
Property Description
Display Name Display name assigned to the process. The name is a link to the Process Type Details page.
Note: If more than one version of the process is deployed, it is customary to append the version number to the display name, but this convention is not enforced.
Public URI The process URI. If there are multiple versions deployed, this is the version group URI (that is, the version number is not appended).
State The process type (Stateful or Stateless).
Tracking Level The tracking level set for the process.
Architecture Policy The architecture policy set for tracking data.
2. Scroll through the pages to locate a specific process type. Use the controls in the lower left corner. Go to a page by selecting the page number or by using the arrow buttons to go to the next , previous , first , or last page.
Related Topics
z “Viewing and Changing Process Details” on page 2-13
z “Updating Security Policies” on page 2-30
z “Adding and Changing Dynamic Control Selectors” on page 2-32
Listing and Locating Dynamic Controls
The View Dynamic Control Properties page displays the dynamic controls (Process and Service Broker controls) referenced by deployed processes. For each control, the selector values for any dynamic bindings are displayed. To learn how to add or change control selectors, see “Adding and Changing Dynamic Control Selectors” on page 2-32.
Figure 2-2 View Dynamic Control Properties
1. From the home page, select the Process Configuration module. 2. From the left panel, select View Dynamic Controls.
3. To locate a specific control, do one of the following:
– Re-sort the list. Ascending and descending arrow buttons indicate sortable columns. Click the button to change the sort order.
– Scroll through the pages. Use the controls in the lower left corner. Go to a page by selecting the page number or by using the arrow buttons to go to the next , previous
V i e w i n g a n d C h a n g i n g P r o c e s s D e t a i l s
Related Topics
z “Dynamic Controls” on page 2-7
z “Adding and Changing Dynamic Control Selectors” on page 2-32
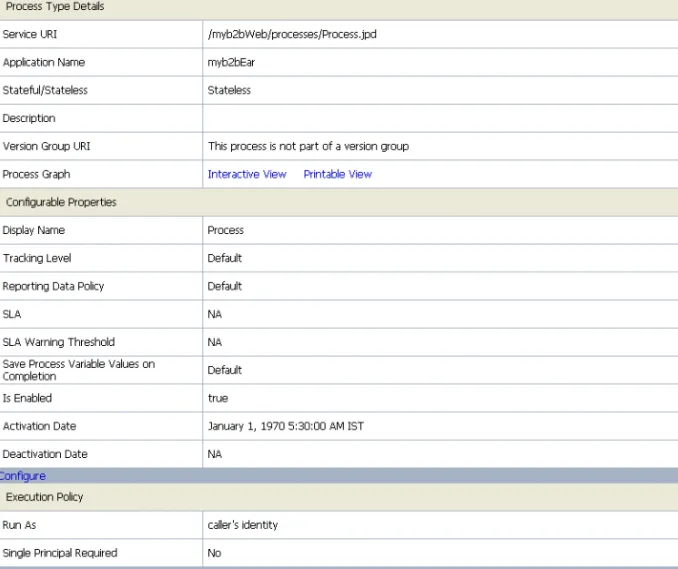
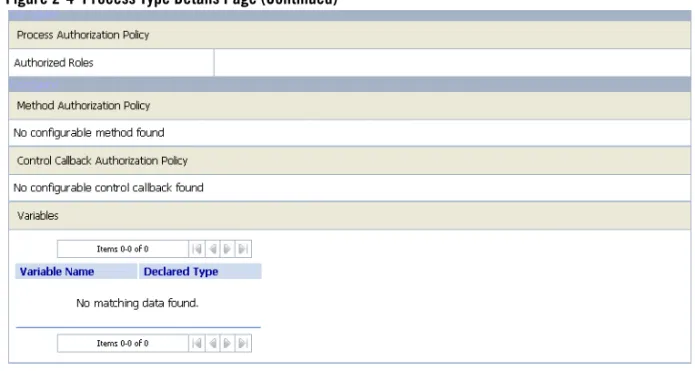
Viewing and Changing Process Details
The Process Type Details page allows you to view or change process properties.
Figure 2-4 Process Type Details Page (Continued)
V i e w i n g a n d C h a n g i n g P r o c e s s D e t a i l s
a. In the Configurable Properties section, click Configure to display the Edit Process Properties page.
b. Set the properties as required. The properties are described in Table 2-4.
c. Click Submit to update the properties and return to the Process Type Details page. 5. For information on how to enable, disable, or activate a version, see “Managing Process
Versions” on page 2-24.
6. For information on how to configure dynamic client callback properties, see “Adding and Changing Dynamic Client Callback Selectors” on page 2-26.
7. For information on how to update the execution policy, process authorization policy, or method authorization policy, see “Updating Security Policies” on page 2-30.
Table 2-4 summarizes the information displayed on the Process Type Details page.
Note: When the server is started in iterative development mode (iterativeDevFlag=true), updates to the configurable properties are overridden when the process is redeployed through an application build or process redeploy.
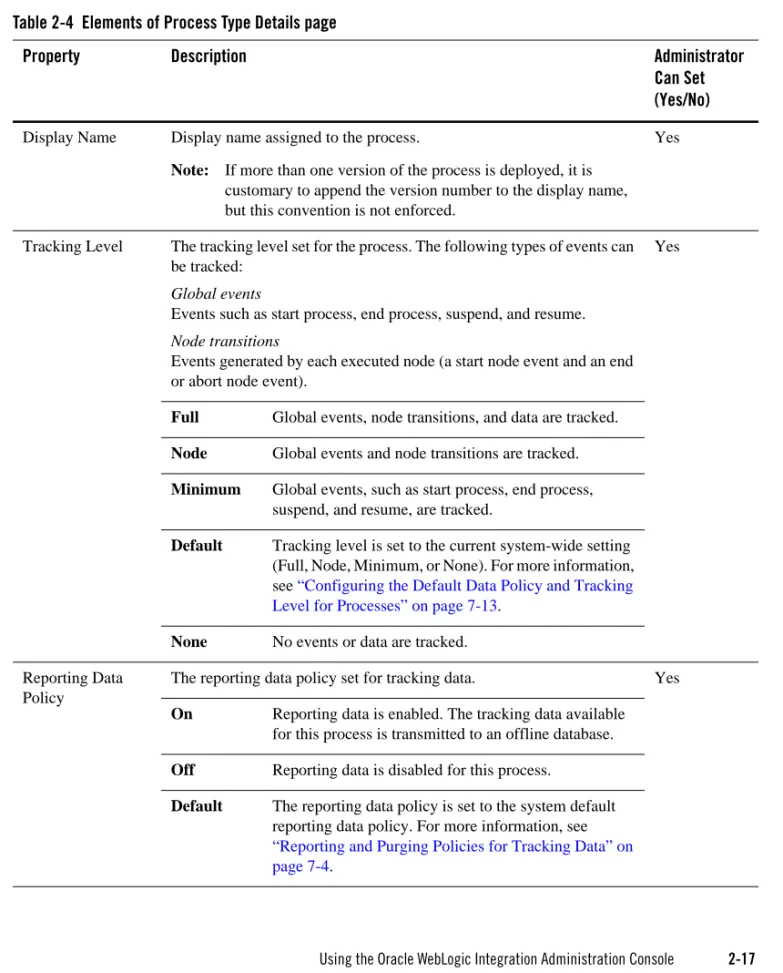
Table 2-4 Elements of Process Type Details page
Property Description Administrator
Can Set (Yes/No)
Service URI The process URI. If there are multiple versions of the process, a version number is appended
No
Application Name The name of the application. No
Stateful/Stateless The process type (Stateful or Stateless.) To learn more about how stateful and stateless processes are created, see Building Stateless and Stateful Business Processes in Guide to Building Business Processes.
No
Description User-friendly description of the process. No
Version Group URI For versioned processes, the URI for the version group. No
Process Graph Links to an interactive or printable view of the process. For more information, see “Viewing an Interactive or Printable Process Type Graph” on page 2-21.
No
V i e w i n g a n d C h a n g i n g P r o c e s s D e t a i l s
Display Name Display name assigned to the process.
Note: If more than one version of the process is deployed, it is customary to append the version number to the display name, but this convention is not enforced.
Yes
Tracking Level The tracking level set for the process. The following types of events can be tracked:
Global events
Events such as start process, end process, suspend, and resume.
Node transitions
Events generated by each executed node (a start node event and an end or abort node event).
Yes
Full Global events, node transitions, and data are tracked.
Node Global events and node transitions are tracked.
Minimum Global events, such as start process, end process, suspend, and resume, are tracked.
Default Tracking level is set to the current system-wide setting (Full, Node, Minimum, or None). For more information, see “Configuring the Default Data Policy and Tracking Level for Processes” on page 7-13.
None No events or data are tracked.
Reporting Data Policy
The reporting data policy set for tracking data. Yes
On Reporting data is enabled. The tracking data available for this process is transmitted to an offline database.
Off Reporting data is disabled for this process.
Default The reporting data policy is set to the system default reporting data policy. For more information, see
“Reporting and Purging Policies for Tracking Data” on page 7-4.
Table 2-4 Elements of Process Type Details page
Property Description Administrator
Can Set (Yes/No)
Save Process Variable Values on Completion
On Process variable values are saved when the process is complete.
Yes
Off Process variable values are not saved when the process is complete.
SLA Service level agreements (SLA) expressed as the number of seconds, minutes, hours, or days. When this threshold has been reached, a red flag
is displayed for the process instance.
For processes without an SLA, NA is displayed. To remove an SLA setting, enter 0 in the SLA field on the Edit Process Properties page. To learn more about the SLA, see “Service Level Agreements” on page 2-6.
Yes
SLA Warning Threshold
A percent of the total SLA time. When this threshold has been reached, a warning flag is displayed for the process instance.
Yes
Is Enabled For non-versioned processes, indicates whether the process is enabled (true) or disabled (false). For versioned processes, see the Version Group section.
Yes
Activation Time For non-versioned processes, the date and time the process became, or is to become, active.
Yes
Deactivation Time For non-versioned processes, the date and time the process is to become inactive.
Yes
Dynamic Client Callback Properties
Table 2-4 Elements of Process Type Details page
Property Description Administrator
Can Set (Yes/No)
V i e w i n g a n d C h a n g i n g P r o c e s s D e t a i l s
Selector table If the process includes a Client Response node for which a lookup property has been specified, this table lists the selector values configured by the administrator. If no values are listed, none have yet been added.
Yes
Selector name
The selector name used to look up the selector properties.
Edit A link to the Edit Client Callback Properties page for the selector.
Delete A control used to delete the selector.
Version Group
Version Group URI The URI for the group. No
Default Service URI
The URI for the process type. No
Current Active The process in the group that is currently active. No
Table 2-4 Elements of Process Type Details page
Property Description Administrator
Can Set (Yes/No)
Version group table Entry for each deployed version in the version group. No
Display Name
Display name assigned to the process version. No
Service URI The URI for the process version. No
Enabled Indicates whether the process is enabled (true) or disabled (false).
Yes
Activation Date
Date and time the process version became, or is to become, active.
Yes
Deactivation Date
Date and time the process version is to become inactive. Yes
Configure Link to the Edit Process Versioning page, from which you can enable, disable, or update the activation time for the process version. For more information, see
“Managing Process Versions” on page 2-24.
Security Policies
Execution Policy Run As The identity the operations in the process assume while executing. Options are caller’s identity or start user.
Yes
Single Principal Required
Yes or No. If set to Yes, all incoming client requests must come from the same user.
Process Authorization Policy
Roles authorized to invoke process methods. Yes
Method Authorization Policy
Additional roles authorized to invoke the method. (The roles specified for Process Authorization Policy are inherited by the method.)
Yes
Table 2-4 Elements of Process Type Details page
Property Description Administrator
Can Set (Yes/No)
V i e w i n g a n I n t e r a c t i v e o r P r i n t a b l e P r o c e s s T y p e G r a p h
Related Topics
z “Viewing an Interactive or Printable Process Instance Graph” on page 3-22
z “Updating Security Policies” on page 2-30
z “Adding and Changing Dynamic Control Selectors” on page 2-32
Viewing an Interactive or Printable Process Type Graph
The Process Type Details page allows you to view an interactive or printable graph of the deployed process type. The graphical view represents your business process and its interactions with clients and resources, such as databases, JMS queues, file systems.
If there are running instances, you can access an interactive or printable graph of any instance from the Process Instance Detail page. For more information, see “Viewing an Interactive or Printable Process Instance Graph” on page 3-22.
Note: The interactive process graph requires Adobe SVG Viewer Version 3.0 or Java Batik 1.7 SVG. To learn more, see “Requirements for the Interactive Graph” on page 3-4. The printable graph requires a PDF viewer such as Adobe Acrobat. We recommend that you use Java Batik to view the interactive process graph, if your browser does not support Adobe SVG Viewer.
Note: You must have Acrobat Reader installed to view the printable graph.
1. Locate the process to view. For more information, see “Listing and Locating Process Types” on page 2-11.
Callback Authorization Policy
Roles authorized to invoke the callback. Yes
Variables
Variables Name and declared type for each variable defined No
Table 2-4 Elements of Process Type Details page
Property Description Administrator
Can Set (Yes/No)
2. Click the process name to display the Process Type Details page. 3. Click Printable View.
The process graph is displayed as a PDF document.
1. Verify that your browser meets the requirements. For more information, see “Requirements for the Interactive Graph” on page 3-4.
2. Locate the process to view. For more information, see “Listing and Locating Process Types” on page 2-11.
3. Click the process name to display the Process Type Details page. 4. Click Interactive View.
V i e w i n g a n I n t e r a c t i v e o r P r i n t a b l e P r o c e s s T y p e G r a p h
Java Batik SVG Viewer displays the interactive view as shown in the following figure.
5. For Adobe SVG Viewer, do any of the following:
– To display the name, type, and description for a node, click the node image. – To scroll the view, press and hold down the Alt key. The cursor changes to a hand
tool. Click and drag to scroll the process graph vertically or horizontally. – To zoom in, press and hold down the Ctrl key. The cursor changes to a zoom in
tool. Click to zoom in.
– To zoom out, press and hold down the Ctrl+Shift keys. The cursor changes to a zoom out tool. Click to zoom out.
– To change to a printable view, click Print View. The process graph is displayed as a PDF document.
6. If you do not have Adobe SVG Viewer on your system, the WLI Administration Console will display the Interactive view in an Java Batik SVG applet.
Note: To view the java applet in the Java Batik 1.7 SVG viewer you require the Java Runtime Environment 1.6 to be installed in advance and the Sun Java console working with your browser. You can download the Java Runtime Environment 1.6 and the Java console at: http://java.sun.com/javase/downloads/index.jsp
For Java Batik SVG Viewer, do any of the following:
– To display the name, type and description for a node, click the node image. – To pan within the process graph, shift+left click and drag.
– To zoom in, press and hold down the Ctrl key and select portion for zoom in. – To zoom out, press and hold down the Ctrl+Shift+right click.
– To change to a printable view, click Print View. The process graph is displayed as PDF document.
Related Topics
z “Requirements for the Interactive Graph” on page 3-4
z “Viewing an Interactive or Printable Process Instance Graph” on page 3-22
Managing Process Versions
The Version Group section of the Process Type Details page allows you to enable, disable, or set the activation time for the versions in a process group.
M a n a g i n g P r o c e s s V e r s i o n s
Note: If you are running with noiterativedev, running instances will not be terminated when you redeploy an EAR. In production it is recommended that you use the following flags when starting Oracle WebLogic Server:
production noiterativedev nodebug notestconsole
1. Locate the process to view. For more information, see “Listing and Locating Process Types” on page 2-11.
2. Click the process name to display the Process Type Details page.
In the Version Group section, the current status of each version is displayed in the version table.
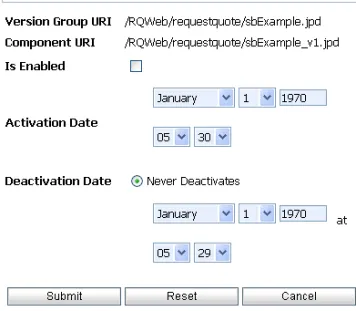
3. In the version table, click the Configure link for the version. The Edit Process Versioning page is displayed.
Figure 2-7 Edit Process Versioning
4. Define the required settings:
– To set the activation time, select the month, date, and time from the Activation Date
drop-down lists.
– To enable the version, select the Is Enabled check box. 5. Do one of the following:
– To save the changes, click Submit.
The Process Type Details page is displayed. The version table reflects the changes. – To reset to the last saved values, click Reset.
– To disregard changes and return to the Process Type Details page, click Cancel.
Note: There should always be one active version. If no version is available (that is, all versions are disabled) when the process is invoked, an error is logged.
Related Topics
z “Process Versions” on page 2-6
z “Viewing and Changing Process Details” on page 2-13
Adding and Changing Dynamic Client Callback Selectors
If a process includes a Client Response node for which a lookup property has been specified, the
Process Type Details page includes a Dynamic Client Callback Properties section. This section allows you to define the selector values and properties required to dynamically configure the callback to the client.
To learn more about specifying a lookup property for a Client Response node, see Sending Messages to Clients in Guide to Building Business Processes.
1. Locate the process. For more information, see “Listing and Locating Process Types” on page 2-11.
2. Click the process name to display the Process Type Details page.
3. In the Dynamic Client Callback Properties section, do one of the following: – To add a new selector, click Add a new callback property.
A d d i n g a n d C h a n g i n g D y n a m i c C l i e n t C a l l b a c k S e l e c t o r s
Figure 2-8 Add New Client CallBack Properties Page
– To edit a selector, click the Edit link to the right of the selector value to display the Edit Client Callback Properties.
4. Set the properties as required. For a description of the available properties, see the table at the end of this procedure.
5. Click Submit.
The Process Type Details page is displayed. If you added a new selector, the value is displayed.
The Table 2-5 summarizes the settings available on the Add New Client Callback Properties and
Edit Client Callback Properties pages.
Table 2-5 Elements of Edit Client Callback Properties page
Setting Description Required/
Optional
In the Selector Value field, enter the look up key.
The value used to select and dynamically set control attributes at runtime.
Note: This field cannot be edited on the Edit Client Callback Properties page.
Required
Select the No Dynamic Authentication, Basic
Authentication, or Certificate Based Authentication option button.
Type of authentication. Optional
In the User Name field, enter the user name.
If Basic Authentication is selected, the required user name.
Required if Basic
Authentication is selected. In the Password Alias field, enter the
password alias.
The password alias used to look up the user password in the password store. For more information, see “Password Aliases and the Password Store” on page 7-6.
A d d i n g a n d C h a n g i n g D y n a m i c C l i e n t C a l l b a c k S e l e c t o r s
1. Locate the process. For more information, see “Listing and Locating Process Types” on page 2-11.
2. Click the process name to display the Process Type Details page.
3. In the Dynamic Client Callback Properties section, click the Delete link to the right of the selector value.
Related Topics
z “Viewing and Changing Process Details” on page 2-13
In the Client Certificate Alias field, enter the certificate alias.
Certificate alias for Certificate Based Authentication.
Required if Certificate Based
Authentication is selected. In the Client Certificate Password
Alias field, enter the password alias.
Password alias to look up the certificate password in the password store. For more information, see “Password Aliases and the Password Store” on page 7-6. In the Keystore Location field, enter
the keystore location.
The keystore location.
In the Keystore Password Alias field, enter the password alias.
The password alias used to look up the keystore password in the password store. For more information, see “Password Aliases and the Password Store” on page 7-6.
In the Keystore Type field, enter the keystore type.
The keystore type.
Table 2-5 Elements of Edit Client Callback Properties page
Setting Description Required/
Updating Security Policies
The Process Type Details page allows you to set the security policies for the process or its methods and callbacks.
Note: If an authenticator that implements the required MBeans is not configured, the options for configuring the process, method, and callback authorization policies are disabled. To learn more about the authenticator requirements, For more information, see Security Provider Requirements for User Management in the Worklist User Guide.
1. Locate the process to view. For more information, see “Listing and Locating Process Types” on page 2-11.
2. Click the process name to display the Process Type Details page. 3. To configure the execution policy for the process:
a. In the Execution Policy section, click Configure. The Edit Process Execution Policy page is displayed.
Figure 2-9 Edit Process Execution Policy
b. From the Run As drop-down list, select caller’s identity or start user. c. Check or uncheck the Single Principal Required check box.
d. Click Submit to update the properties and return to the Process Type Details page. 4. To configure the method authorization policies, do one or more of the following:
U p d a t i n g S e c u r i t y P o l i c i e s
– To configure the authorization policy for the process methods, in the Method Authorization Policy section, click Configure.
The Edit Method Authorization Policy page is displayed.
Figure 2-10 Edit Method Authorization Page
Note: If no roles are specified, everyone is authorized.
Note: All the methods in the process inherit the roles assigned in the authorization policy for the process method. These roles cannot be removed.
– To configure the authorization policy for a callback, click the Configure link for the callback.
The Edit Callback Authorization Policy page is displayed.
Figure 2-11 Edit Callback Authorization Policy
To add roles:
a. From the Available Roles list, select the required roles. (To select multiple roles, press and hold the Ctrl key as you click each additional role.)
b. Click the icon to move the selected roles to the Current Roles list. To remove roles:
a. From the Current Roles list, select the roles to remove. (To select multiple roles, press and hold the Ctrl key as you click each additional role.)
b. Click the icon to move the selected roles to the Available Roles list. 6. Do one of the following:
– To update the policy, click Submit.
The Process Type Details page is displayed and reflects the changes. – To reset to the last saved values, click Reset.
– To disregard changes and return to the Process Type Details page, click Cancel.
Related Topics
z “Process Security Policies” on page 2-5
z “Viewing and Changing Process Details” on page 2-13
Adding and Changing Dynamic Control Selectors
The View Dynamic Controls Properties page allows you to add new or update existing selectors.
1. Locate the dynamic control to update. For more information, see “Listing and Locating Dynamic Controls” on page 2-12.
2. Do one of the following: – Select the Add Selector link.
– Select the Edit link to the right of the selector value to be updated.
3. Set the properties as required. For a description of the available properties, see the topic applicable to type of dynamic control.
D e f i n i n g P r o c e s s C o n t r o l P r o p e r t i e s f o r a S e l e c t o r
– “Defining Process Control Properties for a Selector” on page 2-33 – “Defining Service Broker Control Properties for a Selector” on page 2-35 – “Defining ALSB Control Properties for a Selector” on page 2-37
4. Do one of the following: – To update, click Submit.
The View Dynamic Controls Properties page is displayed. If you added a new selector, the value is displayed.
– To reset to the last saved values, click Reset.
– To disregard changes and return to the View Dynamic Controls Properties page, click
Cancel.
Defining Process Control Properties for a Selector
Note: The (Dynamic) Selector has now been deprecated. Please use the XML Metadata Cache Control to look up Oracle WebLogic Integration Administration Console configured values and then use the setProperties() calls of the Process Control to set the endpoint at runtime. For more information on the:
z XML MetaData Cache Control, see XML Metadata Cache Control in Using Integration Controls
z Process Control, see Process Control in Using Integration Controls.
z WebLogic Integration Administration Console, see Managing WebLogic Integration Solutions.
The Add New Process Control Selector and Edit Process Control Selector pages allow you to set the selector value, target URI, user name, and password alias.
Figure 2-12 Add New Process Control Selector Page
The following table summarizes the available settings.
Related Topics
z “Dynamic Controls” on page 2-7
Table 2-6 Elements of Add New Process Control Selector Page
Setting Description Required/
Optional
In the Selector Value field, enter the look up key.
The value used to select and dynamically set control attributes at runtime.
Note: This field cannot be edited on the Edit Process Control Selector page.
Required to Add
In the Target URI field, enter the URI for the target process.
The URI for the target process associated with this look up key.
Optional
In the User Name field, enter the user name.
The user name (if required) used to invoke the target process.
Optional
In the Password Alias field, enter the password alias.
The password alias used to look up the user password in the password store. For more information, see “Password Aliases and the Password Store” on page 7-6.
D e f i n i n g S e r v i c e B r o k e r C o n t r o l P r o p e r t i e s f o r a S e l e c t o r
z “Adding and Changing Dynamic Control Selectors” on page 2-32
Defining Service Broker Control Properties for a
Selector
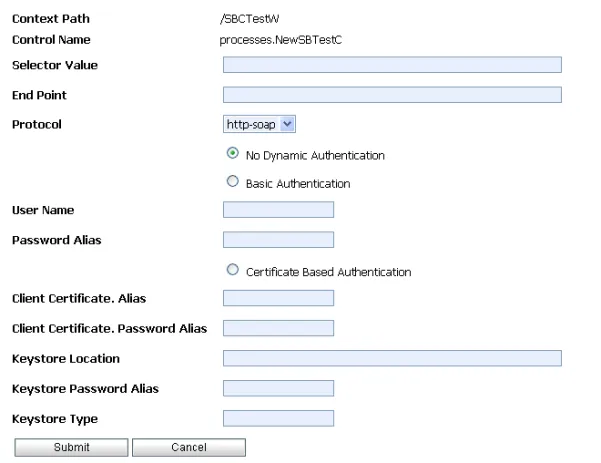
Note: The (Dynamic) Selector has now been deprecated. Please use the XML Metadata Cache Control to look up Oracle WebLogic Integration Administration Console configured values and then use the setProperties() calls of the Service Broker Control to set the endpoint at runtime. For more information on the XML MetaData Cache Control, see XML Metadata Cache Control in Using Integration Controls, and for more information on the Service Broker Control see, Service Broker Control in Using Integration Controls. The Add New Service Broker Control Selector and Edit Service Broker Selector pages allow you to set the selector value and associated properties.
The following table summarizes the available settings.
Table 2-7 Elements of Add New Service Broker Control Selector page
Setting Description Required/
Optional
In the Selector Value field, enter the look up key.
The value used to select and dynamically set control attributes at runtime.
Note: This field cannot be edited on the Edit Service Broker Selector page.
Required
In the End Point field, enter the URI for the target service.
The URI for the service end point associated with this look up key.
Optional
From the Protocol drop-down list, select the protocol.
Protocol to use when making the call. Valid values are
http-soap http-xml jms-soap jms-xml form-get form-post
The default is http-soap.
Note: The Oracle WebLogic Integration Administration Console allows you to specify any of the above values, therefore, you must take care to select a protocol that is supported by the process. For example, raw XML (non-SOAP) protocols do not work with conversational web services.
Optional
Select the
No Dynamic Authentication, Basic Authentication,
or Certificate Based Authorization option button.
Type of authentication.
If client certificates are required, select Certificate Based Authorization and enter values in the Keystore Location, Keystore Password Alias, and Keystore Type fields.
D e f i n i n g A L S B C o n t r o l P r o p e r t i e s f o r a S e l e c t o r
Related Topics
z “Dynamic Controls” on page 2-7
z “Adding and Changing Dynamic Control Selectors” on page 2-32
Defining ALSB Control Properties for a Selector
For more information, see ALSB Control in Using Integration Controls.
In the User Name field, enter the user name.
The user name (if required) used to invoke the target process.
Required if Basic
Authentication is selected. In the Password Alias field, enter the
password alias.
The password alias used to look up the user password in the password store. For more information, see “Password Aliases and the Password Store” on page 7-6. In the Client Certificate Alias field,
enter the certificate alias.
Certificate alias if the remote service requires SSL with two-way authentication or a digital signature.
Required if Certificate Based Authorization is selected. In the Client Certificate Password
Alias field, enter the password alias.
Password alias to look up the certificate password in the password store. For more information, see “Password Aliases and the Password Store” on page 7-6. In the Keystore Location field, enter
the keystore location.
The keystore location. Required if Certificate Based Authorization is selected. In the Keystore Password Alias field,
enter the password alias.
The password alias used to look up the keystore password in the password store. For more information, see “Password Aliases and the Password Store” on page 7-6.
In the Keystore Type field, enter the keystore type.
The keystore type.
Table 2-7 Elements of Add New Service Broker Control Selector page (Continued)
Setting Description Required/
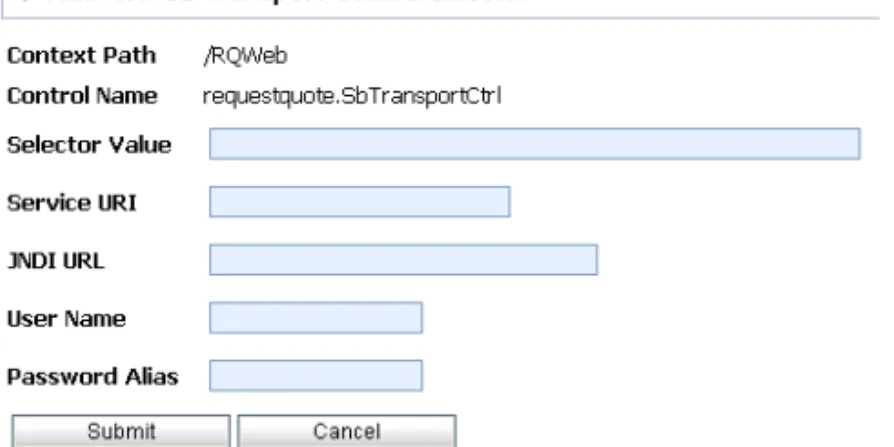
The Add New ALSB Control Selector page allows you to set the selector value, service URI, JNDI URL, user name, and password alias.
Figure 2-14 Add New Process Control Selector Page
The following table summarizes the available settings.
Table 2-8 Elements of Add New ALSB Control Selector Page
Setting Description Required/
Optional
In the Selector Value field, enter the look up key.
The value used to select and dynamically set control attributes at runtime.
Required
In the Service URI field, enter the URI for the service.
The URI for the service that is associated with this look up key.
Optional
In the JNDI URL field, enter the JNDI URL for the service.
The JNDI URL for the service Optional
In the User Name field, enter the user name.
The user name (if required) used to invoke the target service.
Optional
In the Password Alias field, enter the password alias.
The password alias used to look up the user password in the password store. For more information, see “Password Aliases and the Password Store” on page 7-6.
D e l e t i n g D y n a m i c C o n t r o l S e l e c t o r s
Related Topics
z “Dynamic Controls” on page 2-7
z “Adding and Changing Dynamic Control Selectors” on page 2-32
Deleting Dynamic Control Selectors
The View Dynamic Controls Properties page allows you to edit and delete selectors. 1. Locate the dynamic control to update. For more information, see “Listing and Locating
Dynamic Controls” on page 2-12.
2. Click the Delete link to the left of the selector value to be deleted. The selector is deleted from the list.
C H A P T E R
3
Process Instance Monitoring
The Process Instance Monitoring module allows you to:
z View summary statistics that reflect system health.
z View the summary or detailed status for selected instances.
z View an interactive or printable process instance graph.
z Terminate or suspend instances, resume previously suspended instances, or unfreeze frozen instances.
Note: You must be logged in as a member of the Administrators, IntegrationAdministrators, or IntegrationOperators group to make changes to process status. See “About WebLogic Integration Users, Groups, Roles, and Security Policies” in User Management in Using the Worklist Console.
The information displayed in the Process Monitoring module is based on the tracking data stored in the runtime database. A combination of system-level and process-level properties control the type of data available. To learn more about how tracking data is managed, see “Managing Process Tracking Data” on page 2-3.
The following topics are provided:
z Overview of the Process Instance Monitoring Module
z Requirements for the Interactive Graph