BUNGEE Quick Start Guide
for AWS EC2 based elastic clouds
Felix Rauh
([email protected])
and
Nikolas Herbst
([email protected])
At the Department of Computer Science Chair for Computer Science II
Software Engineering
July 7, 2015 BUNGEE version 1.0
Contents
1 Introduction 1
1.1 Requirements . . . 1
2 Installation and configuration of BUNGEE for AWS EC2 2 2.1 Load Driver system setup . . . 2
2.2 AWS EC2 Management Console . . . 3
2.3 Images for worker vm instances (Launch configuration) . . . 4
3 Getting started 5 3.1 BUNGEE Examples . . . 5 3.1.1 TestAWS.java . . . 5 3.1.2 DetailedAWSAnalysis.java . . . 5 3.1.3 RunBenchmarkonAWS.java . . . 6 3.2 Property files . . . 7 3.2.1 measurement.prop file . . . 7 3.2.2 host.prop file . . . 7 3.2.3 jmeter.prop file . . . 7 3.2.4 request.prop file . . . 7
4 Installation and configuration of BUNGEE for CloudStack 8 5 Result analysis 9 5.1 result.runresult file . . . 9
6 Possible Extensions to BUNGEE 11
1. Introduction
The following instructions intend to enable an easy start using the BUNGEE IaaS elasticity benchmarking framework.
For in-depth documentation, please refer to the Master’s thesis by Andreas Weber, Chapter 6, Pages 49 - 70.
1.1 Requirements
At the moment BUNGEE works with Windows on your local load-driver machine. We are working to fix the remaining bugs on Linux/Mac, as JMeter is not called correctly by BUNGEE on these platforms.
Access to a public elastic IaaS cloud (e.g. AWS EC2) or a private (e.g. CloudStack based) environment is required.
2. Installation and configuration of
BUNGEE for AWS EC2
2.1 Load Driver system setup
• Install Java SDK, 1.6 or newer• Install Eclipse IDE (for Java EE Developers recommended for AWS).
• Install LIMBO Load Intensity Modeling Framework (http://descartes.tools/ limbo) via the Eclipse Update site http://se2.informatik.uni-wuerzburg.de/ eclipse/limbo/.
• Install viewer plugins of the BUNGEE framework via the Eclipse Update sitehttp: //se2.informatik.uni-wuerzburg.de/eclipse/bungee/
• Install http://aws.amazon.com/eclipseAWS Toolkit/SDK for Java. The AWS SDK for Android is not needed. To enable all the features within Eclipse you need your AWS Access Key ID and your AWS Secret Access Key after that installation. • Checkout BUNGEE Java projects from:
https://github.com/NikolasHerbst/BUNGEE
• Download Apache JMeterhttp://jmeter.apache.org/download_jmeter.cgi ver-sion 2.11 and install the JMeter TimestampTimer Plugin from https://github. com/andreaswe/JMeterTimestampTimer(Apache JMeter 2.11 with the required Times-tampTimer Plugin is also available at the BUNGEE GITHUB repository.)
• BUNGEE experiments perform distributed time measurements of high amount of short running tasks (in the order of milliseconds). Before running a BUNGEE ex-periment the time of your local system and the time of the cloud instances should be configured to synchronize with the same NTP servers. The NTP time service on Windows machines is getting imprecise within experiment duration. BUNGEE’s sanity check on after a measurement run fails in these cases as the timestamp of request sent may be bigger than the one of request processed on cloud instance. We suggest to use the Meinberg NTP package on your Windows load driver machine to fix the issue of imprecise system times. (https://www.meinbergglobal.com/ english/sw/ntp.htm#ntp_stable)
2.2. AWS EC2 Management Console 3
2.2 AWS EC2 Management Console
• Login to your AWS EC2 management console • Create a Load Balancer:
– set Ports on 8080 (HTTP)
– select a Security Group and Security Settings
– set Ping Path (see Configure Health Check) to ‘/?size=1’ and in advanced Details you can set Timeout = 2 seconds; Interval = 5 seconds and Thresholds on 2.
– you don’t have to choose an instance
– disable Cross-Zone Load Balancing
– set Connection Draining on 30 seconds
– set Tags you want
• Create a Launch Configuration:
– select a AMI you want; for easy testing can try our preconfigured image for Elasticity Benchmarking (for more information see below)
– choose a instance type you want
– enable CloudWatch detailed monitoring
– select the your security group like configured above
– finally select a key pair • Create an Auto Scaling Group:
– select your just now created launch configuration
– select a network and a subnet of your choice
– see advanced details for enabling load Balancing and select the balancer you’ve created before. Set Health Check Type on EC2 with a Grace Period of 30 seconds
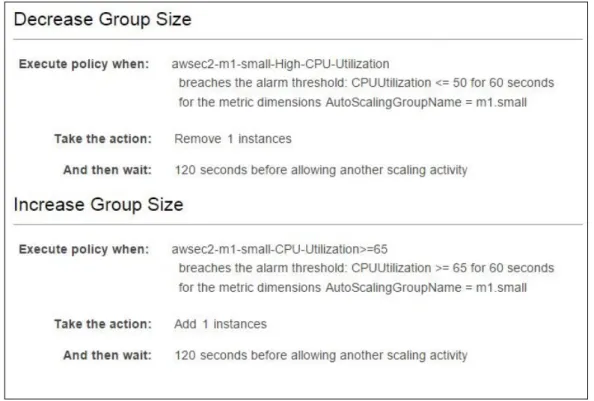
– use scaling policies to adjust the capacity of this group; see Figure 2.1 for an example
• Make sure you have set the same security group for your Load Balancer and your Launch Configuration. It will not work when launched instances haven’t the same group.
2.3. Images for worker vm instances (Launch configuration) 4
Figure 2.1: scaling policies example
2.3 Images for worker vm instances (Launch configuration)
You can use our preconfigured AMI for testing BUNGEE. Our Image is available in any region:• US East (N. Virginia) - AMI ID: ami-6ff31404 • US West (Oregon) - AMI ID: ami-55c8f465 • US West (N.California) - AMI ID: ami-253ad261 • EU (Ireland) - AMI ID: ami-b94388ce
• EU (Frankfurt) - AMI ID: ami-4e86b853
• Asia Pacific (Singapore) - AMI ID: ami-70390122 • Asia Pacific (Tokyo) - AMI ID: ami-60ac7d60 • Asia Pacific (Sydney) - AMI ID: ami-c5b0c9ff • South America (S˜ao Paulo) - AMI ID: ami-5195144c
Otherwise you can simply set up your own machine: The cloud-side load generation appli-cation is a java based HTTP server. This allows to easily deploy it on any platform with a support for java. The application uses Simple (version 5.1.6) as a lightweight HTTP server framework. You can find the required libraries and classes for the server application inside the packagetools.descartes.bungee.SimpleHTTPof this project.
3. Getting started
3.1 BUNGEE Examples
Let’s try some examples of the project you can find attools.descartes.bungee.cloud. aws/src/tools.descartes.bungee.examples.
The testsTestAWS.java,DetailedAWSAnalysis.javaandRunBenchmarkonAWS.javaare described below.
3.1.1 TestAWS.java
This is a ’Hello World’ to check, if infrastructure setup is okay. • insert the DNS of your Load Balancer at hostName (line 11) • runTestAWS.java as a Java application
• this test starts an instance, if none is started yet.
• it tests whether BUNGEE can connect to AWS and can measure request response times
3.1.2 DetailedAWSAnalysis.java
The Detailed Analysis process searches for the maximum intensity in requests your cloud can sustain at every scaling stage via a binary search. Be aware that this process can easily take up to several hours.
• make sure the files defined in lines 20–22 exist
• inside the host properties file you have to set the DNS of you Load Balancer as hostname
• you can switch on or of the GUI by changing the value/file inside the jmeter prop-erties file
• this test creates the calibration/mapping files that are used for the next test: the amount of instances is controlled by BUNGEE (controller disabled) – BUNGEE searches the maximum load intensity your system can withstand at a certain scaling level.
3.1. BUNGEE Examples 6
3.1.3 RunBenchmarkonAWS.java
This executes a load profile defined in DLIM scaled to a given upper maximum number of instances.
• select a property file for the settings of your test (line 15)
• use our preconfigured property files or create/adapt your own (the property files are documented separately, see below)
opt Use LIMBO to build own Descartes Load Intensity Profiles (DLIM) or extract model instances from own traces. We suggest the LIMBO tutorial as background.
• make sure, the called files inside that property file are existing (line 1–6)
• inside the called host properties file you have to set the DNS of you Load Balancer as hostname
• run this Java application for a benchmark which is defined inside the property file; here the calibration files from above are used
• the jmeter GUI can be activated at propertyFiles/jmeter.prop
• This program executes the elasticity measurement based on the DLIM load profile given as input (the amount of resources is now controlled by your controller/AWS autoscaling configuration).
• BUNGEE executes a sanity check on the measurement data, whether your load driver machine achieved to send the requests accurately timed.
3.2. Property files 7
3.2 Property files
These property files are important for AWS EC2. The other property files additionally needed for CloudStack based environments.
3.2.1 measurement.prop file
mappingFile=path/file.mapping #the created mapping file of the analysis run before
numberOfBenchmarkedResources=10 #set the max number of instances that are spawning
relativePathes=true #true or false
intensityModelFile=path/file.dlim #LIMBO load intensity profile used for the benchmark
hostPropertiesFile=path/file.prop #for the communication with the host
requestPropertiesFile=path/file.prop #location of the request file for JMeter
warmUpSeconds=300 #duration without measuring
secondsPerTimeUnit=225 #depends on the load profile, here we have a time unit (1 arrival rate value) per 15 minutes - the experiment of simulation one day is speed up times 4 when using 225 (resulting in 6h experiment time)
3.2.2 host.prop file
hostname=DNS #insert the load balancer DNS here
port=8080 #port for HTTP communication
3.2.3 jmeter.prop file
noGui=true # true or false activates the GUI; also set the jmx file
jMeterPath=path/ApacheJMeter.jar #relative path to the JMeter project
jmxFile=jmx/noGui.jmx #select a jmx you like; depends on the boolean Gui
propertyFile=propertyFiles/jmeter.properties #yet another file for JMeter properties
3.2.4 request.prop file # arguments for JMeter
problemSize=500000 timeout=1000
4. Installation and configuration of
BUNGEE for CloudStack
Please check out the code to get BUNGEE with CloudStack working. Find the places inside the code where to add needed information (like above). This property files are used for CloudStack:
• cloudSettings.prop
• netscaler.prop
• cloudstack.prop
5. Result analysis
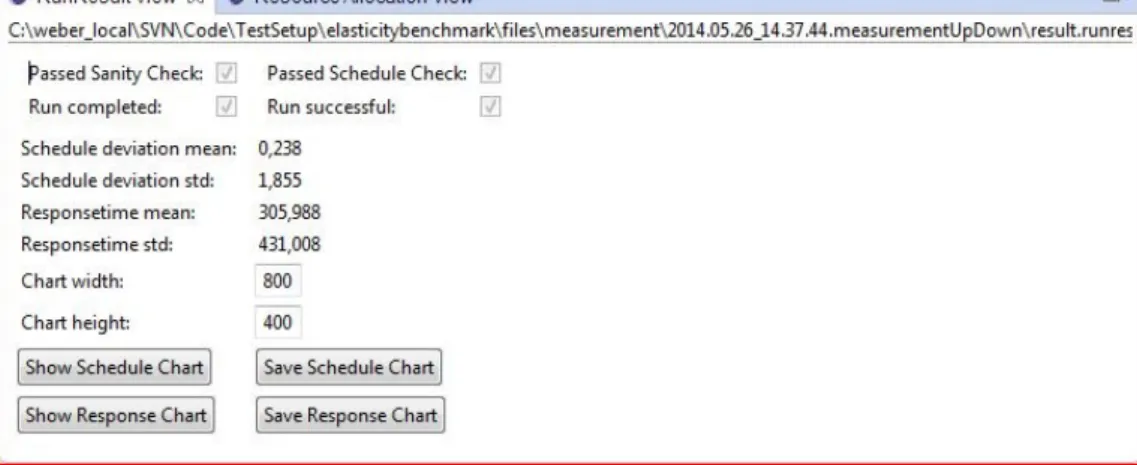
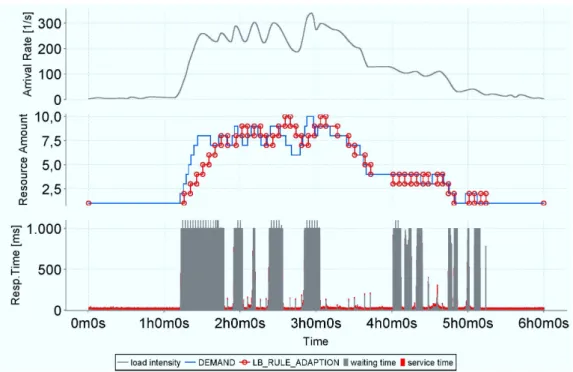
You can use the viewer Plugin (see Figure 5.1) to analyse the results. Also generate and watch charts, for an example see Figure 5.2.
To enable the viewer plug-in features in Eclipse click on Window → Show View → Other. . ., select BUNGEE Elasticity Measurement and choose the views you want. If you click on a BUNGEE generated file inside ”measurement” or ”calibration” you can see the result in the correspondent view. Be warned – klicking on a runresult file could take a while, because it contains all the timestamp of sent requests. At the moment you can not save the figures, because of the itext licence.
5.1 result.runresult file
##Tue May 26 11:10:58 CEST 2015 #Timestamp automatically created
responseFile=responses.csv #responses of the benchmark. The file contains: id, timer start, start, end, response Time, latency, start Wortk, end Work, duration, result, failed, response Code, Server IP
warmUpSeconds=180.0 #waiting-time after a new instance has started
timestampFile=timestamps.csv #timestamps for the benchmark test. Stamps are automatically created
5.1. result.runresult file 10
6. Possible Extensions to BUNGEE
• add own metrics that are based on measured response times, throughput, resource supply/demand changes
• change application type (adapting the jmx-file containing the JMETER test plan) and connecting BUNGEE to the elastic application in the cloud running behind the load balancer
• employ other than out-of-the-box controllers that implement the AWS or CloudStack autoscaling API
• AWS and Cloudstack support is given by now. BUNGEE can be easily extended to support OpenStack and other cloud management APIs
• Distributed, synchronised execution of several BUNGEE load driver instances to achieve higher intensities (more than 600 req/sec)
7. Final Remarks
Your feedback is highly appreciated. Countless hours of work have been spent for this work - please cite us if you are using our framework:
Nikolas Roman Herbst, Samuel Kounev, Andreas Weber, and Henning Groenda. BUNGEE: An Elasticity Benchmark for Self-Adaptive IaaS Cloud Environments. In Proceedings of the 10th International Symposium on Software Engineering for Adaptive and Self-Managing Systems (SEAMS 2015), Firenze, Italy, May 18-19, 2015.
@inproceedings{HeKoWeGr_2015_SEAMS_BUNGEE,
author = {Nikolas Roman Herbst and Samuel Kounev and Andreas Weber and Henning Groenda},
title = {{BUNGEE: An Elasticity Benchmark for Self-Adaptive IaaS Cloud Environments}},
keywords = {IaaS, benchmark, metric, cloud, elasticity, resource, measurement},
booktitle = {Proceedings of the 10th International Symposium on Software Engineering for Adaptive and Self-Managing Systems (SEAMS 2015)}, day = {18--19},
location = {Firenze, Italy}, month = {May}, year = {2015}, pdf = {http://se2.informatik.uni-wuerzburg.de/pa/uploads/papers/paper-782. pdf}, slides = {http://se2.informatik.uni-wuerzburg.de/pa/uploads/slides/slides-paper-782.pdf} }
For more information please refer to:
BUNGEE IaaS Cloud Elasticity Benchmarking Framework:
http://descartes.tools/bungee
LIMBO Load Intensity Modeling Framework:
http://descartes.tools/limbo
Further Descartes Tools: