Rapid SQL® 7.6 Evaluation Guide
Published: January 12, 2009San Francisco, CA 94111 U.S.A.
This is a preliminary document and may be changed substantially prior to final commercial release of the software described herein.
The information contained in this document represents the current view of Embarcadero Technologies, Inc. on the issues discussed as of the date of publication. Because Embarcadero must respond to changing market conditions, it should not be interpreted to be a commitment on the part of Embarcadero, and Embarcadero cannot guarantee the accuracy of any information presented after the date of publication.
This reviewer’s guide is for informational purposes only. EMBARCADERO MAKES NO WARRANTIES, EXPRESS OR IMPLIED, AS TO THE INFORMATION IN THIS DOCUMENT.
Complying with all applicable copyright laws is the responsibility of the user. Without limiting the rights under copyright, no part of this document may be reproduced, stored in or introduced into a retrieval system, or transmitted in any form or by any means (electronic, mechanical, photocopying, recording, or otherwise), or for any purpose, without the express written permission of Embarcadero Technologies, Inc..
Embarcadero may have patents, patent applications, trademarks, copyrights, or other intellectual property rights covering subject matter in this document. Except as expressly provided in any written license agreement from Embarcadero, the furnishing of this document does not give you any license to these patents, trademarks, copyrights, or other intellectual property. © 2009 Embarcadero Technologies, Inc. All rights reserved.
Embarcadero Technologies, Inc., and all of the company’s products are either registered trademarks or trademarks of Embarcadero Technologies, Inc. in the United States and/or other countries.
3
Contents
INTRODUCTION TO EMBARCADERO’S RAPID SQL ... 4
Product Benefits by Audience ... 4
About this Evaluation Guide ... 5
Session 1: Getting Started with Rapid SQL ... 6
Session 2: Productivity Enhancers ... 9
Session 3: Scripting... 19
Session 4: Working with Code Workbench ... 22
Session 5: Building a Database Project ... 24
Section 6: Visual Query Builder and Data Editor ... 26
Section 7: Code Analyst ... 28
Section 8: SQL Debugging and Profiling ... 31
ADDITIONAL RESOURCES...35
Licensing Your Embarcadero Technologies Product... 35
Embarcadero Technologies Product Support ... 35
Embarcadero Technologies Technical Support ... 35
4
Introduction to Embarcadero’s Rapid SQL
Rapid SQL® is an integrated development environment that enables developers to create, edit, version, tune, and deploy server-side objects residing on Microsoft® SQL Server, Oracle®, Sybase Adaptive Server®, IBM® UDB DB2®, and IBM® DB2® for OS/390® databases. Its unified database development environment provides extensive graphical facilities that simplify SQL scripting, object management, reverse engineering, database project management, version control and schema deployment. With Rapid SQL, programmers can develop and maintain high-quality, high-performance client/server and web-based applications in less time, and with greater accuracy.
Product Benefits by Audience
Database Developers/Administrators
Rapid SQL provides an easy-to-use graphical user interface (GUI), which allows Database Developers to be immediately productive in a cross-platform environment without having platform specific knowledge. Along this line, Rapid SQL provides standard object creation wizards and graphical object editors for all supported platforms, which greatly reduce the time and effort to build an application database from the ground up.
Rapid SQL also offers several cross-platform code-generation options, which help Developers build SQL code that is syntactically and functionally correct the first time. In addition, Rapid SQL can be used for the immediate or scheduled execution of SQL scripts and files, both with output and notification options.
Rapid SQL makes short order of working with data by providing Developers with several easy-to-use browsing, visual query building and data editing options. All operations can be completed with drag-and-drop, point-and-click ease, with little or no SQL coding required. Database Project Management
Rapid SQL provides seamless, out-of-the-box integration with all major Version Control Systems (VCS). Rapid SQL offers complete database project management capabilities, which allows for the reverse-engineering of live database objects into corresponding off-line SQL source code files, which may be checked into and out of any of the supported VCSs. Rapid SQL also provides detailed HTML reports at the database object level that can be viewed immediately within the application or published to a defined web directory.
5 About this Evaluation Guide
This evaluation guide is intended to help you get started using Embarcadero’s Rapid SQL. After completion of this evaluation guide, you’ll have the foundation you need to explore the many features of Rapid SQL. You’ll have learned how to register and connect cross-platform datasources, navigate the database explorer, work with the individual object browsers, editors and wizards, build and manage projects, and leverage many of the productivity-focused features offered throughout Rapid SQL. You will also know that Rapid SQL allows you to concentrate more on what needs to be done and less on how it should be done.
This guide is divided into separate sessions. Do them all at once, or complete them individually as you have time:
Session 1: Getting Started with Rapid SQL Session 2: Productivity Enhancers
Session 3: Scripting
Session 4: Working with Code Workbench Session 5: Building a Database Project
Section 6: Visual Query Builder and Data Editor Section 7: Code Analyst
Section 8: SQL Debugging and Profiling
You can use this basic tutorial as a roadmap of product highlights; but also to help you find your own path to explore Rapid SQL.
Once you’ve started, you can select Help Topics from the Help menu to find many additional resources including Tutorials that complement and build on many of the activities shown in this brief guide.
6 Session 1: Getting Started with Rapid SQL
Download and Install
You can obtain the latest version of the Rapid SQL software from the Embarcadero website at www.embarcadero.com.
Click “Download”, and follow the steps indicated. Save the file on your computer and then double-click to launch the self-extracting file that will guide you through the installation process.
When you first install an evaluation copy of Rapid SQL, you can use the tool for 14 days. After that time, a permanent license is needed.
Overview
The graphic below illustrates all the elements of the Rapid SQL application window.
Database Explorer Datasource Group Datasource Toolbars Application Workspace
7
Start Rapid SQL
1. Choose Start > Programs>Embarcadero Rapid SQL 7.6.0>Rapid SQL 7.6.0.
The first time Rapid SQL starts, if offers to automatically discover and register any datasources on your network. The Discover Datasources feature automatically searches the DBMS
configuration files and discovers datasources residing on your system that are not currently registered. When you use this feature, a dialog box lists the name of the server or instance and the type of DBMS of all unregistered datasources found on your network or local machine and gives you the option to register the discovered datasources.
2. Choose “No” for the purpose of this guide.
Registering Cross-Platform Datasources
For now, you will register a data source manually.1. On the Datasource menu, select Register Datasource. A Datasource Registration wizard opens.
2. Choose Microsoft SQL Server as the DBMS type and then click Next.
Rapid SQL allows you to view and manage all of your databases at the same time from the Database Explorer. You can easily move from DB2 to Oracle to SQL Server to Sybase all within the same window. Rapid SQL’s multi-threaded, productivity-enhancing environment allows you to have several workspaces open at the same time so you can continue to work, even while the application processes in the background.
8 3. Specify the Host name of a SQL Server datasource on your network, override the Datasource
name with “SAMPLE_DATASOURCE” and then click Next.
4. Provide valid credentials in the User ID and Password boxes, and then select the Auto-Connect? checkbox to eliminate having to provide credentials each time you connect to this datasource.
5. In the left-hand pane, select Datasource Group, select the MS SQL Server folder, and then click Finish.
6. Select Yes when prompted to connect to the new datasource.
Rapid SQL offers the same easy-to-use Datasource Registration Wizard for IBM DB2, Microsoft SQL Server, Oracle, Sybase and ODBC connections. The connection information only needs to be set up one time for each platform and can be saved locally or in a common datasource catalog for use by other Embarcadero products.
You can configure Embarcadero database applications to use a datasource catalog stored in the system registry of your machine (local) or to use a datasource catalog located in the registry of
another computer (remote). This capability makes it easy to share datasource catalogs among multiple users so that maintenance can occur in one location.
All Embarcadero database management products share the datasource catalog, which means that when you set up your datasource catalog using one product such as Rapid SQL, the same list of datasources is available in other Embarcadero Technologies products. Any changes you make to the datasource catalog are reflected in all Embarcadero database management products.
9 Session 2: Productivity Enhancers
Database Object Management Made Easy
Rapid SQL makes it easy and intuitive to navigate between datasources and to drill-down into atomic database objects within the Database Explorer Tree. The Database Explorer Tree displays all
registered datasources and serves as the entry-point for much of Rapid SQL’s advanced functionality.
The Database Explorer Tree
1. Click on the Explorer title bar and select By Object Type.
2. Select and Expand the SAMPLE_DATASOURCE > Databases > pubs node to display the database object sub-nodes.
Creating an Object Using the Object Creation Wizard
From within the Database Explorer Tree you can create any database object using simple Object Creation Wizards. The following is an example of how to use the Table Object Creation Wizard. It is similar to the object creation wizards available within Rapid SQL for all database objects.
10 2. Select a Schema, provide a Name of SAMPLE_TABLE. Leave the remaining default settings
and click Next.
3. Add a column, using a Name of Sample_Column1 and select a Type of char(100). Experiment with the Add Column and Delete buttons, and with selecting a column and modifying its attributes.
4. Click Finish. The DDL View panel opens showing the DDL that will be used to create the new table.
5. Deselect the Launch Object Editor After Execute and then click Execute.
Rapid SQL builds the platform-specific SQL code, syntactically-correct and ready to run the first time. There is no SQL coding required in any of the Rapid SQL creation wizards.
11 While the wizard offered you the option to automatically open an editor on creating the table, you can also manually open an editor.
1. In the Database Explorer, right-click on your new table and select Open.
Object editor features are as follows:
All Object Editors provide standardized, multi-tabbed windows for each database object type. All Object Editors provide fully-functional toolbars for easy object management
Rapid SQL has full knowledge of the underlying DBMS system catalog, syntax and alteration rules, so the user can concentrate on what needs to be done, not how to do it.
Drop-down boxes allow you to easily move between owners and objects.
The Rapid SQL Object Editor easily performs operations that would normally require painstaking and error-prone scripting, such as deleting or inserting columns in a table while preserving data,
dependencies and permissions. Rapid SQL analyzes the database catalog to determine its structure, and then automatically generates the SQL script required for the extended alteration. For instance, when a full table alteration is required, Rapid SQL automatically unloads and reloads the data, eliminating tedious work.
Close the object editor window.
Object Documentation and Reporting
Rapid SQL provides rich, detailed HTML Reporting for all database objects. Building a browser-ready report for any object is any a few mouse-clicks away.
1. Expand the Tables node, right-click on any table and select Report from the menu. A Report dialog opens.
12 2. Enter a destination Report Home Page File Name. This can be a network web server
directory\file.
3. Enter a Report Title and click Execute.
The HTML report will automatically be displayed in the Rapid SQL application workspace. For example:
The HTML report can be saved to a new file or referenced in the file named above.
NOTE: All HTML reports are browser-ready and suitable for posting directly to the web.
Working With Code, Files and Data
Rapid SQL provides many features and powerful development tools for creating and executing SQL code and working with data.
Setting Environment Options
The Options Editor allows you to set the Rapid SQL development environment to meet your needs. 1. Select File > Options from the menu. The Options dialog opens.
Note: For purposes of this Evaluation Guide, we are only covering high-level functionality of the major features and tools within Rapid SQL.
13 The Options dialog has one page per option category. You select an option category in the left-hand pane and can subsequently set options on that page. Options are applied when you click OK.
Favorites Tab
The Favorites Tab provides a drag-and-drop library interface of all supported DBMS syntax, SQL syntax, built-in functions, optimizer hints, and SQL-conditional syntax. Additionally, it provides the ability to create custom folders to store commonly-used code for quick and efficient access, as needed.
To open the Favorites Explorer:
1. At the bottom of the Explorer pane, click Favorites. The Favorites Explorer appears. 2. Expand the Microsoft node and then expend the Schema subnode.
3. RIght-click the Procedures node and select Open. The selected code opens in the SQL Editor window and is ready for execution.
To add a custom folder to the Favorites Explorer
1. Open the Favorites Explorer and right-click the Favorites folder.
2. Select New Folder from the menu. A new folder is added to the bottom of the tree view. To add an existing script to the Favorites Tab
1. Select New>SQL, create a two or three-line script in the SQL editor, and then save your script. 2. After saving the script, right-click anywhere on the workspace and select Add to Favorites. The
Favorite Properties dialog box opens.
3. Enter the appropriate information in the fields provided. The script is added to the Favorites Explorer.
14 NOTE: Code from the Paste SQL, Paste SQL Syntax, and Favorites Tab are available from any SQL or DDL Editing window.
Working with Scripts and Files
Rapid SQL extends the auto-generation of SQL code by allowing you to run your scripts across multiple databases at the same time. In addition, there is the option to execute the code immediately or schedule it to run later via the Windows NT Event Scheduler or the Embarcadero Job Scheduler.
Script Execution Facility
1. On the Favorites Explorer, navigate to the Microsoft SQL Server node and select the Schema subnode.
2. Right-click the Procedures node and select Script Execution Facility. The Script Execution Facility dialog box appears.
3. Click the Target Tab and select the datasources against which the script will run.
4. Click the Output Tab and select a type of output format. For the purposes of this example, select Graphical Output.
5. If you want to send a notification message indicating that the script has executed, click the Notify Tab and enter the appropriate information in the fields provided.
6. Click Execute. Rapid SQL runs the script against the datasources specified on the Target Tab. NOTE: Separate script output windows are created for each selected datasource.
File Execution Facility
Similar to the Script Execution Facility, files containing SQL scripts can be added to the File Execution Facility and executed immediately or scheduled to run later. Other than the origin of the code, all supporting functionality is the same.
1. On the Tools toolbar, click File Execution Facility. Rapid SQL opens the File Execution Facility dialog box.
2. To locate the file you want to execute, click Add. Use the Select Files dialog box to locate and select a file.
15 3. On the Target Tab, select the datasources to run the script against.
4. On the Output Tab, select the desired output option. For the purposes of this example, select Graphical Output.
5. To enable the scheduling function for the script, you must select the File Output option. 6. If you want to send notification that the script has executed, on the Notify Tab, complete the
target information. 7. Click Execute.
Rapid SQL runs the script against the target datasources.
NOTE: Separate script output windows are created for each selected datasource.
Viewing Data
Rapid SQL provides several options for browsing data. In addition, it gives you the ability to construct even the most complex SQL statements with point-and-click ease.
Select * Browsing
1. On the Database Explorer ensure that the Explorer tab is displayed and then expand the MS SQL server node.
2. Expand any database you know has table data, expand the Tables node, right-click a table, and then click SELECT * FROM.
All columns and rows from the table are displayed in the active workspace.
Retaining Datasoure Explorer View Settings
1. Click on expandable settings at the top of the Explorer pane.
2. Select Retain View Settings.
The Explorer will open the next time just as you left it. All connections that were present when you closed DBArtisan will be re-established.
16
Datasource Explorer Bookmarks
Rapid SQL allows you to set bookmarks for frequently visited database objects. 1. Right-click on any node in the Datasource Explorer Tree.
2. Select “Add Bookmark”.
You may wish to modify the bookmark name.
After Bookmarks are defined you can use them to easily navigate to commonly used datasource resources via the main menu “Bookmarks” item.
The Bookmark Manager handles maintenance of Bookmarks. 1. Select Bookmarks from the menu bar.
17
Setting Keyboard Shortcuts and Hotkeys
1. On the Tools menu, select Customize.
2. In the Customize dialog go to the Keyboard tab.
3. The Keyboard tab can be used to set Keyboard shortcut hotkeys for all areas of DBArtisan functionality.
Referencing Most Recently Used Datasources
18 This will automatically place you on the datasource within the Explorer, ready to work with active connection.
19 Session 3: Scripting
Generating Code
By providing several code generation and assistance options, Rapid SQL makes cross-platform development easy for developers of all experience levels.
Code Generation Facility
The Code Generation Facility can be used to create complete procedures, functions or packages revolving around views or tables.
Finished!
Note: The following examples build on the SQL Server 2000 SAMPLE_DATASOURCE
registered earlier in this Evaluation Guide. These examples can be applied to any registered datasource for any of the supported platforms.
1. From the menu, open Tools > Code Generation Facility.
2. Select the SAMPLE_DATASOURCE datasource and the “pubs” database from the drop-down listboxes. 3. Select the “authors” table, “state” as
the input column and all columns for output.
4. Select “select” as the code option. 5. Select a file to save the generated
script and check “Open”.
6. Click “OK” and the DDL to create the procedure will be generated and displayed in an editable window, called the DDL Editor. You can edit the name of the new procedure and any of the generated code at this time. Name the new procedure
“sample_select_authors”.
7. Click on the (execute or step execute) button to submit the DDL and create the procedure.
8. The indicated file will be saved on the selected directory.
9. 10.
No SQL statement coding is required to generate complete stored procedures and
packages. If applicable, Rapid SQL allows all
generated code to be previewed and edited to fit any development need.
20
Right-click feature
Similar to the Code Generation Facility, the “right-click” code generation feature can be used to create complete procedures, functions or packages revolving around views or tables.
1. From the Database Explorer Tree, expand the SAMPLE_DATASOURCE > pubs > Tables sub node.
2. Right-click on the “authors” table. 3. Select Generate > Procedure > Select. 4. Select “state” as the input column, and leave all
output columns selected.
5. Click “OK” and the DDL to create the procedure will be generated and displayed in an editable window, called the DDL Editor. You can edit the name of the new procedure and any of the generated code. Name the new procedure “sample_select_authors”. 6. Click on the (execute or step execute) button
to submit the DDL and create the procedure. Finished!
No SQL statement coding is required to generate
complete stored procedures and packages. If
applicable, Rapid SQL allows all generated code to be previewed and edited to fit any development need.
21
Code Assistance
Rapid SQL provides extensive, easy-to-use code assistance features for all of the supported DBMS platforms, throughout the application. Assistance is provided in the form of ready-to-use code templates and blocks of syntactically correct code.
Paste SQL
Paste SQL Syntax
1. From the Database Explorer Tree, expand the
SAMPLE_DATASOURCE > pubs sub node.
2. Open a SQL Editor window. From the menu, open File > New > SQL (Ctrl+N).
3. Select the toolbar menu item to open the Paste SQL Syntax window, at right.
4. Select a template and click on “Paste” to copy the code template into the SQL Editor window. 5. Add your own code to complete the
needed operation.
1. From the Database Explorer Tree, expand the SAMPLE_DATASOURCE > pubs sub node.
2. Open a SQL Editor window. From the menu, open File > New > SQL (Ctrl+N). 3. Select the toolbar menu item to
open the Paste SQL window, at right. 4. Select the “authors” table, all columns
and “select” for the generation options. 5. Click “Paste Statement” to copy the
generated code to the SQL Editor window.
6. You can use the statement as is, or modify the code as needed.
22 Session 4: Working with Code Workbench
Rapid SQL now empowers the developer with the ability to create his own personal toolbox of coding accessories. The Code Workbench consists of Auto Column Lookup, Auto Replace, and Code Templates. To invoke the Code Workbench settings, select Tools > Code Workbench. From this panel, you can configure the Code Workbench to fit your needs.
Select the specific options within Code Workbench that you’d like to enable.
Work with the Code Templates facility by modifying the code templates that are shipped with Rapid SQL or adding your own.
Rapid SQL ships with a set of Auto Replace entries.
When Column Auto Lookup is enabled, the list of columns for the specific table is listed. You can use the arrow keys or the mouse to select the column.
Note: The table must be aliased or fully qualified.
23 Invoke the Code Templates by
pressing the defined hot key. Then select the desired code template to be inserted into the ISQL window.
24 Session 5: Building a Database Project
Creating a new Rapid SQL Project
Rapid SQL provides an excellent team development environment by allowing you to Reverse Engineer live database objects into off-line SQL source code files that can then be easily added to a Version Control System (VCS). Rapid SQL’s seamless VCS integration offers all version control operations, such as get, check-out, check-in, history and diff. This example will Reverse Engineer the table objects from the Microsoft SQL Server pubs database into a Rapid SQL project and then will add the project to version control under Microsoft Visual Source Safe.
1. Select File > New > Project to open the wizard.
2. Enter “sample_project” as the name, and browse and select a directory that contains a VSS database. Enter a description (optional). Select “From Database” and click “OK”.
3. Select “SAMPLE_DATASOURCE” and click “Next”. 4. Select “pubs” and click “Next”.
5. Select “dbo” as the owner. Right-click in the object type selection window and “unselect” all of the options. Select only “Tables”. Under Extract Scope select “Selected Objects Only”. Click “Next”. 6. Select only the authors, discounts and employees tables.
7. Uncheck all selected “Options for tables”. Click “Next”. 8. Select Retain. Click “Next”.
9. Preview the last panel (shown at right) and click “Execute”.
Finished! You have now successfully created a working database project. At this point, the project is available to be added to Version Control. This can be done by clicking “yes” when prompted and following the dialog, or by right clicking on the project within Project Explorer tree. Select “yes” for the purpose of this guide.
25
Adding a Project to Version Control (Sample - Microsoft Visual Source Safe)
When a project is created Rapid SQL will automatically prompt you to add the project files to the selected VCS solution (see “Setting Environment Options” below). The following dialog will be displayed:
Finished! The following message indicates that the project was successfully placed under version control.
1. Enter username and password (if applicable). 2. Enter or Browse to the project database folder.
Select “Open”.
3. Click “OK” and enter “sample_project” as the Project name.
26 Section 6: Visual Query Builder and Data Editor
Visual Query Builder
Rapid SQL gives you the ability to construct complex SQL statements with point-and-click ease using the Visual Query Builder.
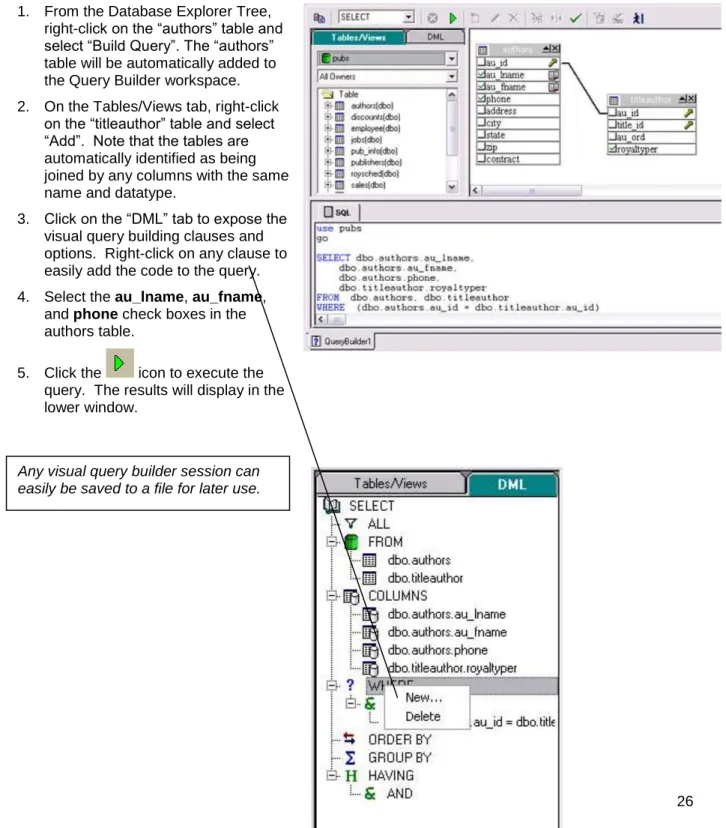
1. From the Database Explorer Tree, right-click on the “authors” table and select “Build Query”. The “authors” table will be automatically added to the Query Builder workspace. 2. On the Tables/Views tab, right-click
on the “titleauthor” table and select “Add”. Note that the tables are automatically identified as being joined by any columns with the same name and datatype.
3. Click on the “DML” tab to expose the visual query building clauses and options. Right-click on any clause to easily add the code to the query. 4. Select the au_lname, au_fname,
and phone check boxes in the authors table.
5. Click the icon to execute the query. The results will display in the lower window.
Any visual query builder session can easily be saved to a file for later use.
27
Live Data Editor
1. From the Database Explorer Tree, right-click on the “authors” table and select “Edit Data”. 2. Add all columns to editing session. At this
point, you can add a WHERE clause that will filter for only the desired data. Note that Rapid SQL builds the SQL to retrieve the data to be edited in the window below. 3. Note that the editing window has LIVE and
BATCH modes.
LIVE mode commits your changes each time you move to a new row.
BATCH mode will allow you to move within the window and commit your changes when ready.
4. Changes made in BATCH mode can be cancelled by selecting the “Reload Data” icon.
5. At any time during the session, you can change the filter parameters by selecting the “Filter Data Dialog” icon.
28 Section 7: Code Analyst
The Code Analyst allows you to capture run-time statistics on executable database objects, included stored procedures and functions. Not only can you capture runs for single objects, but you can group more than one object.
To get started, select Tools > Code Analyst
Note: In order for Code Analyst to run, 5 repository tables will be created on the database. Select the database you would like the tables to be installed on and press OK.
Once the tables are installed, you’re ready to start defining a session. 1. On the Code Analyst toolbar, click the Create New Collection button.
Define the session by giving it a name, selecting the objects to be executed, and clicking Next.
If the objects require parameters, Code Analyst prompts you to enter the parameters.
29 Once the session has been run,
the total time for the run is displayed in the Run Summary tab.
The Run Detail tab shows a breakdown of the different objects that make up the session.
After defining input variables, if you selected multiple objects, the
sequence of execution can be set by moving the object up or down in the list.
Code Analyst provides lets you schedule the session to run unattended during off-peak hours.
30
The Unit Detail contains the specific time measurements for individual SQL statements.
31 Section 8: SQL Debugging and Profiling
SQL Debugging
The DBArtisan SQL Debugger is another database productivity tool that lets you debug SQL Server, Oracle, Sybase or DB2 UDB stored procedures as well as Oracle functions. SQL Debugger simplifies the task of finding coding errors.
1. From the Datasource Explorer browser, select the procedure/function object group under your database. 2. From the detail window at right, select a
procedure/function, which you would like to debug. 3. Right-click the object to open the pull-down menu. 4. Select Debug to invoke the SQL Debugger.
5. If the
procedure/function contains input variables, the Procedure Execution window prompts for entry of these values. 6. Enter the value(s) for
the input variable(s) and press Continue.
Note: pressing the Debug button or selecting Debug from the Command dropdown menu can also invoke The SQL Debugger.
Tip: DBArtisan allows the user to save the input variable values to a file for later use. This is very helpful for procedures/functions with many input variables that need to be run repeatedly.
32 The application opens the SQL Debugger Interface (show below).
The Debugger features basic execution, line-by-line execution, breakpoint support, and other common debugging features. For details, refer to the online Help.
DDL Editor
Watch Window
Variables Window
Call Stack Window
33
SQL Profiling- Oracle Only
The SQL Profiler within Rapid SQL provides the ability to capture the metrics of various PL/SQL programmable objects as they are executed in the database. It quickly identifies performance bottlenecks by first calculating the overall runtimes of objects like Oracle packages, and then
computing the amount of time each line of PL/SQL code spends executing. Information is presented in an easily viewed, drill-down format.
1. To start a profiling session, use the Tools menu option and select SQL Profiler, Start.
2. Enter a name for the profiling session or select an existing name from the dropdown. Press OK. The Profile session is now active.
3. Execute the programmable object (i.e. Stored Procedure) you wish to capture metrics on. 4. When finished, select Tools > SQL Profiler > Stop. The SQL Profiler – Stop dialog window
prompts you to select an option.
5. Press Stop.
6. Under the Database Explorer, expand the PL/SQL Code Profling section.
7. Right-click on the profile session and select Run Summary. The Run Summary window will appear.
34 7. Select a session and select Run Detail from the right-click menu. The Run Detail screen appears
allowing you to view the metrics for this run in both a graphical and text format.
8. To drill down further into the data, highlight a unit and select Unit Detail from the Right-Click Menu. Scroll through the Source window to view the times for each statement.
9. To compare 2 cases, select the 2 cases you wish to compare (shift-click to select the second case) from the Run Summary screen and select Compare from the right-click menu. The SQL Profiler Run Comparison screen appears.
35
Additional Resources
Licensing Your Embarcadero Technologies Product
All Embarcadero Technologies products include a 14-day trial period. To continue using the product without interruption, we recommend that you license it as soon as possible. To license your product, use the License Request Wizard found in the Help menu of your respective product. If you have not yet purchased your Embarcadero Technologies product, contact [email protected], or [email protected] for sales in the EMEA region.
Embarcadero Technologies Product Support
The Embarcadero Technologies Web site is an excellent source for additional product information, including white papers, articles, FAQs, discussion groups, and the Embarcadero Knowledge Base. Go to www.embarcadero.com/resources, or click any of the links below, to find:
Documentation Online Demos Technical Papers Discussion Groups Knowledge Base FAQ
Embarcadero Technologies Technical Support
If you have a valid maintenance contract with Embarcadero Technologies, the Embarcadero Technical Support team is available to assist you with any problems you have with our applications. Our
maintenance contract also entitles registered users of Embarcadero Technologies products to download free software upgrades during the active contract period. Evaluators receive free technical support for the term of their evaluation (14 days).
We encourage you to open technical support cases via the Technical Support request form at the Embarcadero Technologies Web site. For additional information about Embarcadero Technologies Technical Support, go to the Support page on our Web site.
Embarcadero Technologies on the Web
To download evaluations of other Embarcadero Technologies products or to learn more about our company and our products visit us at www.embarcadero.com