Deployment Guide
vRanger
software license or nondisclosure agreement. This software may be used or copied only in accordance with the terms of the applicable agreement. No part of this guide may be reproduced or transmitted in any form or by any means, electronic or mechanical, including photocopying and recording for any purpose other than the purchaser’s personal use without the written permission of Quest Software, Inc.
The information in this document is provided in connection with Quest products. No license, express or implied, by estoppel or otherwise, to any intellectual property right is granted by this document or in connection with the sale of Quest products. EXCEPT AS SET FORTH IN QUEST'S TERMS AND CONDITIONS AS SPECIFIED IN THE LICENSE AGREEMENT FOR THIS PRODUCT, QUEST ASSUMES NO LIABILITY WHATSOEVER AND DISCLAIMS ANY EXPRESS, IMPLIED OR STATUTORY WARRANTY RELATING TO ITS PRODUCTS INCLUDING, BUT NOT LIMITED TO, THE IMPLIED WARRANTY OF
MERCHANTABILITY, FITNESS FOR A PARTICULAR PURPOSE, OR NON-INFRINGEMENT. IN NO EVENT SHALL QUEST BE LIABLE FOR ANY DIRECT, INDIRECT, CONSEQUENTIAL, PUNITIVE, SPECIAL OR INCIDENTAL DAMAGES
(INCLUDING, WITHOUT LIMITATION, DAMAGES FOR LOSS OF PROFITS, BUSINESS INTERRUPTION OR LOSS OF INFORMATION) ARISING OUT OF THE USE OR INABILITY TO USE THIS DOCUMENT, EVEN IF QUEST HAS BEEN ADVISED OF THE POSSIBILITY OF SUCH DAMAGES. Quest makes no representations or warranties with respect to the accuracy or completeness of the contents of this document and reserves the right to make changes to specifications and product descriptions at any time without notice. Quest does not make any commitment to update the information contained in this document.
If you have any questions regarding your potential use of this material, contact: Quest Software World Headquarters
LEGAL Dept 5 Polaris Way Aliso Viejo, CA 92656 www.quest.com email: [email protected]
Refer to our Web site for regional and international office information. Patents
This product includes patent pending technology. Trademarks
Quest, Quest Software, the Quest Software logo, AccessManager, ActiveRoles, Aelita, Akonix, Benchmark Factory, Big Brother, BridgeAccess, BridgeAutoEscalate, BridgeSearch, BridgeTrak, BusinessInsight, ChangeAuditor, CI Discovery, Defender, DeployDirector, Desktop Authority, Directory Analyzer, Directory Troubleshooter, DS Analyzer, DS Expert, Foglight, GPOADmin, Help Desk Authority, Imceda, IntelliProfile, InTrust, Invirtus, iToken, JClass, JProbe, LeccoTech, LiteSpeed, LiveReorg, LogADmin, MessageStats, Monosphere, NBSpool, NetBase, NetControl, Npulse, NetPro, PassGo, PerformaSure, Point, Click, Done!, Quest vToolkit, Quest vWorkSpace, ReportADmin, RestoreADmin, ScriptLogic, SelfServiceADmin, SharePlex, Sitraka, SmartAlarm, Spotlight, SQL Navigator, SQL Watch, SQLab, Stat, StealthCollect, Storage Horizon, Tag and Follow, Toad, T.O.A.D., Toad World, vAutomator, vConverter, vEcoShell, VESI, vFoglight, vPackager, vRanger, vSpotlight, vStream, vToad, Vintela, Virtual DBA, VizionCore, Vizioncore vAutomation Suite, Vizioncore vEssentials, Vizioncore vWorkflow, WebDefender, Webthority, Xaffire, and XRT are trademarks and registered trademarks of Quest Software, Inc in the United States of America and other countries. Other trademarks and registered trademarks are property of their respective owners.
Deployment Guide August 2011 Version 5.2.1
Planning Your Deployment ...5
Getting Started ... 6
Before You Begin ... 7
Other Information Sources ... 11
vRanger Overview... 13
vRanger Overview ... 14
vRanger Architecture... 14
The vRanger Backup Process... 18
Available Backup Architectures ... 20
The vRanger Restore Process ... 28
vRanger Repositories ... 29
The vRanger Replication Process ... 34
Deploying vRanger ...42
The Deployment Environment... 43
The Deployment Environment ... 44
Choosing a vRanger Deployment Architecture ... 47
Environment Configuration Recommendations ... 54
VMware Recommendations ... 59
vRanger Repositories ... 68
Common Configuration Issues ... 71
Managing vRanger Performance ...75
Protection Best Practices ... 76
Workload Protection Considerations ... 77
Pre-seeding Replication Jobs... 80
Filtering Catalog Collections...86
Integrating vRanger...88
Integrating vRanger...89
vRanger and Tape Backup Vendors ...89
Application Backup & Recovery: Recovery Manager for Exchange...97
Data Domain and vRanger Repositories...98
Using vRanger and Microsoft PowerShell...98
This section provides general information on vRanger features and functions, as well as some key questions intended to guide your deployment planning.
This portion of the document contains the following sections:
Getting Started...6
Other Information Sources...11
vRanger Overview...14
vRanger Architecture...14
The vRanger Backup Process...18
The vRanger Backup Process...18
The vRanger Restore Process...28
vRanger Repositories...29
This chapter provides information on key questions and information sources used to plan a vRanger deployment.
This chapter contains the following sections:
Before You Begin...7
Learn About vRanger...8
Setup Your Environment...8
Install vRanger...9
Test Your Installation...9
Tune Your Deployment...10
Get More Out Of vRanger...10
Before You Begin
When planning any deployment, there are several steps that all customers will go through. Each of these steps is listed in the graphic below. The table below the image list the most common questions for each step, and provide links to the relevant sections of the document.
Learn About vRanger
Setup Your Environment
What does vRanger do? • “vRanger Overview” on page 14
How does vRanger work? • “vRanger Architecture” on page 14 • “The vRanger Backup Process” on page 18 • “The vRanger Restore Process” on page 28 • “The vRanger Replication Process” on page 34 • “vRanger Repositories” on page 29
What are my options for using vRanger?
• “The vRanger Backup Process” on page 18 • “The vRanger Replication Process” on page 34 • “The vRanger Restore Process” on page 28
Where can I get more information? • “Other Information Sources” on page 11
What are the requirements for deploying vRanger?
• “Hardware Requirements” on page 74 • “Software Requirements” on page 74 • “Application Databases” on page 16
• “Source and Destination Requirements” on page 75 • “VMware Requirements” on page 45
• “Port Requirements” on page 44
How should I configure my environment for vRanger?
• “Recommendations for Network Backups” on page 54 • “Recommendations for Fibre Backups” on page 55 • “Recommendations for Replication” on page 56 • “VMware Recommendations” on page 59 • “vRanger Repositories” on page 68 • “Installing the Databases” on page 78
What are some common configuration issues I should avoid?
Install vRanger
Test Your Installation
I’m upgrading from vRanger 3.x - what do I need to know?• “Upgrading from vRanger Pro 3.x” on page 80 • “Performance Expectations” on page 82 • “Job Migration” on page 84
Where should I install vRanger? • “Where to Install?” on page 75
What should I do with the vRanger database?
• “Database deployment options” on page 16 • “Installing the Databases” on page 78
I’ve got my repositories set up - how can I test them?
Tune Your Deployment
Get More Out Of vRanger
How should I configure by backup jobs for the best performance?• “Workload Protection Considerations” on page 77 • “Load Balancing” on page 84
How can I improve my data consistency?
• “Pre-seeding Replication Jobs” on page 80
How does vRanger reduce the storage footprint of archives?
• “Space Saving Technologies” on page 85 • “Data Domain and vRanger Repositories” on
page 98
How do I get vRanger to work with my tape software?
• “vRanger and Tape Backup Vendors” on page 89
How can I extend vRanger?
• “Application Backup & Recovery: Recovery Manager for Exchange” on page 97
• “Using vRanger and Microsoft PowerShell” on page 98
I have a Data Domain appliance. Can I use that with vRanger?
Other Information Sources
Before deploying vRanger, it is recommended to familiarize yourself with the available information sources.
Documentation
The vRanger documentation set consists of the following: • Release Notes (PDF)
• Getting Started Guide (PDF) • What’s New Guide (PDF)
• System Requirements Guide (PDF) • Installation and Setup Guide set PDF): • User Guide (PDF and online help)
The vRanger documentation is available online at: http://portal.vizioncore.com
Quest Online Resources:
The Quest website contains a wealth of information, including product features and functions, release information, product documentation, training, and support forums.
• General Product Page - Feature Information, Demos, etc: http://vizioncore.com/product/vRangerPro
• vCommunity - A collaborative environment for Quest customers featuring forums, wikis, and more.
http://vcommunity.vizioncore.com/
• Training - Free access to online product training. http://training.vizioncore.com
Contacting Support
Quest Support is available to customers who have a trial version of a Quest product or who have purchased a commercial version and have a valid maintenance contract. Quest Support is easily accessed in the following ways:
• Contact Quest support directly via our global and local telephone numbers. • Log and create/update your case, and check its status via the Quest Support Case
Management portal.
View the Quest Support Guide for a detailed explanation of support programs, online services, contact information, and policy and procedures. The guide is available at:
This chapter details the vRanger features and functions and provides an overview of the backup and restore process.
This chapter contains the following sections:
vRanger Overview...14
vRanger Architecture...14
Application Architecture...14
Application Databases...16
The vRanger Backup Process...18
The vRanger Restore Process...28
vRanger Repositories...29
vRanger Overview
vRanger offers comprehensive data protection and management that supports vSphere. Delivering fast and reliable backup and recovery, vRanger can capture the entire image of a VM or an individual file. All jobs can be executed without interrupting service--that is, while the source machine is running. Multiple ESX hosts can be used for
simultaneous jobs, reducing the backup window. To save time and disk storage space after a full backup, you can run differential backup job to capture only the data that has changed since the full backup. You can run backup and restore jobs immediately or schedule them. You can track the progress of all jobs and their component tasks. vRanger allows you to connect to multiple VirtualCenters (VCs) and back up multiple ESX hosts.
vRanger Architecture
vRanger is a multi-tiered application with both the client and server components installed on the same machine. vRanger will use a SQL Express database by default, but can easily be configured to use an existing SQL database installed anywhere in the network environment.
Application Architecture
The diagram below shows the various components, and where they are utilized during the backup process.
vRanger Client The vRanger Client is the main user interface for vRanger. The Client must be installed and run on the same machine as the vRanger Service.
vRanger Service The vRanger Service is the scheduling and communication “engine” for vRanger. The service runs independently of the vRanger Client, which means that task scheduling is not affected by closing the client.
vAPI vAPI is an exposed web service through which third-party vendors can integrate with vRanger.
A subset of the vRanger vAPI is the vAPI cmdlets for PowerShell. These cmdlets can be used to script vRanger features and
Application Databases
vRanger utilizes a SQL database to store application and task configuration data. The database can be either SQL Express 2005, which is the default, or an external SQL database running on your own SQL Server 2005 or SQL Server 2008 database server.
Note The cataloging function of vRanger requires that the application and catalog databases be installed on the vRanger server. For more information, see “Installing the Databases” on page 78
Database deployment options
The database deployment occurs during the initial installation of vRanger. Default
The Installation Wizard will default with a selection to install vRanger with the embedded SQL Express 2005 database. The default database can only be installed on the vRanger server.
While the embedded SQL Express database is free and simple to install, there is a size limit of 4GB per database.
External SQL Server
The Installation Wizard will guide you through configuring vRanger with an external SQL database. There is also an option in the Install Wizard to configure the database connection manually, but the guided approach is recommended.
USDI Service The USDI Service is responsible for FLR, specifically for the mounting of the .var archive and launching vzwino.exe to allow file extraction from within the GUI.
Repository In vRanger, this is the configured storage location for backup jobs. A repository can be: CIFS, FTP, SFTP, or NFS v 3.
Database vRanger requires a database (SQL or SQL Express) to store configuration information and task details. The database is installed by default on the vRanger machine, but can easily be installed on an existing SQL server as well.
Most larger organizations chose to use the embedded database to comply with internal policies and best practices. A significant advantage of using an external database, however, is that all settings and configurations (which are stored in the application database) are stored separate from the vRanger installation. In the event of a failure on the vRanger machine, the application can be quickly installed on another machine and configured to use the existing database.
Using an external database also makes it possible to move the vRanger installation with minimal effort.
The following versions of Microsoft SQL are supported for operation with vRanger.
Caution If you chose to use Microsoft SQL Server instead of SQL Express, the SQL Server application must be installed on the vRanger Machine in order for the cataloging feature to function. For more information, see “Installing the Databases” on page 78
SQL 2005 SQL 2005 SP1 SQL 2005 SP2 SQL 2005 SP3
SQL 2008 SQL 2008 R2
The vRanger Backup Process
With Inventory Node Selection, you can browse the VirtualCenter (vCenter) inventory and select which VMs or groups (folders) you wish to backup. You can select a VM, ESX host, folder, resource pool, datacenter, or vCenter and backup all of the VMs located under that node in the tree.
vRanger uses VMware snapshot technology to temporarily store incoming write requests while the VM is being backed up. After the backup completes, the snapshot is deleted, which commits those pending writes to disk. vRanger can backup a VM that already has an open snapshot and will backup the open snapshot, but any secondary consolidated helper backups will be closed prior to running the backup.
Backup Limitations
vRanger cannot backup physical RDMs (raw device map) partitions. You should see the warning: “incompatible drive detected”. Virtual RDMs (vRDMs) are supported. For more detailed information on backup features supported by various configurations, please see the tables below.
• “Usage Compatibility Matrix - Compression” on page 110
• “Usage Compatibility Matrix - Space Saving Technologies” on page 111 • “Usage Compatibility Matrix - VM Disk Configurations” on page 112
What Changes in the Guest OS
By default, vRanger does not place any code into the Guest OS. Starting with vRanger 4.5, the vzShadow.exe executable will be included with the application download. vzShadow.exe is an optional component that can, if you choose, be installed on Windows VMs to provide an additional level of consistency. For more information, please see “Guest Quiescing” on page 82.
What Changes on the Source
While vRanger does not permanently install anything on the source ESX Servers, several tools are uploaded when a backup or restore task is run. Once the task is completed, these tools are removed. The tools are uploaded to the /tmp/.vzbin directory. The table below lists the tools that are uploaded:
Note For VMware ESX servers, these files are uploaded and run in the COS. For VMware ESXi, nothing is changed on the source server.
Tool Description
backup.exe backs up VM disks to a repository as a archive file
cleanup.exe deletes any orphaned temp files
delete.exe removes one archive file from a repository
deleteall.exe removes all archive files from a repository
filter-and.exe combines 2 filter files (for backup) into 1 by doing bitwise-and on each bit.
free.exe Checks the repository for sufficient free space.
metadata.exe writes metadata associated with a VM backup
restore.exe restores an archive file to a host
sizes.exe returns the size of a var file
sprinkle.exe re-arranges the original vRanger 4.0 repository structure to the current model.
ssh.exe Used for SSH connections.
touch.exe verifies access to a repository by writing and deleting a file
vddkd.exe used to engage the vStorage API for ESXi backups and LAN-Free backups.
vznwinio.exe an intermediate tool used in conjunction with vRanger’s file-level restore tool.
Available Backup Architectures
vRanger can be used in either a network based mode (using a Direct-To-Target configuration for ESX backups) or in a LAN Free mode (using Fibre or HotAdd). Each option is described below, along with some common advantages and considerations.
Network Mode
Network Mode within vRanger can be configured one of two ways, depending on whether you are using ESX or ESXi as your hypervisor. When using ESX, Quest refers to the vRanger architecture as Direct-To-Target.
When using ESXi as the hypervisor of choice, the preferred option is to use the vRanger’s HotAdd functionality. This will yield performance similar to ESX network backups.
Direct-To-Target
For network-based backups when using ESX, the backup data flows from the ESX Host to the target repository. This means that the vRanger server does not process any of the backup traffic. This Network Mode configuration, also known as "Direct-To-Target", provides the best scalability when using ESX as your hypervisor platform, as the number of concurrent backup jobs can be scaled across multiple hosts to write to multiple data repositories.
For smaller environments, the Direct-To-Target configuration is simple to configure and requires no additional hardware. For larger VMware deployments, this
configuration allows for a highly scalable backup solution that distributes load across multiple hosts and repositories while minimizing single points of contention. For example, assume that you have 10 ESX hosts, each with 1 GBit/s network connection. Your total backup bandwidth is theoretically 10Gbit/s. As 10 GBit/s networks become more common, this configuration will be able to handle even higher throughputs.
Advantages Disadvantages
Easiest method to install. Works this way "out-of-the-box"
Performs better with a larger number of ESX servers
HotAdd
When using vRanger in Network mode with ESXI, the best performance will be achieved by using HotAdd. In this configuration, as illustrated below, the VMDK(s) of the source VM are attached (via HotAdd) to the vRanger machine, yielding direct access to source data. Overall, the performance in this configuration is slightly less than network backups from ESX servers, but significantly faster than previous ESXi backup methods.
Allows for leveraging Direct-to-Target for optimal scalability
Service Console NIC is a limiter of throughput
Sufficient configuration for small and large environments alike
Works well in conjunction with Data Deduplication appliances like Data Domain, ExaGrid, and Quantum. vRanger can be installed in a VM
LAN Free Mode
vRanger can operate in two LAN-Free modes, traditional (using a physical proxy connected to your fibre infrastructure, or HotAdd (with vRanger installed in a VM). LAN-Free- Traditional
Note The information in this section applies to a traditional LAN-Free configuration using physical proxies. To configure vRanger for LAN-Free backups and restores with vRanger installed in a virtual machine, see HotAdd
vRanger provides a method to offload backup traffic from the network and can perform backups directly via iSCSI or Fibre connectivity. The LAN Free configuration is identical whether ESX or ESXi is used, providing the best mix of performance and compatibility for protecting your data, especially if your environment has a mix of VMware hypervisors. In order to perform LAN Free backups, vRanger must be installed on a physical system attached to your SAN environment. This is a high performance configuration that requires vRanger to be installed on a physical proxy server connected to your fibre or iSCSI network. In addition, the VMFS volumes containing the VMs to be protected must also be properly zoned/mapped to the vRanger proxy server.
Advantages Disadvantages
Easiest method to install. Works this way "out-of-the-box"
Performance is slightly slower than traditional LAN-Free methods. vRanger is installed in a VM All traffic must flow through vRanger
Advantages Disadvantages Backups are isolated to the fibre
channel infrastructure or iSCSI network
Performs best when backing up data between LUNs within the same SAN infrastructure
Provides high performance throughput for backup traffic
More complicated to setup and configure than network backup Offloads ESX/ESXi hosts and
network
If not configured correctly there is risk of VMFS volume corruption. Make sure to follow the instructions below. Communicates via vStorage APIs vRanger must be installed on a
Requirements for a LAN Free Configuration
In order to implement a LAN Free configuration, you must install vRanger on a physical proxy server connected to your Fibre or iSCSI infrastructure. You will also need to enable LAN Free backups for each backup job.
When using the vStorage API, plan on 1 concurrent backup per CPU core. To calculate the maximum number of concurrent backup tasks per proxy server, simply identify the number of CPU cores on that server - that is the maximum number of concurrent backups. For example, a Dual-Socket, Quad-Core system will be able to perform up to 8 concurrent backup jobs.
SAN Configuration Requirements
There are several SAN configurations that should be addressed before installing vRanger on the proxy server.
Caution Do NOT initialize or format the unknown or offline disks from the backup server - these represent your VMFS volumes. Any changes could potentially corrupt your VMFS volumes.
• Disable automount on the vRanger machine:
• From the start menu, select "run" and enter diskpart.
• oRun the automount disable command to disable automatic drive letter assignment.
• Run the automount scrub command to clean any registry entries pertaining to previously mounted volumes.
• The multi-pathing software from your SAN vendor should be installed and configured for the best throughput performance
• LUNs that are not accessible to the proxy server should be masked in the storage array configuration
• On your storage device, zone your LUNs so that the vRanger HBA has Read-Only access (for backups). If you want to restore over fibre, zone your LUNS so that the vRanger HBA has Read-Write access
• Only one proxy should see a set of VMFS LUN's at one time. LAN Free - HotAdd
vRanger includes support for VMware's HotAdd disk transport functionality. With the proper configuration, HotAdd allows you to perform LAN-Free backups with vRanger installed inside a virtual machine. This configuration that requires vRanger to be
installed on a virtual machine residing on an ESX(i) host connected to your fibre or iSCSI network.
Advantages Disadvantages
Backups are isolated to the fibre channel infrastructure or iSCSI network
Performs best when backing up data between LUNs within the same SAN infrastructure
Provides high performance throughput for backup traffic
More complicated to setup and configure than network backup Offloads ESX/ESXi hosts and
network
Requirements for a LAN Free - HotAdd Configuration
In order to use vRanger with HotAdd, vRanger must be installed in a VM, and that VM must be able to access the target VM's datastore(s). In addition, all hosts that the vRanger VM could be vMotioned to must be able to see the storage for all VMs that vRanger will be configured to back up. You will also need to enable LAN Free backups in the vRanger backup job options.
When using the vStorage API, plan on 1 concurrent backup per CPU core. To calculate the maximum number of concurrent backup tasks per proxy server, simply identify the number of CPU cores on that server - that is the maximum number of concurrent backups. For example, a Dual-Socket, Quad-Core system will be able to perform up to 8 concurrent backup jobs.
Configuring vRanger for HotAdd
When using HotAdd, make sure to disable automount on the vRanger machine. This will prevent Windows on the vRanger VM from assigning a drive letter to the target VMDK. To disable automount:
• From the start menu, select "run" and enter diskpart.
• Run the automount disable command to disable automatic drive letter assignment.
• Run the automount scrub command to clean any registry entries pertaining to previously mounted volumes.
The vRanger Restore Process
Using vRanger, recovery of an entire VM, multiple VMs, or individual files are simple processes. Configure a restore job to include particular VMs but exclude certain disks. Not only can you elect to restore only two of a VM’s four disks, you can do this while the VM is running and the other disks are not impacted. vRanger’s inline data validation for restore ensures that the data in the backup matches the data in the restore.
Data streaming is used with incremental and differential restores to speed up the restoration process. During the traditional restoration process of a VM, you restore the full backup first and then restore each incremental -one at a time - starting with the oldest one. This is very time consuming and inefficient.
vRanger Data Streaming allows each savepoint in a set, if it has the most recent instance of a block, to transfer that block from the repository to the VM(s) specified in the restore job. All of the savepoints transfer their blocks in parallel, resulting in an extremely fast restore, almost as fast as restoring a single full backup. With the speed of incremental restores, backup administrators may consider doing incrementally rather than doing full backups every night and saving lots of repository disk space.
The only caveat is that if any of the incremental savepoints in the set are corrupted on disk or corrupted during network transfer, the set becomes unusable.
For more detailed information on restore features supported by various configurations, please see the table below.
• “Usage Compatibility Matrix - Restore” on page 114
FLR Process
vRanger allows the restore of one or more files from a compressed or uncompressed full, differential, or incremental backup.
FLR Limitations
• Linux - File level restores from Linux VMs requires the use of a virtual appliance • Files can only be restored to a Windows server.
• FLR is not supported with GPT partitions. • FLR is not supported from dynamic disks.
Catalog Search
vRanger includes the option to collect and record file and directory information during the backup process. This information is stored in a catalog database, and used to enable a Browse and Search function that speeds and simplifies file level recovery.
During the backup transfer process, the source volume is mounted to achieve volume level access using VMware’s vStorage API. As a process independent of the backup transfer, data about the volumes files and directory structure is captured and recorded. Once the backup has been verified as successful, the catalog data is activated and available for searching. If there is a backup failure, the catalog data is deleted. Catalog data is also deleted when the corresponding savepoint is purged by retention policies. Catalog collections are disabled by default, as there may be a slight performance impact. Collection must be enabled globally through vRanger’s Tools>Options menu. Collection must also be enabled on a per-job basis. Once enabled, if catalog collections are disabled in the future, the catalog data will be retained in line with retention policies. In order to get the best performance and reliability from the cataloging function, the following recommendations are made:
• The catalog database can grow quite large. Please give careful consideration to the location of the database installation. If the default SQL Express installation is used, the catalog database will have a size limit of 4 GB.Please refer to “Sizing the Catalog Database” on page 78 for sizing information and recommendations for the cataloging database.
• Take advantage of the catalog filtering option to avoid recording data for system and program files. This will greatly reduce the number of files cataloged per backup, which will improve performance and limit database growth. For more information on filtering, see “Filtering Catalog Collections” on page 86.
vRanger Repositories
Designed for ease-of-use in recovery operations, repositories eliminate the need for countless backup locations and endless configurations. With vRanger, you can configure a repository once, and use it forever.
Repositories can be either in the CIFS, FTP, SFTP, or NFS (version 3) format. VMware VMFS does not support SFTP, so the SFTP repository must be located on a separate Linux or Windows server running the SFTP service.
Repository Structure
A repository is essentially a directory on a supported file system that vRanger uses to store savepoints (backup archives). When viewed from outside vRanger (through Windows Explorer, for example), a repository consists of a configuration file (GlobalManifest.metadata) and root level directories for each protected object. Any time you add a repository in vRanger a GlobalManifest.Metadata XML file is created in the selected directory. It is the presence of that manifest file that tells vRanger that a repository exists in that folder.
Whenever you add a repository, that repository contains a global manifest XML file that provides details about the repository. As you do backups, an entry is placed in the global manifest file. The global manifest file is required when restoring a deleted repository. Inside the root level directory for each object are sub-directories created for each full backup of the object in question. Differential or incremental savepoints will reside within the full backup sub-directory.
Inside the sub-directories are archives for every file protected during that task. Also in the sub-directory are two metadata files. The image below depicts a basic repository structure:
The tables below describe the naming conventions for the repository files and folders. Root Level Directories - Naming Structure
Name Structure <ObjectName>_<ObjectUUID> ObjectName The name of the protected object
ObjectUUID A unique identifier for the protected object. In the case of a VMware ESX VM this would be its UUID.BIOS
Full Backup Sub-directory - Naming Structure
Name Structure <ObjectName>_<Date>_<Time>_<JobTemplate UUID> ObjectName The name of the protected object
Date The date the task started in YYYYMMDD format.
Time The time the task started, in 24 format HHMMSS. JobTemplate_UUID The UUID of the job template that the backup task
was spawned from.
Note This is not the same as the object UUID.
Archive File - Naming Convention
Name Structure
<ObjectName>_<Date>_<Time>_<JobType>_<FileIndex>_<FileName> _<Extension>
ObjectName The name of the protected object
Date The date the task started in YYYYMMDD format. Time The time the task started, in 24 format HHMMSS. JobType A single character representing the type of job.
• F - for full backup, • I - for incremental, • D - for differential
FileIndex The index of the file in the backup order for the current task. This is not guaranteed to remain constant for the same input file between tasks. This is present to ensure there can be no filename collisions. FileName The name of the input file minus extension
Savepoints
When a backup task runs, a savepoint is written to the specified repository. A savepoint consists of three files - the archive itself and two small XML files, the
Manifest.metadata and the VmConfig.metadata. The savepoint manifest and the VmConfig.metadata file together are equivalent to the .info file used in vRanger 3.x. Whenever you do a backup, the job writes a savepoint to the specified repository along with a corresponding savepoint manifest XML file. The savepoint manifest provides details about the backup job. The savepoint manifest is placed in the repository’s folder for that job. The items in the blue box below represent one savepoint.
Extension The extension of the file. If the input file has no extension it should be set to an empty string
Metadata File - Naming Convention
Name Structure <ObjectName>_<Date>_<Time>_<JobType>.<Key> ObjectName The name of the protected object
Date The date the task started in YYYYMMDD format. Time The time the task started, in 24 format HHMMSS. JobType A single character representing the type of job.
• F - for full backup, • I - for incremental, • D - for differential
FileIndex The key portion for the metadata file. This value is either “Manifest” or “VmConfig”.
If we assume an incremental backup job with a Threshold Count setting of “2”, you will get a full backup savepoint and two incremental savepoints (the first savepoint of an incremental job is always a full backup).
Each of the three savepoints will have their own savepoint manifest. These savepoints and their respective manifests will be placed in a single folder in the repository that represents the job.
Repository Size
There is no limit to the number of savepoints that can be stored in a vRanger repository. There are, however, environmental limits on the size of a single directory. The available options, and their limits, are described below.
Tip When sizing vRanger repositories, allow for maintaining at least 5 GB of free space.
Note The volume limitations described in this section are limitations within the Microsoft Windows environment.
• Default Configuration- A standard volume, with an MBR partition on a basic disk, has a limit of 2 TB. This is the default configuration for Windows Server 2003. In this configuration, the vRanger repository cannot exceed 2 TB. • Dynamic Disks - Dynamic disks contain dynamic volumes, including simple
volumes, spanned volumes, striped volumes, mirrored volumes, and RAID-5 volumes. A repository located on dynamic disk volumes can be as large as 64 TB.
For more information, see the Microsoft TechNet article: http:// technet.microsoft.com/en-us/library/cc773268(WS.10).aspx
• GPT Volumes - GPT provides a more flexible mechanism for partitioning disks than the older Master Boot Record (MBR) partitioning scheme that has been common to PCs. GPT partitions are supported on Windows Server 2003, SP1 and later, and can reach up to 256 TB. For more information, see http://
www.microsoft.com/whdc/device/storage/GPT_FAQ.mspx
Note FLR will not work from a GPT Partition.
The vRanger Replication Process
vRanger includes an integrated replication based on the proven technology of
vReplicator. There are two options for replication: standard replication using the service console; or replication via virtual appliance (required for replication to or from VMware ESXi). The replication process is the same for each method, except as noted.
A VM is made up of a set of files, which means that replicating a VM is, in essence, replicating the set of files that make up the VM, with changes to these files that reflect user specified settings for the target VM.
The set of files replicated by vReplicator is listed below:
File Extension Description
.vmx The VM config file, one per VM
.vmxf The extended VM config file, one per VM
.nvram The VM BIO file, one per VM
.vmdk The VM hard disk file, one per hard disk or snapshot
-flat.vmdk The VM hard disk data file, one per hard disk or snapshot
-delta.vmdk The VM snapshot data file, one per snapshot
-ctk.vmdk The VM hard disk change tracking file when CB is enabled on the disk
During the replication process, the configuration files will be created and modified on the target server via the VMware API.
A set of working files is also created and used during the replication process. These files and their purposes are listed below:
File Extension Description
.vzmap Records data block offset and hash of files on the target VM. A .vzmap file is created for each of the files replicated at the end of the replication. The .vzmap file is used by the next replication pass to detect any data changes since the previous pass. It stays on the target VM as long as the job is still configured to run.
Note These files are only used in Hybrid mode for VM disk -flat and -delta files.
vzundo-script A script created by the replication process to roll back changes on the target VM in case of a replication failure. This file created in the target VM folder at the beginning of the replication process and removed at the end.
.vzundo This is a temporary file that records original data of changed blocks since the replication started. One for each file replicated. In case of a replication failure such as network failure, vzundo-script can be executed to restore files to their original state. These files are created by the replication process and removed when the job is completed.
.vmdk-abbt.vztemp Active block filter file. One for each hard disk data file when ABT is enabled. It records active data block offsets for source VM disks. This file is used against the .vzmap file to figure out data blocks that need to be streamed to the target. It is created at the beginning of the replication process and removed when disk replication is completed.
When replication is executed through the virtual appliance, handling of these files will change:
• Working files that only exist during the replication process shall be written to a temporary directory of the VA, since their existence is relevant to the BET on the VA
• Working files that exists across replication processes shall be written to their original location, since these are not truly temporary files and should be reference-able even when the job is modified to not use a VA
• The .vzmutex file shall no longer be checked similar to how it is handled in ESXi backup
vRanger support three modes of replication: Change Block Tracking (CBT), differential and hybrid, all with the option of Active Block Mapping (ABM). Note that there is no option for CBT replication. If CBT is enabled on a VM, differential repliction will query for the changed blocks without a scan.
.vmdk-abfg.vztemp Change block filter file. One for each hard disk when CBT is enabled. It records changed block offsets for source VM disks. This file is only generated when CBT and ABT are both enabled. It will later be combined with the .vmdk-abbt.vztemp file into -flat-map.vztemp and removed.
-flat-map.vztemp Disk data filter file. One for each hard disk when one of two situations are true: CB is enabled, or both AB and CB are enabled. It contains active/changed data block offsets that need to be compared to the .vzmap file at the target in order to figure out data blocks that need to be streamed to the target. It is created right before file replication starts and removed when file replication is completed
.vzcid Records target VM disk CIDs at the end of the replication pass.
.vzmutex Lock file. Indicate ownership of the VM by the current Quest application.
VM replication in general starts with replicating the source VM to the target host. Changes are applied to the target VM at user designated intervals to keep the target in sync with the source. Thus the key areas of difference among the replication modes are:
• Base target VM creation
• Detection and application of changes to the base target VM
• The rest of the section describes each replication mode in more detail.
Differential/CBT Replication
The flowchart below, and the steps that follow, describe the process for differential replication.
Base target VM creation 1 Snapshot source VM 2 Capture source VM config
4 Fill disk data and retain disk hash map 5 Persist target CID map
6 Register target VM
7 Fix network configuration on target VM 8 Delete source snapshot
Subsequent replication pass 1 Verify CID in sync 2 Snapshot source VM 3 Capture source VM config
4 Update target VM based on source config 5 Compare source disk hash with vzmap on target
6 Transfer changed blocks over to the target disk and retain new target hash 7 Update CID map
8 Refresh target VM
9 Fix network configuration on target VM 10 Delete source snapshot
Hybrid Replication
The flowchart below, and the steps that follow, describe the process for hybrid replication.
Note You should only use Hybrid Replication if CBT is not an option. Replication with CBT is the preferred method. Hybrid replication is not supported when using the vRanger virtual appliance.
Initial pass
Hybrid replication is also known as snapshot rotation replication. It makes use of the differential engine for its initial pass and leaves the source snapshot open after the initial pass for snapshot rotation.
Subsequent passes 1 Verify CID in sync
2 Add new rotational snapshot to source VM 3 Snap target VM
4 Capture source VM config
5 Update target VM based on source config
6 Replicate rotational snapshot from source to target 7 Delete target snapshot
8 Delete old rotational snapshot from source 9 Update CID map
10 Refresh target VM
11 Fix network configuration on target VM (this step merges into step 5 in FMO)
Switching from Differential to Hybrid
Since Hybrid replication depends on an open snapshot at the source VM which is not created by differential replication, when a replication job is changed from Differential to Hybrid, the first replication after the job configuration change should still be differential on the back end. However, the source snapshot is not removed at the end of the replication pass in order to prepare for the next replication pass.
Switching from Hybrid to Differential
The initial pass after the job configuration change should delete the rotational snapshot created by the previous hybrid pass and reopen a new one to perform a full replication.
This section provides information on configuring your environment and deploying vRanger.
This portion of the document contains the following sections:
The Deployment Environment...44 Environment Configuration Recommendations...54 VMware Recommendations...59 Common Configuration Issues...71
This chapter outlines the recommendations and best practices for configuring your virtual environment with vRanger.
This chapter contains the following sections:
The Deployment Environment...44 Environmental Requirements...44 Choosing a vRanger Deployment Architecture...47 Small Environments (1-30 VMs)...47 Mid-Size Environments (30-100 VMs)...49 Large Environments (100+ VMs)...52 Environment Configuration Recommendations...54 Recommendations for Network Backups...54 Recommendations for Fibre Backups...55 Recommendations for Replication...56 SAN Setup Recommendations...59
VMware Recommendations...59 vRanger Repositories...68 Common Configuration Issues...71
The Deployment Environment
The performance and reliability of vRanger depends, in large part, on the configuration of the environment in which it is used. Please use these configuration recommendations and guidelines to ensure proper operation of vRanger.
Environmental Requirements
There are some configurations required to be in place before vRanger will function properly.
Port Requirements
The diagram below depicts the ports used by each of the vRanger components.
Caution Replication with vRanger requires an SSH tunnel between the production site and D/R site. Port forwarding is not supported with vRanger replication.
Note A continuous connection between source and target sites is required when replication is taking place. Excessive network packet loss could result in replication failure. Replication
will work with links having average packet loss of less than 2%. Replication is not designed to work in replication environments where packet loss can exceed commercially accepted limits. Networks having an of 99% Uptime/Availability will generally provide for good Replication performance.
VMware Requirements
The table below lists the versions of VMware platform components supported by vRanger.
vRanger supports backup, restore, and replication operation against the following versions of VMware Infrastructure:
Caution vRanger only supports VMware ESX(i) Servers running in English. No other language packs are supported.
Other VMware Requirements
• Licensing - Every ESX/ESXi host for which vRanger is expected to provide protection must be properly licensed, both by VMware and in the vRanger Host Licensing tab. While vRanger can restore to a host for which you have not
ESX(i) Server* vCenter Server VCB
• 3.5
• 3.5 Update 1 • 3.5 Update 2 • 3.5 Update 3 • 3.5 Update 4 • 3.5 Update 5 • 4.0
• 4.0 Update 1 • 4.1
• 4.1 Update 1
• 2.5
• 2.5 Update 1 • 2.5 Update 2 • 2.5 Update 3 • 2.5 Update 4 • 2.5 Update 5 • 4.0
• 4.1
• 4.1 Update 1
VCB integration is not supported in this release.
* Support for ESXi requires VMware’s vStorage API. The vStorage API is not available with the free version of ESXi Server. Please be sure to have the appropriate platform licensing level before attempting ESXi backups.
purchased a vRanger license, the application does not support the free versions of VMware ESXi.
Storage Requirements
• Dynamic Disks - While not a requirement, several vRanger features (most notably File-Level Restore) are not compatible with dynamic discs.
Choosing a vRanger Deployment Architecture
Choosing the correct architecture for your vRanger deployment is the single most important decision you can make in order to optimize the speed of your backups and restores. Choose the fastest option available given your network and storage
considerations.
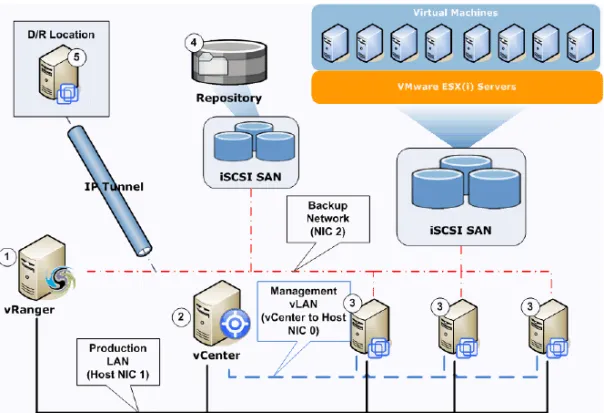
Small Environments (1-30 VMs)
Smaller environments will typically deploy a simple, network-based architecture using local storage or a small array. The image below depicts the logical deployment of vRanger in a typical small environment.
The key elements of this deployment are identified by numerals in white circles. The numbers in the image correspond to the descriptions below.
1 The vRanger machine - in a smaller environment, this can be a VM or perhaps an administrators workstation. In a network-based deployment, no backup traffic flows through the vRanger machine.
2 The vCenter Server - while vRanger can connect directly to an ESX host, only editions of VMware Virtual Infrastructure or vSphere that include vCenter are supported. It is not recommended to install vRanger on the vCenter Server. 3 VMware ESX hosts - in the network deployment shown above, backup data is
sent directly from the ESX host to the repository. Processing functions
(compression, block comparisons, etc) occur in the Service Console of the ESX Server hosting the VMs being backed up.
4 vRanger Repository - Repositories are a supported storage device located somewhere in your environment, and configured as a repository within vRanger. Backup data flows directly from the ESX hosts to the Repository- bandwidth to the repository is a significant factor in determining the maximum number of simultaneous backups jobs.
5 D/R Location - in order to protect business operations in the event of a localized failure, business critical VMs should be replicated to an offsite D/R location. This may be a remote office, but for smaller deployments will most likely be capacity rented from a service provider.
Note D/R locations must be connected to the production environment via an IP tunnel for successful replication. For more information, see “Recommendations for
Replication” on page 56.
Network Based Architecture
This is the default option out of the box, as it will apply to most configurations. In this configuration vRanger is typically installed in a VM. The table below lists the key benefits of this configuration, along with some important considerations.
Benefits Considerations
• Communications via Service Console NIC
• Easiest method to install. Works this way “out-of-the-box”
• Allows for leveraging Direct-to-Target
• Sufficient throughput for small environments
• vRanger can be installed in a VM or on a Physical server
• Performs better with a larger number of ESX servers that are less VM/data dense • SC NIC is a limiter of throughput • Works well for small environments or
Mid-Size Environments (30-100 VMs)
Mid-sized environments offer more complexity as the number of ESX hosts and VMs increases and multiple storage configurations are used. In a mid-sized environment, backup traffic is typically isolated to avoid impacting the production network.
Figure 1 The key elements of this deployment are identified by numerals in white circles. The numbers in the image correspond to the descriptions below.
1 The vRanger machine - in a mid-sized environment, this should be a virtual machine with access to the datastores for any VMs it will be configured to back up. Many environments of this size will include both VMware ESX and ESXi servers. With this configuration, vRanger can leverage VMware’s HotAdd functionality to speed network backups of ESXi servers.
2 The vCenter Server - while vRanger can connect directly to an ESX host, only editions of VMware Virtual Infrastructure or vSphere that include vCenter are supported. It is not recommended to install vRanger on the vCenter Server. 3 VMware ESX(i) hosts - in the deployment shown above, backup data is isolated
to a separate backup network. If ESXi hosts are to be backed up, this traffic will be routed through the vRanger machine to the repository.
4 vRanger Repository - Repositories are a supported storage device located somewhere in your environment, and configured as a repository within vRanger. Backup data flows directly from the ESX hosts to the Repository- bandwidth to the repository is a significant factor in determining the maximum number of simultaneous backups jobs.
5 D/R Location - in order to protect business operations in the event of a localized failure, business critical VMs should be replicated to an off site D/R location. This may be a remote office, or capacity rented from a service provider.
Note D/R locations must be connected to the production environment via an IP tunnel for successful replication. For more information, see “Recommendations for
Replication” on page 56.
Mid-sized environments will typically use a combination of backup methods based on server or workload configuration. For information on network based backups, see “Network Based Architecture” on page 48. For information in iSCSI and VMware ESXi backups, please see the sections below.
iSCSI Backups
This is a high performance configuration that requires that vRanger is installed on a physical or virtual server with access to the target datastores.
The table below lists the key benefits of this configuration, along with some important considerations.
ESXi Backups
vRanger includes support for VMware's HotAdd disk transport functionality which enables faster backup speeds for network backups of ESXi.
Benefits Considerations
• Communications via vStorage API to the ESX server and the iSCSI initiator to the target.
• Performs very well.
VERY IMPORTANT: Do not
initialize the VMFS volume from the backup server. This will wipe out your VM data.
The table below lists the key benefits of this configuration, along with some important considerations.
Benefits Considerations
• Target VM disks are mounted directly to the vRanger VM using VMware's I/O stack rather than through the network. • vRanger can be installed in a VM. • Backup processing (whitespace removal,
compression) done before data is sent over the network.
• No direct-to-target.
• vRanger cannot be installed on a physical server.
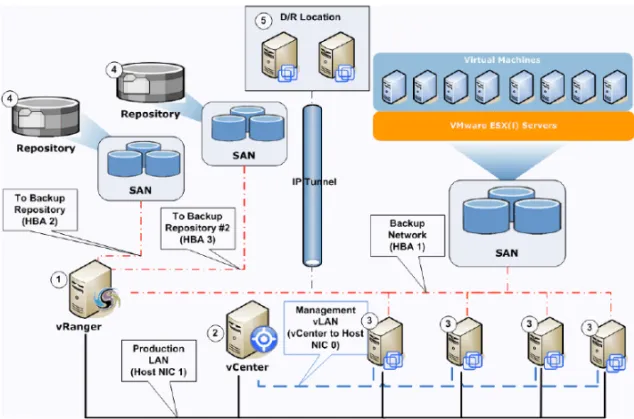
Large Environments (100+ VMs)
Larger environments are the most complex to configure, with a large number of VMs and storage devices, and often multiple repositories. The preferred architecture for larger environments is most often a LAN-Free configuration over fibre.
Figure 2 The key elements of this deployment are identified by numerals in white circles. The numbers in the image correspond to the descriptions below.
1 The vRanger machine - in a larger environment, this should be a dedicated physical server. Many environments of this size will include both VMware ESX and ESXi servers. Backup traffic for ESXi backups must flow through the vRanger machine as there is no Service Console to process backup operations. 2 The vCenter Server - while vRanger can connect directly to an ESX host, only
editions of VMware Virtual Infrastructure or vSphere that include vCenter are supported. It is not recommended to install vRanger on the vCenter Server. 3 VMware ESX(i) hosts - in the deployment shown above, backup data is isolated
to a separate backup network. If ESXi hosts are to be backed up, this traffic will be routed through the vRanger machine to the repository.
4 vRanger Repository - Repositories are a supported storage device located somewhere in your environment, and configured as a repository within vRanger.
Backup data flows directly from the ESX hosts to the Repository- bandwidth to the repository is a significant factor in determining the maximum number of simultaneous backups jobs. In larger environments, multiple repositories may be desired.
5 D/R location - in order to protect business operations in the event of a localized failure, business critical VMs should be replicated to an off site D/R location. This may be a remote office, or capacity rented from a service provider.
Note D/R locations must be connected to the production environment via an IP tunnel for successful replication. For more information, see “Recommendations for
Replication” on page 56.
Larger environments will typically use a combination of backup methods based on server or workload configuration. For information on Fibre Channel backups, please see the section below. For information on the other types of backup architecture, please see:
• “Network Based Architecture” on page 48 • “iSCSI Backups” on page 50
• “ESXi Backups” on page 50
Fiber Channel Backups
This is a high performance configuration that requires that vRanger is installed on a physical proxy server connected to your fiber network.
The table below lists the key benefits of this configuration, along with some important considerations.
Benefits Considerations
• Communications via vStorage API to the ESX
• vRanger must be installed in a physical proxy server
• Backups are isolated to the fiber channel infrastructure
• Performs very well.
• Performs best when backup from LUNs to other LUNs in the same fiber infrastructure
• VERY IMPORTANT: Do not
initialize the VMFS volume from the backup server. This will wipe out your VM data.
Environment Configuration Recommendations
In order to maximize the performance of vRanger, and safeguard your production network, the following recommendations should be considered.
Recommendations for Network Backups
vRanger, by virtue of it’s Direct-To-Target architecture, pushes a lot of data through the network very quickly. While this performance is good for minimizing your backup window, if not configured properly it can degrade your production network.
An important best practice is to separate the backup traffic from the production network by configuring a dedicated backup network.
Note This approach requires that each ESX host and the vRanger machine have two NICs installed.
1 Using the first (primary) NIC, connect the vRanger server, the vCenter Server, and Service Console 1 of each ESX Server host. This becomes the primary production network for VM traffic.
2 In each ESX Server host, configure a second Service Console, connecting it to a dedicated NIC.
3 Using the second NIC, connect: the vRanger server; each Service Console 2; and each repository. This becomes the dedicated backup network.
Note For the backup network, fibre NICs are preferred and will provide better throughput than 1Gb/sec Ethernet nics;
NIC Teaming
NIC Teaming is a feature of VMware Infrastructure that allows you to connect a single virtual switch to multiple physical Ethernet adapters. To utilize NIC teaming, two or more network adapters must be uplinked to a virtual switch. The main advantage of NIC teaming is increased network capacity for the virtual switch hosting the team.
When bonding NICs into a team, it is important to use NICs from the same vendor as different NIC vendors achieve bonding differently. When using teamed NICs with vRanger, it is critical that the NICs are teamed for performance rather than load balancing. vRanger backups are streamed as a continuous file - changing NICs during a data stream will cause backup errors.
For more information on NIC teaming, please refer to the VMware Knowledge Base article 1004088: http://kb.vmware.com/kb/1004088
Recommendations for Fibre Backups
vRanger uses VMware’s vStorage API for fibre (LAN-Free) backups through your storage infrastructure. You must be using a version of VMware ESX(i) that supports vStorage API in order to use LAN-Free backups.
vRanger requires the use of physical backup proxy servers to take advantage of LAN-Free backups. Use the requirements and recommendations in the sections below to guide you in the proper configuration of your backup proxies.
Proxy Requirements
• The backup proxy server must be a physical machine running one of the supported operating systems below. Depending on the size of your environment, more than one proxy may be required.
• Windows Server 2003 SP2 (x86, x64) • Windows Server 2008 SP2 (x86, x64) • Windows Server 2008 R2 (x64)
• The backup proxy must use Fibre Channel HBAs to connect to the SAN on which virtual machines reside.
• It is recommended to use two HBAs - one for read operations and one for writing.
• vRanger must be installed on each proxy server. Sizing Recommendations
When planning your proxy configuration, you must evaluate a number of factors and identify which are likely to become bottlenecks in your environment. Factors that you should consider when sizing your deployment.
• The number of virtual machines in your environment is the main factor that determines the size of your backup infrastructure. If there are a great many virtual machines, you must either allow longer backup times or allocate a significant amount of resources to meet time constraints. As a starting point for testing your deployment, Quest recommends using 1 backup proxy for every 10 hosts or 100 VMs.
• A factor coinciding with the number of VMs is the number of VMs that can be processed at once. vRanger includes the Maximum number of tasks running locally configuration option that will limit the number of simultaneous backups per proxy server.
As a starting point, plan on 1 concurrent task per CPU core. For example, if your proxy server has 8 cores, you should set the Maximum number of tasks running locally setting to 8.
Recommendations for Replication
The sections below describe the configurations recommended for best replication performance.
Choosing a D/R Site
A disaster recovery site can be cold, warm or hot. Each type of site has different recovery times and different corresponding infrastructure requirements and costs. A Cold, or Offline, site consists of powered off servers. A cold site is generally the most affordable DR strategy, and provides the highest RTO of any of the site types. In a DR event the servers are booted up and backup images are restored to them. Replication is not applicable to a cold site, but backups can be used in this situation.
A Warm site holds a number of ESX hosts, powered on. Network communication is fully enabled between the production site and the DR site. The ESX hosts hold powered
off replicas of production VMs, ready to be booted up at a moment’s notice. With a warm site, no production services are running.
Similar to a warm site, a Hot site consists of powered on ESX hosts. In addition, a hot site includes running production services. for example, Active Directory Domain Controllers, DNS servers and File Servers. A hot site usually results in the fastest time to recovery as many essential infrastructure services are already running, reducing the time required for business applications to come online.
When implementing a hot disaster recovery site, you can choose to use a combination of replication tools native to certain infrastructure applications as well as vRanger for other applications. For example, Active Directory, DNS, Exchange 2007, SQL Server and many other applications include native replication functionality. When deciding whether to use vRanger or native replication functionality, consider the following questions:
• Are there any extra licensing costs for using vendor native replication rather than using vRanger to replicate to a powered off image?
• Will using multiple replication techniques for different applications complicate the DR plan for limited marginal benefit?
It is usually beneficial to have live critical infrastructure components such as Active Directory and DNS available at a hot site to assist with a quick recovery.
Network Connections to D/R Site
Network architecture is a significant component of any disaster recovery infrastructure. Components to consider include bandwidth, link contention and latency. Correct sizing of a link for replication traffic is part science and part art. As a general rule of thumb, you should ensure you have sufficient bandwidth to handle replicated changes to the source virtual machines, any extra traffic that may utilize the link, and overhead for large data changes such as service packs and application upgrades. When sizing a link, ensure that all network traffic that will traverse the link is taken into account, as this may have an impact on replication times.
Replication traffic is transmitted using the TCP protocol, and is susceptible to lower performance if transmitted across a link with a very high latency, such as a satellite link. Low latency links such as Ethernet, DSL and MPLS allow TCP to transmit data at its highest rate possible.
If there is a significant amount of production network traffic also using the link, implement network quality of service (QoS). QoS will ensure that network traffic is correctly prioritized, granting all applications a fair percentage of the bandwidth
available. vRanger replication traffic can be identified for QoS as a transmission between ESX hosts on TCP port 22 (SSH).
IP Addressing
Probably the most complicated and most overlooked component of designing a disaster recovery solution is the IP Addressing. Designing the IP Addressing architecture correctly will allow your production site to communicate with your DR site, and, more importantly, will allow your client computers to communicate with your servers in the event of a disaster.
A bridged network connection between sites will ensure the highest probability of a successful failover in the case of a disaster. With a bridged network connection, the Layer 2 network protocol is spanned between sites so a single IP address range can be shared between sites. This simplifies the disaster recovery failover process significantly and aids with any live failover testing. Changing IP address during a high pressure disaster recovery event always complicates the process. This introduces a potential for error and may lengthen the time to recover business operations at the DR site. Bridging the production and DR networks should always be your first choice.
An alternative configuration is to use two virtual network cards for each virtual machine that you replicate. The dual virtual NIC approach complicates the architecture of the solution. It can, however, prove more cost effective in some situations.
Both of the virtual network cards should be configured with IP addresses; a production virtual NIC with a production IP, and a DR virtual NIC with a DR IP.
When running in production, NIC1 will have the production IP address and be connected to the production virtual switch on the production network. NIC2 will have the DR IP address, and will be connected a DR virtual switch disconnected from any networks.
On the replicated virtual machine, the configuration will be the same except on the ESX host layer. The DR ESX host’s “Production” virtual switch should be disconnected from the physical network, whereas the DR virtual switch should be connected to the network at the DR site.
If choosing to implement the dual network card approach, ensure you comprehensively test a full site failover to ensure that all routing considerations are taken into account. Latency Limitations
Excessive network packet loss could result in replication failure. Replication is not designed to work in replication environments where packet loss can exceed commercially accepted limits, summarized by the requirements below: