Agile Product Lifecycle Management
Getting Started with Agile PLM User Guide
February 2008
9.2.2.2
ii Agile Product Lifecycle Management
Copyright and Trademarks
Copyright © 1995, 2008, Oracle. All rights reserved.
The Programs (which include both the software and documentation) contain proprietary information; they are provided under a license agreement containing restrictions on use and disclosure and are also protected by copyright, patent, and other intellectual and industrial property laws. Reverse engineering, disassembly, or decompilation of the Programs, except to the extent required to obtain interoperability with other independently created software or as specified by law, is prohibited. The information contained in this document is subject to change without notice. If you find any problems in the documentation, please report them to us in writing. This document is not warranted to be error-free. Except as may be expressly permitted in your license agreement for these
Programs, no part of these Programs may be reproduced or transmitted in any form or by any means, electronic or mechanical, for any purpose.
If the Programs are delivered to the United States Government or anyone licensing or using the Programs on behalf of the United States Government, the following notice is applicable:
U.S. GOVERNMENT RIGHTS Programs, software, databases, and related documentation and technical data delivered to U.S. Government customers are "commercial computer software" or "commercial technical data" pursuant to the applicable Federal Acquisition Regulation and agency-specific supplemental regulations. As such, use, duplication, disclosure, modification, and
adaptation of the Programs, including documentation and technical data, shall be subject to the licensing restrictions set forth in the applicable Oracle license agreement, and, to the extent applicable, the additional rights set forth in FAR 52.227-19, Commercial Computer Software--Restricted Rights (June 1987). Oracle USA, Inc., 500 Oracle Parkway, Redwood City, CA 94065. The Programs are not intended for use in any nuclear, aviation, mass transit, medical, or other inherently dangerous applications. It shall be the licensee's responsibility to take all appropriate fail-safe, backup, redundancy and other measures to ensure the safe use of such applications if the Programs are used for such purposes, and we disclaim liability for any damages caused by such use of the Programs.
Oracle and Agile are registered trademarks of Oracle Corporation and/or its affiliates. Other names may be trademarks of their respective owners.
The Programs may provide links to Web sites and access to content, products, and services from third parties. Oracle is not responsible for the availability of, or any content provided on, third-party Web sites. You bear all risks associated with the use of such content. If you choose to purchase any products or services from a third party, the relationship is directly between you and the third party. Oracle is not responsible for: (a) the quality of third-party products or services; or (b) fulfilling any of the terms of the agreement with the third party, including delivery of products or services and warranty obligations related to purchased products or services. Oracle is not responsible for any loss or damage of any sort that you may incur from dealing with any third party.
iii
C
ONTENTS
Copyright and Trademarks... ii
Introduction... 1
What’s in this Manual ...1
This Agile Manual Precedes the Solution Manuals ...1
Overview of the Agile PLM Suite...2
What’s New for the User Experience in Agile PLM 9.2.2 ...3
Java Client and Web Client User Interfaces...3
Navigating in Agile Java Client ... 5
Logging In and Out of Java Client ...5
Java Client Windows, Menus, and Toolbars ...7
Java Client Menus...7
Agile Scan Utility...7
Java Client Toolbars...7
Windows Bar ...9
Hiding and Showing the Navigation Pane ...9
Java Client Tables ...10
Sort Order in Tables ...10
Selecting Rows in Tables ...10
Using the Inbox...11
Notifications...11
Workflow Routings...12
Using Bookmarks and the Recently Visited List...12
Bookmarking ...13
Removing Bookmarks ...14
Renaming Bookmarks ...14
Recently Visited List ...14
Changing Your User Settings...14
Changing Your User Profile...14
Changing Your Password...15
Working with Escalations...16
Creating Personal Criteria ...16
iv Agile Product Lifecycle Management
Address Book in Java Client ...18
Overview of the Address Book ...18
Selecting Users and User Groups from the Address Book ...19
User Groups ...20
Creating User Groups...20
Completing or Editing User Groups...21
Deleting Personal User Groups...22
Creating Supplier Groups...22
Navigating in Agile Web Client ... 23
Introducing Web Client ...23
Logging In to Web Client ...23
Choosing Your Preferred Start Page...24
Logging Out of Web Client ...25
Bookmarking Web Client in Your Browser ...25
Web Client Tables ...25
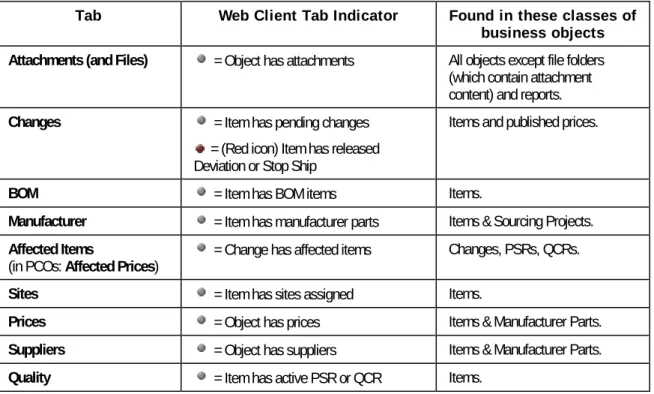
Web Client Tab Content Indicator Icons...27
Using Online Help...29
Main Toolbar...29
Web Client Session Timeouts ...31
Navigation Pane Toolbar...31
Showing and Hiding the Navigation Pane ...32
Search Folders ...32
Shortcuts ...32
Analytics and Reports Folders ...33
Using the Wizard Process Flow Diagrams ...33
Changing Your User Settings...33
Changing Your User Profile...35
Changing Your Password...36
Viewing Signoff Authority Transfers ...36
Exploring the Home Page ...37
Quick Links...37
Home Page Inbox Tabs...37
Viewing the Home Page...38
Notifications...38
Workflow Routings...39
My Assignments ...40
Using and Organizing Bookmarks...48
Bookmarking ...48
v
Using Folders to Organize Bookmarks...50
Using the Recently Visited List...52
User Groups and the Address Book in Web Client ...52
Selecting Users from the Address Book...53
Using the Details and Save As Group Buttons...54
Creating Personal User Groups ...54
Editing Personal User Groups...54
Deleting Personal User Groups...55
Creating Personal Supplier Groups...55
User Properties Defined ...56
Concepts and Terms in Agile PLM Solutions ... 61
Introducing Agile Objects ...61
How Objects Appear ...61
Agile Object Types ...63
Installed Agile Classes, Base Classes, and Subclasses ...64
Discovery and Read Privileges...68
Routable and Non-Routable Objects...68
Other Important Concepts in Agile ...69
Login Security and Passwords ...69
Object Subscriptions, Relationships, and Sharing...70
File Folder Objects and Attachment Files...70
Searching for Data ...71
Agile Packages...71
Exporting Data...72
Product Collaboration Process...72
Bills of Material ...72
Approved Manufacturer Lists...72
Change Control Process ...72
Product Portfolio Management Process...75
Common Terms in PPM ...76
Product Quality Tracking Process ...76
Common Terms in PQM...77
Product Cost Management Process...78
Common Terms in PCM...78
Product Governance and Compliance Process ...78
vi Agile Product Lifecycle Management
Working with Business Objects ... 81
Interacting with Agile Objects: Actions and Tabs ...81
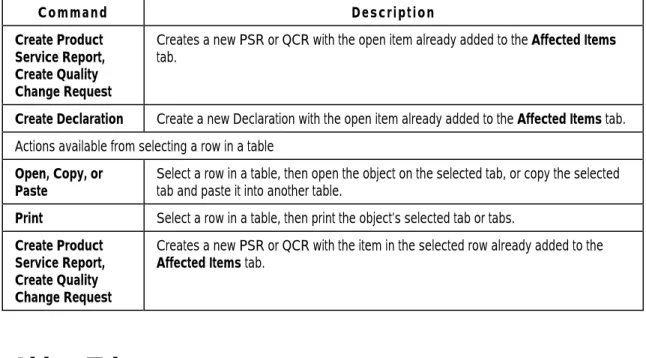
Actions Menu...81
Object Tabs ...83
Creating Objects...88
Creating Objects in Java Client Using the New Command ...89
Creating Objects in Web Client Using the Create Command...89
Add Files by Search Options...90
Creating an Object Using Save As...91
Direct Addition of Objects to BOM, AML, and AI Tables...92
Item Addition Rules ...93
Modifying Date and Time Fields...93
Using the Calendar to Modify Date Fields in Java Client ...93
Using the Calendar to Modify Date Fields in Web Client...94
Manually Modifying Date and Time Fields...94
Printing Object Tabs ...95
Emailing Objects...96
Quick Access to Objects and Files...96
Agile-Generated Quick Access Object URLs ...97
Formats for User-Generated Smart Object URLs ...97
Using Quick Access Object URLs ...98
Discussion Objects ...98
Creating and Viewing Discussions ...99
Adding To and Editing Discussions...99
Sharing Objects with Other Users ...99
Subscribing to Objects ... 101
Subscribing to an Item or Price Revision...101
Subscription in Product Portfolio Management ...102
Relationships and Dependencies Between Objects ... 103
What are Relationships? ...103
Relationships Tab... 104
Relationships Tab Views ...104
Relationship Tab Actions in Java Client ...104
Relationship Tab Actions in Web Client ...105
Relationships Tab Preview Pane in Web Client ...106
Using the Table Filter ...107
Adding Relationships to Objects ...107
Editing the Relationships Table...108
Removing Relationships...109
vii
Relationship Rule Guidelines ...110
Adding a Rule to a Relationship ...111
Editing a Relationship Rule ...111
Removing a Relationship Rule ...112
Relationships in PQM...112
Deleting Agile Objects ... 113
Working with Agile Reports ... 117
About Reports... 117
Types of Reports ...117
How Your Roles and Privileges Affect Reports ...118
General Info Tab... 119
Layout Tab... 120
Creating Standard Report Layouts...121
About Standard Report Layouts with Multiple Headers...121
Creating the Standard Layout ...122
Creating Custom Report Layouts ...123
Editing Standard Report Layouts ...123
Editing Custom Report Layouts...124
Deleting Report Layouts...124
Schedule Tab ... 125
Historical Report Tab... 126
History Tab ... 127
Working with Standard Reports... 127
Accessing Standard Reports...127
Working with Custom Reports... 128
Creating a Custom Report...129
Creating a New Query...129
Conditions to Edit and Save a Query ...130
Using a Saved Search...131
Executing Custom Reports...131
Deleting and Undeleting Custom Reports ...131
Working with External Reports ... 132
Creating an External Report...132
Executing an External Report...133
viii Agile Product Lifecycle Management
Finding Agile Data with Searches ... 135
Overview of Search Tools ... 135
Types of Searches...135
Search Results ...136
Saved Searches ... 138
Predefined System Searches...138
Running a Saved Search ...139
Running Saved "Prompt at Runtime" Searches ...140
Quick Searches ... 140
Quick Search Overview...140
Java Client Quick Search ...142
Web Client Quick Search ...144
Quick Searches and Wildcard Characters ... 145
Using Wildcard Characters...145
Full Text Search for Content in Attachment Files... 147
Using Quick Search to Find Attachment File Content ...147
Using Attachment Content Advanced Search Capabilities...148
Pre-configured Parametric Searches ... 149
Parametric Search Window...150
Saving a Search ... 153
Saving a Parametric Search as an Advanced Search...154
Using Save As to Save a Search ... 155
Advanced Searches ... 156
Overview of Advanced Searches ...157
Basic Process to Create an Advanced Search...158
Some Caveats about Advanced Searches...158
Creating an Advanced Search in Java Client...159
Creating an Advanced Search in Web Client ...162
Selecting Search Operators ...165
Using And/Or Values in Advanced Searches...168
Using Parentheses in Search Definitions ...169
Where-Used Searches for Items ... 170
Searching on Rev-Specific Values ...171
Where-Used Search Types ...171
Where-Used Set Operators...174
Creating a Where-Used Search in Java Client...176
Creating a Where-Used Search in Web Client...178
Where-used Searches for File Folders ... 180
Relationship Searches ... 180
ix
Searching for Routable Objects with Workflow Attributes... 182
Creating Workflow Searches...182
Creating Grouped Conditions for Workflow Searches...185
Editing and Managing Searches and Search Folders... 189
Buttons and Right-click Menu Choices in the Java Client Search Toolbar...189
Organizing Searches...191
Editing Searches ...192
Renaming a Search...193
Deleting a Search...194
Using Folders to Organize Searches...194
Routing Objects with Workflows ... 199
About Workflows... 199
Status List... 200
Viewing Workflows ...201
Default Workflows... 202
Example of a Customized Workflow... 204
Using Workflows in the Change Control Process ... 205
Selecting a Workflow...206
Working with Workflows ... 207
Switching a Routable Object from One Status to Another Status ...208
Auditing Routable Objects...209
Autopromotion Failure ...212
Demoting a Routable Object ...213
Completing the Status Change...214
Handling Routed Changes ...216
Approving Routable Objects...219
Rejecting Routable Objects...222
Reminder Period and Review Escalation Period...225
Designated Escalation Person ...225
Transferring Signoff Authority...225
Defining Personal Criteria for Authority Transfers...229
Returning a Routable Object to the Originator ...230
Canceling a Routable Object...231
Uncanceling a Routable Object...232
Putting a Routable Object on Hold ...232
x Agile Product Lifecycle Management
Unreleasing Routable Objects...234
Multiple Released Status Types...235
Adding Comments to the History Tab ...236
Changing a Routable Object’s Subclass ...236
After a Routable Object is Released ... 238
Switching Routable Objects to Their Final Status ... 238
Redlining through ECOs, MCOs, PCOs and SCOs ... 239
Redlining through ECOs...239
Redlining through MCOs ...239
Redlining Prices through PCOs...240
Redlining through SCOs...240
Deleting Routable Objects... 240
Undeleting Routable Objects...241
Printing Routable Object’s Data ... 242
Working with Attachments ... 243
What are Attachments?... 243
Attachment Files and Agile File Folders: an Analogy to Papers, Desks, and Vaults...243
Agile Document Management: Even More Efficient than Doris...244
What are Attachment Versions?...245
Working with the Attachments Tab of Business Objects... 246
Buttons on the Attachments Tab ...246
Fields on the Attachments Tab...252
Basic Procedures on the Attachments Tab... 253
Getting Attachment Files ...253
Opening Attachment Files in their Native Applications...255
Printing Attachment Files ...256
Accessing Different Versions of Attachments...257
Adding and Removing Files via the Attachments Tab ... 257
Adding Attachment Files from your Local Disk or Network ...258
Add Files by Search Options...261
Adding a URL ...262
Adding Files by using SaveAs to Create a New Business Object...263
Removing Attachments from the Attachments Tab...263
Editing the Attachments Table...264
Revising Attachment Files... 265
Checking Out Attachment Files...266
Checking In Revised Attachment Files...267
Canceling Checkouts ...268
xi
About Item Revisions and File Folder Versions ... 269
Revision and Version Defined for Agile PLM...269
Viewing a Different Revision...269
Introductory Revisions...270
How the Revision List Works...270
Effects of CopyFilesToRev SmartRule...272
Availability of Attachment Operations...273
Viewing and Redlining Attachment Files in the Viewer ... 274
Redlining or Marking Up Files in the Viewer...274
Configuring File Associations for Opening Files in Web Client ...276
Generating Attachment Quick Access URLs ... 277
Agile-Generated Attachment Quick Access URLs ...277
User-Generated Attachment Quick Access Smart URL Formats...278
Accessing Attachment Files using Quick Access URLs...281
Scan Utility... 282
Installing a Scanner...282
Using the Scan Utility ...282
Working with File Folders ... 285
What are File Folders? ... 285
Why Use and Modify File Folders Directly?...285
Working with File Folders ... 286
File Folder Tabs, Buttons, and Menus ... 287
File Folder Tabs...287
Buttons on the Files Tab ...288
Buttons on Files tab in Java Client ...289
Working with the Files Tab of File Folders ...292
Fields on the Files Tab ...293
Opening and Viewing Contents of File Folders ...294
Switching Between Versions ...295
Printing Contents of File Folders ...295
Creating File Folders ... 296
Revising File Folders...296
Adding Attachment Files and URLs to File Folders ... 297
Using the Advanced File Uploader...297
Editing the Files Table...301
xii Agile Product Lifecycle Management
Purging Unused File Folder Versions ... 302
Getting and Revising Attachment Files and File Folders ... 303
Getting Attachment Files or File Folders ...304
Checkout and Checkin to Revise Attachment Files or File Folders...305
Canceling Checkouts ...307
Other File Folder Operations... 308
Performing a Mass Update of a File Folder...308
Routing and Reviewing File Folders...309
File Folders and the Effects of CopyFilesToRev SmartRule ...310
File Folders and Viewing ...310
File Validation (Handle File Checksum) ...310
xiii
Preface
The Oracle|Agile documentation set includes Adobe® Acrobat™ PDF files. The Oracle Technology
Network (OTN) Web site (http://www.oracle.com/technology/documentation/agile.html) contains the latest versions of the Oracle|Agile PLM PDF files. You can view or download these manuals from the Web site, or you can ask your Agile administrator if there is an Oracle|Agile Documentation folder available on your network from which you can access the Oracle|Agile documentation (PDF) files.
Note To read the PDF files, you must use the free Adobe Acrobat Reader™ version 7.0 or later. This program can be downloaded from the Adobe Web site (http://www.adobe.com). The Oracle Technology Network (OTN) Web site
(http://www.oracle.com/technology/documentation/agile.html) can be accessed through Help >
Manuals in both the Agile Web Client and the Agile Java Client. If you need additional assistance or information, please contact support (http://www.oracle.com/agile/support.html)
(http://www.oracle.com/agile/support.html) for assistance.
Note Before calling Agile Support about a problem with an Oracle|Agile PLM manual, please have the full part number, which is located on the title page.
TTY Access to Oracle Support Services
Oracle provides dedicated Text Telephone (TTY) access to Oracle Support Services within the United States of America 24 hours a day, 7 days a week. For TTY support, call 800.446.2398. Outside the United States, call +1.407.458.2479.
Documentation Accessibility
Our goal is to make Oracle products, services, and supporting documentation accessible, with good usability, to the disabled community. To that end, our documentation includes features that make information available to users of assistive technology. This documentation is available in HTML format, and contains markup to facilitate access by the disabled community. Accessibility standards will continue to evolve over time, and Oracle is actively engaged with other market-leading
technology vendors to address technical obstacles so that our documentation can be accessible to all of our customers. For more information, visit the Oracle Accessibility Program Web site at
http://www.oracle.com/accessibility/ http://www.oracle.com/accessibility/.
Readme
Any last-minute information about Oracle|Agile PLM can be found in the Readme file on the Oracle
Technology Network (OTN) Web site (http://www.oracle.com/technology/documentation/agile.html)
xiv Agile Product Lifecycle Management
Agile Training Aids
Go to the Oracle University Web page
(http://www.oracle.com/education/chooser/selectcountry_new.html) for more information on Agile Training offerings.
Accessibility of Code Examples in Documentation
Screen readers may not always correctly read the code examples in this document. The
conventions for writing code require that closing braces should appear on an otherwise empty line; however, some screen readers may not always read a line of text that consists solely of a bracket or brace.
Accessibility of Links to External Web Sites in Documentation
This documentation may contain links to Web sites of other companies or organizations that Oracle does not own or control. Oracle neither evaluates nor makes any representations regarding the accessibility of these Web sites.
Agile Product Lifecycle Management Page - 1
Chapter 1
Introduction
This chapter includes the following:
What’s in this Manual... 1 Overview of the Agile PLM Suite ... 2 What’s New for the User Experience in Agile PLM 9.2.2... 3
What’s in this Manual
This manual is an introduction to Agile Product Lifecycle Management (PLM) and its main features across the user solutions of the Agile PLM suite. Agile PLM is a comprehensive suite of enterprise business applications, and the information in this guide is both a starting point for learning Agile as well as a “return-to” reference manual.
This Agile Manual Precedes the Solution Manuals
Chapters 2–5 provide information about the two primary client applications and introduce basic terms, concepts, and features that are used in Agile PLM. Chapters 6–10 cover features and functionality in Agile PLM 9.2.2 that all users will work with sooner or later.
Agile PLM Basics
Every new Agile user needs to have a good grasp of the material in either Chapters 2, 4, and 5, if primarily using Java Client, or Chapters 3, 4, and 5, if primarily using Web Client. Some solutions are accessed only through Web Client. Your Agile administrator has likely set up your Agile account with a “preferred client.”
à
Chapter 2, Navigating in Agile Java Client (on page 5) — Java Client user interface is fully describedà
Chapter 3, Navigating in Agile Web Client (on page 23) — Web Client user interface is fully describedà
Chapter 4, Concepts and Terms in Agile PLM Solutions (on page 61) — the basics in Agile PLM are surveyedà
Chapter 5, Working with Business Objects (on page 81) — creating objects, printing, sending, relationships, subscriptionsYou can change many of your user settings to help you manage your Agile user experience. A complete list of the settings in your user object is found in User Properties Defined (on page 56).
Cross-Solution Utilities in Agile PLM
The material in Chapters 6–10, within each chapter, tends to run from elementary to advanced. You will likely need to learn some things about reports, searches, workflows, and attachments in Agile
Page - 2 Agile Product Lifecycle Management
early on; however, not everything in these chapters has to be – or can be – mastered at once. For example, you could learn how to work with attachments (ch.9) but find that you do not have to work with file folders (ch.10).
à
Chapter 6, Working with Agile Reports (on page 117) — using and customizing the many out-of-box reports in Agile PLMà
Chapter 7, Finding Agile Data with Searches (on page 135) — locating data and information in the Agile databaseà
Chapter 8, Routing Objects with Workflows (on page 199) — routing business objects for approval and to gather other kinds of informationà
Chapter 9, Working with Attachments (on page 243) — Agile business objects can “carry” additional data as attachmentsà
Chapter 10, Working with File Folders (on page 286) — more advanced capabilities with the Agile objects that hold attachment files and URLsThe Agile end-user guides all assume that you have learned the basic information presented in this guide. For instance, although each PLM solution may have its own default workflows, saved searches, and predefined reports, the basic information in this manual is preliminary to the more specific information in the various user guides.
Overview of the Agile PLM Suite
The Agile PLM suite of solutions covers five primary areas of product lifecycle management:
à
Agile Product Collaboration (PC) — Management and collaboration of product record information throughout the product lifecycle, across internal organizations and the extended supply chain. Accessed through Java Client and Web Client.à
Agile Product Governance & Compliance (PG&C) — Management and tracking of all substances and materials contained by any item or manufacturer part, allowing companies to meet substance restrictions and reporting requirements, design recyclable products, minimize compliance costs, and eliminate noncompliance on future products. Accessed through Web Client.à
Agile Product Portfolio Management (PPM, formerly Program Execution) — Integration of program and product information, streamlining business processes across the product lifecycle and across a portfolio of programs. Accessed through Web Client.à
Agile Product Quality Management (PQM, formerly Product Service & Improvement) — Integration of customer, product, quality, and regulatory information with a closed-loop corrective action system. Accessed through Java Client and Web Client.à
Agile Product Cost Management (PCM) — Management of product costs across the product lifecycle and synchronization of product cost data and processes. Accessed through Web Client.Agile administrators use Agile Java Client to set up and maintain settings for these solutions. The Agile Application Server, the foundation of the Agile suite, manages data stored in the Agile database. All Agile data is contained or organized in business objects that are set up by the administrator, and specified and used by the enterprise’s Agile users. For instance, the
Page - 3
of the kinds of Parts made available to them. “Business objects” is a general term that implies objects created from the classes available to the enterprise, but other entities in Agile are also objects, such as workflows, searches, reports, and so forth.
The following figure shows relationships between the Agile functional components, the primary client applications used to manipulate the data (Agile Java Client and Web Client), and the Agile Application Server (the database where the data is stored).
Agile Java Client (Java client)
Agile Web Client (HTML client)
Application & Database Servers (hold the Agile database) Administrative
settings
Product Collaboration
Product Quality Management
Product Cost Management
Product Portfolio Management AGILE PLM FUNCTION
CLIENT APPLICATION USED TO WORK WITH DATA
DATA STORAGE
Product Governance & Compliance
What’s New for the User Experience in Agile
PLM 9.2.2
This section lists new elements of the user experience that are found in Agile PLM 9.2.2.
Java Client and Web Client User Interfaces
The user interfaces of the primary Agile clients are described in Navigating in Agile Java Client (on page 5), and Navigating in Agile Web Client (on page 23).
à
Bookmarks – you can create nested organizational bookmark folders in which to sort and save your bookmarks. You can rename bookmarks in order to give them names that are meaningful to you.à
Parametric Search – Agile 9.2.2 includes easy-to-use parametric searches. The Agileadministrator configures the parametric searches to present the most commonly used search attributes. Parametric searches can be saved.
à
New Rational Search Operators – New search operators include: Contains All, Between, Not Between. Updated search operators are In, Not In, Contains Any, and Contains None.à
Tab content indicator – In Web Client, a simplified content indicator is used on all tabs. A grey dot indicates there is content on the tab. A red dot alerts users to problematic content on the tab. For more information, see Web Client Tab Content Indicator Icons (on page 27).Page - 4 Agile Product Lifecycle Management
à
Relationships tab – the Relationships tab and Reference tab have been merged into one tab called the Relationships tab. All Agile objects (except Reports and Action Items) have Relationships tabs. Relationships may have an optional rule to define how the two objects affect one another. The Web Client Relationships tab includes a preview pane that allows you to view details about the selected related object.à
Dashboard Management Extensions – This feature introduced in this release is similar to Process Extensions. Dashboard Extensions (DX) allow the Agile system to access internal or external content and configure the display format (tabular or charts) for authorized users to view and manipulate the outputs in Agile Web Client. Dashboard tabs and formats are defined in Agile Administrator.à
Web Client Home Page – The inbox display has been simplified. The Web Client inbox is organized into three tabs: Notifications, Workflow Routings, and My Assignments. The MyAssignments tab can be sorted by pre-defined views and by using the filter to sort the table by multiple criteria. Many assignment management actions and tasks can be performed on the My
Assignments tab.
à
User-defined Web Client Home Page Quick Links – Each user can define his own list of ten most commonly used Links, Bookmarks, and Searches.Agile Product Lifecycle Management Page - 5
Chapter 2
Navigating in Agile Java Client
This chapter includes the following:
Logging In and Out of Java Client ... 5
Java Client Windows, Menus, and Toolbars... 7
Java Client Tables ... 10
Using the Inbox... 11
Using Bookmarks and the Recently Visited List ... 12
Changing Your User Settings ... 14
Address Book in Java Client... 18
User Groups ... 20
Creating Supplier Groups ... 22
Agile Java Client is distributed using only a browser and Java Web Start. The Product Collaboration and Product Quality Management (PQM) solutions can be accessed with Java Client. While you may prefer to work in Java Client on a regular basis, some utilities on the Tools menu (Agile Import, Export, FileLoad) and Reports open only in Web Client.
Logging In and Out of Java Client
Agile PLM 9.2.2 has been installed on your company’s system, and the administrator has sent you a URL to connect to Java Client. There may already be a shortcut icon on your desktop, or there is an application path on your Start menu. If you do not have access to Java Client, see your
administrator.
Complete details for installing Java Client are in the appropriate Agile Installation Guide. To log in to Java Client:
1. Start the Web browser and type the following, per information from your administrator:
http://<webserver_hostname>/JavaClient/start.html
2. You will receive a message about accessing the computer when you install and run Java Client. Click Launch. The Login window appears.
3. Enter your username. Your username is not case-sensitive.
Your username is assigned by your Agile administrator and can be an abbreviation of your full name. For example, the name Michael Jones may be abbreviated to MICHAELJ or MJONES.
Page - 6 Agile Product Lifecycle Management
4. Enter your password. Your password is case-sensitive.
Your password is initially assigned by your Agile administrator. If you have the appropriate privileges, you can change your password at any time. The administrator may require you to do so within a set number of sessions. (See Changing Your Password (on page 36)).
5. Click OK.
The login process is complete. The Java Client window opens, as shown in the figure below. The next time you start Java Client, you are prompted to create shortcuts on the desktop and in the Start menu. It is recommended that you choose Yes for either or both shortcut types. You can also start Java Client using the Java Web Start icon on your desktop. double-click the icon and you will see an option for Agile PLM.
Note If you are having difficulty logging in to Java Client, check with your administrator, who can see if any users are logged in multiple times, or if any users have been inactive for awhile and their session can be terminated by the administrator. Another problem could be that your Java Web Start cache is too full. To clear the cache, open Java Web Start, choose File > Preferences, click the Advanced tab, and click Clear Folder. Then try launching Java Client.
You can search for Agile data using the Simple Search field and Run Search button. To create a Quick Search, use the Search Option drop-down list to select a specific object type. Or, use the
Advanced Search button. You can choose an activity from the menu bar, main toolbar, or tab toolbar. For detailed instructions about searching, see, Finding Agile Data with Searches (on page 135).
Page - 7
To close Java Client, click the Exit button.
Java Client Windows, Menus, and Toolbars
This section discusses some of the key user interface elements of Java Client.
Java Client Menus
Depending on your assigned roles and privileges, you can use the following menus to perform various tasks:
à
File — Perform actions on Agile business objects, including New (Create), Open, Close, Save,Save As, Send, Scan Files, Batch Print, and Exit Java Client. Some Agile objects are items (parts and documents), changes (such as engineering change orders and price change orders), file folders (attachment objects), users, and suppliers. For more information about classes of Agile objects, see Introducing Agile Objects (on page 61).
Note The Scan utility (File > Scan Files) is available in Java Client only. See Agile
Scan Utility (on page 7).
à
Edit — Cut, Copy, and Paste data. Delete and Undelete an object. Create a Quick Search or anAdvanced Search and Organize Searches (delete). Add and organize (that is, delete) Bookmarks.
à
View — View Notifications, Workflow Routings, and toggle the Windows Bar on or off: the Windows Bar shows all current open windows in Java Client.à
Tools — Work with the Address Book; generate Reports and Analytics; access Agile Import, Export, and FileLoad (these are documented in Import & Export Guide). Process Extensions appear on a drop-down menu, which depends on a developer at your company (or an Oracle Consulting – Agile Practice consultant) having created process extensions.à
Settings — Transfer Authority for other users or user groups to sign off your workflows; create and modify Personal Groups, Personal Supplier Groups, and Personal Criteria; view Deleted PersonalGroups; view and modify your Current User settings; Change Password.
Note Color Scheme and Options offer some standard Windows-based options.
à
Window — This is a standard menu that lets you switch to the Previous Window or the NextWindow, and to arrange your open windows in Cascade or Tile schemes. There are some keyboard equivalents if you prefer to use those.
à
Help — Manuals gives access to Agile documentation. About Agile displays information about the current release of Java Client.Agile Scan Utility
From Java Client only, Agile’s Scan utility runs a Windows utility that scans documents using a TWAIN interface. The user specifies valid file types. Scanned images are designated as one of those file types, and they are added to the system as an attached file to a file folder object. Scan is described in Scan Utility (on page 282).
Java Client Toolbars
Page - 8 Agile Product Lifecycle Management
Depending on your assigned roles and privileges, you can use the toolbar buttons on the main toolbar to perform the tasks described in the following table. Toolbars in object windows contain buttons that pertain to the object.
These are the buttons that appear on Java Client’s main toolbar.
Button Name Description For more information,
see... Inbox Displays Notifications or Workflow
Routings. You can change this by clicking
the View/Edit Current User button; see below.
Using the Inbox (on page 11)
New Object Opens the New window, where you select which type of object you want to create, and assign a number to the object.
Agile Object Types (on page 63)
Open Selected Objects
Displays the tabbed window for the selected object(s).
—
Cut Removes selected information and places it
on the Clipboard. —
Copy Places a copy of the selected information on
the Clipboard. —
Paste Places a copy of the Clipboard contents into editable fields and tables. —
Show Search Options, Hide Search Options, & Search Attachment Contents
Show Search Options opens a drop-down
list to select a base class of objects that will limit the search (this is now default layout).
Hide Search Options toggles back to the
basic search icons. There is also a checkbox that lets you Search Attachment Contents when checked.
Base classes and other object types are presented in Installed Agile Classes, Base
Classes, and Subclasses (on page 64).
Full Text Search for Content in Attachment Files (on page 147)
Run Search Searches for objects that match the criteria in the Simple Search text box.
Quick Searches and Wildcard Characters (on page 145)
Advanced
Search Looks for objects with fields that match (multiple) conditions of the search that you set up. A Where Used search finds
assemblies that contain parts that meet your search criteria; a Relationship search finds objects related to the objects that match your search criteria.
Advanced Searches (on page 156)
Last Search
Results Displays results of the most recent search you performed. —
Address Book
Opens the Address Book window, where you can view, create, and modify user groups.
Address Book in Java Client (on page 18)
Page - 9
Button Name Description For more information,
see... Process
Extensions Lets you run/access custom actions that were defined by someone else. Agile SDK Developer Guide — how to use Process Extensions framework to develop and deploy custom actions
View/Edit
Current User Lets you modify your Agile user profile.
Changing Your User Settings (on page 33)
Exit Lets you log out of Java Client. —
Windows Bar
Below the main toolbar is an optional windows bar.
The windows bar contains a button for each open Java Client window. Each button includes the title of the window and an icon reflecting the window’s contents. The button representing the current window is recessed, that is, it appears concave. To move to a different window, click its button in the windows bar.
To close a window using the windows bar:
Right-click the button representing the window you want to close, and choose Close.
You can also use Shift-click and Ctrl-click to select multiple windows, right-click (over one of the selected windows), and choose Close.
Finally, there is also a Close All option when you right-click over any window.
You can hide or show the windows bar, and you can move it to the top or bottom of the Java Client desktop.
To hide the windows bar:
Right-click the window bar and choose Hide Windows Bar, or choose View > Windows Bar. To show the windows bar:
Choose View > Windows Bar. To move the windows bar:
Right-click the windows bar and choose Move.
Hiding and Showing the Navigation Pane
Page - 10 Agile Product Lifecycle Management
navigation pane again when you need to use it. To hide or show the navigation pane:
1. On the boundary between the navigation and content panes, click the small arrows that point left (to hide) and right (to show) the navigation pane.
To adjust the width of the navigation pane:
1. Hold the pointer on the boundary between the navigation and content panes. The pointer changes to a double-sided arrow.
2. Drag until the pane is the desired width: it is limited to a maximum of about one-fourth the total screen width.
Java Client Tables
Java Client displays many types of information in tables. For example, search results, BOMs, and AML information appear in tables.
Sort Order in Tables
You can change the sort order of some Agile tables, such as the Affected Items table. To sort a table, click the column header of the column by which you want to sort. For example, to sort the
Affected Items table by item description, click the Item Description column header. You can change the width of the columns, too.
Selecting Rows in Tables
There are a number of tables in Java Client on which you can perform certain actions. For example, on the Affected Items table, you can remove items. From the search results table, you can open an object and modify it or export it; you select the items on which you want to perform the action, then click the action to perform it.
Tables on object tabs have a “handle” column at the left, as shown in the following figure. You can select rows by using any of the following methods:
à
You can select all the rows with the top handle, or you can use Windows commands (Shift– click and Ctrl–click) on the row handles to select the rows on which you want to perform the action.à
You can select a row by clicking in the row or you can use Windows commands (Shift–click and Ctrl–click) in the rows you want.Page - 11
When you have selected the rows you want, the available actions are buttons in the menu bar above the table.
For editable tables, select the rows you want and click the Edit button, and the Edit mode popup appears. In this mode, make any changes or updates and click OK. The table refreshes to reflect the changes.
In Edit mode, Java Client displays the object ID and object Description, which identifies the data in the row that has the focus.
To open and view objects in a table, use one of these methods:
à
To open one object, double-click the object’s row in the table.à
To open an object with a specific tab on top: a. Select the object’s row in the table. b. Right-click.c. In the displayed menu, choose Open and the tab you want.
à
To open multiple objects:a. Select multiple rows in the table.
b. Either press Enter on the keyboard, or right-click the mouse and choose Open.
Using the Inbox
As information passes through the Agile system, users receive news of status changes, requests, and notifications. When you first start Java Client, it is a good idea to view your Inbox.
To view your Inbox in Java Client:
1. Click the arrow to the right of the Inbox icon on the main menu bar.
2. Click the Inbox section that you want to view, Workflow Routings or Notifications.
Notifications
The Notifications section of the Inbox lists program notifications. Notifications inform you of some action or process that has taken place, such as subscriptions, RFQs, and project invitations. You also receive a notification when a program-related request is sent to your My Assignments tab. The Accept function does not apply to notifications.
You can view or delete a notification. To view a notification, double-click it. To delete a notification, select it and click Delete.
Page - 12 Agile Product Lifecycle Management
Workflow Routings
The Workflow Routings section of the Inbox lists routable objects that require your review or action. For example, your Inbox may contain changes for which you are an approver. The out-of-box workflow routings are a combination of base classes and actions that define the kind of review, as in the table below.
Base class... ...includes routable objects
from these classes... ...combined with these actions of review
Change Change Orders, Change Requests, Site
Change Orders, Price Change Orders, Deviations, and Stop Ships
... That Require My Approval ... That I Am An Observer Of ... That Were Returned To Me ... Transferred to Me
... Escalated to Me
Quality Change Request
(QCR) Corrective and Preventive Actions and Audits
Problem Service Request
(PSR) Non-Conformance Requests and Problem Reports
Package Packages
Program Activities and Gates
Transfer Order Content Transfer Orders and Automated Transfer Orders
Declarations Substance Declarations, Part Declarations, JGPSSI Declarations, Homogeneous Material Declarations, Supplier Declarations of Conformance, IPC 1752-1 Declarations, and IPC 1752-2 Declarations
To open a workflow routing in the table, double-click its number.
To export objects to a text or PDX file (if you have privileges), select the row and choose Tools >
Export.
The Print button prints the entire Inbox table.
Using Bookmarks and the Recently Visited List
If there are objects that you need to return to frequently, you can use Bookmarks and the Recently Visited list for quick access.
Page - 13
Bookmarking
Bookmarking lets you keep a list of objects that you return to frequently. You can click an object bookmark to quickly display that object.
To bookmark an object in Java Client: 1. Open the object.
2. Choose Edit > Add Bookmark, or click the Add Bookmark button in the object’s toolbar. The Add Bookmark dialog displays.
3. Enter a name for the bookmark in the Name field. 4. Select a folder in which to store it.
You can always save a bookmark in the My Bookmarks folder.
5. To create a new folder, click the New button. In the Create New Folder dialog, enter a folder name and click OK.
6. Click OK in the Add Bookmark dialog to save the bookmark.
The object’s number is saved in the MyBookmarks list on the Searches tab in the navigation pane.
To open a bookmarked object in Java Client:
Double-click the object’s number in the MyBookmarks list on the Searches tab in the navigation pane. The object opens.
Organizing Bookmarks
You can arrange your bookmarks in folders using the Organize Bookmarks window (Edit > Organize
Bookmarks).
To organize bookmarks in Java Client:
1. Choose Edit > Organize Bookmarks. The Organize Bookmarks window opens.
The Organize Bookmarks Window
Use the features in the Organize Bookmarks window to create or remove folders and rename or remove bookmarks.
Button Description
Remove Removes the selected bookmark or folder.
Rename Renames the selected bookmark or folder.
New Adds a new bookmarks folder within the current folder. See Bookmarking (on page 48) for more information.
Save Saves the changes you made in the Organize Bookmarks window.
Page - 14 Agile Product Lifecycle Management
Removing Bookmarks
To remove a bookmark:
1. In the Organize Bookmarks window, select the bookmark or folder you want to remove. 2. Click the Remove button.
3. Click Yes to remove the bookmark or folder.
Note Removing a folder will also remove all of its children. 4. When you are finished, click Save.
Renaming Bookmarks
To rename a bookmark:
1. In the Organize Bookmarks window, select the bookmark or folder you want to rename. 2. Click the Rename button.
3. Edit the name of the bookmark in the Enter Name field. 4. Click OK.
5. When you are finished, click Save.
Recently Visited List
When you view an object during a work session, it is added to the Recently Visited list. The Recently Visited list includes the last 10 objects viewed (or 25, 50, or 100, depending on your administrator’s setting of a Preference).
To open a recently visited object in Java Client:
1. double-click the Recently Visited icon under the Searches tab in the navigation pane. 2. double-click the object’s number in the list. The object opens.
Changing Your User Settings
This section includes information about creating or changing your User Profile, password, personal criteria, and escalations.
Note Keep in mind that the Agile administrator may have set values in Agile PLM that impact what you are able to modify. Most changes made by the administrator are automatically implemented systemwide; however, if the administrator makes changes in your role assignment, or to the roles and privilege masks themselves, these take effect for a user only after the user has logged out and logged back in to Web or Java Client.
Changing Your User Profile
Your user profile contains a variety of information about how to contact you, your Windows date and time preferences, and several Java Client onscreen display preferences. Your Agile administrator
Page - 15
determines whether you can edit your user profile. To edit or add information to your user profile:
1. Open your user profile by choosing Settings > Current User on the computer from which you are logged in to Java Client, or click the View/Edit Current User button .
2. Click the tab on which you want to make changes.
3. To make changes to the General Info tab, simply edit any field that is available. Use the lists, browse buttons, and text boxes to enter the requested information.
You can also make changes to the Escalations and Attachments tabs. For information about escalations, see Working with Escalations (on page 16). For information about working with the
Attachments tab, see Working with Attachments (on page 243).
Note If you will be working primarily in Java Client, check the System Preferences under the
Preferences tab: Preferred Client should be set to Java Client and Receive Email
Notifications should be set to Yes. This will ensure that you will receive email notifications in the same client you are working in. If there is a discrepancy and you are not able to change these properties, see your Agile administrator.
Changing Your Password
These instructions describe how to change your login password, which you can do at any time. The
Change Approval Password option is enabled only when your Use Login Password for Approval user property is set to No.
To change your login password:
1. Choose Settings > Change Password. The Change Password dialog box appears. 2. Type your old login password in the Old Password field.
3. Type your new login password in the New Password and Retype New Password fields. (Passwords are case-sensitive.)
If you want to change your approval password (and the Change Password dialog displays the
Change Approval Password fields), fill in the fields as described above. 4. Click OK.
If you have not followed the rules defined on your Agile system for selecting passwords, you are prompted to correct your password.
Persisted User Interface Settings
For some user interface settings, the most recently used settings are persisted across sessions for each user.
Examples include:
à
Add method – (Search, Type in Known Number(s), Create)Page - 16 Agile Product Lifecycle Management
Working with Escalations
If your administrator has granted you the necessary privileges, you can set up escalations for yourself. Escalations allow changes to be forwarded automatically to a designated user if you do not respond within a set amount of time. You can also create escalations for your personal user groups. Your Agile administrator can add escalations to your user profile, and can edit existing escalations. To manage escalations for yourself:
1. Choose Settings > Current User on the computer from which you are logged in to Java Client. Or, click the View/Edit Current User button on the main toolbar.
2. Click the Escalations tab.
3. To set up a new escalation, click the Add button, then select an escalation criteria and one or more users to be notified for that criteria. You can select a different person for each criteria, if you want.
4. To edit an escalation, select it on the Escalations tab and click the Edit button . Add users to, or remove them from, the Notify Users list.
5. To delete an escalation, select it and click the Delete button . To manage escalations for a personal user group:
1. Choose Settings > Personal Groups. 2. Double-click the group.
3. When the user group window appears, click the Escalations tab.
4. Follow steps 3–5 in the preceding procedure, “To manage escalations for yourself.”
5. To set up a new escalation, click the Add button, then select an escalation criteria and one or more users to be notified for that criteria. You can select a different person for each criteria, if you want.
6. To edit an escalation, select it on the Escalations tab and click the Edit button . Add users to, or remove them from, the Notify Users list.
7. To delete an escalation, select it and click the Delete button .
Creating Personal Criteria
A saved “personal criteria” is a reusable database query very similar to an advanced search, in that the attributes used to create personal criteria are similar to the attributes used to create advanced searches. (For more information, see Advanced Searches (on page 156).) They may also be thought of as “filters” or “qualifying descriptions” of objects that you are interested in tracking. Personal criteria are used to define signoff authority transfers. If you have the appropriate privileges, you can temporarily transfer your signoff authority for routable objects to one or more Agile users. For more information about signoff authority transfers, see Transferring Signoff
Authority (on page 225) and Defining Personal Criteria for Authority Transfers (on page 229). Any criteria in Agile—personal or reusable—applies to one Agile class (and its children) or a particular subclass; therefore, you must create a separate criteria to apply to the objects of another
Page - 17
class or another subclass. To create a personal criteria:
1. Choose Settings > Personal Criteria. The Personal Criteria window appears. 2. Click the Create button. The Create Criteria dialog box appears.
3. Fill in the Name and Description fields, and select the object type that your personal criteria will apply to. This list includes all the Agile classes and user-defined subclasses.
Note The personal criteria name must be unique. If you specify a personal criteria name that is already used, you get a duplicate name error message.
4. Select the attribute you want from the Attribute drop-down list. The values that are available change according to the Agile class or subclass you selected in the previous step. Click OK in the small dialog box.
5. The Match If field specifies the search operator. The values that appear depend on what you selected from the Attribute list. Select from the listed operators, which will be a subset of the following:
Contains, Does Not Contain Equal To, Not Equal To
Greater Than, Greater Than Or Equal To Less Than, Less Than Or Equal To Is Null, Is Not Null
Starts With, Does Not Start With Like, Not Like
6. In the Value field, select a value for the field you selected from the Attribute list.Click OK in the small dialog box.
7. If you are going to add additional conditions, select AND or OR in the And/Or field. 8. Repeat step 4 through step 7 until your personal criteria is complete.
9. When the criteria is complete, click OK.
Note Changing the criteria in the Object Type field resets the entire personal criteria. A personal criteria applies to one class or subclass. You must create a separate global criteria to apply to another class or subclass.
If you want your criteria to be case-sensitive, select the Case Sensitive checkbox. This can simplify how you define personal criteria:
y
If you enter text in the Value field, the criteria will look for text that is an exact match, depending on the restraints of the Match If field’s value.y
If you define a numerical value, checking Case Sensitive allows the Agile system to make use of internal database settings to find objects more quickly.Using case-sensitive searches improves performance of the system and is recommended when possible.
The Add( ) button places parentheses around the specified condition or conditions, which changes the order in which the search conditions are evaluated. The Add( ) button functions like a formula within parentheses in an algebraic equation, following the standard algebraic order of operations. The grouped criteria within parentheses are resolved before any others. If you do not use
parentheses when defining your personal criteria search, the search is processed row by row without any precedence of And/Or values. The first line is combined with the second based on the
Page - 18 Agile Product Lifecycle Management
first line’s And/Or value. The result of the first two lines is then combined with the third line based on the second line’s And/Or value, and so on.
Editing Personal Criteria
Use this dialog box to edit the conditions in your personal criteria object. Defining or modifying a personal criteria object is similar to defining or modifying an advanced search. For detailed information about searches, see Finding Agile Data with Searches (on page 135).
You can perform the following modifications to your personal criteria object:
à
In the search condition table, use Add, Insert, and Delete to add more Search Condition rows as needed, or to delete rows you do not want.à
Click a cell in the Search Condition table to display the search criteria selection list.Working from left to right in the search condition row, click the drop-down list buttons to select the target Attribute (for example, CoverPage.Originator), the Match If search operator (for example, Equal To), and the Value (for example, John Smith).
Depending on the selection in the Attribute list, the Value field may contain a list that is relevant to the selection, a calendar button, or a field where you can enter text or numbers.
à
Click the And/Or field to select And or Or from the list. Use And if both conditions must be met. Use Or if either or both conditions can be met.à
Use the ( ) button to enclose selected rows in parentheses, which determines precedence in the way the search is performed.If you do not use parentheses when defining your personal criteria search, the search is processed row by row without any precedence of And/Or values. The first line is combined with the second based on the first line’s And/Or value. The result of the first two lines is then combined with the third line based on the second line’s And/Or value, and so on.
à
Select Case Sensitive if you want to perform a case-sensitive search where text capitalization matters.Address Book in Java Client
The address book is a multi-list window that lets you select users and user groups for various functions. The situations in which you use the address book can include:
à
When you send email notificationsà
When you select people or groups to sign off a workflowà
When you share, or grant, one or more of your roles to another user or user group for specific objectsYou can also create user groups in the address book.
Overview of the Address Book
Page - 19
Tools > Address Book, or when you are performing actions that involve sending an object or a notification (for example, routing a change). You can select individual users or user groups. The address book lists all the individuals and user groups that use Java Client and Web Client.
Note The Agile administrator can use Discovery privileges to limit the users you see in the address book.
Selecting Users and User Groups from the Address Book
You can select recipients individually or in groups. When you select a group, all the members of the group receive the email message. You can sort users by Last Name or First Name by clicking one of the radio buttons.
To select users or user groups from the address book:
1. To display a list of names on the Users tab, click the Check Names button, which returns a list of all users.
Page - 20 Agile Product Lifecycle Management
To see more information about a user or user group, select it and click the View button. 3. To add names directly to the Recipients list, type a known value (e.g., last name) in the Find
Name field, then click the Check Names button or the keyboard shortcut Ctrl+K; the system moves that name over to Recipients.
Once you click the Check Names button or Ctrl+K, the entire list on the left disappears: delete the name(s) in the Find Name field, click the Check Names button or Ctrl+K again, the list of users or user groups returns.
4. You can also select a name, then click the Add button to move your selection into the
Recipients list.
To select multiple names or user groups, use the Shift-click or Ctrl-click, then the Add button. To remove a name or multiple names, select using the same techniques and click the Remove
button.
5. On the User Groups tab, if you select a user group, and you want only the group name to appear in the Recipients list, use the button. If you do this when selecting approvers, only the group as a whole becomes an approver, and any single member of the group can approve. If you select a user group, and you want to see every name in that group in the Recipients list, use the Add all the users in the selected group button (this button only appears on the User Groups tab). If you do this when selecting approvers for a routable object, each individual becomes an approver.
6. Continue selecting names and using the arrows until the Recipients list is correct. 7. Click Save As to create a new user group that includes every individual’s name on the
assembled list. This includes the individuals of any user group you included in the new group. 8. Click Save to save the list. Click Close to close the address book.
Note When you add a user group to a group, and save it, then open the modified user group, all the names of the added user group are there; the modified group does not “track” user groups that were added.
User Groups
This section details how to create both personal and global user groups, as well as modifying and deleting them. See also Creating Supplier Groups (on page 22).
Note Your User Profile User Group tab lists the Global Groups of which you are a member. Your membership in the personal groups of individual users is not displayed on the User Group tab. See also Changing Your User Profile (on page 14).
Creating User Groups
You can create personal user groups; with the appropriate privileges, you can create global user groups.
Page - 21
To create a personal user group in Java Client:
1. Choose Settings > Personal Groups. The Personal User Groups window appears. 2. Click the New button. The Create User Group dialog box opens.
3. Using the Subclass drop-down list, select a subclass of the User Groups class. User Groups will be the only subclass available if your administrator has not created another one in the User Groups class.
4. Fill in a name for the group in the Name field.
5. Click next to the Users field, and move users (from the Users list) or other user groups (from the Groups list) to the Recipient list.
6. Click OK. The new user group object appears, with applicable fields populated.
7. On the General Info tab, select or accept values from the drop-down lists. Enter a description and the maximum number of named users, if appropriate.
8. When you are finished, click Save.
9. Continue to select, enter, or accept values for properties under the Users and Escalations tabs. To create a user group from the address book:
1. Open the address book by clicking the button on the main toolbar, or by choosing Tools >
Address Book.
2. Select and move users (from the Users list) or other user groups (from the User Groups list) to the Recipients list.
3. Click Save As Group. The Save Group dialog box appears.
4. Enter a name in the New Group field. Or you can select a group from the Existing Group field; the new version of the existing group will overwrite the original one.
5. In the Save In area, select Personal Groups or Global Groups.
6. The Subclass field contains only User Group. It will list other subclasses if the administrator has created new subclasses of the User Groups class.
7. Click OK. The new user group is saved in the Global or Personal Groups folder.
Completing or Editing User Groups
To complete additional information about your user group, or to edit an existing personal user group:
1. If the address book is still open, click Refresh. Otherwise, choose Settings > Personal Groups, or open the address book , and display the Groups tab.
2. Navigate to the group you created by expanding the appropriate group folder. 3. Select the group and click View. The group opens in a tabbed window.
4. On the General Info tab, specify general information about the user group.
5. You can click the Users tab to delete users. On the Users tab, select the name, and click the
Delete button .
6. To add or modify escalations for the user group, click the Escalations tab. For information about escalations, see Working with Escalations (on page 16).