JUnit 4.x in Eclipse
Lars Vogel
<[email protected]>
Version 0.2
Copyright © 2007 Lars Vogel 30.06.2007
Abstract
This article gives a short overview of JUnit 4.x and its usage within Eclipse. You should be able to run tests with JUnit from Eclipse after reading this chapter.
Table of Contents
1. General ... 1
1.1. Unit Testing ... 1
1.2. Installation ... 2
2. Introduction in Writing a Test ... 2
2.1. Overview ... 2
2.2. Write your first test ... 2
2.3. Run your first test (Eclipse) ... 3
2.4. Run your first test (command line) ... 3
3. JUnit with Eclipse ... 3
3.1. Preparation ... 3
3.2. Create a normal class ... 3
3.3. Create a test class ... 4
3.4. Create a test suite ... 4
4. JUnit (more) in Detail ... 5
4.1. Annotations ... 5
4.2. Test statements ... 5
5. Links and Literature ... 6
1. General
1.1. Unit Testing
A unit test is a piece of code written by a developer that exercises a very small, specific area of functionality of the code being tested. It can be used to ensure that existing functionality is still working after changes to the coding or the environment the program is running in.
JUnit 4.x is a framework for automatically testing java code originally written by Erich Gamma and Kent Beck. It uses annotation to identify what are the test methods.
A very important assumption of JUnit is that the all test can be performed in an arbitrary order hence each test should stand alone and not depend on another test.
1.2. Installation
Download JUnit4.x.jar from the JUnit website here [6] and add it to classpath.
Tip
You can use Junit independently of Eclipse but using Junit with Eclipse is easier due to the very good integrated JUnit support.
2. Introduction in Writing a Test
2.1. Overview
JUnit uses annotations to identify which methods should be used for testing. To write a test
• Annotate a method with @org.JUnit.Test
• When you want to check two value for equality, import org.JUnit.Assert.* statically1, call assertEquals() and pass both values.
Static imports are available since Java 5.0: static import, e.g. import static org.junit.Assert.*;
2.2. Write your first test
Write the following java source file:
package testingTest;
import static org.junit.Assert.assertEquals;
import org.junit.Test;
public class MyFirstJUnitTest {
@Test
public void simpleAdd() {
int result = 1;
int expected = 1;
assertEquals(result, expected);
2.3. Run your first test (Eclipse)
If your are using Eclipse select your new file, right mouse click on it and select Run As -> JUnit test Eclipse will display the result via a green or red bar.
2.4. Run your first test (command line)
I the JUnit distribution you have a testrunner which can also run your JUnit tests. Switch to the command line and type the following command.
org.junit.JUnitCore.runClasses(TestClass1.class, ...);
3. JUnit with Eclipse
3.1. Preparation
Create a new project. Add a folder lib to this project. Copy your Junit jar into this folder and add it to the buld path of Eclipse. See here [http://www.vogella.de/articles/Eclipse/article.html] on how to do this. Create a new source folder “junit” for your project. To do so right mouse click on your project, select properties and choose the java build path. Select the tab source code.
Press "Add folder" then then press "Create new folder". Create the folder junit.
3.2. Create a normal class
Create his extremely boring class "MyClass". We will use this class for testing.
public class MyClass {
public int multiply(int x, int y) { return x / y;
} }
3.3. Create a test class
Add JUnit.jar to your build path
Select your new class, right mouse click and select New ->JUnit Test case, change the source folder to JUnit
Press next and select the methods which you want to test.
Create a test with the following code.
import static org.junit.Assert.assertEquals;
import org.junit.Test;
public class MyClassTest {
@Test
public void testMultiply() { MyClass tester = new MyClass();
assertEquals("Result", 50, tester.multiply(10, 5));
} }
Right click on your new test class and select Run-As-> Junit Test.
The result should be the following. This is due to the fact that our multiplier class is currently doing division. Fix the bug and re-run test to get a green light.
Select your test classes , right mouse click-> New-> Other -> JUnit -Test Suite
Select next and select the methods you would like to have test created for. Press finish.
4. JUnit (more) in Detail
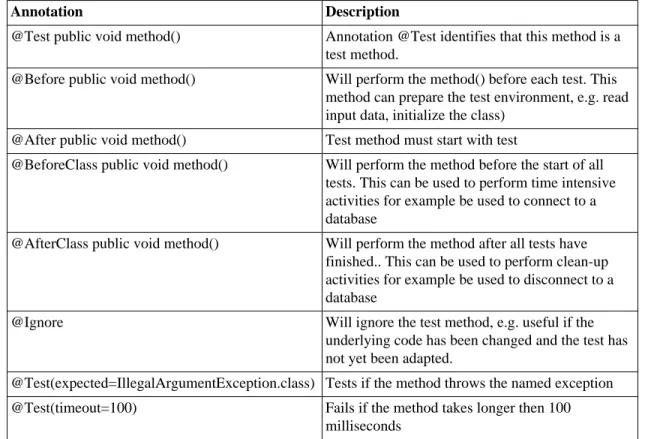
4.1. Annotations
The following give an overview of the available annotations in JUnit 4.x
Table 1. Annotations
Annotation Description
@Test public void method() Annotation @Test identifies that this method is a test method.
@Before public void method() Will perform the method() before each test. This method can prepare the test environment, e.g. read input data, initialize the class)
@After public void method() Test method must start with test
@BeforeClass public void method() Will perform the method before the start of all tests. This can be used to perform time intensive activities for example be used to connect to a database
@AfterClass public void method() Will perform the method after all tests have finished.. This can be used to perform clean-up activities for example be used to disconnect to a database
@Ignore Will ignore the test method, e.g. useful if the
underlying code has been changed and the test has not yet been adapted.
@Test(expected=IllegalArgumentException.class) Tests if the method throws the named exception
@Test(timeout=100) Fails if the method takes longer then 100
milliseconds
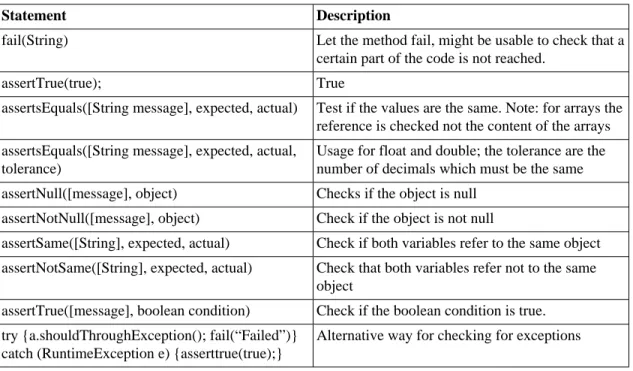
4.2. Test statements
Table 2. Test methods
Statement Description
fail(String) Let the method fail, might be usable to check that a
certain part of the code is not reached.
assertTrue(true); True
assertsEquals([String message], expected, actual) Test if the values are the same. Note: for arrays the reference is checked not the content of the arrays assertsEquals([String message], expected, actual,
tolerance)
Usage for float and double; the tolerance are the number of decimals which must be the same assertNull([message], object) Checks if the object is null
assertNotNull([message], object) Check if the object is not null
assertSame([String], expected, actual) Check if both variables refer to the same object assertNotSame([String], expected, actual) Check that both variables refer not to the same
object
assertTrue([message], boolean condition) Check if the boolean condition is true. try {a.shouldThroughException(); fail(“Failed”)}
catch (RuntimeException e) {asserttrue(true);}
Alternative way for checking for exceptions
5. Links and Literature
http://www.junit.org/ - Junit Homepage [http://www.junit.org/] .
http://junit.sourceforge.net/doc/cookbook/cookbook.htm - The JUnit Cookbook from Erich Gamma and Kent Beck [http://junit.sourceforge.net/doc/cookbook/cookbook.htm] .