Personal Storage 3100 Installation Guide
Pre-Installation:
Thank You
Thank you for selecting a Maxtor Personal Storage product. Please follow these instructions to take full advantage of its features.
Handling Precautions
If these handling precautions are not followed, damage to the Personal Storage product may result-which may void your product warranty. Please see the warranty section for additional information.
• DO NOT open the product.
Opening the product will void the warranty
DO NOT bu
• mp, jar, drop, or move this device while in operation as it may result in loss of data
DO NOT
• stack the Personal Storage 3100
DO NOT
• set or operate the Personal Storage 3100 on its side
DO
• NOT disconnect any
cables while copying files without properly unplugging or dismounting the device via your operating system - as this can result in data loss and possible damage to the internal hard drive
DO NOT
• send any liquids or drinks on the product - as they will damage the internal electronics
Hardware and Operating System Requirements for
Windows PC
• Pentium II-class equivalent processor or later
• Windows 98SE, Me, 2000 or XP
• 64MB RAM or more as required by operating system
• Internet connection (for Windows 98SE)
NOTE: Macintosh Systems are NOT supported with this product.
Kit Components
The Maxtor Personal Storage 3100 comes complete with
components shown here. Please familiarize yourself with each of these items prior to installation.
• Personal Storage 3100 • Power Adapter
• USB Interface Cable • Maxtor Limited Warranty
USB Backward Compatibility
The Maxtor Personal Storage 3100 is backward compatible and can be used with current computer systems with built in USB 1.1 ports. If your computer does not have USB 2.0 support built in, a USB 2.0 PCI adapter card is required to achieve the USB 2.0 data transfer rates.
Personal Storage 3100 Installation Guide
Windows PC Software Setup:
Windows Millennium/2000/XP
Maxtor has completely prepared your new personal storage 3100 with one large FAT32 partition. After you connect the drive to your computer (see Part 3 Hardware - Installation for more
information), Windows will detect the "USB Mass Storage Device" and install the drivers for it. Allow up to two minutes for your
computer to recognize the drive. Restart your system. Your drive is now ready to use.
Windows 98SE
Additional drivers are required to use the Maxtor Personal Storage 3100 with Windows 98SE. These drivers can be downloaded from: www.maxsupportPS3100.com
NOTE: The software drivers MUST be installed prior to connecting the Personal Storage 3100 to your Windows PC.
File Name: PS3100_98SE_Drivers.exe File Download Size: 1.61 MB
File Version: 1.0
Compatible Operating Systems: Windows 98
Click on the link for "Download Personal Storage 3100/Win98SE Driver".
Please follow these steps for proper installation:
1. Download and extract PS3100_98SE_Drivers.exe to the
computer to which you connect the Personal Storage to. Maxtor suggests that you extract the file to the C:\> drive.
2. Browse to the C:\PS3100_98SE_Drivers folder and double-click on the 3100_98SE_Drivers file. This will launch the InstallShield Wizard.
3. At the Welcome Screen, click Next
4. Review and accept the terms of the License Agreement and click Next.
5. At this point, the drivers will install for the Personal Storage 3100. When prompted, click Finish.
6. Close all windows and shutdown your PC
7. Connect the Personal Storage 3100 to your PC and reboot.
Hardware – Installation:
Personal Storage 3100 Installation
To connect your new Maxtor personal storage 3100 to your
computer, please follow these simple steps. If these steps are not performed in order, the Personal Storage 3100 may not function properly.
Powered Cord Connections
1. Ensure that your computer is turned on and is running one of the required operating systems.
Plug the one-pin male connecto
2. r into the back of the Personal Storage 3100’s DC power-in connector.
3. Connect the female end of the power cord into the power adapter.
4. Plug the male connector from the power adapter into your power source.
Personal Storage 3100 Installation Guide
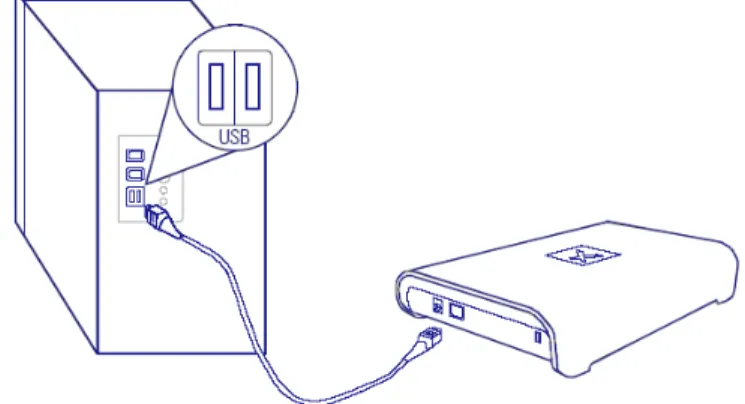
USB Data Cable Connections
1. Plug the larger end of the USB cable into available USB port on your computer.
2. Plug the smaller end of the USB cable into the USB connection on the Maxtor Personal Storage 3100.
Figure 2 - Connecting USB Data Cable Connections
Disconnecting the Personal Storage 3100
1. Right-click on the Windows Unplug or Eject Hardware icon in your System Tray located at the bottom right order of your screen
2. Unplug the male connector from the power cord in your electrical wall outlet
3. Unplug the smaller end of the USB cable in the USB connection of the Personal Storage 3100
Reconnecting the Personal Storage 3100
1. Plug the male connector from the power cord into your electrical wall outlet.
2. Plug in the smaller end of the USB cable into the USB connection on the Personal Storage 3100.
Formatting Your Drive
Optional for Windows 98SE/2000/Me/XP
Your Maxtor Personal Storage 3100 drive was formatted at the factory with the Windows FAT32 file system. The FAT32 file system limits any file to a maximum size of 4GB. If you are running
Windows 98SE or Me, consider upgrading to Windows 2000 or XP to take advantage of the NTFS file system.
If you are running either the Windows 2000 or XP operating system, consider reformatting your drive to the NTFS file system. The NTFS file system provides several advantages, including support for very large files. See “Formatting Your Drive with NTFS”. Your new drive will display a drive capacity that is slightly less than the capacity stated on the box. This is normal. For a complete explanation, see “General Troubleshooting & FAQs” for more information.
Formatting Your Drive with NTFS
This section describes how to format your drive with the NTFS file system for Windows 2000 or XP. Please note that formatting the drive destroys all data contained on that drive. Make a backup copy of all your data before formatting your drive.
To format the drive for NTFS
1. Select Start → Settings → Control Panel. 2. Double-click Administrative Tools.
3. Double-click Computer Management.
4. Double-click Disk Management (located under the Storage icon).
Personal Storage 3100 Installation Guide
5. To format into two or more logical partitions, use the partitioningfeature in the Disk Management utility. For more information, press F1 to access Help and enter partition in the keyword field. 6. Right-click on the icon for your new drive in the window that
appears. FAT32 should be listed in the column labeled File System.
7. Select Format from the menu.
8. Select NTFS in the File System field. Click OK when you are ready to format your drive. Formatting time varies based on your system speed, the interface used, and the drive’s capacity.
Troubleshooting & FAQs
1. The Personal Storage 3100 does not appear on my system. a. Is the drive running?
Make sure all power connectors on the drive and power adapter are securely plugged in. If the drive is plugged into a power strip, try plugging it directly into the wall outlet.
Is the USB cables connected properly? b.
Verify that the cables are connected according to the installation instructions in “Step 3 Hardware Installation – Power Cord Connections”.
Have you tried cycling the power for the drive
c. ?
• While your computer is running, unplug the USB cable from the drive, and then unplug the drive’s power cord. Wait ten seconds; plug the power cable back into the •
drive.
• Wait another ten seconds, plug the USB cable in. See if the drive appears on your system.
Is your USB interface card recognized and working pr
d. operly
in the Device Manager? To open the Device Manager:
• Select → Start → Settings → Control Panel.
• Double-click the System icon. The System Properties dialog box appears.
98SE and Me: Select the Device Manager tab.
2000 or XP: Select the Hardware tab and then click Device Manager.
• Double-click the entry for the Universal Serial Bus Controller.
e. If using Windows 2000/XP: Have you installed the latest Microsoft Service Pack? The most current Service Pack(s) contain drivers that assist with the recognition of USB devices. Go to www.microsoft.com for more information. f. Have you run Diagnostic Utilities for the Personal Storage
3100?
File Name: PS3100_DIAG.EXE File Download Size: 500 KB File Version: 1.0
Compatible Operating Systems: Windows 98SE, Me, 2000 and XP
Click on the link for "Download Personal Storage 3100 Diagnostic Utility".
1. Download and extract PS3100_DIAG.EXE to the
computer to which you connect the Personal Storage to. Maxtor suggests that you extract the file to the C:\> drive. 2. Browse to the C:\PS3100_Diag folder and double-click
on the 3100_diagnostic.exe file.
3. This will launch the Maxtor Diagnostics Tool for the Personal Storage 3100.
Personal Storage 3100 Installation Guide
4. Click on the Short Test button to perform the diagnostic test on the drive. Test time(s) may vary.
5. When finished click Exit. If the word, Pass is displayed, the drive is functional and no defects were found; if an error code is generated, please contact Maxtor for further assistance.
2. My computer shows less drive capacity than on the box label.
Hard drive capacity is defined in terms of decimal (base 10) capacity. In decimal notation, one megabyte (MB) is equal to one million bytes and one gigabyte (GB) is equal to one billion bytes. We are most accustomed to the decimal system in everyday life. However, computers use the binary (base 2) numbering system. In the binary numbering system, one megabyte is equal to 1,048,576 bytes, and one gigabyte is equal to 1,073,741,824 bytes. Windows uses the binary numbering system. When you use your system to check your drive’s capacity, multiply the value shown (displayed in base 2 megabytes) by 1,048,576 to determine the decimal equivalent for the hard drive's capacity.
3. My applications run slowly using the USB 1.1 interface. When you connect the drive to your system using the USB 1.1 interface, the data transfer rate is approximately 1 MB per
second. Maxtor does not recommend installing applications on a drive using the USB 1.1 interface. You can however use your drive to store the data for many applications over a USB 1.1 interface.
4. I get a message stating that I have a high-speed device connected to a low-speed port in Windows XP.
This is normal. Windows XP is letting you know that you have connected your USB 2.0 drive to a USB 1.1 port and you will not have the high-speed capabilities that you would have with a USB 2.0 port.
5. I’m having data transfer performance problems with my USB 2.0 adapter card.
Maxtor drives will run as fast as the host adapter card will allow (up to the maximum burst rate of 480 Mb per second). If you are having performance issues, make sure the card’s drivers are the most current available and that they are installed properly.