Service Desk
Agent Desktop
User Guide
1
Contents
About This Guide ... 2
1. Agent Desktop Setup ... 3
2. Agent Desktop... 7
2.1. The CTI Panel of Agent Desktop ... 10
2.1.1. The Incoming/Outgoing Call Block... 10
2.1.2. The Call Transfer Block... 13
2.1.3. The Subscriber Search Window ... 15
2.2. The Contact Identification Area... 17
2.2.1. The Contact Search Mode ... 18
2.2.2. The Contact Information Mode... 19
2.2.3. The Contact Registration Mode... 22
2.3. The Working Area of Agent Desktop... 24
2.3.1. The [Call] Tab... 25
2.3.2. The [Email] Tab ... 27
2.3.3. The [Task] Tab ... 29
2.3.4. The [Wrap-Up] Tab ... 30
2.3.5. The [Tickets] Tab... 31
2.3.6. The [Contact History] Tab... 31
2.3.7. The [Campaign Search] Tab... 32
2.3.8. The [Campaign] Tab ... 33
2.3.9. The [Product Search] Tab ... 35
2.3.10. The [Product] Tab ... 35
2.3.11. The [Configuration Item Search] Tab... 37
About This Guide
Agent Desktop is a specialized application of BPMonline CRM + Service Desk that helps improve the customer service. The application helps manage customers' tickets or search for objects in the system, reduces the average time of working with calls and emails and visualizes results of calls and tickets.
Before you start working with Agent Desktop, take several preparatory steps that include system licensing and connection setup procedure for BPMonline and the phone network. Besides that, set up phone lines and mailbox synchronization with BPMonline for Call Centre operators.
Note
The procedure of licensing is described in the Customization Guide. The initial telephony setup is described in the BPMonline Call Centre User Guide.
The Agent Desktop interface consists of several areas described in separate chapters. The incoming/outgoing call block and the call transfer block are described in the “The CTI Panel of Agent Desktop” chapter.
Searching contacts, getting additional information about a contact and creating a new contact are described in the “The Contact Identification Area” chapter.
Working with tasks, tickets and other objects that are involved in operator's work are described in the “The Working Area of Agent Desktop” chapter.
3
2. Agent Desktop Setup
Before you start working with Agent Desktop, set up the application. Menu of the button of the toolbar contains setup commands (Fig. 2.1).
Fig. 2.1 — The Setup Menu of Agent Desktop
Selecting the User Main Page
To select the user main page, use the [Set Up Parameters for the Current User] command. Running this command will open the notification window where you can specify the user authentication parameters and select the user's main page.
Note
Configuring parameters for the current user is performed by the System Administrator and described in the Customization Guide.
Configuring the Call Centre Parameters
To specify your phone line parameters, set up the Call Centre parameters. To do this: 1. Click the button of the toolbar and select the [Configure Call Centre
Parameters] command (Fig. 2.2).
Fig. 2.2 Selecting the [Configure Call Centre Parameters] Command
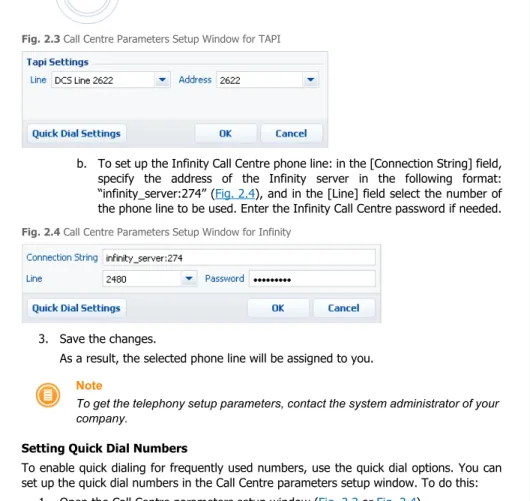
2. In the Call Centre parameters setup window, fill in all required fields. Phone line settings vary depending on the telephony protocol.
a. To set up the TAPI Call Centre phone line: in the [Line] field select the available phone line. The [Address] field (Fig. 2.3) will display the number of the selected line.
Fig. 2.3 Call Centre Parameters Setup Window for TAPI
b. To set up the Infinity Call Centre phone line: in the [Connection String] field, specify the address of the Infinity server in the following format: “infinity_server:274” (Fig. 2.4), and in the [Line] field select the number of the phone line to be used. Enter the Infinity Call Centre password if needed. Fig. 2.4 Call Centre Parameters Setup Window for Infinity
3. Save the changes.
As a result, the selected phone line will be assigned to you.
Note
To get the telephony setup parameters, contact the system administrator of your company.
Setting Quick Dial Numbers
To enable quick dialing for frequently used numbers, use the quick dial options. You can set up the quick dial numbers in the Call Centre parameters setup window. To do this:
1. Open the Call Centre parameters setup window (Fig. 2.3 or Fig. 2.4).
2. Click the [Quick Dial Settings] button (Fig. 2.5). An additional window containing the list of quick dial numbers will open.
Fig. 2.5 Opening the List of Quick Dial Numbers
5
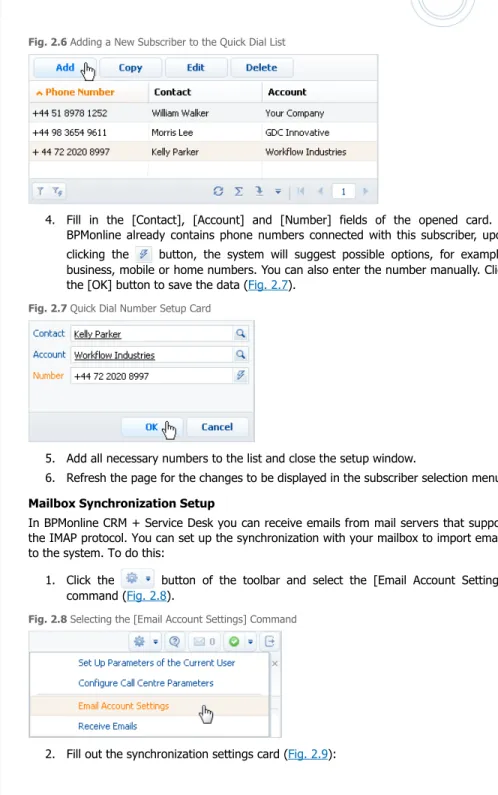
Fig. 2.6 Adding a New Subscriber to the Quick Dial List
4. Fill in the [Contact], [Account] and [Number] fields of the opened card. If BPMonline already contains phone numbers connected with this subscriber, upon clicking the button, the system will suggest possible options, for example, business, mobile or home numbers. You can also enter the number manually. Click the [OK] button to save the data (Fig. 2.7).
Fig. 2.7 Quick Dial Number Setup Card
5. Add all necessary numbers to the list and close the setup window.
6. Refresh the page for the changes to be displayed in the subscriber selection menu.
Mailbox Synchronization Setup
In BPMonline CRM + Service Desk you can receive emails from mail servers that support the IMAP protocol. You can set up the synchronization with your mailbox to import emails to the system. To do this:
1. Click the button of the toolbar and select the [Email Account Settings] command (Fig. 2.8).
Fig. 2.8 Selecting the [Email Account Settings] Command
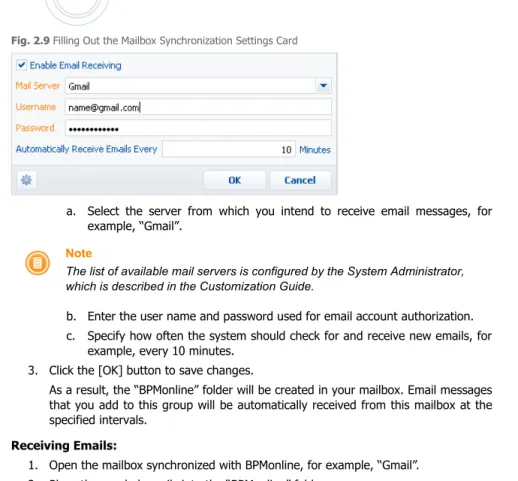
Fig. 2.9 Filling Out the Mailbox Synchronization Settings Card
a. Select the server from which you intend to receive email messages, for example, “Gmail”.
Note
The list of available mail servers is configured by the System Administrator, which is described in the Customization Guide.
b. Enter the user name and password used for email account authorization. c. Specify how often the system should check for and receive new emails, for
example, every 10 minutes. 3. Click the [OK] button to save changes.
As a result, the “BPMonline” folder will be created in your mailbox. Email messages that you add to this group will be automatically received from this mailbox at the specified intervals.
Receiving Emails:
1. Open the mailbox synchronized with BPMonline, for example, “Gmail”. 2. Place the needed emails into the “BPMonline” folder.
3. Log in to the system and select the [Receive Emails] command of the button of the toolbar (Fig. 2.10).
Fig. 2.10 Selecting the [Receive Emails] Command
As a result, the specified email messages will be received and saved by the system as new activities of the “Email” type. The toolbar will show the corresponding number of unread emails.
7
3. Agent Desktop
Agent Desktop is designed to facilitate the work of Contact Centre operators. With the help of Agent Desktop you can conduct outbound campaigns, manage incoming and outgoing calls, plan the workload of operators, and analyze their performance.
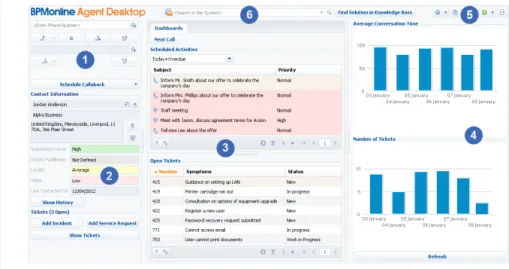
The Agent Desktop interface (Fig. 3.1) consists of several functional areas. Fig. 3.1 The Agent Desktop Interface
CTI Panel (1)
The CTI panel is located in the left part of the Agent Desktop interface. It is an efficient tool to conduct outbound campaigns and work with incoming and outgoing calls.
Contact Identification Area (2)
The contact identification area is located under the CTI panel. It displays contact information of a customer and some additional data. Here you can search for a customer by specified search conditions, as well as add and edit customers' contact data.
The Working Area (3)
The working area is the main element of the interface. The working area consists of a number of tabs that are used for managing tasks, tickets, knowledge base articles and other system records.
The Chart Area (4)
The chart area is used for visual demonstration of results of calls and tickets.
The Toolbar (5)
The toolbar contains controls used for setting up the application, displaying unread message notifications, and indicating the operator's status. It also contains the context help button.
– the application setup menu. The menu contains commands for setting up Call Centre parameters, mailbox synchronization, receiving emails and selecting the login main page for the system administrator. More information about the application setup can be found in a separate chapter.
– open the contact card.
– display the number of unread email messages for the current user. Click this button to view the messages.
– the operator's status button. The button commands differ depending on the telephone network connection used. For example, only the [Active] and [Do Not Disturb] statuses are available for TAPI. When using the Infinity server, you can also set the [Away] and [Break] statuses.
“Active” is the primary status. It is set automatically when starting the application. It is recommended that you select this status when you are ready to receive and initiate calls. To prohibit incoming calls, use the [Do Not Disturb] status. If you use the Infinity server, you can state the reason of blocking incoming calls by selecting either [Away] or [On Break] status.
Edit Infinity telephony settings to enable additional options, such as receiving internal calls while in the [Break] status.
While establishing the connection with the telephony server, the status button switches to , and the CTI panel becomes inactive.
The Search Panel (6)
The search panel is designed to quickly search for products, campaigns and configuration items throughout the system.
– clear the search string.
– open a list of sections to search in: [Campaigns], [Configuration Items] or [Products]. – start the search. The objects that meet the searching conditions will open in a separate tab of the working area.
For example, to search for a configuration item: 1. Enter the configuration item name in the string.
2. Click the button and select the [Configuration Items] option.
3. Click the button. The list of of matching configuration items will open on the [Configuration Items] tab of the Agent Desktop working area.
Use the [Find Solution in Knowledge Base] button to start searching for relevant knowledge base articles. Clicking this button will open an additional window where where you can specify search parameters to filter the articles that can help resolve the incident or service request.
Note
More information about searching solutions can be found in the User Guide book of the BPMonline CRM + Service Desk application.
9
Later in This Chapter
• The CTI Panel of Agent Desktop, page 10 • The Contact Identification Area, page 17 • The Working Area of Agent Desktop, page 24 • The Chart Area, page 38
See Also
3.1. The CTI Panel of Agent Desktop
The CTI (Computer Telephony Integration) panel enables users to efficiently manage incoming and outgoing calls as well as carry out outbound campaigns.
Note
To use the CTI panel in your work, you will need to set up the telephone line.
Fig. 3.2 The CTI Panel of Agent Desktop
Blocks of the CTI Panel:
• The incoming/outgoing call block enables to receive incoming calls and initiate outgoing calls.
• The call transfer block provides means to transfer a call to another number.
Later in This Chapter
• The Incoming/Outgoing Call Block, page 10 • The Call Transfer Block, page 13
• The Subscriber Search Window, page 15 See Also
• Agent Desktop Setup, page 3
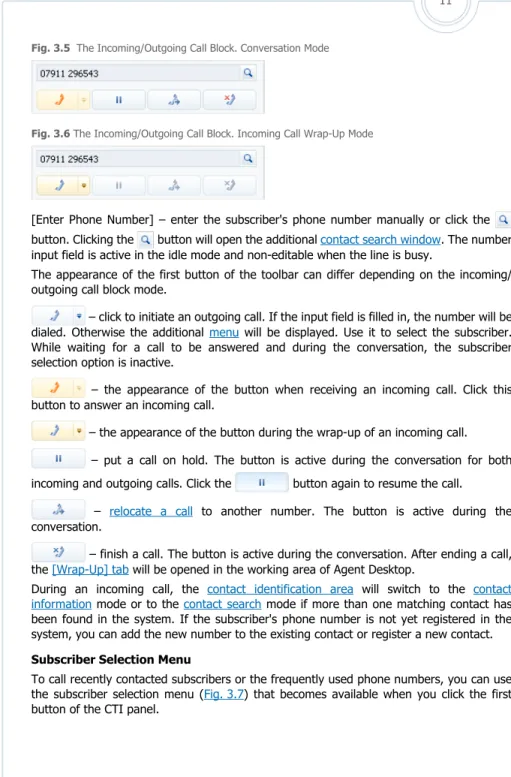
3.1.1. The Incoming/Outgoing Call Block
Use this block to initiate a call, receive an incoming call and put a call on hold. The block switches to different modes depending on the call direction and agent's actions (Fig. 3.3 –
Fig. 3.6).
Fig. 3.3 The Incoming/Outgoing Call Block. Idle Mode
The CTI Panel of Agent Desktop
11
Fig. 3.5 The Incoming/Outgoing Call Block. Conversation Mode
Fig. 3.6 The Incoming/Outgoing Call Block. Incoming Call Wrap-Up Mode
[Enter Phone Number] – enter the subscriber's phone number manually or click the button. Clicking the button will open the additional contact search window. The number input field is active in the idle mode and non-editable when the line is busy.
The appearance of the first button of the toolbar can differ depending on the incoming/ outgoing call block mode.
– click to initiate an outgoing call. If the input field is filled in, the number will be dialed. Otherwise the additional menu will be displayed. Use it to select the subscriber. While waiting for a call to be answered and during the conversation, the subscriber selection option is inactive.
– the appearance of the button when receiving an incoming call. Click this button to answer an incoming call.
– the appearance of the button during the wrap-up of an incoming call. – put a call on hold. The button is active during the conversation for both incoming and outgoing calls. Click the button again to resume the call.
– relocate a call to another number. The button is active during the conversation.
– finish a call. The button is active during the conversation. After ending a call, the [Wrap-Up] tab will be opened in the working area of Agent Desktop.
During an incoming call, the contact identification area will switch to the contact information mode or to the contact search mode if more than one matching contact has been found in the system. If the subscriber's phone number is not yet registered in the system, you can add the new number to the existing contact or register a new contact.
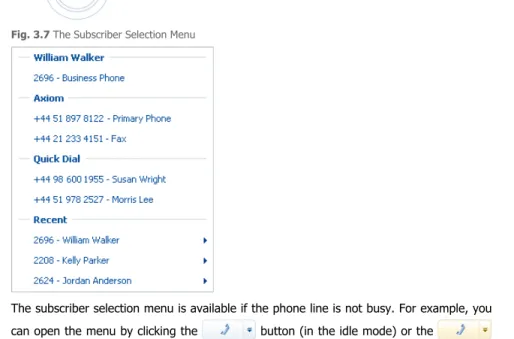
Subscriber Selection Menu
To call recently contacted subscribers or the frequently used phone numbers, you can use the subscriber selection menu (Fig. 3.7) that becomes available when you click the first button of the CTI panel.
Fig. 3.7 The Subscriber Selection Menu
The subscriber selection menu is available if the phone line is not busy. For example, you can open the menu by clicking the button (in the idle mode) or the
button (in the incoming call wrap-up mode). However, the menu is unavailable while waiting for a call to be answered and when answering a call.
The heading of the upper group corresponds to the name of the contact selected in the
contact identification area. If the selected contact is connected to a certain account in the system, headings of the first and second groups correspond to the contact's name and account's name respectively. The groups display all available phone numbers of the contact and account. Click any record to dial the corresponding number.
[Quick Dial] – use this group to make a call to one of the subscribers that you call frequently. The list of numbers in this group is established in the quick dial settings window. Click any record to dial the corresponding number.
Note
Setting quick dial numbers is described in detail in a separate chapter.
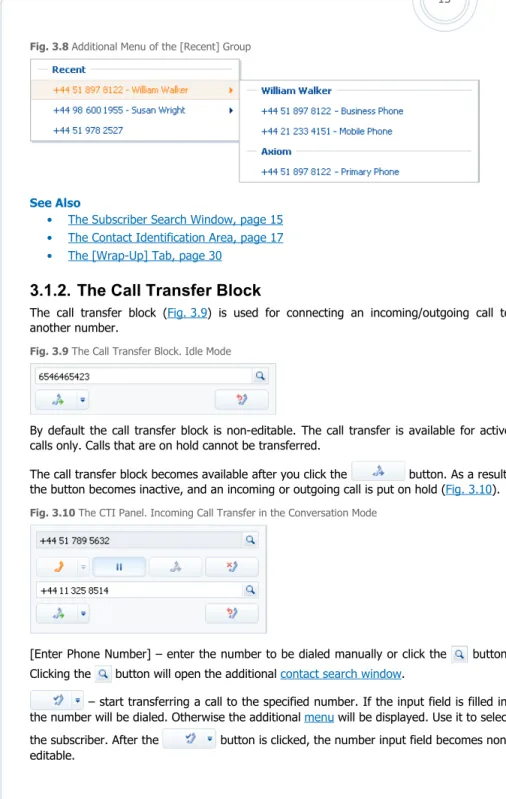
[Recent] – use this group to dial one of the subscribers that you have recently called. The list displays five most recent incoming and outgoing calls in chronological order. If a subscriber has additional phone numbers or is connected to an account with phone numbers filled in, the additional menu (Fig. 3.8) that contains these numbers will be also available. Click any record to dial the corresponding number.
The CTI Panel of Agent Desktop
13
Fig. 3.8 Additional Menu of the [Recent] Group
See Also
• The Subscriber Search Window, page 15 • The Contact Identification Area, page 17 • The [Wrap-Up] Tab, page 30
3.1.2. The Call Transfer Block
The call transfer block (Fig. 3.9) is used for connecting an incoming/outgoing call to another number.
Fig. 3.9 The Call Transfer Block. Idle Mode
By default the call transfer block is non-editable. The call transfer is available for active calls only. Calls that are on hold cannot be transferred.
The call transfer block becomes available after you click the button. As a result, the button becomes inactive, and an incoming or outgoing call is put on hold (Fig. 3.10). Fig. 3.10 The CTI Panel. Incoming Call Transfer in the Conversation Mode
[Enter Phone Number] – enter the number to be dialed manually or click the button. Clicking the button will open the additional contact search window.
– start transferring a call to the specified number. If the input field is filled in, the number will be dialed. Otherwise the additional menu will be displayed. Use it to select the subscriber. After the button is clicked, the number input field becomes non-editable.
– this button is displayed instead of the button if a subscriber has answered the transferred call. At this time you can inform the subscriber about the call being transferred. After the button is clicked, the connection will be established, and you will be disconnected from the call. The CTI panel will switch to the idle mode.
– cancel a call transfer. Upon clicking this button, the call transfer block will become unavailable, and you will be able to continue the conversation.
Subscriber Selection Menu
To transfer calls to subscribers that have recently received call transfers or dial the frequently dialed numbers, open the subscriber selection menu (Fig. 3.7) by clicking the
button.
Fig. 3.11 The Subscriber Selection Menu
The subscriber selection menu is available if a call transfer has not been started. For example, the menu is available during the conversation, but becomes unavailable while waiting for a call transfer to be answered or during the transferred call conversation.
[Quick Dial] – use this group to make a call to one of the subscribers that you call frequently. The list of numbers in this group is established in the quick dial settings window. Click any record to dial the corresponding number.
Note
Setting quick dial numbers is described in detail in a separate chapter.
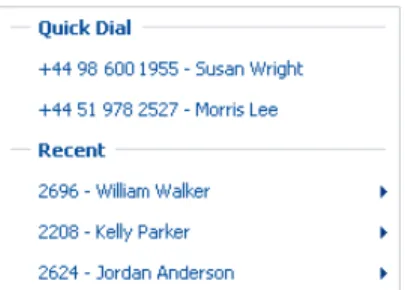
[Recent] – use this group to transfer calls to subscribers that have recently received transferred calls. The list displays five most recent phone numbers that have received transferred calls, in chronological order. If a subscriber has additional phone numbers or is connected to an account with phone numbers filled in, the additional menu (Fig. 3.12) that contains these numbers will be also available. The call transfer will be initiated immediately after you click any of the menu commands.
The CTI Panel of Agent Desktop
15
Fig. 3.12 Additional Menu of the [Recent] Group
See Also
• The Subscriber Search Window, page 15
3.1.3. The Subscriber Search Window
Use the subscriber search window (Fig. 3.13) to quickly search for phone numbers of a subscriber. You can open this window by clicking the button in the phone number input fields.
Fig. 3.13 The Subscriber Search Window
The search window contains several tabs:
• [Employees], [Contacts] – are used for searching for phone numbers of your company's employees and other contacts registered in the system.
• [Accounts] – is used for searching for phone numbers of companies registered in the system.
The search panel is located in the upper part of the window. If the phone input field has contained any digits, they will be copied to the search field of the panel.
Depending on the characters entered in the search field, the results will be filtered by different columns.
• Digits, space character, “(”, “)”, “+”, “*”, “#”, “%” – the search will be made by the [Number] column.
• Other characters and empty search field – search will be performed by the [Contact] column for the [Employees] and [Contacts] tabs and by the [Contacts] and [Account] columns for the [Accounts] tab.
Press the [Enter] key or the [Find] button to start the search.
Clicking the [Accounts Phone Numbers] button in the [Employees] and [Contacts] tabs will display phone numbers of companies connected with the employee or contact selected in the window.
If you double-click the record or click the [OK] button, the phone number of the selected subscriber will be copied into the number input field from which the search has been initiated.
See Also
• The Incoming/Outgoing Call Block, page 10 • The Call Transfer Block, page 13
The Contact Identification Area
17
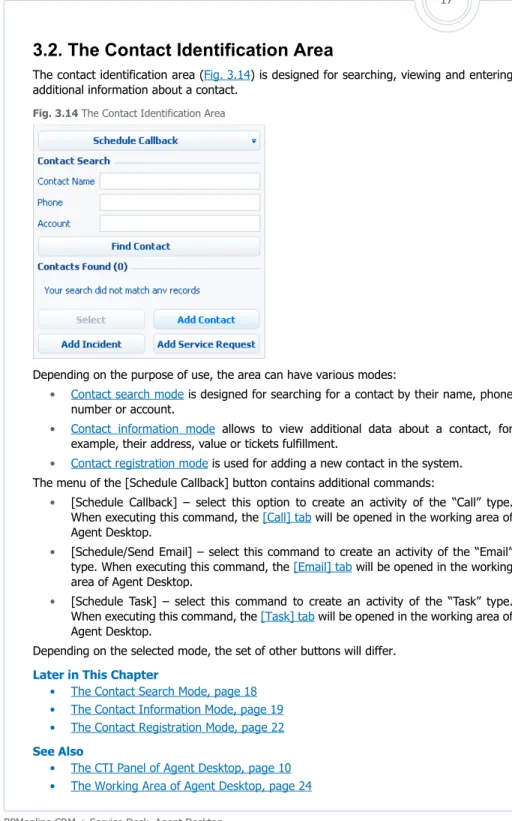
3.2. The Contact Identification Area
The contact identification area (Fig. 3.14) is designed for searching, viewing and entering additional information about a contact.
Fig. 3.14 The Contact Identification Area
Depending on the purpose of use, the area can have various modes:
• Contact search mode is designed for searching for a contact by their name, phone number or account.
• Contact information mode allows to view additional data about a contact, for example, their address, value or tickets fulfillment.
• Contact registration mode is used for adding a new contact in the system. The menu of the [Schedule Callback] button contains additional commands:
• [Schedule Callback] – select this option to create an activity of the “Call” type. When executing this command, the [Call] tab will be opened in the working area of Agent Desktop.
• [Schedule/Send Email] – select this command to create an activity of the “Email” type. When executing this command, the [Email] tab will be opened in the working area of Agent Desktop.
• [Schedule Task] – select this command to create an activity of the “Task” type. When executing this command, the [Task] tab will be opened in the working area of Agent Desktop.
Depending on the selected mode, the set of other buttons will differ.
Later in This Chapter
• The Contact Search Mode, page 18 • The Contact Information Mode, page 19 • The Contact Registration Mode, page 22 See Also
3.2.1. The Contact Search Mode
Use the contact search mode of the identification area in order to quickly search for contacts registered in the system (Fig. 3.15). This mode is selected by default when you open Agent Desktop.
Fig. 3.15 The Contact Identification Area. Search Mode
When in the search mode, the identification area consists of the search conditions area and the search results area.
Search Conditions
[Contact Name] – enter the first few letters of the name or complete name of the contact you search for. By default the search results are based on the matching first letters of the [Contact Name] column. You can use the “%” symbol to obtain more search results. [Phone] – enter the phone number of the contact you need to find. When you specify the fragment of the phone number, the results will include only numbers ending in the specified digits.
[Account] – enter the name of the account connected with this contact. By default the search results are based on the matching first letters of the [Name] column. You can use the “%” symbol to obtain more search results.
Note
An account is considered connected with a contact if it is specified in the contact card.
The Contact Identification Area
19
To start searching, press the [Enter/Return] key or click the [Find Contact] button. To clear search results, use the button.
Search Results
The heading of the results list displays the number of contacts matching the search conditions.
If you specify all conditions, the results list will display only those contacts that match all conditions specified.
[Select] – displays additional information about the contact selected in the search area. If you click this button, the contact identification area will switch to the contact information mode.
[Add Contact] – switches the contact identification area to the contact registration mode. Use the [Add Incident] button to open a new incident card in a separate window. Use the [Add Service Request] button to open a new service request card in a separate window.
Note
More information about working with the incident and service request cards can be found in the BPMonline CRM + Service Desk User Guide.
If the search yields no results, the results area will display the relevant message, and the [Select] button will become inactive.
If only one contact is found, the contact identification area will automatically switch to the contact information mode.
See Also
• The Contact Information Mode, page 19 • The Contact Registration Mode, page 22
3.2.2. The Contact Information Mode
To obtain additional information about the contact, use the contact identification area in the contact information mode (Fig. 3.16).
Fig. 3.16 The Contact Identification Area. Contact Information Mode
Depending on the contact's data available in the system, the information area will display different fields. For example, if a contact card contains the contact's address and connected account, the information area will display three fields: contact name, account name and address.
– opens the contact card.
Note
More information about working with the contact card can be found in the BPMonline CRM + Service Desk User Guide.
– switches to the contact search mode.
, – buttons are used for searching the contact's address on the map and getting directions to this contact.
[Value] – the importance of the contact. This indicator is calculated automatically based on the data about fully and partially paid invoices of the contact within the last 30 days. Depending on the paid amount, the contact obtains certain level of value.
[Satisfaction] – level of customer satisfaction. This indicator is calculated automatically based on the average satisfaction score specified in the contact's tickets closed within the last 30 days.
[Loyalty] – level of the contact's loyalty. This indicator is calculated based on how long and how often a contact uses the company's services.
The Contact Identification Area
21
[Tickets Fulfillment] – the frequency of tickets submitted by a contact. This indicator is calculated automatically based on the number of incidents and service requests of the contact for the last 30 days.
Note
Rules of calculating contact's indicators are set by a system administrator and described in detail in the Customization Guide.
[Last Contacted On] – date of the last incoming or outgoing call of this contact. This field displays the date of the latest activity of the “Call” type connected to the contact.
Toolbar
Click the [Show History] button to open the [Contact History] tab in the working area where you can view all activities of the selected contact.
Use the [Add Incident] button to open in a separate window a new card of the incident that is connected with the contact.
Use the [Add Service Request] button to open in a separate window a new card of the service request that is connected with the contact.
Note
More information about working with the incident and service request cards can be found in the BPMonline CRM + Service Desk User Guide.
Click the [Show Tickets] button to open the [Tickets] tab in the working area where you can view all tickets submitted by the selected contact.
The information string indicates the number of open incidents and service requests of the selected contact.
Adding New Communication Options
If the number of the incoming call has not been found in the system, you can connect this number to an existing contact. To do so, switch to the contact search mode. Find the corresponding contact and select it. In the contact information mode the identification area will display the [Add Communication Option] button (Fig. 3.17).
Fig. 3.17 The [Add Communication Option] Button Menu
In the menu of the [Add Communication Option] button, select the required communication option, for example, “Business Phone” or “Home Phone”. After you choose any of the options, the number of the incoming call will be added as a new communication option for the selected contact.
See Also
• The [Contact History] Tab, page 31 • The [Tickets] Tab, page 31
3.2.3. The Contact Registration Mode
To add a new contact to the system, use the contact registration mode of the contact identification area (Fig. 3.18).
Fig. 3.18 The Contact Identification Area. Contact Registration Mode
[Contact Name] – enter the first, last and middle names of the contact. This is a required field. Click the button to open the contact card.
Note
More information about working with the contact card can be found in the BPMonline CRM + Service Desk User Guide.
[Account] – the company where the contact works. Choose the appropriate value from the lookup.
Communication Options
In the left field select the communication option type, and enter the corresponding value in the right field.
Address
The Contact Identification Area
23
Fig. 3.19 Adding the Contact's Address
[Address Type] – select the contact's address type from the list, for example, “Delivery” or “Home”.
[Country], [State/Province], [City] – specify the geographic location of the contact, selecting the values from the corresponding lookups.
The [State/Province] and [City] fields are connected to the [Country] field. For example, if a city is located in a certain country, then when you fill in the [City] field, the [Country] field will be filled in automatically. Similarly, if you enter a state or a province, the [Country] field will be filled in automatically.
When you fill in the [Country] field, the [State/Province] and [City] fields will show only those regions and cities that correspond to the selected country.
[ZIP/Postal Code], [Address] – enter the zip/postal code, street and building number of the contact and any suite or apartment if applicable.
To the right of the [Address] field there are and buttons used for searching for the contact's location on the map and getting directions to this contact.
Toolbar
[Save Contact] – adds the entered data to the system. After you click this button, the contact identification area will switch to the contact information mode.
[Find Contact] – switches to the contact search mode. Any entered information will be lost. Use the [Add Incident] button to open a new incident card in a separate window. Use the [Add Service Request] button to open a new service request card in a separate window.
Note
More information about working with the incident and service request cards can be found in the BPMonline CRM + Service Desk User Guide.
See Also
• The Contact Search Mode, page 18 • The Contact Information Mode, page 19
3.3. The Working Area of Agent Desktop
The working area of Agent Desktop is designed to work with system records, such as tasks, tickets, knowledge base articles, etc. The working area consists of the main tab ([Dashboards] tab) and a series of additional tabs. The main tab is always available; other tabs can be opened when needed.
The "*" sign is used to mark the tabs with unsaved changes.
The main tab of the working area (Fig. 3.20) displays the list of activities (tasks, emails and calls) and opened tickets of the operator. The list of tickets contains incidents and service requests.
Fig. 3.20 The [Dashboards] Tab of the Working Area
This tab consists of two areas:
The List of Activities (1)
The list of activities on the [Dashboards] tab displays the list of tasks, emails and calls of the current operator.
The [Next Call] Button
The [Next Call] button of the [Dashboards] tab becomes active if the current operator is engaged in at least one of the outbound campaigns that are currently in progress and have at least one contact in their call queue.
The Working Area of Agent Desktop
25
Click this button to automatically select next contact to call. Contacts are chosen from the target audience of current outbound campaigns. The name of the outbound campaign as well as information about the selected contact will be displayed in the identification area. Besides, if a conversation script is specified for the outbound campaign, the corresponding
knowledge base article will be opened in a new tab. To call the selected contact, click the corresponding button on the CTI Panel.
Filters of the List of Activities
The list of filters, which is located above the list of activities, can be used to limit the scope of displayed activities. The following filters are available:
• [Email] – display only the activities of the “Email” type in the list.
• [Today] – display only uncompleted activities whose start date corresponds to the current date.
• [Overdue] – display only those activities that have not been completed and whose start date is less than the current date.
• [Today+Overdue] – display uncompleted activities whose start date is equal to the current date, as well as any uncompleted activities whose start date and time are less than the current date and time.
• [All Outstanding] – display all activities that are in an uncompleted state.
• [All] – display all activities, including the completed ones, that have current operator specified as their owner.
The List of Opened Tickets (2)
The list of opened tickets shows the list of uncompleted service requests and incidents for which the current operator has been specified as the owner.
Later in This Chapter • The [Call] Tab, page 25 • The [Email] Tab, page 27 • The [Task] Tab, page 29 • The [Wrap-Up] Tab, page 30 • The [Tickets] Tab, page 31 • The [Contact History] Tab, page 31 • The [Campaign Search] Tab, page 32 • The [Campaign] Tab, page 33 • The [Product Search] Tab, page 35 • The [Product] Tab, page 35
• The [Configuration Item Search] Tab, page 37 See Also
• The CTI Panel of Agent Desktop, page 10 • The Contact Identification Area, page 17
3.3.1. The [Call] Tab
Fig. 3.21 The [Call] Tab of the Working Area
Buttons
Click the [OK] button to save changes and close the tab.
Click the [Call] button to dial the number specified in the [Phone] field.
– open the call card in a separate window to view and edit detailed information about the call.
– close the tab without saving.
Fields
The [Date] field indicates the start date and time for the call. This is a required field. In the [Priority] field select the priority of the call from the drop-down list. A call can have high, normal or low priority. This is a required field.
The [Subject] field indicates the subject of the call, for example, “Customer Survey”. This is a required field.
In the [Contact] field, select the contact person to whom the call is made. By default, the contact currently selected in the identification area is specified in this field. Use the button to quickly select the contact displayed in the identification area (if the field is not filled in or if a different contact is selected). You can also use this button to display in the identification area the information about the contact that is specified in this field (if the contact is not displayed in the identification area).
Use the [Account] field to select the company to which the call is made. By default, the account currently selected in the identification area is specified.
Use the [Status] field to assign a status for the activity, for example, “Not Started”, “In Progress” or “Completed”. This is a required field. If you select the “Completed” status, the [Result] and [Result Details] fields will be displayed on the tab.
In the [Phone] field, enter the phone number to dial.
Use the [Incident] field to connect the call with an invoice. Select the value from the lookup.
The Working Area of Agent Desktop
27
In the [Service Request] field, specify the number of the service request that is connected with the call.
If necessary, use the [Configuration Item] field to select a configuration item connected with the call.
In the [Result] field select the outcome of the completed call from the list. If necessary, enter additional information on the call completion in the [Result Details] field. The [Result] and [Result Details] fields are displayed when the “Completed” status is assigned for the call.
3.3.2. The [Email] Tab
The [Email] tab (Fig. 3.22) is designed for adding and editing activities of the “Email” type using Agent Desktop. This tab contains basic information about an email message. Fig. 3.22 The [Email] Tab of the Working Area
Buttons
Click the [OK] button to save changes and close the tab.
– open the email card in a separate window to view and edit detailed information about the email message.
Click the [Send] button to send the email message. After the message has been sent, some fields on the tab (such as [To], [Cc], etc.) will become non-editable. The button is available on the tabs of outgoing emails only.
Click the [Reply] button to create an email for the sender of an incoming message. A new [Email] tab will be opened, containing the text of the incoming message. The address of the current message sender will be entered in the [To] field.
[Reply All] – click to create an email that will be sent to all addresses specified in the [From], [To], and [Cc] fields. A new [Email] tab will be opened, containing the text of the original message. The address of the current sender will be entered in the [To] and [Cc] fields.
The [Reply] and [Reply All] buttons are available on the tabs for the incoming email messages only.
Fields
The [Date] field indicates the date and time when the email activity should start. This is a required field.
In the [Priority] field select the priority of the activity from the drop-down list. An email can have high, normal or low priority.
Use the [Status] field to assign a status for the activity, for example, “Not Started”, “In Progress” or “Completed”. After the email is sent, the field will indicate “Completed” and will become non-editable.
The [From] field contains the return address of the email message. Depending on the system settings, this field will contain either email address of the current operator, or one common email address for all operators. After the email is sent, the field becomes non-editable.
The [To] field is used for specifying the email address of the recipient. By default, this field contains email address of the contact that is selected in the identification area. You can add recipients by selecting contacts from the lookup. This is a required field. After the email is sent, the field becomes non-editable.
Use the [Cc] field to specify email addresses to which copies of the email will be sent. You can add recipients by selecting contacts from the lookup. After the email is sent, the field becomes non-editable.
The [Subject] field indicates the subject of the email message. This is a required field. After the email is sent, the field becomes non-editable.
Enter the text of the email message in the message body area. You can format this text using the toolbar, which is located above the message body. After the email is sent, the field becomes non-editable.
In the [Contact] field, select the contact person to whom the email will be sent. By default, the contact currently selected in the identification area is specified in this field.
Use the [Account] field to select the company to which the email will be sent. By default, the account that is currently selected in the identification area is specified.
Use the [Incident] field to select the number of the incident that is connected with the email. Select the value from the lookup.
Use the [Service Request] field to select the number of the service request that is connected with the email.
The Working Area of Agent Desktop
29
Use the [Configuration Item] field to specify the configuration item that is connected with the email.
The [Files] Detail
Use the [Files] detail to add and view email attachments. You can add an attachment, delete it or download an existing attachment.
3.3.3. The [Task] Tab
The [Task] tab (Fig. 3.23) is designed for adding and editing activities of the “Task” type using Agent Desktop. This tab contains basic information about a task.
Fig. 3.23 The [Task] Tab of the Working Area
Buttons
Click the [OK] button to save changes and close the tab.
– open the task card in a separate window to view and edit detailed information about the task.
– close the tab without saving.
Fields
The [Date] field indicates the start date and time for the task. This is a required field. In the [Priority] field select the priority of the task from the drop-down list. A task can have high, normal or low priority.
The [Subject] field indicates what the task actually is, for example, “Prepare a report”. This is a required field.
Use the [Contact] field to connect the task with a contact person. Select the value from the lookup. By default, the contact currently selected in the identification area is specified in this field. Use the button to quickly select the contact displayed in the identification area (if the field is not filled in or if a different contact is selected). You can also use this
button to display the information about the contact that is specified in this field (if the contact is not displayed in the identification area) in the identification area.
Use the [Account] field to connect the task with a company. Select the value from the lookup. By default, the account currently selected in the identification area is specified in this field.
Use the [Incident] field to specify the incident number connected with the task. Select the value from the lookup.
In the [Service Request] field, specify the number of the service request that is connected with the task.
Use the [Configuration Item] field to specify the configuration item that is connected with the task.
Use the [Status] field to assign a status for the activity, for example, “Not Started”, “In Progress” or “Completed”. If you select the “Completed” status, the [Result] and [Result Details] fields will be displayed on the tab.
In the [Result] field select the outcome of the completed task from the list. If necessary, enter additional information on the task completion in the [Result Details] field. The [Result] and [Result Details] fields are displayed when the “Completed” status is assigned for the task.
3.3.4. The [Wrap-Up] Tab
The [Wrap-Up] tab (Fig. 3.24) opens automatically after the call is completed and is used for entering results of calls into the system.
Fig. 3.24 The [Wrap-Up] Tab of the Working Area
Buttons
Click the [Finish] button to save changes and close the tab. – close the tab without saving.
Fields
The [Result] can be used to select a result of the call from the list, for example, “Call Back Later”. If the call is made as a part of an outbound campaign, then upon selecting the “Call Back Later” value, you will be able to schedule the next call to this contact.
The Working Area of Agent Desktop
31
3.3.5. The [Tickets] Tab
The [Tickets] tab (Fig. 3.25) contains the list of service requests and incidents of the contact or its account that is selected in the identification area.
Fig. 3.25 The [Tickets] Tab of the Working Area
The [Tickets] tab opens when you click the [Show Tickets] button that is located in the contact identification area in the contact information display mode.
Double-click the ticket to open the card for viewing and changing information. The card will open in a new window.
Tab Views
[Open] – a list of tickets that are not in the final state. [All] – a list of all tickets.
[Contact] – a list of all tickets of the contact selected in the identification area.
[Account] – a list of all tickets of the account whose contact is selected in the identification area.
3.3.6. The [Contact History] Tab
The [Contact History] tab (Fig. 3.26) displays the activity log for the contact selected in the
Fig. 3.26 The [Contact History] Tab of the Working Area
Click the [Show History] button in the identification area to open this tab. Double-click the record to open it in a separate tab.
Click the button in the left part of a string in the list to view contents of this record without opening it in a tab (Fig. 3.27).
Fig. 3.27 Record Quick View in The [Contact History] Tab of the Working Area
3.3.7. The [Campaign Search] Tab
The [Campaign Search] tab (Fig. 3.28) contains the list of marketing campaigns that correspond to the conditions specified in the search string.
The Working Area of Agent Desktop
33
Fig. 3.28 The [Campaign Search] Tab of the Working Area
To search for campaigns, select [Campaigns] command in the search string, enter characters that the name of the searched campaign begins with, and click the search button.
Double-click a campaign record to open in on a new tab.
List Views
The [Current] view shows the marketing campaigns if their status is “In Progress” and the current date falls between their start and finish dates.
The [All] view shows all campaigns that correspond to the search conditions.
Right-Click Menu
The [Add Contact to Target Audience] option becomes active if a contact is selected in the identification area. Use this command to add the selected contact to the target audience of the campaign, for example, to add the contact to the mass mail connected to the currently selected marketing campaign. If the contact is already added to the target audience, the option will change to [Remove Contact from Target Audience].
See Also
• The [Campaign] Tab, page 33
3.3.8. The [Campaign] Tab
The [Campaign] tab (Fig. 3.29) is designed to display information about the found campaign.
Fig. 3.29 The [Campaign] Tab of the Working Area
Double-click a record on the [Campaign Search] tab to open that record on a separate tab.
Buttons
– open the campaign card in a separate window to view and edit detailed information about the campaign.
– close the tab.
Click the [Send via Email] button to open a new [Email] tab. The title of the campaign will be copied to the [Subject] field and the campaign description in the [Notes] field will be entered as message body.
The [Add Contact to Target Audience] button becomes active if a contact is selected in the
identification area. Use this button to add the selected contact to the target audience of the campaign, for example, to add the contact to the mass mail connected to the currently selected marketing campaign. If the contact is already added to the target audience, the button will change to [Remove Contact from Target Audience].
Fields
The Working Area of Agent Desktop
35
The [Type] field indicates the type of the marketing campaign, such as “Sales Promotion” or “Corporate Advertising”.
The [Status] field shows the current status of the campaign. The [Start] field displays the date when the campaign begins. The [End] field indicates the date of campaign completion.
The [Notes] field contains description and other information about the campaign.
Note
All fields on this tab are non-editable.
The [Products] Detail
The [Products] detail contains the list of products related to the marketing campaign. Double-click a product record to open it on a separate [Product] tab.
See Also
• The [Campaign Search] Tab, page 32 • The [Product] Tab, page 35
3.3.9. The [Product Search] Tab
The [Product Search] tab (Fig. 3.30) displays the list of products that match the search parameters.
Fig. 3.30 The [Product Search] Tab of the Working Area
The list contains the products whose name or code start with the characters entered in the search string.
Double-click a product record to view information about that product on a new [Product] tab.
See Also
• The [Product] Tab, page 35
3.3.10. The [Product] Tab
Fig. 3.31 The [Product] Tab of the Working Area
Double-click a product record on the [Product Search] tab to open the [Product] tab.
Buttons
– open the product card in a separate window to view and edit detailed information about the product.
– close the tab.
Click the [Send via Email] button to open a new [Email] tab. The name of the product will be copied to the [Subject] field and product description in the [Notes] field will be entered as message body.
Fields
The [Product Name] field displays the name of the product. The [Price] field indicates the product price in your base currency.
The [Notes] field contains detailed information about the product. The product description can include external links and images.
Note
All fields on this tab are non-editable.
The [Special Offers] Detail
The [Special Offers] detail contains the list of marketing campaigns that involve this product, have “In Progress” status, and for which the current date falls between their start and end dates. You can open any of the records in this list. Double-click a campaign record to open the [Campaign] tab.
The Working Area of Agent Desktop
37
See Also
• The [Product Search] Tab, page 35 • The [Campaign] Tab, page 33
3.3.11. The [Configuration Item Search] Tab
The [Configuration Item Search] tab (Fig. 3.32) contains the list of configuration items that correspond to the conditions specified in the search string.
Fig. 3.32 The [Configuration Item Search] Tab of the Working Area
The list contains the configuration items whose name or code start with the characters entered in the search string.
Buttons
– switch to treelike mode. Click this button to view the hierarchical interconnections of configuration items, including their components. Click the button again to switch to the regular mode.
– show location of configuration item on the map.
– get directions from your company to the selected configuration item address on the map.
To open a record card for viewing or changing data, double-click the configuration item record on the tab. The card will open in a separate window.
Note
More information about working with the configuration item card can be found in the BPMonline CRM + Service Desk User Guide.
3.4. The Chart Area
The chart area is designed to display statistics about calls and tickets.
The [Average Conversation Time] vertical bar chart displays the average call duration of the current user for the last week (Fig. 3.33).
Fig. 3.33 The [Average Conversation Time] Chart
The [Number of Tickets] vertical bar chart shows the number of registered tickets for which the current user is specified as owner. The chart displays data for the last week. The data is grouped by the registration date (Fig. 3.34).
Fig. 3.34 The [Number of Tickets] Chart
![Fig. 3.12 Additional Menu of the [Recent] Group](https://thumb-us.123doks.com/thumbv2/123dok_us/8458077.2252928/16.630.65.568.52.690/fig-additional-menu-of-the-recent-group.webp)