INSTALLATION GUIDE
LAUNCHPAD NETWORK CONNECT
(V2.1)
Welcome to LaunchPad
This guide will assist you integrating your network with LaunchPad. Integrating your network will allow you to utilize your existing user credentials and even access your home folders/network shares right from the Cloud Drive!
What to expect
In this guide, you’ll learn how to: Understand the prerequisites for Launchpad Network Connect
Setup IIS
Setup the LaunchPad network connector
Troubleshooting common issues
FAQ
If you have any questions feel free to email our helpdesk at [email protected] or call us directly at 888.963.7550 x 101.
Contents
Installation Guidelines ... 4
Prerequisites ... 4
Setting up IIS ... 5
Installing LaunchPad Network Connect ... 7
Troubleshooting Common Issues... 21
If IIS 7.0 does not support WCF ... 21
Installation Guidelines
Prerequisites
1. Pre-requisites: Pre-requisites of LaunchPad Network Connect
Hardware required Hard Drive 160 GB or above
RAM 2 GB or above
Processor (4+) 2.0 GHz or above
Software required Operating System WINDOWS XP/7/2003/2008 with latest service pack
2. ClassLink Local LaunchPad Network Connect application environment
Components required are integrated with ClassLink LaunchPad Network Connect setup is listed below: -
Microsoft .NET framework 3.5 SP1
Window Installer 3.1
MySql 5.1 Server
MySql Data Connector
Amazon SDK
Internet Access
Public IP Address with port 80 or 443 (https*)
Setting up IIS
# OS IIS
Support
Website Supported Link to create Custom website
1 WinXp IIS 5.1 or 6.0
Default -
2 Win2003 IIS 6.0 Default or Custom http://www.windowsnetworking.com/articles_tutorials/Web-Sites-Windows-2003.html http://support.microsoft.com/kb/324742 3 Win7, Win2008 IIS 7.0 Default or Custom http://technet.microsoft.com/en-us/library/cc772350(v=ws.10).aspx
Note: Website/Virtual Directory should allow Anonymous Authentication
Host Header Entry Required
In IIS you can host multiple Web sites on a single server with the same port number and a single IP address using Host Header. By adding a unique host header to each Web site, you can map more than one Web site to a single IP address.
To add a host header entry for a Web Site in IIS 6.0.
1. Right click Web Site (Default Web Site in our case) and click on Properties
2. Click Advanced… button in the Web Site tab 3. Click on Default and click Edit
4. Type the host header in the text box (dotnetscraps.com in our case)
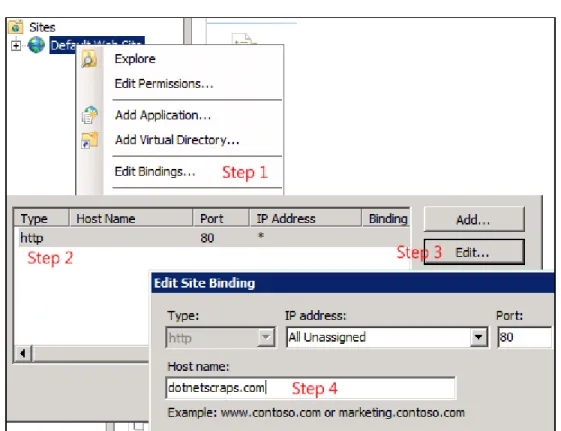
To add a host header entry for a Web Site in IIS 7
1. Right click the Web Site (Default Web Site in our case) 2. Click Edit Bindings
4. Type the host header in the text box (dotnetscraps.com in our case)
Installing LaunchPad Network Connect
1. Double click on setup.exe. This displays the Windows Installer window. Refer to Figure1: Windows Installer screen.
Figure 1: Windows Installer
This displays the ClassLink Tenant Server window with setup wizard. Refer to Figure 2: ClassLink Tenant Server screen.
Figure 2: ClassLink Tenant Server
2. To continue with the installation process, click on Next button. This displays the ClassLink Tenant Web Installation Address screen. Refer to Figure 3: ClassLink Tenant Web Installation Address
Site: Select the default site from the Site drop down Option. The default value is Default Web Site.
Virtual directory: Enter the Virtual directory name. The default Virtual directory is CLTenantWS as shown in red circle. Refer to Figure 7: ClassLink Tenant Web Installation Address screen.
Application Pool: Select the Application Pool using the corresponding dropdown. The default Application Pool is DefaultAppPool.
Click on Next button to continue with the installation. To cancel the process click on Cancel button to abort the installation process or Back button to move to previous screen.
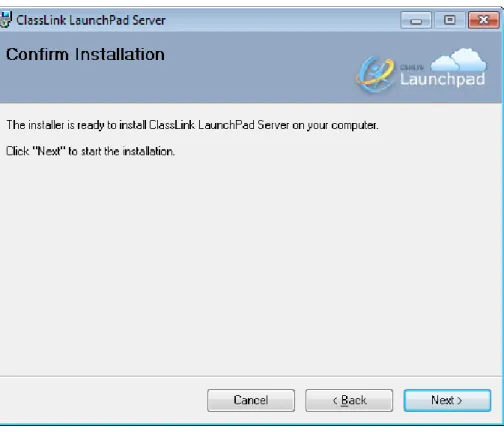
Next Screen displays the Confirm Installation screen. Refer to Figure 4: ClassLink Tenant Server – Confirm Installation screen.
Figure 4: ClassLink Tenant Server –Confirm Installation screen.
3. Click on Next button to confirm installation. This starts the installation process. It takes few minutes to complete the installation.
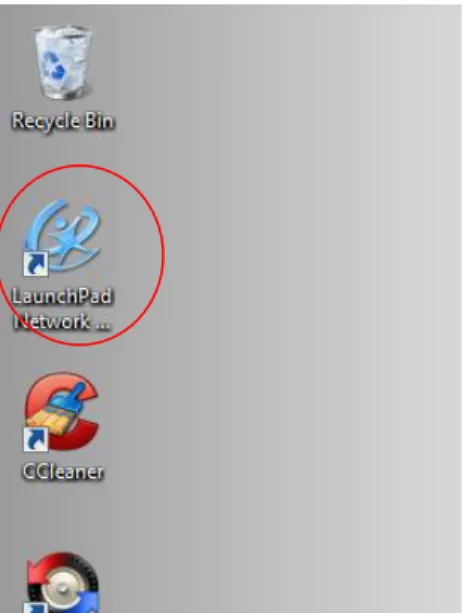
4. Installer has been successfully installed, Click on Close button to close the screen.
5. After completing installation, click on “LaunchPad Network Connector” icon from desktop for open Tenant Admin Authentication screen.
6. This displays the Tenant Admin Authentication screen. Refer to Figure 6: ClassLink Tenant Server – Tenant Admin Authentication screen.
Enter the following details:
Label /Field Description Remarks
Tenant User Id Please input user id User should be tenant admin
Password Enter password
7. Click on login button to confirm Tenant Admin Authentication. On successful validation of Tenant Admin Authentication, building configuration screen displays. Refer to Figure 7: ClassLink Tenant Server – General Settings screen.
Figure 7(b): ClassLink Tenant Server – Building Configuration screen
Label /Field Description Remarks Building Select building which is
registered to the tenant.
School Code Enter school code.(If school code is already register then it will in read only mode, refer Figure 7(b))
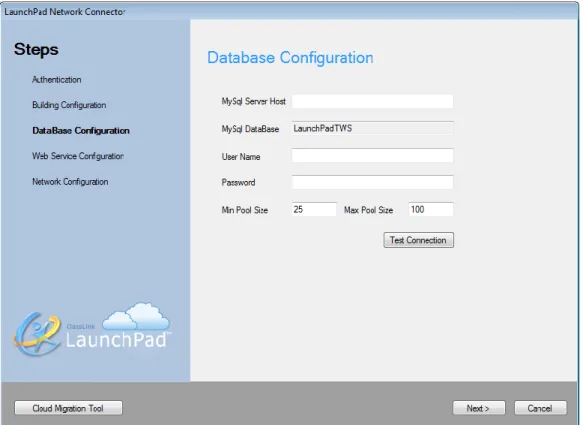
8. Click on Next button, database configuration screen displays. Refer to Figure 8: ClassLink Tenant Server – database Configuration Settings screen.
Figure 8 : ClassLink Tenant Server – Database Configuration screen
Label /Field Description Remarks MySql Server Host Name of the Server
Where Tenant Database will be configured
User Name Authorized Login User Name
Password Authorized Login Password
Min Pool Size Min Pool Size The minimum number of connections maintained in the pool.
allowed in the pool.
9. Click on Next button, Web Service configuration screen displays. Refer to Figure 9: ClassLink Tenant Server – Web Service Configuration Settings screen
Figure 9: ClassLink Tenant Server – Web Service Configuration screen
Label /Field Description Remarks SSL Enabled Checked if tenant Web
service is SSl Enabled.
Web Service Url Url of Tenant web service.
10. Click on Next button, Network configuration screen displays. Refer to Figure 10(a): ClassLink Tenant Server – Web Service Configuration Settings screen
Case 1: Select Type eDirectory
Figure 10(a): ClassLink Tenant Server – eDirectory Configuration screen
Label /Field Description Remarks LDAP Server Please input Ldap
server
e.g. 122.22.34.198
User OU Path Root OU path e.g. ou=test,o=mytest
SSL Checked if required
Port (Optional) Enter port number if required
SSL Certificate (Required if SSL enabled)
Browse the certificate file
But if SSL is checked it is mandatory
User Filter Select the supporting attribute from the dropdown for filtering user
Supporting attribute is “cn”
User LDAP user id who
have at least all read access
e.g. cn=testuser,ou=teachers,ou=test,o=mytest
Password Provide password
Case 2: Select Type LDap
Figure 10(b): ClassLink Tenant Server – LDap Configuration screen
Label /Field Description Remarks LDAP Server Please input Ldap
server
e.g. 172.29.57.250 or Contoso.com
User OU Path Root OU path e.g. DC=Contoso,DC=com
SSL Checked if required
Port (Optional) Enter port number if required
By default for SSL port is 636 else 339
SSL Certificate (Required if SSL enabled)
Browse the certificate file
But if SSL is checked it is mandatory
User Filter Select the supporting attribute from the dropdown for filtering user
Supporting attribute is “samaccount”
Define Parent/ Child servers
(Required if Building have child domains)
Fill the grid with all the servers with its DC filter
Class OU Path (Optional)
Define the OU path where all the class group exists
e.g. OU=Teachers,DC=Contoso,DC=com
User LDAP user id who have at least all read access
In case of MS Windows XP - Domain\User required
Troubleshooting Common Issues
If IIS 7.0 does not support WCF
http://rongchaua.net/blog/wcf-publish-wcf-services-in-iis-7-step-by-step-for-dummies/ Open Control Panel
Figure 1
Click on “Turn Windows Features on or off” on Left Panel of Program and Features
Select the option “Windows Communication Foundation HTTP Activation” and “Windows Communication Foundation Non-HTTP Activation” under the “Microsoft .NET Framework 3.5.1” option
FAQ
Q1. Which version of MySql needs to be installed? A. MySql Server 5.1
Q2. From where I can get MySql installer? www.mysql.com
Q3. What are the installation steps for MySql?
Referenced from: downloads.mysql.com/docs/mysql-installation-excerpt-5.1-en.pdf
Q4. How to check if the Launchpad database was created?
A. After successfully installation of Launchpad server, there will be a database created named ‘launchpadtws ‘in the Database.
Q5. Which tables are created on MySql database?
A. There will be two tables named ‘copymovedetails’ and ‘tokenmaster’ created in Tenant Database. Q6. What should be the “User Filter” when Configuring Network Configuration in the site from LNC (as defined in steps C5 to C10)?
A. If Network Type is Ldap then User Filter should be ‘samaccontname’ and if Network Type is eDrectory then User Filter should be ‘cn’, as shown in following figures-