'410239
RevB
All rights reoerved. No part of this publication may be reproduced, recorded or stored in a retrieval system, or transmitted, in any form or by any means, whether electronic, mechanical, photographic, or otherwise, without prior wri tten permission of Dynabyte.
Copyright
©
1982 by Dynabyte.1\+1 specifications are subject to change without notice. Dynabyte does not assume any liability arising out of the application or use of any product deecribed herein; neither does it convey any license under its patent rights nortl1e rights of .,others.
[Q3 3
USER' S GUIDE
TABLE OF CXIftERl'S
1. INTRODOCTrON • • • • • • • • • •
. . .
.
. .
.
.
.
.
1.1 DOS 3 Features • • • • • • 1.2 Scope of thi s Manual • • • 1.3 Documentation Conventions
.
. .
.
. . .
.
.
.
. . .
.
.
.
.
.
.
.
. . .
2 • GErrII.'G S'.rAR'JH): (X)P!IR; AND INS'J2\LL1}I; OOS 4 • 2.1 Models 5200, 5305 • • • • • • 2.2 Models 5505, 5605 • • •
2.3 Model 5615 • • • • • • • • • .. 2.4 Models 5013, 5700, 5710
3 • SYSTEJt DEFINITION All) GENERATION • • • • • • • • • • • •
3 .1
DYNASYS...
3.1.1 3.1.2 3.1.3 3.1.4 3.1.5 3.1.6 3.1.7 3.1.8 3.1.9
AL Option: Assign / Setup All Parameters •
se Option: Set Clear Screen Sequence • CA Option: Character I/O Assignments •
CS Option: Character I/O Setup • • • • • • • DA Option: Disk Drive Assignments • • • • 3.1.5.1 Cartridge Module Drives ••
3.1.5.2 Floppy Drives • • • • • • • • 3.1.5.3 Fujitsu Winchester Drives •• 3.1.5.4 Micropolis Winchester Drives
3.1.5.5 Mini Winchester Drives • • • • 3.1.5.6 Example • • • • • • • • • • •
DS Option: Disk Dr i ve Setup • • • • CM Option: Chain Module Setup • • • • DL Option: Disk Log / Message Setup • • • • 3.1.8.1 Cold Boot Log Drive • • • • • • • • • • 3.1.8.2 Waom Reboot Drive • • • • • •
IS Option: Load /Save Parameter File • 3.1.9.1 The Load (LP) Option • • • •
3.1.9.2 The Save (SP) Option •• 0 • • • • • •
3.1.9.3 The Clear (CP) Option • • •
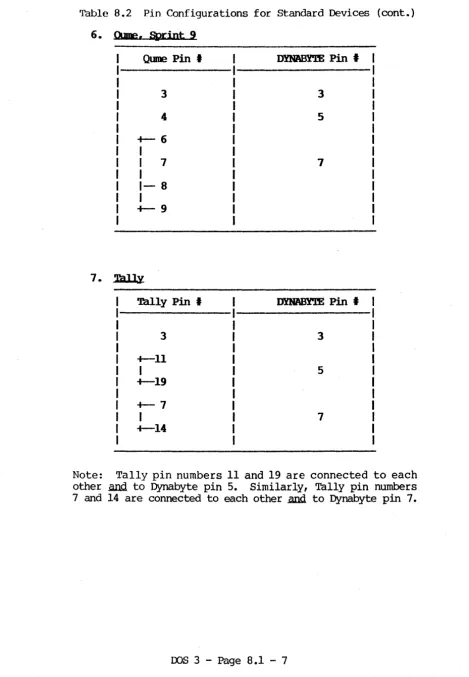
[image:3.618.46.551.74.702.2]3.2
3.3
3.4
3.1.10 DC Option: Display Current Configuration •• 3.1.11 CD Option: Create System Disk • • • •
3.1.11.1 The Write (WR) Option • • •
3.1.11.2 The Transfer ('IR) Option • • • 3.1.12 EX Option: Exit to Operating System
D'YN'J\C;m • • • • • • • • • • •
3.2.1 The TR Option • • • • • • 3.2.2 The CT Option • • • • • •
D'YN'ASTAT. • • • • • • • • • • • •
3.3.1 3.3.2 3.3.3 3.3.4 3.3.5 MOVC~l. .3.4.1 3.4.2
Character I/O Assignments Modem Characteristics • • •
Disk Drive Assignments •• • • • • Modules Included • • • • • • • • •
Baud Rates and Installation Messages
.
.
. .
.
.
.
. . .
.
. . . .
Determining Maximum System Size • Installing New System Size
3.4.2.1 DYNAGm • • • • • •
3.4.2.2 DYNASYS...
4 • THE lDJl' 1Dt • • • •
4 .1 256-Byte ROM • •
4.2 512-Byte ROM • • • •
4.3 2K Byte ROM • • • • • • • • •
4.3.1 Installing the 2K Ra.i • • • •
4.3.2 Disabling the Main Board ROM • 4.3.3 Booting Procedures ••
4.3.3.1 Procedure 1. • • • • • •
4.3.3.2 Procedure 2. • • • • • • • • • • • • 4.3.3.3 Procedure 3. • • • • • • •
4.3.4 Determining the Floppy Disk Configuration. 4.3.5 Setting the CPU SWitches • • • • • 4.4 Detailed Description of the ROMs •
5 • FOR4l\.TTIH; Am <DlFlGUR:n«; DISKS • • • • •
5 .1 FloPf'Y' Disks • • • .• • • • • • • • • • • • • • • • • • 5.1.1 Description • • • • • • • • • • • •
5.1.1.1 8-inch Floppy Disk Systems •• 5.1.1.2 5.25-inch Floppy Disk Systems
5 .1. 2 FFORMAT...
5.1.2.1 The Format Option • • • • • • • 5.1.2.1.1 Side Format • • • • 5.1.2.1.2 Density • • • • • • • 5.1.2.1.3 Directory Entries 5.1.2.2 The Check Option • • • • • • •
5.2
5.3
5.4
5.5
Cartridge Module Hard Disks 5.2.1 Description . . . 5.2.2 HFO~mT . . • • • ~
Micropo1is Winchester Hard Disks 5.3.1 Description • • • • • 5.3.2 WFOm~T . . . .
Fuj i tsu Winchester Hard Disks . • • . 5.4.1 Description • • • •
5.4.2 FUJFMT • • • • • •
Mini Winchester Hard Disks .. • • • 5.5.1 Description • • • • • • • 5.5.2 WINFMl'5 • • • • • • •
5.5.2.1 The Check Only Option •• 5.5.2.2 The Format and Check Option
6. ~ ~ SYSTBMS • • • • • • • • • • • • • • • e • •
6.1 Description • • • • • • • • • • • • .. • ..
6.1.1 Cartridge Tape Media . . . .. 6.1.2 Testing the Cartridge Tape System
6.2 D T I P . . . e • • • • • • • •
6.2.1 File Naming Conventions .. 6.2.2 DTIP Options • • • • • • • 6.2.3 Examples • • • • • • • • • 6.2.4 Creating DTIP Submit Files .. 6.2.5 Error Messages • • • • • •
6.3 Preventive Maintenance • • • • • • • • • • • 6.4 Installation • • • • • • • • e • •
6.4.1 DTIP Record Format • • • •
6.4.2 Cartridge Drive Data Format • • • • • 6.4.3 DS-100, DZ80B I/O Connections
7. OOPYING ~ • e • • • e • • • • 7.1 7.2 BACKUP 7.1.1 7.1.2 7.1.3 7.1.4 7.1.5 HCOPY
.
. .
.
...
. . . .
BACKUP versus PIPo
Invoking BACKUP • • • • • • • •
Copying from Hard Disk to a Floppy Disk Set 7.1.3.1 Choosing Track or File Mode . . . 7.1.3.2 File by File Co~l • G O • • • 0 • •
7.1.3.3 Restoring File by File, Floppy Disk Set to Hard Disk • • • • • • • • • • • • 7.1.3.4 Track by Track Copy • • • • • • • • • 7.1.3.5 Restoring Track by Track, Floppy Disk Set
to Hard Disk •• • • • • • • •
Copying Between Like Devices • • • • • • • • • • • 7.1.4.1 Floppy Disk to Floppy Disk Copy •
7.1.482 Hard Disk to Hard Disk Copy. Error Messages ~ • • • • • • • •
• • G • ., II • • • • • • • • • • • • • •
PAGE 5.2-10 5.2-10 5.2-11 5.3-12 5.3-12 5.3-13 5.4-15 5.4-15 5.4-17 5~5-21 5.5-21 5.5-22 5.5-22 5.5-22 6.1-1 6.1-1\ 6.1-1 'J
8.
9.
PRIRl'ERS, <l'mS)LES, AND KlDEJfS • • • • •
8.1 Console and Printer Connections 8.2 Multiple Printers • • • •
8.3 8.4
8.2.1 Installation. 8.2.2 PRINTON
emSOLE
Auto-Answer Moderns • •
8.4.1 Installation.
8.4.2
8.4.1.1 D.C. Hayes 8 .. 4.1.2 PMr-iI.
Modem Usage • • • •
J\IJVAlUD FEATORES '
...
9.1
9.2 User-Installed I/O Drivers • Cold and Warm Boots • • • • 9.2.1 Cold Boot
9.2.2 Warm Boot
9.2.3 Disk Log • • • • • • • •
90204 Chain Modules • • • • 9.2.5 Cold Boot Message Display 9.2.6 System Load Map • • • • •
APPJH)I~
A. Memory Board Switch Settings •
B. System Load Map • • • •
c.
USERIO.MAC Listing • • • • • • • D. Files on Distribution Media E. User's Comments Form.INTRODUCTION DOS 3 F&,atures
DOS 3 is Dynabyte's single-user operating systeme DOS 3 enhances Digital Research's CP/M 2.2 disk operating system and fully implements all of the features of CP/M. In addition, DOS 3 supports the entire Dynabyte product line.
1.1 1m 3 Features
Dynabyte's DOS 3 enhances CP/M with several unique features and interfaces it completely to all Dynabyte hardware. Clear installation procedures allow you to expand the system using ei ther standard DOS 3 software or user--defined software.
You may install your own sign-on message to appear anytime you boot your system. The DYNASYS program also allows you to easily customize your system. Other features include user-friendly utility programs that eliminate the need to learn the CP/M PIP program.
OOS 3, however, has not altered cp/ro1 in any way. You may use everyone of its facilities and features as outlined in the CP/M manuals~ DOS 3, rather, has enhanced several areas of the Basic Input/Output System (BIOS) and has added features to provide capabilities beyond those of
Cp/r·l.
The following paragraphs describe these notable features of Dynabyte DOS 3.Connect Up To Four I/O Devices
Since DOS 3 is a Single-user operating system, it follows tr~t only one person may use it at a time. However, up to four consoles, printers, readers, and punches may be connected and installed in the operating system. DOS 3 utilities switch control between any of the four devices. This feature allows consoles to be placed at up to four user positions. You can then easily transfer control of the Dynabyte computer between any of the consoles.
Also, more than one printer may be connected directly on-line to the system, each with different capabilities (loaded with a different type of paper, character printer or dot matrix, and so forth). You can then decide which printer is appropriate for a. given applications program.
Autanatic P.r.og'I'anl Load
You can specify a particular command to be executed each time you turn on or restart the computer. Using this feature can put you directly into an applications program, such as WordStar or Business Manager.
Sign-On Message
You can write your own sign-on message that would appear whenever your compu-ter is first turned on or reset. Your sign-on or "Cold Boot Message" would replace the DYNABYTE OOS 3 message. In this manner, you may have your company logo displayed anytime your system is booted., This feature could also be used
INTRODUCTION Scope of this Manual
to pass along information, making your Dynabyte computer even more user-friendly.
Modular Design
DOS 3 consists of a series of utility program modules. Each module contains one code required to support one item in the Dynabyte product line. For example, the FPYCPM.COM program module is dedicated to Dynabyte floppy disk drives. Other program modules support CPU input/output (I/O) ports, the
Dynaby~e octaport circuit board (which provides eight physical I/O ports), and direct-connect, auto-answer moderns for computer communications over a tele-phone line. The DYNASYS program uses these utility programs to configure your system disk such that it contains only those modules needed for your particu-lar system. Furthermore, if you expand your Dynabyte computer, you need only run DYNASYS to configure a new system disk to add the necessary modules. B¥
not loading unnecessary files, this modular concept saves valuable disk and computer memory space.
User-Selected Cold and
warm
Boot DrivesThe DYNASYS program allows you to determine the default logged disk drive. When you turn on the computer or press the reset button, the computer goes to the default logged drive for the operating system program. In standard CP/M,
this drive is always drive A. However, by using DYNASYS, you can cause the computer to automatically select any disk drive for start-up (Cold Boot). In addition, you can cause the computer to automatically select drive A through dr i ve P when you type Control-C at your console (Warm Boot). DOS 3 allows this relo?-d operation to be configured for any logical drive. One distinct advantage of this feature is that your
oos
3 operating system may be placed on your hard disk, thus allowing the computer to rapidly restart when you type Control-C at your console.Auto-Answer Modem
DOS 3 includes a special module dedicated to the direct~connect, auto-answer modern boards manufactured by Potonac Micro-Magic, Inc. (PMMI) and D.C. Hayes, Inc. These circuit boards, the PMMI MM-103 and the D.C. Hayes Micromodem 100, both install directly into your Dynabyte computer. These Bell l03A-compatible modems operate at a variety of baud rates, stop bits, and word lengths. You may define up to an eight-character password; DOS 3 will not allow another person to use your system through the modem until he correctly enters the password.
1.2 Scqle of this Manual
INTRODUCl'ION Scope of this Manual
Introduction
1. 2. 3.
4.
5. 6. 7. 8.
9.
Getting Started: Copying and Installing DOS 3 System Definition and Configuration
Appendix A. Appendix B. Appendix C. Appendix D.
Appendix E.
The Boot ROM
Formatting and Configuring Disks Cartridge Tape Systems
Copying Data
Consoles, Printers and Modems Advanced Features
Memory Board Switch Settings System Load Map
USERIO.MAC Listing
Files on the Distribution Media User's Comments Form
The following paragraphs describe the general purpose and content of these sections.
Introduction
This section contains general information about DOS 3, including its features and options. The introduction also describes the manual's overall scope and documentation conventions used.
Getting started: Copying and InstallinJ OOS 3
The second section contains procedures that are specially written to get you started with your new Dynabyte operating system DOS 3. This section tells you how to copy the oos 3 distribution media (i.e., floppy disk or cartridqe tape) -- a task you should always do to protect your masters- ~ section further explains how to install DOS 3 for the first time on your system.
System Definition and C.onfiguration
The third section provides procedures to define your system and tailor the system to your requirements.
The Boot lUI
This section describes the relationship of Dynabyte's HOM series to the system start-up.
Formatting and Configuring Disks
This section describes how to format and confiqure the various types of disk drives supported bv nos 3.
IN'IROPUCTION Scope of this Manual
cartridge IJ.ape &y8tems
The Cartridge Tape section contains instructions for using cartridge tape media. It also contains procedures for transferring files from the Winchester drive to a tape cartr iclgc.
Copying ~ta
This section details two programs that copy volumes of'data from disk drives - BACKUP and HCOPY.
Cbnsoles, Printers And Modems
This section tells you how to install printers and terminals with your Dynabyte computer. These instructions include information for choosing a Dynabyte input/output (I/O) port for the printer and terminal. It also describes the built-in modem capability of DOS 3 and how it may be used with modems which install inside the Dynabyte.
Mvanced Features
This last section provides information and instructions for advanced Dynabyte users to program their own user modules.. It lists port addresses and entry points for user access to the BIOS.
Appendix A
The first appendix illustrates the correct setting of the switches on the memory board. These switches define such user-alterable operating parameters as addresses.
Appendix B
When first booted, OOS 3 optionally displays an address directory (system load map) that lists the starting memory addresses of Dynabyte program modules. Appendix B describes the function and use of the information displayed by the load map.
Appendix C
Appendix C lists the Dynabyte macro program module User I/O (USERIO.MAC). This listing is provided for advanced system users who wish to define their own I/O drivers.
Appendix D
INTRQDUCl'ION Docrnnentation Conventions
Appendix E
Dynabyte created the reader comment form at the back of this manual because we want to hear from you. If you have any suggestions for improving this User's Guide, please let us know. When filling out the form, please be as specific as possible.
1.3 Documentatim Conventions
The terms used in this manual are consistent with those used in the micro-computer industry. If you are new to microcomputers, we recommend you read Dynabyte's Getting Started Guide. You may also acquire one of the many good texts on basic computer concepts and terms. These texts are widely available at computer and electronic hobbyist stores.
Most conventions used in this manual are also consistent with those used throughout the industry. This manual does, however, use several conventions unique to pynabyte. The following paragraphs describe these conventions.
Screen Displays
This manual contains many illustrations of console screen displays. These displays are shown in bold type and capital letters.
User Entries
Entries you make at your console keyboard are underlined and are in bold face in these illustrations. For example, a typical screen display with your keyboard entry would appear as
DYNABYTE I n ) 3
Typing the carriage return key is represented as
<CR>.
COPYING AND INSTALLING OOS 3
ME'IHOD DESCRIPI'ION OF COMPUTER SYSTEM
1 '!Wo floppy drives (5.25" or 8") See Section 2.1
2 5 .25" Mini Winchester with one floppy drive (5.25" or 8") See Section 2.2
3 8" Fujitsu Winchester with one 8" floppy drive See Section 2.3
4 Winchester hard disk with cartridge tape drive See Section 2.4
Introduction
DYNABYTE K>DELS
5200 5300 5305 5400
5505 5605 5615
CDPYING AND INSTALLING OOS 3
2.1 tkldels 5281, 5315
Two floppy drives (5.25" or 811 )
Dynabyte Models 5200, 5300, 5305, 5400
METHOD 1 OVERVIEW
• Boot DOS 3 fram Distribution Disk #1.
• For.mat two floppy disks.
• Copy the DOS 3 distribution disks.
Models 5200, 5305
• Reboot DOS 3 from one of the new copies of the distribution disks.
CQpym; AND INSTALLING ooS 3 Models 5200, 5305
Boot DOS 3 fram Distribution Disk #1.
---1. 'l\lrn on the computer.
2. Insert Distribution Disk #1.
3. Press and release the reset button.
DYNABrI'E 1m 3.XX
A>
Insert distribution disk #1 into the left (or top) floppy drive, drive "A", and close ,the d.oo:r, (Insert an
a"
floppy disk with its lapel face up; insert a 5.25" floppy disk so that its label faces the computer power switch.)oos
3 will automatically be read into the computer, and will then sign on with the following message:COPYING AND INSTALLING OOS 3 Models 5200. 5305
Format two floppy disks.
1. Use FFORMAT to format two floppy disks.
A>FFOIf1AT<CR>
VERSI<E X.X FOR Im 3.XX
Enter "FFORMAT" followed by a carr iage return. FFORMAT will sign on with the following prompt:
ENTER 1IUVE IBrJER <F FUlPPY 1IUVE (A-P): B<CR>
Enter "B" followed by a carriage return to specify the right-hand floppy drive. Depending on your computer system's dr i ve type, you will then receive one of the following messages:
1IUVE B IS A SnDaE SIDFD 8 n«E 1IUVE 1IUVE B IS A IXDBLE SIDED 8 IKlI 1IUVE 1IUVE B IS A SDGLE SlIB) 5 1/4 n«E 1IUVE 1IUVE B IS A IXDBLE S:IJ:E) 5 1/4 1lDI 1IUVE CAtR7l' REXXnnZE 1IUVE TfPE
R) ATTAaIID 1IUVE
00 mJ WANT .iO:
F - FORMAT C - <lIFXX Q - QUIT
1 - FOR SnG:.E SIDED 2 - FOR DOOBLE SIDED REmRN - FOR SDI,;LE SIDED
SIDE FORMAT ? 1<CR>
FFORMAT will then ask what function you would like to perform:
Enter "F" followed by a carriage return to indicate FORMAT.
If the drive is double-sided, FFORMAT will then ask whether you want one or both sides formatted:
Enter "1" followed by a carriage
COPYING AND INSTALLING OOS 3
DF.H)ITY F<HV\T SELBCTICW
1 - FOR SJK2LE DmSrIY 2 - FOR IXXm.E DmSITY RETURN - FOR IXllBLE DENSITY
1 - FOR 64 EMRIES 2 - ·Pm 128 EMRIES 3 - FOR 256 EMRIES RETURN - FOR 64 EMRI&S
I OF DIRtCIORY EMRIES ? 2<CB>
Models 5200, 5305
return to indicate single-sided.
All 5.25" floppy drives are automati-cally double-density, but if you have an a" floppy drive, then FFORMAT will prompt for single- or double-density:
Enter a carriage returq to indicate double-density.
FFORMAT will now ask you to enter the number of directory entries to reserve space for on the floppy disk:
Enter "2" followed by a carriage return to reserve space for l2a directory entries.
FFORMAT will then tell you to insert the floppy disk you want to format into the floppy drive:
INSERT DISK. HIT .&.TAPE '10 1BRr
em
ANY 0lUER KEYm
BmIN •••Insert a floppy disk into the right-hand floppy drive, drive "B", and close the door.
CAUTION: FFORMAT will erase any data that exists on the floppy disk.
Also, be sure the floppy disk is not write-protected. You can write on an a" floppy disk if the write-protect notch is covered up; you can write on a 5.25" floppy disk if the notch is uncovered.
CPPXIOO AND INSTALLIOO OOS 3 Models 5200. 5305
....
FCIIIA'J.'T]K; IS lUf BEIK; IX&: PLEASE WAIT ••••If, during the formatting process, FFORMAT finds a bad sector on the floppy disk and is unable to format it, the error will be reported as follows:
BARD mRB AT 'l!WX=XX Sl'X:'JIB=XX
***
111 BAD DISKE'l-ns REPUI!Ewrm
A NDl CEE II!***
*****
F<JIIJAT <XMPLE'.lB) O.K.*****
A damaged floppy disk should be removed and discarded. start the format process on another floppy disk.
After the floppy disk has been formatted, FFORMAT will confirm its completion and then ask if you want to format another floppy disk:
REPEAT SNm OPERATI<B
m
A NDl DISK (YIN) ?Y<CR>
....
Remove the newly formatted flqppy disk from floppy dr i ve "B".
Enter "Y" followed by a carriage return. FFORMAT will then tell you to insert a floppy disk into the drive:
Insert another floppy disk into floppy dr i ve "B", and close the door.
Enter a carriage return to start the formatting process. FFORMAT tells you it is working and asks you to wait:
FCIIIA'J.'T]K; IS KIf BEIK; IDm PLEASE WAIT ••••
Again, if FFORMATreports a bad sector, the damaged floppy disk should be discarded and the format process tried on another floppy disk.
After the floppy disk has been formatted, FFORMAT will confirm its completion and then ask if you want to format another floppy disk:
COPYING AND INSTALLING OOS 3 Models 520~, 5305
*****
FtmMAT 0JU?LE'.ltD O.K.*****
REPEAT SME OPERATICB
m
A NEJf DISK (YIN) ? ~F - RHV\T
C - <mXl{
o -
QOI'1'Enter
"N"
followed by a carriage return. FFORMAT will then return to its main menu:Enter "Q" followed by a carriage return to exit FFORMAT and return to the operating system.
Leave the newly formatted floppy disk in floppy drive "B".
mPYOO AND INSTALLING OOS 3 Models 5200, 5305
Copy the DOS 3 Distribution Disks.
1. Insert Distribution Disk #2 into floppy drive "A", and close the door.
2. Invoke BAaruP.
Enter "BAa<UP" followed by a carriage return. BACKUP will then sign on with the following menu and prompt:
***
mNABY'JE IWl«JP UTILI'lY VER. X.X RlJlfi[K; t:HlER CP/M***
F = FILE BY FILE roPY
T = TRHX BY TRHX <DPY X
=
EKI'l' 'lO OPERATIR; SYS'l'FB3. Remove Distribution Disk #2 from floppy drive "An.
4. Insert Distribution Disk #1 into floppy drive "A", and close the door.
5. Copy Distribution Disk #1.
WHICH IWl«JP fD>E ? T<CR>
&XIRCE DRIVE (A - P) ? A<CR>
DF.S.rINATIOO' DRIVE (A - P) ? B<CR>
Enter "T" followed by a carriage return to indicate a track-by-track transfer from floppy-to-floppy. BACKUP will then ask you to identify the source drive:
Enter "A" followed by a carriage return to specify the left floppy drive as the source drive. BACKUP will then prompt for the destination drive:
Enter "Bq followed by a carriage return to specify the right-hand floppy drive as the destination drive. BACKUP will confirm your instructions for the data transfer, and then instruct you to insert the formatted floppy disk:
COPYING AND INSTALLING OOS 3 Models 5200, 5305
SDRCE
=
X·ss m
FUlPPY DIR fN.llU:F.S=
1128 DES'1'INATION=
X·ss m
FUlPPY DIR fN.llU:F.S=
1128INTERNAL RAM MI'KmY BUFFER SIZE
=
4Z137 Br.lY.SI OF SDRCE DISK 'lWQ{S BtJFPEREI) = 86
INSERT FUlPPY DIS{ '"I . IN DRIVE B
Brr RE'lURN '10 <nlmIIE •••• ~
Br.r RE'lURN '10 <nlmIIE •••• ~
Enter a carriage return to start the actual data transfer. The screen will display a single line of iterating numbers as BACKUP reads groups of tracks from the source disk and writes groups of tracks onto the formatted destination disk:
When all of the tracks have been copied, BACKUP will report its completion and prompt you to enter a carriage return:
Enter a carriage return. BACKUP will then return to its main menu:
***
DYNABY'm BAC«JP U'1'ILl'l'Y VER. X.X RlJ!K[K; tH>ER CP/M***
F = FILE BY FILE <DPY
T
=
ilWl{ BY ilWl{ <DPYX
=
EKrr '10 0PERA'l'IR; SYS'JBItlBI<lI BAC«JP IIDE ?
6. Remove Distribution Disk #1 from floppy drive "A".
7 • Remove the new copy of Distribution Disk #1 from floppy drive "B" and label it "Copy -- DOS 3.XX Distribution Disk #1 of 2".
8. Inser.t Distribution Disk #2 into floppy drive "A", and close the door.
COPYING AND INSTALLING OOS 3
10. Copy Distribution Disk #2.
SDRCE DRIVE (A - P) ? ~
DESTINATIW DRIVE (A - P) ? B<CR>
Models 5200. 5305
Enter a "T" followed by a carriage return to once again indicate a track-by-track transfer from floppy-to-floppy. BACKUP will then ask you to identify the source drive:.
Enter
"A"
followed by a carriage return to specify the left floppy drive as the source drive. BACKUPwill then prompt for the destination drive: . .
Enter "B" followed by a carriage return to specify the right-hand floppy drive as the destination drive.
BACKUP will confirm your instructions for the data transfer, and then instruct you to insert the formatted floppy disk:
&XlRCE
=
X· SS ID FLOPPY DIR ~=
1128 DESTINATIm=
X· SS ID FLOPPY DIR ~=
1128l1ll'ERNl\L Rl\M MIKI« BUFFER SIZE
=
4Z137arms
I
OF &XlRCE DISK TRI\a{S BUFFERED= s6
IRlERr FLOPPY DIfI{ ts1 IN DRIVE B
HIT REmRN iO cnm:NUE •••• ~
IWlroP IN :m:x;RESS
RFAI1[R; IJRIC{
IssIss
HIT REmRN iO cnm:NUE •••• ~
Enter a carriage return to start the actual data transfer. The screen will display a single line of iterating numbers as BACKUP reads groups of
tracks from the source disk and writes groups of tracks onto the formatted destination disk:
When all of the tracks have been copied, BACKUP will report its
completion and prompt you to enter a carriage return:
Enter a carriage return. BACKUP will then return to its main menu:
COPYING AND INSTALLING OOS 3 Models 5200, 5305
***
DYNAB1'TE BMI«JP U'1'ILI'lY VER. X.X RlJ.NNI}I; UNDERa>/M
***
F= FILE BY FILE ~T
=
ml\aC BY ml\aC <DPY X=
EXI'l' 'ID C>PERATDI; SYS'lUtWHIm IWXOP fIDE ? X<CR> Enter "X" followed by a carriage return to exit BACKUP and return to the operating system.
11. Remove Distribution Disk #2 from floppy drive "A".
12. Remove the new copy of Distribution disk #2 from floppy drive "B" and label it "Copy - OOS 3.XX Distribution Disk #2 of 2".
COPYING AND INSTALLING OOS 3
2.2 Models 55B5, 56B5
5.25" Mini Winchester with one floppy drive (5.25" or 8") Dynabyte Models 5505, 5605
Models 5200. 5305
When the 5505 or 5605 computer arrives, the Mini Winchester contains no installed software; DOS 3 is shipped on two floppy disks. You must, therefore, initially boot DOS 3 from one of the floppy disks. Both the 5505 and the 5605 can, however, easily be configured to boot DOS 3 from the Mini Winchester, and normally DOS 3 is transferred to the Mini Winchester and run from there. Booting DOS 3 from the Mini Winchester is faster and more convenient.
The procedure below describes how to copy the DOS 3 software, and how to configure DOS 3 to boot from the Mini Winchester. This procedure will confi-gure the computer into six logical drives (you may have use of only three, depending on your model type): The Mini Winchester will be assigned to logi-cal drives A and B, and the floppy drives will be assigned to logical drives C
through F. Drives A and B will be of equal capacity; their actual size depends on the particular 5505 or 5605 model. You may wish to later reconfi-gure DOS 3 in some other manner. This procedure only describes a standard first-time installation.
t-lETHOD 2 OVERVIEW
• Boot DOS 3 fram Distribution Disk #1.
• Format the Mini Winchester.
• Copy the DOS 3 files from both distribution disks onto the Mini Winchester. • For.rnat two floppy disks.
• Copy the DOS 3 loading files to the formatted floppy disks.
• Copy the DOS 3 files fran the Mini Winchester to the "boatable" floppy disks.
• Install DOS 3 onto the Mini Winchester. • Reboot
oos
3 fran the Mini Winchester.oopxm;
AN[) INSTALLING OOS 3 Models 5200.5305-
---Boot DOS 3 from Distribution Disk #1.
1. Turn on the computer.
2. Insert Distribution Disk #1.
3. Press and release the reset button.
mNl\BY'IE 1m 3.XX A>
Insert Distribution Disk #1 into the floppy d~ i ve, apd close the door. (Insert ap
a"
floppy qisk with its label face up; insert ~ 5.25" floppy disk so that its label faces the computer power switch.)1X>S 3 will automatically be read into the computer, and will then sign on with the following message:
mpym; AND INSTALLING OOS 3 Models 52e0, 5305
Format the Mini Winchester.
---1. Use WINFMl'S to format and check the S.2S" Mini Winchester.
A>J01IM15<CR> Enter "WINFM'I5" followed by a carriage return. WINFM'I5 will then sign on with the following menu and prompt:
AAAAAAAAA D!NABI'JE 5.25- BARD DISK FCH4AT VERSlm X.XX PeR IXl) 3.n AAAAAAAA
YOOR SE:UCrICE: PC<CR>
.•...•...
...
...
Enter "FC" followed by a car r iage return. WINFM'I5 will tell you that it has begun the formatting process, and then slowly display several rows of dots on the screen:
When WINFM'I5 has finished formatting
the Mini Winchester, it will confirm its completion and then prompt you to choose a drive configuration:
16MB HARD DISK IIUVE
A) 1 IIUVE 1 IIUVE
B) 2 IIUVES
C) 4 IIUVES
8.33 MB
4.49 MB
6.4 MB
3.2 MB
1824 DIRtClU<Y EmRIES
512 DIRlC1Q(Y EmRIES
256 DIRlC1Q(Y EmRIES
sm:.Fr.r OPl'ICE
m
<.RE'l'lJRN> FeR DEF.AI1LT (0Pl'I~ B): B<CR>CPPYING AND INSTALLING OOS 3
•...
[image:26.615.38.544.54.773.2]~
...••...
...
...
1) 2) 6) 7)
11) 12)
16) 17)
21) 22)
26) 21)
31) 32) 36) 37)
41) 42)
46)
47) 51) 52) 56) 57)Models 5200. 5305
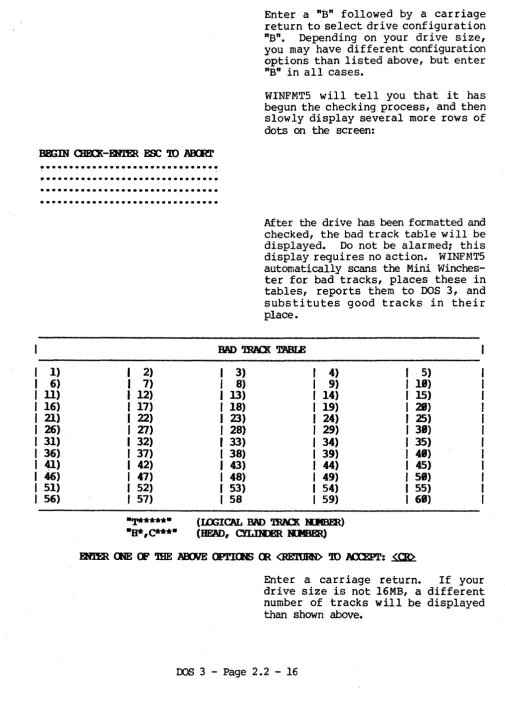
Enter a "B" followed by a carriage return to select drive configuration "B". Depending on your drive size, you may have different configuration options than listed above, but enter "B" in all cases.
WINFMT5 will tell you that it has begun the checking process, and then slowly display several more rows of dots on the screen:
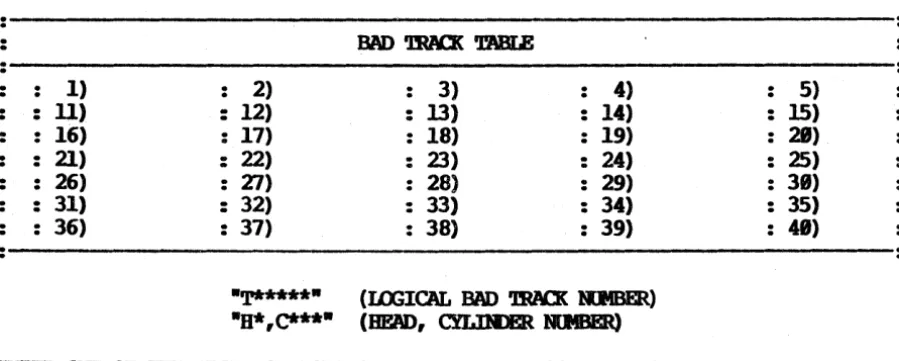
After the drive has been formatted and checked, the bad track table will be displayed. Do not be alarmed; this display requires no action. WINFf.1T5 automatically scans the Mini Winches-ter for bad tracks, places these in tables, reports them to DOS 3, and substitutes good tracks in their place.
JW) 'BW:X TABLE
3) 4) 5) 8) I 9) 18)
13) I 14) 15)
18) I 19) 28)
23) I 24) 25)
28) I 29) 38) 33) I 34) 35) 38) I 39) 48)
43) I. 44) 45)
48) I 49) 58) 53) I 54) 55) 58 I 59) 68)
-1.*****- (IOOIC'AL Bl\J) 'BW:X RJmm)
-B*,C***- (BEAD, crI.IRlER RJmER)
roWING AND INSTALLING OOS 3
<mac CXJIPLE'JH) O.K.
Models 5200, 5305
WINFM'I5 will confirm its completion of the check process and then prompt you enter a carriage return:
PRESS <RE'l1lRN> 'JD DISPIAY MIRJ. ~
Enter a carriage return. WINFM'I5 will then return to its main menu:
••••••••• mNl\BY'lE 5.25- BARD DIS{ F(RtAT VERSIm X.XX P{R JXl) 3.XX
********
Enter "EX" followed by a carriage return to exi t WINFMT5 and return to the operating system.
oopym; AND INSTALLING OOS 3 Models 5200, 5305
Copy the DOS 3 files from both distribution disks onto the Mini Winchester.
1. Use PIP to copy the files from Distribution Disk #1 to the Mini Winchester.
A>PIP E:=A: *. *[00 <CR> Enter "PIP E:=A:*.*[OV]" followed by a carriage return. PIP will display the name of each DOS 3 file as it is copied from Distribution Disk #1 to the Mini Winchester, and then automatically return you to the
operating system~ .
2. Remove Distribution Disk #1 from the floppy drive.
3. Insert Distribution Disk #2 into the floppy drive, and close the door.
4. Reset the floppy drive.
A><CJm.>C . Enter a "Control
e"
to inform the operating system that you have changed floppy disks. (To enter a "Controle",
press and release the "C" key while the CRTL or <XNlROL key is depressed.)5 • Use PIP to copy the f il~s from Distribution Disk #2 to the Mini Winchester. A>PlP E: =A:
*. *
[00 <00 Enter "PIP E:=A: *.* [01]" followed by acarriage return. PIP will display the name of each DOS 3 file as it is copied from Distribution Disk #2 to the Mini Winchester, and then automatically return you to the operating system.
mpy~ AND INSTAILING 008 3 Models 5200. 5305
Format two floppy disks.
1. Wg onto the Mini Winchester.
A>S:<rn>
E>
Enter "E:" followed by a carriage return to log onto the Mini Winchester.
The "E)" prompt signifies that DOS 3
is connected to logical drive "E", and is ready for additional commands.
2. Use FFO~ to format two floppy disks.
VERSI(E X.X FeR I n ) 3.XX
Enter "FFORMAT" followed by a carriage return. PFO~1AT will sign on with the following prompt:
FXlER IJ.UVE IB.l"JER (p FWPPY IJ.UVE (A-P): A<CR>:
Enter
"A"
followed by a carriage return to specify the floppy drive. Depending on your computer system's drive type, you will then receive one of the following messages:IJ.UVE A IS A SnG:.E SIDED 8 n«lI IJ.UVE IJ.UVE A IS A IDJBI..E SIDED 8 llCI IJ.UVE IJ.UVE A IS A Sl1G:aE SIDFD 5 1/4 IlCI IJ.UVE IJ.UVE A .. IS A IDJBI..E SIDED 5 1/4 1lOI IJ.UVE
c:.AlH7r REXXDnZE IJ.UVE TfPE
11) l\'rl'laJED IJ.UVE
F - POIM\T
C -
cmxx
Q - WITFFORMAT will then ask what function you would like to perform:
Enter "P" followed by a carriage return to indicate FORMAT.
CDPYING AND INSTALLING OOS 3
SIIE POIIM.' SEUr.l'IOO
1 - Pm SIlG:B
smm
2 - Pm ID1BLE SIDED RE'D1RN - FOR SIlG:B SlIB>SllE POIIM.' ? 1<00
DmSl'l'Y POIIM.' ~
1 - FOR SllG..E ~1'lY
2 - FOR IXX1BU: DmSI'l.'Y RE'D1RN - FOR IXX1BU: DmSI'l'Y
~l'l'Y POIIM.' ? ~
1 - FOR 64 mJRIES 2 - FOR 128 EJmUES 3 - FOR 256 mJRIES RE'l'URN - FOR 64 mJRIES
I (P DIRFrlDRY mJRIES ? 2<00
Models 5200, 5305
If the drive is double-sided, FFORMAT will then ask whether you want one or both sides formatted:
Enter "1" followed by a carriage return to indicate sin~le-sided.
All 5.25" floppy d~ives are automati-cally double-density, but if you hav~
an 8" floppy drive, then FFORf.1AT will prompt for single- or double-density:
Enter a carriage return to indicate double-density.
FFORMAT will now ask you to enter the number of directory entries to reserve space for on the floppy disk:
Enter "2" followed by a carriage return to reserve space for 128 directory entries.
FFORMAT will then tell you to insert the floppy disk you want to format into the floppy drive:
Insert a floppy disk into the floppy drive, and close the 'door.
mpxING AND INSTALLING OOS 3 Models 5200. 5305
Also, be sure the floppy disk is not write-protected. You can write on an
a"
floppy disk if the write-protect notch is covered up; you can w rite on a 5.25" floppy disk if the notch is uncovered.Enter a carriage return to start the actual formatting process. FFORMAT then tells you it is working and asks you to wait:
~ IS lUi BEIR; IXH: PI.F.N;E WAIT ••••
BARD Jam AT mH:X=XX SlC.ItD=XX
If, during the formatting process, FFORMAT finds a bad sector on the floppy disk and is unable to format it, the error will be reported as follows:
***
111 BAD DISKE'I-lE REPlACEwrm
A NFJf CEE 111***
*****
POEIV\T CXJIPLE'lH) O.K.*****
A damaged floppy disk should be removed and discarded. Start the format process on another floppy disk.
After the floppy disk has been formatted, FFORMAT will confirm its completion and then ask if you want to format another floppy disk:
REPEAT SME OPERATIOO
m
A NOr DISK (Y/N) ?Y<CR>
Remove the newly formatted floppy disk from the floppy drive.
Enter
"Y"
followed by a carriage return. FPO~ will then tell you to insert a floppy disk into the drive:INSERT DISK. BIT EOC:APE
m
ABRrm
1iNY OJBER KEYm
BmIN •••Insert another floppy disk into the floppy drive, and close the door. Enter a carriage return to start the formatting process. FFORMAT tells you it is working and asks you to wait:
(X)P¥ING AND INSTALLING OOS 3
***** FCHIAT <XIn'LE'.lm O.K.
*****
Models 5200. 5305
Again, if FFORMAT reports a bad sector, the damaged floppy disk should be discarded and the format process tried on a another disk.
After the floppy disk has been formatted, FFORMAT will confirm its completion and then ask if you want to format another fl~p'y disk:
~
m,m
OPERA'1'ION (B A NEJf DISK (yIN) ? B<CR>00 Y{XJ WANT 'lO:
F - FCHIAT C - (]lEX]{
0- OOIT
Enter "N" followed by a carriage return. FFORMAT will then return to its main menu:
3. Remove the newly formatted floppy disk fram the floppy drive.
4. Insert Distribution Disk #1 into the floppy drive, and close the door.
5. Exit FFORMAT.
E>
Enter "Q" followed by a carriage return to exit FFORMAT and return to the operating system:
CDP¥ING AND INSTALLING OOS 3 Models 5200, 5305
Copy the DOS 3 loading files to the formatted floppy disks.
1. Use DYNAGEN to copy the DOS 3 loading files to the outer two tracks of the newly formatted floppy disks.
Enter "DYNAGEN" followed by a carriage return. (You are still logged onto the Mini Winchester on drive "E".) DYNAGEN will then sign on with the following menu and prompt:
JmPJGEN VERSI<E X.XX FOR D!Nl\Bl'm JD) 3.XX
m) 'mANSFER S!S'JDf FlDl (H; DISK 'lD .AtOJBtR Cl') 'mI\NSFER S!S'JDf IJS]K; -.<III- JDll' FILE
EX) EXIT JmPJGEN
Enter "eT" followed by a carriage return. DYNAGEN w ill then ask you to identify the source drive:
(C1') S!S'JDf FILES IOCATED ~ DISK DRIVE (A-P) ? E<CR>
Enter "En followed by a carriage . return to specify the Mini Winchester as the source drive. DYNAGEN will then prompt for the destination drive:
1iRrm S!S'JDf 'lD DISK DRIVE (A-P) ? A<CR>
Enter "An followed by a carriage return to specify the floppy drive as the destination drive. DYNAGEN will then prompt you to insert the floppy disk:
Insert one of the formatted floppy disks into the floppy drive, and close the door.
CDFYm; AND INSTALLING OOS 3
PRESS <RE'.ltlRN>
m
DISPIAY MIH1. ~Models 5200. 5305
Enter a carriage return to start the actual copying process. DYNAGEN then tells you it is working and asks you to wait:
When DYNAGEN has finished writing the loading instructions, it will prompt you to enter a carriage return:
Enter a carriage return. DYNAG~J will then return to its main menu:
~ VERSlCE X.XX RR DYNABr.lE 1m 3.XX
'lR) 'mANSFER S!S'lB4 FlOt CH: DISK '10 ANJ'mER C'l') mANSFER S!S'lB4 USn«; - .CXJI- ID7.l' FILE
EX) EXIT~
Em'ER MEHJ ~ (RETURN
ro
EXITro
MAIN MJaJ) ? CT<<IDEnter "eT" followed by a carriage return to copy the DOS 3 loading instructions to the other formatted floppy disk. DYNAGEN will then ask you to identify the source drive:
(Cl') S!S'lB4 FILES I.OC.ATm CE DISK DRIVE (A-P) ? E<CR>
Enter "E" followed by a carriage return to specify the Mini Winchester as the source drive. DYNAGEN will then prompt for the destination drive:
IiRI'l'E S!S'lB4
ro
DISK DRIVE (A-P) ? A<<IDEnter "A" followed by a carriage return to speci~ the floppy drive as the destination drive. DYNAGEN will then prompt you to insert the floppy disk:
mPXING AN[) INSTALLING OOS 3 Models 5200, 5305
Enter a carriage return to start the actual copying process. DYNAGEN then tells you it is working and asks you to wait:
When DYNAGEN has finished writing the loading instructions, it will prompt you to enter a carriage return:
Enter a carriage return. DYNAGEN will then return to its main menu:
DYlW3'l VERSlCE X.XX P(E DnW3Y'.IE IXI) 3.XX
m)
mANSFER S!S'J.B( FlUlam
DISKm
AtOlHER C'l') '.Im\NSFER S!S'J.B( US]K; •• <Dl" JD}T FILEEX) EXIT DYlW3'l
mmR MEaJI'.lDI (RE'l1lRN
m
EXITm
MAIN MEHJ) ? EX<CR>Enter "EX" followed by a carriage return to exit DYNAGEN and return to the operating system.
Both of the formatted floppy disks are now "bootable"; that is, OOS 3 can now
be booted from either of them.
Leave the new "bootable" floppy disk in the floppy drive.
CPPYXNG AND . INSTALLING OOS 3 Models 5200, 5305
Copy the DOS 3 files from the Mini Winchester to the "bootable" floppy disks.
1. Wg onto the floppy drive because the subsequent SUBMIT operations must be perfor.med fram drive A.
E>A:<Q>
A>
Enter "A:" followed by a carriage return to log onto the floppy drive.
The "A)" prompt signifies that DOS 3
is connected to logical drive "Air, and is ready for additional commands.
2. Copy the Distribution Disk #1 files fran the Mini Winchester to the floppy disk that was left in the floppy drive.
A>E: SDfiT E:CXlPYl E A<CR> Enter "E: SUBMIT E:OOPYI E A" followed by a carriage return. Enter this command exactly as shown~ the spaces are very important.
"COPYl" is the name of a SUBMIT file stored with DOS 3 that contains file copying instructions for Distribution Disk #1. The appropriate files will automatically be copied from source drive "E" to destination drive "A".
When all the files have been copied, the following message w ill be displayed on the screen:
A>; DIS'rRIBOTIC6 mANSFER Em
DISK
.1 <XJU?IB.lE3. Remove the new copy of Distribution Disk #1 from the floppy drive and label it "Copy -- DOS 3.XX Distribution Disk II of 2".
4. Insert the remaining "bootable" floppy disk into the floppy drive, and close the door.
5. Reset the floppy drive.
AXC'Jm.>C Enter a "Control C" to inform the operating system that you have changed floppy disks.
mPYING AND INSTALLING OOS 3
A>E: SDfIT E:<DPX2 E A<CR>
Models 5200. 5305
Enter "E: SUBMIT E:COPY2 E A" followed by a carriage return. Enter this command exactly as shownl the spaces are very important.
"COPY2" is the name of a SUBMIT file stored with DOS 3 that contains file transfer instructions for Distribution Disk #2. The appropriate files will automatically be copied from source drive "E" to destination drive "A".
When all the files have been copied, the following message will be displayed on the screen:
A>; DIS'lRIII1l'ICB DISK 12 'mANSFER CXJU?IBlE
7. Remove the new copy of Distribution Disk #2 fram the floppy drive and label it "Copy - DOS 3.XX Distribution Disk #2 of 2".
YOU tDV HAVE (l)PIES OF THE '!WO OOS 3 DIS'IRIBUTION DISKS '!HAT WERE SHIPPED WI'lH YOUR COM1?UTER.
* * * * * * * * * * * * * * * * * * * * * * * * * * * * * * * * * * * * * * *
oopxm;
ANI) INSTALLING OOS 3 Models 5200. 5305---,
Install DOS 3 onto the Mini Winchester.1. Insert either of the new copies of the distribution disks into the floppy drive, and close the door.
2. Log onto the Mini Winchester.
A>B:<CR> Enter "E:" followed by a car r iage ret.Qrn tc> log onto the Mini Winchester,
E> The "E)" prompt signifies that DOS 3
is connected to logical drive "E", and is ready for additional commands.
3. Use DYNASYS to change the disk drive assignments, and to save the new system configuration onto the Mini Winchester.
E>DYNl\SXS<CR> Enter "DYNASYS" followed by a carriage return. DYNASYS will sign-on with the following menu and prompt:
DYHl\S!S VERSI<E X.XX - Pm. mNABY'l'E JD) 3.XX CP/M 2.2 SfS'lBt ~(E UTILI'lY
MAIN MIRJ OPTI<BS
AL) ACJSIGl / SE'lUP ALL PARMETERS Ee) SE'l' a..FAR ~ SEQUtH:E CA) ClIl\RlClER I/o ACJSI<aftm'S
(l) ~ I/O SE'lUP Dl\) DISK DRIVE ACJSI<aftm'S 00) DISK DRIVE SE'lUP
'(X) <lIAIN!IDtD:.E SE'lUP
IL) DISK IOO / MFSSAGE SE'lUP LS) UW> / SAVE PARMETER, FIIB OC) DISPLAY <llRRENT <DJFIGDRATI(E
Q» mF.l\m smL'Dt DISK
EX) EXIT
m
CJPERATll«; SfS'lBtmP¥ING AND INSTALLING OOS 3 Model§ 5200.
5305
A:
=
B:
=
c: =
D:=
DmASYS VERSI(E
x.xx -
F(R mNl\BY'lE In) 3.XXCP/M 2.2 SYS'lDt RR.»mRATI<E l1l'ILI'l'Y DISK IIUVE ASSIGMEm'S
FI - F4 = FUlPPY DISK IIUVFS
amI - CJm2
=
am
RIKNABIB IOOICAL ~CJlFI - CJlFIB = (]I) FIXID IOOIC'AL ~
mn -
PUJ8 = PUJrl'S(J wnu:tJ!811SR IOOICAL ~MINIl - MINI8
=
MINI WIKiIESlER (5 1/4·)..a -
IIi5 = MIClO:ULIS WDDmS'lER ~PI E:
=
MINIl I:=
II: =F2 F: = MINI2 J: = N: =
F3 G: =
mn
K: = 0: =F4 H:
=
FUJ2 L: = P: =IIUVE
m
awa:
A:-P (RE'JIIRNm
LFAVE AS IS) ? MeR>Enter
"A"
followed by a carriage return to begin reassigning the logical drives, starting with logical drive "A". DYNASYS will then continue to prompt you for subsequent drive assignments until you respond to one of the prompts with nothing but a carriage return. Reassign the drives as shown here:IIUVE A: MINIl<CR> IIUVE B: MINI2<CR> IIUVE
c:
n<CR> IIUVE D: F2<CR> IIUVE E: Fl<CR> IIUVE F: F4<CR>IIUVE G: ~ Enter a carriage return after the
"DRIVE G:" prompt. DYNASYS will stop prompting for logical drives, and display the new disk drive assignments. DYNASYS will then prompt you to enter the letter of another drive assignment you want to change:
mpym; AND INSTALLING OOS 3 Models 5200. 5305
A:
B:
c:
D:
nnmsm
VERSI<E X.XX - Pm Imi\B!'JE JD) 3.XXCP/M 2.2 SYSTFX RB2mRATICB IJTII..IW DISK DRIVE ASSI(HBJl'S
FI - F4
=
~ DISK lIUVESoml. - am2
=
am
RIH7I.ABLE IroIC'AL lIUVES QlFI - 0IF18 = (]I) FIXED IOOICAL lIUVESPm1 - Fl1J8 = FWrrsD WIlUIES"lER IOOICAL lIUVES
MINIl - MINI8
=
MINI WDDIFSl'ER. (5 1/4·) Nfl -!liS = MI<IVPOLIS WINCBES'lER lIUVES.=
MINIl E:=
F3 I:=
M:=
=
=
=
MINI2 F:
=
F4 J:=
N:=
FI G:=
FOJl K:=
0:=
F2 H:
=
Fm2 L:=
P:=
DRIVE '10 QJAR;E lr-P (RETflRN 'IO LFAVE AS IS) ? G<CID
Enter "G" followed by a carriage return. DYNASYS will respond with the following prompt:
DRIVE G: ~ Enter a carriage return to clear the preset assignment from logical drive "G". DYNASYS will again display the new drive assignments, and then prompt you to enter the letter of another drive assignment you want to change:
A:
B:
c:
D:
nnmsm
VERSlOO X.XX - FCR DnW3Y'JE ra; 3.XX CP/M 2.2 SY~ RB2mRATIal IJTII..IWDISK DRIVE ASSI(HBJl'S
FI - F4 = FIDPPY DISK lIUVES
oml. - CMR2
=
am
RIH7I.ABLE IOOIC'AL lIUVES OIFI - a.F18=
QI) FInD IOOICAL lIUVESFWl - mJ8
=
FWI'l'SU WINCBES'lER IOOICA{. IJUVESMINIl - MINI8
=
MINI WIlUIES"lER (5 1/4·)IWl - I I f j
=
MI<IVPOLIS WINCBES'lER lIUVES=
MINIl E:=
F3 I:=
M:=
=
MINI2 F:=
F4 J:=
N:=
=
FI G:=
K:=
0:=
=
F2 H:=
Fm2 L:=
P:=
mPYING AND INSTALLING OOS 3 Models 5200. 5305
A: B:
c:
D:Enter nH" followed by a carriage return. D~S will respond with the following prompt:
Enter a carriage return to clear the preset assignment from logical drive nH". DYNASYS will again display the new disk drive assignments, and then prompt you to confirm the displayed assignments by entering a carriage return:
nnmsm VERSI~ X.XX - FeR D!Nl\BY'1'E I n ) 3.XX
CP/M 2.2 SYS'lDI REX2mRATI~ u.rn.:rJ.Y
.-=
=
=DISK IIUVE ASSI~
Fl - F4
=
FIDPPY DISK IIUVESamI - CJIR2
= am
RJKJ\1ABLE IOOICAL IIUVES 0tF1 - CJlFli=
QI) FIXED IOOICAL IIUVESPW1 - Fm8
=
Pml'l'SO W'IlUIES"lER IOOICAL IIUVES MINIl - MINI8=
MINI WDllJES'lER (5 1/4·)!Ml - IIfi = MICRlPOLIS WDDJES'mR IIUVES
MINIl E:
=
F3 I:=
M:=
IIINI2 F: = F4 J:
=
N: =Fl G:
=
K: = 0: =F2 B: = L:
=
P: =IIUVE it) ClIAtI,;E Ir-P (REmRN
m
LEAVE AS IS) ? ~Enter a carriage return to confirm the displayed assignments. DYNASYS will then return to its main menu:
CDpym3 AN[) INSTALLING OOS 3 Models 5200, 5305
~s VERSI<E' X.XX - FeR mNABY'm I a ) 3.XX
CP/M 2.2 SYS'lBt ~m tn'ILI'.lY
MAIN MFKJ OPl'ImB
AL) A$IGt / SE'1'UP ALL P~
S:) SE'l' a.FAR ~ SIQJJR::E
CA) ClIl\1W:'.lER I/O ASSIcamlIS CS) ClIl\1W:'.lER I/O SEmP
lP1) DIS.{ DRIVE M)SIcamlIS 00) DIS.{ DRIVE SEmP
(1) OIAIN KIXJLE SE'1'UP
IL) DIS.{ UX; / ~ SEmP LS) UlN) / SAVE PARMETER FILE OC) DISPLAY aJRRmr ClH'IGORATIOO
Q) amATE SYS'lBt DISK
EX) EKl'r
m
OPERATIR; SYS'lBtm.nm.
MEHJ l'ftH? DL<CR> Enter "DL" followed by a carriage return to reassign drive "A" as the warm reboot drive. DYNASYS will respond with the current disk log assignments, and then prompt you to choose one of the following options:DYNASYS VERSI<E X.XX - F<E DYNl\BYTE ra; 3.XX CP/M 2.2 SYS'JDI REX2mRATIOO tn'ILI'.lY
DISK 100 / ~ SE'lUP
cr.) <DID BX>T UX; DRIVE
=
A 'WR) . WARM RFBXJr DRIVE=
~(1) <DID Inn' ~ FILE
=
RJ.r INSTAI.UDIlL) DISPLAY u w ) MAP = YES
m.nm.
MEHJ 1.'lBIm
CIWI;E (RETORN '10 LFAVE ~ IS) ? JiR<CR>(Ill) WARM RFBXJr DRIVE (A-P) ? A<CR>
Enter "WR" followed by a carriage return. DYNASYS will then prompt for the letter of the logical drive to be logged on during a warm boot. (A warm
boot occurs whenever you enter a Control C, or whenever a program f inishes- running.)
mP¥ING AN[) INSTALLING OOS 3 Models 5200. 5305
w ill then prompt you for the remaining two items on the menu. ·Enter a carriage return following each prompt to leave that assignment stand:
«.M) run l.UlI" ~~ l'lLE (FILtH\ME. TIP) ? ~
DYNASYS will display the new disk log assignments, and then prompt you to confirm the displa¥ed assignments by entering ~ carriage ~eturp:
mNl\SYS VERSICE X.XX - J.i'tE mNABY'.lE ID3 3.XX CP/M 2.2 S!S'lDl REX.DERA.TICE UTILI'l'f
DISK 100 / ~ SE'.lUP
cr.)
rom
ID11' 100 lIUVE=
A 1m) WA1It REBX7r lIUVE=
Aau
<D.D ID7l' ~ FILE=
R1.l' INSTAIUD IL) DISPlAY ION> MAP=
~Enter a carriage return to confirm the displayed assignments. DYNASYS will then return to its main menu:
DYNASYS VERSICE X.XX - Pm mNABY'.lE OOS 3.XX CP/M 2.2 S!S'lDl mxamRATI<E UTILI'l'f
MAIN MF.HJ QPTI<BS
AL) ASSIm / SE'.lUP ALL PARME'lERS
9::) SET CUJ\R ~ SIQJEHE CA) aww.:TER I/O ASSI<HIEN1'S CS) aww.:TER I/O SE'.lUP
M) DISK lIUVE ASSI<HIEN1'S 00) DISK lIUVE SETUP
CM) aJAIN KDlLE SE'.lUP
IL) DISK UX; / MESSlG:: SE'lUP LS) I£W) / SAVE PARME'mR FILE DC) DISPlAY CORRENl' ClR?IGJRATICE
C) ClmATE S!S'lDl DISK
EX) EXl'l'
m
OJ?ERATIR; S!S'lDlmIER MFKJ l"lDI? axCR> Enter nCO" followed by a carriage return to wr i te the new system
mP¥m; AND INSTALLING 008 3 Models 5200. 5305
configuration onto the Mini Winchester. DYNASYS will respond with the CREATE SYSTEM DISK menu, and prompt you to choose one of two methods:
D!NASrS VlmSICE X.XX - Pm DYNABY'JE IU) 3.XX CP/M 2.2 SYS'.IUI REGHmATlCB UTIL1.'l'i
1iR) MUTE SYS'.IUI it) DIS{
m)
TRANSFER SYS'lDt PlDf CH.: DISKm
lUClBERENIER MEHJ I'.lBI (~ it) EXIT
m
MAIN MEHJ}? JiR<CR>Enter "WR" followed by a carriage return. DYNASYS will then ask you to identify the source drive:
(WIl) SYS'lDt FILES lOCATED CE DISK DRIVE (A:-P)? E<CR>
Enter "E" followed by a carriage return to specify the Mini Winchester as the source drive. (Remember, the Mini Winchester will not be assigned to logical drive "A" until after DOS 3 has been rebooted.) DYNASYS will then prompt for the destination drive:
MUTE SYS'lDt
m
DISK DRIVE (A:-P)? E<CR>Enter "E" followed by a carriage return to specify the Mini Winchester as the destination drive. DYNASYS will then prompt you to place the proper disks into the proper drives:
mpxm; AND INSTALLING OOS 3 Models 5200, 5305
When DYNASYS has finished writing the new system configuration, it will prompt you to enter a carriage return:
Enter a carriage return. DYNASYS will return to the "CD" menu:
DfNAbYS VERSI~
x.xx -
F<R D!NABY'm JD3 3.XXCP/M 2.2 SYS'l'EM ~(B UTILl'l'Y
WR) WRrlE SYSTEH
m
DISKm)
mANSPER SYS'l'EM FIUtam
DISKm
AtD.IBEREnter a carriage return. DYNASYS will then return to its main menu:
DfNAbYS VERSI~ X.XX - F<R D!NABY'm JD3 3.XX
CP/M 2.2 SYS'l'EM ~(B UTILl'l'Y
E>
AL) .ASSI~ / SE'lUP AU, PARN4ETERS
9::) SET a.FAR s:mmI SQJJHE CA) CBl\RPClER
I/O
ASSI~CS)
ClIARI\CTERI/o
SE'lUPDI\) DISK DRIVE ASSI~
OS) DISK DRIVE SE'lUP (]f) ClIAIN IIDJLE SE'lUP
IL) DISK UX; / MESSliGE SE'lUP
LS) ION) / SAVE PAIWm'lER FILE
DC) DISPLAY <lIRREM' aH'IGORATICB Q» <ImAm SYS'l'EM DISK
EK) EKIT
m
0PERATnC SYS'l'EMF.HrER MFHJ l'.lBt? BK<CR> Enter "EX" followed by a carriage return to exit DYNASYS and return to the operating system:
4. Remove the floppy disk frQm the floppy drive.
oopym; AND INSTALLING OOS 3 Models 5200, 5305
Reboot I)Qg 3 from the Mini Winchester.
Make sure that no floppy disk is in the flqppy disk drive. Press and release the reset button. The computer will now boot DOS 3 from the Mini Winchester.
The computer is now configured as a six drive system. Drives A and B are on the Mini Winchester, and Drives C through F are the floppy drives. This can be seen from the following list of disk drive assignments, as it would appear using DYNASTAT:
I DISK IIUVE I
I ASSIGt I
I I
I A:MINIl I I B:MINI2 I
I C:Fl I I D:F2 I I E:F3 I I F:F4 I
I G: I
roWING AND INSl'ALLING OOS 3
2.3 Model 5615
a"
Fujitsu Winchester with one S" flq>py drive Dynabyte Model 5615Models 5200, 5305
When the 5615 computer arrives, the Fujitsu contains no installed software;
DOS 3 is shipped on two
a"
floppy disks. You must, therefore, initially boot DOS 3 from one of the floppy disks. If you have a tape controller (Funnel interface) board, the 5615 can, however, easily be configured to boot 008 3 from the Fujitsu. Booting DOS 3 from the Fujitsu is faster and more conven-ient.The procedure below describes how to copy the DOS 3 software, and, if you have the tape controller board, how to configure the operating system to cold boot from the Fujitsu. If you don't have the tape controller board, this procedure describes how to configure DOS 3 to cold boot from the floppy drive and warm boot from the Fujitsu.
If you have a 23 megabyte drive, this procedure will configure the 5615 into eight logical drives (you may have use of only five of these depending on your model). The Fujitsu will be assigned to logical drives A through D, and the floppy drives will be assigned to logical drives E through H. Drives A through D will be of equal capacity; their actual size will be 4.7 megabytes each. If you have an 11 megabyte drive, this procedure will instead configure the 5615 into six logical drives (you may have use of only three of these
depend-ing on your model). The Fujitsu will be assigned to logical drives A and B,
and the flq>py drives will be assigned to logical drives C through F. Drives
A and B will be of equal capacity; their actual size will be 4.7 megabytes each.
You may wish to later reconfigure DOS 3 in some other manner. This procedure only describes a standard first-time installation.
METlDD 3 OVERVThW
• Boot DOS 3 from Distribution Disk #1.
• Fonmat the Fujitsu.
• Copy the DOS 3 files from both distribution disks onto the Fujitsu. • Format two floppy disks.
• Copy the DOS 3 loading instructions to the formatted floppy disks. • Copy the DOS 3 files from the Fujitsu to the "bootable" floppy disks. • Install DOS 3.
• Reboot DOS 3.
OOPYIN; AND INSTALLING OOS 3 Models 5200, 5305
Boot DOS 3 from Distribution Disk tl.
1. Turn on the computer.
2. Insert Distribution Disk #1.
3. Press and release the reset button.
DYNABYTE 1m 3.XX A>
Insert Distribution Disk #1 into the floppy drive and close the door. (Insert the
a"
floppy disk with its label face up.)oos
3 will automatically be read into the computer, and will then sign on with the following message:The "A)" prompt indicates that OOS 3
CX)PXOO AND INSTALLING OOS 3 Models 5200. 5305
Format the Fujitsu.
1. Use FUJFMl' to format the 8" Fujitsu hard disk drive.
A>FIIJPMT<CR>
VERSIGl X.X FeR IXlS 3.XX
m.rER F - PaItAT
C - cmxl{
Enter "FWFMT" followed by a carr iage return. FUJFMT will then sign on with the following menu and prompt:
<RE'1URN> - RE'1'URN '10 OPERATJ:R; &YS'lUI
~ '!BE DRIVE 'l'!PE:
B - 11 MmABYTE DRIVE. 1 - 23 MmABYTE DRIVE.
Enter "F" followed by a carriage return. FUJFMT will then prompt for the size of the Fujitsu you are formatting (11 or 23 megabyte):
m.rER DRIVE TnJE (B CE 1) ? B<C3> or 1<00
A
Fm1 - 8.3 MB
·
·
PIl12 - 1.2 MB
·
·
Fm3- 8.3 MB
·
·
FIl14 - 1.2 MB·
·
B
Fm1 - 4.7 MB
·
·
PIl12 - 4.7 MB
·
·
FOJ3 - 4.7 MB
·
·
Fll14 - 4.7 MB·
·
You should enter either """ for an 11 megabyte dr ive or "1" for a 23
megabyte drive, depending on your drive size.
FUJFMT will then prompt you to choose a configuration:
C
mn -
2.3 MB Fm2 - 2.3 MBPOJ3 - 2.3 MB PUJ4 - 2.3 MB
ProS - 2.3 MB FIl16 - 2.3 MB
J.iU11 - 2.3 MB mJ8 - 2.3 MB