GreenPages: a demonstration
Christopher Frost
Ben Hale
Rob Harrop
Glyn Normington
Steve Powell
Andy Wilkinson
2.1.0.M02-incubation
AbstractSpring application programmers are introduced to Virgo Web Server by installing the Web Server and examining a small application called GreenPages. Despite its simplicity, GreenPages is designed to demonstrate many different Web Server features and to act as a template from which other modular applications can be built.
This version of the guide is based on the following software versions:
Web Server 2.1.0.M01
GreenPages 2.1.0.M01
SpringSource Tool Suite 2.3.2.RELEASE
All rights reserved. This document is made available under the terms of the Eclipse Public License v1.0 which is available athttp://www.eclipse.org/legal/epl-v10.html.
Java, Sun, and Sun Microsystems are trademarks or registered trademarks of Sun Microsystems, Inc. in the United States and other countries.
OSGi is a trademark or a registered trademark of the OSGi Alliance in the United States, other countries, or both. Eclipse is a trademark of Eclipse Foundation, Inc.
UNIX is a registered trademark of The Open Group.
Windows is a registered trademark of Microsoft Corporation in the United States and other countries. Mac and Mac OS are trademarks of Apple Inc., registered in the U.S. and other countries.
1.1. OSGi concepts ... 1
1.2. Spring DM concepts ... 6
1.3. Web Server concepts ... 7
2. Installation ... 9
2.1. Pre-requisites ... 9
2.2. Installing Web Server ... 9
2.3. Installing the SpringSource Tool Suite ... 10
2.4. Installing Apache Maven ... 12
3. Installing GreenPages ... 13
3.1. Introduction ... 13
3.2. Obtaining GreenPages ... 14
3.3. Building and installing GreenPages ... 15
3.4. Browsing the GreenPages application ... 17
3.5. Running GreenPages from Eclipse ... 19
4. The Web Module ... 25
4.1. Introduction ... 25
4.2. GreenPages set up ... 25
4.3. The controller ... 26
4.4. Deploying a bundle ... 29
4.5. Creating a PAR ... 32
4.6. Referencing an OSGi Service ... 36
4.7. Publishing an OSGi Service ... 39
5. The Middle Tier ... 41
5.1. Introduction ... 41
5.2. Creating the DataSource project ... 42
5.3. Building the JPA module ... 48
5.4. Trying out the JPA middle tier ... 52
5.5. Applying best practices to the middle tier ... 53
6. Testing GreenPages ... 57
6.1. Introduction ... 57
6.2. Single bundle integration testing ... 57
6.3. Contributing OSGi sourced dependencies ... 58
6.4. Multi bundle integration testing ... 59
7. Automated Build ... 61
7.1. Introduction ... 61
7.2. Setting up for Automated Build ... 61
7.3. Create POM ... 62
7.4. Adding the par plugin ... 63
7.5. Adding the dependency plugin ... 64
7.6. Automatically running the tests ... 65
7.7. Deploying the application ... 65
Preface
This Guide introduces some basic concepts, explains how to install Virgo Web Server and the associated Eclipse™ tools, and examines a sample web application in detail, including how the application is built and tested.
It is intended for Spring application programmers and assumes little or no understanding of OSGi™ or Virgo Web Server.
Questions about Web Server and SpringSource Tool Suite (or this Guide) may be posted to the Web Server Community Forums (http://www.eclipse.org/forums).
1. Concepts
Virgo Web Server is a Java application server composed of a collection of modules which supports applications which are also composed of a collection of modules. These may be traditional Java web applications packaged as Web ARchive (.war) files as well as other modular applications.
This chapter introduces concepts necessary for developing Web Server applications. These concepts will become clearer as the GreenPages application is explored in later chapters.
1.1 OSGi concepts
Modules in Virgo are represented using a standard Java module system known as OSGi. Modules consist of programs and resources organised by Java package together with metadata which declares imported and exported packages. A module exports a package to make the corresponding programs and resources available for use by other modules. A module imports a package to use the corresponding programs and resources of another module.
Representing a program as a collection of modules makes it easier for the programmer to manage it and modify it and for teams of programmers to divide responsibilities between themselves. A module is similar to a Java class in this respect. Rules similar to those for organising data and programs into classes can be applied to organising applications into modules.
An industry consortium known as the OSGi Alliance (see the appendix Projects) develops OSGi specifications, reference implementations, and compliance tests. Virgo Web Server is built on the Equinox OSGi framework which is also the reference implementation for the OSGi framework specification.
Bundles
Modules in OSGi are known as bundles. Each bundle conforms to the JAR file format and can contain Java classes, a manifest (inMETA-INF/MANIFEST.MF), and further resource files. The OSGi framework enables bundles to be installed and run.
OSGi identifies bundles “by name” or “by identifier” (id).
The symbolic name and version of a bundle is an attribute of the bundle itself and uniquely identifies that bundle (by name) in an OSGi framework. A bundle usually declares its symbolic
name and version in its manifest (a file calledMANIFEST.MF) like this:
Bundle-SymbolicName: org.foo.bundle Bundle-Version: 1.2.3.BUILD-2009-06-04
Additionally, the OSGi framework assigns a distinct number, known as a bundle id, to each bundle as it is installed. Bundles may be referred to “by identifier” using this number. The OSGi
framework itself resides in a bundle with bundle id0.
The dependencies between bundles are expressed statically in terms of packages and
dynamically in terms of services. A package is familiar to Java programmers. For example, a Java program may depend on a classorg.foo.X, from packageorg.foo, and a bundle containing that program would either need to containorg.foo.Xor depend on the package
org.foo. Package dependencies are specified in the bundle manifest, for example:
Import-Package: org.foo
A bundle which provides a package for use by other bundles must export the package in its manifest. For example:
Export-Package: org.foo
The OSGi framework ensures that a given bundle’s package dependencies can be satisfied before the bundle runs. This process is known as resolution.
After a bundle is resolved, its classes and resources are available for loading. In OSGi, bundles and their packages do not appear on the application classpath. Instead, each bundle has a class loader which loads its own classes and loads classes belonging to each of its imported packages by deferring to the bundle class loader that exported the package.
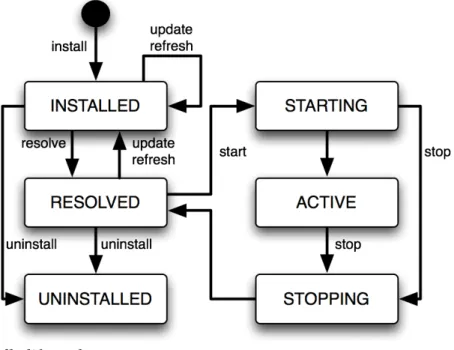
Life cycle
The OSGi framework manages the life cycle of each bundle. A bundle is first of all installed and will be in the INSTALLED state. If a request is made to start the bundle, the OSGi framework
resolves the bundle and, if resolution was successful, will subsequently move the bundle to the
ACTIVE state. If a request is made to stop the bundle, the OSGi framework will move the bundle back to the INSTALLED state. A request may then be made to uninstall the bundle. While the bundle is INSTALLED or ACTIVE, it may be updated to pick up some changes. These changes are not detected by bundles which were depending on the bundle before it was updated. A “refresh packages” operation may be performed to ripple the changes out to those bundles. (See Services concepts.)
The life cycle of a bundle can be summarised by a state transition diagram. This diagram shows some more of the intermediate states of a bundle not described in the overview above:
Figure 1.1. Bundle life cycle
Services
Bundles may publish Java objects, known as services, to a registry managed by the OSGi framework. Other bundles running in the same OSGi framework can then find and use those services. Services are typically instances of some shared Java interface. A bundle which provides a service need not export the package containing the implementation class of the service.
For example, a bundle could export a package containing the interface
org.bar.SomeInterface, thus:
Export-Package: org.bar
…implement the interface with a classSomeImpl:
package org.bar.impl;
class SomeImpl implements SomeInterface { …
}
…create an instance ofSomeImpland then publish this instance (as an instance of the interface
SomeInterface).
OSGi publishes a number of standard services. For example, the Package Admin service provides the “refresh packages” life cycle operation mentioned above.
OSGi provides an API which can be used to publish and find services, but it is much simpler to use Spring DM to accomplish this. (See Spring DM concepts.)
Versioning
OSGi allows different versions of bundles, packages, and several other entities, to co-exist and provides some mechanisms for managing these versions.
Version numbers
An OSGi version number consists of up to three numeric components, or exactly three numeric components followed by a string component. These components are separated by a period (“.”) and are called the major, minor, micro, and qualifier components, respectively.
For example, the version2.4.1.gahas major component2, minor component4, micro component1, and a qualifier componentga. (There are restrictions on the characters that can appear in a qualifier. For example: letters, digits, underscores and hyphens are allowed; periods and commas are not.)
Trailing components may be omitted along with their period (.). So, for example, the version numbers2,2.0, and2.0.0all denote the same version. This example demonstrates that0is assumed if a numeric component is omitted, and the empty string is assumed for an omitted qualifier.
Version ranges
Dependencies on bundles and packages have an associated version range which is specified using an interval notation: a square bracket “[” or “]” denotes an inclusive end of the range and a round bracket “(” or “)” denotes an exclusive end of the range. Where one end of the range is to be included and the other excluded, it is permitted to pair a round bracket with a square bracket. The examples below make this clear.
If a single version number is used where a version range is required this does not indicate a single version, but the range starting from that version and including all higher versions. There are three common cases:
• A “strict” version range, such as[1.2,1.2], which denotes that version and only that version.
• A “half-open” range, such as[1.2,2), which has an inclusive lower limit and an exclusive upper limit, denoting version1.2.0and any version later than this, up to, but not including, version2.0.0.
• An “unbounded” version range, such as1.2, which denotes version1.2and all later versions.
Versioning policies
A versioning policy is a way of using version numbers to indicate compatible and incompatible changes. OSGi does not mandate a particular versioning policy. Instead, a specific versioning policy may be implemented using version ranges.
Strict and half-open version ranges are most useful in representing versioning policies. Unbounded version ranges can lead to problems as they (unrealistically) assume that compatibility will be preserved indefinitely.
For example, a conservative versioning policy might assume that any change, other than in the qualifier component of a version, implies an incompatible change to the object. Such a policy would employ version ranges such as[1.2.1.beta,1.2.2)which accept any version from
1.2.1.beta(inclusive) up to but not including1.2.2(exclusive).
Alternatively, a relaxed versioning policy might assume that only changes in the major component of a version denote an incompatible change. Such a policy would employ version ranges such as[1.2,2)to capture this.
Bundle version
Each bundle has a version. The bundle’s version may be specified in the manifest using a
Bundle-Versionheader:
Bundle-Version: 1.4.3.BUILD-20090302
If not specified the bundle version is assumed to be0.
Package version
Each exported package has a version. The exported package’s version may be specified on the Export-Package manifest header. For example
Export-Package: org.foo;version="2.9",org.bar;version="1"
exports two packages:org.foo, at version2.9.0andorg.bar, at version1.0.0. If the version attribute is omitted the version is assumed to be0.
Each package import has a version range. The package import version range may be specified on theImport-Packagemanifest header. If interval notation is used, the version range must be enclosed in double quotes, for example:
Import-Package: org.foo;version="[2,3)",org.bar;version="[1,1]"
seeks to import a packageorg.fooin the range[2.0.0,3.0.0)and a packageorg.bar
If a version range is not specified on an import, the range0is assumed, meaning that any version of this package would satisfy the import.
Bundle manifest version
Bundle manifests have a version which is1by default, indicating OSGi Release 3 semantics. Web Server is based on OSGi Release 4 and therefore expects bundle manifests to be at version
2, indicating OSGi Release 4 semantics. (See the appendix Projects.) The bundle manifest’s version should be specified on the Bundle-ManifestVersion manifest header, exactly as follows:
Bundle-ManifestVersion: 2
Manifest version
Manifests themselves also have a version which must be specified as1.0. This is not an OSGi definition but part of the JAR file specification
(http://java.sun.com/javase/6/docs/technotes/guides/jar/jar.html).
Manifest-Version: 1.0
1.2 Spring DM concepts
Spring DM is a project which enables services to be published and consumed using descriptions written in XML. Web Server has Spring DM built-in.
The XML descriptions reside in files with extension.xmlin the bundle’sMETA-INF/spring
sub-directory.
To publish a service, an<osgi:service>tag is used, specifying the implementation class of the service and the interface class to be used. Spring DM constructs an instance of the
implementation class like any other Spring bean and then publishes that instance in the OSGi service registry under the interface when the bundle is started.
To consume a service, an<osgi:reference>tag is used and the service may be passed into other Spring beans using Spring’s dependency injection facilities.
Spring DM automatically creates proxies for OSGi services so that the actual service object may come and go at runtime. If a service disappears, any proxies to the service will wait for the service to re-appear. This effect is known as damping.
When a bundle is started, Spring DM builds the application contexts specified by the XML descriptions, creates proxies for the specified services, and publishes the specified services to the OSGi service registry.
When a bundle is stopped, Spring DM retracts any services it published on behalf of the bundle and closes the bundle’s application contexts. Web Server turns off damping of a service proxy while the proxy’s application context is being closed.
Note that, at the time of writing, Spring DM is in the process of being contributed to Eclipse as the Gemini Blueprint service.
1.3 Web Server concepts
Several Web Server concepts are essential for developing an application.
PAR files
Web Server provides a way of grouping together a collection of OSGi bundles which comprise a single application. These bundles are placed in a JAR file with extension “.par”. This is called a PAR file.
All the bundles in a PAR file are resolved together and so mutual dependencies are permitted. At runtime a PAR file provides a scope in the sense that bundles inside the PAR file may depend on packages and services outside the PAR file, but bundles outside the PAR file may not depend on packages and services provided by the PAR file.
Virgo also provides another way of grouping bundles and other artifacts into an application: plans. A plan is a XML file listing a collection of artifacts. This Guide makes no further reference to plans.
Deployment
PAR files or individual bundles are deployed into Web Server by dropping them into a “pickup” directory or using the Administration Console web application provided with Web Server. During deployment, the bundle or bundles are installed into OSGi, resolved together, and then started together.
Personalities
Web Server supports multiple application programming models known as personalities. Each bundle of an application has a personality. For example, a bundle providing a servlet has the web personality. Bundles which provide packages and services using the OSGi and Spring DM programming models have the bundle personality.
When a bundle is deployed into Web Server, personality-specific transformations are applied to the bundle’s contents, including its manifest, and the bundle is made available for use in a personality-specific way. For example, a bundle with the web personality has some package
imports added to its manifest and its servlet is automatically made available for dispatching from HTTP requests.
2. Installation
Before developing an application with Web Server, it is essential to install Web Server, the Eclipse Integrated Development Environment (IDE), the Eclipse-based SpringSource Tool Suite (STS), and a build system integrated with Eclipse. The build system used here is Apache Maven. STS is supplied as a fully configured Eclipse IDE, with Virgo Web Server and Maven plugins built-in.
2.1 Pre-requisites
Before proceeding, ensure that a Java™ Standard Edition Development Kit for Java 6 or later is installed and that theJAVA_HOMEenvironment variable is set to the correct value. (A Java
Runtime Environment (JRE) alone is not sufficient, a development kit is necessary to use the facilities in STS.)
To verify this, issue the command"%JAVA_HOME%"\bin\java -versionfrom a command prompt on Windows or$JAVA_HOME/bin/java -versionfrom a terminal window on UNIX and ensure that the command completes successfully and reports a Java version1.6.x(denoting Java 6) or greater.
Also issue the command"%JAVA_HOME%"\bin\jarto ensure that there is a means of extracting files from zip archives. If thejarcommand is unavailable, download and install a suitable zip program such as7zip,gzip, orWinZip. This is most relevant for Windows operating systems where the inbuilt zip extraction utility may mishandle long pathnames.
2.2 Installing Web Server
Although the steps are similar, the details of installing the Virgo Web Server depend on the operating system.
Obtain Web Server from the download site (http://www.eclipse.org/virgo/download). This guide is consistent with version 2.1.0.M01 of Web Server.
Installing Web Server on Windows
™
operating systems
Unzip the download of Web Server to the root directory of a drive (this will avoid possible problems with long pathnames). Set an environment variable%VWS_HOME%to refer to the unzipped folder…
prompt> cd C:\
prompt> "%JAVA_HOME%"\bin\jar xf \path\to\virgo-web-server-2.1.0.M01.zip prompt> set VWS_HOME=C:\virgo-web-server-2.1.0.M01
ensure a message numberedUR0001Iis displayed. You will see many other messages about starting and installing other required artifacts, but theUR0001Imessage indicates that the user region is ready for your use. (Timestamps have been removed and thread names and other
details may vary with different installations and versions.)
system-artifacts <TC0000I> Starting Tomcat.
system-artifacts <TC0010I> Creating HTTP/1.1 connector with scheme http on port 8080. system-artifacts <TC0010I> Creating HTTP/1.1 connector with scheme https on port 8443. system-artifacts <TC0010I> Creating AJP/1.3 connector with scheme http on port 8009. system-artifacts <TC0001I> Started Tomcat.
system-artifacts <DE0004I> Starting bundle 'org.eclipse.virgo.server.web.core' version '2.0.0.M6'. system-artifacts <DE0004I> Starting bundle 'org.eclipse.virgo.server.web.dm' version '2.0.0.M6'. start-signalling-1 <DE0005I> Started bundle 'org.eclipse.virgo.server.web.dm' version '2.0.0.M6'. system-artifacts <DE0005I> Started bundle 'org.eclipse.virgo.server.web.tomcat' version '2.0.0.M6'.
start-signalling-1 <DE0005I> Started bundle 'com.springsource.osgi.webcontainer.tomcat' version '1.0.0.CI-102'. start-signalling-1 <DE0005I> Started bundle 'org.eclipse.virgo.server.web.core' version '2.0.0.M6'.
start-signalling-1 <DE0005I> Started plan 'org.eclipse.virgo.server.web' version '2.0.0'. Thread-2 <UR0001I> User region ready.
Shut down the server by pressingCtrl-C.
Installing Web Server on UNIX
™
operating systems
Unzip the download of Web Server to a suitable location on the file system, such as the home directory. (If the download was automatically unzipped by the operating system, simply move the unzipped directory to the chosen location.) Set an environment variable$VWS_HOMEto refer to the unzipped folder…
prompt$ mkdir /path/to/home/springsource prompt$ cd /path/to/home/springsource
prompt$ unzip /path/to/virgo-web-server-2.1.0.M01.zip
prompt$ export VWS_HOME=/path/to/home/springsource/virgo-web-server-2.1.0.M01
To verify the installation, use a terminal window to issue the command:
$VWS_HOME/bin/startup.shand ensure a message numberedUR0001Iis displayed. You will see many other messages about starting and installing other required artifacts, but the
UR0001Imessage indicates that the user region is ready for your use. (Timestamps have been
removed and thread names and other details may vary with different installations and versions.)
system-artifacts <TC0000I> Starting Tomcat.
system-artifacts <TC0010I> Creating HTTP/1.1 connector with scheme http on port 8080. system-artifacts <TC0010I> Creating HTTP/1.1 connector with scheme https on port 8443. system-artifacts <TC0010I> Creating AJP/1.3 connector with scheme http on port 8009. system-artifacts <TC0001I> Started Tomcat.
system-artifacts <DE0004I> Starting bundle 'org.eclipse.virgo.server.web.core' version '2.0.0.M6'. system-artifacts <DE0004I> Starting bundle 'org.eclipse.virgo.server.web.dm' version '2.0.0.M6'. start-signalling-1 <DE0005I> Started bundle 'org.eclipse.virgo.server.web.dm' version '2.0.0.M6'. system-artifacts <DE0005I> Started bundle 'org.eclipse.virgo.server.web.tomcat' version '2.0.0.M6'.
start-signalling-1 <DE0005I> Started bundle 'com.springsource.osgi.webcontainer.tomcat' version '1.0.0.CI-102'. start-signalling-1 <DE0005I> Started bundle 'org.eclipse.virgo.server.web.core' version '2.0.0.M6'.
start-signalling-1 <DE0005I> Started plan 'org.eclipse.virgo.server.web' version '2.0.0'. Thread-2 <UR0001I> User region ready.
Shut down the server by pressingCtrl-C.
2.3 Installing the SpringSource Tool Suite
The SpringSource Tool Suite (STS) is a development environment based on Eclipse that needs to be configured with the plugins needed to work with Web Server and OSGi. Although the steps are similar, the details of installing STS depend on the operating system.
Go to the STS download site (http://www.springsource.com/products/sts) and download the variant appropriate to the operating system being used. This guide is consistent with STS version 2.3.2.RELEASE. Previous versions may not work properly with the latest revision of
GreenPages, currently 2.1.0.M01.
Installing STS on Windows
™
operating systems
Unzip the download of STS to the root directory of a drive (this will avoid possible problems with long pathnames).
prompt> cd C:\
prompt> "%JAVA_HOME%"\bin\jar xf \full…path…to\springsource-tool-suite-2.3.2.RELEASE-e3.4-win32.zip
To verify the installation, run theeclipse.exeexecutable in the unzipped directory and check that STS displays a welcome panel. The first time there may be a short delay due to the initial set-up of indexes.
Installing STS on UNIX™operating systems
Unpack the download of STS to a suitable location on the file system, such as/optor, if root access is not available, the home directory. (If the download was automatically unpacked by the operating system, simply move the unpacked directory to the chosen location.)
To verify the installation, run the STS executable (Eclipse.appon Mac OS X) in the unpacked directory and check that STS displays a welcome panel. The first time there may be a short delay due to the initial set-up of indexes.
Adding the Virgo tools plugins
After installing and starting STS, click Help > Install New Software... and add the
SpringSource Tools tools update site (http://www.springsource.com/snapshot/e3.5). Install the SpringSource dm Server Tools which include the tools for Virgo. When prompted, restart Eclipse.
Note about Java versions in STS
SpringSource Tool Suite runs on Eclipse using Java Version 1.5, and Web Server requires Java Version 1.6. The GreenPages application built here also requires Java Version 1.6. Alter the default Java compiler settings in STS before proceeding:
1. In SpringSource Tool Suite, click Window > Preferences from the menu. 2. In the Preferences window, click Java > Compiler in the left panel. 3. In the right panel, set the Compiler compliance level to1.6.
4. Click Apply. You will get a message asking if you want a full rebuild; click Yes. The rebuild should take very little time to complete.
You might also see a message similar to the following on the settings panel: “When selecting
1.6 compliance, make sure to have a compatible JRE installed and activated (currently 1.5).”
A link to Configure this will appear. Select this link to open the Java--Installed JREs panel. If not already selected, choose a JRE suitable for Java Version 1.6.x (for exampleJVM
1.6.0). 5. Click OK.
2.4 Installing Apache Maven
Apache Maven, or Maven for short, is a software project management and comprehension tool
which uses a central Project Object Model (POM) to manage a project’s build, reporting and documentation generation. The POM files (pom.xml) are included in the projects for GreenPages.
To install Maven, visit the Maven website (http://maven.apache.org) and follow the download instructions from there. This document has been written and tested with Maven version 2.2.0. The rest of the document assumes that Maven commands (mvn …) are available from the command line.
3. Installing and exploring GreenPages
3.1 Introduction
GreenPages is a simple application that allows users to search an online email address directory. Each listing in the directory details the relevant email addresses and the name of the owner. GreenPages has only three screens: the search screen, the results screen and the listing detail screen.
In the search screen, users can enter search criteria to be matched against the listings in the directory. The result screen displays any listings that match the criteria entered by the user. The listing detail screen shows all the data known about a given listing.
Despite its simplicity, GreenPages is designed to demonstrate many different Web Server features and to act as a template from which other modular applications can be built. In particular, GreenPages demonstrates:
• module dependencies withImport-Package, • load-time weaving with JPA and AspectJ,
• bundle classpath scanning, and • service export, lookup and injection.
In addition to demonstrating common Web Server features, GreenPages demonstrates integration with: • Spring Framework 3.0; • FreeMarker 2.3; • EclipseLink 1.0.0; • H2 1.0.71; and • Commons DBCP 1.2.2.
Thegreenpages.dbmodule provides access to an external database and publishes a
javax.sql.DataSourceservice.
Thegreenpages.appmodule exports agreenpagespackage containingDirectoryand
Listinginterfaces.
Thegreenpages.jpamodule imports thegreenpagespackage and uses the
javax.sql.DataSourceservice to access the external database and publishes its contents as agreenpages.Directoryservice.
Thegreenpages.webmodule imports thegreenpagespackage and uses the
greenpages.Directoryservice to respond to web requests.
3.2 Obtaining GreenPages
This document provides instructions for building the complete GreenPages application and running it in Web Server as well as running tests and executing it from the SpringSource Tool Suite. In addition, the application is examined in development stages from SpringSource Tool Suite, stepping through the development process and comparing this to the solution.
To get the completed GreenPages application, including tests and explanatory skeleton parts: 1. download the latest ZIP file from
http://eclipse.org/virgo/documentation/
2. extract all the files from the ZIP file to a convenient directory (preserving the directory structure).
To extract the files on Windows:
prompt> mkdir c:\springsource\samples prompt> cd c:\springsource\samples
prompt> jar xf c:\path\to\greenpages-2.1.0.M01.zip
prompt> set GREENPAGES_HOME=c:\springsource\samples\greenpages-2.1.0.M01
To extract the files on Unix systems:
prompt$ mkdir -p /opt/springsource/samples prompt$ cd /opt/springsource/samples
prompt$ unzip /path/to/greenpages-2.1.0.M01.zip
prompt$ export GREENPAGES_HOME=/opt/springsource/samples/greenpages-2.1.0.M01
The environment variableGREENPAGES_HOMEset here is not used by the projects, but is used as a shorthand in the instructions that follow.
The GreenPages zip file contains two main directories calledsolutionandstart. The
solutiondirectory contains the completed application which can be built and tested (as described in the next section). Thestartdirectory contains an initial skeleton of the GreenPages application which can be used to generate the full application. The examination steps refer to this skeleton by way of illustration.
To follow the examination steps read Chapter 4, The Web Module after installing the full application in the following section.
3.3 Building and installing GreenPages
Building with Apache Maven
GreenPages uses Apache Maven as its primary build system. Each module of the application can be built separately and the entire application can built and assembled into a PAR file from a single location. To build the application and assemble it into a PAR file:
1. Make$GREENPAGES_HOME/solutionthe current directory.
2. Run the commandmvn package. The first time this is run several files will be downloaded from Maven repositories and SpringSource repositories. Subsequent runs will not need to do this.
3. Verify that thegreenpages-2.1.0.RELEASE.parfile exists in
$GREENPAGES_HOME/solution/greenpages/target.
Installing dependencies into Web Server
Unlike traditional Java EE applications, GreenPages does not package all of its dependencies inside its deployment unit. Instead, it relies on the mechanisms of OSGi to locate its
dependencies at runtime. When running an OSGi application on Web Server, these dependencies can be loaded into memory as needed, but first they must be made available to Web Server. The Maven build included with GreenPages uses thedependency:copy-dependencies
plugin to gather all the artifacts that GreenPages depends on that are not supplied by the Web Server runtime. These dependencies can then be installed into the Web Server repository.
Dependencies are gathered automatically during thepackagephase. These dependencies can be found in$GREENPAGES_HOME/solution/greenpages/target/par-provided. To install dependencies simply copy all the*.jarfiles from this directory into
$VWS_HOME/repository/usr. Installing dependencies on Windows:
prompt> cd %GREENPAGES_HOME%\solution\greenpages
prompt> copy target\par-provided\* %VWS_HOME%\repository\usr
Installing Dependencies on UNIX:
prompt$ cd $GREENPAGES_HOME/solution/greenpages
prompt$ cp target/par-provided/* $VWS_HOME/repository/usr
Notice that Web Server will not necessarily see these dependencies unless its repository indexes are rebuilt. Different repositories behave differently in this respect; some are passive (their indexes are built only once upon startup) and some are active (they can detect new files or files being removed dynamically). Theusrrepository is active so there is no need to restart Web Server when copying these files. The next time Web Server is started the-cleanoption will cause Web Server to re-scan the repository directories in any case. It is always safe to start Web Server with the-cleanoption.
Starting and configuring the database
GreenPages uses the H2 database to store all its data. Before you can start the application, you must start the database server and populate the database with data.
1. Change to the$GREENPAGES_HOME/dbcurrent directory. On Unix:
prompt$ cd $GREENPAGES_HOME/db
On Windows:
prompt> cd %GREENPAGES_HOME%\db
2. Run the database startup script appropriate to the operating system. For Unix, this isrun.sh, run in the background:
prompt$ sh run.sh &
Press Return to continue.
On Windows, run therun.batcommand:
prompt> run
For both platforms, the command might invoke a browser window offering a connection to the database; close this window.
3. Run the data population script appropriate to the operating system. For Unix, this is
data.sh:
prompt$ sh data.sh
On Windows, run thedata.batcommand:
prompt> data
You only to need run these commands once to start a database server for H2; the server will continue to run in the background.
Installing and starting GreenPages PAR
To install the GreenPages PAR into Web Server and start it:
1. Copy the GreenPages PAR to the$VWS_HOME/pickupdirectory. On Unix:
prompt$ cd $VWS_HOME
prompt$ cp $GREENPAGES_HOME/solution/greenpages/target/greenpages-solution-2.1.0.RELEASE.par pickup/
On Windows:
prompt> cd %VWS_HOME%
prompt> copy %GREENPAGES_HOME%\solution\greenpages\target\greenpages-solution-2.1.0.RELEASE.par pickup\
2. Start Web Server with the-cleanoption. On Unix:
prompt$ $VWS_HOME/bin/startup.sh -clean
On Windows:
prompt> "%VWS_HOME%"\bin\startup.bat -clean
3. Verify that GreenPages starts correctly by checking in the Web Server output for the log message:
<DE0005I> Started par 'greenpages' version '2.1.0.RELEASE'.
3.4 Browsing the GreenPages application
Once installed and started, the GreenPages application can be accessed with a web browser using the addresshttp://localhost:8080/greenpages.
After entering a query into the search box, the results page shows all the matches from the directory:
Clicking on view next to an entry in the search listing displays the full details for that listing entry:
3.5 Running GreenPages from Eclipse
Using Eclipse and the Web Server tools, it is possible to run applications directly from the IDE. As changes are made to the application in the IDE, they can be automatically applied to the running application allowing for rapid feedback of changes in function.
Importing the GreenPages projects into Eclipse
Before you can start the GreenPages application from Eclipse, you must import the projects. To import the projects into Eclipse:
1. Open the Import Wizard using File→Import.
3. Click Browse… and select$GREENPAGES_HOME/solutionas the root directory. 4. In the Import Projects window, select all the projects and click Finish:
5. Validate that the imported projects appear in Package Explorer:
There may be compilation errors at this stage.
Configuring Web Server target runtime
Projects for Web Server are associated with a Virgo Web Server runtime environment in Eclipse. This is to allow launching and testing from within Eclipse, and also to allow classpath
construction in Eclipse to mirror the dynamic classpath in the Web Server runtime. Compilation errors in the previous step will be resolved here.
To configure a Web Server runtime environment:
1. Open Window→Show View→Other….
2. In the Show View dialog choose Server→Servers to make the servers view visible:
3. Right-click in the Servers (which may not be empty) view and select New→Server. 4. In the New Server dialog, choose EclipseRT→Virgo Web Server and click Next.
5. Click Browse and select the$VWS_HOMEdirectory. Ensure that a JRE is selected supporting Java 1.6 or above. Click Finish to complete creation of the server:
6. Select all projects (except Servers) in Package Explorer. Right-click on the projects and choose Close Project and then Open Project.
which case a project clean build may clear the problems. Select Project→Clean… from the main menu, and choose to Clean all projects. It may be necessary to repeat this on a few projects. (This process is sometimes known as the “Eclipse dance”.)
Despite the dance steps outlined, there will remain some Warnings like this:
It is safe to ignore these.
Running GreenPages from within Eclipse
Now that GreenPages is successfully imported into Eclipse, you can run the project directly from within the IDE.
If you previously deployed the GreenPages PAR to Web Server by copying the PAR file to the
pickupdirectory, be sure you now remove it so that it does not conflict with the deployment of the Eclipse project. On Unix:
prompt$ cd $VWS_HOME/pickup
prompt$ rm greenpages-solution-2.1.0.RELEASE.par
On Windows:
prompt> cd %VWS_HOME%\pickup
prompt> del greenpages-solution-2.1.0.RELEASE.par
Also, to prevent conflicts with the server configured in Eclipse, stop a currently-running Web Server by typingControl-Cin the console window from which you started the server. To run GreenPages from within Eclipse:
1. Right click on the Web Server instance in the Servers view and select the Add and Remove… menu item.
2. Add greenpages-solution (which is the containing project or PAR) to the server and finish. 3. To start Web Server from within Eclipse right-click on the Web Server node in the Servers
window and choose Start. The Servers view should now show the server and the added project:
4. Verify that GreenPages is started correctly by checking for<DE0005I> Started par 'greenpages' version '2.0.1'.in the Console window.
(If errors are shown implying that GreenPages failed to be installed, this may be because some
dependencies were not copied to Web Server, as described in section the section called “Installing dependencies into Web Server”. Check this.)
Once installed and started GreenPages is again available from a web browser at the address
4. The Web Module
4.1 Introduction
In common with most Enterprise Java applications GreenPages uses a web-based interface for user interactions. The following steps show how the controller for the application is constructed, using a service from the OSGi Service Registry.
It is assumed that the instructions in Chapter 2, Installation have been followed already and that the GreenPages zip file has been downloaded and unzipped as described in Chapter 3, Installing
and exploring GreenPages.
4.2 GreenPages set up
Before beginning, configure the development environment to work with the application. In the case of GreenPages this means Maven and Eclipse.
Setting up Eclipse (STS)
The following sections are most easily followed in the Java perspective (not, for example, the Java EE perspective). If not already in the Java perspective, switch to the Java perspective in SpringSource Tool Suite using the Open Perspective menu:
In this step create a reference to the Web Server instance that the GreenPages application integrates with (this may already be created).
In STS open Preferences→Server→Runtime Environments. Select Add… to create a new Web Server runtime environment. In the dialog that opens, select the Virgo Web Server (runtime) v2.1 and check the box to Create a new local server. When complete, press Next.
In the next dialog, set the Virgo Web Server installation directory field to the value of
$VWS_HOMEand check that the JRE: option is set to Java 1.6 or above. This may not be the
workbench default. When complete, press Finish.
After returning to the Preferences window, press OK to return to Eclipse. The Servers view has opened and now shows an instance of Virgo Web Server in it.
There is also a Servers project, in which the server is listed.
4.3 The controller
The Spring’s @MVC style of web application development is used in which the central type is theControllerclass.
Import the web project
The GreenPages application is divided into OSGi bundles that are represented as Eclipse projects. In this step import thegreenpages.webproject.
Starting with no projects, import the web project by right-clicking in the Package Explorer view and selecting the Import… menu item. In the dialog that opens, choose General→Existing Projects into Workspace and select Next. In the following dialog set the root directory to the value of$GREENPAGES_HOME/start/greenpages.weband press Finish.
(Initially this project may have compiler errors; this is to be expected particularly if the Maven repository hasn’t yet been created.)
When this project is imported go to the next step.
The controller class
In thesrc/main/javasource folder of thegreenpages.webproject the package
greenpages.webshould contain the controller class namedGreenPagesController. Create this by right-clicking on thegreenpages.webpackage in thesrc/main/java
source folder and selecting New→Class. (If Class is not offered on the New menu the Java perspective may not be being used, in which case look for the Class option under Other… in the
Java section.)
The code should be edited to look like this:
@Controller
public class GreenPagesController { …
@RequestMapping("/home.htm")
public void home() { }
…
The annotationsControllerandRequestMappingare from Spring Framework and are imported by adding the lines:
import org.springframework.stereotype.Controller;
import org.springframework.web.bind.annotation.RequestMapping;
STS will offer (as a Quick Fix) to insert imports for these Spring Framework annotations the first time they are used. (Java 1.6 supports annotations, and the Spring Framework libraries are accessible by linking to the correct Web Server runtime environment or generating the correct dependencies for the Maven plug-in.)
Enabling component scanning
Spring will detect the@Controllerannotation and create a bean of controller type, provided
that it scans the classpath for these. Spring’s component scanning is enabled by inserting a
contexttag in one of the Spring bean definition files.
Open theWEB-INF/greenpages-servlet.xmlfile in thesrc/main/webappfolder and ensure the following lines are present:
<!-- enable classpath scanning -->
<context:component-scan base-package="greenpages.web" />
Experiment by adding and removing this line, saving the file after each change. (Easily done by
commenting it—use the Toggle Comment shortcut in STS.) Look in the Spring Explorer view for
a bean namedgreenPagesControllerdynamically created by thecomponent-scan
tag.
4.4 Deploying a bundle
During development time, it can be helpful to run an application inside of the deployment container. In the case of GreenPages, this means deploying thegreenpages.webbundle to the Virgo Web Server.
Deploying the
greenpages.web
bundle and starting the Web
Server
The Web Server can be used while working in Eclipse. In this step thegreenpages.web
bundle is deployed and the Web Server instance is started.
Drag thegreenpages.webproject from the Package Explorer and drop it on the Web Server instance in the Servers view. Becausegreenpages.webis a web bundle the server will start automatically, and a browser window may open. Expand the Web Server instance and the bundle
greenpages.webwill be listed as a child.
(Eclipse may open its internal web browser as this is a web project. You can choose to use this or just close it and use another browser later.)
If deployment has gone successfully the console will contain the message<DE0005I> Started bundle 'greenpages.web' version '2.0.0'.
Creating web module metadata
The Web Server has special knowledge of web application bundles. In this step web bundle metadata is added to the bundle and a web browser is used to navigate to it.
Open a web browser and navigate tohttp://localhost:8080/greenpages. If the link is not currently served by any bundle in the Web Server there may be an error displayed:
or else there is a blank page displayed. No pages are served.
To fix this issue thegreenpages.webbundle must be declared to be a web bundle and a context path defined.
Open thetemplate.mffile (at the top level under thegreenpages.webproject) and add (and save) the following entry (using the template.mf pane of the editor):
Web-ContextPath: greenpages
Be careful not to insert any blank lines or trailing spaces in this file.
Once added, right-click on thegreenpages.webproject and select Spring Tools→Run generation of MANIFEST.MF file. This will use a tool called Bundlor (included in STS) to update the OSGi metadata in theMANIFEST.MFfile. Once Bundlor has finished running, open theMETA-INF/MANIFEST.MFfile in thesrc/main/webappfolder.
It should look something like the following:
Manifest-Version: 1.0 Bundle-Name: GreenPages Web
Import-Library: org.springframework.spring;version="[3.0, 3.1)" Import-Bundle: com.springsource.org.apache.taglibs.standard;version="[ 1.1.2,1.3)" Web-ContextPath: greenpages Import-Package: org.eclipse.virgo.server.web.dm;version="[2.0.0, 3.0.0) ",freemarker.cache;version="[2.3.15,2.3.15]",javax.servlet.jsp.jstl.c ore;version="[1.1.2,1.2.0)",javax.sql,org.apache.commons.dbcp,org.spr ingframework.core.io,org.springframework.stereotype,org.springframewo rk.web.bind.annotation,org.springframework.web.context,org.springfram ework.web.servlet Bundle-ManifestVersion: 2 Bundle-SymbolicName: greenpages.web Tool: Bundlor 1.0.0.M6 Bundle-Version: 2.0
although the order of the entries may be different.
The server (if it is still running) will track these changes and automatically refresh (or restart) the
greenpages.webbundle as required. Observe the context path for the web bundle being announced (it should now be'/greenpages'whereas previously it would have been a
By default, Bundlor generatesImport-Packageentries with no version range specified. In the absence of a version range, the OSGi default (which denotes any version) is used. While this is very flexible it is generally a good idea to restrict an import by specifying a narrower range. This can be achieved by providing Bundlor with some additional information in the manifest template, as in the next step.
Add (and save) the following entry to thetemplate.mffile:
Import-Template:
org.springframework.*;version="[3.0.0, 3.1.0)"
(Again, be careful not to leave trailing spaces on lines or insert blank lines in this file, except that there must be one trailing space after the colon to indicate that the header continues on the next line.)
Re-run the MANIFEST.MF generation as described earlier. In theMANIFEST.MFfile the
Import-Packageentry should now have version ranges on each of thespringframework
packages: Import-Package: org.eclipse.virgo.server.web.dm;version="[2.0.0, 3.0.0) ",freemarker.cache;version="[2.3.15,2.3.15]",javax.servlet.jsp.jstl.c ore;version="[1.1.2,1.2.0)",javax.sql,org.apache.commons.dbcp,org.spr ingframework.core.io;version="[3.0.0, 3.1.0)",org.springframework.ste reotype;version="[3.0.0, 3.1.0)",org.springframework.web.bind.annotat ion;version="[3.0.0, 3.1.0)",org.springframework.web.context;version= "[3.0.0, 3.1.0)",org.springframework.web.servlet;version="[3.0.0, 3.1 .0)"
Behind the scenes the Web Server Tools have refreshed the deployed bundle as changes were made. Once again navigate tohttp://localhost:8080/greenpages. This page now displays an entry field.
Put any characters into the entry field and press Submit. This should display a “404” error page with the description:
description The requested resource () is not available.
This is because there is no search page (search.htm) to process this request yet. The next section will address this.
4.5 Creating a PAR
At the end of the previous step, the Web Server instance was started and the
greenpages.webbundle deployed. This bundle shows a static home page but a search value causes an error. The error appears because the URL for that search is not serviced by the
controller. The application logic behind the search request is not in thegreenpages.web
project but in another project calledgreenpages.app. This section creates the
greenpages.appproject and then combines the two projects into a PAR so as to deploy them together as a single unit.
While executing these instructions it is not necessary to remove bundles from the Web Server instance, nor to stop the instance. As changes are made the bundle will be refreshed (or
redeployed) and the server instance may report errors if the changes are incomplete. These may safely be ignored. Alternatively, thegreenpages.webbundle can be removed from the Web Server instance, or the server can be stopped while these changes are made.
Importing the
greenpages.app
project
In this step, thegreenpages.appproject is imported which contains the business interfaces (and stub implementations of these interfaces).
In the same way that the startinggreenpages.webproject was imported (see Section 4.3, “The controller”) import the$GREENPAGES_HOME/start/greenpages.appproject.
When Eclipse finishes importing the project, go to the next step.
Adding the controller implementation
The controller implementation will depend on theDirectoryandListinginterfaces found in thegreenpages.appproject. In this step, the implementation is added.
Open theGreenPagesControllerclass. Add the following field and methods to the class:
@Autowired
private Directory directory; @RequestMapping("/search.htm")
public List<Listing> search(@RequestParam("query") String query) {
return this.directory.search(query); }
@RequestMapping("/entry.htm")
public Listing entry(@RequestParam("id") int id) {
return this.directory.findListing(id); }
Add the (Quick Fix) suggested imports for the annotationsAutowiredandRequestParam, and choose the import forList< >fromjava.util.List.
Eclipse will not be able to suggest import statements for theListingandDirectorytypes. This is because thegreenpages.webandgreenpages.appprojects are not linked together and therefore cannot see each other’s types.
Creating a PAR project
In Web Server, applications consisting of multiple bundles can be packaged as part of a PAR. In this step a PAR project containing thegreenpages.webandgreenpages.appbundles is created and deployed to the server.
Right-click in the Package Explorer and select New→Project…. In the dialog that opens select Virgo Web Server→PAR Project and press Next:
In the New PAR Project dialog, ensure the Use default location option is unchecked, name the projectgreenpages, set the location to$GREENPAGES_HOME/start/greenpagesand press Next.
In the next dialog, some of the PAR properties are pre-populated. Change the Application Name toGreenpages PARand the Version to2.0.0, then ensure that the Target Runtime is set to
Virgo Web Server (Runtime) v2.1 and press Next.
In the next dialog, select thegreenpages.appandgreenpages.webbundles so that they are contained in the PAR and press Finish.
The projectgreenpages.webstill shows errors; these are soon to be fixed. The package explorer view will now show the following:
PAR project creation is complete, go to the next section.
4.6 Referencing an OSGi Service
In an OSGi-based application, the business logic behind a controller is typically accessed through the OSGi Service Registry.
Exporting Packages
By default, Bundlor detects and exports all packages in a bundle. In this step Bundlor is told what to export from thegreenpages.appbundle and which types from those packages to use in thegreenpages.webbundle.
Add and save the following entry to thetemplate.mffile in thegreenpages.appproject and then run theMANIFEST.MFgeneration on the project as explained in the section called “Creating web module metadata”.
Excluded-Exports: greenpages.internal
(As before, be careful not to leave trailing spaces on the ends of lines, except for the one space after the colon, and not to add any blank lines to the file. The second line of this entry has a leading space—do not omit it.)
Check that the package is no longer exported in thegreenpages.app MANIFEST.MFfile which should look something like this:
Manifest-Version: 1.0
Bundle-Name: GreenPages Service Bundle-ManifestVersion: 2 Bundle-SymbolicName: greenpages Tool: Bundlor 1.0.0.M6
Export-Package: greenpages;version="2.0" Bundle-Version: 2.0
Go to the next step.
Referencing Projects and Packages
Now that thegreenpages.appbundle exports the package that theDirectoryand
will update the Mavenpom.xmlfile to depend on thegreenpages.appbundle and import the package.
Open thepom.xmlfile in thegreenpages.webproject. (Edit the source directly by using thepom.xmltab in the editor.) In this file add the following entry (between the
<dependencies>tags):
<dependency>
<groupId>com.springsource.dmserver</groupId> <artifactId>greenpages.app</artifactId> <version>${project.version}</version> </dependency>
Open theGreenPagesControllerclass and import theListingandDirectorytypes. (Eclipse should now offer these as a Quick Fix. It it does not, setgreenpages.appas a project dependency ofgreenpages.webin the Build Path of the web project.) The class should now compile cleanly.
The following imports should now have been added to theGreenPagesControllerclass:
import greenpages.Directory; import greenpages.Listing; import java.util.List; import org.springframework.beans.factory.annotation.Autowired; import org.springframework.stereotype.Controller; import org.springframework.web.bind.annotation.RequestMapping; import org.springframework.web.bind.annotation.RequestParam;
Add the following package clause to theImport-Templateentry in thetemplate.mffile in thegreenpages.webproject. When added run the MANIFEST.MF generation on the project as described in the section called “Creating web module metadata”.
greenpages.*;version="[2.0, 2.1)"
Be careful to include the “.*” in the package pattern. Once Bundlor has finished, go to the next step.
Deploying a PAR
Currently the Web Server instance has a single web module bundle deployed. In this step, the
greenpages.webbundle is undeployed andgreenpagesPAR is deployed.
Right-click on the Web Server in the Servers view, and select Add and Remove…. In the dialog that opens, remove thegreenpages.webbundle and add thegreenpagesPAR to the server. When the configuration is complete, press Finish.
Eclipse automatically undeploys thegreenpages.webbundle and deploys thegreenpages
PAR. When this happens, the deployment may fail with an error. If it does not, open the browser again athttp://localhost:8080/greenpagesand observe the failure which should have a root cause similar to:
org.springframework.beans.factory.NoSuchBeanDefinitionException:
No matching bean of type [greenpages.Directory] found for dependency:
expected at least 1 bean which qualifies as autowire candidate for this dependency.
Dependency annotations: {@org.springframework.beans.factory.annotation.Autowired(required=true)}
This error is caused by there being no instance ofDirectoryto inject into the controller. The next section will supply one.
Referencing an OSGi Service
There is no instance ofDirectoryto be injected into the controller. In the GreenPages application, it is intended that this implementation is used through an interface in the OSGi
Service Registry. Using a service in the Service Registry enables another bundle to provide an
implementation without revealing the implementation or the provider to all clients of the service. Web Server supports the use of the Spring DM namespace for referencing elements in the OSGi Service Registry. This step adds an OSGi Service Reference to an implementation of the
Directoryinterface.
In thewebapp/WEB-INF/applicationContext.xmlfile in thegreenpages.web
projects add a reference to agreenpages.Directoryinstance in the OSGi service registry using the<osgi:reference/>tag as follows:
<osgi:reference id="directory" interface="greenpages.Directory"/>
The tools will automatically redeploy thegreenpages.webbundle when the change to the bean definition has been saved. The web bundle will not completely start.
This is because there is no provider of agreenpages.Directoryin the Service Registry. The next step will address this.
The error is re-issued as the Web Server instance waits for the service to be supplied. After about five minutes the server will “time-out” and the deploy will be abandoned. This same error (and time-out) will occur each time the PAR is redeployed as each change is made.
Stop the server instance by right-clicking on the server in the Servers view and selecting Stop. This will avoid unnecessary delays as changes are made.
4.7 Publishing an OSGi Service
At the end of the previous step, a dependency was created on an OSGi Service Registry exposed instance ofgreenpages.Directory. The application would not start because no other bundle was contributing an instance of this service to the Service Registry.
Stop the server instance before proceeding.
Add Implementation
In this step Spring’s context scanning is added which will create an instance of the
DirectoryImplclass.
Open thegreenpages.internal.DirectoryImplclass in thegreenpages.app
project. Add the@Componentannotation to the class:
@Component("directory")
public class DirectoryImpl implements Directory { …
generating imports with Eclipse’s help if necessary.
Open theMETA-INF/spring/module-context.xmlin thegreenpages.appproject. Add component scanning to this file:
<context:component-scan base-package="greenpages.internal"/>
When complete, go to the next step.
Publish OSGi Service
In this step theDirectoryImplinstance is published to the OSGi Service Registry.
Open theMETA-INF/spring/osgi-context.xmlfile. Add the<osgi:service/>
<osgi:service ref="directory" interface="greenpages.Directory"/>
A Working Web Application
Start (or restart) the Web Server instance from theServersview. If the GreenPages PAR was not removed before, it will be automatically deployed, otherwise deploy it as before. There should be no errors reported. When GreenPages is deployed successfully, open a web browser and navigate tohttp://localhost:8080/greenpages. On the home page typewilkinsoninto the search field and press Submit. Unlike the previous attempt, this should return a list (of size 1) of search results. From here, select view to get the “detailed” listing.
This uses a stub implementation of theDirectoryinterface which only knows about “Andy Wilkinson”.
The web interface is complete enough. Go to the next chapter to see the middle tier implementation.
5. The Middle Tier
5.1 Introduction
GreenPages’ middle-tier provides implementations of theDirectoryandListinginterfaces that can be used by the Web bundle. The implementation will use EclipseLink JPA to access a database via aDataSourcepublished in the OSGi service registry.
The database
The GreenPages application uses a very simple database that contains a single table. The table, namedLISTING, consists of four columns:
LISTING_NUMBER FIRST_NAME LAST_NAME EMAIL_ADDRESS
Scripts are provided with the sample source code (in$GREENPAGES_HOME/db) to start, create, and populate the database. These will be used during the creation of the middle tier.
Using JPA
The middle tier will provide JPA-based implementations of theDirectoryandListing
interfaces with the four attributes of aListing(first name, last name, email address, and id) being mapped to the corresponding columns in theLISTING. JPA will be used to implement the queries that search the database and returnListings.
Structure
The middle tier consists of two bundles,greenpages.jpathat publishes aDirectory
implementation for consumption by the Web bundle, andgreenpages.dbto configure and publish theDataSourceused to access the database.
5.2 Creating the DataSource project
This section describes how to use the bundle project creation wizard to create a newBundle Project. The project’s Spring bean definition files will also be created using the Spring bean configuration file creation wizard.
Creating a new Bundle Project
Create a new project by right-clicking in the Package Explorer view and selecting New→ Project…. In the resulting dialog select Virgo Web Server→Bundle Project (or, with early builds of the Virgo tools, SpringSource dm Server→Bundle Project) and press Next:
In the New Bundle Project dialog, name the projectgreenpages.db. Choose the create the project from an existing source location and specify a location that will place the new
greenpages.dbalongside the project skeletons that were imported into the workspace earlier. If thestartdirectory of the GreenPages sample is being used this will be
$GREENPAGES_HOME/start/greenpages.db. Click Next.
In this page of the wizard, many of the Bundle Properties are already populated. The
Bundle-SymbolicNameis the name of the project. TheBundle-Nameis derived from the
Bundle-SymbolicName. TheBundle-Versionis set, and there is no
Bundle-Description.
Change theBundle-Nameto “GreenPages DataSource” to more accurately describe the bundle’s purpose. An option to select a ‘Bundle Classpath Container’ is already selected. It should be de-selected, as a Maven Classpath container will be configured later. Ensure that the
Thegreenpages.dbproject appears in the Package Explorer view.
Configuring the project’s classpath container
Before a Maven Classpath Container can be added to the project, apom.xmlfile must be created. Create a new file in the root of thegreenpages.dbproject namedpom.xmland add the following contents to it:
<?xml version="1.0" encoding="UTF-8"?> <project
xmlns="http://maven.apache.org/POM/4.0.0"
xmlns:xsi="http://www.w3.org/2001/XMLSchema-instance"
xsi:schemaLocation="http://maven.apache.org/POM/4.0.0 http://maven.apache.org/maven-v4_0_0.xsd"> <parent>
<groupId>com.springsource.dmserver</groupId> <artifactId>greenpages.parent</artifactId> <version>2.1.0.RELEASE</version>
<relativePath>../parent</relativePath> </parent>
<modelVersion>4.0.0</modelVersion>
<groupId>com.springsource.dmserver</groupId> <artifactId>greenpages.db</artifactId> <name>greenpages.db</name>
<packaging>jar</packaging> <dependencies>
</dependencies> </project>
Save the file.
A Maven Classpath Container can now be added to the project. Right-click the
greenpages.dbproject in the Package Explorer and select Maven 2→Enable dependency management. Eclipse will perform some workspace building, and thegreenpages.dbproject
parent POMoccurs check that the version is correct. It may differ from the one given here.)
Configuring the source folders
The last part of the setup of the project is to configure its source folders. Return to the Properties dialog of thegreenpages.dbproject (from the Package Explorer view). Select Java Build
Path on the left-hand side and the Source tab on the right-hand side. Remove any pre-configured
source folders by selecting them and clicking Remove.
Now click Add folder and then Create new folder…. Specifysrc/main/resourcesas the folder name and click Finish, then OK and OK again.
The final change to be made is to drag theMETA-INFfolder fromsrcto
src/main/resources. Once these changes have been made the project will appear similar to the following in the Package Explorer view:
Configuring the DataSource
The DataSource bundle’s main rôle is to configure and create aDataSourceobject and to publish this to the OSGi service registry. This will be done by creating a handful of Spring beans.
By default, Spring DM looks for application context files in a bundle’sMETA-INF/spring
directory. Create a new folder namedspringin thegreenpages.dbproject’sMETA-INF
folder. Having created the new folder, right-click it in the Package Explorer and select New→ Spring Bean Configuration File. This will open the wizard for creating Spring bean configuration files.
Add the p - http://www.springframework.org/schema/p namespace declaration to the pre-selected
beans declaration and then click Finish.
Update the newly-created file (which is opened by Eclipse) to declare a bean that defines the