MASTERING (VIRTUAL) NETWORKS
A Case Study of Virtualizing Internet Lab
∗Chen Avin, Michael Borokhovich, Arik Goldfeld
Communication Systems Engineering Department, Ben-Gurion University of the Negev, Beer-Sheva, Israel [email protected], [email protected], [email protected]
Keywords: Virtual Labs, Networking Labs, open-source, web access, Xen, MLN.
Abstract: In this paper we describe a single-server-based system we developed for a large scale networking laboratory. The system, based on virtual machines, is capable of running many concurrent virtual networks, each consist-ing of PCs, routers and switches, that can be connected in various configurations. Lab users can initiate and switch lab experiments with a simple web-based interface and remotely access each of the network devices for configuration and measurements, therefore, users can perform the lab either in a 30 students lab session with a TA or from home at their convenience. In addition, administration tools are simple and most failures can be recovered using a web interface. This cost effective system is based on Linux and other open-source/freeware software and was proven to be very effective in practice in the last two years.
1
INTRODUCTION
In the course of educating computer, electrical and communication systems engineers the role of com-puter networks laboratory, and in particular Internet laboratory is very important. The design and im-plementation of a successful lab is very challenging, since the basic feature of such a lab is to facilitate a complex communication infrastructure between many and different networking devices. Moreover, lab users should be able to establish different network topolo-gies and to have full control (i.e., ”root access”) over the devices. Clearly, the design of lab experiments (by course instructor) is limited by the infrastructure constrains that the lab can support.
Solutions and approaches to networking labs evolved over the years, but the two basic ones are simulations lab and physical lab. Simulations-based labs, such as at (Wang et al., 2004) enjoy the ability to execute large scale and complex experiments, as well as the cost-effectiveness of the system. On the down side, these labs are based on network simula-tors (i.e., NS2, OMNeT++, OPNET) and by definition cannot fully capture the interaction between real
net-∗a paraphrase on the book title ”Mastering Networks:
An Internet Lab Manual” (Liebeherr and Zarki, 2003).
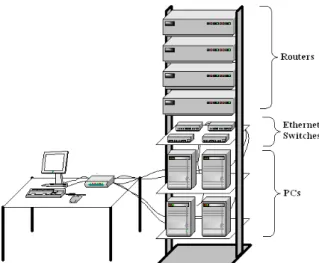
work devices. Physical based labs2such as in (Liebe-herr and Zarki, 2003) give an excellent platform to ex-perience networking scenarios, but are obviously lim-ited by their cost, accessibly and space. For example, in (Liebeherr and Zarki, 2003), a lab is limited by its size (four PCs, four routers and four Hubs). More-over, it is not realistic to assume that a school will afford to have so many lab stations (see Figure 1) for a course, which significantly reduces the lab availably for students. Recently, larger physical based lab tems (Emulab, 2008) were developed, but these sys-tems are still very costly and complex to implement and administer.
Another approach that is gaining popularity in re-cent years is virtualization or virtual labs (F`abrega et al., 2002; Kuczborski, 2005; Ramalingam, 2007; Stockman, 2003; Wang et al., 2004). Virtualization is referring to a hardware platform and software that enables it to run many isolated and independent op-erating systems i.e. virtual machines. This approach makes possible to run many network devices on a sin-gle computer
We take this direction and in this paper present a case study of the virtual network laboratory we
veloped and successfully exploited for almost two years. The basic idea behind the lab was to imple-ment the lab book ”Mastering Networks: An Internet Lab Manual” (Liebeherr and Zarki, 2003) into a vir-tual lab. Our system is based on a single hardware server that accommodates all virtual machines, open-source virtualization platform - Xen (Xen, 2008), opensource virtual networks management software -MLN (-MLN, 2008), our own software tools for the virtual laboratory management and user-friendly stu-dents’ interface, and a freeware VNC viewer program to access the virtual machines from any computer with Internet access. Our approach incorporates the benefits of the real hardware laboratory, eliminates al-most all drawbacks of other alternatives and is very cost-effective.
The rest of the paper is organized as follows: in section 2 we presents the main features of our system. Section 3 gives a user oriented overview of our lab and Section 4 discuss related work. Section 5 then describe in detail our hardware and software config-uration and we close the paper with some lab experi-ments examples.
Figure 1: Real Internet Lab equipment from (Liebeherr and Zarki, 2003).
2
SYSTEM FEATURES
The main features of our virtual networking lab are summarized bellow:
• System capacity: our single server system sup-ports the parallel running of 60 Virtual PCs (Linux based), 60 virtual routers (Linux based) and 120 virtual switches. This sums to a total of 240 vir-tual network devices that can be configured in
ar-bitrary topologies. Currently we divide these de-vices into 15 separate NetLabs, each consisting of four PCs, four routers and 8 switches. To the best of our knowledge such a large scale single server virtual system has not been used before.
• System flexibility: Any network topology of the above devices can be easily configured, includ-ing isolated networks, interconnection of subnet-works and netsubnet-works with an Internet access.
• User remote access: a user can access and run the lab from any PC connected to the Internet and equipped with a standard web browser and a (free-ware) VNC viewer. System users can select and activate different lab topologies via a simple web-based interface. Activating or switching between the topologies takes about 10 seconds which is much faster than other approaches (i.e., cables in real lab or MLN start/stop projects). In addition, users can access their network devices remotely via VNC clients.
• Cost and space effective: the system is based on a single $3,000 server; there is no need for many costly devices that occupy a lot of lab space.
• In-class instructions: following the above item, in practice we have a 30 students lab sessions, where students work in the lab with the help of a lab instructor. If and when the students need to complete the labs, they do it in their spare time, from home or any computer station in the campus.
• Simple system administration: This includes simple creation of new network topologies, web-based activity monitoring and failure recovery (i.e., start/stop networks devices and labs), and upgrade of virtual machines (i.e., virtual hardware changes and installation of new software).
• Open source/freeware software.
• Failure recovery: users can safely have ”root” permissions since in case of failure it is easy to recover the VM (just by replacing the damaged image). The single server allows for full backup and redundancy.
3
LAB OVERVIEW
In this case study we implemented the lab to enable students to run networking experiments taken from Liebeherr and Zarki book ”Mastering Networks: An Internet Lab Manual” (Liebeherr and Zarki, 2003). The book gives a good and detailed set of Internet labs which require a unit of equipment for each team of students (in our case students work in pairs). Such
a unit has to include four PC’s, four routers and four hubs for device interconnection. We call such a set NetLab. Additionally, working in the real lab re-quires cables, connectors and a control unit (i.e, KVM switch, display, etc.). Figure 1 (taken from the book) illustrates a real NetLab.
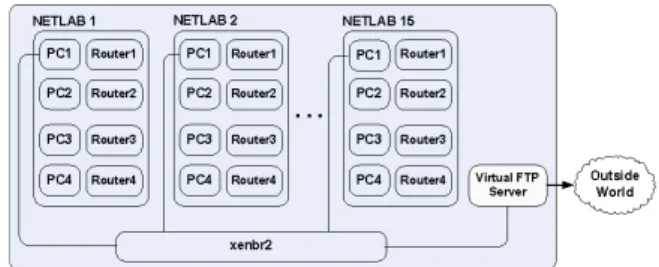
Using virtual machines, we created a collection of NetLabs, each consists of four virtual PCs, four vir-tual routers and 8 virvir-tual switches3. Ideally, we would like to grant each team (pair) of students an exclusive use of a unique NetLab (we distinguish between Net-Lab by their IDs) during the whole course. But, due to the hardware and software limitations (described later in the paper), we couldn’t have more than 15 NetLabs (or 15*8=120 virtual machines) running concurrently, so in practice every three pairs share a virtual NetLab (but at different times). Each NetLab was configured as an isolated private network. To enable access from each network to the real world (mostly for transfer-ring files required for lab reports) we added a virtual FTP server that was connected on one side to all the NetLabs and on its other side to the Internet. Figure 2 illustrate our virtual labs architecture.
Figure 2: Our virtual lab architecture.
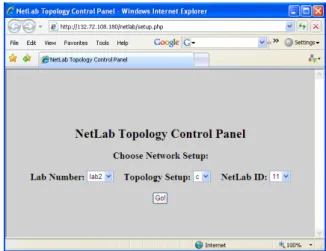
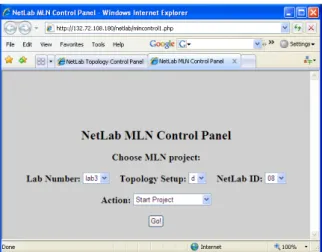
Students/users’ interface to the lab is very con-venient. By using a web browser, users can choose and activate the lab experiment and the topology setup they need to take (single lab experiment can have sev-eral different topologies). Currently, users can choose from an existing set of labs supplied by lab admin-istrators. Due to a new approach that we developed (describe later) the process of setting new topology takes about 10 seconds. Previously (e.g., start/stop machines), the task of changing topologies was very slow, and actually it was not feasible if a few groups wanted to change/start topologies in a short time pe-riod (e.g., start of class). Figure 3 is a print screen of the topology control Web page.
3we needed 8 switches instead of four hubs since in
some lab routers are directly connected to PCs.
Figure 3: Users topology control Web interface.
After setting the topology, in order to perform the lab, students need to access network devices, config-ure them, run commands and perform measconfig-urements. We enable access to virtual machines (i.e., PCs and routers) using a VNC-viewer program which serves as an input/output to it. Each virtual machine gets a unique VNC display number which must be known before accessing the machine. Figure 4 presents an example of students’ view of the lab: a screen of sev-eral VNC displays opened in parallel. The top-right window displays the desktop of a PC that runs soft-ware for capturing and analyzing network traffic. The bottom-right window displays the desktop of a router and shows the configuration process.
3.1
Example: Dynamic Routing Lab
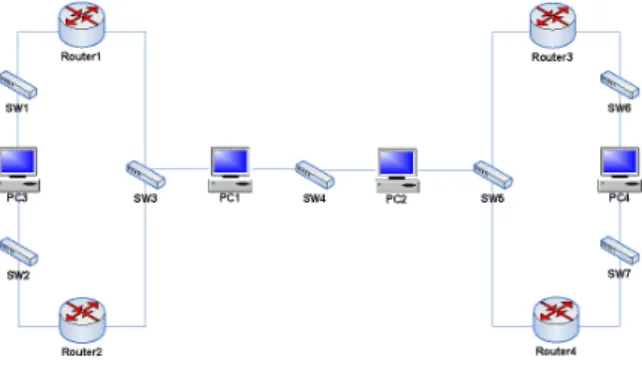
The dynamic routing lab, taken from (Liebeherr and Zarki, 2003), is an example of an advanced network-ing lab in which students learn and practice routnetwork-ing protocols used in the Internet. The lab utilizes all four PCs and four routers and includes experiments with RIP, OSPF and BGP protocols. During the lab students explore features, benefits and drawbacks of each protocol. Figure 5 describes one of the topolo-gies used during this lab.
Figure 5: Example of dynamic routing lab.
4
RELATED WORK
In this section we present related work done in the area of computer networks laboratory education.
Real Computer Networks Lab Approach This
approach was proposed in the Liebeherr and Zarki book ”Mastering Networks: An Internet Lab Man-ual” (Liebeherr and Zarki, 2003). There, the labo-ratory should be equipped with real computers and routers. The advantage of this approach is that the students work with a real hardware, connect real ca-bles. Unfortunately this approach has the following drawbacks: real hardware is very expensive, it re-quires a lot of space and sophisticated maintenance. Moreover, if there is not enough equipment, students have to do time-sharing on the hardware, hence it is impossible to perform group lab sessions with instruc-tor. And, of course, students can’t get the ”root” per-missions on the real machines because the recovery is not straight-forward and may take significant time.
Simulation Approach In (Wang et al., 2004) the authors propose the design model and implementa-tion method of virtual computer networks lab which is based on NS2 simulator. There is a single pow-erful server that utilizes NS2 as computing platform.
The web-based software layer between the user and NS2 eliminates the trouble of studying the NS2 sim-ulator. User’s can access the lab remotely using the Java Applet. This approach allows students to con-struct network scenarios quickly and to study differ-ent networking protocols. The drawback of this ap-proach is that users (students) do not work with real (or virtual) computers and routers, thus do not learn how to configure them.
Virtual Machines Approach (Kuczborski, 2005) describes the benefits of virtual machines and vir-tual networks for on-campus and distance education, as well as industry-based training. In the proposed approach, the VMware or VirtualPC are used as the virtualization platform. Then, students build their virtual networks on their computers. This method have some drawbacks, namely, there is no centralized server holding all virtual machines, thus the lab main-tenance becomes difficult. Students must be familiar with the virtualization software since building virtual networks is not a trivial task for beginners. Also, the suggested virtualization software is not a freeware.
Emulab Approach Emulab (Emulab, 2008) is a large plant of powerful and expensive computers run-ning common management software and initially de-signed for research purposes. The idea of using Emu-labs for educational purposes is presented in (Laverell et al., 2008). Until now, Emulabs, were used only for research purposes, since they are very expensive and Emulab management software is very complex, thus, substantial knowledge and experience is required to deploy it. Once deployed, Emulabs provides an ex-cellent platform for operating system and network-ing projects. Emulab management software allows to build networks and also to define links type and band-width. The major Emulabs drawbacks are: expensive hardware and a very complex maintenance
5
DETAILED SYSTEM
ARCHITECTURE
In this section we present the hardware and software tools that were used in creating the virtual laboratory. As mentioned earlier, our system is based on a single physical server (”the lab server”) with the following hardware and software parameters.
5.1
Hardware
The lab server is equipped with Intel’s Xeon E5310 CPU which supports hardware assisted virtualization. This feature is used by the Xen virtualization software to achieve better performance of the virtual machines. Hardware assisted virtualization feature allows virtual machines to access hardware resources directly, thus improving the performance. Relatively large amount of RAM is needed since all virtual machines share the same physical memory. Large amount of hard disk space is required as well. Hard disk space is used for virtual machines’ images storage and swap files, sys-tem and images backup. Image backup is essential since an image may be easily damaged by an inex-perienced user (every user has ”root” permissions on virtual machines). The lab server hardware specifica-tions summarized in the Table 1.
Table 1: Lab server hardware
CPU Intel Xeon 1.6GHz, E5310, Quad Core Number of CPUs 2 (8 cores)
RAM 8GB
Hard Disk 250GB Number of Hard Disks 4
5.2
Software
The lab server’s software consists of the following main components:
5.2.1 Virtualization Platform - Xen
Xen is an open-source software layer that runs di-rectly on the server’s hardware and enables it to run many isolated and independent operating systems, i.e. virtual machines. Since we use Xen paravirtualization (for better performance) rather than full virtualization, we must use ported versions of hosting and guest op-erating systems. The version currently in use is Xen 3.1, though we are planning to move to the version Xen 3.3.
5.2.2 Hosting Operating System
The main operating system that controls the lab server is called hosting operating system or Dom0 (i.e. domain 0). This OS is a Debian Linux 4.0 with 2.6.18-xen kernel supporting SMP - Symmetric Mul-tiprocessing (technology in which each CPU core is treated as a single processor and all cores share the same main memory). This OS was chosen mainly be-cause MLN best runs on it.
5.2.3 Virtual Machines’ Builds
The virtual machine images were initially created dur-ing the MLN build process. All of them - routers included - are based on Debian Linux 4.0 template. Additional software packages were subsequently in-stalled to accommodate for the lab needs. Each vir-tual machine is assigned 64M RAM out of server’s physical memory.
• Quagga routing suit. Quagga is a software pack-age that provides static and dynamic routing ca-pabilities and has Cisco IOS-like command line interface. Working with Quagga-equipped Linux machine is similar to working with Cisco router.
• Packet-tracing software: Tcpdump, WireShark
5.2.4 Virtual Machines’ Management
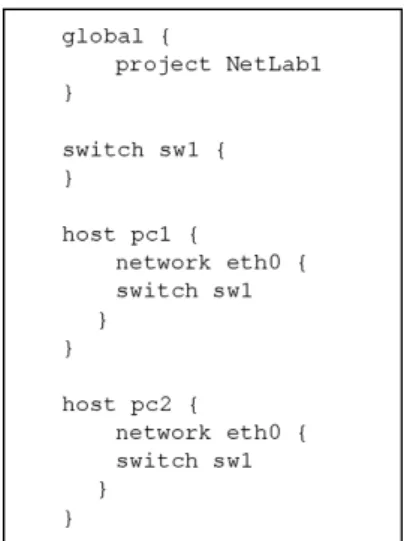
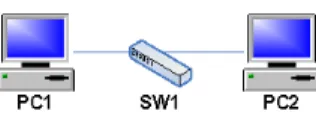
For managing virtual machines we use open-source software package called MLN - Managing Large Net-works. MLN allows to create easily sets of virtual machines (called MLN projects) and to connect them into a network. MLN is developed and maintained by Kyrre Bergnum of the Oslo University College. MLN uses an original high-level language to describe vir-tual networks. It is easy to create the desired number of network interfaces for each virtual machine using MLN. It also provides scripts for starting and stop-ping the whole project or each separate virtual ma-chine. Figure 6 presents an example of MLN code that creates a simple network (i.e., MLN project) of virtual machines with the topology of Figure 7.
Figure 7: Network topology corresponding to the configu-ration on Figure 6.
5.2.5 Bridge Utils
Bridge Utils is a necessary software package when working with Xen. This package allows creation and management of virtual Ethernet bridges/switches that are used to interconnect virtual machines. Following is an example of disconnecting one virtual machine (machine with domain number 57 and network inter-face number 0) from a virtual switch ”sw1” and con-necting the same network interface to another virtual switch - ”sw2”.
brctl delif sw1 vif57.0
brctl addif sw2 vif57.0
Figure 8: Bridge Utils commands example
5.2.6 Xen VNC Framebuffer
VNC (Virtual Network Computing) software was chosen to provide an access method to the virtual ma-chines and routers. Fortunately, Xen has an integrated VNC server (xen-vncfb), which allows direct connec-tion to the virtual machines’ desktops. The alternative is to run a VNC server on each virtual PC and router and configure every one of them with real IP address, which is unrealistic, given the number of machines and routers we employ. The lab server software is summarized in the Table 2.
Table 2: Lab server software OS Debian Linux 4.0 Linux Kernel 2.6.18-xen, SMP Virtualization Platform Xen 3.1
Virtual Network MLN (Managing Management Large Networks) Virtual Ethernet Switches Linux Bridge Utilities
Virtual Machines Virtual Framebuffer Access (VNC Server)
6
LAB DESIGN
This section describes our design of the virtual labo-ratory, students and administrator’s interfaces and ad-ditional software tools that were developed for the lab management.
6.1
Lab Organization
As mentioned earlier in the paper, we refer to the set of 4 Linux PC’s, 4 Cisco-like routers and 8 Ether-net switches as NetLab. Using virtualization, we cre-ated each NetLab as a single MLN project. Ideally we should have created as many NetLabs as the num-ber of students teams (in our case they work in pairs), thus, each team would have a separate NetLab for ex-clusive use during the whole course. In doing so, we encountered a problem with Xen limiting the overall number of virtual machines, no matter what amount of RAM is installed. Further investigation showed that, in fact, Xen limits the size of the operating sys-tem interrupt vector to 256, which results in overall limitation in the number of block devices it supports. A block device is a virtual hard disk partition or a vir-tual network interface card. Each virvir-tual machine or router has one hard disk partition and two NICs, thus one NetLab requires 24 block devices. That led to the maximum of 10 NetLabs running concurrently on the server. The solution to the problem was to mod-ify the Xen source code to overcome this limitation. Namely, we changed the size of the Interrupt Vector from 256 to 4096 and recompiled the whole source tree. More minor modifications were made to opti-mize Xen performance. Detailed technical descrip-tion of the changes is out of this paper’s scope. In our current Virtual Lab setup we have 15 NetLabs running concurrently on the Lab server (see Figure 2).
6.2
Virtual Networks Management
Building networks with virtual machines can be done using following two approaches.
6.2.1 MLN projects
In this approach, each MLN project defines a virtual network comprised of Linux PCs, Cisco-like routers, and Ethernet switches, thus, devices interconnections are defined in the MLN code. It implies that in order to change network topology students have to stop the current MLN project (eight virtual machines) and to start a new one. We developed a user-friendly web-based interface (written in PHP), which performs the required operations (i.e. starts, stops and checks the status of the required MLN project). Figure 9 illus-trates the interface of MLN projects management.
6.2.2 Network Topology Management
Under a heavy load (120 virtual machines), starting and stopping MLN projects takes considerably long time, thus, an alternative way of changing network
Figure 9: Web interface for managing MLN projects.
topology was designed. It is using Linux ”Bridge Utils” in conjunction with our custom-developed soft-ware. ”Bridge Utils” commands allow to discon-nect a virtual machine from one switch and condiscon-nect it to another one easily and efficiently, without need to restart the NetLabs. In such a manner we can always keep our NetLabs ”on air” all the time and change the topology (VMs’ interconnections inside each NetLab) using ”Bridge Utils”. Although this solution seems to be suitable, it requires student’s knowledge of ”Bridge Utils” commands which is not mandatory at this stage of education. To overcome this and to shorten the lab setup times, we developed a user-friendly web-based interface (written in PHP), which performs the required operations (i.e. sets the required NetLab topology). Figure 3 illustrates the interface of topology changing using ”Bridge Utils”. The management software uses the configuration files to create desired network topology. We have prepared the whole set of configuration files which describe ev-ery network topology we use. Figure 10 is an example of a configuration file corresponding to the topology shown in Figure 5.
Figure 10: Topology configuration file for the network of Figure 5.
As our experience shows, the ”Bridge
Utils”-based method of topology change is much more effi-cient than the MLN-based, and hence is almost solely used for network topology management. MLN is used only to create new virtual machines images and to startup/shutdown the NetLabs.
6.3
Lab Access (Lab Interface)
6.3.1 Students
Students’ interface to the lab is very convenient. They can access each virtual machine in their NetLab from every computer class using a VNC-viewer program. They also can access the virtual machines’ desktops from any Internet-connected computer running VNC viewer. VNC display serves as input and output inter-face to the virtual machine. Each virtual machine has a unique VNC display number which is assigned to it during the build process of the MLN project. Figure 11 bellow describes the way students connect to their virtual desktops:
Figure 11: Connecting to virtual machine.
Students also can set the desired network topology using the web-based interface presented in Figure 3.
6.3.2 Administrators
In addition to the lab interfaces available for students, lab administrators/instructors have an ability to easily manage MLN projects via the above-mentioned web-based interface (see Figure 9).
6.4
Interacting with the outer world
When performing the experiments, students are re-quired to save various data as files (e.g. packet trace log files or PC’s routing table) to be used in lab re-ports. Since all the virtual networks are isolated from the outside world due to security considerations, there is no trivial way out. For this purpose we designed the following solution. Another virtual machine called ”Virtual FTP server” was created on the lab server and equipped with two network interfaces. One of them is connected to the special internal virtual net-work, and the other one to the outside world (with a
real IP address). This special network consists of the ”Virtual FTP server” and all PC1 of all the NetLabs. In such manner, each NetLab has a way out. Figure 12 illustrates the idea.
Figure 12: Configuration with Virtual FTP Server.
7
LAB EXAMPLES
During the course the students are exposed to differ-ent network topologies, explore routing and transport protocols, learn to work with different networking tools. Now we will present some experiments per-formed by students during the course. Most of the experiments are based on the book ”Mastering Net-works”. Since it is written with the real laboratory in mind, changes were made to the proposed experi-ments to adapt for the virtual environment.
Single Segment IP Network In this lab students make their first steps working with computer net-works. They study how to configure IP addresses, test communication between devices and use sniffers.
Figure 13: One of the topologies for static routing lab.
Static Routing During this lab students become fa-miliar with routers. They learn how to configure Cisco-like router, gain knowledge of such concepts as routing table, default gateway, subnet, and network mask. Figure 13 describes one of the topologies used in this lab.
Other Experiments There are also other experi-ments that we performed in this lab:
• Dynamic Routing (RIP, OSPF, BGP)
• Multicast (IGMP, PIM, SSMPING, ASMPING)
• Transport Protocols (UDP, TCP along with its mechanisms for flow and congestion control)
8
CONCLUSIONS AND FUTURE
DIRECTIONS
In this paper we presented a virtual computer net-works laboratory based on a single server. The ad-vantages of it are the cost and space saving, energy saving, simple lab administration, flexible network topologies. We’ve exploited this lab for almost two years and students’ feedbacks were very positive and encouraging. As our future work, we are considering to scale up the system by using more then one server and to develop even more flexible user interface for network topologies construction. In addition, we are planning to develop many more lab experiments in the near future.
REFERENCES
Emulab (2008). http://www.emulab.net.
F`abrega, L., Massaguer, J., Jov´e, T., and M´erida, D. (2002). A virtual network laboratory for learning ip network-ing. In Caspersen, M. E., Joyce, D., Goelman, D., and Utting, I., editors,ITiCSE, pages 161–164. ACM. Kuczborski, W. (2005). A computer network laboratory
based on the concept of virtual machines. World Transactions on Engineering and Technology Educa-tion, 4(1):7–10.
Laverell, W. D., Fei, Z., and Griffioen, J. N. (2008). Isn’t it time you had an emulab? In SIGCSE ’08: Pro-ceedings of the 39th SIGCSE technical symposium on Computer science education, pages 246–250, New York, NY, USA. ACM.
Liebeherr, J. and Zarki, M. E. (2003).Mastering Networks: An Internet Lab Manual. Addison-Wesley Longman Publishing Co., Inc., Boston, MA, USA.
MLN (2008). Manage large networks. http://mln.sourceforge.net/.
Ramalingam, D. (2007). Practicing computer hardware configuration and network installation in a virtual lab-oratory environment: A case study. Frontiers in education conference - global engineering: knowl-edge without borders, opportunities without pass-ports, 2007. FIE ’07. 37th annual, pages F3G–21– F3G–24.
Stockman, M. (2003). Creating remotely accessible ”virtual networks” on a single pc to teach computer network-ing and operatnetwork-ing systems. InCITC4 ’03: Proceed-ings of the 4th conference on Information technology curriculum, pages 67–71, New York, NY, USA. ACM. Wang, J., Peng, B., and Jia, W. (2004). Design and imple-mentation of virtual computer network lab based on ns2 in the internet. In Liu, W., Shi, Y., and Li, Q., editors,ICWL, volume 3143 ofLecture Notes in Com-puter Science, pages 346–353. Springer.