Futuredata
Advanced Microprocessor Development System
Reference Manual
GenRad
future@@JC~@)
5
Futuredata
Advanced Microprocessor Development. System
Futuredata Advanced Microprocessor Development System
Reference Manual
copyright 1980
Genrad Futuredata Computer Corporation
All rights reserved.
Preliminary-edition
Genrad
TABLE OF CONTENTS
1 How to Use this Manual
2 Introduction to Microprocessor Development
3 Beginning Operation
4 Conventions
5 Command Files
6 File Manager
7 Editor
8 Assembler
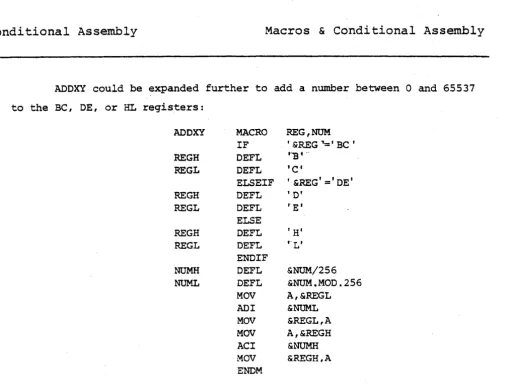
9 Assembler Macros & Conditional Statements
10 Program Segment Linker
11 Debugger
12 Emulator
Section 1
How to Use This Manual
This manual is designed to allow easy access to information needed by
the user of the Futuredata Advanced Microprocesser Development System.
Sections Sections are placed in the order of use. The beginning of
each section may be found by fanning the manual pages slightly and matching
the appropriate black block on the edge of the Table of Contents page with
that of the section. Sections of more than three pages are indexed.
Pages Each page has one or two lines across the top. If the page
holds information about a command or other input to the AMDS system, there
is one line. If the page holds purely explanatory information, there are
two lines.
Conventions An explanation of the conventions used to describe
commands is given in Section 4.
QUICK INTRODUCTION TO AMDS
For a quick introduction to AMDS features and capabilities, read
only the page headings, the information shown under the subheading PURPOSE
if that subheading is given, and look at the photographs of the keyboard
and the various displays.
PRELIMINARY EDITION
This is a preliminary edition of this manual. The next edition will
be automatically mailed to each AMDS user.
Section 2
Introduction to Microprocessor Development
SOFTWARE DEVELOPMENT
The Futuredata Advanced Microprocessor Development System provides
all of the software tools necessary for the rapid development of large
microcomputer programs. Four major functions of the AMDS are used for
soft-ware development. These are the Editor, Assembler, Linker, Debugger, and
File Manager.
Software development typically proceeds in the following manner.
First a program in assembly language (or Basic) is typed into the Editor.
The Editor provides a large number of features for easy entry and editing
of text. The finished program is then stored on diskette.
Then the Assembler translates the assembly language program on the
diskette to binary microprocessor instructions. The Assembler is capable
of detecting a number of syntax errors. If there are errors, the program
is edited using the Editor and assembled again. The executable binary
program is stored on disk.
Often the program is written in modules which may be located
any-place in memory, and which must be linked together. Relocation and linking
is performed by the Linker. The linked program is stored on a diskette
file.
The program is then executed by the Debugger which prov~des powerful
features for testing. The Debugger displays the contents of memory and the
microprocessor registers. Changes can be made where necessary.
Normally there are execution errors in a program when it is first
written. After the errors are found using the Debugger, changes are made
in the assembly language program using the Editor. The program is
assem-bled, linked and tested again. THis process is repeated if necessary until
the program is perfect.
Hardware Development
Microproces,sor Development
HARDWARE DEVELOPMENT
A hardware prototype is developed using the Emulator, which is pro-vided with a plug which fits directly into a microprocessor socket.
To the prototype, the Emulator appears almost ,exactly as though a microprocessor were plugged into the socket. However, the keyboard, dis-play, and all of the other features of the AMOS are available to the user during emulation. This makes testing of the prototype extremely efficient.
The prototype clock, interrupts, control lines, direct memory access, I/O, and memory may be tested separately.
TURNING ON POWER
Section 3
Beginning Operation
To begin operation:
1) Plug diskette drive cable into connector on AMOS back panel.
2) Plug in AMOS power line cord.
3) Turn on switch on back panel.
4) Turn on diskette drive unit.
5) Insert system diskette in drive O. For proper method of insertion see USING DISKETTES on page 3-3.
6) Wait 5 seconds for drive speed to stabilize.
7) Type
J{system-character}
to begin operation of one of the Futuredata system programs.system-character
is one of the following:M File Manager E Editor
A Assembler L Linker D Debugger
U Utility
B Basic Interpreter C Basic Compiler
TURNING OFF POWER
To turn off power:
1) Remove all diskettes. If a diskette is in the drive when power is
turned off, it is possible that the magnetic information stored on
the diskette will be changed.
2) Turn off diskette drive unit.
3) Turn off switch on AMOS back panel.
qsinq
Diskettes
Beginning Operation
HANDLING DISKETTES
A diskette is a flexible disk coated with magnetic material and
en-closed in a plastic jacket. A paper envelope is supplied for storage.
Observing the following rules will insure diskette reliability:
1) Never touch the magnetic recording surfaces of the diskette. These
surfaces can be seen through the holes punched in the jacket.
2) When a diskette is not loaded in a diskette drive, it should at all
times be kept in the envelope provided.
3) Never bend a diskette.
4) Never subject a diskette to magnets or magnetic influence. Diskettes
should not be stored near power transformers or motors.
5) Diskettes must be used and stored at a temperature within 50oF. This is
equivalent to 100e to 520C.
6) Always insert a diskette into the diskette drive carefully.
7) Do not write on the plastic jacket with a lead pencil or ball-point
pen. Use a felt tip pen.
8) Heat and contamination from a carelessly dropped ash can damage a
diskette.
9) Do not expose a diskette to sunlight.
10) Do not attempt to clean the magnetic surface. Abrasions may cause loss
of stored data.
Using Diskettes
Beginning" Operation
INSERTION INTO DRIVE
The proper position of insertion is shown in the drawing below. To
insert a diskette, depress the drive door latch. Insert the diskette with
the label to the right until a click is heard. Close the drive door.
Once the click is heard on insertion, it is not possible to remove
the diskette until the door is closed and opened again.
PHYSICAL WRITE PROTECTION
A diskette drive will not write on a diskette which has an open write
protection hole or notch. To write magnetic information on a diskette it is
necessary to cover the hole or notch with a tab or label. Tabs or labels are
supplied with the diskette. The magnetic information on a diskette may be
read regardless of write protection. System write protection is also
avail-able, see page 6-11.
UNPROTeCTED
Write
ProtC TaO
Futuredata AMOS Reference Manual 12/07/78
O
o©
V=
cQCl
o
WRITe "'OTecTeo
LV I
~
Futuredata AMDS keyboard The special keys on the
left are used in text editing. The arrow keys on the right scroll or
space through text (Editor) or memory (Debugger).
the far right are hardware control function keys.
The keys on
It is important to note that the bracket and brace keys to the right
of the Pare never used for entering commands. They are only used when
they are part of text. Brackets and braces in this manual show only the
COMMANDS
Section 4
Conventions
All commands and command parameters are printed in
Large
type. In Sections 8, 9, and 10, Assembler and Linker input is also shown inlarge type.
Command Letters Command letters, which must be typed exactly as
shown, are printed in upper case.
Command Parameters Parameters, which require a choice by the user,
are shown in lower case. If a parameter is optional, it is shown in
brackets:
[parameter]
If a parameter is required, it is shown in braces:{required-parameter}
Do nvt type the brackets or D£a~es. They only show syntax and are not part of any command or required input.Dots in Syntax ..• A series of dots in a command syntax shows that
the parameter previous to the dots may be repeated indefinitely. Vertical
dots have the same meaning.
Blank Spaces No blanks are allowed within system commands, and none
are shoWn. Blanks shown for Assembler and Linker input are required.
Special Keys are Shown with Rectangles A rectangle drawn around a
letter, series of letters, or a word indicates that a special key must be
depressed on the keyboard. The letters shown inside the rectangle are the
same as the letters printed on the key top. Here is an example:
IRETURNI (depress the return key)
Command Entry After each keyboard input the return key must be
depressed to indicate to the system that what was typed is ready to be
entered.
File Name Conventions
Conventions
FILE NAME CONVENTIONS·
Drive Number Prefix In any case where a file name is required as a
command parameter or an input,
d:,
whered
is the diskette drive number, must be prefixed to the file name unless the diskette is loaded in driveo.
If the prefix is not given, drive 0 is assumed.
Create File Prefix In any case where the file name of an output file
is required as a command parameter or an input,
N:
(new) may be prefixed to the file name to create the file before writing to it. The create commanddescribed on page 6-5 may also be used to create a file, but this command
can only be used during File Manager operation, whereas
N:
may always be used.Use of Both Prefixes When both prefixes are used, the sequence
is:
[N:] [d:]file-name
INTRODUCTION
Section 5
Command Files
The AMOS allows the user to save frequently used sequences of
commands on a diskette file and later to use this file for command input.
Provision is made for accepting input from the keyboard, prompting for
input, and for passing parameters to commands when initiating command
file operation.
IMPORTANT NOTE
The Assembler and Linker wait for
I
RETURNI
before accepting inputagain after operation. A command file must contain a blank line at this
point to ensure that these system programs terminate properly.
writing a Command File
Return to Keyboard for Input
Command Files
RETURN FOR ONE LINE
[prompt]"L
prompt
will be displayed when Command File processing reaches this line on the diskette file.Typing
I
RETURNI
causes the AMDS to continue reading commands from the file.ADDENDUM
prompt must be part of a command. No messages or characters
which are not part of a command are allowed in a
command file. Characters entered at the keyboard must,
when substituted into the line in which the carat L
occurred, become part of a legal command. The command
may continue after the carat L, and other carat L
instructions may be placed in the same line.
RETURN UNTIL A IS INPUT
[prompt]"K
prompt
will be displayed.No characters are allowed after the K.
PURPOSE
This command allows input from the keyboard until " is typed. The
AMOS then continues reading commands from the command file.
ADDENDUM
prompt must be part of a conmand. It may be absent. No char-acters which are not part of a command are allowed
in a command file.
Writing a Command File
Accepting Parameters
Command Files
COMMAND
A{n}
n may be any integer from 1 to 9.
PURPOSE
This sequence within a command in a command file will be replaced by
the nth parameter entered at initiation of command file processing.
EXPLANATION
Parameters will replace this sequence by direct substitution. The
command in which the sequence occurs will be expanded or contracted to fit
the parameter.
Initiating Reading of Command File
Aborting Operation
INITIATING READING
JA{file-name}[,parameter].
Command Files
file-name
is the name of the file on which commands have been stored.parameter
is a string of characters which will be directly substituted into commands on the file.PURPOSE
This command causes the AMDS to accept further command input from
the file
file-name.
EXPLANATION
Reading of this file for command input is terminated when the end-of
the file is reached, or if command file processing is aborted. Up to 9
parameters may be entered.
ABORTING OPERATION
SHIFT:
rBREAK
I
Command file processing may be aborted by holding the shift key down while
depressing the break key.
Messages
Command Files
NOT A COMMAND FILE
The file specified in a JA
file-name
command does not have the "C" attribute.FIRST CHARACTER OF FILE NOT "J"
The first line of a command file must start with a J command.
INTRODUCTION
Section 6
File Manager
The File Manager is a computer program which allows the user to
create, delete, and copy diskette files.
A file is any collection of information such as a program, data, or
binary computer instructions. Each collection of information is
referenced by a file name. A file is first created by executing a command
which writes the file name into the diskette file directory and allocates
to this file at least one track of the 76 available on the diskette. As
information is written to the file, the system automatically allocates
additional tracks as needed. One track at a time is added, unless a
greater number is specified when the file is created.
BEGINNING FILE MANAGER OPERATION
Enter JMIRETURNI to begin operation.
Initialize Diskette (I)
File Manager
COMMAND
I [drive-number]
drive-number
may be 0 or 1.drive-number
may be omitted; the system will specify drive 1.PURPOSE
Initialization A diskette must be initialized before it can be used
for the first time.
Erasure Initialization erases any information previously stored on
a diskette.
EXPLANATION
As supplied by the manufacturer, diskettes have no magnetic
infor-mation written on them. Initialization causes the boundaries of the tracks
which later will hold file information to be defined and formats a file
directory. Before initialization begins, the File Manager displays the
message: INITIALIZE DISKETTE ON UNIT n? Typing Y (yes) starts
initialization. Pressing the
jRETURNI
key bypasses initialization.Display Diskette Directory
(D)COMMAND
D[drive-number][P]
drive-number
may be the integer 0 or 1.If
drive-number
is not specified, the value assumed iso.
IfP
is appended, the directory will be printed.PURPOSE
File Manager
This command displays the file directory information which is on
the diskette loaded in the specified diskette drive. Included in the
directory display are: 1) the drive number in which the diskette is loaded,
2) file names, 3) file attributes, 4) the number of tracks allocated to each
file, 5) the number of tracks on the diskette which have not yet been
allocated.
File Name Conventions
Command Conventions
File Manager
NAME CONVENTIONS
Each collection of information stored on diskette is called a file
and is referenced by a file name. The File Manager will accept only names
which follow these conventions:
EXAMPLES
1) File names must be one to ten characters in length.
2) The first character must be a letter or a number. After the
first, any other ASCII character which results in a displayed
symbol may be used, such as slash, period, or hypehn.
3) No blanks, commas, or colons are allowed within the name.
These are legal file names:
A
COUNTERS23
COUNT.R
2
Q-B//3
DATA
COMMAND CONVENTIONS
[N:] [drive-number:] {file-name}
N:
specifies that the file is to be created.drive-number:
specifies the drive number in which the diskette is loaded. It may be 0 or 1. If this parameter is not included, 0 is assumed.EXPLANATION
N:
and/ordrive-number:
may be prefixed to a file-name in any command in which a file name is one of the parameters. The usage ofN:
must be appropriate; the file name it prefices must be one that will bewritten.
Create a File
(Cor
N:)File Manager
CREATE COMMAND
C{file-name}[,tracks[,extension-size]]
tracks
is an integer which specifies the initial number of tracks to be allocated to the newly created file. If omitted, the value used is 1.extension-size
is an integer which specifies the number of tracks which will be added to the total allocation oft~acks
each time information written to the file overflows the former allocation. If omitted,the val~e used is 1.
PREFIX CREATE COMMAND
N:
prefixed to any new file name specifies that the system will create the file before writing to it. See Command Conventions on the previous page.Scratch a File
(S)
Free Unused Space in File
(F)File -Manager
SCRATCH FILE COMMAND
S{file-name}
The system will request verification: SCRATCH THIS FILE? Type Y (yes).
Pressing the
IRETURij
key causes the command to be ignored.PURPOSE
This command deletes the file name from the directory and releases
the diskette tracks which had been allocated to that file.
The scratch command requires writing to the directory. If the file
has the P attribute (permanent) or if the d{skette is physically write
protected, deletion cannot take place. (See Specify File Attributes
Command in this section for information on the P attribute. See Section 3
for further information on physical write protection.)
FREE UNUSED SPACE IN FILE
F{file-name}
PURPOSE
This command releases unused diskette tracks from a file.
EXPLANATION
If new file information is written over the information on an
existing file, and the new file information does not require as much space
as the overwritten file, the unneeded diskette tracks may be returned to
system availability.
Rename File
CR)
Exchange File Names
(E)File Manager
RENAME FILE COMMAND
R{current-file-name},{new-file-name}
PURPOSE
This command renames a file, leaving all other information
unchanged.
EXCHANGE FILE NAMES COMMAND
E{file-name-one},{file-name-two}
PURPOSE
This command exchanges the names of two files, leaving all other
information unchanged.
Copy
File
File Manager
COMMAND
M{from-file-name},{to-file-name}
M{[d:]from-file-name},{[N:](d: to-file-name}
(creates new file)d is the drive number. It may be 0 or 1.
PURPOSE
Copies (moves) all information stored under
from-file-name
to the fileto-file-name. to-file-name
may be prefixed byN:
to indicate that it is a new file which must be created. In this case, the new file will begiven the same attributes as the "from-file."
d:
may be prefixed to any file name to indicate the diskette· drivenumber.
EXAMPLE
MFILE-A,N:l:FILE-B
This example creates the file
FILE-B
and copies the information onFILE-A
toFILE-B. FILE-B
is on diskette drive 1.MFILE-A,N:FILE-B
FILE-B
is on diskette drive O.Copy Diskette
(X)File Manager
COMMAND
X{from-dr;ve-number},{to-dr;ve-number}[,type]
drive-number
may be 0 or 1.type
may be anyone of the following characters:A
copy all filesS
copy only files with a Z attribute (system files)If
type
is omitted, only files without a Z attribute will be copied.PURPOSE
This command allows easy bulk copying. It is recommended that at least one copy be made of an important diskette to insure against loss in case the original is damaged or lost.
EXPLANATION
The name of each file is displayed as it is being copied. If a file to be copied already exists on the "to-drive" and has the sa~e name as a file on the "from-drive," the name of the file and the message WRITE INTO EXISTING FILE? will be displayed. Typing Y (yes) authorizes writing over the existing file. Pressing the RETURN key will bypass the copying of that one file.
Futuredata AMOS Reference Manual 12/07/78
Specify File Attributes
(A)File-Manager
COMMAND
A{file-name}[,attribute[attribute) ... ]
attribute
may be any combination of the following characters:PURPOSE
Data Type Attributes
S
source file (text)C
command file (text)R relocatable object file (binary)
o
absolute object file (binary)Z
system fileFile Protection Attributes
P
permanent file (cannot be deleted)W
write-protected file (cannot be overwritten)B
blind file (not listed in the file directory)File attributes help prevent the misuse or accidental destruction of
files. Except for a blind file, file attributes are listed in the file
directory display; they are a useful bookkeeping aid.
EXPLANATION
Data Type Attributes Data Type Attributes specify the kind of
information contained in the file. These are helpful in preventing file
misuse. For example, the Assembler will not attempt to assemble a file
with attribute R (relocatable object file). Instead, the system will
display the message:~NOT A SOURCE FILE.
specify File Attributes
(A)File Manager
Programs supplied by Futuredata will use only files with the correct
attributes, as shown:
Program
Editor
Assembler
Linker
Debugger
Basic Compiler
Basic Interpreter
Utility
System
Command File
Jump Command
Input File Attributes
S
S
R
0S
S
0 or
S
C Z
Output File Attributes
S
Ro
s
anyFiles may be given multiple data type attributes. For example, if it
is necessary to edit a command file it must have the attribute S. To
exe-cute
a
command file it must have the attribute C. If it is given both at-tributes, the file may be used in both ways without executing a newattrib-ute command. The system does not prevent assigning an inappropriate
attrib-ute, such as an S to a binary object file.
File Protection Attributes These attributes prevent the destruction
of a file. Also, the blind file attribute helps prevent use by
unauthor-ized persons.
Notice that to prevent deletion of a file and destruction of the
in-formation in a file by writing new inin-formation over it, it is necessary to
use both file attributes P and W.
Blind files are not listed in the File Directory~ thus they cannot
be used by persons who do not know the name of the file because it is
necessary to specify the file name to access a file. The existence of
blind files on a diskette can be determined without knowing the name,
how-ever. If the number of tracks allocated to files in the directory is less
than the number of tracks in use, the difference is the number of tracks
allocated to blind files.
Messages
File Manager
FILE NOT FOUND
The requested file was not found on the specified di.skette. Ei ther
the file does not exist, or an erroneous drive number was specified, or the
file name was type incorrectly.
DUPLICATE NAME
The new file name specified for creating or renaming already exists
on the specified diskette. Choose another name.
DRIVE NOT READY
The disk drive specified for use is not ready. This message is
generated when the referenced drive is unloaded. It will also be generated
if a recently loaded drive is referenced before it has come up to speed.
This takes appro~imately 5 to 10 seconds. Wait a few seconds, and try
again.
There are several conditions that will prevent a drive from becoming
ready for use. Probably the most likely is that the diskette is inserted
incorrectly or is defective. If this message is generated even when a new
diskette is used, it is possible that there is a hardware fault.
PERM FILE
The file referenced for deletion has the permanent liP" attribute and
cannot be deleted. If the attribute is changed, it can then be deleted.
WRITE PROTECT
A file has been selected for output that has the write protect "W"
attribute. The file may be read from, but not written into. If rewriting
is necessary, change the file attributes.
DISK FULL
Messages
File Manager
and none is available on the diskette. The message may occur when a new
file is being created, or when more space is required while writing into
an existing file. The space should be obtained on another diskette or by
deleting superfluous files on the full diskette.
NOT SOURCE FILE
This message is generated when a file without the source
"s"
attribute is specified as a file to be read by one of the system functions
that require source file input.
NOT OBJECT FILE
This message is generated when a file without the object "0"
attribute is specified as a file to be ready by one of the system functions
that require object file input.
PARM ERR
When displayed after a "J" command, this message indicates that the
requested function could not be found on the system diskette. This message
usually occurs when there was an invalid parameter character.
PERM I/O ERR
A permanent error has been detected. During a seek or read, the
system retries the operation 10 times before the message is generated.
During a write, the system rereads the data to see that it was written
successfully. If this read is unsuccessful, the write followed by read
check is also retried 10 times.
The message is most likely caused by a worn or defective diskette.
If it persists after trying several ndw diskettes, it may be a hardware
problem.
Messages
File Manager
END-FILE
A read operation has attempted to read beyond the end-of-file.
The following messages may be generated only when the user program call the
Disk I/O routines directly:
PARM ERR
A specification error was detected in the parameter list passed to
the Disk I/O routine.
FILE NOT OPEN
A function was attempted on a file that is not open.
INTRODUCTION
Section 7
Text Editor
The text Editor is a computer program which allows easy creation and correction of files of text. Examples of text include command files and computer instructions in Assembly language or Basic.
BEGINNING EDITOR OPERATION
Enter
JE IRETURNI
to begin editor operation. The display will then show two dashed lines across the center.Edi tor·· Display Editor
DISPLAY EXAMPLE
This is an example of an Editor display which has been filled with
text, in this case part of an assembly language program:
Notice that the cursor is on the command line. This indicates
that the Editor is ready to accept commands.
Editor Definitions
Editor
There are always two dashed lines across the display during Editor operation. These are a visual guide to the line used for text entry and editing (edit line).
Tab Line The dashed line just above the center of the display is
called the tab line. Vertical lines (+'s) on the tab line show the
position of tab stops. Tabs are set at positions 10, 18 and 42 automati-cally upon entering the Editor.
of assembly language mnemonics. commands. )
These positions are convenient for entry (Tabs may be set or cleared using the T
Edit Line The center line of the. display, which is between the two dashed lines, is the edit line. All text entry and editing is done on this line.
Entry Cursor The entry cursor is a blinking rectangle. This cursor is present at the command line during entry of commands and at the edit line during entry of text. The cursor is positioned at the bottom of the display when the Editor expects a command as the next entry at the key-board. The cursor is positioned on the edit line when the Editor expects text as .the next entry at the keyboard.
Command Line The command line is at the extreme bottom of the display. When the entry cursor (the blinking rectangle) is positioned on this line, commands to the Editor may be entered ..
Message Line This line is the second from the bottom of the display and is just above the command line. When an error is made in the entry of a command, an error message appears here. Some Editor commands request verification on this line. If there is no message, this line will be blank or contain text.
Workspace The workspace is a part of computer memory which holds more than a thousand lines of text (with 48K memory). The text may have been read from a diskette file or entered at the keyboard.
Display There is a special definition of the display during Editor operation: The display is that part of the workspace which is visible.
Editor Definitions
Editor
The display is 24 lines high and 80 characters wide. Twenty-one
lines of text are visible, and 3 lines are used for tab, dashed visual
guide lines, and commands. Messages to th.e user temporarily overwrite
the bottom text line.
Input File, Output File The Editor retains file names so that once
they have been specified in commands, they need not be included again.
Editor File Management
Load Workspace from
Fi~e(L)
Editor
COMMAND
L [file-name]
If
file-name
is omitted, text will be loaded from the input file previously specified in an L command.PURPOSE
This command causes the workspace area of computer memory to be loaded with text from the input file.
If a file name is specified, that file then becomes the new Input file. When an L command without file name is executed, the Editor uses the last specified Input file.
EXPLANATION
The first 11 lines of the loaded text will be ~ediately visible on the display. Other area of the workspace can be viewed using commands described later.
Information stored on the Input file is not altered.
The first time an L command is executed, text is loaded starting at the beginning of the file and continuing until the workspace is full or the end of the file is reached.
Second and subsequent executions of the L command load the workspace starting at the line after the last line loaded during the previous
execution.
If an attempt is made to load into the workspace after the end of the file has been reached, the message END FILE is displayed.
Editor File Management
Write Workspace to File
{W)
Editor
COMMAND
W[$][*][file-name]
If file-~ame is not specified, text will be written to .the output file
previously specified in a W command.
If the file
file-name
has not yet been created, it is necessary to create it by prefixing the file name with the charactersN:
If
$
is specified, only that part of the workspace from the beginning up to but not including the text entry line will be written to theoutput file.
If * is specified, the text which was written to the output file will not be removed from the workspace.
Both
$
and*
may be used in the same command, only in the order shown.PURPOSE
This command writes the workspace to the output file.
EXPLANATION
If a file name is specified, that file then becomes the new output
file used when an output command is executed withOut specifying a file
name. The command can also cause an output file to be created.
When a new output file is specified, the system displays the
message: END OUTPUT FILE? The user must type Y (yes) to end the old
output file and begin with the new file as the output file.
Editor File Management
Write Workspace Then Load
(N)
Editor
COMMAND
N
Both input and output filenames must have been previously specified.
PURPOSE
This command is the equivalent of a
W
command followed by anL
command.The entire workspace is written to the previously specified output file and completely removed from the workspace. Then the workspace is filled from the previously specified input file.
Editor File Management
End Output File
(E)
Editor
COMMAND
E
PURPOSE
This command terminates use of the present output file.
Enter Commands
DISPLAY
Keyboard Modes
(Command Mode)
Editor
The Editor is in the command mode when the blinking cursor is on the
command line (at the bottom of the display).
If a command is entered in error, a message is written on the error
line above the command line.
EXPLANATION
See the Keyboard Editing Operations table on Page 7-13 for an
explanation of command mode editing features.
Insert Text Lines
Keyboard Modes
(Line Insert Mode)
(I)
Editor
COMMAND
I IRETURNI
Enter Line Insert Mode[RETURNI IRETURN'
Leave Line Insert ModePURPOSE
I
This command allows entry of text to the workspace.
EXPLANATION
Execution of this command allows entry of a new line of text between
the edit line present before execution and the line above the edit line.
At execution, the edit line present before execution and all the
lines below it in the workspace are pushed down one line; the edit line is
then blank. Characters may then be entered to the edit line at the
keyboard.
At the end of entry of the new line, the
IRETUR@
key is depressedand the entire process described above is repeated.
Two successive depressions of the
IRETU~
key, with no keystrokesin between, cause the Editor to leave the text entry mode; the Editor is
then ready to accept a new command.
The character insert sub-mode may be entered from this mode by
depressing the IINSRTI key.
See the Keyboard Editing Operations table on Page 7-13 for an
explanation of editing features.
Keyboard Modes
Edit Text
(Line Editing Mode)
(X)
COMMAND
x
IRETURN)
(RETURN)
PURPOSE
Enter line editing mode
Leave line editing mode
Text may be edited efficiently in this' mode.
EXPLANATION
Editor
This command moves the blinking cursor to the edit line to enable editing that line. The character insert sub-mode may be entered from the mode by depressing the [INSRT I key. The scrolling keys
rn
and[I]
may be used in line editing mode to move other lines to the edit line. The cursor does not move during scrolling.See the Keyboard Editing Operations table on Page 7-13 for an explanation of editing features.
Insert Characters
Keyboard Modes
(Character Insert Sub-Mode)
Editor
COMMAND
IINSRT\
Depressing this key turns this mode on or off.PURPOSE
Characters may be inserted or deleted using this sub-mode without
re-typing the rest of the line.
EXPLANATION
The Editor is in Character Insert Sub-mode when there is an
asterisk on the dashed line below the edit line.
This sub-mode may be used in either the Line Insert Mode (I)
or the Line Editing Mode (X).
See the Keyboard Editing Operations table on Page 7-13 for an
explanation of editing features.
Special Keyboard Editing Operations Mode:
@i~!J
(delete)~
(cancel) IRETURNIElG
I SPACE I
other
Conunand
Removes character under cursor and all of line to right of cursor.
Removes entire line.
Scrolls text,
blanks command line.
Enters command.
Spaces cursor right or left, does not affect text.
Enters a blank under blinking
cursor, moves cursor right one space.
Line Insert (I)
Removes character above cursor and moves all of line to right of cursor one space left.
same
Returns Editor to conunand mode.
Depressing IRETURij
key twice causes Editor to leave line insert mode and returns to conunand mode.
same
same
Moves cursor left one same space, removes character
under cursor.
Enters character corresponding to key.
same
Line Edit (X)
same as Line Insert.
same
Scrolls text, cursor remains on edit line.
Editor leaves line editing mode, returns to conunand mode.
same same same same 7-13 Editor
Character Insert
(a submode, works with line insert and line edit modes)
same as Line Insert.
same
Leave character insert mode, scroll text.
Editor leaves character insert mode. Continues in line insert or line edit mode.
. same
Moves cursor, character under cursor, and all of line to
right of cursor one space right. Inserts blank at former cursor position.
Removes character to left of cursor. Cursor and all of line to right of cursor move one space left. Adds blank in right end of line.
Advance Displayed Text
Back Up Displayed Text
Editor
ADVANCE TEXT KEY
Each depression of this key advances the text one line.
ADVANCED TEXT COMMAND
An
n is the number of lines to advance. The number must be less than 256. A$ advances the text to the end of the workspace.
BACK UP TEXT K:::Y
Each depression pf this key backs up the text one line.
BACKUP TEXT COMMAND
Bn
n is the number of lines to backup. The number must be less than 256. B$ backs up the text to the beginning of the workspace.
Advance Displayed Text
Back Up Displayed Text
Editor
EXPLANATION
The following comparison explains the use of the words "advance"
and "back up." Compare the workspace to a very long sheet of paper with
the text typed on it. Compare the display to a small window which is in
front of one area of the paper.
As the text is advanced, the paper is moved upward, and the section
which can be seen through the window is closer to the end of the text.
As the text is backed up, the paper is moved downward and the
section which can be seen is closer to the beginning of the text.
Find (and Replace) a String in Workspace
(F)Editor
COMMAND
F[{delim}{string}{delim}l{rstring}{delim}[A] [V]]]
delim
is any character occuring in neitherstring
norr.string
string
is any series of display characters, including blanks.If
string
is not specified, the previously specified string is used.A
(all) specifies that all matches ofstring
from the current edit line to the end of workspace be replaced.V (verify) specifies that the system ask for verification before replacing a string. Type Y to replace, RETURN! to continue without replacing,
and N to terminate the F command.
PURPOSE
This command searches for a match between
string
and a character or series of characters in the workspace. The command may display the firstline found containing a match. Also, it
may
replace the charactersstring
with
rstring
in the first line or all lines containing a match.EXPLANATION
Finding a String When this command is used to find a string of
characters in workspace, searching begins on, the first line following the
current edit line. The first line in which a match occurs is displayed.
Since the parameters of the previous F command are saved, subsequent
searches may be initiated merely by executing the command
F \RETVRNt.
After a line is displayed, it is possible to enter the line edit mode
(X command) and change the text on the edit line or any of the surrounding
lines.
Finding and Replacing a String When this command is used to replace
a string of characters, searching begins on the current edit line. If
A
(all) is specified, searching and replacing continues to the end of
workspace.
Find (and Replace) a S.tring in Workspace
(F)Editor
It is possible to use this command to delete characters from lines
in workspace. This is done by specifying a null replacement string by
typing the second and third delimiters with no intervening characters
or spaces. This causes the characters in
string
to be deleted. The characters afterstring.
EXAMPLES
These are legal F commands:
Notice that th~ command
F
F/OLDSTRING TO BE DISPLAYED/
F*BAD*GOOD*AV
F.TEST.
would find two matches in the line:
THIS IS A TEST OF THE FITTEST.
Not only would the command find the word TEST, it would also match the last
syllable of FITTEST. This can be prevented by specifying a string with
blanks on both sides:
R. TEST •
This command would match only occurrences of the word TEST.
Get
{and Replace) a Strinq in File
(G)
Editor
COMMAND
G{{delim}{string}{del im} [{rstri ng}{del im}
[Al [V]]]delim
is any character occurrinq in neitherstring
nor-rstring
string
is any series of display characters, includinq blanks.If
string
is not specified, the previouslyspecifiedstrinq is used.A
(all) specified that all matches ofstring
from the current edit-line to the end of the Input file be replaced.V
(verify) specifies that the system ask for verification before replacing a string. Type Yto replace,IRETURNI
to continue without replacing, and N to terminate execution of the G command.PURPOSE
This command searches for a match between
string
and a character or series of characters in the workspace and Input file. The command may display the first line found containing a match. Also, it may replace the charactersstring
withrstring
in the first line or in all lines containing a match.EXPLANATION
'!'he G (Get) command is identical to the F command except that it searches both the workspace and the Input file. Searching· begins as in the F command. If the end of the workspace is reached during a search, all the text in the workspace is written to the OUtput file, the workspace is filled again with text from the Input file, and the search continues until a match between the text and the string is found or the end of the Input file is re.ched.
Except for the field of search, the explanation of the F command applies to the G command.
Delete Lines
(DEL)
Clear Workspace
(CLR)
Editor
DELETE LINES COMMAND
DEL n
If n is not specified, only the edit line is deleted. n must be less than 256.
PURPOSE
This command deletes the edit line and n-l lines beneath the edit
line toward the end of the workspace.
CLEAR WORKSPACE COMMAND
CLR
PURPOSE
This command clears the display and all of the computer memory
devoted to workspace.
set Tabs
lTcolumn-number)
Clear Tabs
(T)
SET TABS COMMAND
T{column-number}[,column-number].
Editor
Column-number
is an integer between I and 80 inclusive. If column-number is not specified, all tabs are cleared.PURPOSE
This command sets tabs to which the cursor will be advanced when the
tab key is depressed.
EXPLANATION
Each tab stop appears as a + symbol on the tab line. If the Tab key
is depressed when the cursor is at or past the last tab stop, the cursor
will appear at the first ch~racter on the line.
CLEAR TABS COMMAND
T
PURPOSE
The T command without parameters clears all tabs.
EXPLANATION
It is not possible to clear fewer than all the tabs.
Display Upper/Lower Case
(SU,SL)
Editor
COMMANDS
SU
SL
PURPOSE
The SU command causes all keyboard 'alphabetic entries to be entered
as upper case only, even though the shift key is not used.
The SL command allows entry of both upper and lower case characters,
as on a typewriter.
EXPLANATION
The SU command is useful for entry of assembly language mnemonics,
which must all be upper case. The SL command is useful for typing long
comments or text because of the greater clarity of upper and lower case
text.
Messages
Editor
SYNTAX
There is a syntax error in the command.
OVERFLOW
While inserting lines into the Editor workspace, the workspace has
become full. Allor part of the workspace should be written to the output
file. Use the W command on page 7-6.
NOT FOUND
In an F (find) or G (get) command, a character string match was not
found in the field of search.
NOT SOURCE FILE
The file which was designated in a L (load) command does not have
as
S
attribute. See File Manager, page 6-10, for a discussion of file attributes.FILE NOT SPECIFIED
An L (load) or W (write) or N command was entered without
specifying a file name and without having previously specified either an
Input or Output file.
END PREVIOUS FILE?
An attempt was made to write to a new Output file without ending use
of the old file (E command). Typing Y (yes) ends the previous file.
Typing Nor
IRETURNI
cancels the write command.END-FILE
The Editor has reached the end of the Input file.
Messages
Editor
SAVE DATA'?
An attempt was made to execute another Futuredata system program without writing the workspace to an Output file.
REPLACE THIS LINE
This message is a request for verification before replacing a string in the line displayed on the edit line (F or G command). Type Y (yes) to replace,
IRETU~
to continue without replacement, or N to cancelexecution of the command.
Futuredata AMDS Reference Manual 12/07/78
INTRODUCTION
Section 8 Assembler
An assembler is a computer program which converts mnemon~cs, chosen
for the ease with which they remind the programmer-of the function of an
instruction, to binary instructions, chosen according to the architecture
and ease of design of the computer.
The input to the Assembler is assembly source code in ASCII
charac-ters. The Assembler evaluates the input on a line-by-line oasis. Each line
is either an assembler statement, which results in a binary computer
in-struction, or an assembler directive, which directs the Assembler to perform
some other operation that mayor may not result in the generation of binary.
There are two categories of assembler directives. There are
direc-tives which do not result in the generation of binary. These are sometimes
called pseudo-instructions, pseudo operations, or pseudo-ops; in this manual
they will be referred to simply as assembler directives.
There are two kinds of assembler directives which do result in the
generation of binary. There are Macros, which allow the programmer to
de-fine an assembler statement that produces many computer instructions, and
there are Conditional Assembly Directives, which generate different
se-quences of binary depending on simple ,specifications at the beginning of the
program. Macros and Conditional Assembly are described in the next section,
Section 9. Instruction mnemonics and assembler directives are collectively
called assembly language.
The Futuredata Assembler provides a single standard set of rules of
use, options, and assembler directives for several microprocessors. This is
an important advantage, since the programmer need only learn one assembler.
In all cases the assembler mnemonics are identical to those specified
by the microprocessor manufacturer.
Beginning Assembler Operation
Assembler .
BEGINNING ASSEMBLER OPERATION
Type JA
@ETUR@
to begin Assembler operation. A list of Assembleroptions will appear on the screen.
Assembler Options
Assembler
ASSEMBLER OPTIONS
L Display a program listing on the screen. This option is affected by the
T and E options.
M This option selects the use of a macro library. If the assembler does
not find a macro definition on the input file, it will search the
macro library file. The definitions of commonly used macros may be
kept on the file, making it unnecessary to write them into programs.
A macro file is originated using the Editor. The library file is
read until i t reaches the end of the file or encounters a statement
which is not part of a macro definition. The only statements which
may appear between macro definitions are printer control directives.
(See page 8-18). Comments may not appear between macro definitions.
Any legal statement may appear inside a definition. This feature
allows the use of a source program file which has macros defined at
the beginning as a macro library.
o
Write a binary object file to diskette. When this option is selected, anobject file is always written, even if there are errors in the
assembly.
T Truncate lines of the display to 80 characters.
truncated. )
(Printer lines are never
The T option limits listings of the DC directive to a one line. If this
option is not specified, all lines generated by the directive are
output, one byte per line. This feature of the T option operates
identically for printer or display.
E Only lines containing errors flagged by the assembler are displayed if
L or T is specified, or printed if P, B or L is specified.
S Include a table of symbolic labeLS at the end of the binary
object file. (During debugging, memory locations can be referenced
by their label names if a symbol table is written by the
assembler, selected as a Linker option, and loaded by the Debugger.)
Z This option for the Z-80 assembler only will flag all lines which contain
Assembler Options
Assembler
assembler mnemonics specific to the Z-80. Since the 8080 and 8085
instructions are a subset of the Z-80 instructions, this option is
useful when rewriting a Z-80 program to run on the 8080. Lines are
flagged with a "P".
P Print a program listing. This option is affected by. the T and E options.
B[s][d] Output the listing to the serial port. If this option is selected,
it must be the last entered. The listing is output on port 2 which is RS-232C compatible. The transmission rate can be selected by
specifying the parameter s according to the following table:
0 50 Baud 6 600 Baud c ~"()
1 75 7
'00
l) 72.G>o2 110 8 1200 E
9'(J()
3 134.5 9 1800 1= /9~~O
4 150 A 2400
5 300 B ~o
The delay during carriage return is selected by specifying the parameter
d. d is the number of idle characters sent after a carriage return
is output to provide time to complete this mechanical operation. d
may be 0 to-9.·- If the parameter n is not specified, it is given the
value 1 when the transmission rate is 150 Baud or less and the 7alue
4 when the rate is 300 or greater.
ENTRY OF OPTIONS
.Type the appropriate letter or letters in any order without intervening
blanks to select Assembler options. Then depress the
(RETURNI
key. Assembler options must be the first entry after· beginning
Assembler operation.
Specifying Assembler Files Assembly Begins.
SPECIFYING ASSEMBLER FILES
Assembler
After the assembler options are entered, the assembler will display
the message SPECIFY INPUT FILE. Type the file name (which must have an
"s"
attribute) and depress the ~TURNI key.
M option If the M option was selected, the message SPECIFY MACRO
LIBRARY will be displayed. Enter the name of the file on which the library
resides. (The file must have an
"s"
attribute.)o
option If the 0 option was selected, the message SPECIFY OBJECTFILE i3 displayed. Enter the file name. The file may be created upon entry
to the assembler by prefixing the name with N: (See page 6-4). An object
file must have an "0" attribute. If the file is created on entry to the
assembler, it will be given this attribute.
ASSEMBLY BEGINS
Pass 1 After the last file name is entered, assembly begins.
State-ments are processed in 2 passes. On the first pass, the asser.~ler assigns
values to symbolic labels and stores a symbol table. The message PASS 1 is
displayed.
Pass 2 During pass 2 the assembler analyzes each statement on the
input file and generates binary. If the assembler recognizes errors, they
are flagged and no binary is generated for that statement.
Stopping Assembly During assembly, pressing the IRETURN key causes
the assembler to pause and display the message RESTART? To abort the
assembly, type Y. To continue the assembly, depress the IRETURij key.
Assembler statement Syntax
Statement Fields
Assembler
Assembly language programs are composed of three types of statements: instruction mnemonics, assembler directives, and comment statements. Each statement is one line of a maximum of 80 characters.
Statements are made up of four components or fields, as shown below. Each field is separated from the next on the line by
a
blank space or series of blanks.Label Field The label field of a statement may contain a symbolic name which is used to reference the statement from other statements, or which will be assigned a value by an EQU directive. This field is optional.
If included, it must begin in the first character position on the line.
Operation Code Field The operation code (also called opcode) field contains either a microprocessor instruction mnemonic or an assembler directive. This field must always be present unless the entire line is a comment. See Assembler Comments, page 8-14. Operation code fields must begin in the second character position on the line or later, and must be six characters or shorter.
Operand Field This field contains additional parameters called operands associated with the mnemonic or directive in the operation code field. Operands are not always required.
Comment Field The comment field is the last field. It is not processed by the assembler but is printed or displayed in the program
listing. This field allows the programmer to document the action or purpose of the statement. (Note that there is also a comment statement, which
occupies an entire line~ See Comment Statement, page 8-1~) If the operand field is absent, and the operation code field allows optional operands, the first character of a comment field should bea semicolon, to avoid ambigu-ity. A semicolon terminates assembler processing on the line in which it appears.
Statement Diagram Assembler statement fields are represented on later pages by the following diagram. The field being described is in bold.
label opcode operand comment
Assembler Statement Syntax
Label Field Assembler
label
opcode operand commentA label may be invented and included on statements which must be
referenced by other statements in the program. Labels are optional and
should be used only where needed.
The EQU directive assigns a value to a label.
Label Name Conventions Labels must be 1 to 8 characters long and
begin with a letter. Characters in a label after the first must be letters
or numbers.
Labels may not be the same as the mnemonics used for microprocessor
instructions, registers, or condition codes. See the appropriate Futuredata
microprocessor reference manual for reserved names. Labels may also not be
the same as assembler directives.
Assembler Processing During assembly, a value is assigned to each
symbol.
In absolute program segments, the value assigned is the absolute
address of the memory location in which the instruction will be stored.
In relocatable program segments, the value assigned to a label is the
local address within the segment. (When the segment becomes part of a
program, the absolute memory address of the first word of the segment is
added to the local address of the label.)
When the assembler directive EQU is used, the label is assigned the
value of the operand field. This directive is described on page 8-16.
Symbol Table The assembler writes each label name, the address of
the label, and other information in a symbol table. Label names are
represented in ASCII. Each character of a label name requires one byte of
memory; short labels conserve memory space.
Assembler Statement Syntax
Operation Code Field
label
opcode
operand commentAssembler
The opcode is a 3 or 4 character microprocessor instruction mnemonic or an assembler directive of up to six characters. All instruction
mnemonics are those assigned by the microprocessor manufacturer. Each mnemonic causes the assembler to generate one to three bytes of binary.
Refer to this manual for all information on assembler directives.
![Crystal structure of di μ methanolato bis{[N′ (1 benzoylprop 1 en 2 yl)thiophene 2 carbohydrazidato κ3O,N′,O′]oxidovanadium(V)}](data:image/gif;base64,R0lGODlhAQABAIAAAP///wAAACH5BAEAAAAALAAAAAABAAEAAAICRAEAOw==)