"'--
EPSON
FX-80 PRINTER
USER'S MANUAL
By
FCC COMPLIANCE STATEMENT FOR AMERICAN USERS
This equipment generates and uses radio frequency energy and if not installed and used properly, that is, in strict accordance with the manufacturer's instructions, may cause interference to radio and television reception . .!t has been type tested and found to comply with the limits for a Class B computing device in accordance with the specifications in Subpart J of Part 15 of FCC rules, which are designed to provide reasonable protection against such interference in a residential installation. However, there is no guarantee that interference will not occur in a particular installation. If this equipment does cause inter-ference to radio or television reception, which can be determined by turning the equip-ment off and on, the user is encouraged to try to correct the interference by one or more of the following measures:
- Reorient the receiving antenna
- Relocate the computer with respect to the receiver
- Move the computer into a different outlet so that computer and receiver are on different branch circuits.
If necessary, the user should consult the dealer or an experienced radio/television techni-cian for additional suggestions. The user may find the following booklet prepared by the Federal Communications Commission helpful:
"How to Identify and Resolve Radio-TV Interference Problems."
This booklet is available from the u.S. Government Printing Office, Washington, DC 20402. Stock No. 004-000-00345-4.
All rightS reserved. No part of this publication may be reproduced, stored in a retrieval system, or transmitted, in any form or by any means, mechanical, photocopying, recording or other-wise, without the prior written permission of Epson America, Inc. No patent liability is as-sumed with respect to the use of the information contained herein. While every precaution has been taken in the preparation of this book, Epson America, Inc. and the author assume no responsibility for errors or omissions. Neither is any liability assumed for damages resulting from the use of the information contained herein.
Apple@ is a registered trademark of Apple Computer, Inc.
Centronics@ is a registered trademark of Data Computer Corporation. Concept'· is a trademark of Corvus Systems, Inc.
DEC is the Digital Equipment Corporation.,
NEC is the NEC Information Systems, Inc., a subsidiary of Nippon Electronic Company, Ltd. TRS-8Q® is a registered trademark of Radio Shack, a division of Tandy Corporation.
FX-80
User's Manual
The Chapters at a Glance
1 Looking It Over ., . . . 1
2 Controlling the Printer from BASIC ... 21
3 Print Pitches ... , . . . 35
4 Print Quality ... 47
5 Dress-Up Modes and Master Select ... 55
6 Special Print Features ... 69
7 Line Spacing and Line Feeds ... 79
8 Forms Control ... 91
9 Formatting. . . 101
10 Saving Vertical Tabs in Channels ... 119
11 Introduction to Dot Graphics . . . 127
12 Printer Graphics: Firing Single Pins ... . . 137
13 Graphics Pin Patterns and ... 141
New Graphics Modes 14 Two Types of Graphics Programs. . . 155
15 Plotter Graphics . . . 167
16 Advanced Graphics in Memory . . . 183
17 User-Defined Characters ... 195
18 Combining User-Defined Characters ... 211
Table of Contents
Table of Contents ... iii
Table of Figures ... , . . . xi
Table of Tables ... xv
Introduction ... xvii
FX-80 Features. . . xvii
What's Inside the Printer ... xviii
Using the Manual ... xx
Your Personal Guide ... xxi
One Easy Lesson ... ". . xxv
1 First Steps ... xxv
Ticket Program . . . xxvi
Ticket Program Description ... xxviii
Looking It Over ... . Supplies and Accessories ... . Find Your FX-80 a Safe Home ... . First Things First ... . The covers ... . The ribbon ... . The paper guide ... . Paper Feeders ... . The pin feeders ... . The optional tractor feeder ... . The friction feeder ... . Parts with Settings ... . The paper thickness lever ... . Function switches ... . Starting Up ... . Top panel buttons and lights ... . The FX-80 tests itself ... .
2
3
4
Controlling the Printer from BASIC ... . BASIC Communications ... . The CHR$ function ... . Printing from BASIC ... . BASIC basics ... . Control codes ... . ESCape ... . Resetting Commands ... . The Master Reset Code ... . The print buffer ... . CANcel and DELete ... .
21 22 23 23 25 26 27 28 28 29 30
Specific reset codes ... 31
ASCII Characters in ESCape Sequences ... 32
Summary ... :... 32
Notation Used in This Manual . . . 33
Print Pitches ... . 35
Dot-Matrix Printing. . . 35 .
The print head ... 35
Main columns ... 36
Intermediate positions . . . 37
Modes for Pitches ... 38
Pica and Elite Modes . . . 38
Compressed Mode . . . 40
Conflicting modes ... 40
Mixing Pitch Modes ... 41
Expanded Mode . . . 42
Mixing print pitches on one line . . . 44
Summary... 46
Print Quality ... . Modes for Weights ... . Double-Strike Mode ... . Emphasized Mode ... . Emphasized and Double-Strike ... . in concert 47 47 47 49 50 Proportional Mode ... 50
More Mixing of Modes ... 52
5
6
7
8
Dress-Up Modes and Master Select ... . Dress-Up Modes ... . Underline Mode ... . Super- and Subscript Modes ... . Italic Mode ... . Master Print Mode Select ... .
55 55 55 56 57 58
The inner workings of . . . 62
the Master Select Unique modes ... 62
Switching modes with Master Select ... 64
The Master Select as a subroutine ... 66
Summary .... ;... 67
Special Print Features ... . Special Characters ... . The backspace function ... . Some special characters ... . International characters ... . International switches ... . Special Speeds ... . Half-Speed Mode ... . Immediate Print Mode ... . Solving the 7-Bit Dilemma ... . Summary ... . Line Spacing and Line Feeds ... . Line Spacing ... . Changing line spacing ... . Variable line spacing ... . Microscopic line spacing ... . Line Feeds ... . 69 69 69 71 72 74 75 75 75 76 77 79 79 79 81 83 84 One-time, immediate line feed ... 84
Reverse feed ... 86
Summary... 88
Forms Control ... . Controlling Form Length ... . Form feed ... . Not-so-standard forms ... . Absolute form length ... . Avoiding the Paper Perforation ... . The SOP solution ... .
9 Formatting ... . Vertical Tabs ... .
101 101
Activating vertical tabs . . . 102
Fixed VTabs ... 106
Range limitations . . . 106
Horizontal Tabs ... 106
Default horizontal tabs ... 112
BASIC TABs ... 113
Setting the Margins ... 113
Left margin . . . 113
Right margin ... 114
Using the margin commands together ... 115
Margin Settings and Other Modes . . . 115
Unidirectional Print . . . 116
Summary... ... 117
10 Saving Vertical Tabs in Channels ... 119
Setting the Numbers ... 119
Filling in Preprinted Forms ... 124
Multiple-Page Forms ... 124
Next Up . . . Graphics . . . 125
Summary ... 125
11 Introduction to Dot Graphics . . . 127
The Big Dot Matrix ... 127
Graphics Mode ... 128
Entering a Graphics Mode ... 129
The 7-Bit Limitation ... 130
Firing the pins ... 132
Testing, testing ... 133
First Graphics Program . . . 134
Graphics Width Limitations ... 135
Summary ... 135
12 Printer Graphics: Firing Single Pins ... . . . . 137
Controlling the Pins . . . 137
Changing direction ... 138
Graphics Line Spacing . . . 139
13 Graphics Pin Patterns and ... 141
New Graphics Modes Software Notes ... 142
More Software Notes ... 142
Changing Densities ... 143
High-Speed Double-Density. . . 143
Graphics Mode Low-Speed Double-Density ... 144
Graphics Mode Quadruple-Density Graphics Mode. . . 146
More densities ... 147
9-Pin Graphics Mode ... 149
Pattern Design ... 151
Repeating a pattern. . . .. . . 152
Repeating DATA numbers ... 152
Summary ... 153
14 Two Types of Graphics Programs. . . 155
The Planning Process ... 155
Logo Design ... 156
3-Dimensional Design. . . .. . . 158
Entering the program ... 160
Flexing your graphics muscles ... 163
15 Plotter Graphics . . . 167
Arrays.. ... 168
DIMensioning an array . . . 170
Filling an array . . . 170
Plotting a Circle. . . 171
Translating the ones to dots ... 172
One last step . . . 173
Problem ... 175
Higher Resolution ... 175
Reflections ... 177
The exploding universe ... 178
16 Advanced Graphics in Memory . . . 183
Generating the Array (Phase One) . . . 184
Describing the 2-Dimensional . . . 186
Matrix (Pause) Calculating Pin Patterns (Phase Two) ... 187
Setting the Graphics Width . . . 188
(Phase Three) Printing the Figure (Phase Four) . . . 189
Variations on a Theme (Phase Five) .. . . 191
17 User-Defined Characters. . . 195
Preparation. . . 196
Defining Characters. . . 196
Designing characters ... 197
Translating dots to DATA. . . 199
The attribute byte ... 199
Proportional print information ... 200
Printing User-Defined Characters . . . 202
Download Commands ... 204
Defining Strings of Characters ... 205
Defining Control Codes ... 205
Printing low-order control codes ... 207
Mode Strings ... 209
Strata ... 209
Summary ... 210
18 Combining User-Defined Characters ... 211
Large Letters: Double Wide ... 211
Large Letters: Double High . . . 213
Large Letters: Double High . . . 213
and Double Wide Let's Print ... 217
Building Symbols from a Small Core Set ... 221
Line Graphics . . . 223
19 Printing Applications ... 225
Preparing for Take-off ... . . . 226
Barchart ... 226
Appendixes
A ASCII Charts ... 237
B Character Fonts ... 243
C Proportional Character Widths ... 249
D Control Codes in Numeric Order . . . 255
E Control Codes by Function . . . 265
F Mixing Print Modes . . . 269
G Summary of Differences between the FX-80 and the MX Graftrax Plus ... 273
H Hex Dumping and Problem Codes ... 279
I Troubleshooting the Sample Programs ... 287
J
General Troubleshooting . . . 291K Switch Settings . . . 295
L Customizing the FX-80 ... 299
M Printer Maintenance ... 301
N Technical Specifications . . . 303
o
The Parallel Interface ... 307P Schematic. . . 311
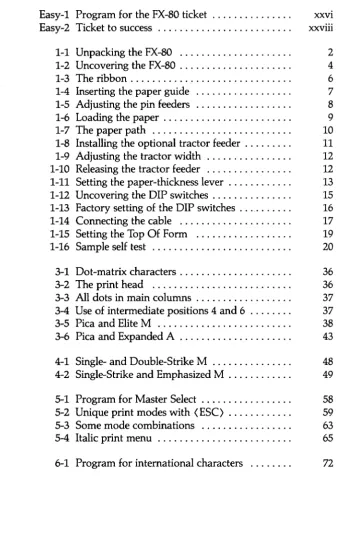
Table of Figures
Easy-l Program for the FX-80 ticket. . . xxvi
Easy-2 Ticket to success. . . xxviii
1-1 Unpacking the FX-80 ... 2
1-2 Uncovering the FX-80 . . . 4
1-3 The ribbon . . . 6
1-4 Inserting the paper guide ... 7
1-5 Adjusting the pin feeders ... 8
1-6 Loading the paper . . . 9
1-7 The paper path ... 10
1-8 Installing the optional tractor feeder . . . 11
1-9 Adjusting the tractor width ... 12
1-10 Releasing the tractor feeder ... 12
1-11 Setting the paper-thickness lever . . . 13
1-12 Uncovering the DIP switches. . . 15
1-13 Factory setting of the DIP switches .. '.' . . . 16
1-14 Connecting the cable ... 17
1-15 Setting the Top Of Form ... 19
1-16 Sample self test ... 20
3-1 Dot-matrix characters. . . 36
3-2 The print head ... 36
3-3 All dots in main columns . . . 37
3-4 Use of intermediate positions 4 and 6 . . . 37
3-5 Pica and Elite M ... 38
3-6 Pica and Expanded A . . . 43
4-1 Single- and Double-Strike M ... . . . 48
4-2 Single-Strike and Emphasized M . . . 49
5-1 Program for Master Select . . . 58
5-2 Unique print modes with (ESC) ... . . 59
5-3 Some mode combinations ... 63
5-4 Italic print menu ... 65
7-1 Standard character matrix and line feed. . . 80
7-2 Regular STAIR STEPS ... 82
7-3 Irregular STAIR STEPS ... 85
8-1 Setting the Top Of Form (TOF) . . . 92
8-2 Example of 2-inch spacing ... 93
8-3 Example of 2-line spacing . . . 94
8-4 Example of 14-line spacing. . . 95
8-5 Centering the SOP gap . . . 97
9-1 Rental maintenance form . . . 102
9-2 Form using two pages. . . 104
9-3 Setting up the form . . . .. . . . 105
9-4 A test of changing line spacing ... 107
9-5 Adding horizontal tabs . . . 109
9-6 A test of changing pitch . . . 111
9-7 Program for FORM... 112
9-8 Uneven columns ... 116
9-9 Even columns with Unidirectional Mode ... 117
10-1 Program for using FORM ... 120
10-2 Four sets of sample answers and printouts . . . . 122
10-3 Program for multiple-page channels . . . 125
10-4 Three pages of channels printed out ... 126
11-1 Comparison of 7- and 12-dot line spacing .... 128
11-2 Usable pins labelled sequentially. . . 132
11-3 Usable pins labelled uniquely ... 133
13-1 Double-Density handling of dots in ... 144
consecutive columns 13-2 No overlapping dots. . . 145
13-3 Dots do overlap ... 146
13 .. ,4 The seven modes for densities. . . 147
13-5 9-pin graphics ... 149
13-6 Printout to check bottom pin ... 150
14-1 Logo layout. . . 156
14-2 Double-S logo ... 158
14-3 Analysis of a comer of FX-80 design ... 159
14-4 DATA for the program ... 162
14-5 FX-80 design ... 163
14-6 Program for FX-80 design ... 164
14-7 More distinct FX-80 ... 165
14-8 Most distinct FX-80 . . . 165
14-9 Reversed FX-80 ... 166
15-1 Using the computer as a sketch pad ... 168
15-2 An array in memory and on paper . . . 168
15-3 Ones and zeros become dots and no-dots .... 169
15-4 Finding a cell's label ... 169
15-5 Plotting a circle .. . . 171
15-6 Program and RUN for displaying an array ... 172
15-7 Program for a circle ... 174
15-8 The circle . . . 174
15-9 Divide and conquer ... 176
15-10 Program for full-page pattern ... 181
15-11 Full-page explosion .. . . 182
16-1 Array into design ... 183
16-2 Printing the contents of the array ... 185
16-3 Pattern sets ... 186
16-4 Translation of the times table . . . 187
16-5 Program for SYMMETRY ... 189
16-6 Symmetric pattern 1 . . . 191
16-7 Symmetric pattern 2 . . . 192
16-8 Symmetric pattern 3 . . . 192
17-1 Sample characters and ROM equivalents. . . 195
17-2 User-defined letter E ... 198
17-3 Incorrectly designed E ... 198
17-4 Use of pins chosen by attribute byte. . . 200
18-1 Side-by-side user-defined characters ... 212
18-2 Double high and wide character ... 215
18-3 Program for large G . . . 217
18-4 Large G ... 218
18-5 DATA for AMES ... 219
18-6 Games seem same . . . 220
18-7 Messages in three pitches. . . 220
18-8 Tracks ... 222
18-9 Intricate pattern ... 222
18-10 Phone list . . . 224
19-1 Barchart . . . 227
19-2 Statement form. . . 230
1-1 2-1 2-2 2-3 3-1 4-1 4-2 5-1 5-2 5-3 6-1 6-2 6-3 6-4 7-1 13-1 16-1 17-1 18-1
Table of Tables
The DIP Switches ... .
LISTing on Several Computers ... . Printer Commands on Several Computers ... . FX-80 Interpretation of ASCII Codes ... .
Print Type Summary ... .
Summary of Modes ... . Mode Priorities ... .
Master Select and the 256 ASCII Codes ... . Master Select Bits, Codes, and Modes ... . Master Select Quick Reference Chart ... .
Some Special Characters ... . International Characters in ... .
Roman Typeface
International Characters in ... . Italic Typeface
Switch Settings by Country ... .
Line-Spacing Commands ... .
Description of the Seven Density Modes ... .
Variables for SYMMETRY Program ... .
International Character Internal Codes ... .
ASCII Pattern for Character Versions ... .
Introduction
So Epson has a new printer on the market!
As people develop expertise in the use of their printers, they dis-cover new applications, and consequently demand more from their printers. To cope with these expanding demands, printer technology is moving ahead at a breakneck pace; printer mechanisms are becoming more sophisticated, and printer brains are approaching genius levels.
We at Epson are striving to keep you one step ahead of the field so that you can tackle new printing jobs as fast as you can think of them. And with the FX-80 printer, we've done just that. This printer is packed with features just waiting for new applications.
FX-80 Features
The MX series of printers attracted enough attention to become the most popular line of printers in the industry. The FX-80 printer follows in the same grand tradition. Its power-packed assortment of features includes:
• Upward compatibility with Graftrax Plus features.
• Several different print modes that can be combined to produce a variety of print styles. These include:
Roman and italic print fonts Six different print pitches Two kinds of bold printing
• Sixteen unique print mode combinations that can be selected by number.
docu-• Advanced forms handling capability, including horizontal and ver-tical tabs, margin select, skip-over-perforation, and variable for-ward and reverse line feeds.
• User-definable character sets. With this powerful feature you can create your own alphabets and special symbols.
• High-resolution graphics images with six different densities. Create your own charts, diagrams, figures, and illustrations.
• International characters.
• Typewriter simulation mode.
• Program debugging mode (hexadecimal echo of codes received from the computer).
• Fast print speed-160 characters per second for rapid processing of documents.
• 2K print buffer for smoother operation.
• Epson reliability and quality.
• Built-in friction and tractor feeders with an optional tractor unit for narrow forms.
• Disposable print head.
• Easy-to-reach switch settings to customize printer features.
In short, the FX-80 is loaded with features that will challenge your ability to put it to work.
What's Inside the Printer?
The FX-80 printer contains two kinds of internal memory. There is 12K (approximately 12,000 characters) of ROM (Read Only Mem-ory). This permanent memory contains all the logic required for the various print features as well as the patterns for the several built-in character sets. The FX-80 also contains 2K (about 2,000 characters) of RAM (Random Access Memory). RAM can be used in two different ways:
2) RAM can be used to store a complete set of user-defined charac-ters and symbols. Now you can create all those special symbols you wished for but your printer never had. .
The FX-80 is indeed a powerful printer. But do not fear. You have your hands on an equally powerful User's Manual that will patiently guide you through the printer's features and warn you about pitfalls. To appreciate what we mean by pitfalls, imagine yourself in the fol-lowing scenario:
WELCOME TO FX-80 ADVENTURE!
YOU ARE STANDING IN THE FAMILY ROOM NEXT TO YOUR COMPUTER DESK. THE KIDS ARE ACROSS THE ROOM PLAY-ING A VIDEO GAME ON THE TV. ON YOUR DESK IS A LARGE BOX WITH LETTERING.
YOUR COMMAND? read lettering
THE BOX IS LABELED "EPSON"
YOUR COMMAND? open box
INSIDE THE BOX YOU FIND A BRAND NEW FX-80 PRINTER.
A USER'S MANUAL FALLS TO THE FLOOR.
AN EERIE VOICE (YOUR CONSCIENCE MAYBE?) WHISPERS: "READ THE MANUAL FIRST."
YOUR COMMAND? ignore manual; connect printer to computer
KABOOOOM! THE PRINTER EXPLODES, VAPORIZING EVERY-THING WITHIN 5 FEET OF THE DESK. THE KIDS CONTINUE BLASTING ALIENS ON THE TV, UNAWARE OF YOUR FATE.
YOU ARE DEAD. PLAY AGAIN?
The result is admittedly exaggerated, but the underlying message is very clear: when all else fails, READ THE MANUAL!!
"Okay, I'll spend some time learning how to set up the printer, but why should I bother with the advanced features when I can simply buy programs that will control them for me?" Because whenever a new printer comes on the market, it takes time for the professional programmers to develop applications programs utilizing the ad-vanced features. And even more important, if and when the program of your dreams finally becomes available, it will likely require some customization to meet your EXACT needs. So learning how to con-trol your FX-80 now will enable you to fully exploit the applications programs as they roll in. In the meantime, you can take advantage of your printer's capabilities.
Using the Manual
Now that you've decided to take the plunge, you're in for a treat. Helping you learn how to use the FX-80 to its fullest is one of the places where we really shine. This manual will take you on a carefully planned guided tour of the various features of the FX-80 printer. You can learn just how to use your computer to control the printer for a variety of applications.
This manual can be used as a reference, a tutorial study guide, or some combination thereof. The key is flexibility; the manual can be different things to different people:
Those of you who want to use the printer for one simple application (like listing BASIC programs or doing simple word processing) need only Chapter 1, the Appendixes, and a knowledge of the program you are using. If you decide to learn about the advanced features of the printer at a later time, fine. The lessons will be waiting for you.
For those who prefer to roll up their sleeves and see how the printer works firsthand, we've used sample programs to demonstrate each of the printer features.
For those who only want a quick and easy reference, the compre-hensive Table of Contents, set of Appendixes, and Index provide ready access to information.
For those users who are familiar with the MX series of printers, Appendix G provides a summary of the differences between the FX-80 and the MX Graftrax Plus.
Most readers, however, will want to start with Chapter 1 and fol-low the manual from start to finish.
Your Personal Guide
Think of the manual as your personal guide in your exploration of the FX-80's many features.
It will teach you step by step how to operate the printer as you work through examples on your computer. Along the way, you may stum-ble across a few things that the BASIC language on your computer system can't handle. We try to point these out for you and suggest ways to work around them. You may want to dig a little deeper to find a solution. In any case, you'll have a much greater appreciation for the programming experts who solve these problems for us.
the printer with your computer, but the hands-on style of presentation will encourage you to develop your own programs. Experiment with these programs at your own pace, and you'll soon be on your way to your own FX-80 Adventure, this one with a happy ending! For a pre-view of what is to come, feast your eyes on the following potpourri of print modes, user-defined characters, and graphics.
If:» III.]~ IHllr Illl Q]) II) IE~ ~~
IUPER SUI
SUPER SUI SCRIPT ICRIPT
SUPER SCRIPT SUI SCRIPT ITALIC ITALIC ITAliC IIIRMAL SUPER lUI URDER SCRIPT UIIDER SCRIPT IJllDER URDER UIIDER !llDER PRINT SCRIPT SCRIPT ITALIC LINE ITALIC LINE ITALIC LIME LINE LIME LIME
5lIl&LE-STRlk£ PICA AileD ABCD 01lCI!. ABCIl
SIII&LE-STRlk£ RITE ADCOE ABeDE ADCDE ABeDE
SIII6LE-STRIKE COMPREnED ABCDEF6 ABCmG ABCDEF6 ABCDfFG
SINBlE-STRIKE ElIP PICA ABCD ABCCJ ABCD ABCCJ
DOIJBLE-STRIKE PICA ABCD ABCCJ ABCD AIiiIC:::C ABCCJ ~.!!£.e
DOUBLE-STRIKE Rm ABCDE ABCDE ABCDE ~A8CD[ _ _ ~
DOUBLE-STRIKE COMPRESSED ABCDEF6 ABClU' AlCD£F1
._u.,.
~A.CD.'. !!9!!2 AICDEFI ~ !!£!!!.!.DOUBLE-STRIKE ABeD ABCCJ ABCD ABCCJ
UPHASIZED PICA ~ ~
StilLE-STRIKE
""13
A B t'!..!':t ~:@.EIPANDED PICA
SIII6LE-STRIKE AB AS
B1!.. AS
ElPANDED ELm
SIII6LE-STRIKE ABC ABC ABC ABC
EIPANDED CDRPRESSED
SIII6LE-STRIKE UPHASIZED A S A B A S A B
EIPANDED PICA
DDUBLE-STRlk£ A B A B A B ~B
ElPANDES PICA ~.!!!!!!..
""""'-DDUBLE-STRlk£ AS AS
EIPAMMD ELITE AB a.!L AS <'!.!!L
DOUBLE-STRIKE ABC ABC ABC ABC
EXPANDED COII'RESSED ~ t!.!!.£
DOUBLE-STRIKE EMPHASIZEB A B A B A B ~AB
EXPANDED PICA
....-.
II) IE~ F ]~ IHI IE~ II) (:IEi~~Ifl~~(:lrIE~Ifl~~
lrlI:;"lr
P X C A
SINGLE --STR H<E 123456 7891Z1ABCDEFGH I ,JKLMN '" DOUBLE-STR I KE 123456 7891Z1ABCDEFGH I JKLMN SINGLE-STRIKE EMPHASIZED 1234567890ABC '" DOUBLE-STRIKE EMPHASIZED 12345b7S90ABC
5 5 E X P A N D E D 1 : 2 3 4 5 6 7 '" D S E X P A N D E D 1 2 3 4 5 6 7 5 5 E X P E M P H A 5 X Z E D 1 '" D S E X P E M P H A S X Z E D 1
UNDERLINE 1234567 '" BU2!'ItsCRXFT 1:Z:34~&';r . / tsU~I!l!:~II5C"X"'T l:;O!:;:!: .... :=Ie.-7 . / ITALICS 1234.567 E L X T E
51 NGLE -STR IKE 123456 7B90ABCDEFGH I JKLMNOPQRSTUV / DOUBLE-STRIKE 1234S6789IABCDEFSHIJKL"NOPQRSTUV
55 EXPANDED 1234567B911lA / DB EXPANDED 1234!567B911lA
UNDERLINE 12345b7B90A / .U • • C'U~T 12345&7.''11'" / SUPERSCRIPT 1234S67gQ.A / ITALICS 12J456789'A
C O M P R E S S E D
One Easy Lesson!!!
or . . . So who ever looks at the manual anyway?
The title of this section is a bit misleading; it takes more than "One Easy Lesson" to learn the full value of the feature-packed FX-80 printer. In fact, the more time you spend with this manual, the more your printer will cooperate with your every command. But there are always a few experts who refuse to read manuals and want to see something from their new printer RIGHT NOW-at any risk. The next few pages are especially for you experts. So go ahead, tear open the box and set that hot little item up as best you can. (You did that already? Then fasten your safety belts and prepare for a crash land-ing.)
If you get stuck, the proper set-up procedures are covered in Chap-ter 1. Those of you who've got that rare ability to wait and read the directions first should turn there now. The rest of you, in the rush of excitement that follows taking your printer out of the box, should at least follow these few simple steps to avoid getting into TOO much trouble.
First Steps
1. Make all connections with the power OFF! Connect the FX-80 printer to your computer via the printer cable (purchased separately). Some computers require a special printer interface kit (also purchased separately) .
2. With the paper release lever set toward the front of the printer, insert 91/z-inch fanfold paper and pull it through the paper path with
With continuous-feed paper, use the plastic paper separator to make sure that the incoming paper is separate from the outgoing paper. Check that it does not double back through and jam the feed mecha-nism. Remove all obstacles from the paper path so that the paper feeds freely.
If you're using single sheets, the "paper out" beeper will sound unless you shut it off via the internal switches. The switches are located un-der the upper right vent. (See Appendix K.)
3. Turn the printer and computer on, and load a BASIC program. Then send a listing to the printer (using LLIST, PR#l, or whatever your computer's LLIST command is). You should get a single-spaced listing. If the printout is double-spaced or printed without line spac-ing, change internal switch 2-4. Note that switches must be set with the power off.
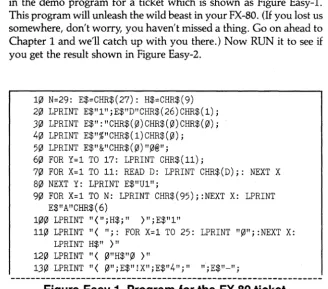
Ticket Program
If you've gotten this far without turning to Chapter 1 for directions, then you are probably anxious to see what your printer can do. Type in the demo program for a ticket which is shown as Figure Easy-I. This program will unleash the wild beast in your FX-80. (If you lost us somewhere, don't worry, you haven't missed a thing. Go on ahead to Chapter 1 and we'll catch up with you there.) Now RUN it to see if you get the result shown in Figure Easy-2.
1~ N=29: E$=CHR$(27): H$=CHR$(9)
2~ LPRINT E$"1";E$"D"CHR$(26)CHR$(1);
3~ LPRINT E$":"CHR$(~)CHR$(0)CHR$(0); 4~ LPRINT E$"%"CHR$(1)CHR$(0);
5~ LPRINT E$"&"CHR$(~)"~@"; 6~ FOR Y=l TO 17: LPRINT CHR$(ll);
7~ FOR X=l TO 11: READ D: LPRINT CHR$(D);: NEXT X
8~ NEXT Y: LPRINT E$"Ul";
9~ FOR X=l TO N: LPRINT CHR$(95);:NEXT X: LPRINT E$"A"CHR$(6)
1~0 LPRINT "(";H$;" )";E$"l"
110 LPRINT "( ";: FOR X=l TO 25: LPRINT "~";:NEXT X: LPRINT H$" )"
120 LPRINT "( ~"H$"~ )"
[image:27.436.50.378.310.598.2]14fIJ LPRINT "TICKET TO SUCCESS!"jE$"!@"jE$"5"jE$"-flJ"j 15fIJ LPRINT H$j"fIJ )": FOR X=1 TO 2:LPRINT "( fIJ"H$"fIJ )":
NEXT X
16fIJ LPRINT "( fIJ" j: LPRINT CHR$(14) jE$"E" j" 1 3 5 7" j 17fIJ LPRINT CHR$(2f1J)"?@"jE$"F"jH$j"fIJ )"
18fIJ LPRINT "9 fIJ"j: LPRINT CHR$(14)jE$"E"j" 2 4 - 6 8"j
19fIJ LPRINT CHR$(2f1J)jE$"F"jH$j"fIJ :"
2fIJfIJ LPRINT "j fIJ"jH$j"fIJ =": LPRINT "( fIJ"jH$j"fIJ )"
21fIJ LPRINT "( fIJ PRODUCED "CHR$(15)"BY "E$"!X"j"EPSON"j 22fIJ LPRINT E$"SfIJ"jE$"!@"j"(TM)"E$"T"jH$j"fIJ )"
23fIJ LPRINT "( fIJ"jH$j"fIJ )": LPRINT "( fIJ"TAB(7)E$"!Q"j 24fIJ LPRINT "GENERAL ADMISSION"jE$"!@"jH$j"fIJ )":LPRINT
"( fIJ"H$"fIJ )"
25fIJ LPRING "( "j: FOR X=1 TO 25: LPRINT "fIJ"j:NEXT X: LPRINT H$j" )"
26fIJ LPRINT "( "jH$j" )"jE$"A"CHR$(1) 27fIJ FOR X=1 TO N: LPRINT CHR$(95)j: NEXT X: 28fIJ LPRINT E$"@"
LPRINT
29fIJ DATA 73,fIJ,2f1J,34,fIJ,73,fIJ,34,2f1J,fIJ,73 3fIJfIJ DATA 64,fIJ,127,fIJ,127,fIJ,64,fIJ,65,fIJ,112 31fIJ DATA 1,fIJ,127,fIJ,127,fIJ,65,fIJ,96,f/J,f/J 32f/J DATA 64,48,72,54,73,6,1,4,72,48,64 33f/J DATA 1,6,9,48,64,48,73,54,9,6,1 34f/J DATA 28,34,28,99,f/J,65,f/J,99,28,34,28 35f/J DATA 60,66,6f/J,67,f/J,1,f/J,67,6f/J,66,6f/J 36f/J DATA 31,32,31,96,f/J,64,f/J,96,31,32,31 37f/J DATA 124,2,124,3,f/J,1,f/J,3,124,2,124 38f/J
'***
TICKET BORDERS***
39f/J DATA 64,f/J,64,f/J,64,f/J,32,f/J,16,8,7 4f1Jf/J DATA 7,8,16,f/J,32,fIJ,64,f/J,64,f/J,64 41fIJ DATA 1,f/J,1,f/J,1,fIJ,2,f/J,4,8,112 :'j 42f/J DATA 127,f/J,f/J,f/J,f/J,f/J,f/J,f/J,f/J,f/J,f/J :'( 43f/J DATA 112,8,4,f/J,2,f/J,1,f/J,1,f/J,1 :'= 44f/J DATA f/J,f/J,f/J,f/J,f/J,f/J,f/J,f/J,f/J,f/J,127 :') 45f/J
'***
REGISTERED TRADE MARK***
: 'f/J : '1 : '2 : '3 : '4 : '5 : '6 : '7 : '8 : '9
.,
.
46f/J DATA f/J,f/J,f/J,f/J,28,34,f/J,65,62,65,40 :'? 47f/J DATA 65,44,83,f/J,34,28,f/J,fIJ,f/J,f/J,f/J : '@
TICKET TO SUCCESS!
F
x
8
DID
r
F'!:;:UDUC[D BY EPSON ( ' " I ' M )I
GENERAL ADMISSIONL._ ....
;~~~~:~::~.:~=~~:::~~~~::-.)~?~~~~:=.::~=?::~:::~.:~:~~~~.~:::::::~~~~::::::.:=~~:::~:~~~~~.;;
... _._
Figure Easy·2. Ticket to success.
Ticket Program Description
We do not attempt a complete explanation of the program here. That's what the rest of the manual is all about. But we do provide a cursory, line-by-line description for those of you who wish to analyze the program.
10 This line stores values in variables for easy access.
20 (ESC) "1" sets the line spacing to 7/72 inch. The (ESC) "0" se-quence sets a horizontal tab stop at column 26.
30 The (ESC)":" string copies the entire ROM character set into RAM. See Chapter 17.
40 Designates RAM as the source for the active character set. 50 Prepares the printer to redefine characters 0 through @.
60 Sets a counter for the 17 letters being defined and prints the "at-tribute byte" of each new character.
70 Reads the data that defines the letters (17 sets of 11). 80 Turns on Unidirectional Mode.
90 Prints the top of the ticket and sets the line feed to 6/72 inch. 100 Prints the newly defined symbol" (" (ticket border), tabs to the
next stop, prints the other border (»), and sets the line spacing back to 7/72 inch.
110 After printing the outside border, this line prints the top of the inside border (which was defined as the zero character).
120 Gives another line of borders.
[image:29.433.55.381.34.299.2]140 Prints TICKET TO SUCCESS! in Master Select 24, Italic, and Underline; then it turns all those modes OFF.
150 Produces two more border lines.
160 Prints the upper half of the "FX-80" letters in CHR$(14) (Ex-panded) and (ESC) "E" (Emphasized) print. Those are more user-defined characters.
170 Turns OFF Expanded Mode and prints the trademark symbol (user-defined as? and @). Turns OFF Emphasized.
180 Prints the bottom half of the "FX-80" letters. 190 Turns OFF the codes and prints a border. 200 Prints borders.
210 Prints PRODUCED, then switches to Compressed Mode and prints BY. (ESC>"!X" sets the Master Select Mode 24 (this time without italic and underline) and prints EPSON. The Master Se-lect Mode automatically turns OFF Compressed.
220 Turns OFF the Master Select 24 and sets Superscript Mode (ESCape "SO"). It prints (TM) and cancels Scripts.
230 Prints another line of borders, then sets the Master Select Mode 17
(Q) (that's Double-Strike and Elite combined).
240 Prints GENERAL ADMISSION and sets everything back to the default printing modes.
250 Prints the bottom of the inside border. 260 Sets line spacing to 1172 inch.
270 Prints the bottom of the outside border. 280 Returns the printer to the default mode.
290-370 This is the data for the inside border (0) and the "FX-80" letters as user-defined characters 1-8.
Chapter
1
Looking It Over
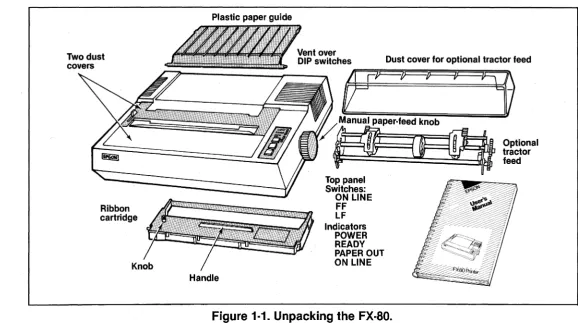
Once you've removed the packing materials from the FX-80 printer, the first thing you should do is make sure you have all of the parts. With the purchase of your FX-80 printer, you should receive the items shown in Figure 1-1:
1) The printer itself.
N
Two dust
Ribbon cartridge
Plastic paper guide
Handle
Dust cover for optional tractor feed
E~~
l
~Manual paper-feed knob
; t _
Top panel Switches: ON LINE
FF LF
Indicators POWER READY PAPER OUT ON LINE
[image:33.651.39.617.54.377.2]Supplies and Accessories
The following items may be purchased separately from your Epson dealer:
Printer cable or interface kit. Each computer system has its own
way of connecting to a printer. Some need a cable only, others require a cable and circuit board. The FX-80 printer uses the Centronics™ standard parallel interface scheme. If your system requires a serial printer, you must purchase a serial board for the printer. Your Epson dealer can supply you with a variety of interface boards and cables.
Printer paper. The FX-80 is designed to accommodate several types
and sizes of paper. Standard printer paper is 9Yz by ll-inch fanfold paper (called continuous-feed) with Yz-inch tear-offs on each side for the pin-feed holes; when the printout is torn down to size, or "burst," a standard 8V2 by l1-inch page is left. The pin-feed mechanism handles this type of paper. Single sheets of paper (without holes) are moved through the printer by the friction feed mechanism. And continuous-feed papers whose widths range between 4 and 8V2 inches (such as mailing labels) are handled with an optional tractor-feed unit which you may purchase from your Epson dealer.
You'll need a stack of paper for the sample programs in this manual. Standard continuous-feed paper is recommended for these application programs.
Tractor feeder (optional). The tractor-feed mechanism is necessary
only if you intend to print forms 8V2 or less inches wide-such as pin-feed mailing labels or fanfold paper without removable perforations.
Roll paper holder (optional). This option holds continuous-feed
pa-per that is fed by the friction feeder.
Ribbon cartridge replacement. The expected life of a cartridge is
three million characters-(roughly 1,000 pages of text.)
Print head replacement. The expected life of a print head is one
hundred million characters.
while you have valuable information stored in memory. A quiet spot is always nice, one that's away from other appliances. And your printer needs enough room for the paper to flow freely.
Note: The printer should be turned OFF during all set-up operations.
First Things First
Once you've found a good home for your FX-80, you'll want to get acquainted with it. The first parts that you need to recognize are the pair of covers, the ribbon assembly, and the paper guide.
The covers
[image:35.435.57.387.248.595.2]The two covers on the FX-80 printer protect it from dust or foreign objects that might damage the printer mechanism. You'll need to move these lids to gain access to the inside, but they should be re-placed when you're through (Figure 1-2). The rear cover comes off with a slight tug upward; it snaps back into place. Move the front lid to its full vertical position, then remove it by lifting straight up (you may need to remove packing tape).
The ribbon
Remove the ribbon cartridge from its packing materials. Holding the cartridge by the plastidin on the top, lift the paper bail and insert the cartridge. The ribbon should rest directly between the silver rib-bon guide and the black print head (Figure 1-3). Note that the paper bail has three positions: resting on the paper, raised straight up, and raised forward (partially up and pulled toward the front of the printer).
The two pairs of tabs at the ends of the ribbon cartridge snap neatly into slots in the printer's frame. The cartridge should fit snugly into place. To remove any slack in the ribbon, tum the ribbon knob in the direction of the arrow.
Ribbon
a. Print head and ribbon guide.
b. Inserting the ribbon cartridge.
c. Adjusting the ribbon.
Silver ribbon guide
Slot
\\.\ •... . /
Ribbon
[image:37.438.48.380.31.618.2]The paper guide
[image:38.435.42.365.107.446.2]Next, insert the plastic paper guide into the appropriate notches as shown in Figure 1-4.
Figure 1·4. Inserting the paper guide.
Paper Feeders
Now it's time to learn how to feed the paper on the FX-80-and for that, one of the following three sections will help.
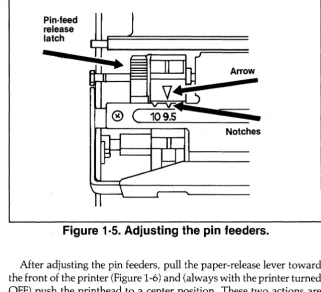
The pin feeders
Pin·feed release latch
-
Arrow [image:39.435.55.377.41.333.2]-Notches
Figure 1·5. Adjusting the pin feeders.
Figure 1·6. Loading the paper.
Manual paper-feed knob
Set a stack of paper on a flat surface directly behind or under the printer. If the paper is kinked or
Figure 1·7. The paper path.
The technicians assure us that turning the manual-feed knob with the printer on does not damage the gears, but it's easier to tum with the printer off.
Don't get discouraged-it takes a little practice to get the paper loaded right. The pin feeders must be set to just the right width or the paper will jam. Feed the paper through, then, holding the paper firmly, tum the roller knob until the paper holes line up with the pins.
If desperation sets in, try folding the first sheet over the second and feeding them through together (thicker paper feeds a little better). With a little practice, you will feed the paper through smoothly every time.
The optional tractor feeder
If you plan to use either 81fz-inch paper with permanent pin-feed holes or small labels with holes, you'll need to purchase a tractor-feed unit to accommodate the narrower paper.
Figure 1·8. Installing the optional tractor feeder.
To adjust the width of the tractor feeders, simply release the trac-tor's locking levers on each side so that the units move freely (see Fig-ure 1-9). Now adjust the units to match the size of your paper or labels. Lock the units back into place. Pull the paper-release lever to-ward the front of the printer. It's that easy!
Figure 1·9. Adjusting the tractor width.
Pin-feed
Tractor-release lever
--:~2:::!:JU-.-1L---Figure 1·10. Releasing the tractor feeder.
The friction feeder
If you are using single sheets or roll paper, you'll need to remove the tractor unit as shown above and use the friction-feed mechanism.
[image:43.435.43.375.28.531.2]printer, and then push the paper-release lever toward the rear of the printer to engage the friction feed. Use the manual-feed knob to feed the paper through (as you would feed paper through a typewriter). And, finally, lower the paper bail onto the paper to hold it in place.
Parts with Settings
The FX-80 can be adjusted to meet your hardware and software needs. Hardware adjustments that you'll want to know about first involve the paper thickness lever and a set of internal switches; the next two sections fill you in on adjusting these settings.
The paper thickness lever
The paper thickness lever shown in Figure 1-11 adjusts the print head to accommodate various paper thicknesses.
Low High setting
Normal
[image:44.433.37.376.269.551.2]setting
Front
Figure 1·11b. (top view)
The factory sets it for normal paper (starting from the back, that means to the third notch-which gives about 1/ SOOth of an inch), but you can adjust it for printing one original and up to two copies. For thicker paper, move this lever toward the front of the printer. To compensate for faint print, move it toward the rear.
Function switches
We're almost ready to start printing! Just a few more important steps . . . like setting the printer's internal switches. These are tiny switches (inside the printer, of course) that con-trol a number of printer functions (such as line-feed adjustment, the paper-out buzzer, print modes, etc.). In Appendix L, "Customizing the FX-80," we'll show you how to play with the different variations, but for now there are just a few things we should say about them.
The switches are set at the factory and don't need to be touched except for special uses and to solve problems with computer/printer interfacing. You may need to answer one or two interface questions right now. If you are using single-sheet paper, or if your computer doesn't send line feeds to the printer, read on.
Note: Always turn the power off (with the switch on the left side of the printer) before touching any internal switch!
Do not replace the screw because in the course of this manual, we will sometimes suggest that you reset switches. (Keep the screw in a safe spot so that you can replace it if you ever pack up the printer for shipping.)
Table 1-1 shows the factory settings of the internal DIP switches, and Figure 1-13 illustrates them.
[image:47.436.43.396.46.633.2]Switch 1 Switch 2
Figure 1·13. Factory setting of the DIP switches.
Table 1·1. The DIP Switches.
Switch 1
Switch 2
If you are using single sheet-paper, switch 1-3 should be in the on position. (The factory sets this switch to the off position.) Setting this switch to on enables the printer to continue printing on the bottom third of the page even after the paper-out sensor detects that there is no more paper in the printer.
Some printer interfaces (like the Apple's) will automatically line-feed the paper as it goes through the printer. Others (like the TRS-80's) rely on the printer to do that; that is what switch 2-4 is for. In the on position it will automatically add a line feed to every carriage return. In the
off
position it will not. If you are not sure what your computer requires, leave switch 2-4 the way the factory set it and you can adjust it later. For more on the internal switches, see Appendix K.(Users of the MX printers will notice that the functions of switches 2-3and 2-4 are reversed on the FX-80.)
Starting Up
Now, tum it on!
You get a little dance from the print head and three lights go on: the POWER light, the READY light, and the ON LINE light. If the ON LINE and READY lights are not on, push the button marked "ON LINE." If the PAPER OUT light is on, then you will have to reload the paper.
Top panel buttons and lights
When the ON LINE light is on, the printer and computer are in
di-rect communication. The FF (form feed) and LF (line feed) buttons have no effect when the printer is on line. Go ahead, try pushing one.
To use the FF and LF buttons, press the ON LINE button to tum its light off. Now you can see what the other buttons do.
Press the LF button once. Okay, that gives one line feed. Now hold the button down for a moment. Line by line advancement!! (We're getting more and more advanced all the time.)
The FF button will advance the paper a complete page (form). If
you hold the button down, it will advance several forms.
Figure 1·15. Setting the Top Of Form.
If you turn the printer on while the printhead is sitting in the middle of a form, that is precisely where the next form will start when you FORM FEED.
Remember: The ON LINE button has to be in the off position (Off
Line) for the FF and LF to work.
The FX-80 tests itself
COPYRIGHT 1982 (C) BY EPSON CORPORATION
! "#:f.%~, ' ( ) *+, -. 10123456789: ; <::::: >?@ABCDEFGHIJ,
"#::1::%8,' () * .. 1-, ...• 101Z~:'4!::;6789:; <=>?(f:!ABCDEFL.,HIcIKI
#$%&' ()*+,-./0123456789:;<=>?@ABCDEFGHIJKL:
$:%g~ , ( )
*+, ... -.
Il~ 12:3A~;6 7BC.I: ; <:::: >·-;·'@{'~BCDEFGH I .JKLMI:%g,' () ·Ii--!- , --. / 012::::'4~!6 71:39: ; <:::: >?@(4B(:;DEF[~H I ~J KU1N:
,g~ , () .~+, -. /01. 2~::;4~i6 789: ; <:::= >?@ABCDEFGHLJKLI'"1NOi :' ()*+,-./01.23456789:;<=>?@ABCDEFGHIJKLMNOP ()*+,-./0123456789:;<:=>?@ABCDEFGHIJKLMNOPQI )*+,-./0123456789:;<=>?@ABCDEFGHIJKLMNOPQR *+,-./0123456789:;<=>?@ABCDEFGHIJKLMNOPQRS ·+.-./0123456789::<=}?@ABCDFFGHIJKI MNOPQRST
Figure 1·16. Sample self test.
Figure 1-16 shows the FX-80's self test, which prints a pattern to display the standard characters that are stored in the printer. The test continues until you tum the printer off. Notice that there are two sets of upper- and lower-case letters (roman and italic), plus lots of other characters.
Chapter 2
Controlling the Printer from BASIC
In this manual you'll be testing the printer with BASIC programs. So the logical starting point is to learn just how the BASIC in your computer interacts with the FX-80.
One of the simplest things you can do with the FX-80 is print listings of your BASIC programs. You merely load a BASIC program into the computer and send the LISTing output to the printer instead of to the screen.
Unfortunately, different computers access the printer in different ways. For example, the TRS-80 and most other Microsoft BASICs use an L before the usual PRINT or LIST commands (e.g., LPRINT, LLIST, etc.). Some other computers use PRINT# in place of LPRINT. A third group (Apple in particular) uses PR#l to route information to the printer and PR#O to restore the flow of information to the screen. Most likely your computer uses one of these three methods. Be sure to consult your computer manual.
We will use the LPRINT and LLIST commands for our examples in this manual. The widespread acceptance of Microsoft BASIC makes these commands as close to a standard as we have in this industry. But remember that you may need to modify some of the programs to match the unique aspects of your system.
Table 2·1. LiSTing on Several Computers.
Command Computer
LLIST TRS-80 and Microsoft BASIC LIST"COM!il:" HX-20
PR#l Apple LIST
PR#!il
If your listing is more than a page long (or if you didn't start the listing at the top of a page), you may notice that it is printed right over the perforation. Don't worry, we'll show you how to correct that in Chapter 8, when we cover forms control.
Meanwhile, printing a program LISTing is a fundamental function of the printer. Be sure you manage this before continuing (if you have trouble, consult your computer's manual for help).
BASIC Communications or . . . The Nonexistent
Standard
Part of the difficulty in controlling communications between com-puter and printer is the lack of a standard coding scheme. When your computer sends out a numeric code for the letter A, the printer had better interpret that code as an A or we're all in trouble. For frequently used characters like the alphabet, numerals, and keyboard symbols, most manufacturers use the American Standard Code for Information Interchange (ASCII, pronounced ask-key and shown in full in Appen-dix A). Use of this coding system assures that computers and printers use the same set of numbers to represent the most commonly used characters. Unfortunately, the original ASCII standard does not allow for the advanced features in today's printers and computers_ Manu-facturers have therefore adjusted the code to suit their individual needs.
The CHR$ function
The CHR$ function is designed to print special symbols on the video display. It converts any decimal number from 0 through 255 to a character (or action). What is printed is determined by the particular modified ASCII table that is used by your computer system.
To check what you have, try printing a few characters on your com-puter's screen. The usual format for this is PRINT CHR$(n). The 'n' represents one of the numbers from 0 to 255, each one of which ac-cesses a unique character or action. Try typing this:
1~ PRINT CHR$(65)
and RUN it. Since most computers use the numbers from 32 to 127 to mean the same set of characters, you should see a capital A on the screen.
It's the numbers less than 32 and greater than 127 that produce different results on nearly every brand of computer. Try entering:
1~ PRINT CHR$(193)
and RUNning it. (What you see is what you get.) If you don't see anything on the screen, don't worry. Remember that we are mainly interested in sending that 193 to the printer, and what it prints on the screen is of little consequence.
Printing from BASIC
Table 2·2. Printer Commands on Several Computers.
Activating Command Computer
iii' LPRINT CHR$(193) TRS-80 and Microsoft BASIC
5 OPEN "0" ,#1, "COMIi': " HX-20
iii' PRINT#l, CHR$(193) 99 CLOSE#l
5 PR#l Apple
iii' PRINT CHR$(193) 99 PR#O
Check your computer's reference manual, and type in the state-ments appropriate to your computer_ Then type RUN.
With any luck, you will get an italic capital A on the printer: /l
BASIC basics or . . . It's not your printer's fault!
If you ended up with a roman A: PI
(instead of the one in italics), pay close attention to the following.
The original ASCII code was designed to use the decimal numbers 0 through 127. Computer systems designers soon decided to extend this range (to 0 through 255) in order to make room for more features. Unfortunately, some designers did not anticipate that printers would make use of this extended range. So they designed the BASIC lan-guage (actually the printer driver) to intercept any number in the up-per half of the range (128 to 255) and automatically convert it to the lower half of the range by subtracting 128. In these systems, the code CHR$(193), for instance, never makes it to the printer. It arrives as a CHR$(65): 193-128 = 65.
For many applications, you don't need the upper half of the ASCII codes. For others, the inability to generate codes greater than 127 is a severe handicap. It is good to be aware of the problem right from the beginning. Apple users and those of you who suspect the worst, see Appendix H.
and send out a CHR$(13) (carriage return) instead. Typical problem codes include 0 and the numbers 9 to 13. Your computer manual may alert you to these problems. Or experience may have to be your guide.
In order to help systems which can't send a zero, several printers' instruction sequences allow such options as using "0" (quote-zero-quote) in place of CHR$(O). We'll be mentioning some of these prob-lems and solutions throughout this User's Manual. Again, Appendix H is intended to help you find and solve these inequities of working with BASIC. Appendix I will help with specific problems on the sam-ple programs.
Control codes
Enough talking about problems. Here's a program line for every-one! Type:
1~ LPRINT CHR$(7)
(Be sure to use the appropriate printer access commands for your sys-tem.)
Now RUN it! You should hear a short beep. That's the FX-80's bell or buzzer. Certain codes, like CHR$(7), actually perform printer func-tions rather than print a specific character. Table 2-3 shows a break-down of the ASCII codes as interpreted by the FX-80.
Table 2·3.
FX·SO
Interpretation of ASCII Codes.Code FX·80 Interpretation
o to 31,127 Printer control codes
32 to 126 Standard (roman) character set 128 to 159, 255 Additional printer control codes 160 to 254 Italic character set
See Appendix A for the entire ASCII chart of CHR$ codes.
ESCape!
As more features are added to the printer, even the extended range of codes (0 to 255) is inadequate if only single-code instructions can be used. Because of this, the FX-80's logic is designed to understand spe-cial sequences of codes. You use these code sequences to select one or more printing features, or "modes."
Each "ESCape code sequence" consists of an (ESC) code that is followed by one or more CHR$ codes. In BASIC, the (ESC) code itself is sent by using CHR$(27):
LPRINT CHR$(27);CHR$(n)
or
LPRINT CHR$(27) ;CHR$(nJ ;CHR$(n2 ) ; • • • ;CHR$(nk )
(where nl represents the first number in a series, n2 the second, and
nk the conclusion).
In this manual we provide sample programs that allow you to test various features of your FX-80. Quite often we start with a few pro-gram lines, make several changes and additions, and end up with a substantial program. You may wish to save some of the programs for later use. We suggest that you periodically save the larger programs in case of power fluctuations or other interruptions.
Start a new pwgram now by entering:
NEW
1~ LPRINT CHR$(27)CHR$(52)
2~ LPRINT "ITALIC CHARACTER SET!"
Note: Some systems require semicolons between all codes as in: LPRINT CHR$(27)jCHR$(52)
We include semicolons only when needed for clarity.
The FX-80 interprets the CHR$(27)CHR$(S2) sequence in line 10 above as a command to switch from roman to italic characters. The LPRINT in line 20 sends a string of characters to the printer to verify that the printer is in Italic Mode.
Now type:
LLIST (or your system's version of LLIST)
to check the printer's.status. Since all characters are still printed in italics, you can see that this mode stays on until it is turned off.
If your printer is printing one line on top of another or if it is double spacing, you need to change the setting of the FX-80's internal switch 2-4 (see "Function switches" in Chapter 1).
Resetting Commands
There are several ways you can reset a command. You can get back to square one by turning the printer off or using the Master Reset Code; you may CANcel all of the text stored in the printer's memory buffer without changing print modes; you may DELete the last text character sent to the printer; or you may use a command to turn off a specific mode. The next sections cover these various ways of telling the printer that you've changed your mind.
The Master Reset Code
To see the Master Reset Code work, add these lines to your budding program:
3~ LPRINT CHR$(27)CHR$(64)
4~ LPRINT "BACK TO ROMAN WITH THE MASTER RESET"
and RUN it.
ITALIC CHARACTER SET!
BACK TO ROMAN WITH THE MASTER RESET
Line 30 turns off all special print modes and returns the FX-80 to "nor-mal" print (i.e., to its default settings as determined by the internal switch settings). The factory sets this for roman typeface. Line 40 is the proof of the pudding.
Note that line 30 adds an extra line feed between the two rows of text. BASIC automatically provides a line feed after every print line at no extra charge, whether that line prints text or not. A trailing semi-colon (;) at the end of this line would eliminate the extra line space. We will use trailing semicolons extensively throughout this manual to link print lines together.
The Master Reset Code is useful when you want to tum off all printer modes. It resets everything to its start-up condition, including the user-defined characters which we introduce in Chapter 17. If you have two or three different modes active in the printer at one time, they would all be shut off with the (ESC)CHR$(64).
The print buffer
Every printer control code sent to the printer is stored in the print-er's RAM buffer right along with the text. All material goes through this buffer to get to the printed page. This buffer is like a holding tank in which each print line is assembled.
line is processed, one character at a time: text characters are printed on the page, and control codes are activated as they are encountered.
When the Master Reset Code is sent to a partially full buffer, all text characters and control codes currently in the buffer get erased. At the same time all printer modes are reset to their default conditions.
CANcel and DELete
But suppose you don't want that much power. Suppose you only want to erase text in the buffer without affecting any print modes. There is a way! It's called the CANcel code and it looks like this:
CHR$(24)
Add the CAN code to the end of line 20 above, print it to see how it acts, and then restore the line.
Another code that deletes characters from the buffer is the DELete code:
CHR$(127)
When placed in the buffer, DEL deletes only the previous text char-acter. It does not affect control codes.
Specific reset codes
The FX-80 also provides specific codes to tum off each mode sepa-rately. For example, an (ESC) CHR$(53) will turn off the italic charac-ter set and leave everything else untouched. To see how the reset code for italic characters works, change the Master Reset Code in line 30 above to an (ESC)CHR$(53):
3~ LPRINT CHR$(27)CHR$(53)
4~ LPRINT "BACK TO ROMAN WITH ITALIC OFF"
ITALIC CHARACTER SET!
ASCII Characters in ESCape Sequences
Since the FX-80 has so many features, remembering all of them by number is not easy. Fortunately, there is another way to send the re-quired codes to the printer.
In some cases it is convenient to use (inside the quotation marks) the ASCII character that equates with a given code number instead of the CHR$(n) format. A string character is shorter and easier to remember than a number. For example, CHR$(64) can be replaced by "@". (If you don't believe it, trot back to Appendix A and check it out.) So an alternate way to send the Master Reset Code is to send the ESCape code plus "@":
LPRINT CHR$(27)"@"
Using the"@" in place of CHR$(64) simplifies the process, and it's also easier to remember. We will use symbols whenever possible to keep the programs short. Change these lines in your current program:
1~ LPRINT CHR$(27)"4"
3~ LPRINT CHR$(27)"@"
and RUN it to make sure that both ESCape codes work as before.
In the next two chapters, you'll learn how to control print width and print quality for all kinds of useful applications.
Summary
All printer commands stay active until they are turned off. (Well, there are a few exceptions, but we'll cover them later.) You can turn off all printer commands by turning the printer off or by sending the Master Reset Code. In addition, each mode has its own reset code that will turn off only that particular mode.
CHR$(n) ASCII code format. Allows communication between computer and printer:
Codes FX-80 Interpretations
o
to 31, 127 Printer control codes32 to 126 Roman (standard) character set
128 to 159,255 Printer control codes (repeat of 0-31, 127) 160 to 254 Italic version of the roman character set
CHR$(24) CHR$(27) CHR$(127) (ESC)"@" (ESC)"4" (ESC)"5"
CAN code ESCape code DEL code
Master Reset Code Italic Mode ON Italic Mode OFF
Notation Used in This Manual
1) A special character 011) will be used to represent blank spaces when several spaces are required in a print string. This will make it easier to count spaces. For example:
"]:6]:6]:6]:6]:6]:6]:6]:6]:6SAMPLE STRING"
Means that you type:
II SAMPLE STRING"
which allows 9 spaces between the initial quote mark and the first S.
2) Remarks will be included in some program lines, always preceded by an apostrophe (').
Example:
10 LPRINT CHR$(27)"@" , Master Reset Code
3) The carat symbol (II) will be used to indicate exponents. For example:
ill'
X=
yll2Chapter 3
Print Pitches
One of the big advantages the FX-80 printer has over a daisy-wheel printer or a typewriter is the ability it gives you to easily vary the width, or "pitch" of characters. To use this feature well, it's important to understand just how the FX-80 prints. The technique used by the FX-80 printer is called "dot-matrix printing."
Dot-Matrix Printing
To see how dot-matrix printing works, we need to look first at the print head and then at the way characters are stored in the internal memory of the printer.
The print head
6 columns
Figure
3·1. Dot·matrix characters.
Main columns
The construction of the print head restricts the maximum height of any character to nine dots. The print head uses a vertical column of nine pins (actually, wires-see Figure 3-2a) that are fired at the paper by electrical impulses. Each pin presses against the ribbon to produce a single dot of the matrix. Because there is only one column of pins, the head must move sequentially to each of the different column posi-tions of the matrix, then fire the appropriate pins. At each position, only the pins necessary to print the current character are fired.
To print a capital H as in Figure 3-2b, the print head fires pins 1 through 7 in column 1; pin 3 in columns 2, 3, and 4; and pins 1 through 7 again in column 5.
Intermediate positions
Most characters are designed to be 5 or less columns wide. As we saw in Figure 3-1, leaving the sixth column blank allows for space between each pair of letters. Only one character in the ROM uses all 6 dot positions-the underline character (Figure 3-3) .
•
Figure 3·3. All dots in main columns.
All the rest fit neatly into the 5-dot format, freeing the sixth column for spacing. But use of 5 dots does not give quite enough detail for the highest quality characters. So the FX-80 prints some dots halfway be-tween the main columns in the 6-dot-wide matrix. This means that the matrix grid for any character actually contains 11 columns-6 main columns with 5 intermediate columns. You can count the 11 positions on the grid shown in Figure 3-4.