FlexNet
lMNetwork Operating System
COPYRIGHT
Copyright © 1986 Digital Research Inc. All rights reserved. No part of this publication ~ay be reproduced, transmitted, transcribed, stored in a retrieval system, or translated into any language or computer language, in any form or by any means, electronic, mechanical, magnetic, optical, chemical, manual, or otherwise, without the prior written permission of Digital Research Inc., 60 Garden Court, P.O. Box DR I, Monterey, California 93942.
DISCLAIMER
DIGITAL RESEARCH INC. MAKES NO REPRESENTATIONS OR WARRANTIES WITH RESPECT TO THE CONTENTS HEREOF AND SPECIFICALLY DISCLAIMS ANY IMPLIED WARRANTIES OF MERCHANTABILITY OR FITNESS FOR ANY PARTICULAR PURPOSE. Further. Digital Research Inc. reserves the right to revise this publication and to make changes from time to time in the content hereof without obligation of Digital Research Inc. to notify any person of such revision or changes.
NOTICE TO USER
This manual should not be construed as any representation or warranty with respect to the software named herein. Occasionally changes or variations exist in the software that are not reflected in the manual. Generally, if such changes or variations are known to exist and to affect the product significantly, a release note or README.DOC file accompanies the manual and distribution disk(s). In that event, be sure to read the release note or README.DOC file before using the product.
TRADEMARKS
Digital Research and its logo are registered trademarks of Digital Research Inc. Concurrent, DR Net, FlexNet, and FlexOS are trademarks of Digital Research Inc. IBM is a registered trademark of International Business Machines Corp.
FOREWORD
BEFORE YOU BEGIN
The presentation of information in this guide assumes you. have already read the FlexOS
™
User's Guide. Before you begin reading this guide, you should know:• How to start FlexOS
• How to start a session on your computer • How to use disks, directories, and printers • How to enter and edit commands
• How to use the following FlexOS commands:
ASSIGN Give a disk drive a new assignment
CHDIR Change the current directory
COpy Copy a file from one directory to another
DEFINE Create a logical name
DIR List the files in a directory
LOGON Start a session on your computer
LOGOFF End a session on your computer
MKDIR Make a subdirectory
The FlexNet User's Guide describes how to:
• Start and end sessions on remote computers
• Lfst the node names of computers on your network • Use disks, files, and printers on other computers • Display the network status
• Set up FlexNet. on the computer and change network parameters
• Use the print spooler system in the network environment
HOW THIS BOOK IS ORGANIZED
The FlexNet User's Guide consists of four sections and two appendices. Section 1 leads you through a brief exercise that demonstrates how to log on a remote computer and use its hard disk.
Section 2 provides general information regarding computer networks and an overview of FlexNet. Read this section for explanations of network terms and concepts and a description of how you use FlexNet.
Section 3 describes the FlexNet commands and lists the FlexOS commands you can use over the network.
Section 4 describes FlexNet installation. This section is intended for system managers.
Appendix A lists the network error messages.
Appendix B describes how to integrate nodes running PC DOS with nodes running FlexOS. Appendix 8, like Section 4, is intended for system managers.
CONTENTS
1 Getting Started with the Network
An Exercise that Uses the Network 1-1
2 Who's Who on the Network
Nodes. . . 2-1 Logging On . . . .. . . . 2-4
Nodes You Can and Cannot Log On . . . 2-4 User Accounts and Their Access Mode. . . 2-5 Server Security Modes. . . 2-5 User Accounts and Access Modes Illustrated . . . 2-6 Shared Resources . . . 2-7 . Remote File Specification . . . 2-7 Remote Printer Specification. . . 2-8 IDs and Access Privileges. . . 2-8 PC DOS Versus FlexOS Nodes . . . .. 2-10 Using a PC DOS Server from a FlexOS Requester. . . .. 2-10 Using a FlexOS Server from a PC DOS Requester. . . .. 2-10 You and the System Manager . . . .. 2-11
3 Network Commands
Contents
NAMES. . . . . . 3-6 NETSTAT . . . . . . . . . . . . 3-9 FlexOS Commands. . . . . . . . . . . . . . . . . . .. 3- 1 4 PC DOS Commands. . . . . . . .. 3- 1 6
4 Network Installation
Make a General Plan . . . . . . . . . . . 4-2 Create Name Service Database . . . 4-6 Insta II Accounts. . . . . . . . .. 4- 1 0 Set Network Parameters. . . . .. 4-11 Network Parameter Descriptions. . . . . . . . .. 4- 1 1 Changing Network Parameters . . . ; . . . .. 4- 1 4 Update Each Node's CONFIG.BAT File. . . . .. 4-16 Copying FlexNet Files. . . .. 4-21 Load Applications. . . .. 4-22 Test the Network. . . . . . .. 4-23
A Ne~ork Error Message Descriptions. . . . . . . A-1
. LOGOFF Error Messages. . . .. A-1 LOGON Error Messages . . . " A-1 NAMES Error Messages. . . .. A-3 NAMES PARSE Error Messages . . . " A-4 NETSET Error Messages. . . .. A-5 NETSTAT Error Messages. . . . .. A-6
B Networking with PC DOS Nodes. . . 8-1
Contents
C Print Spooler System Use. . . . . . . C-1
FlexOS Requester to PC LAN Server. . . . . . C-1 PC LAN Requester to FlexOS Server. . . . . . C-2
Tables
3-1 NETSTAT Connection States. . . . . . . .. 3-12 4- 1 NETSET Parameters. . . . . . . . . . . .. 4- 12 4-2 FlexNet Drivers. . . . . . . . . . . . . . . . . . .. 4- 1 9 4-3 FlexNet Required Files. . . . . . . . . . . .. 4-21
Figures
2- 1 A Sample Network. . . . . . . 2-3 3- 1 Sample NAMES LIST Display. . . . . . . 3-8 3-2 NETSTAT A Display. . . .. 3-11 4- 1 Sample Node Form. . . . . . . . . . . . 4-5 4-2 NETNAMES.DAT Entry Format. . . . . . . . . . . . . . . 4-7
Listings
SECTION 1
GETTING STARTED WITH THE NETWORK
AN EXERCISE THAT USES THE NETWORK
A network is a combination of computer hardware and software that connects one computer to another. The network gives you access to disks and printers on the other computers. Computers on the network are referred to as nodes.
About This Lesson
The following exercise demonstrates how you can access a disk drive on another computer. The exercise is a sequence of commands and explanations.
To begin the exercise, turn on your computer and, if required, enter your FlexOS LOGON command. The operating system's prompt must be displayed in order for. you to enter the commands that follow.
List the Nodes
Enter the command
C>NAMES LIST
Getting Started with FlexNet FlexNet User's Guide
You will need to use a node name when you enter the commands that follow. Pick one of the names under the Remote Node(s} heading in the NAMES LIST display. Use the node name you pick in place of
node::
as you enter the commands.Log on a Server
Enter the command
C>LOGON
node: :
Enter your user name and password when LOGON prompts you. The system prompt is returned to your screen when LOGON completes.
Just as you use the LOGON command to start a session on your own computer, you also use it to start sessions on another computer. In this manual we'll refer to starting a session as logging on. Ending a session is called logging off.
The computers on the network you can log on are called "servers." The disk drives and printers available on a server are called "remote resources." The computer you are sitting at is referred to as the "Iocal" computer.
You log on servers one at a· time. If your network has more than one server, you can be logged on to multiple servers simultaneously.
Display Remote Files
Enter the command
C>DIR
node::C:
FlexNet User's Guide Getting Started with FlexNet
You use the DIR command to display the files in the server's directories. To distinguish a server's drive from a drive on the local computer, precede the drive specification with the server's node name.
Give the Remote Drive a Logical Name
Enter the command
C>DEFINE G:=node::C:\
This defines the logical name G: as the server's drive C:. Now you can use G: to designate this drive in your commands instead of the full network path. For example, enter D I R G: and notice that you get the same directory display shown by the previous command.
A full network path consists of a node name, drive, directory, and filename.
Show Network Status
Enter the command
C>NETSTAT
NETSTAT is the FlexNet network status command. You can use NETSTAT to determine which servers you have logged on. See Section 3 for the complete description of NETSTAT and its options.
Summary
Getting Started with FlexNet FlexNet User's Guide
• You must log on a remote computer before you can use any of its resources.
• You designate a remote device by using the remote computer's node name before the device name.
• You use standard FlexOS commands to access server resources.
The next section describes more of the how, when, and where of logging on and remote resource use. Section 3 describes the network commands.
SECTION 2
WHO'S WHO ON THE NETWORK
NODES
The network allows you and other users to share disks, printers, and files among different computers. Although some networks give you access to every user's disks and printers, most have security measures that limit access or deny it altogether to some of the nodes. This section describes who is who on the network and which remote resources are available to you.
Note: There are few hard and fast rules governing network configuration (that is, which computers are connected to each other and who can access whom). In fact, one of FlexNet's features is its configuration flexibility--its ability to be reconfigured as more users, computers, and resources are needed. Consequently, we cannot describe exactly which nodes on your network are servers and what resources are available on them. For explicit information on your network's nodes and remote resources, see your system manager.
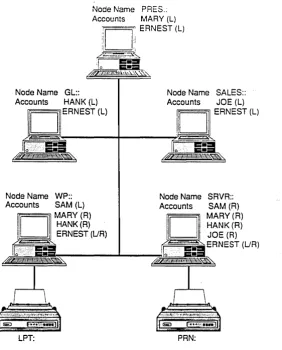
Computers on a network are called nodes. Each node is identified by a unique name and is either a requester-only or a combination requester and server. Figure 2-1 illustrates a network with both types of nodes.
Nodes FlexNet User's Guide
Here are' some examples of the requests you can make:
• Log on another computer
• Display the files in a remote directory • Print a file
• Make a new directory • Copy a file
• Get data trom a file
A requester-only node's drives and printers are not available to other network users.
Combination requester and server nodes (henceforth called requester/servers) are computers from which you can issue requests while simultaneously the computer services requests from other users. The requester and server mechanisms are completely separate. If your computer is a combination requester and server, FlexNet and FlexOS complete remote requests without interrupting your program.
Networks can be configured with requesters and requester/servers in any combination. For example, the network shown in Figure 2- 1 is composed of three requester nodes and two requester/servers; the five nodes in Figure 2-1 could also configured as five requester/servers or as one requester/server and four requesters.
Each node has a name. Use the node name in your commands to designate which node you want to use. For example, Joe in Figure 2-1 enters
DIR SRVR::C:
FlexNet User's Guide
Node Name PRES.: Accounts MARY (L)
:1
1,
ERNEST (L)"
I.
~~~
t:_::t
~
~~~~
Node Name GL:: Node Name SALES:: Accounts HANK (L) Accounts JOE (L)
l
gllii'ER_N_E_ST_(L_)1 _ _
fr~11 ~~I~1
ERNEST (L)JebEL
at
&
Node Name WP:: Accounts SAM (L)
n
MARY(R) HANK(R)ID,
ERNEST (UR)LPT: PRN:
Figure 2-1. A Sample Network
Nodes
[image:17.488.137.419.60.410.2]Logging On FlexNet User's Guide
LOGGING ON
Logging on means starting a session on a computer. To log on your computer, enter the LOGON command and enter your account name and password. The LOGON program makes sure you have an account on the computer and confirms that the . password is correct and returns the system prompt. You can
then proceed to use the computer's disks and printers.
You must also log on a remote node to use its disks and printers. This establishes a connection (like a telephone connection) through the network between your node and the remote node. The connection remains in place until you log off.
You must have an account on the remote node to log on. However, an explicit LOGON command might not be necessary. Whether or not LOGON is required is determined by the server security mode.
Note: The description of accounts, access modes, and server security applies only to nodes on which the FlexOS protection mechanism is installed. If your network has no nodes with protection (your system manager can tell you if it does or does not), you can skip to "Shared Resources" below.
Nodes You Can and Canriot Log On
The network allows you to log on requester/server nodes from another node. You must have a user account on the node, however, or FlexNet does not allow you to log on.
FlexNet User's Guide Logging On
User Accounts and Their Access Mode
Each computer has a user account file. Each account entry in the file contains a user name, password, user and group identification numbers, home directory, and access mode. The LOGON command checks the name and password you enter against the entries in the file. If there is a match you are allowed to log on.
You can log on under one account at a time; you cannot log on two accounts simultaneously. You do not need to log off explicitly, however, to change accounts. To log on under a different account, run the LOGON command and specify a different account name. FlexNet automatically logs you off the other account.
The access mode determines whether you can log on as a local user, a remote user, or as either a local or remote. user. Users with accounts that allow local access only cannot log on the node from another. They can, however, log on from the computer's keyboard. Users with accounts that allow remote access only cannot log on from the computer's keyboard. They can, however, log on from· another network node. Users with accounts that allow local and remote access can log on from the computer's keyboard or another node.
Server Security Modes
There are two server security modes: normal or extended. Requester/server nodes with normal security do not require an explicit LOGON command to log on from a remote node. Instead, FlexNet logs you on automatically the first time you put the node name in a path specification. For example, if WP:: in Figure 2-1 above has normal security, Hank is logged on automatically by the command
Logging On FlexNet User's Guide
To take advantage of this convenience, you must have an account on the requester/server and the remote account's ·name must match your local account name. If the account names are different, you must log on the requester/server with the LOGON command regardless of its security mode.
Requester/server nodes with extended security require you to log on with the LOGON command at all times. Section 3 explains how to use the LOGON command.
The security mode of one requester/server is independent of other nodes. You can have one requester/server on the network with normal security while another has extended security. Your system manager can tell you whether a requester/server has extended or normal security.
User Accounts and Access Modes Illustrated
Figure 2-1 above shows how accounts and access modes are used to determine who can log on which nodes. Ernest is the system manager of this network and has given himself an account on each node.
Mary, Hank, and Joe have their own computers (nodes PRES::, GL::, and SALES::, respectively) with accounts set for local access mode. These users can log on their computers directly (that is, from the keyboard), but they cannot log on from another node.
The node SRVR:: has an account for all users. Each account except for Ernest's has the remote security mode. Ernest's has the local and remote mode. This means that Mary, Hank, Joe, and SAM can log on SRVR:: from their own computer. However, only Ernest can log on SRVR:: from its keyboard.
FlexNet User's Guide Shared Resources
accounts allow a local log on. Mary and Hank can onlv log on from their own nodes. Joe cannot log on the WP:: node at all.
Networks can have some nodes with protection installed and some without. See your system manager for answers to questions regarding local and remote protection, accounts, and access modes.
SHARED RESOURCES
When you log on a FlexOS requester/server node, you have access to the root directory on all disks and all printers on that computer. Access to subdirectories and the files in them depends on whether the protection mechanism is installed. See "IDs and Access Privileges" below for the description of the protection mechanism and how it affects file access. If file protection is not installed, you have access to all files and printers.
Remote File Specification
To access a file on another node, put the node name at the front of the path specification. For example, to type the file AR.DAT with the path C:GL\ACCOUNTING on node SRVR::, enter:
TYPE SRVR::C:\GL\ACCOUNTI NG\AR.DAT
You can also use the node name in a logical name assignment:
DEFINE DATA=SRVR::C:\GL\ACCOUNTING\ARDAT
Shared Resources FlexNet User's Guide
Remote Printer Specification
To specify a remote printer, use the same form as a remote drive and file specification by preceding the printer name with the node name. For example, the path that specifies a printer named LPT: on node WP:: is:
WP::LPT:
You could give this printer the logical name REMPRINT: with the command
DEFINE REMPRINT:=WP::LPT:
IDs and Access Privileges
On nodes where the FlexOS file protection mechanism is installed, you might be restricted from accessing some subdirectories and files. The system manager assigns each user a user identification number (user ID) and a group identification number (group ID). FlexOS uses these numbers to deny some users and allow others access to a file or a directory.
Your user ID and group ID are a part of your account. Your user number is unique. Your group number is shared with others who use the same data and programs. For example, all the users in an accounting department would have the same group number. You can have different user and group identification numbers on different nodes.
FlexNet User's Guide Shared Resources
There are four access privileges.
• READ: The user is allowed to read the file.
• WRITE: The user is allowed to read the file and modify its contents.
• EXECUTE: The user can run the file. (This privilege applies to program files only).
• DELETE: The user can delete the file and change its file attributes.
The access privileges for the owner, group, and world are established when the file is created If you have the DELETE privilege, you can change the acces > privileges with the FSET
command. The FSET command also allows you to change file attributes; see the FlexOS _ User.) Guid_~ for a description of FSET.
PC DOS Versus FlexOS Nodes FlexNet User's Guide
PC DOS VERSUS FLEXOS NODES
So far, this description of network use assumed your network is composed entirely of computers running FlexOS. Your network can also include requester and server nodes running IBM® PC DOS and the PC Local Area Network Program (PC LAN). Appendix B contains PC DOS node information for system managers.
If your network consists solely of FlexOS, skip to "You and the System Manager," below.
Using a PC DOS Server from a FlexOS Requester
For the most part, logging on and using a PC DOS server is just like using a FlexOS server. The differences are as follows:
• Instead of the node and all its resources, you log on a single device on a PC DOS server.
• You enter the device's shortname instead of an account name in the LOGON command. You cannot use the device's path to log on; you must used the shortname assigned to it with the PC DOS NET SHARE command.
• Logging on more than one device does not log you off devices previously logged on.
You use the LOGON command to log on a PC DOS server. In the command, use the FlexOS node naming convention (nodename::) rather than PC DOS's (\\nodename). When prompted for the user name, enter the shortname assigned to the device.
FlexNet User's Guide You and the System Manager
Using a FlexOS Server from a PC DOS Requester
Use the standard PC DOS NET USE command and syntax to log on a FlexOS server from a PC DOS node. Note, however, that you must use a shortname for a directory path rather than the path specification itself.
FlexOS interprets the shortname as the logical name for a directory path. FlexOS limits you to that directory and its subdirectories. FlexNet allows you to log on multiple directories on the same node simultaneously from a PC DOS requester.
Unless the FlexNet spooling system is installed and running in your network, your access to a FlexOS node's resources from a PC DOS requester is limited to disks and directories .. Without the spooling system, any printers on the FlexOS node are inaccessible. See your system manager for details about the spooling system.
YOU AND THE SYSTEM MANAGER
Because each network is different, we have not tried to describe the specifics of your network. For example, FlexNet is equally suited for small networks consisting of a few requester/server nodes with no protection and large networks with complex configurations of requester/servers, requesters, accounts, and access privileges.
Your system manager can give you specific information on your system configuration. The system manager set up the network by defining node names, installing protection where necessary, putting in the accounts and access modes on each node, and assigning the user and group numbers.
You and the System Manager FlexNet User's Guide
accounts on, who is your primary server, which directories are available to you on each node, which servers have normal versus extended security, and what programs you can use on each node. The system manager can also help you when you need changes made.
SECTION 3
NETWORK COMMANDS·
This section is divided into three parts:
• "FlexNet Commands" describes the FlexNet commands.
• "FlexOS Commands" on page 3-13 identifies which FlexOS commands to use for access to remote FlexOS and PC DOS nodes.
• "PC DOS Commands" on page 3-15 lists the PC DOS commands you can use to access resources on FlexOS nodes and describes general rules for their use.
To access resources on FlexOS and PC DOS servers from FlexOS requesters, use the standard FlexOS commands. To access resources on a FlexOS server from a PC DOS requester, use the PC DOS commands. Never run a PC DOS command on a FlexOS node or a FlexOS command on a PC DOS node.
FLEXNET COMMANDS
Three network-specific commands are provided with FlexNet:
NAMES: sets and displays node names
NETSTAT: displays network status information NETSET: sets network parameters
LOGOFF FlexNet User's Guide
LOGOFF
Forms:
{1} LOGOFF
{2} LOGOFF node::
{3} LOGOFF node::shortname
Explanation: LOGOFF ends a session on a computer. To access the computer again, you must log on first.
Form 1 ends the session on your local computer and all remote computers. To use the computer, you must log on again.
Form 2 logs off the remote computer specified by node::. All other sessions with other computers remain active. If the node specified is a PC DOS server, this command logs off all devices and directories on that server.
FlexNet User's Guide LOGON
LOGON
Forms:
(1) LOGON
(2) LOGON node::
(3) LOGON node::username (4) LOGON node::shortname
Explanation: LOGON starts a session on a computer. You must have a user account on the computer and the account password to start the session.
Use form 1 to log on your computer. Use form 2 to log on a remote computer. After you have entered the command, LOGON prompts you to enter your user name (also called an account name) and your password. You get the system prompt when you log on your computer. You get a success message indicating the remote node and user name when you log on a remote computer.
Use form 3 to specify the remote node and account name in the LOGON command line. LOGON prompts you to enter the password.
LOGON FlexNet User's Guide
description in the PC Local Area Network Program User's Guide for instructions on assigning shortnames and device passwords.) FlexOS prompts you for the device password.
You log on FlexOS requester/servers one account at a time. If you log on the same node again under a different user name, DR Net logs off the previous account.
You can log on PC DOS servers multiple times without affecting previous logons. This lets you log on several of the node's directories and devices simultaneously.
FlexNet User's Guide NAMES
NAMES
Forms:
(1) NAMES HELP
(2) NAMES SET LOCAL nodename (3) NAMES GET LOCAL
(4) NAMES LIST
(5) NAMES PARSE filename
Explanation: NAMES manages your directory of nodes. There are four basic directory management tasks:
• Setting your node's name • Getting your node's name
• Listing ~he nodes in your network
• Checking the names database for form errors
Use form 1 to display a brief explanation of the command options.
Use form 2 to set the node's name. In most cases, your node's name is defined for you in the configuration program that loads FlexOS. You cannot change your node's name once it has been set.
Use form 3 to find out the name of your node. Note, however, that your node name is shown in the NAMES LIST (form 4) display.
NAMES
Examples:
FlexNet User's Guide
partial node name with the *, ?, and " wildcard characters. Figure 3-1 illustrates the NAMES LIST display for the sample network in shown Figure 2-1 as Mary would see it.
Note: The NAMES LIST command also lists the network sockets. Sockets are connection points on each node. This information is valuable to the system manager but has little if any use to users.
Use form 5 to test the NAMES database file for format errors. See Section 4 for the description of the NAMES database file and the use of this command.
The following example of NAMES form 2 sets the local node name to MARK::.
A>NAMES SET LOCAL MARK
The following example of form 3 lists all nodes whose name starts with MA.
A>NAMES LIST MA*
The following example of form 5 checks each name entry in the STDNAMES.DAT file for format errors.
FlexNet User's Guide
LIST OF NETWORK NAMES BY NAME TYPE
Local Name:
Remote Node(s)
Local Socket(s)
Remote Socket(s)
PRES
GL
SALES
WP
SRVR
DRIRQSTR
DRISRVR
DRINAMES
None known
Figure 3-1. Sample NAMES LIST Display
NETSTAT
NETSTAT
Forms:
(1) NETSTAT HELP (2) NETSTAT (3) NETSTAT E (4) NETSTAT A (5) NETSTAT [opt]C
FlexNet User's Guide
Explanation: NETSTAT displays network connection status. A connection is a virtual circuit between two nodes. You make a connection when you log on another node. Network applications also make connections. Use form 1 to display a NETSTAT option summary.
Form 2 lists your connections. The NETSTAT display lists the remote nodes' name, your account name on that server, and the connection status. Table 3-1 lists the connection states.
Use form 3 to display the nodes you are logged on, how many bytes of data have been transferred through the connection, and your user 10 and group 10 on each node. NETSTAT formats this information as shown in the top half of Figure 3-2.
FlexNet User's Guide NETSTAT
Form 5 runs NETSTAT at fixed intervals. NETSTAT prompts you to specify the interval. The time unit is seconds. Enter A or E for [opt]. For example, the following command repeats the NETSTAT A display:
NETSTAT AC
The information on the message bytes received and sent is cumulative starting from the time connection was established. This NETSTAT information is useful for network development and monitoring, but has little application for day-to-day network use.
NETSTAT FlexNet User's Guide
Network Status Utility You are connected to these servers:
Node User Status Received Sent Uid Gid
These nodes are using your computer: Node Status Received Sent
LISTEN 0
Figure 3-2. NETSTAT A Display
FlexNet User's Guide NETSTAT
Status
IDLE
LISTEN
CONNECT
VERIFY
OPEN
CLOSING
Table 3-1. NETSTAT Connection States
Description
The socket has no connections.
FlexNet server mechanism is waiting for a connection request to come in.
You have requested a logon, but FlexNet has not finished processing your request.
FlexNet has established a connection between the two sockets. However, FlexNet has not determined whether or not your node and the other speak the same network dialect.
You have successfully logged on the server and can communicate with it.
NETSTAT
Status
REOPEN
FAIL
FLUSH
DIALURE
XWAIT
FlexNet User's Guide
Table 3-1. Cont'd
Description
You have requested a logon after a logoff, but FlexNet has not yet logged you off.
An error has been detected; this connection is no longer reliable.
Connection requests have failed and all connection processing has been flushed.
A dialect failure occurred during VERIFY.
FlexNet User's Guide FlexOS Commands
FLEXOS COMMANDS
Use the standard FlexOS commands to access remote files and printers over the network. Some of the commands, however, can have disasterous consequences if misused. The following commands are safe for general use.
ASSIGN DIR MKDIR RESTORE BACKUP ERASE MORE RMDIR BATCH EXIT PATH SORT CHDIR FIND PRINT TREE COMP FSET RECDIR TYPE COpy LOGOFF RECFILE VOL DEFINE LOGON RENAME
Specify the remote computer, rather than the local computer, by placing the node name at the beginning of the path. For example, enter the following command to make a directory called PRIVATE on node SRVR:: drive C:
MD SRVR::C:/PRIVATE
To copy all files from your default directory to the new directory, use the node name in your COpy command as follows:
COpy
*.*
SRVR::C:/PRIVATE
You can also use the node name in a logical name definition. The following DEFINE command assigns the name MYDIR: to the directory just made:
FlexOS Commands FlexNet User's Guide
You also use the node name in a file's directory path. For example, to display a file named RESUME.ME in the PRIVATE directory one screen-full at a time, you could enter the following command:
MORE
<SRVR::C:/PRIVATE/RESUME.MS
Using the logical name previously defined, the same command would appear as shown below.
MORE
<MYDIR:RESUME.ME
The following FlexOS commands should be used with extreme caution or eliminated from network use entirely:
CHKDSK DISKCOMP DISKCOPY DISKSET FDISK FORMAT SYS
Generally, these commands are useful only to the system manager.
Use the following FlexOS commands to access files on PC DOS servers:
BATCH CHOIR COMP COpy DEFINE DIR ERASE FIND LOGON LOGOFF MKDIR MORE PATH PRINT RENAME RMDIR SORT TREE TYPE VOL
FlexNet User's Guide PC DOS Commands
PC DOS COMMANDS
On PC DOS nodes, use PC DOS commands to manage files and directories on FlexOS servers. The FlexNet print spooler must be installed on a FlexOS server node before you can access its printer from a PC. DOS requester. You cannot access printers on FlexOS servers from a PC DOS requester using the PC DOS PRINT command, the PrtSc function key, or the PC LAN NET PRINT command.
You can use the PC DOS commands listed below. Be sure to use the PC DOS node naming convention, rather than the FlexOS convention, in your path specifications.
APPEND DEL RENAME
ASSIGN DIR RESTORE
ATTRIB1 ERASE RMDIR
BACKUP EXE2BIN SORT
BATCH FIND SUBST
CHOIR JOIN TREE
COMP MKDIR TYPE
COpy2 MORE VOL
1. The only person who can change the read-only attribute on a FlexOS server is the person who created the file.
2. You can copy files to a remote disk. You can copy files to a remote printer on a FlexOS server if the spooler is installed.
Use the NET USE command to log on a FlexOS server. Use of the other NET commands is not affected by a FlexOS server except for NET PRINT, NET FORWARD, and NET SEND. For these commands, the destination node canno,t be a FlexOS server.
SECTION 4
NETWORK INSTALLATION
FlexNet software consists of driver modules, command files, and data resource files. This section describes how to select the appropriate drivers and commands for each node and how to create the data resource files.
Note: Before proceeding with FlexNet installation, you should have the network hardware and cables installed. In addition, make a copy of each FlexNet distribution diskette and use the backup instead of the original. Store the originals in a safe place.
FlexNet installation consists of the following tasks:
1. Make a general plan: Determine which computers are servers and which are requesters.
2. Create a name service database: Make the NETNAMES.DAT file for each node.
3. Install accounts: Add remote users to the USER.TAB file on each server node.
4. Set network parameters: Create a NETSET resource file for each node that requires changes to default values.
5. Update each node's CONFIG.BAT file: Add DVRLOAD commands to install the required drivers, make required changes with the NETSET command, and set the local node name.
6. Record FlexNet files: Copy the required drivers and command files to the computer's system: drive.
Make a General Plan FlexNet User's Guide
8. Test the network: Make sure the accounts and programs are installed properly.
This section describes each task in the order listed above. If you have need to integrate servers or requesters running the IBM PC Local Area Network Program, see Appendix B for the installation instructions after reading this section.
MAKE A GENERAL PLAN
Note: Some networks impose restraints on the configuration of requesters and requester/servers. Ask your network vendor if there are restraints and how they can affect your configuration.
Your plan is the network configuration blueprint. The complete plan indicates which computers are requester/server nodes, which are requesters only and which users have accounts on which nodes. Keep in mind these goals as you develop your plan:
• Optimize use of hard disks and printers: Put hard disks and printers on requester/server nodes so more than one user can access them.
• Balance the load on requester/servers: Too many requesters on the same requester/server impedes program and network performance.
• Provide security where confidential data must be protected: Enable protection on server nodes that have programs and files that must be restricted from general access. Assign user and group identification numbers and set access privileges to limit file and program access.
FlexNet User's Guide Make a General Plan
many requesters. This reduces file storage requirements, eases file maintenance and updating, and ensures that all users have the most up-to-date data. Keep the following points in mind while you consider which applications will have shared access:
It is illegal to run some applications on more than one computer.
Some applications do not have locking mechanisms to prevent two users from changing the same file record simultaneously. This can have disasterous consequences.
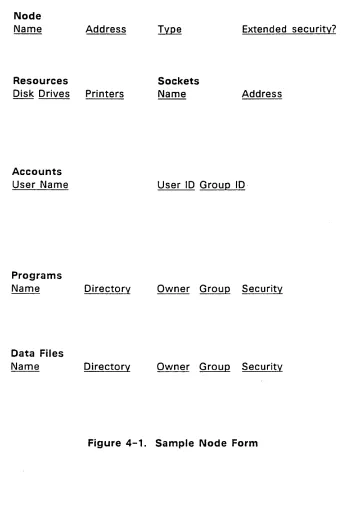
Gather all the information you need to complete the plan before you go on to the next step. To help in this task, make a map of your network and develop a summary form for each node. Figure 4-1 illus'trates a form that contains the important node characteristics.
Most of the items shown in the form are explained in this manual or in the FlexOS User's Guide. Two new network characteristics introduced' here are "node addresses" and "sockets."
Node addresses are the physical addresses used by the network hardware to identify each node. Each node has a different address. Get the address values from the network hardware or your network vendor.
Make a General Plan FlexNet User's Guide
Sockets are logical plugs used by FlexNet to make and distinguish connections between nodes. When you log on another node, FlexNet makes a virtual connection between a socket on your node and a socket on the requester/server--somewhat like the connections operators made on old-style telephone switchboards to connect one caller to another.
FlexNet use two sockets: DRIRQSTR on each requester and DRISRVR on each requester/server. Network applications, such as an electronic mail package, use other sockets to distinguish their connections from those used by FlexNet and other applications. You can have multiple connections to different nodes out of the same socket. For example, a" connections to a FlexOS requester/server come into the DRISRVR socket.
Sockets, like nodes, are identified by a name and an address. The socket name is defined by the program that uses it (you do not make up names for sockets). You provide FlexNet with the socket's name-to-address translation in the NETNAMES.DAT file along with the node name translation.
Note: The addresses for DRIRQSTR, DRISRVR, and a third reserved socket, DRINAMES, are set within FlexNet. You do not need to provide name-to-address translations for these sockets.
FlexNet User's Guide
Node
Name Address
Resources
Disk Drives Printers
Accounts
User Name
Programs
Name
Data Files
Name
Directory
Directory
Sockets
Name
Make a General Plan
Extended security?
Address
User ID Group ID·
Owner Group Security
Owner Group Security
[image:47.486.83.426.46.557.2]Create Name Service Database FlexNet User's Guide
CREATE NAME SERVICE DATABASE
FlexNet requires you to store the node and socket translation information for each node in a file named NETNAMES.DAT. Each node must have its own NETNAMES.DAT file recorded on its system: drive with the system (-S) attribute.
Create NETNAMES.DAT with an editor or word processor. Each node and socket name entry in the file must adhere to a specific format. Figure 4-2 illustrates the entry format.
Note: If you use a word processor, be sure that it does not insert special characters in the file. (Some word processors use special or control characters to justify lines, change typestyles, underscore, and so forth.)
Each NETNAMES.DAT entry consists of the field identifiers NAME:, ADDRESS:, TYPE:, and, optionally, OEM:. Terminate each NAME:, ADDRESS:, and TYPE: entry with a Carriage Return. The OEM: field is an implementation option. Do not include the OEM: field identifier unless your network vendor has instructed you to.
FlexNet User's Guide Create Name Service Database
NAME:
[node or socket name]
ADDRESS:
[physical network address]
TYPE: [NODE, LOCAL SOCKET,
or
REMOTE SOCKET]
OEM:
[optional--network vendor defined]
/*
comments
*/
Create Name Service Database FlexNet User's Guide
The items within each entry are defined as follows:
• NAME: Socket and node names can be fifteen characters or less and must consist of letters and numbers only. Do not use punctuation or special characters. The first character in the name must be a letter.
• ADDRESS: Node or socket addresses can be 16 characters or less. You have two options for specifying the address:
character strinq: To express the address as a character string, enclose the entry in double quotes; for example, "Node6" or "005".
numeric string: To express the address as a numeric string, enter the hexadecimal value for each ASCII character in the address. For example, the ASCII character string address "005" expressed as a hexadecimal numeric string is 30,30,35; "Node6" is 4E,6F,64,65,36. To put a NULL (ASCII 00) in the address, enter two commas one right after the other. See the FlexOS User's Guide for the ASCII to hexadecimal conversion table. The comma does not count in the character total.
Remote sockets present on multiple nodes must have the same address.
• TYPE: The type for each entry must be one of the following:
NODE - Entry is a node.
LOCAL SOCKET - Entry is a socket on this node. REMOTE SOCKET - Entry is a socket on another node.
FlexNet User's Guide Create Name Service Database
Listing 4-1. Sample NETNAMES.DAT Entries
/* Sockets
NAME:
ADDRESS:
TYPE:
1*
Local
NAME:
ADDRESS:
TYPE:
/*
Remote
/*
Nodes
NAME:
ADDRESS
TYPE:
LMAIL
"001"
LOCAL
socket for
RMAIL
"001"
REMOTE
socket for
HANK
31,31
NODE
SOCKET
email program
SOCKET
email program
1*
This is network address 11
NAME:
ADDRESS
TYPE:
MARY
31,41
NODE
1*
This is network address lA
*1
*1
*1
*/*1
*/Before proceeding with the next section, make a NETNAMES.DAT file for each node. Use the NAMES PARSE command to check the file for syntax errors. The command form is:
A>NAMES PARSE NETNAMES.DAT
Install Accounts FlexNet User's Guide
INSTALL ACCOUNTS
Users cannot log on servers that have protection installed unless they have an account there. (Protection is installed on the node with the DEFINE PROTECT=ON command in the node's CONFIG.BAT file.) Accounts are recorded in the node's USER.TAB file.
Create and update the USERTAB files with a text editor or word processor. Be sure the word processor does not put any special characters in the file. The USERTAB file must be recorded on the node's system: drive.
Each entry in USERTAB consists of eight items, separated by commas, arranged in the following sequence:
name,password,userid,groupid,home,wmanager,shell,access
End each entry with a Carriage Return.
See the FlexOS User's Guide for the description of the first seven fields. The eighth field, "access," is a numeric value which states whether the user can log on this node as a local user only, as a remote user only, or as either a local or remote user. The values for the access field are as follows:
Value Definition
1 Local logon only 2 Remote logon only
3 Both local and remote logon allowed
Take some time to assign each account's user and group IDs. See Loading Applications and Their Data Files below for a description of user and group IDs and a strategy for assigning values.
FlexNet User's Guide Set Network Parameters
After the accounts have been entered, run the PASSWORD command for each account to set its password. Note that the password cannot be set from a remote node.
SET NETWORK PARAMETERS
FlexNet has a set of parameters that allow you to adjust variable network characteristics. Use the NETSET command to display the default parameter values and modify them for your network. When you modify a NETSET parameter, its new value is not used until the network is restarted. Parameters not changed keep their default value.
Use the following command to show the default parameter values:
A> NETSET LIST
To display a brief description of the parameters, enter
A>NETSET HELP
Network Parameter Descriptions
Most of the network parameter values shown in the NETSET LIST command should remain as is. These values are set by your vendor to establish essential operating characteristics. However, there are several parameters you can set without jeopardizing network operation. Table 4-1 lists the NETSET parameters you can change and explains their purpose.
Set Network Parameters FlexNet User's Guide
Parameter
NSESS
NLOGR
NLOGS
Table 4-1. NETSET Parameters
Description
Maximum number of connections: A connection is required for each logon. On requester/server nodes, this includes logon requests issued by the requester mechanism and the requests accepted by the server side. In addition, network applications might also require their own connections to send and receive messages. Refer to the program's manual to determine how many connections you should allow for network applications.
Each connection requires 256 bytes of memory in the FlexNet internal memory pool (see NIMP below). If you change NSESS, adjust NIMP accordingly.
Maximum number of requester logons: Requester logons are connections to requester/servers established by the user. This value determines what number of the total connections (NSESS) can be used to log on remote servers. The limit is applied on a user window basis. For example, a value of 3 lets each user on the computer log on three servers from each window. A zero value imposes no limit.
FlexNet User's Guide Set Network Parameters
Parameter
NNTE
EXTSEC
NIMP
PKEY
Table 4-1. (Continued)
Description
Maximum number of memory-based name translations: Memory-based name translations are entries read from the NETNAMES.DAT file and stored in memory. Putting the entry in memory provides faster translation.
Server Security Mode: Set this value to 1 to select extended security or to 0 for normal security.
Size, of FlexNet internal memory pool: The FlexNet internal memory pool is the storage area for the data used to manage connections. Increase this value by 256 for each NSESS connection you add. Do not decrease this value without consulting your network vendor.
Passwor j encryption key: FlexNet uses this value to modify its password scrambling mechanism. Nodes can have different PKEY values, but requesters can log on only servers that have the same key.
Set Network Parameters FlexNet User's Guide
Changing Network Parameters
There are two ways to change network parameters:
• Change the parameters directly with NETSET commands. • Create a parameter resource file.
Both means use the NETSET command. In the first option, you specify the parameter by name in the NETSET command line. In the second option, you specify a file in the NETSET command line. The file consists of a sequence of parameter changes. Regardless of the option you select, all changes must be made before you set the node's local name with the NAMES SET LOCAL command.
Note: You should invoke NETSET from within the CONFIG.BAT boot script to minimize the chances of a user error. Invoking NETSET and NAMES is demonstrated in the CONFIG.BAT excerpt in "Update Each Node's CONFIG.BAT File" below.
NETSET Command Form
The NETSET form used to change a parameter directly is
NETSET parm=value
where "parm" is one of the parameters listed in Table 4-1 above and "value" is its value. For example, to set the PKEY string to AA, enter
NETSET PKEY="AA"
You can set multiple parameters in the same line by separating each option with a space. For example, the following command sets the PKEY, NSESS, and EXTSEC parameters:
FlexNet User's Guide Set Network Parameters
If you intend to set any parameters directly with NETSET, make a list of the parameters and their values for each node before proceeding with the next section. Skip ahead to "Update Each Node's CONFIG.BAT File" for instructions on putting the NETSET command in the nodes' CONFIG.BAT file.
Creating the Parameter Resource File
The NETSET parameter resource file consists of a string of statements in the format
parm=value
where "parm" is one of the parameters and "value" is the new value. Separate each statement with a space or a RETURN. To insert comments, begin the comment with the /* characters and end it with the */ characters. Listing 4-2 illustrates the entry format in a NETSET parameter file.
Listing 4-2. Sample NETSET Parameter File
/*
Timeout parameters
STMO=5 CTMO=30
/*
Node capacity
NSESS=15
NLOGR=3
NLOGS=12
NNTE=3
/*
Server Characteristics
EXTSEC=O
PKEY=Ox5A
*/
*/
Update Each Node's CONFIG.BAT File FlexNet User's Guide
Edit the resource file with a text editor or word processor. Be careful that the program does not insert any special characters into the· file. Make a backup copy of the resource file provided by your network vendor before you edit it.
You use the NETSET FILE command to set the parameters from a resource file. The command form is
NETSET
FIL~=filenarneListing 4-3 below includes a demonstration of the NETSET FILE command.
Before proceedi ng with the next section, create the NETSET parameter resource file for each node. Store the file on the node's system: disk and give it the -S (system) attribute with FSET.
UPDATE EACH NODE'S CONFIG.BAT FILE
FlexNet is composed of a set of drivers--individual program modules provided as files on the FlexNet distribution diskette. Table 4-2 describes the drivers. You do not need to load all of the drivers provided to run FlexNet.
You install the network by invoking the DVRLOAD command from the CONFIG.BAT file to load the drivers required. Besides loading the drivers, you should invoke NETSET and run NAMES SET LOCAL in CONFIG.BAT.
FlexNet User's Guide Update Each Node's CONFIG.BAT File
Listing 4-3. CONFIG.BAT Excerpt
REM
Install FlexNet drivers.
REM
NETMAN must be first.
REM
DVRLOAD NETMAN: SYSTEM:FLXNETR.DRV PRWSNL
REM
REM
Now install name server driver
REM
DVRLOAD NAMES: SYSTEM:NSD.DRV PRWSNL
REM
REM
Now load the server. This
REM
driver is not necessary
REM
for requester-only nodes.
REM
DVRLOAD SVR: SYSTEM:FLXNETS.DRV PRWSNL
REM
REM
Include the following driver only
REM
if you have network apps. that
REM
require it.
REM
REM
DVRLOAD NET: SYSTEM:NETDEV.DRV PRWSNL
REM
REM
Load the network vendor's
REM
transport driver
REM
DVRLOAD XPORT: SYSTEM:xport.drv PRWSNL
REM
REM
Make changes to network
REM
parameters using PARM.DAT
REM
file. This command must
Update Each Node's CONFIG.BAT File FlexNet User's Guide
REM
NETSET FILE=SYSTEM:PARM.DAT
REM
REM
Put any additional changes
REM
necessary here.
REM
REM
Time to set local name; no more
REM
NETSETs allowed.
REM
NAMES SET LOCAL JOE
REM
REM
Enable protection and set
REM
default security word for
REM
node users.
REM
DEFINE -5 PROTECT=ON
SECURITY -O=RWED -G=RE -W=RE
REM
REM
Load the log on process
REM
BACK LOGON
REM
FlexNet User's Guide Update Each Node's CONFIG.BAT File
Driver File Name
FLXNETRDRV
Table 4-2. FlexNet Drivers
Description
This driver contains the FlexNet interface to FlexOS and the FlexNet requester mechanism. Load either this driver or FLXNETDRDRV on each node. Use this driver when the network contains only FlexOS requester/servers.
FLXNETDRDRV This driver contains the FlexNet interface to FlexOS and the FlexNet requester mechanism. Load either this driver or FLXNETRDRV on each node. Use this driver when the network includes PC DOS servers.
NETDEV.DRV
NSD.DRV
FLXNETS.DRV
This driver provides applications direct access to the network. Load this driver only if you have a network application that requires it.
This driver provides the FlexNet name service. Load this driver on all nodes.
This driver provides the FlexNet server mechanism. Load either this driver or FLXNETDS.DRV to make a requester/server node.
requester nodes are req u e ste r / serve rs.
Update Each Node's CONFIG.BAT File FlexNet User's Guide
Table 4-2. (Continued)
Driver
File Name Description
FLXNETDS.DRV This driver provides the FlexNet server mechanism. Load either this driver or FLXNETS.DRV to make a requester/server node. Use this driver when the requester nodes include PC DOS requesters.
xport.drv This driver provides the interface to the network hardware. Load this driver on all nodes.
The name of this driver is shown in lowercase here and in the sample CONFIG.BAT because this may not be the exact file name. Ask your network vendor for the exact name of the hardware interface driver file for your system.
Before proceeding to the next section, add the following to the CONFIG.BAT file on each node:
• DVRLOAD commands to load the network drivers required by that node
• A NETSET command, if necessary, to modify the default network parameters
• The NAMES SET LOCAL command to set the local node name
FlexNet User's Guide Copying FlexNet Files
COPYING FLEXNET FILES
Table 4-3 lists the FlexNet files you need to make FlexOS requesters and requester/servers.
Table 4-3. FlexNet Required Files
File Name
Required Drivers
FLXNETR.DRV or FLXNETDR.DRV
NSD.DRV xport.drv
Optional Driver
NETDEV.DRV
FLXNETS.DRV or FLXNETDS.DRV
Network Commands
NETSET NAMES NETSTAT
Network Resource Files
parm.dat
NETNAMES.DAT
Explanation
Requester and network control module
Name server driver Network hardware driver
Application interface to
network--copy only if required Server module--copy only if the node is a server
Sets network parameters Manages node name directory Displays network status
Load Applications FlexNet User's Guide
Before proceeding with the next section, copy the files required for that node from your backup of the FlexNet distribution diskettes to the node's system: drive. On each node where you have enabled protection, you must also have a USER.TAB file and the LOGON command present on the system: drive.
Once the files have been copied and the CONFIG.BAT file has been modified, FlexNet is installed. Starting FlexOS also loads FlexNet.
LOAD APPLICATIONS
One of your tasks as system manager is to record applications and their data files so that those users who need access have it, while those who should not have access do not. Note that as long as you have an account on the node with user and group IDs of 0,0, you have unrestricted access to all files and directories regardless of the file's or directory's access privileges.
FlexOS limits access to nodes with accounts and passwords. It controls file access through the user and group IDs assigned in the user's account. When a user creates or copies a file, FlexOS records. the user's user 10, group 10, and default access privileges with it. When a user trys to use the file, FlexOS compares that user's user and group IDs against the file owner's user and group IDs. Depending on the results of the comparison, the user gets the owner, group, or world access privileges.
FlexNet User's Guide Test the Network
To limit application and data file access, organize the users into groups according to their program and data needs and assign each group a different number. Set each user's group number in the group 10 field in his or her USER.TAB account. Users who require access to different groups of files might require more than one account. Note that users can have different user and group IDs on different nodes.
To complete loading applications, copy the program and data files from the application's distribution diskettes to the network nodes. When you copy the files, be sure you are logged on under an account with the user and group lOs you want permanently recorded with the file. If you log on as the system manager, the user and group IDs recorded with all files and directories you create are zero.
TEST THE NETWORK
This section describes how to test the following aspects of the network:
• Servers--Can each user log on his or her servers and is the proper security mode implemented?
• Access privileges--Ooes each user have the correct user and group 10 numbers?
• Node names--Are the node names correct for each node and does each user have a suitable names directory?
To prepare for testing, start each network node and load FlexOS. No special commands are needed to load FlexNet; it is loaded along with the operating system.
Test the Network FlexNet User's Guide
properly. If in testing you determine that the FlexNet portion is prepared correctly but you cannot establish a connection, call your network vendor for assistance. The problem could be in the hardware.
To test the servers, log on a requester node as the local user rather than as the system manager. Once you are in the shell, log on that user's server. If the server has normal security, log on with OIR; if the server has extended security, log on with LOGON. Failure to log on indicates that the user does not have an account on the server.
On all servers with extended security, try logging on with OIR. You should not be successful. If you are, change the EXTSEC value to' one on that server with NETSET .
. To test access privileges, log on as a user rather than the system manager and invoke the programs that user needs to run to do his or her job. If data files are used, access them and, if required, make changes to make sure the user has read and write privileges. Finally, use CHOIR to confirm that the user has access to all required subdirectories.
In addition, attempt to run commands or to modify files that should not be accessible. Include accessing directories in your test. If you can use them, something is wrong. Make sure node protection is set on in the node's CONFIG.BAT file, the user and group lOs preclude access, and the access privileges are set properly.
FlexNet User's Guide Test the Network
This concludes FlexNet testing. If you have network applications, you should test them at this point. Otherwise, the network is ready for use.
APPENDIX A
NETWORK ERROR MESSAGE DESCRIPTIONS
This appendix describes the error messages returned by the LOGOFF, LOGON, NAMES, NETSET, and NETSTAT commands. Network failures that o~cur during the execution of the FlexOS commands do not return special network error messages
LOGOFF ERROR MESSAGES
• Node does not exist
There is no node for the name entered.
• Not logged on to specified node.
LOGOFF entered but user was not already logged on.
• Local node name not set
Log off of a remote node attempted local node name was set.
• An invalid parameter was passed to logoff