HONEYWELL
MULTICS
EMACS
TEXT EDITOR
USER'S GUIDE
SUBJECT
MULTICS
EMACS TEXT EDITOR USER'S GUIDE
Tutorial Introduction to the Emacs Text Editor, Full Description of the Editing Requests Available, and Instructions for Using Special Features of Emacs
SPECIAL INSTRUCTIONS
This manual presupposes some basic knowledge of the Multics system provided by the two-volume set, New Users' Introduction to Multics. Some of the
pre-liminary information covered in that set is summarized briefly here, however, so that users at any level of experience can comprehend the techniques presented in this man ual.
SOFTWARE SUPPORTED
Multics Software Release 10.2
Includes update pages issued as Addendum A in July 1981, Addendum B in Jan-uary 1982, Addendum C in August 1982, Addendum D in FebrJan-uary 1983, and Addendum E in December 1983.
ORDER NUMBER
CH27-00 December 1979
PREFACE
This book is a detailed description of the Multics Emacs t ext e d ito r , a r e a 1-tim e e d i tin g and form a t tin g s y s t em des i g ned for use on video terminals. It is intended for all users; both those who have relatively little experience on the Multics operating system (or any other computer system) and experienced programmers will find this a complete description. Users ;:tre, however, expected to be famil iar with the Multics concepts described in the two-volume set, New Users' Introduction to Multics--Part I (Order No. CH24), and--Part II (Order No. CH25)-,- referred to in this manual as New Users' Introduction .
Although Multics Emacs is easily used by technically inexperienced people, those with some programming experience can utilize it even more effectively by writing their own extensions. Examples of supplied extensions are the Emacs message subsystem and the various language modes, described in Appendices Band C of this manual. Information about extensions and instructions for writing them are provided in the Emacs Extension Writers' Guide, Order No. CJ52, which is referred to in this book as Extension
I
Wri ters' Guide. The Introduct ion to Emacs, Order No. CP31, is recommended for users interested in a simpler introductory manual that describes a basic subset of Emacs editor requests.Many video terminal types are supported by Emacs, as supplied. Information on how to support additional terminal types is also available in the Extension Writers' Guioe. It is recommended that at least one person at your site have a copy; someone should also be familiar with the Emacs installation information.
The information and specifications in this document are subject to change without notice. This document contains information about Honeywell products or services that may not be available outside the United States. Consult your Honeywell Marketing Representative.
The term "file" is used interchangeably with "segment" in
this manual, since many of the editing requests have the word
"file" as part of their command names. Emacs requests operate
both on single-segment and multisegment files. Zeros are slashed
in this manual (0) in a few instances when they might be confused with the letter O.
The sections of this manual fully describe the Emacs editor and explain the steps required to edit effectively any type of user text. In general, the basic techniques are explained first; more powerful or efficient requests are introduced as you proceed
through this book. The first sixteen sections are tutorial;
Section 17 summarizes, by editing function, all the Fundamental
mode requests, including both those described in the tutorial and some additional requests that are used less frequently.
Section 1 is a brief introduction.
Section
logging into
environment.
2 describes
the Multics
how to system,
begin: using the terminal,
and entering the Multics
SectIon 3 tells how to enter text, move the cursor, make simple corrections, and log out.
Section 4 describes a few requests for deleting text and
retrieving deleted text.
Section 5 explains how to read and write files (segments).
Section
6
describes some simple search requests for locating character stringsaSection 7 introduces requests for manipulating blocks of
texts.
Section 8 describes numeric arguments and various other ways to reexecute and reverse editing requests.
Section 9 defines an Emacs "word" and describes the requests that operate on words.
Section 10 deals with screens and buffers, telling
display different areas of the buffer on your screen,
switch buffers, list them, and delete them.
how to how to
Section 11 includes the help facilities available on Emacs.
The editor is completely documented online, so information is
always available during editing.
Section 12 defines Emacs sentences and paragraphs, and
describes requests that operate on them.
Section 13 includes many requests for handling white space, indentation, and formatting.
Section 14 gives more information on manipulating blocks of text, inserting files, and using named regions and marks.
Section 15 describes keyboard macros that can easily be
created to perform special editing tasks.
Section 16 describes the use of multiple windows, the window editor, and the buffer editor.
Section 17 contains descriptions of all the Fundamental mode requests, arranged by function.
Appendix A documents the emacs command and
alphabetically, all the Fundamental mode requests.
lists,
Appendix B describes the Emacs mail mode for sending and
reading electronic mail.
~ppendix C describes the Emacs programming language modes
and their requests, which are tailored for use in writing and
editing programs in Lisp, FORTRAN, PL/I, and ALM.
Appendix D describes the Macro Edit mode for editing
keyboard macros.
Appendix E gives instructions for using Emacs on printing
and glass teletype terminals.
Appendix F describes the Emacs message accepting and responding to interactive messages.
facility for
Appendix
customize the
entered.
G details how to write
environment automatically
an Emacs start-up to
each time Emacs is
Appendix
H
describes pop-up-windows mode, which dynamicallycreates and removes windows as they are needed.
Appendix I describes the list emacs ctls command, which
lists all known Emacs terminal types.
Appendix J describes the overwrite-mode minor mode, which
alters the ways characters are inserted into the buffer.
Multics Emacs was modelled after the EMACS editor at the MIT Artificial Intelligence Lab. EMACS (on the AI Lab PDP-10's) was written, in TECO, by staff members of the MIT AI Lab and the
(MIT) Laboratory for Computer Science (LCS), without whose
encouragement and support this project would not have been
possible.
Significant Changes in CH27-00F
Emacs now supports multisegment files (MSFs). The much
larger capacity MSFs can be read and written, using the same
Emacs commands used to read and write single-segment files.
Thus, multisegment file is assumed throughout this manual, where file and segment are used interchangeably.
Emacs affords greater protection against inadvertent
destruction of file and buffer modifications by querying whether
to proceed with write-file, save-file, read-file, and find-file
requests, when file or buffer contents have changed since last
read or written.
In compliance with above, new options have been added to the opt command (see find-file-check-dtcm, save-same-file-check-dtcm,
read-file-force, and write-file-overwrite). Also, defaults have
changed for the find-file-set-modes, remember-empty-response, and paragraph-definition-type options.
The default compiler option for pI1-compile-option is now
the null string.
This page intentionally left blank.
Section
Section 2
Section 3
CONTENTS
Introduction
Getting Started . The Terminal .
The Screen . . . • The Keyboard . . • . . . .
Control Key . . • . Escape Key .
Linefeed Key . . . .
Delete Key . . . . . Carriage Return Key • . . . The Modem . . . • .
".,,,,...,~V"\..; ,,""', D _ _ ,lI": --. ______ "- ....
J . C C l l l l . L C a l . . n C " - j U . L l CIIICllL,L:)
Logging In . . . . Invoking the emacs Command . The Initial Display • . .
Summary of Terms . • .
Entering Text and Simple Cursor Movements Typing in Text . . . • . . .
Editing with Emacs Requests Self-Inserting Characters
Correcting Typing Errors with Emacs The Erase Character (n) • • . . The Delete Key (\177)
The Kill Character (@) . . . Typing in Special Characters
A Q • • • • • • • • • • • • • • •
Moving the Cursor . . . . • Getting to the Right Line
A p • • • • • • •
Moving Within the Line
"F • • • • • • • • •
A B • • • • • • • •
Getting Back to the Right Line
The Ends of the Line
A A • • • • • • • • • • • • • • • " E • • • • • • • • • •
Getting Stopped . . . • . • . . Exiting from the Editor • . • • . •
vii Page 1-1 2-1 2-1 2-1 2-4 2-4 2-4 2-5 2-5 2-5 2-5 ") C
c:..-~ 2-6 2-8 2-9 2-10
3-1
3-1
3-2
3-2
3-33-3
3-3
3- 3. 1 3- 3. 1 3- 3. 13-4
3-4
3-4
3-5
3-5 3-5 3-6 3-6 3-63-6
3-6. 1
3-6. 1
3-7
CH27-00D
Section 4
Section 5
Section 6
Section
7
CONTENTS (cont)
.... X .... C • • •
Summary of Terms . Logging Out • • . • .
Simple Deleting and Killing •
Deleting Characters • • • . . Deleting One Character at a Time
"D • • • • •
Deleting Lines .... K • • • • •
Retrieving Killed Lines The Kill Ring • • . .
Summary of Terms . Yanking Text Back .
.... y • • • •
More About .... K
Writing and Reading Files Writing a File Out • .
.... X "'W • • • • • •
Is Your New File Really There? Reading a File In . • . . • . •
A X A F • • • • • • • • • • •
Counting the Lines in a File
A X
= • • • ••
• • • • •
Saving (Rewriting) a File AX AS • • • • • • • •
Additional Notes on Writing Files Access Restrictions • • e , • • • • The Default Pathname with "'X"'W
Summary of Terms • . • .
Locating a Sequence of Characters • • Searching Forward . . . • • .
AS . . . • • • •
A Word About Search Strings • Getting Out of Trouble • • •
A G • • • • • • • • • • •
"'X"'G, "'Z .... G, and ESC .... G • Searching Backward • • • • . .
"R • • • . • • • • • •
General Rules for Searching . • .
Locating and Replacing Strings
Automatically • •
ESC % - • • • •
Working with Blocks of Text Marking a Region • . . .
viii Page 3-7 3-9 3-9 4-1 4-2 4-2 4-2 4-2 4-2 4-3 4-4 4-4 4-4 4-5 5-1 5-1 5-2 5-3 5-3 5-4 5-4 5-6 5-6 5-6 5-6 5-7 5-7 6-1 6-1 6-1 6-2 6-2. 1
6-2. 1
Section 8
Section 9
CONTENTS (cont)
Setting the Mark
A. @ • • • • • • •
Exchanging the Mark and the Point •
A X AX • • • • • • • •
Deleting a Region
"w . . . . .
Yanking a Region Back • ESC Y . . . Summary of Terms .
Repeating and Undoing Requests . . • Numeric Arguments • • . • . •
Requests Accepting Numeric
Arguments • • • . . . . • . • Numeric Arguments with Regular
Characters • . . . . • • . • • . . Re-executing a Request • • . . .
"'C • • • • • • • • • • • • •
Multiple Executions of a Request . "'U .. .. .. .. .. .. .. .. .. Undoing the Action of a Request
A \ • • • • • • • • • • • • •
"'\ and Self-Inserting Characters Going to a Specific Line Number
ESC G . • . . . • • •
Working With Words . • . What's in a Word.
Moving Forward and Backward ESC F
ESC B • • • • • • •
Deleting Words . . . .
ESC /I • • •
ESC \177 . . . • . ESC D . . • Capitalization . . . . •
ESC L, ESC U, ESC C • . . Changing the Case of Regions
""X"'L, "'XAD • • •
Underlining Words • . . • . . . • . . ESC • . . • .
"'z
Underlining Regions
AX
Locating-Words
AXW
Locating Words by Their Prefix
Page 7-1 7-2
7-3
7-3
7-3
7-3
7-3
7-4 7-4 8-1 8-1 8-2 8-4 8-4 8-4 8-5 8-5 8-5 8-5 8-5 8-6 8-6 9-1 9-1 9-2 9-2 9-2 9-3 9-3 9-4 9-4 9-5 9-5 9-6 9-6 9-7 9-7 9-7 9-8 9-8 9-8 9-8with
* . . .
9-9ix CH27-00D
I
Section 10
Section 11
Section 12
CONTENTS (cont)
Manipulating Screens and Buffers Moving Through a Buffer Screen by
Screen . . • • . "V • • • •
ESC V
Page
• • 10-1
10-1 10-1 • 10-1 Moving to Either End of a Buffer 10-2
ESC
<
ESC
>
. • 10-2 10-2Editing More than One Buffer. • 10-2.1 Going from One Buffer to Another • 10-3
"'XB • . . . • . . . . • 1 0-3
Listing the Buffers and Local
Displays. • . • • • • 10-4
"XAB . . . . . 10-4
The Linefeed Key and "'J • • 10-5 A Garbled Screen • • • • • . • • • 10-5 "'L. • • • • • • • • • 10-5 Entire Buffer 11'\ t:..
IV-V Marking an
"'XH 10-6
Killing an Entire Buffer . • • • • • . 10-6 "'XK • • • • . • . • • • 10-6 Summary of Terms • • • • • • 1 0-6 Help • • . • • • . . • 11-1
What Does This Key Do? • . . . . • 11-1 ESC? • • . • • . • . 11-1 Extended Requests e • e e ~ ~ e e 11-2 ESC X • . . . • • • • 11-3 What Keys Do This Job? . . • • • • 11-3 apropos • • • • • • • • • • 11-3 What Does This Extended Request Do? • 11-4 describe . • • • • . • • • . • • 11-4 Tangible Help . . • • . . . . • • • • 11-4 make-waIl-chart • • . . . . 11-4 More Help and What Did I Just Do? • • 11-5 " . . . • . • . . . . . 11-5
Sentences and Paragraphs Sentences . • . • .
12-1 12-1 Moving Forward or
Sentences
Backward by
ESC A • • • •
ESC E .. .. .. ..
Killing Sentences • • • •
A X II • • • • • • •
"X\177 ESC K Paragraphs • •
x 12-2 12-2 12-2 12-2 12-3 · • • • 12-3
• • • • . 12-4 12-4
Section 13
Section 14
CONTENTS (cont)
Moving Forward or Backward by Paragraphs • • . • • • • • • •
ESC [ • • . • • • • • • •
ESC ] • • • • • • • • • •
Marking a Paragraph • • • • • • • ES C H . . . • • • • • • • • Formatting a Paragraph
ESC Q • . . .
Page
12-5 • 12-5 • 12-5 · 12-5 12-5 • 12-5 • 12-6
Indentation and Spacing. • • • • • • 13-1 Blank Lines • . • . • • • . • • 13-1 Adding Them. . • . 13-1
""0 • • • • • • • • • 13-1
Removing Them. . . . • • . • • 13-2 ""X""O • • . • 13-2 Dealing with White Space on a Line 13-2 Spacing Over Indentation . • • • • 13-2 ESC M • . • • • • • . • • • . . 13-2 Deleting White Space • • . • • 13-3 ESC \ . . • . • • • • 13-3 ESC"" . . . . . . . • . • • 13-3 Fill Mode • • . . . 13-4 ESC X filIon and ESC X filloff • 13-5
Margins • • . 13-5
Setting the Margins Q • • • • • 13-5
AX. • • • • • • • • • 13-5
""XF . • e _ 13-6 Centering a Line • . • . • • • • • 13-6 ESC S • • . . • . . . • 13-6 More About Lines and White Space • • • 13-7 Shearing a Line • • . • • 13-7
ESC ""0 • • • • • • • • 13-7
Undenting to the Fill Prefix . 13-8 ESC ""I • • . . • • • • 13-8 Indentation • . . . . • • 13-8 ESC I • • • . • • . . • . • • • 13-8 ESC Carriage Return 13-9 ""X""I . . . . • . • . . • 13-10 Summary of Terms • . • 13-10
Moving Blocks of Text . • . Inserting an Entire File • .
"" XI . . .
Copying a Region • . • . . ESC W . • . . • . •
14-1 • • • • • 14-1 . • • . • 14-1 · 14-2 • 14-2 Selecting and Joining Text on the Kill
Ring . . • • . • • . • • • • • 14-2 ESC
""w • • • • • • • • • • • • •
14-2Section 15
Section 16
CONTENTS (cont)
Page
Named Regions • • • • • • • • • • • • 14-3
Storing the Region to a Variable • 14-3
"XX • • • • • • • • • • • • 14-"3
Inserting a Variable • • • 14-3
"XG • • • • • • • • • • 14-3
Listing Your Variables • • • • 14-4
ESC X lvars • • • • • • • • • • 14-4
Named Marks • . . • . . • • • 14-4
Setting a Named Mark • . • 14-5
AZ""@ • • • • • • • • • • • • • • 14-5
Going to a Named Mark • . • • • • • 14-5
"ZG . . . • • 14-5
Listing Your Named Marks • • . • • 14-6
ESC X list-named-marks • • • 14-6
Summary of Terms . • 14-6
Keyboard Macros • . Creating a Macro
AX( and AX)
. • . • 15-1 . . . • 15-1
. . . . . 15-1
Executing a Macro · . · · 15-3
"XE • • • • · · . . • 15 -3
Mid-Macro Query · · · · 15 - 3
"XQ • • • · 15-3
Displaying a Macro • • . . . 15-4
A X
* . . . .
Saving a Macro • • • Esc X save-macro .
15-4
15-4. 1
15-4.1
Displaying a Saved Macro Esc X show-macro • Editing a Macro . . . .
. . . 15 - 5 . . • 15-5 . . . 15-5
ESC X edit-macros • • • . Setting and Changing Key Bindings
ESC X set-key and ESC X
set-permanent-key . . . . • Examples of Acceptable Forms of
Key Names • . • . • . . . .
· 15-5 15-6
15-6
15-7
Multiple Windows and the Buffer Editor • 16-1
Adding Windows • . • • . · · • 16-3
A X 2 • • • • • • • • • • • · 16-3 A X 3 • • • . • • • • • • .
Removing Windows . • . • • • • • . · 16-3 16-3 At X l . • • • • • • • •
"VrA
A 'I.J • • •
Selecting a Window . . • • A XO • • • • • • • •
A X 4 • • • • • • • •
Editing with Multiple Windows
xii
· 16-3 it: ..,
I V - j
16-4 16-4 16-4 16-4
Section 11
CONTENTS (cont).
Page
ESC AV • • • • 16-5
Dedicated Buffers • • . • • . • • 16-5 The Window Editor • • . . • • • • 16-6 AZAW • • • • • • • • • • 16-6
Window Editor Requests • • . • 16-1 Leaving the Window Editor • • • 16-9 The Buffer Editor • . • • • . • • . • 16-9
A ZA B • • • • • • . • • • • • • • 16-9
Buffer Editor Requests . . • • • • 16-10 Leaving the Buffer Editor • • • 16-11
Summary of Emacs Fundamental Mode
Requests . • . . . . • . . . • 11- 1 List of Editing Functions and the Keys
That Perform Them. . . . • . 11-1 Descriptions of the Requests . . 11-6 Movements Forward/Backward . • 11-6 Deletion . • . . . • . . • • • . • 11-10 Retrievals/Yanks . . • • . • 11-12 Marks, Regions, Variables • • • . • 11-13 Searches and Substitutions • • . . 11-15 Files • . . . • • • . 11-11.1 Insertion . • . . . • • . 11-20 Entry and Exit . . • • • 11-20.1
Help • • • . • • 17-21
Error Recovery . . . • . . . • . . 17-22 New Lines/Blank Lines • . 11-23 Indentation and White Space • . 17-24 Comments . . . . . . • • 17-25 Formatting . . . • • . • • 11-26 Literal Character Entry . • • • • • 17-27 Special Purpose Keys . 11-28 Macros . . . 17-29 Characters (Moving by/Deleting) . • 17-30 Lines (Moving in and by/Deleting) • 17-31
Words . . . 17-32
Sentences • • . . . . . 17-34
Paragraphs 17-36
Screens . . . . • • . . . . . . 17-36 Buffers • • . . • • • • • 17-37 Multiple Windows . • . • . . • . . 17-39 Mail/Messages . . . . • • . . 17-40 Typing Shortcuts . . . . 17-41 Programming Modes . 17-44 Printing Terminal Usage . • . • • . 17-44.2 Extension Writing. . . 17-45 Additional Optional Settings 17-46
Appendix A
Appendix B
Appendix C
Appendix D
Appendix E
CONTENTS (cant)
The Multics emacs Command . • • • . Alphabetized List of Fundamental Mode
Requests • .. • • • • • • • •
Emacs Mail
Senolng Mail .
AXM
Reading Mail .
AXR
Programming Language Modes
Fundamental Mode Requests for Programming Use . • •
A X ; • • • • • • • •
A Z ; • • •
ESC
ESC N • • • • • • • • • • • ESC ESC ESC ESC ESC ESC ESC ESC ESC P A8 •
A F • • •
X set-comment-prefix •
X set-compile-options
X set-compiler • • • .
ES C • • • • • • • • • • • •
X ldebug . • • • . • • • • • X fundamental-mode • • .. .. .. Lisp Mode . • • • • •
FORTRAN Mode . • • • • • • • • •
PL/T Mode • . • • . . . • • • • • • • PL/T Options . . . • • • • •
Electric PL/T Mode • • • ALM Mode • . . . • • • •
Electric ALM Mode • . • • • • • • .
A-1
A-3
B-1 B-1 B-1 B-4 B-4 C-1 C-1 C-1 C-2 C-2 C-2 C-2 C-2 C-2C-3
C-3
C-3
C-3
C-3
C-3
C-4 c-8 C-12 C-14 C-11 C-18 c-18Macro Edit Mode . • • . • • . . . • • • • D-1 Entering Macro Edit Mode • . . . • • • D-1 Editing the Macros . • • . • • • • • • D-2 Redefining Macros • • . • .
D-3
ESC AZ and ESC X
load-these-macros • • • • . • •
D-3
Writing Macros Out to a File • •D-3
Using Macros Previously Written to
a File . . • . • • . • . • . • . . D=3 ESC X load-macrofile
Using Emacs on Printing Terminals and Glass Teletypes • . • . • • • •
xiv
D-3
E-1
Appendix F
Appendix G
Appendix H
Appendix I
Appendix J
T _ ...l _ _ _
[image:16.613.89.524.121.734.2]..LflUeX
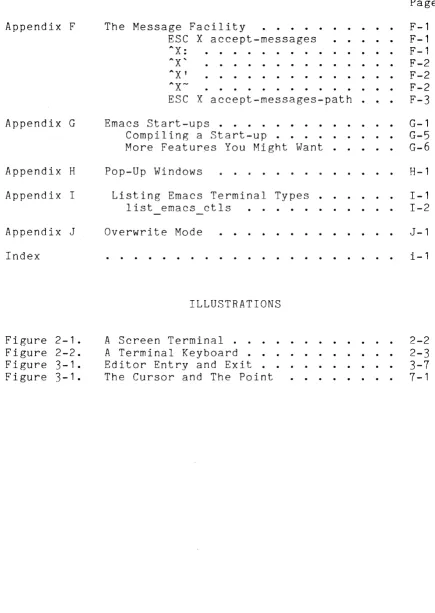
Figure 2-1.
Figure 2-2.
Figure 3-1. Figure 3-1.
CONTENTS (cant)
Page
The Message Facility . • • • • • • F-1 ESC X accept-messages • • • • • F-1 AX: • • • • • • • • • F-1
"X' . . . F-2
"X' . . . F-2
"x-
. . . .
F-2ESC X accept-messages-path . F-3
Emacs Start-ups • . . . . • . • G-1 Compiling a Start-up. . . • • . G-5
More Features You Might Want . . • . • G-6
Pop-Up Windows
Listing Emacs Terminal Types • list emacs ctls . . . .
Overwrite Mode
ILLUSTRATIONS
A Screen Terminal . . . A Terminal Keyboard • • Editor Entry and Exit . The Cursor and The Point
xv
H-1
1-1 1-2
J-1
i-i
2-2
2-3 3-7
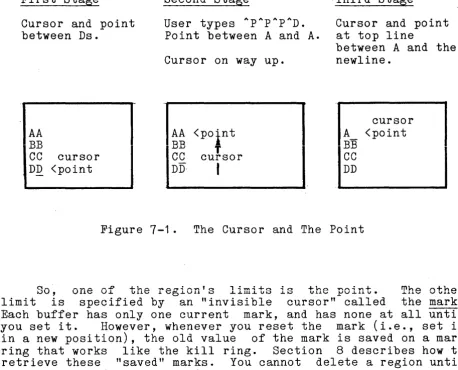
7-1
SECTION 1
INTHODUCTIOIJ
Multics Emacs is an integrated editing, text preparation, and screen management system designed to take advantage of the features of modern display terminals. Text entry and editing on these video screen display terminals are done interactively. You, the user, can see the effects of Emacs editing on the screen as you type.
This manual is arranged so that you, as a new Emacs user, can learn Emacs by immediately beginning to use it. The first part, Sections 2 through 16, are tutorial in nature, and cover text entry and the more basic Emacs requests. Section 17
summarizes the requests covered in the preceding sections, and introduces the remaining Pundarnental mode (basic Emacs mode) requests. Advanced users should immediately turn to this section, which provides short descriptions of every Fundamental mode request. The requests are presented there in functional groups, i.e., for a particular type of editing task, all the reqQests available to perform that task are described.
Users who work throUGh the iirst sixteen sections will also find Section 17 useful for reference and for learning the additional requests not covered in the tutorial.
The appendices describe specialized uses of Emacs, including the Emacs mail system and programming language modes. Appendix A
provides the emacs command description, and an alphabetized list of the Fundamental mode requests.
Throughout this manual, ".6macs" designates the system, and the all lowercase "emacs" designates the Nultics command invoked to use the system.
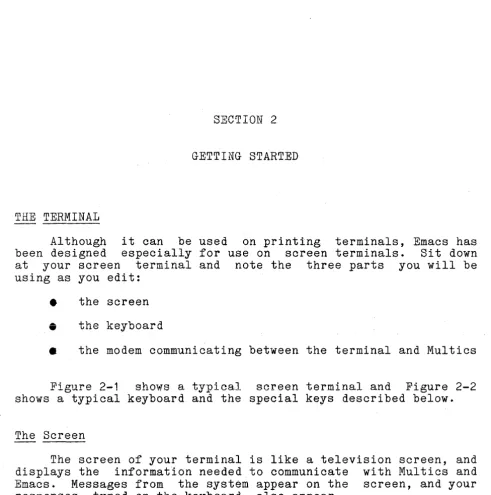
SECTION 2
GETTING STARTED
THE TERMINAL
Although it can be used on printing terminals, Emacs has
been designed especially for use on screen terminals. Sit down
at your screen terminal and note the three parts you will be
using as you edit:
• the screen
• the keyboard
• the modem communicating between the terminal and Multics
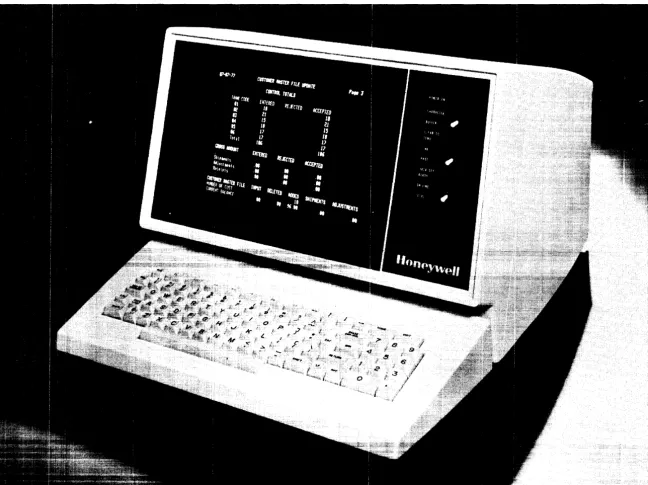
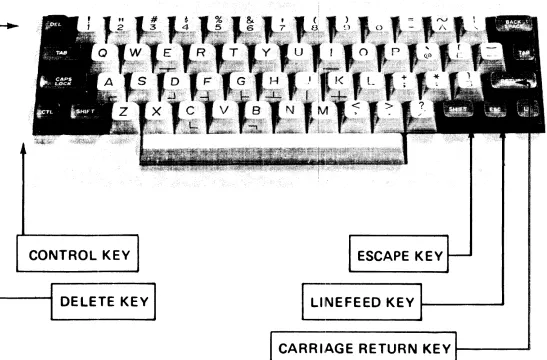
Figure 2-1 shows a typical screen terminal and Figure 2-2
shows a typical keyboard and the special keys described below.
The Screen
The screen of your terminal is like a television screen, and
displays the information needed to communicate with Multics and
Emacs. Messages from the system appear on the screen, and your
responses, typed on the keyboard, also appear.
[image:18.617.55.547.51.546.2]N
I
N
o
p:.::
N
-.J
[image:19.797.90.738.50.535.2]I o o
f\.) I
V.J
(")
CONTROL KEY
I
ESCAPE KEYDELETE KEY
I
LlNEFEED KEYt
-~
CARRIIAGE RETURN KEY
...---.J
I o o
[image:20.792.92.639.157.517.2]The Keyboard
Your keyboard resembles the keyboard of a typewriter, with its letters and special characters, but has additional keys. Several of them are important for Emacs usage. They include the following:
•
control key•
escape key•
linefeed key•
delete key•
carriage return key CONTROL KEYTerminals vary, but you should be able to locate a key labelled with the letters CTL, CTRL, CONTROL, CNTRL, or something similar. This is the control key. It operates like a shift key in that it must be held down while you hit one or more normal characters. Simply pressing it and releasing it has no effect. For example, if you press the "p" key, you get a lowercase p. If you press the "p" key while holding down the shift key, you get an uppercase P. If you press the "p" key while holding down the control key, you get something called a control P. This control P is a control character. All control characters are interpreted as requests to Emacs. Control characters are used to control Emacs, to manipulate the cursor and text. In this manual, the A symbol represents the control key; alphabetic characters following the A symbol are represented as uppercase, even though, for them, a control character is the same whether the shift key is held down or not (and generally you would not hold it down).
ESCAPE KEY
The next key you should locate is the escape key. The escape key is commonly labelled with the letters ESC, ESCAPE, ALT, or ALTMODE. On some terminals, you may have to hold down the shift key to get an escape. Unlike the control key, which is held down while a normal character is typed, the escape key is typed sequentially, i.e., before or after a normal character. You use the escape key for some Emacs requests and to terminate your response to a few of the Emacs prompts. Be sure to release the ESC key quickly, to avoid getting two (or more) escapes in a row. In this manual, the letters ESC represent the escape key.
LINEPE.ED KEY
Your keyboard should have a linefeed key labelled with the" letters LINEFEED, LF, or N~W LINB. The linefeed key is sometimes used in Emacs.
DB1ETE KEY
The delete key transmits the ASCII DB1 character, octal code
177. The key is generally labelled with the letters DEL or
RUBOUT. As its name suggests, its use is to rubout, or erase,
the previously typed character(s). In this manual, the character sequence \177 represent the delete key.
CARRIAGB RETURN KEY
On Multics, a carriage return returns you to the left margin and inserts a newline character in your input. This key is often labelled either RETUH~ or CR.
,]~he Modem
Your terminal must be connected to the Multics system in some manner for emacs, or any other Multics cOQmand, to work. The modem
or
an acoustic coupler provides an interface to the communications link between your terminal and Multics. Many modems are equipped with a telephone receiver and dial. For this type of modem, you dial a specific number to begin the logging in procedure and make the connection to rvIul tics. dOvlever 7 a widevariety of modems exist; if you do not know how to establish the connection between your terminal and Multics, you should ask a technically qualified person at your site to help you log in.
Technical Requirements
Two technical requirements that your terminal must meet are that it be an ASCII terminal, and that it be capable of running in full duplex mode (i.e., have controllable local echo). Either your terminal or your modem may have a switch that can be positioned to half or full duplex mode; you should set this switch to full duplex. If your terminal does not have
+ 11 h1 ..L1n0P,1..L Qr>h" ("'.,...~"'+r-.Y> r.v./r..p-.p-\ ·~o"" _l_-U'..:J ' 0 " . .
can "ro..J...,L..aOJ,L..e ~~~ C;vdV \ 1-11 .l.lluc.:l UU/ U.l...L) , .y u. oilU J..U J.. 0 1n 1n
full duplex and echoplex modes. Generally, your site will have arranged for appropriate terminal modes to be set automatically when you log in. If you find characters are printed out twice, setting the modes and/or switches should correct the problem. Again, if you have a question about either of these requirements, ask someone for help.
If your terminal has an auto-linefeed key or switch, be sure it is off, and use lfecho mode to achieve its effect. Pailure to do this results in certain displays vanishing from the screen· prematurely.
LOGGING IN
The first thing you want to do is establish a connection with the computer. This is called logging in. To log in, you must be registered on the system, as a member of a certain project. You are given a unique User idt user identification~
which consists of a Person id (name)-and Project id (project name). Por example, f1ary Smith, working in the sales-department, may be given the following User id:
3mith.Sales
This User id belongs to Nary alone; no one else can use it. Mary also has
a
password, which along with her User id allows her to use the system.The procedure for logging in is explained in depth in the New Users' Introduction - Part I. Briefly, however, to log in you turn power on for the terminal, dial the appropriate telephone number, and when you hear a beep signal, either press a button or place the telephone receiver in the modem and wait. (This method is employed unless your terminal is directly connected to Multics, in which case you do not need to dial a phone number.) When a connection has been established, a header of the following type is displayed by Multics on the terminal:
Multics 8.0:
peo,
Phoenix, Az.~oad
=
26.0 out of 100.0 units: users=
26 At this point, type the login command and separated by a blank, and then a carriage return.login Smith Password:
your Person_id, For example:
Multics then requests your password (the second line, above). Depending on your terminal, the display of the password is either suppressed or hidden in a string of cover-up characters typed by the system. Video terminals usually just suppress tha password. If you make an error while logging in, the system informs you of it and asks you to try again.
Login incorrect.
Please try again or type "help" for instructions. l-ogin Smi th
Password:
After you have successfully typed your password, the system responds with information regarding your last login.
Smith Sales logged in 06/07/80 0937.5 mst Tue from .•• Last login 06/06/80 1359.8 mst Mon from terminal ..•
The last line of system-generated text in the log-in sequence is the ready message. This message is printed to indicate that Multics is at command level and ready to receive the next command. The ready message consists of the letter "r" followed by the time of day and two numbers tqat reflect system resource usage. For more information about the ready message, refer to the ready command in the MPM Commands.
r 12:22 3.229 1799
The complete log-in sequence for Mary Smith is:
login Smith Password:
Smith Sales logged in 06/07/80 0937.5 mst Tue from ••• Last login 06/06/80 1359.8 mst Mon from terminal .•. r 12:22 3.229 1799
INVOKING THE emacs COMMAND
You have logged in and received the ready message indicating that you are at command level. To enter Emacs, type the emacs command on your keyboard, followed by a carriage return (Multics command lines are always terminated by a carriage return):
emacs
I
Emacs then checks your terminal type against the list of known~:~~~~:~ ~~~~~o~~~~~rttC;L~:)
.emaIc;, i~h~~~d~r~ kcno~~~~OalsleErma~~r v~~~~
terminal, Emacs uses that controller. If your terminal type is
not found, it checks the current terminal modes to see if your terminal is a video display terminal (CRT) or a hardcopy printing terminal. If your terminal is a printing terminal, Emacs displays the file the best that it can, given the limited capabilities of printing terminals. If you have a video terminal of an unknown type, Emacs tells you:
I
Unknown terminal type.I
Do you want a list of known terminal types?If you type "yes", Emacs displays the names of all termindls it knows how to support. (This list is the same as the one generated by the list emacs ctls command, described in Appendix I.) Among these names -; you -should be able to find the acceptable form of the name of your terminal, or the name of a supported terminal that most closely matches the characterist ics of your terminal. After displaying the list, Emacs asks:
I
What type terminal do you have?I
Type it in, followed by a carriage return. If you cannot find the name of an acceptable terminal type, type:I
quitI
followed by a carriage return, to return to command level. You may want to try again on a different terminal type. (Instructions for supporting new terminal types are available in Emacs Extension Writers' Guide, Order No. CJ52, "Writing Emacs Terminal Control Modules. " jThe Init~~! Display
Once Emacs (las recognized your terminal type, ei ther ::iutomatically or by querying you as described above, it takes several seconds to get started. When it has started up, it clears the screen, and displays the line:
Emacs 11. 11 ( Fundamental) - main
I
at the lower left of the screen. This line is called the mode
I
line. The mode line tells you several things, the most importantof which is that you are (:()ilHi1iElic~tlne with Multics Emacs, rather
th~~ with the command processor or with another editor. A number may follow the word "Emacs"; it gives the Emacs version in use.
Thf~ n3'ne of the major mode you are in is parenthesized, and here in the above example it is the simplest major mode, Fundamental
I
mode. Emacs has several modes best suited for different tasks, such as prepar lng text or programs in the various programming lClnguages. Major modes each have a distinct set of key bindings (typed key sequences that specify particular request instructions to Emacs). Minor modes provide "fine tuning" to modify the way the Emacs works, but do not have a special set of key bindings. The names of minor modes, if you are using any, appear right after the major mode name in the mode line, enclos8d in angle brackets « » :Emacs 11.11 (Fundamental <overwrite» - main
I
You can edit several different items at once with Emacs.
I
Each item being edited is edited in a separate editing environmentI
called a buffer. The buffers are named so th2t you can identify them. The buffer name in the mode line above is "main".The area betHeen the top of the screen and the mode line is where text being edited appe2 r·s. This area of the sc reen is
I
called the window. The window always (li:3p lays about twenty consecutive lines of the text you are editing. Of course, ifI
your text is shorter than that, part of the window is empty.
At this point, the only sign of life in your window is a blinking object in the upper left corner. This is the cursor. It may be a blinking underline, or a blinking or solid box, depending on your terminal. The cursor is the most important thing to
I
watch on your screen. It is al ways on S0:ne posi t ion on the sc reen, and all "action" occurs at the cursor. All the text you enter is entered at the cursor (and the cursor moves), and all the text you delete is deleted ::it the cursor.SUMMARY OF TERMS
When the emacs command is invoked, the first screen displayed is pretty simple, since it is practically empty. You should, however, be familiar with the following terms, and be able to relate them to what appears on the screen.
•
mode line•
major mode•
key bindings•
minor mode•
buffer•
buffer name•
window•
cursorSECTION
3
ENTERING TEXT AND SIMPLE CURSOR MOVEMENTS
TYPING IN TEXT
Now you are going to enter some text. To do so, you simply begin typing. Type the following on the terminal, and stop after typing the period:
This is sample text.
In general, you may have to wait a few moments for the characters you are typing to appear on the screen, especially if it has been a few minutes since the last time you typed. If the user load on Multics is especially heavy, the wait is correspondingly longer.
The text appears at the top of the screen as you type~ This line is the beginning of your document; the way it looks is exactly
the way your document is. Stop and look at the screen. The
cursor is to the right of the period in the sentence just typed. You should get into the habit of thinking of yourself as being "at"·some point in your document. That point is indicated on the screen by the cursor.
At the bottom of the screen, an asterisk (*) appears in the
line below the mode line. This indicates that the buffer has
been modified, i.e., changed in some way. It remains until the
modified buffer is written out, and reappears thereafter whenever
new modifications occur that have not been written out. This is
discussed more in Section
5.
Now add another 1 ine Hi t the carriage return key (for a Multics newline) This puts a carriage return into your text and moves the cursor to the beginning of the next line Type:
Here is more text yet.
Again, the text appears on the screen as you type it. The first line you typed stays where it is, with the second line appearing under it, Your document is now two lines long, and you could continue to type in more text indefini tely. It is just like using a typewriter.
EDITING WITH EMACS REQUESTS
Emacs performs all of its editing functions by carrying out programmed instructions when you issue a request. You issue, or invoke, a request by typing certain keys or key sequences. Each request (key or key sequence) is individually attached, or bound, to a command name, which tells Emacs what set of instructions to follow when you issue the request associated with it. A command name is a hyphenated, abbreviated (sometimes) name that describes the action of the request to you, and specifies the appropriate instructions to Emacs. As you learn Emacs, command names serve t o r em i n d you 0 f wh at the r e que s t s do. Wh e n you are pro f i c i en t in Emacs, however, the command names can be used in computer programs to construct your own requests. As a matter of fact, you can "connect" (bind) any key of your choice to any command name of your choice if you do not like the default requests provided. The section on keyboard macros describes how to do so.
Self-Inserting Characters
Wh en yo u t y p e i n n e w t ext, you are act u a 11 y iss u in g Em a c s requests. Printing characters (other than II, @. and \, whose special meanings are explained later)' are called self-inserting because when you type one, it inserts itself intOEhe text in your buffer. So typing the letter "d", for example, tells Emacs:
Wh at: to ins e r t a " d " Where: at the cursor
Correcting Typing Errors with Emacs
Even the best typist makes an occasional error. The following are special characters useful for making corrections with a single keystroke:
• # (The erase character)
• \177 (the delete key)
• @ (the kill character)
To see how these characters work, you will have to type a line wi th an error in it. Go to the next line, by typing a carriage return, and type:
Multix
Stop as soon as you type the "x".
THE ERASE CHARACTER (#)
On Multics, if you type a wrong letter: you use the # (pound or number sign) character to erase it. The same is true in Emacs;
the command name of the # request is rubout-char. Type the #
character and watch what happens. The "x" in Mul tix disappears from the screen, leaving no trace of itself or the erase character. The cursor, which was positioned right after the x, backs up a space and is now posi tioned right after "i" in Mul ti. No trace
or record of the mistake remains. You could, at this point,
simply type in the letters c and s, and your correction would be completed. However, type an "x" back in, so that you can see another way to correct typing errors.
THE DELETE KEY (\177)
The screen should be set up now exactly the same as when you tried the erase character a minute ago. With the right after the "x" in Mul tix, hi t the delete key once. the x disappears and the cursor moves back one space to right after the "i" in Multi.
it was cursor Again, appear
Typing ei ther a II or the delete key erases the previous
character, i.e., the character right before the cursor. Use
whichever is most convenient. The command name of the delete key request, as you might expect; is also rubout-char.
THE KILL CHARACTER (@)
Suppose that you decide you would like to erase the whole 1 in e, w hi c h now con sis t s 0 f the 1 e t t e r s " M u 1 t i . " Th e cur so r i s
s t i l l po sit ion e d d ire c t 1 Y t o t h e r i g h t 0 f the t r ail in g i. On
Multics, you use the @ (commercial-at sign) character to erase
everything typed so far on the current 1 ine . In Emac s, the @
also erases everything on the current line to the left of the cursor, and the remaining text moves to the beginning of the 1 ine. Try typing it. You see the five letters displayed disappear, and the cursor move to where the
"M"
was. The @ request's command name is kill-to-beginning-of-line.Typing in Special Characters
If you are wondering how to actually insert one of the special characters, like the II, into your experimental text, here is an additional thing to tryout.
"Q
The "Q request, whose command name is quote-char, "quotes" the c h a r act e rim me d i ate 1 y follow i n g it, i . e., i t t ell s Em a c s to insert it literally into the buffer. For example, if you hold the control key down and type a q, then release the control key and type a pound sign (holding down the shift key on your terminal if necessary), a # appears on your third line. No characters are deleted. Now type a II without preceding it by a "Q, and the # in your text disappears.
MOVING THE CURSOR
You could continue to add text to your two-line document by
I
just typing it, ending each line with a carriage return, andsimply typing at the end of the document to add more lines (but always ending that last with a carriage return), and correcting
any mistakes you catch with the II, \177, and @. However, you
would probably soon wish to change or modify some text already entered. In order to do so, you need to know how to move the cursor to the place requiring the change. The following p'aragraphs demonstrate how to move the cursor:
•
to the pr~vious line ( Ap)•
to the next line ( AN)•
forward a character (AF)•
backward a character ( A8 )•
to the beginning of the line (AA)•
to the end of the line (AE) Getting to the Right LineIn order to change the line you entered that reads:
"This is sample text" to
"This is some sample text"
you first have to get from the beginning of the empty third line on your screen to the first line, and then to the right place in that first line. To do this, you move the cursor up one line at a time by telling Emacs to go to the previous line.
The Emacs request that moves the cursor to the previous line is Ap (control P). The command name is prev-line-command. Locate the control key, hold it down while you press the p key, and then
release both keys. Now wa tch the screen: you see the cursor
move up to the previous line, to a place right above where it had been. Note also that when you type the Ap, you do not "see" it appear on the screen, but only its effect. What you see on the screen is what you have in your document, and it does not matter what you used to achieve that state.
You still need to go up one more line, so type another
AP.
Moving Within the Line
Now that you are on the line in which the change is to be made, you need to be able to move the cursor forward to the correct point on that line. The Emacs request for moving forward a character at a time is AF, forw~rd-char. Hold down the control key and slowly press the f key a few times. The cursor moves to the right, one character at a time, as many times as you type AF. Continue to type AFs until the cursor is under (or covering, on some terminals) the letter s of the word "sample". This is where you plan to add the word "some".
If you go too far to the right, you have to "back up" to the s in f!sample". The Emacs request for moving backward a character at a time is A B, backward-char. So, regardless of whether you
did in fact go too far or not, try moving the cursor backward. Again, hold down the control key and hit the b key several times. The cursor moves backward to the left one position for each AB you type. Soon you reach the beginning of the line. You cannot go any further back, since this is the beginning of your text, so Emacs causes your terminal to beep, indicating that you have made an error. Simply wait for the beeping to stop, and release the control key.
Now, go ~head and move the cursor forward again to the s in "sample". To add the word "some", just type it in. Emacs moves the rest of the line over and displays your text:
This is somesample text.
Obviously, this is not quite the way you want this sentence to appear. To add the space between the two words, simply hit the space bar. Now you see:
This is some sample text.
wi th the cursor sti 11 under the s in "sa!Tlple". The text is fixed.
Note that you did not have to do anything special to type in the new word. You just moved the cursor to the right place and started typing.
Getting 83ck to the Right Line
In order to add rt few more lines to the end of you~ document, you must move the cursor down a couple of lines. You do this by go i n g t o t hen ext 1 in e , and the n t h e n ext 1 in e aft e r t hat. As you may have guessed, the Emacs request for going to the next 1 ine is AN, next-line-command. Hold down the control key and type an n. The cursor moves down to the next line, but note its position in that line. Ernrlcs tries to keep you in the S8me column when going between lines, so the cursor is under the initial t in the word "text". When you hit the n key again, still holding down the control key, the cursor moves down another line but goes all the way over to the left. This 1 ine is empty. Al though Smacs tries to keep you in the same column, it chooses the column in a reasonable fashion. In general, you would not consider it useful to be positioned in the middle of an empty line. Likewise, if the word "Multix" had still been on this line, Emacs would have placed the cursor immediately to the right of the x, the closest column on this much shorter line.
The Ends of the Line
To tryout the next two line-movement requests, type in:
using Em8cs is easy
To say instead, "I think using Emacs is easy," you could type a string of ABs to move backwards to Cidd the first two words. However, rtn easier way exists (using Emacs really is easy). Emacs provides the AA request (go-to-beginning-of-line)to move the cursor to the beginning of the current line. Type (1 AA 8nd watch your
screen. The cursor moves to the u in "using". You can now type:
I think
remembering to end with a sp8.ce so that the "somesample" problem does not recur.
The only thing now missing from your sentence is punctuation.
Rath~r than typing a series of AFs to move forward a character at a time, you can skip right to the end of the current line with a AE, go-to-end-of-line. The AE request positions the cursor right after the last character, and before the carriage return if the line has one. On a line with nothing on it (nothing in it but a carriage return), AE does nothing. Try the AE, watch the screen, and then type either a period or an exclamation point, depending on your state of enthusiasm!
GETTING STOPPED
You may wish to practice and experiment with the Emacs requests you have just learned. Feel free to do so, since none of this text will be saved (reading in and writing out files is covered in Section 5). When you are finished you can exit from Emacs and log out of Multics.
Exiting from the Editor
When you began this session, you logged into the Multics
system. You were then at command level, and, therefore, able to
invoke the Multics command, emacs, to enter Emacs. When you want
to leave Emacs, you must return to command level by issuing an
Emacs request* Once returned to command level, you can invoke
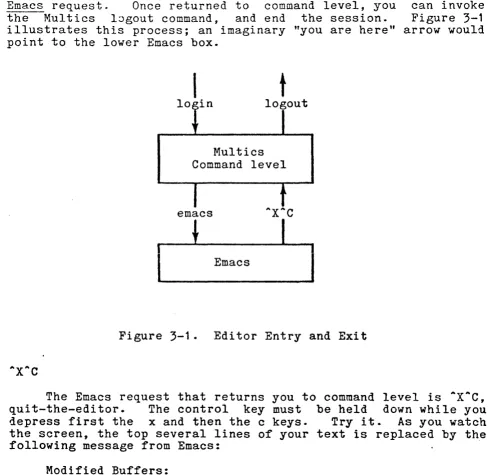
the Multics l~gout command, and end the session. Figure
3-1
illustrates this process; an imaginary "you are here" arrow would point to the lower Emacs box.
I
I
I
t
10 in logout
Multics Command level
emacs
!
[image:36.613.69.567.122.597.2]Emacs
I
Figure
3-1.
Editor Entry and ExitThe Emacs request that returns you to command level is AXAC,
quit-the-editor. The control key must be held down while you
depress first the x and then the c keys.
Try
it.As
you watchthe screen, the top several lines of your text is replaced by the
following message from Emacs: .
Modified Buffers:
) *
mainAt the same time) Emacs writes a message and question, called a prompt» in the area below your mode line at the bottom of the screen. The ques t ion is called a prompt beca use Emac sis" prompti ng" you for a response. This area where the prompt appears is called a minibuffer, and normally occupies two lines (though both are not always used). Emacs prints this message in the minibuffer:
Modified buffers exist. Quit?
Since your buffer has changed, from being empty to having text in it it is now modified. Emacs is telling you that you have done work that will not be saved, and making sure that you really want to quit under these circumstances. If you had saved your work by writing it out to a file, Emacs would not prompt you at all, but simply return you immediately to command level.
However, since you are not going to save this practice work, simply type your response:
yes
and a carriage return. Prompts require not only a response; but also a termination character, generally a carriage return, to indicate the response's end. When you type the carriage return, angle brackets
«»
appear in the minibuffer at the end of your response.I
In the case of the prompt above, when you type "yes" and a carriage return, Emacs clears the screen and returns you to Multics command level. A ready message appears at the top of your screen to indicate that you are, indeed, at command level.If you mistype your response, Emacs indicates that you've typed an inappropriate response to its query. At the top of the screen, the line that said "Modified Buffers:" will say instead:
Please answer "yes" or "no"
This not only lets you know you have given the wrong response, but also provides you with the acceptable choices. You can answer either "yes" or "no" (or use short forms "y" for "yes" and "n" for "no"). If you catch the error before typing a carriage return to end the prompt, you can ed it your response just as you would edit text.
SUMMARY OF TERMS
A few new terms have been introduced that you should· remember, since they are going to be mentioned frequently.
•
request•
com:nand name•
prompt•
minibuffer•
modified hufferFrom command level, you can now invoke the Multics command for logging out, logout. Logging out breaks the connection between your terminal and Multics. After you have typed it, the system responds by displaying your identification, the date and time of the log out, and the tot~l CPU time and memory units used.
logout
Smith Sales logged out 06/07/80 1249.4 mst Tue CPU usage 17 sec, memory usage 103.1 units. hangup
The 'J'lord "hangup" up the telephone broken on purpose.
18 displayed hy ~ultics to and to indicate that the
remind you to hang connection has been
SBCTlorr 4
SIMPLE DELETING AND KILLING
DELETING CIIARACT8R8
You already know how to use the
#
to delete mistypedcharacters. This is especially useful if you catch an error
immediately after typing it, since it erases the single character
to the left of the cursor. To learn another method, log in again
and invoke the emacs command. You can now type in the following
text, exactly as it appears here 80 that you can follow this
lesson easily (do not type a carriage return after
"computerized."):
The cursor should now be to the right of the period following
"computerized". In reviewing this text, you see that in the
third line, "wirk" should actually say "work". To correct this
in Emacs, first you have to" go" to that point, by moving the
cursor. Type two A pS , the previous line request, and your cursor
moves to after the "h" in "much". The backward character
request, AB , gets you to the letter "i" in the offending "wirk".
Since you have to move backward several characters, you should
hold down the control key and hit the b a dozen or so times. If
you go too far, use A p to go forward to the correct spot. The
cursor should end up under (or covering) the "i" like this (the
cursor is represented as an underscore):
our jobs. In publications wlrk, three areas made much
Deleting One Character at a Time
You now want to change the i at the cursor to an o. In Emacs, this change is made by deleting the unwanted character(s),
and typing in the desired one(s). You delete characters, one
character at a time, by typing AD, delete-char. Type one AD and watch the screen. The third line now appears as:
our jobs. In publications w~k, three areas made much
The 11iH has been removed from the line, the and the cursor is under the "r". Now type and the line reads:
text has closed up, the correct letter,
our jobs. In publications wo~k, three areas made much
The cursor is again under "r" that follows the "0" that you added.
Often, you need to delete a lot more than a few characters; you want to remove entire lines, large pieces of lines, or many
lines. The kill lines request, AK (kill-lines), does this. For
example, typesetting already is computerized, so you might want
to replace that sentence with something else. Again, you must
reposition the cursor and then correct the text.
First, get to the letter "S" in "Someday" by using the
backward character, forward character, next line, and previous
line (AF, AB, Ali, "'p) requests. When the cursor is under the "S"
type a AK, and watch the screen. All the text between the cursor and the end of the line vanishes.
RETRIEVING KILLED LINES
You could replace the line just killed by typing in a new sentence right here and now, but suppose you decide instead that you really want i t back. (The te rms "del ete" and "ki 11" both
mean to erase text, but generally delete applies to characters
deleted one at a time, and ~ill applies to characters deleted as groups, i.e., lines and sentences.) You can get it back intact because it has been prcGsrved In a special place called the kill ring.
The .... K request puts killed text in the kill ring, and it stays there so that you can retrieve it, either right away or many requests later. Often it is useful to purposely kill text so that you can move it from one place to another by killing it at one position in your text, repositioning the cursor, and then retrieving it from the kill ring. Whether you purposely or accidentally kill text, hOTtlever, the kill ring provides the security of being able to conveniently recover it.
The kill ring normally has ten "slots" for saving your text.
I
When you issue a kill request (you know only two so far, @ and.... K), the killed text goes into the first slot. (The II and .... D requests do not put the characters they delete into the kill ring. If you accidentally delete a character, it is easy enough to retype it; if you delete many characters by hand, it is probably not a mistake and thus not important to be able to recover them.) If you later issue another kill request, the text previously killed moves into the second slot, and the newly killed text goes into the first slot just vacated. Ki lled text keeps rotating down a slot in this fashion until all ten slots ~re filled. At the next kill request, the very first killed text would be discarded, since no eleventh slot is available in which to save it.
Kill merging is a feature that allows you to save related killed text in the same slot in the kill ring. For example, if you are looking at several lines, and decide to kill them, you probably start at the top and delete them line by line. Since you delete them as one, they should be stored as one, so that they can be brought back as one. Kill merging provides this; if you type successive kill requests that kill text in the same direction, the text killed by each request is merged andC;CCupies only one slot.
So, for kill merging, the kill requests must be:
• successive kill requests
• in the same direction
Successive kill requests have no intervening keystrokes between them; you cannot type in any new text or issue any non-kill Emacs requests. If you do, the killed text goes into separate slots. These successive kill requests must also kill text in the same direction in order to merge, i.e., the requests must both/all eliminate text from either right to left (forward), or left to right (backward). The AK kills forward. The @ kills backward
(however, note that you cannot do successive @ kills, so they
would never merge anyway).