Order Code: 6AN900()"1AJOO-OBA2
LIMITED DISTRIBUTION MANUAL
'(I-·Thls manual Is for customers who receive preliminaryver-~:!~:Slons of this product. It may contain material subject to
.' h:ehange.
BIINTM 2111 NE 25th Ave. Hillsboro, OR 97124
PREUMINARY
REV. REVISION HISTORY DATE
-001 Preliminary Edition '.",. !, . "~,u,~"7/88
! ":~.*.;(~1J~.,':>,.,
BiiNTM MAKES NO WARRANTY OF ANY KIND WITH REGARD TO THIS MANUAL, INCLUDING, BUT NOT LIMITED TO, THE IMPLIED WARRANTIES OF MERCHANTABILITY AND FITNESS
FOR A PARTICULAR PURPOSE. ~; ,
BliNN assumes no responsibility for any errors that may appear in this doc:umenL BuN" makes no commitment to update nor to keep current the infonnation contained in this doc:umenL "I (;1 .. ' ,\,: 2 G t '
No part of this document may be copied or reproduced in any form or by any means without written consent of B~;;~l::< ~'. BiiNN retains the right to make changes to these specifications at any time. without notice.
The following are trademarks of BiiNN: BiiN, BiiN/OS. BiiN/UX. BiiN Series 20. BiiN Series 40. BiiN Series 60. BiiN Series SO.
Apple and MacTenninal are trademarks of Apple Computer. Inc. UNIX is a trademark of AT&T Bell Laboratories. Toa is a tradenwk of Camcar Screw and Mfg. Ada is a certification mark of the Department of Defense. Ada Joint Program Office. DEC, VI'102. and VAX are trademarks of Digital Equipment Corporation. Smartmodem is a trademark of Hayes Corporation. mM is a trademark of International Business Machines, Inc. MUL TIB US is a registered trademark of Intel Corporation. Macintosh is a trademark of McIntosh Laboratory. Inc. Microsoft is a registered
trademark of Microsoft Corporation. Mirror is a registered trademark of SoftKlone Distributing Corporation. WYSE is a regiStered trademark of Wyse Technology. WY-60 and WY-SO are trademarks ofWyse Technology.
Additional copies of this or any other BiiNN manuals are available from:
ii
BiiNN Corporate Literature Dept. 2111 NE 25th Ave.
.,.
__ J.
PREFACE
Purpose
This manual is a hands-on tutorial that shows how to enter the most common BiiNTM com-mands for daily work. A companion volume, the BiiNTM Systems Commands Reference Man~l~/~ontains complete descriptions of the commands used in this manual.
Audience
This manual is for all first-time users of the BiiNTM system who will be using the native inter-face, CLEX.
If
you are using the BiiNTM lUX interface to the system, refer to the manual Introduction to BiiNTM lUX for beginning information.Organization
Preface
This manual contains the following tutorial chapters and ,appendixes:
1. Welcome to BiiNTM
How to logon, enter some commands, and get help. '
2. Working with Files and Directories
How to show, copy, rename, and remove flies and directories.
3. Your User Account
How to change your password, list your user profile, and customize CLEX. 4. Printing Files How to use the print queue.
5. Controlling Jobs
How to start and stop jobs, list previous commands, and redo previous commands.
6. Working with Windows
How to open a new window, work between windows, and close a window.
7. Protecting Files and Other Objects
How to control access to your files, directories, and other objects. Appendix A, Command Quick Reference
Contains the name, synopsis, and syntax for the commands used in this manual.
Appendix B, BiiN™IUX Commands and BiiNTM Equivalents
Shows which BiiNTM commands are equivalent to Unix commands, to help UNIX-literate readers assimilate the system quickly.
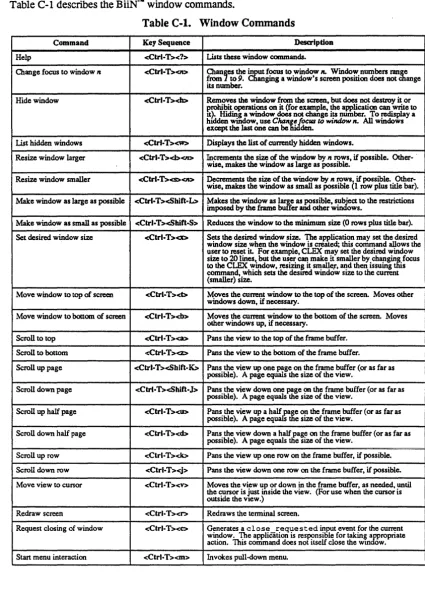
Appendix C, Summary of Window Commands
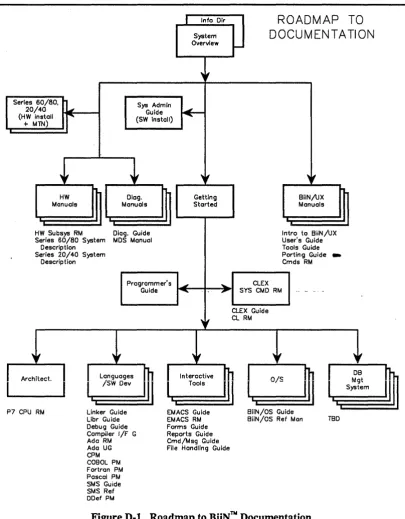
Lists the commands that control windows on character tenninals. Appendix D, Roadmap to BiiNTM Documentation
PRELIMINARY
Shows the BiiNTM document set with paths showing recommended reading
sequence. '~'1
Notation
This manual uses the following notation:
logo f f Typewriter font shows command names, fue names, and other system names.
Iget.timel
window
<Return>
<Ctrl-Z>
Boxes surround your input (what you type).
Italic font shows a new tenn.
Angle brackets surround keyboard keys. That is, if <Return> is shown, press the RETURN key on the keyboard.
Angle brackets surround control keys. You must hold down the <Ctrl> key ~ press the <z> key, and then release both keys.
Related Publications
iv
You may find the following manuals useful when learning about the BiiNTM system.
BiiNTM Systems Overview .
An overview of BiiNTM hardware and software benefits ~. featur-es.-·
BiiNTM Systems Programmer's Guide .~ £.£
General concepts and programming techniques for Biit·i!~~oftware development i. c..,_
:n
0;-BiiNTM Command Language Executive Guide t'
Tutorials on the BiiNTM command interpreter CLEX and command lan-guage BiiNTM CL.
BiiNTM Systems Commands Reference Manual
Complete reference for BiiNTM CL commands.
[;"Jrn;~ .'
CONTENTS
Chapter 1. Welcome to BiiNTM
1.1 Logging On ... 1-1 1.2 Your Initial CLEX Window ... 1-2 1.3 Logging Off . . . 1-2 1.4 Recovering From Mistakes ... 1-3 . 1.5 Getting tlle Time .•... 1-4 1.6 Listing Contents of Your Home Directory ... 1-4 1.7 Abbreviating Commands ...•. 1-5 1.8 Seeing Who's On tlle System ... 1-6 1.9 Getting Syntax Help on a Command ... 1-7 1.10 Session 1 Summary ... 1-8
Chapter 2. Working with Files and Directories
2.1 Creating a File ... 2-1 2.2- Naming·Files, Directories, and Otller Objects ...•... 2-2 2.3 Showing FIle Contents ... 2-3
2~4·o, .. Copying a File ... 2-3 2.5 Renmning a File ... 2-4 2.6 Removing a File ... 2-4 2.7 Getting a Long Listing of Your Home Directory ... 2-4 2.8 Creating a New Directory ... 2-5 2.9 Changing Current Directory ... 2-6 2.10 Using Pattern-Matching .. ~ . . . 2-7 2.11 Session 2 Summary ... 2-8
Chapter 3. Your User Account
3.1 Changing Your Password ... 3-1 3.2 Listing Your User Profile ... 3-1 3.3 Customizing Your Prompt String ... 3-2 3.4 Exmnining Your Startup Files. . . .. . . .. . . 3-3 3.5 Changing Your Command Patll ... 3-4 3.6 Examining BiiNTM CL Variables ... 3-5 3.7 Creating an Alias for a Command. .. .. .. . . ... . . .. . .. .. . . .. .. . . .. . .. .. . . 3-6 3.8 Session 3 Summary ... 3-7
PRELIMINARY
Chapter 4. Printing Files
4.1 Sending a File to the Print Spooler ... 4-1 4.2 Displaying the Print Spooler ... 4-1 4.3 Removing a File from the Print Spooler ... 0 • • • • • • • • • • • • • • • 4-1 4.4 Section 4 Summary .•...••.•....•..••...•...•••. 0 0 • • • • • • • • • • • 4-1
Chapter 5. Controlling Jobs
5.1 Running a Job in the Background ..•... 5-1 5.2 Listing Current Jobs
0...
5-1 5.3 Stopping a Background Job ... 5-1 5.4 Listing Previous Commands ... 5-2 5.5 Redoing a Previous Command ... 5~25.6 Section 5 Summary ... 0 • • • • • • • • • • • • • • • • • • • • • 5-2
Chapter 6. Working with Windows
6.1 Opening a New Window ... 6-1 6.2 Changing Windows ... 6-2 6.3 Resizing a Window ... 6-3 6.4 Getting Help with Window Commands ... 6-4 6.5 Closing a New Window ... 6-4 6.6 Session 6 Summary ... 6-5
Chapter 7. Protecting Files and Other Objects
7.1 Listing Default Protection for Your Directories ... 7-1 7.2 Making a Directory Private ... 7-2 7.3 Confinning the New Authority List ... 7-3 7.4 Adding Group Modify Rights to a File ... 7-3 7.5 Changing a Directory's Default Protection ... 7-4 7.6 Examining Your ID List ... 7-4 7.7 Session 7 Summary ... 7-5 7.8 So You've Finished. . . .. . . .. . . . .. .. .. . . .. . . .. . . . ... 7-5
Appendix A. Command Quick Reference
A.I Summary of Commands ... A-I A.I.I Files and Directories ... A-I
A.1.2 Logon, Logoff, Help ... A-2 A.I.3 User Account ... A-2 A.I.4 Printing Files ... A-3 A.I.S Controlling Jobs ... A-3 A.I.6 Using Windows.. ... ... . ... ... . . ... .. .. .. ... . .... . . A-4 A.I.7 Protecting Objects ... A-4
Appendix B. Unix and BiiNTM Commands
Appendix C. Summary of Window Commands
Appendix D. Roadmap to BiiNTM Documentation
PREUMINARY
List of Figures
1-1. BiiNTM System and Tenninal ... 1-1 D-1. Roadmap to BiiNTM Documentation ... D-2
List of Tables
A-I. Help Commmds ... A-6 B-l. UNIX Commmds md BiiNTU Equivalents ... B-1 C-l. Window Commands ... C-2
PREUMINARY
WELCOME TO
BiiNTM
1
Welcome to computing with BiiNTM! This manual shows you how to enter the commands you will need for daily work on the system. Each of the chapters is a session that takes about 10 minutes to go through.
What You Need. These sessions assume you have the following prerequisites (see your system administrator if you need help):
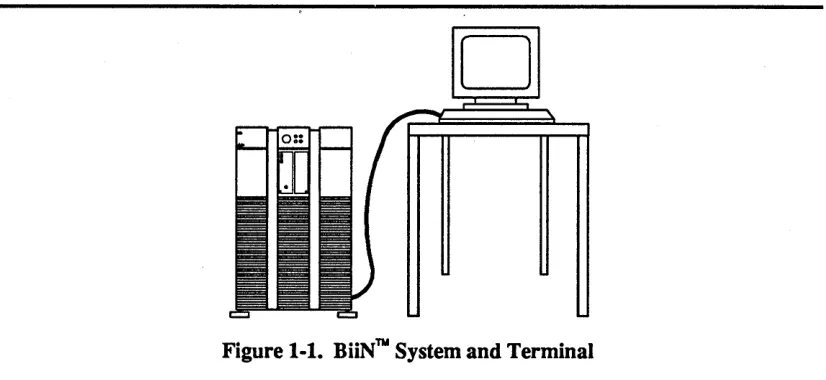
• An installed BiiNTM system with a terminal (Fig. 1-1).
• A user account for yourself, including logon name and password. (If your account is not new, your displays may differ from some of the examples in this book.)
• A printer installed and ready (for the "Printing" chapter).
[image:12.612.132.545.313.503.2]o
Figure 1·1. BiiNTM System and Terminal
This first session shows some basics about BiiNTM commands. After fInishing this session, you will know how to:
• Logon and logoff
• Get the time
• List your home directory
• See who's on the system
• Abbreviate commands and get help
PREUMINARY
1.1
Logging On
1-2
To gain access to the system, you logon at the terminal. (If you have problems logging on, see your system administrator.) Press <Return> to get the logon prompt:
Press Return to continue.
I
<Return>I
Enter your logon name and password at the prompts (use <BACKSPACE> to correct typing mistakes):
Logon name:
I
joe <Return>I
Password:I
newuser <Return>I
The system does not echo your password as you enter it This makes it hard for you to see typing mistakes but it prevents others from reading your password.
Next, you see welcome messages from the system administrator. This part of the logon process may vary depending on what your system administrator sets up.
The following display shows a typical logon sequence.
1 Logon Service
Please enter your identification. Logon Name: joe
Password: newuser (not echoed) .•. logon messages from system administrator ••• Horne directory: ///org/dom/vs/users/joe NoS On since User Name
1 1988-05-09 14:04:48.17 ///org/dom/id/joe Select one of the following terminal types,
followed by a return: w: wyse 50/60 v: vt102 f: freedom 100
:value=<derived> -> w Terminal type wyse 50.
Logon_CLEX - W: The terminal type has been changed within the logon script ..•
Hit return to continue
Here, the administrator gives reminders about using the system, the home directory name, and status of this logon session You may be asked to enter a terminal type, such as Wyse 50.
The duration between when you log on and when you log off is called a session.
1.2 Your Initial CLEX Window
The initial screen after logon is divided into two windows, a message window and a CLEX window.
The smaller window, Message Window, is a read-only window that displays the system's messages to you. You do not type into the message window.
The larger window, Initial Program, runs CLEX when you logon. CLEX (Command Language Executive) is a command interpreter, a program that accepts and intetprets your commands.
The CLEX window may contain some messages from the system administrator followed by the prompt clex->. (If your Initial Program window does not have the clex-> prompt, see your system' administrator. You will need to be set up with CLEX to use this manual.)
See the following display.
1 Na •• age Window
2 Initia~ program: Iv.l.y._vo~.et/ex./c~ax I"
Command_path: ("." "/sys/exe" "/bin" "/usr/bin" "/sys/etc/exe/tools") CLEX Command Language Executive, VERSION: nnn
clex->
1.3 Logging Off
Whenever you want to end a logon session, enter logoff, then press <Return>. (Don't do it now if you want to continue.)
If you switch off the tenninal without a logo f f, your session is not ended although the screen is dark. You must always log offbefore switching off the tenninal, or another person will be able to use your account without pennission.
PREliMINARY
1.4
Recovering From Mistakes
You can use <BACKSPACE> and <Ctrl-C> to recover from mistakes when you type CLEX commands.
To erase the previous character (to the left of the cursor):
clex->
I
g<BACKSPACE>I
To cancel the command in progress:
clex->
I
get. time <Ctrl·C>I
clex->
You can use <Ctrl-C> or <DEL> any time to get back to the clex-> prompt.
1.5 Getting the Time
1-4
To enter CLEX commands, enter the command, then <Return>.
For example, the get. time command displays the current date and time:
clex-> Igetotimel
1988-04-01 16:06:42.78
1.6 Listing Contents of Your Home Directory
When you first logon, you are working in your home directory.
Use the command list. object to seethe entries in your home directory:
clex-> Ilist.objectl
. default_authority .mail_AL var_groups
. logon_script startup
As a new user, your home directory contains two authority lists, two directories, and a script. The . default_authority authority list protects the objects in your account, and
. mail_ AL protects your mail. The startup directory contains a file of commands to be executed when you start various programs. The var _groups directory holds values for CLEX group variables, which can be used to customize CLEX commands. The
. logon_script script contains commands that are executed when you logon. You will work. with authority lists, startup files, and group variables later in these sessions.
Your home directory is the top of your directory hierarchy. You can store your personal files and other working data either in your home directory or in subdirectories that you create; thus, you can think: of your home directory as your own personal real estate in the larger system.
The BiiN'N system uses directories to store names (entries) for objects on disk. An object is simply a BiiN'N container for data or programs: a file, a load image, another directory, and so on.
Directories are arranged in a hierarchy with some directories containing sub-directories. The top of the hierarchy is the slash (/) directory. Pathnames identify directory entries. (The name suggests a "path" from the top of the directory structure to the entry.) Slashes separate directory names. For example, if your home directory is / user s / joe, directory "slash" (/) contains the directory users which contains the directory joe.
PREliMINARY
1.7 Abbreviating Commands
1-6
You can abbreviate command names for easier typing.
BiiNTM commands usually have two words separated by a period (as in verb. noun). A
useful approach is to use the first three letters of each word. The only restriction is that you must enter the dot if the command name includes a dot.
For example, to list your home directory using abbreviation:
clex-> Ilis .obj
I
• default_authority • logon_script
.mail_AL var_groups
startup
If the abbreviation is too short and there is more than one possible command, you'11 get a message that the command is ambiguous; but if you use the first three characters of each word, you will usually get a unique abbreviation
For example, abbreviating list. session_user to lis. ses is ambiguous:
clex-> Ilis. ses
I
The system sends a syntax error message, and displays the choices:
lis.ses
*** SYNTAX ERROR: ambiguous command name:
I list.session_system I list. session user
You can then try again with a different abbreviation.
In this case, you can use another abbreviation feature: names on each side of an underscore can be abbreviated. For example, a different, unique abbreviation for
list. session_user is:
clex-> Ilisos ul
user: session: status:
///org/dom/id/joe joe on tty017 active
From here on in these sessions, abbreviations are shown after long command examples.
1.8 Seeing Who's On the System
You can use the 1 i st. st at us command to see who is logged on to the system:
clex-> Ilist.status user :adminl ///org/dom/id/normal_OS
///org/dom/id/joe ///org/dom/id/sue ///org/dom/id/system
This example shows entering arguments to a command. Arguments affect the operation of a command, and a command may have zero or more arguments. This command has two: user
and : admin.
When entering arguments, be sure to use spaces between the command name and arguments.
PREUMINARY
1.9 Getting Syntax Help on a Command
1-8
You can use the question mark (1) or double question mark (11) to show command syntax.
In general, 1 shows syntax only, and 1 1 shows syntax plus description.
For example, to display the syntax of any command, such as list. spool_rank, enter a space and question mark after the command name:
clex->
I
list. spool_rank 1/Isr [:queue=<pointer>:=$spool.queue] CONTINUE CMD:
Abbreviation: lis. s r ?
At this point, you are prompted to continue the command by entering arguments, or you can enter <Ctrl-C> to cancel the command:
CONTINUE CMD:
I
<Ctrl·C> /The help display shows you the command name, followed by infonnation about arguments: name, type, and default value. This example shows syntax for the command's one argument
(: queue=), of type pointer with default value equal to the value in the BiiNTM CL variable
spool. queue. (You will work with BiiNTM CL variables in Chapter 3.) The brackets ([]) show that the argument is optional, not mandatory.
Note that if you do enter an argument, the following syntax characters should not be entered:
[ ] < > :=
Also, you do not enter the type name such as pointer. Instead, you'll be entering a pointer
value.
In addition to getting syntax help with a command, you can get syntax plus a description of what the command does with the double question mark (11):
clex-> Ilist.spool rank 11/
Isr [:queue=<pointer> := $spool.queue] -- Description:
-- Lists all files in a spool queue in rank order.
-- Includes the following:
-- * status
more?«blank> I <If> I d I q>GQ
CONTINUE CMD:
I
<Ctrl-C>I
If the description continues for more than one screen, you can enter <SPACEBAR> to see the next screen, or q to quit the description. As before, you are then prompted for an argument, or you can enter <Ctrl-C> to get back to CLEX.
There are other features of the question mark command that you may want to experiment with at your leisure; see Appendix A for more infonnation.
1.10
Session
1
Summary
• Press <Return> to get the logon prompt, if it's not showing.
• <Return> erases the character to the left of the cursor. • <Ctrl-C> cancels the command in progress.
• get. time gets the current time.
• list. ob ject lists the entries in a directory.
• Abbreviation allows you to abbreviate a command name or argument name, using the shortest string that uniquely identifies the name.
• list. status user shows system status, such as who is logged on. • The question marks ( and ?? can show command syntax.
PREUMINARY
WORKING WITH FILES AND DIRECTORIES
2
This chapter shows how to work with fues and directories. After you finish this session, you'll knowhow to:
• Create a file
• Name fues and other objects
• Show file contents
• Copy a file
• Rename a file
• Remove a fue
• Get a long listing of your home directory
• Create a new directory
• Change your current directory
• Use pattern-matching on directory entries
PRELIMINARY
2.1 Creating a File
2-2
You can create a simple file by redirecting command output into a file. For example, you can list the directory that contains BiiNTM commands (/ exe), and save that list in a file.
To save the list of commands in file templ, use list. object with the> option:
clex-> 'list.object lexe > temp11
Abbreviation: l.ob /exe > templ
Notice that output is not to the screen, but to the file.
The BiiNTM CL option to redirect command output is >. (BiiN™ CL (Command Language) is the high-level language used to construct CLEX commands.)
A BiiNTM CL option, like an argument, affects the operation of a command. However, where an argument is defined for an individual command, an option can be applied to any command for which it makes sense; in this example, you can redirect the output of any command that has output. Options are usually entered at the end of the command.
To confinn that templ is there, use list. object:
clex-> 'list. object
I
. default_authority .mail AL
. logon_script startup
Abbreviation: 1 . ob
templ var_groups
You can also create a rue using the BiiNTM system text editor, Emacs (see the BiiNTM Systems Emacs User's Guide).
2.2 Naming Files, Directories, and Other Objects
When creating names for your files and other objects, the following guidelines are recom-mended.
1. Use any number of letters, numbers, underscores, and dots:
A- Z (uppercase letters)
a -z (lowercase letters) 0-9 numbers
underscore dot
For example, these are effective names:
my file test.2Feb.300 once_is_not_en6ugh
Names are limited to 256 characters. Uppercase is distinct from lowercase; for example my_file is different from My_file.
2. Don't use any other characters, and avoid starting a name with a number.
If you use any other characters, the character may be intetpreted by CLEX or another program to mean something other than a name. For example, if you wanted to call a ftIe either/or, CLEX would think. it was directory either and entry or, because CLEX expects a slash to separate a directory and an entry. If you start a name with a number, CLEX intetprets the value as a numeric argument instead of a string argument.
2.3 Showing File Contents
The pg command displays file contents. (Note: pg is a command from the BiiNTM lUX inter-face. It will be replaced by a BiiNTM CL command at a later software release.)
To show the contents oftempl, use pg:
clex->
I
pg temp11
clex cobol
compile.terminfo entry
:GJ
-clex->
manage. library manage.messages manage. as_monitor
If the ftIe is longer than one screen, you'll get a colon prompt ( :). You can enter <Return> to see the next screen, or q to quit.
You can also use the BiiN™/UX command cat, which displays a rtIe without pausing for a page at a time.
PRELIMINARY
2.4 Copying a File
You can use the command copy. object to copy one file to another. (A file is one kind of BiiN'N object.)
For example, to copy temp 1 to temp2:
clex->
I
copy. object tempI temp21Abbreviation: COp. ob templ temp2
You can confinn the copy with list. object:
clex-> Ilist.objectl
. default_authority • logon_script
Abbreviation: 1 . ob
.mail_AL startup
tempI temp2
2.5 Renaming a File
The command rename. object renames files and other objects.
To rename temp2 to temp3:
clex-> Irename.object temp2 temp31
Abbreviation: ren. ob temp2 temp3
2.6 Removing a File
The command remove. ob j ect removes the directory entry for an object
To remove temp3:
clex->
I
remove. object temp31Abbreviation: rem.ob temp3
2.7 Getting a Long Listing of Your Home Directory
The long listing of a directory shows more infonnation about each entry in the directory. To get a long listing, use list. ob ject with its : long argument:
clex-> Ilist.object : long
I
. default_authority . logon_script .mail AL startup temp1 var_groups
Abbreviation: 1 . ob : 1
02-09 08:47 directory joe umc
02-09 08:49 authority_l joe umc
02-09 08:49 file joe umc
02-09 08:49 authority_l system umc 02-09 08:49 directory joe umc
02-09 08:49 file joe umc
02-09 08:49 directory joe umc
The long display shows a line for each entry:
Name of entry (dot stands for current directory).
02 - 09 08: 47 Month, day, and time the object was created.
208 108 1471 228 172 2117 172
directory The type of the object, in this case directory for the current directory (dot), and authority for the authority list.
joe The owner of the object (you).
umc The access rights to the object Access rights are use, modify, and control. In general, you have all rights to the objects you own
20 8 The size of the object in bytes.
This example shows an important way of entering arguments: by name. Until now, you have mostly entered values for the command arguments: templ and temp2 for copy. object.
Each argument also has a name. You can enter arguments by name as well as by value. In this example, the name of the argument is : long. The colon (:) is important and must be in-cluded.
If you give an argument's name, such as : long, it can be entered in any position in the command line. If not given argument names, CLEX interprets arguments according to their position in the command line; this is what is happening with a command such as
'remove.object temp3'.
In general, it is easier to enter both name and value when you don't know the argument's position (e.g., : long). It is easier to enter just the value when you already know the argument position (e.g., remove. ob ject temp3).
Also, there's a shortcut for boolean (true/false) arguments such as : long. Instead of entering : long=true, you can simply enter: long to toggle the default (from false to true in most cases).
PRELIMINARY
2.8 Creating a New Directory
2-6
The manage. directory command allows you to create a new directory.
manage. directory is the first two-level command (utility) that you have used in these sessions. A two-level command has an invocation command, like manage. directory,
that you enter from the clex-> prompt Once you have entered, the prompt changes, and you can enter any of that utility's runtime commands.
To create a new directory named per sonal, first enter the utility manage 0 directory:
clex-> Imanage.directory!
manage. directory =>
Abbreviation: man. dir
The prompt changes so you know you're in the utility.
Then, use the runtime command create to create a new directory named personal:
manage. directory =>
I
create personal!To exit from manage. directory, enter the exi t runtime command:
manage.directory => !exitl
To confinn that the new directory is there, use list. object : long:
clex-> Ilist.object :long!
personal 02-09 09:01 directory joe umc
Abbreviation: 1 . ob : 1
172
2.9 Changing Current Directory
The current directory is the one you are currently working in. When you first logon, you are working in your home directory, the top of your directory hierarchy. The command
set 0 current_directory can change your current directory.
To see the name of your current (home) directory, use list 0 current_directory:
clex-> Ilist.current_directoryl
///org/dom/vs/users/joe
Abbreviation: 1 0 cu
The pathname with three leading slashes (/ / /) is the system's full pathname for your home directory. This is just another name for the directory. You may find it easier, when you need to enter a pathname for your home directory, to use the short fonn -. For user joe, - is a short name for directory /users/ joe.
To change your current directory to per sonal:
clex->
I
set o current_directory personallAbbreviation: So cu personal
You are now "in" the new directory.
It is useful to change your current directory to a different directory when you will be working with entries in that new directory; you can list entries, rename, copy, and so on by simply typing entry names instead of full pathnameso
To confinn that your current directory has been changed:
clex-> Ilist.current_directoryl
///org/dom/vs/users/joe/personal
Abbreviation: 1 0 cu
Any time you want to change back to your home directory, use set 0 current_directory with no arguments:
clex-> I set o current_directory
I
Abbreviation: s 0 cu
PREUMINARY
2.10 Using Pattern-Matching
When entering a name as an argument, you can specify a pattern. Only names matching the pattern will be acted upon.
To list all files starting with temp and ending with a single character:
clex-> Ilist.object temp?
I
temp!
Abbreviation: 1 . ob temp?
Other pattern operators available are:
?
*
[xyz]
[a-z]
\
Matches any single character. Matches zero or more characters.
Matches any of the single characters within brackets where x, y, and z are single characters.
Where a and z are single characters, matches all ASCII characters between
a and z, including a and z. The match always fails if z is greater than a in
ASCII collating sequence.
Escape character. "Turns off' the special meanings of pattern operators. Must precede any of ? ,
* , [, ]
that are to be matched. For example,to match a real question mark in a name, you would enter \ ?
(It is best to avoid pattern operators in names anyway.)
Note: In general, any time a command expects an argument that is a name of type string, you can include pattern operators. However, you cannot use pattern operators to match BiiNTM CL runtime commands. Also, a single or double question mark in place of a name is recognized as
a help command, not a pattern operator.
2.11 Session 2 Summary
• > is a BliNN CL option to redirect output.
• Names for files and other objects can be any length, should not start with a number, and should include only letters, numbers, underscore, and dot.
• ca t shows fue contents.
• copy. object copies an object such as a file.
• rename. object renames a directory entry for an object such as a file.
• remove. object removes a directory entry for an object such as a fue.
• list. ob ject : long shows a long listing of directory entries.
• manage. directory can be used to create a directory.
• list. current_directory shows the patbname of your working directory.
• set. current_directory changes your working directory.
• Pattern operators can be used to select names that match a certain pattern.
YOUR USER ACCOUNT
3
Your logon name identifies your user account, so called because system resources can be
assigned for each user. Your account stores your personal files and other working data-your user account is your personal real estate in the larger system. Also, you can customize CLEX to suit your preferences using startup files, BiiNTM CL variables, and command aliases.
After you fmish this ses~ion, you'l1 know how to:
• Change your password
• List your user profile
• Customize your prompt string • Examine your startup files
• Change your command path • Examine BiiNTM CL variables
• Create an alias for a command
3.1 Changing Your Password
Use the command change. password to change your password.
You will be prompted for your old and new passwords:
clex-> IChange.password!
Old password: Inewuser!
New password:
I
sesame!Retype new password:
I
sesame!Abbreviation: ch . pas
As with your logon, the passwords are not echoed on the screen. Both new passwords must match. If you make a mistake and they don't match, try again.
Passwords are an important part of system security. After you use change. password, no one, not even the system administrator, knows what your password is, so no one can log on under your name. See your system administrator for further password guidelines for your system. Some common guidelines are:
• Change your password at random intervals.
• Don't write your password down, and don't give it out.
• Random characters are better than names, birthdays, or other strings that an intruder could guess correctly.
PRELIMINARY
3.2 Listing Your User Profile
3-2
A user account contains a user profile. Your user profile contains your logon name, home directory, initial program, and other things unique to your account.
To list your user profile, use list. useryrofile:
clex->
I
list.user-profileI
user:
home directory: initial program:
Abbreviation: 1 . u Y joe
/users/joe
/vs/sys_volset/exe/clex
This short listing contains the following parts (your system administrator assigns values that make sense for you):
user
home directory
initial program
Your logon name, for example joe.
"Where you are" in the system when you first logon. For example, joe's home directory is lusersl joe.
The program that is automatically invoked when you logon, typically Ivsl sys_ volset I exel clex.·
3.3 Customizing Your Prompt String
You can change your prompt string by changing a BiiNTM CL variable. By default, the elex
prompt is elex->, and is stored in the BiiNTM CL variable eli. prompt.
You can change the prompt temporarily with set. variable. To change your prompt string:
elex-> set. variable eli • prompt "yes, dear? "
yes, dear?
Abbreviation: set.var eli.prompt "yes, dear? "
The prompt immediately changes to your new one. You need to enclose the string value in quotes (") because it con~ains special characters (spaces and question mark).
Enter another command just to see the new prompt again:
yes, dear? Iget.timel
1988
yes, dear?
To change the prompt back to elex->:
yes, dear? Iset.variable eli.prompt "elex->
"I
elex->
Abbreviation: set. var
In general, BiiNTM CL variables affect the way CLEX operates. Later in these sessions you '11 examine the BiiNTM CL variables that you can change, and find out how to make the changes penn anent (to take effect each time you logon).
PRELIMINARY
3.4 Examining Your Startup Files
Your user account initially contains two startup files in your startup directory. A startup file contains CLEX commands that are executed automatically when you start a program (such as the logon program or CLEX).
To see the entries in your startup directory - / startup, use list. object:
clex-> Ilist.object startup
I
startup
startup:
.default_authority clex logon
The - / startup/ logc;>n file contains commands that are executed when you first logon. The -I startup/ clex file contains commands that are executed when you start your logon
CLEX.
To see the contents of the logon startup file, use cat:
clex-> lcat startup/logon
I
set.comrnand-path (. /sys/exe /bin /usr/bin /sys/etc/exe/tools) echo ''''
echo "Command-path: " :omit_LF list.command-path
These commands set and display your command path.
To see the contents of the clex startup file, use cat:
clex-> Icat startup/clexl
set.alias cd set.current_directory set.alias ls "/bin/ls -CIt
set.variable pglob.name clex set.variable cli.prompt "clex-> "
These commands set useful aliases and BiiNTM CL variables, including the initial prompt for CLEX.
In addition to the files in the directory -/ startup, the file . logon_script in your home directory contains commands that are executed when you first logon.
You can use any BiiNTM text editor to change these startup files.
3.5 Changing Your Command Path
A command path is a list of directories. When you enter a command, CLEX searches through each of the directories in the command path, in order, to find the command. You have a default command path for your account, which you can show with list. commandyath:
clex-> Ilist.command_pathl
("." "/sys/exe" "/bin" "/usr/bin" "/sys/etc/exe/tools")
Abbreviation: 1 . com
For example, in Chapter 2, you entered the pg command to show file contents. CLEX searched the directories in your default command path for pg:
/sys/exe /bin
Not found in current directory.
Not found in BiiN'N commands directory. Found in BiiN'N/UX commands directory.
/usr/bin, /sys/etc/ex/tools
Not searched.
Once you begin adding directories to your account, you may want to include them in your command path. For instance, most people create a personal directory for executable programs, for example /users/joe/exe, then put that directory in their command path.
To create a directory / exe in your home directory:
clex-> I manage. directory
I
manage.directory=> I create exel
manage.directory=> lexitl
To add the new directory /users/ joel exe to the command path, use
set.command-path:
clex-> lset.command-path (/sys/exe /bin /usr/bin
\1
CONTINUE CMD: I/sys/etc/exe/tools /users/joe/exe .)
I
Abbreviation: s . com
Note that when you are entering a list of pathnames, you must enclose the list with paren-theses, and you don't have to quote each pathname. Also, when entering a long command, you might want to use the backslash and continue the command on the next line. When you use the backslash, you will automatically be prompted to continue the command. Because the new command path replaces the old one, be sure to include all the directories you want to retain. Note: it's best to order your directories from most-used to least-used, with your current direc-tory (dot) at the end of the list, to minimize search time.
To confinn that your command path is changed, use list. command-path:
clex-> llist.command-pathl
("/sys/exe" "/bin" "/usr/bin" "/users/joe/exe" "/users/joe/exe" ".")
Note: if, during your session, you add an entry to any of the directories in your command path~
be sure to issue a set. commandyath with no arguments. This updates the system's list of the contents of the directories in your command path.
3.6
Examining BiiNTM CL Variables
In BiiN'N CL, a variable is simply a fixed name that holds a varying value.
CLEX and other system utilities use variables to allow you to customize the behavior of a program. For example, to set the prompt string or the number of last commands entered, you simply put your own value into the proper variable (cli . prompt or
eli. num_la st_commands , respectively). You can also create your own variables.
3-6
PRELIMINARY
BiiNTM CL offers variables and group variables. BiiNTM CL variables have a single name with no dot, such as $status, and they are not saved on disk. BiiNTM CL group variables have a two-part name such as eli. prompt, and their values are saved on disk. The first part of the name is the group name; related variables are grouped together. Thus the variables in group
eli affect the command-line interpreter, CLEX; the variables in group logon affect the
logon process; the variables in group print affect the print spooler, and so on. To see a list of the BiiNTM CL variables currently in effect for your account, use
list. variable:
clex-> Ilist. variable
I
STR $TERM "wS"
STR $PATH "/sys/exe:/bin:/usr/bin:/sys/etc/exe/tools: lusers/joe/exe:."
int $status 0
ptr R $OEO -- #directory object#
The display shows the following aspects of variables:
STR Type; in this case, global string. Global variables are uppercase, local are
lowercase. If the variable is read-only, an R appears after the type name
(as in $OEO). $TERM
"w5"
Name. Value.
When you first start your account, you do not have you~ own· personal values for group vari-ables; when a value is needed, you use the system default. Later, when you want to change values, you can store your values in your personal directory -!var_groups.
To see a list of the system's default BiiNTM CL variable groups, list the entries in directory
! sys!var_groups:
clex-> Ilist.object /sys/var groups
I
AMOS ada
cg cli
cobolg •.. debug
Once you know the group name, you can list the default values of the variables in that group. For example, to list the variables in group eli:
clex-> Ilist.variable cli.1
STR $cli.prompt "Enter cmd => " str $eli.prompt "clex-> "
STR $eli.node -- no value
STR $eli.form_request "on_request"
INT $eli.num_last_cmds 30
BOO $eli.verbose_history false
STR $eli.clex "/sys/exe/clex"
See the BiiNTM Command Language Executive Guide for further infonnation about variables.
3.7
Creating an Alias for a Command
To abbreviate long command names or frequently-used commands, you can write an alias.
Just like an alias for a person, an alias for a command is an assumed name that is used instead of the original name.
To write a new alias (11) for a long listing of directory entries, use set. alias:
clex-> Iset.alias 11 "list.object :long"l
Abbreviation: set. a l I I "list. object : long"
You need to enclose the value in quotes (") because it contains a space.
Once your alias is created, any time you want a long listing you can use the alias:
clex->
@]
02-09 08:47 directory joe umc 208
• default_authority 02-09 08:49 authority_l joe --c 208
It's best not to abbreviate the long command when you enter the value in quotes. This avoids ambiguous command names later. (Because the alias itself is short, you don't need the ab-breviation anyway.)
set. alias sets aliases for the current job only. If you want your aliases to be set each time' you logon, add appropriate set. alias commands to the logon startup file
.... / startup/ logon.
3.8 Session 3 Summary
• change. password modifies a user's password.
• list. user yrofile lists infonnation about a specified user.
• set. var iable assigns a value to a BiiNTM CL variable.
• The .... / startup/ logon file contains commands that are executed automatically when you logon.
• The .... / startup/ clex file contains commands that are executed automatically when
you start CLEX.
• list. conunandyath displays your current command path.
• set. commandyath assigns a new value to your command path.
• set. alias defines an alias name for a given string.
PRELIMINARY
Printing Files
PRINTING FILES
This session shows you how to use the print spool queue for files.
After finishing this session, you'l1 know how to:
• Send a fIle to the print spooler • Display the print spo~ler queue • Remove a fIle from the print spooler
4
PRELIMINARY
4.1
Sending a File to the Print Spooler
print. file sends a file to the print spooler.
To send the rtIe temp I to the default print spooler:
clex-> Iprint.file tempI /sys/spool_ql
Abbreviation: p . f
4.2 Displaying the Print Spooler
list. spool_file lists the files in the print spooler.
To see tempI's place in the print spooler:
clex->
I
list. spool_file /sys/spool_qluser: joe
file ID: 1
file size: 2117
file: l/printing/ ... date ...
printing_enabled: true
files_auto_deleted: true
copies: 1
term_msg false
banneryage: true
printers: /vs/sys/_volset/dev ...
Abbreviation: 1 . sp _ f
4.3 Removing a File from the Print Spooler
remove. spool_file allows you to remove a file from the print spooler.
To remove the spooled file tempI, enter its number (File_ID) in the queue:
clex->
I
remove. spool_file 1 /sys/spool_qlAbbreviation: r . sp _ f I
4.4 Section 4 Summary
• print. file queues one or more ftIes for printing.
• list. spool_file lists information about files in a spool queue.
• remove. spool_file removes spooled files from a queue.
CONTROLLING JOBS
5
This session shows you and how to start and stop jobs. Generally, each command you enter runs as a job. You can run more than one command (job) at a time.
After finishing this session, you 'II know how to:
• Run a job in the background
• List current jobs
• Stop a background job
• List previous commands
• Redo a previous command
5.1 Running a Job in the Background
You can run a job "in the background" using the BiiNTM CL option &. The command is started, and the prompt immediately returns so you can continue entering commands. This example uses the command list . monitor_log because it runs until you stop it
To run list . monitor_log in the background:
clex-> Ilist.monitor_log :block > temp6 &1
clex: BACKGROUND JOB: list~monitor_log [list.monitor_log :block > temp6 &].
Abbreviation: lis .mon :b > temp6 &
5.2 Listing Current Jobs
You can display your background jobs (and other jobs) with list. job.
To list your current jobs:
clex->
I
list • jobI
SESSION joe on ttyOl7, CREATED 09May, 14:04:48.17
(1) exec list.monitor_log [list.monitor_log :block > temp6 &]
Abbreviation: lis. job
PRELIMINARY
5.3 Stopping a Background Job
You can stop a background job with kill. job.
To stop the background job list. moni tor_log:
clex->
I
kill. job 11clex: KILL event signalled to job 'list.monitor_log [list.monitor_log :block > temp6 &].'
clex-> list.monitor_log - E: Terminated by event 5.
Notice that the message window shows the completion of the background job, with exit status
, 2 ' (error).
5.4
Listing Previous Commands
CLEX remembers the 30 previous commands you typed. You can list these and re-do a previous command.
To list your previous commands, use list . last_commands:
clex->
I
list. last_commandsI
more? «blank> I <If> I d I
q)1
<SPACEBAR>I
(46) list.monitor_log :block > temp6 & (47) list.job
(48) kill. job 1
Abbreviation: lis .las
Note: you can change the number of remembered commands by changing the value of the variable $cli.num_last_cmds.
5.5 Redoing a Previous Command
To redo a previous command, use redo . last_commands. You can specify which pre-vious command either by its number or its command name.
To redo the last list. job:
clex->
I
redo. last_commands 471 list. jobSESSION joe on tty017, CREATED ••. (1) exec Session_Server
(-) exec Logon_CLEX
Abbreviation: re . las 47
5.6 Section 5 Summary
• The & BiiNTM CL option runs a job in the background.
• list. job lists currently nmningjobs.
• kill. job stops the specified job.
• list .last_conunands lists the previous commands entered.
• redo .last_conunands reexecutes a previous command.
PREUMINARY
WORKING WITH WINDOWS
6
A window is an area of your tenninal screen that acts like an independent "subtenninal".
Take a minute to study the title bars on your two windows. Each window's title bar tells you
the window's number and command. The default windows after login are window 1 for read-ing messages and window 2 for enterread-ing commands to clex. Windows do not overlap.
After finishing this session, you'll know how to:
• Open a new window • Change between windows
• Resize a window
• Get help with window commands
• Close the new window
If Your Terminal Beeps. If your tenninal beeps when you enter a window command, it's an error message. For example, you'll get a beep for a typing mistake, an unknown window number, and so on.
PRELIMINARY
6.1 Opening a New Window
6-2
The : : window option opens a new window for the command being entered.
To open a second CLEX window:
clex-> I clex :: window!
Abbreviation: cl :: w
The new window, number 3, opens below the old one, with the command clex in the title bar. This new clex is a non-logon clex, so it has a different prompt: Enter cmd =>. Note that the previous windows are resized. Window 3 becomes the current window, the one in which you enter commands (note the F in the title bar, for/ocus, in the following display).
1 Maaaage Window
I
clex: Job completed, status ' 2' : list.monitor_log [list.monitor_log :block > temp6 &]2 lnit:ial pzoogram: /va/aya_volaet:/exe/alex
1
clex: BACKGROUND JOB: clex [clex : :window] • clex->3 alex [alex : :w.indow]
CLEX Command Language Executive, VERSION: nn Enter cmd =>
To confinn that you can enter commands in the new window just like the old one, try get. time and list. object:
clex-> ! get. time!
1988-04-01 16:06:42.78
clex-> Ilist.object!
. default_authority . logon_script
.mail AL
exe startup temp!
temp6 var_groups
I
I
r6.2 Changing Windows
The command <Ctrl-T>2 changes to window 2. (In general, <Ctrl-T>n changes to window
n.)
You do not enter a <RETURN> after window commands. If you do enter a <RETURN> out of habit, the <RETURN> will be taken as input Window commands are not echoed on the screen.
To change from your current window (3) to the logon clex window (2):
Enter cmd =>
I
<Ctrl-T>21The cursor is now at the prompt in window 2, and window 2 is the current window which receives your commands.
Experiment with <Ctrl-T> and a window number until you are comfortable with changing windows.
PRELIMINARY
6.3 Resizing a Window
You can change the size of a window with the <CtrI-T><Shift-L> and <CtrI-T>s commands. <CtrI-T><Shift-L> makes a window as large as possible. <CtrI-T>s makes a window smaller by a given number of lines.
First go to window 3:
Enter cmd =>
I
<Ctrl-T>3!Use <CtrI-T><Shift-L> to make window 3 as large as possible:
Enter cmd =>
I
<Ctrl-T><Shift-L>!The other windows (1 aQd 2) only show their title bars, and window 3 occupies all the other lines on the screen (see the following display) .
1 • aaage Window
2 In.t.t:.t.al program: /va/aya_volaet:/axe/elax
3 clax [elax : :window I'
CLEX Command Language Executive, VERSION: nn Enter cmd => get. time
1988-04-01 16:06:42.78 Enter cmd => list.object
• default_authority exe startup temp6 .mail_authority personal temp1 var_groups
You can make a window smaller with <CtrI-T>s. <CtrI-T>s takes a number from 0 through
9.
For example, window 3 is now as large as possible. Suppose you want to make it smaller so as to leave more room for window 2. To make window 3 smaller by 9lines, so that it takes up about half the screen, enter:
Enter cmd =>
I
<Ctrl-T>s91There must be no spaces in the window command.
Windows 1 and 2 are resized larger.
6.4 Getting Help with Window Commands
You can show a list of the window commands with <CtrI-T>?:Enter cmd =>
I
<Ctrl-T><?>I
6.5 Closing a New Window
A window goes away when the command that started it ends.
To close window 3, use the clex command exit, which exits from a non-logon clex:
Enter cmd => lexitl
The new window disappears and windows 1 and 2 resume their previous places.
6.6 Session 6 Summary
• :: window is a BiiNTM CL option to open a new window. • <Ctrl-1"> prefixes window commands.
• <Ctrl-1">? shows the list of window commands.
• exit exits from a non-logon clex.
PRELIMINARY
PROTECTING FILES AND OTHER OBJECTS
7
Each directory in the BiiNTN system is protected from unauthorized access; that is, you control who can access your home directory. Directories, like other BiiNTN objects, are protected with an authority list. The authority list specifies which IDs can access the directory, and with what access rights.
After finishing this session, you'l1 know how to:
• List the default protection for your home directory
• Make a directory private
• Add modify rights to a ftle
• Change a directory's default protection
• Examine your ID list
PRELIMINARY
7.1
Listing Default Protection for Your Directories
7-2
Each user account has an initial default authority list, in • default_authori ty in your home directory. This list specifies the protection that is automatically assigned to your home directory and all the objects you will create in it, such as files and new directories.
To see the contents of your default authority list, use the list runtime command of manage. authority with the suppress argument:
clex-> 'manage.authorityl
manage.authority => Ilist -/.default authority : suppress
I
Default authority list: ///org/dom/vs/users/joe/.default_authority
umc ///org/dom/id/joe
u-- ///org/dom/id/sysgroup
u-- ///org/dom/id/world
The list runtime command displays the object's protecting authority list
If the object is itself an authority list and you want to see the contents, use the
: suppress argument (otherwise you'll see the authority list that protects the authority list).
Your system administrator sets the initial authority list The first ID in the list is your user ID (logon name). Your user 10 has use, modify, and control rights. For a directory, this means you can do any directory operations on it
The second and third IDs (sysgroup and world) give everyone else use rights. These IDs can list your directory entries but cannot do anything else.
(A note about the IDs: a pathname with three leading slashes / / / is the system's full path-name for an 10.)
The authority list that protects your home directory is the same one that is used to automati-cally protect all the new objects you will create in your directory structure.
To exit from manage. authority and return to CLEX:
manage.authority => lexitl
clex->
7.2 Making a Directory Private
By default, all users are allowed to list the contents of your directories. To make a directory private (only you can list it), you need to create a new authority list that has only your access rights in it, then assign the new authority list to that directory.
To create a new authority list pri vate_auth, invoke manage. authority and use the runtime command create:
clex-> Imanage.authorityl
manage.authority => Icreate private_auth (joe umc)
I
You enter only your 10, with all rights, as the protection set (list of <10, rights> pairs).
To associate the new, private authority list with the directory personal, use the runtime command set . object_authority:
manage.authority => set.object_authority personal private_auth
Abbreviation: set. ob
The directory personal is now protected with the authority list private_auth.
7.3 Confirming the New Authority List
To confinn the new, private authority list for the directory personal, use the runtime com-mand list:
manage.authority => Ilist personal
I
umc ///org/dom/id/joe
Your 10 is the only one in the new directory's authority list.
Now that the private authority list is created, set, and confinned, exit from manage.authority:
manage.authority => lexitl
PRELIMINARY
7 .. 4
Adding Group Modify Rights to a File
You can also make a file or other object more public (allow others to modify.) For example, suppose you wanted to allow others to write to a file. You create a new authority list, allowing modify writes for the group ID, then assign the new authority list to the file.
For example, use the Ii s t runtime command to see the authority list protecting t empl:
clex-> Imanage.authorityl
manage.authority=> Ilist templl
Protecting authority list: ///org/dom/vs/users/joe/.default_authority umc ///org/dom/id/joe
u-- ///org/dom/id/sysgroup
u-- ///o~g/dom/id/world
To add group modify rights to the file temp l, create a new authority list named group_m_auth and asSign it to templ:
manage.authority=>I ~c-r-e-a-te~g-r-o-up~m~a-u-th~(-j-o-e-u-m-c~s-y-sg-r-o-u-p-u-m~w-o-r-ld~u~)
I
manage.authority=> Iset.object authority templ group m authl
(Notice that the other IDs are still included with their rights unchanged. If you did not inc1u~e
the IDs, then joe and world would not be able to access tempI.)
You can confinn temp 1 's new authority list:
manage.authority=> Ilist templl
Protecting authority list: ///org/dom/vs/users/joe/group_m_auth umc ///org/dom/id/joe
um- ///org/dom/id/sysgroup
u~= ///org/dom/id/world
Finally, you can exit from manage. authority:
manage.authority=>. lexitl
7.5 Changing a Directory's Default Protection
7-4
Another way to make a directory private is to change its default authority list. When you create a new entry in a directory, the entry is automatically protected by the default authority list unless you specify a different authority list. So to make entries readable only by you, you could change the default authority list of your private directory. Then whenever you create an entry in that directory, the entry is readable only by you.
clex-> Imanage.directoryl
manage.directory=> set.default_authority personal private_auth
manage.directory=> lexitl
Note the differences in protecting a directory with its own authority list or its default authority list. If only the directory's default authority list is private, then others will be able to see the name of the private directory in your home directory, but will not be able to list entries. When the directory's own authority list is private, no one but you will be able to even list the name of the directory in your home directory.
7.6 Examining Your 10 List
You can access any system command (or other object), if you have an ID that matches one in the object's authority list. You may have more than one ID at a time. Your ID list shows the IDs under which you are allowed to access commands and objects (that is, who you can represent-a member of the fmance department or a database user, for example).
Your current ID list is always available in the BiiNTM CL group variable $pglob. id_Iist.
To see your current ID list:
clex-> Ilist.variable pglob.id listl
LIS R $pglob.id_list ("///org/dom/id/joe" "///org/dom/id/sysgroup" "///org/dom/id/world")
Abbreviation: Ii s '. var
In this example, the first entry is Joe's identity, the second entry is a group ID, and the third entry is everyone on the system. Hence, Joe can run programs/scripts and access
directories/files (among other things) as himself, as a member of the sysgroup group, or as
world.
However, his access rights will vary depending upon a specific object's authority list. For example, one object may allow use and modify rights for the ID joe, while another may have no rights listed for joe at all, in which case joe cannot access the object.
pglob is short for process globals. The pglob variable group contains values for your processes that are currently executing (ajob contains at least one process).
7.7 Session 7 Summary
• manage. authority creates, assigns, and lists the contents of authority lists.
• manage. directory lists and assigns default authority lists.
• list. variable pglob. id_list shows your current ID list.
PRELIMINARY
7.8 So You've Finished
7-6
The goal of these sessions has been to give you experience entering the commands you'll need to do basic daily work on a BiiNTM system.
You're not expected to remember everything you did here. As you become more familiar with the BiiNTM system, review the examples in this manual, practice, and experiment Remember that the complete description for BiiNTM CL commands is in the BiiNTM Systems Commands
Reference Manual.
Several topics were intentionally left out of these sessions. For further learning on the follow-ing topics, here are the manuals you will need:
Text editing The BiiNTM text editor is Emacs. The manual BiiNTM Systems Emacs User's
Guide provides tutorials on text editing. CLEX command interpreter
Compiling
Linking
(CLEX) has many more features than were presented here, including flow control and script writing. The manual BiiNTM Command Language
Execu-tive Guide provides tutorials on the command language BiiNTM CL and the program that interprets the language, CLEX.
Refer to the manual for your preferred language for tutorials on using the compiler for your language. For example, the COBOL manual is BiiNTM
COBOL Programming Manual.
The BiiNTM Systems Linker manual is BiiNTM Systems Linker Guide.
COMMAND QUICK REFERENCE
A
This appendix summarizes the commands presented in this manual, the help commands, and syntax notation.
A.1 Summary of Commands
The following sections summarize the commands and examples presented in this manual, in
the following format:
command Description of command. command argJ arg2
(General fonn of command as it is commonly entered; may not appear if obvious. Italics represent arguments that are to be replaced by your actual values.)
command argl arg2
(Example as presented in this manual; may not appear if obvious.)
A.1.1 Files and Directories
copy. object Copies an object from one patbname to anotherpatbname.
rename.object
remove.object
copy. object orig copy
copy.object templ temp2
Renames an object's directory entry. rename.object old n~
rename.object temp2 temp3
Removes an object's directory entry. remove. object entry
remove.object temp3 manage.directory
Command Quick Reference
Creates, lists, and sets authorization for, directories. manage.directory
=> create directory => exit
manage.directory
=> create personal
=> exit
PRELIMINARY
list.current directory
-Lists the current directory's pathname. set.current directory
- Sets the current directory's pathname.
>
set. current_directory directory
set.current_directory personal
BiiNTM CL option to redirect output.
command-output> flle
list.object lexe > tempI
A.1.2 Logon, Logoff, Help .
Logon Service Allows a user to logon to the system.
<RETURN> => logon-name => password
<RETURN> => joe
=> newuser
logoff Tenninates a logon CLEX.
<BACKSPACE> Erases character to the left of the cursor.
<Ctrl-C> Cancels current input (returns to clex-> prompt). get. time Gets the system time.
list. object Lists entries in a directory. list.status user :adrnin
Lists processes, jobs, sessions, and active users.
1 Question mark displays syntax or description help for a command. Single question mark usually displays syntax only.
command 1 or
command ??
list.spool rank 1 list.spool=rank 11
A.1.3 User Account
change.password
Changes a password for a user or other 10. change.password
=> old => new => new
change.password