Snort Users Manual
Snort Release: 1.8.1
Martin Roesch
Contents
1 Snort Overview 3
1.1 Getting Started . . . 3
1.2 Sniffer Mode . . . 3
1.3 Packet Logger Mode . . . 4
1.4 Network Intrusion Detection Mode . . . 5
1.4.1 NIDS Mode Output Options . . . 5
1.4.2 High Performance Configuration . . . 6
1.4.3 Changing Alert Order . . . 6
1.5 Miscellaneous . . . 6
1.6 More Information . . . 7
2 Writing Snort Rules How to Write Snort Rules and Keep Your Sanity 8 2.1 The Basics . . . 8
2.1.1 Includes . . . 8
2.1.2 Variables . . . 9
2.2 Rules Headers . . . 9
2.2.1 Rule Actions . . . 9
2.2.2 Protocols . . . 10
2.2.3 IP Addresses . . . 10
2.2.4 Port Numbers . . . 11
2.2.5 Activate/Dynamic Rules . . . 12
2.3 Rule Options . . . 12
2.3.1 Msg . . . 13
2.3.2 Logto . . . 14
2.3.3 TTL . . . 14
2.3.4 TOS . . . 14
2.3.5 ID . . . 14
2.3.6 Ipoption . . . 14
2.3.7 Fragbits . . . 15
2.3.8 Dsize . . . 15
2.3.9 Content . . . 16
2.3.10 Offset . . . 16
2.3.11 Depth . . . 17
2.3.12 Nocase . . . 17
2.3.13 Flags . . . 17
2.3.15 Ack . . . 18
2.3.16 Itype . . . 19
2.3.17 Icode . . . 19
2.3.18 Session . . . 19
2.3.19 Icmp_id . . . 19
2.3.20 Icmp_seq . . . 20
2.3.21 Rpc . . . 20
2.3.22 Resp . . . 20
2.3.23 Content-list . . . 21
2.3.24 React . . . 21
2.3.25 Reference . . . 22
2.3.26 Sid . . . 22
2.3.27 Rev . . . 23
2.3.28 Classtype . . . 23
2.3.29 Priority . . . 24
2.3.30 Uricontent . . . 24
2.3.31 Tag . . . 25
2.3.32 IP proto . . . 25
2.3.33 Same IP . . . 26
2.3.34 Stateless . . . 26
2.3.35 Regex . . . 26
2.4 Preprocessors . . . 27
2.4.1 Minfrag . . . 27
2.4.2 HTTP Decode . . . 27
2.4.3 Portscan Detector . . . 28
2.4.4 Portscan Ignorehosts . . . 28
2.4.5 Defrag . . . 29
2.4.6 Frag2 . . . 29
2.4.7 Stream . . . 29
2.4.8 Stream4 . . . 30
2.4.9 Spade: the Statistical Packet Anomaly Detection Engine . . . 32
2.5 Output Modules . . . 32
2.5.1 Alert_syslog . . . 32
2.5.2 Alert_fast . . . 33
2.5.3 Alert_full . . . 34
2.5.4 Alert_smb . . . 34
2.5.5 Alert_unixsock . . . 34
2.5.6 Log_tcpdump . . . 35
2.5.7 XML . . . 35
2.5.8 Database . . . 37
2.5.9 CSV . . . 38
2.5.10 Unified . . . 40
2.5.11 SNMP Trap . . . 40
2.6 Writing Good Rules . . . 41
Chapter 1
Snort Overview
1.1
Getting Started
Snort really isn’t very hard to use, but there are a lot of command line options to play with, and it’s not always obvious which ones go together well. This file aims to make using Snort easier for new users.
Before we proceed, there are a few basic concepts you should understand about Snort. There are three main modes in which Snort can be configured: sniffer, packet logger, and network intrusion detection system. Sniffer mode simply reads the packets off of the network and displays them for you in a continuous stream on the console. Packet logger mode logs the packets to the disk. Network intrusion detection mode is the most complex and configurable configuration, allowing Snort to analyze network traffic for matches against a user defined rule set and perform several actions based upon what it sees.
1.2
Sniffer Mode
First, let’s start with the basics. If you just want to print out the TCP/IP packet headers to the screen (i.e. sniffer mode), try this:
./snort -v
This command will run Snort and just show the IP and TCP/UDP/ICMP headers, nothing else. If you want to see the application data in transit, try the following:
./snort -vd
This instructs Snort to display the packet data as well as the headers. If you want an even more descriptive display, showing the data link layer headers do this:
./snort -vde
(As an aside, these switches may be divided up or smashed together in any combination. The last command could also be typed out as:
./snort -d -v -e
1.3
Packet Logger Mode
Ok, all of these commands are pretty cool, but if you want to record the packets to the disk, you need to specify a logging directory and Snort will automatically know to go into packet logger mode:
./snort -dev -l ./log
Of course, this assumes you have a directory named "log" in the current directory. If you don’t, Snort will exit with an error message. When Snort runs in this mode, it collects every packet it sees and places it in a directory hierarchy based upon the IP address of one of the hosts in the datagram.
If you just specify a plain "-l" switch, you may notice that Snort sometimes uses the address of the remote computer as the directory in which it places packets, and sometimes it uses the local host address. In order to log relative to the home network, you need to tell Snort which network is the home network:
./snort -dev -l ./log -h 192.168.1.0/24
This rule tells Snort that you want to print out the data link and TCP/IP headers as well as application data into the directory ./log, and you want to log the packets relative to the 192.168.1.0 class C network. All incoming packets will be recorded into subdirectories of the log directory, with the directory names being based on the address of the remote (non-192.168.1) host. Note that if both hosts are on the home network, then they are recorded based upon the higher of the two’s port numbers, or in the case of a tie, the source address.
If you’re on a high speed network or you want to log the packets into a more compact form for later analysis you should consider logging in "binary mode". Binary mode logs the packets in "tcpdump format" to a single binary file in the logging directory:
./snort -l ./log -b
Note the command line changes here. We don’t need to specify a home network any longer because binary mode logs everything into a single file, which eliminates the need to tell it how to format the output directory structure. Additionally, you don’t need to run in verbose mode or specify the -d or -e switches because in binary mode the entire packet is logged, not just sections of it. All that is really required to place Snort into logger mode is the specification of a logging directory at the command line with the -l switch, the -b binary logging switch merely provides a modifier to tell it to log the packets in something other than the default output format of plain ASCII text.
Once the packets have been logged to the binary file, you can read the packets back out of the file with any sniffer that supports the tcpdump binary format such as tcpdump or Ethereal. Snort can also read the packets back by using the -r switch, which puts it into playback mode. Packets from any tcpdump formatted file can be processed through Snort in any of its run modes. For example, if you wanted to run a binary log file through Snort in sniffer mode to dump the packets to the screen, you can try something like this:
./snort -dv -r packet.log
You can manipulate the data in the file in a number of ways through Snort’s packet logging and intrusion detection modes, as well as with the BPF interface that’s available from the command line. For example, if you only wanted to see the ICMP packets from the log file, simply specify a BPF filter at the command line and Snort will only "see" the ICMP packets in the file:
./snort -dvr packet.log icmp
1.4
Network Intrusion Detection Mode
To enable network intrusion detection (NIDS) mode (so that you don’t record every single packet sent down the wire), try this:
./snort -dev -l ./log -h 192.168.1.0/24 -c snort.conf
Where snort.conf is the name of your rules file. This will apply the rules set in the snort.conf file to each packet to decide if an action based upon the rule type in the file should be taken. If you don’t specify an output directory for the program, it will default to /var/log/snort.
One thing to note about the last command line is that if Snort is going to be used in a long term way as an IDS, the "-v" switch should be left off the command line for the sake of speed. The screen is a slow place to write data to, and packets can be dropped while writing to the display.
It’s also not necessary to record the data link headers for most applications, so the so it’s not necessary to specify the -e switch either.
./snort -d -h 192.168.1.0/24 -l ./log -c snort.conf
This will configure Snort to run in it’s most basic NIDS form, logging packets that the rules tell it to in plain ASCII to a hierarchical directory structure (just like packet logger mode).
1.4.1
NIDS Mode Output Options
There are a number of ways to configure the output of Snort in NIDS mode. The default logging and alerting mecha-nisms are to log in decoded ASCII format and use "full" alerts. The full alert mechanism prints out the alert message in addition to the full packet headers. There are several other alert output modes available at the command line, as well as two logging facilities.
Alert modes are somewhat more complex. There are six alert modes available at the command line, full, fast, socket, syslog, smb (WinPopup), and none. Four of these modes are accessed with the -A command line switch. The four options are:
-A fast fast alert mode, write the alert in a simple format with a timestamp, alert message, source and destination IPs/ports
-A full this is also the default alert mode, so if you specify nothing this will automatically be used
-A unsock send alerts to a UNIX socket that another program can listen on
-A none turn off alerting
Packets can be logged to their default decoded ASCII format or to a binary log file via the -b command line switch. If you wish to disable packet logging all together, use the -N command line switch.
For output modes available through the configuration file, see Section 2.5. Note that command line logging options override any output options specified in the configuration file. This allows debugging of configuration issues quickly via the command line.
To send alerts to syslog, use the ”-s ” switch. The default facilities for the syslog alerting mechanism are LOG_AUTHPRIV and LOG_ALERT. If you want to configure other facilities for syslog output, use the output plugin directives in the rules files. See Section2.5.1 for more details on configuring syslog output.
Finally, there is the SMB alerting mechanism. This allows Snort to make calls to the smbclient that comes with Samba and send WinPopup alert messages to Windows machines. To use this alerting mode, you must configure Snort to use it at configure time with the –enable-smbalerts switch.
Log to default (decoded ASCII) facility and send alerts to syslog
./snort -c snort.conf -l ./log -s -h 192.168.1.0/24
Log to the default facility in /var/log/snort and send alerts to a fast alert file:
./snort -c snort.conf -s -h 192.168.1.0/24
Log to a binary file and send alerts to Windows workstation:
./snort -c snort.conf -b -M WORKSTATIONS
1.4.2
High Performance Configuration
If you want Snort to go fast (like keep up with a 100 Mbps net fast) use the "-b" and "-A fast" or "-s" (syslog) options. This will log packets in tcpdump format and produce minimal alerts. For example:
./snort -b -A fast -c snort.conf
In this configuration, Snort has been able to log multiple simultaneous probes and attacks on a 100 Mbps LAN running at a saturation level of approximately 80 Mbps. In this configuration, the logs are written in binary format to the snort.log tcpdump-formatted file. To read this file back and break out the data in the familiar Snort format, just rerun Snort on the data file with the "-r" option and the other options you would normally use. For example:
./snort -d -c snort.conf -l ./log -h 192.168.1.0/24 -r snort.log
Once this is done running, all of the data will be sitting in the log directory in its normal decoded format. Cool, eh?
1.4.3
Changing Alert Order
Some people don’t like the default way in which Snort applies it’s rules to packets. The Alert rules applied first, then the Pass rules, and finally the Log rules. This sequence is somewhat counterintuitive, but it’s a more foolproof method than allowing the user to write a hundred alert rules and then disable them all with an errant pass rule. For more information on rule types, see Section 2.2.1.
For people who know what they’re doing, the "-o" switch has been provided to change the default rule application behavior to Pass rules, then Alert, then Log:
./snort -d -h 192.168.1.0/24 -l ./log -c snort.conf -o
1.5
Miscellaneous
If you are willing to run snort in "daemon" mode, you can add -D switch to any combination above. Please NOTICE that if you want to be able to restart snort by sending SIGHUP signal to the daemon, you will need to use full path to snort binary, when you start it, i.g.:
/usr/local/bin/snort -d -h 192.168.1.0/24 -l \
Relative paths are not supported due to security concerns.
If you’re going to be posting packet logs to public mailing lists you might want to try out the -O switch. This switch "obfuscates" your the IP addresses in the packet printouts. This is handy if you don’t want the people on the mailing list to know the IP addresses involved. You can also combine the -O switch with the -h switch to only obfuscate the IP addresses of hosts on the home network. This is useful if you don’t care who sees the address of the attacking host. For example:
./snort -d -v -r snort.log -O -h 192.168.1.0/24
This will read the packets from a log file and dump the packets to the screen, obfuscating only the addresses from the 192.168.1.0/24 class C network.
1.6
More Information
Chapter 2 contains much information about many configuration options available in the configuration file. The snort manual page and the output of
snort -h
contain information that can help get Snort running in several different modes.
The Snort web page (http://www.snort.org) and the Snort User’s mailing list (http://www.geocrawler. com/lists/3/SourceForge/4890/0/) at:
Chapter 2
Writing Snort Rules
How to Write Snort Rules and Keep Your
Sanity
2.1
The Basics
Snort uses a simple, lightweight rules description language that is flexible and quite powerful. There are a number of simple guidelines to remember when developing Snort rules.
Most Snort rules are written in a single line. This was required in versions prior to 1.8. In current versions of Snort, rules may span multiple lines by adding a backslash \ to the end of the line.
Snort rules are divided into two logical sections, the rule header and the rule options. The rule header contains the rule’s action, protocol, source and destination IP addresses and netmasks, and the source and destination ports information. The rule option section contains alert messages and information on which parts of the packet should be inspected to determine if the rule action should be taken.
Figure 2.1 illustrates a sample Snort rule.
alert tcp any any -> 192.168.1.0/24 111 (content:"|00 01 86 a5|"; \ msg: "mountd access";)
Figure 2.1: Sample Snort Rule
The text up to the first parenthesis is the rule header and the section enclosed in parenthesis is the rule options. The words before the colons in the rule options section are called option keywords. Note that the rule options section is not specifically required by any rule, they are just used for the sake of making tighter definitions of packets to collect or alert on (or drop, for that matter). All of the elements in that make up a rule must be true for the indicated rule action to be taken. When taken together, the elements can be considered to form a logicalANDstatement. At the same time, the various rules in a Snort rules library file can be considered to form a large logicalORstatement.
2.1.1
Includes
them in place in the file in the place where the include appears.
Format
include: <include file path/name>
Note that there is no semicolon at the end of this line. Included files will substitute any predefined variable values into their own variable references. See the Variables section for more information on defining and using variables in Snort rule files.
2.1.2
Variables
Variables may be defined in Snort. These are simple substitution variables set with the var keyword as in Figure 2.2.
Format
var: <name> <value>
var MY_NET [192.168.1.0/24,10.1.1.0/24]
alert tcp any any -> $MY_NET any (flags: S; msg: "SYN packet";)
Figure 2.2: Example of Variable Definition and Usage
The rule variable names can be modified in several ways. You can define meta-variables using the "$" operator. These can be used with the variable modifier operators, "?" and "-". * $var - define meta variable * $(var) - replace with the contents of variable "var" * $(var:-default) - replace with the contents of the variable "var" or with "default" if "var" is undefined. * $(var:?message) - replace with the contents of variable "var" or print out the error message "message" and exit
See Figure 2.3 for an example of these rules modifiers in action.
var MY_NET $(MY_NET:-192.168.1.0/24)
log tcp any any -> $(MY_NET:?MY_NET is undefined!) 23
Figure 2.3: Figure Advanced Variable Usage Example
2.2
Rules Headers
2.2.1
Rule Actions
The rule header contains the information that defines the "who, where, and what" of a packet, as well as what to do in the event that a packet with all the attributes indicated in the rule should show up. The first item in a rule is the rule action. The rule action tells Snort what to do when it finds a packet that matches the rule criteria. There are 5 available default actions in Snort, alert, log, pass, activate, and dynamic.
1. alert - generate an alert using the selected alert method, and then log the packet
3. pass - ignore the packet
4. activate - alert and then turn on another dynamic rule
5. dynamic - remain idle until activated by an activate rule , then act as a log rule
You can also define your own rule types and associate one or more output plugins with them. You can then use the rule types as actions in Snort rules.
This example will create a type that will log to just tcpdump:
ruletype suspicious {
type log output
log_tcpdump: suspicious.log }
This example will create a rule type that will log to syslog and a MySQL database:
ruletype redalert {
type alert output
alert_syslog: LOG_AUTH LOG_ALERT
output database: log, mysql, user=snort dbname=snort host=localhost }
2.2.2
Protocols
The next field in a rule is the protocol. There are four Protocols that Snort currently analyzes for suspicious behavior – tcp, udp, icmp, and ip. In the future there may be more, such as ARP, IGRP, GRE, OSPF, RIP, IPX, etc.
2.2.3
IP Addresses
The next portion of the rule header deals with the IP address and port information for a given rule. The keyword "any" may be used to define any address. Snort does not have a mechanism to provide host name lookup for the IP address fields in the rules file. The addresses are formed by a straight numeric IP address and a CIDR[4] block. The CIDR block indicates the netmask that should be applied to the rule’s address and any incoming packets that are tested against the rule. A CIDR block mask of /24 indicates a Class C network, /16 a Class B network, and /32 indicates a specific machine address. For example, the address/CIDR combination 192.168.1.0/24 would signify the block of addresses from 192.168.1.1 to 192.168.1.255. Any rule that used this designation for, say, the destination address would match on any address in that range. The CIDR designations give us a nice short-hand way to designate large address spaces with just a few characters.
In Figure 2.1, the source IP address was set to match for any computer talking, and the destination address was set to match on the 192.168.1.0 Class C network.
There is an operator that can be applied to IP addresses, the negation operator. This operator tells Snort to match any IP address except the one indicated by the listed IP address. The negation operator is indicated with a "!". For example, an easy modification to the initial example is to make it alert on any traffic that originates outside of the local net with the negation operator as shown in Figure 2.4.
This rule’s IP addresses indicate "any tcp packet with a source IP address not originating from the internal network and a destination address on the internal network".
alert tcp !192.168.1.0/24 any -> 192.168.1.0/24 111 \
(content: "|00 01 86 a5|"; msg: "external mountd access";)
Figure 2.4: Example IP Address Negation Rule
alert tcp ![192.168.1.0/24,10.1.1.0/24] any -> \
[192.168.1.0/24,10.1.1.0/24] 111 (content: "|00 01 86 a5|"; \ msg: "external mountd access";)
Figure 2.5: IP Address Lists
2.2.4
Port Numbers
Port numbers may be specified in a number of ways, including "any" ports, static port definitions, ranges, and by negation. "Any" ports are a wildcard value, meaning literally any port. Static ports are indicated by a single port number, such as 111 for portmapper, 23 for telnet, or 80 for http, etc. Port ranges are indicated with the range operator ":". The range operator may be applied in a number of ways to take on different meanings, such as in Figure 2.6.
log udp any any -> 192.168.1.0/24 1:1024 log udp
traffic coming from any port and destination ports ranging from 1 to 1024
log tcp any any -> 192.168.1.0/24 :6000
log tcp traffic from any port going to ports less than or equal to 6000
log tcp any :1024 -> 192.168.1.0/24 500:
log tcp traffic from privileged ports less than or equal to 1024 going to ports greater than or equal to 500
Figure 2.6: Port Range Examples
Port negation is indicated by using the negation operator "!". The negation operator may be applied against any of the other rule types (except any, which would translate to none, how Zen...). For example, if for some twisted reason you wanted to log everything except the X Windows ports, you could do something like the rule in Figure 2.7.
log tcp any any -> 192.168.1.0/24 !6000:6010
Figure 2.7: Example of Port Negation
The Direction Operator
log !192.168.1.0/24 any <> 192.168.1.0/24 23
Figure 2.8: Snort rules using the Bidirectional Operator
2.2.5
Activate/Dynamic Rules
Activate/dynamic rule pairs give Snort a powerful capability. You can now have one rule activate another when it’s action is performed for a set number of packets. This is very useful if you want to set Snort up to perform follow on recording when a specific rule "goes off". Activate rules act just like alert rules, except they have a *required* option field: "activates". Dynamic rules act just like log rules, but they have a different option field: "activated_by". Dynamic rules have a second required field as well, "count". When the "activate" rule goes off, it turns on the dynamic rule it is linked to (indicated by the activates/activated_by option numbers) for "count" number of packets (50 in this case).
Put ’em together and they look like Figure 2.9.
activate tcp !$HOME_NET any -> $HOME_NET 143 (flags: PA; \ content: "|E8C0FFFFFF|\bin|; activates: 1; \
msg: "IMAP buffer overflow!";)
dynamic tcp !$HOME_NET any -> $HOME_NET 143 (activated_by: 1; count: 50;)
Figure 2.9: Activate/Dynamic Rule Example
These rules tell Snort to alert when it detects an IMAP buffer overflow and collect the next 50 packets headed for port 143 coming from outside $HOME_NET headed to $HOME_NET. If the buffer overflow happened and was successful, there’s a very good possibility that useful data will be contained within the next 50 (or whatever) packets going to that same service port on the network, so there’s value in collecting those packets for later analysis.
2.3
Rule Options
Rule options form the heart of Snort’s intrusion detection engine, combining ease of use with power and flexibility. All Snort rule options are separated from each other using the semicolon ";" character. Rule option keywords are separated from their arguments with a colon ":" character.
Available Keywords
msg prints a message in alerts and packet logs
logto log the packet to a user specified filename instead of the standard output file
ttl test the IP header’s TTL field value
tos test the IP header’s TOS field value
id test the IP header’s fragment ID field for a specific value
ipoption watch the IP option fields for specific codes
fragbits test the fragmentation bits of the IP header
flags test the TCP flags for certain values
seq test the TCP sequence number field for a specific value
ack test the TCP acknowledgement field for a specific value
itype test the ICMP type field against a specific value
icode test the ICMP code field against a specific value
icmp_id test the ICMP ECHO ID field against a specific value
icmp_seq test the ICMP ECHO sequence number against a specific value
content search for a pattern in the packet’s payload
content-list search for a set of patterns in the packet’s payload
offset modifier for the content option, sets the offset to begin attempting a pattern match
depth modifier for the content option, sets the maximum search depth for a pattern match attempt
nocase match the preceding content string with case insensitivity
session dumps the application layer information for a given session
rpc watch RPC services for specific application/procedure calls
resp active response (knock down connections, etc)
react active response (block web sites)
reference external attack reference ids
sid Snort rule id
rev rule revision number
classtype rule classification identifier
priority rule severity identifier
uricontent search for a pattern in the URI portion of a packet
tag advanced logging actions for rules
ip_proto IP header’s protocol value
sameip determines if source ip equals the destination ip
stateless valid regardless of stream state
regex wildcard pattern matching
2.3.1
Msg
Format
msg: "<message text>";
2.3.2
Logto
The logto option tells Snort to log all packets that trigger this rule to a special output log file. This is especially handy for combining data from things like NMAP activity, HTTP CGI scans, etc. It should be noted that this option does not work when Snort is in binary logging mode.
Format
logto: "<filename>";
2.3.3
TTL
This rule option is used to set a specific time-to-live value to test against. The test it performs is only successful on an exact match. This option keyword was intended for use in the detection of traceroute attempts.
Format
ttl: "<number>";
2.3.4
TOS
The "tos" keyword allows you to check the IP header TOS field for a specific value. The test it performs is only successful on an exact match.
Format
tos: "<number>";
2.3.5
ID
This option keyword is used to test for an exact match in the IP header fragment ID field. Some hacking tools (and other programs) set this field specifically for various purposes, for example the value 31337 is very popular with some hackers. This can be turned against them by putting a simple rule in place to test for this and some other "hacker numbers".
Format
id: "<number>";
2.3.6
Ipoption
If IP options are present in a packet, this option will search for a specific option in use, such as source routing. Valid arguments to this option are:
rr - Record route
nop - No op
ts - Time Stamp
sec - IP security option
lsrr - Loose source routing
ssrr - Strict source routing
satid - Stream identifier
The most frequently watched for IP options are strict and loose source routing which aren’t used in any widespread internet applications. Only a single option may be specified per rule.
Format:
ipopts: <option>;
2.3.7
Fragbits
This rule inspects the fragment and reserved bits in the IP header. There are three bits that can be checked, the Reserved Bit (RB), More Fragments (MF) bit, and the Don’t Fragment (DF) bit. These bits can be checked in a variety of combinations. Use the following values to indicate specific bits: * R - Reserved Bit * D - DF bit * M - MF bit
You can also use modifiers to indicate logical match criteria for the specified bits: * + - ALL flag, match on specified bits plus any others * * - ANY flag, match if any of the specified bits are set * ! - NOT flag, match if the specified bits are not set
Format
fragbits: <bit values>;
alert tcp !$HOME_NET any -> $HOME_NET any (fragbits: R+; \ msg: "Reserved IP bit set!";)
Figure 2.10: Example of fragbits detection usage
2.3.8
Dsize
The dsize option is used to test the packet payload size. It may be set to any value, plus use the greater than/less than signs to indicate ranges and limits. For example, if you know that a certain service has a buffer of a certain size, you can set this option to watch for attempted buffer overflows. It has the added advantage of being a much faster way to test for a buffer overflow than a payload content check.
Format
dsize: [>|<] <number>;
2.3.9
Content
The content keyword is one of the more important features of Snort. It allows the user to set rules that search for specific content in the packet payload and trigger response based on that data. Whenever a content option pattern match is performed, the Boyer-Moore pattern match function is called and the (rather computationally expensive) test is performed against the packet contents. If data exactly matching the argument data string is contained anywhere within the packet’s payload, the test is successful and the remainder of the rule option tests are performed. Be aware that this test is case sensitive.
The option data for the content keyword is somewhat complex; it can contain mixed text and binary data. The binary data is generally enclosed within the pipe ("|") character and represented as bytecode. Bytecode represents binary data as hexadecimal numbers and is a good shorthand method for describing complex binary data. Figure 2.11 contains an example of mixed text and binary data in a Snort rule.
Note that multiple content rules can be specified in one rule. This allows rules to be tailored for less false positives. Also note that the following characters must be escaped inside a content rule:
"
:
|
If the rule is preceeded by a!, the alert will be triggered on packets that do not contain this content. This is useful when writing rules that want to alert on packets that do not match a certain pattern
Format
content: [!] "<content string>";
alert tcp any any -> 192.168.1.0/24 143 (content: "|90C8 C0FF FFFF|/bin/sh"; \ msg: "IMAP buffer overflow!";)
Figure 2.11: Mixed Binary Bytecode and Text in a Content Rule Option
alert tcp any any -> 192.168.1.0/24 21 (content: !"GET"; depth: 3; nocase; \ dsize: >100; msg: "Long Non-Get FTP command!";)
Figure 2.12: Negatation Example
2.3.10
Offset
Format
offset: <number>;
2.3.11
Depth
Depth is another content rule option modifier. This sets the maximum search depth for the content pattern match function to search from the beginning of its search region. It is useful for limiting the pattern match function from performing inefficient searches once the possible search region for a given set of content has been exceeded. (Which is to say, if you’re searching for "cgi-bin/phf" in a web-bound packet, you probably don’t need to waste time searching the payload beyond the first 20 bytes!) See Figure 2.13 for an example of a combined content, offset, and depth search rule.
Format
depth: <number>;
alert tcp any any -> 192.168.1.0/24 80 (content: "cgi-bin/phf"; \ offset: 3; depth: 22; msg: "CGI-PHF access";)
Figure 2.13: Combined Content, Offset and Depth Rule
2.3.12
Nocase
The nocase option is used to deactivate case sensitivity in a "content" rule. It is specified alone within a rule and any ASCII characters that are compared to the packet payload are treated as though they are either upper of lower case.
Format
nocase;
alert tcp any any -> 192.168.1.0/24 21 (content: "USER root"; \ nocase; msg: "FTP root user access attempt";)
Figure 2.14: Content rule with nocase modifier
2.3.13
Flags
This rule tests the TCP flags for a match. There are actually 9 flags variables available in Snort:
F FIN (LSB in TCP Flags byte)
S SYN
R RST
A ACK
U URG
2 Reserved bit 2
1 Reserved bit 1 (MSB in TCP Flags byte)
0 No TCP Flags Set
There are also logical operators that can be used to specify matching criteria for the indicated flags:
+ ALL flag, match on all specified flags plus any others
* ANY flag, match on any of the specified flags
! NOT flag, match if the specified flags aren’t set in the packet
The reserved bits can be used to detect unusual behavior, such as IP stack fingerprinting attempts or other suspicious activity. Figure 13 shows a SYN-FIN scan detection rule.
Format
flags: <flag values>;
alert any any -> 192.168.1.0/24 any (flags: SF; msg: "Possible SYN FIN scan";)
Figure 2.15: Sample TCP Flags Specification
2.3.14
Seq
This rule option refers to the TCP sequence number. Essentially, it detects if the packet has a static sequence number set, and is therefore pretty much unused. It was included for the sake of completeness.
Format
seq: <number>;
2.3.15
Ack
The ack rule option keyword refers to the TCP header’s acknowledge field. This rule has one practical purpose so far: detecting NMAP[1, 3] TCP pings. A NMAP TCP ping sets this field to zero and sends a packet with the TCP ACK flag set to determine if a network host is active. The rule to detect this activity is shown in Figure 2.16.
Format
alert any any -> 192.168.1.0/24 any (flags: A; ack: 0; msg: "NMAP TCP ping";)
Figure 2.16: TCP ACK Field Usage
2.3.16
Itype
This rule tests the value of the ICMP type field. It is set using the numeric value of this field. For a list of the available values, look in the decode.h file included with Snort or in any ICMP reference. It should be noted that the values can be set out of range to detect invalid ICMP type values that are sometimes used in denial of service and flooding attacks.
Format
itype: <number>;
2.3.17
Icode
The icode rule option keyword is pretty much identical to the itype rule, just set a numeric value in here and Snort will detect any traffic using that ICMP code value. Out of range values can also be set to detect suspicious traffic.
Format
icode: <number>;
2.3.18
Session
The session keyword is brand new as of version 1.3.1.1 and is used to extract the user data from TCP sessions. It is extremely useful for seeing what users are typing in telnet, rlogin, ftp, or even web sessions. There are two available argument keywords for the session rule option, printable or all. The printable keyword only prints out data that the user would normally see or be able to type. The all keyword substitutes non-printable characters with their hexadecimal equivalents. This function can slow Snort down considerably, so it shouldn’t be used in heavy load situations, and is probably best suited for post-processing binary (tcpdump format) log files. See Figure 2.17 for a good example of a telnet session logging rule.
Format
session: [printable|all];
log tcp any any <> 192.168.1.0/24 23 (session: printable;)
Figure 2.17: Logging Printable Telnet Session Data
2.3.19
Icmp_id
Format
icmp_id: <number>;
2.3.20
Icmp_seq
The icmp_id option examines an ICMP ECHO packet’s ICMP sequence field for a specific value. This is useful because some [86]covert channel programs use static ICMP fields when they communicate. This particular plugin was developed to enable the stacheldraht detection rules written by [87]Max Vision, but it is certainly useful for detection of a number of potential attacks. (And yes, I know the info for this field is almost identical to the icmp_id description, it’s practically the same damn thing!)
Format
icmp_seq: <number>;
2.3.21
Rpc
This option looks at RPC requests and automatically decodes the application, procedure, and program version, indi-cating success when all three variables are matched. The format of the option call is "application, procedure, version". Wildcards are valid for both the procedure and version numbers and are indicated with a "*".
Format:
rpc: <number, [number|*], [number|*]>;
alert tcp any any -> 192.168.1.0/24 111 (rpc: 100000,*,3;\ msg:"RPC getport (TCP)";)
alert udp any any -> 192.168.1.0/24 111 (rpc: 100000,*,3;\ msg:"RPC getport (UDP)";)
alert udp any any -> 192.168.1.0/24 111 (rpc: 100083,*,*;\ msg:"RPC ttdb";)
alert udp any any -> 192.168.1.0/24 111 (rpc: 100232,10,*;\ msg:"RPC sadmin";)
Figure 2.18: Various RPC Call Alerts
2.3.22
Resp
The resp keyword implements flexible response (FlexResp) to traffic that matches a Snort rule. The FlexResp code allows Snort to actively close offending connections. The following arguments are valid for this module:
icmp_all - send all above ICMP packets to the sender
These options can be combined to send multiple responses to the target host. Multiple arguments are separated by a comma.
Format
resp: <resp_modifier[, resp_modifier...]>;
alert tcp any any -> 192.168.1.0/24 1524 (flags: S; \ resp: rst_all; msg: "Root shell backdoor attempt";)
alert udp any any -> 192.168.1.0/24 31 (resp: icmp_port,icmp_host; \ msg: "Hacker’s Paradise access attempt";)
Figure 2.19: FlexResp Usage Examples
2.3.23
Content-list
The content-list keyword allows multiple content strings to be specified in the place of a single content option. The patterns to be searched for must each be on a single line of content-list file as shown in Figure 2.20, but they are treated otherwise identically to content strings specified as an argument to a standard content directive. This option is the basis for the react keyword.
Using the ! operator, the alert will be triggered on events not matching this rule. See Section 2.3.9 for more explanation.
# adult sites porn
adults hard core
www.pornsite.com # ...
Figure 2.20: Content-list "adults" file example
Format
content-list: [!] "<file_name>";
2.3.24
React
The react keyword based on flexible response (Flex Resp) implements flexible reaction to traffic that matches a Snort rule. The basic reaction is blocking interesting sites users want to access: New York Times, slashdot, or something really important - napster and porn sites. The Flex Resp code allows Snort to actively close offending connections and/or send a visible notice to the browser (warn modifier available soon). The notice may include your own comment. The following arguments (basic modifiers) are valid for this option:
warn - send the visible, warning notice (will be available soon)
The basic argument may be combined with the following arguments (additional modifiers):
msg - include the msg option text into the blocking visible notice
proxy: <port_nr> - use the proxy port to send the visible notice (will be available soon)
Multiple additional arguments are separated by a comma. The react keyword should be placed as the last one in the option list.
Format
react: <react_basic_modifier[, react_additional_modifier...]>;
alert tcp any any <> 192.168.1.0/24 80 (content-list: "adults"; \ msg: "Not for children!"; react: block, msg;)
alert tcp any any <> 192.168.1.0/24 any (content-list: "adults"; \ msg: "Adults list access attempt"; react: block;)
Figure 2.21: React Usage Examples
2.3.25
Reference
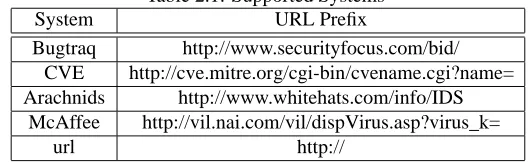
[image:23.612.172.438.423.504.2]The reference keyword allows rules to include references to external attack identification systems. The plugin currently supports several specific systems as well as unique urls. This plugin is to be used by output plugins to provide a link to additional information about the alert produced.
Table 2.1: Supported Systems System URL Prefix
Bugtraq http://www.securityfocus.com/bid/ CVE http://cve.mitre.org/cgi-bin/cvename.cgi?name= Arachnids http://www.whitehats.com/info/IDS
McAffee http://vil.nai.com/vil/dispVirus.asp?virus_k=
url http://
Format
reference:<id system>,<id>; [reference: <id system>,<id>;]
2.3.26
Sid
The sid keyword is used to identify unique Snort rules. This information allows output plugins to identify rules easily. See Figure 2.23for a usage example. Sid ranges are assigned as follows:
alert TCP any any -> any 7070 (msg: "IDS411/dos-realaudio"; flags: \ AP; content: "|fff4 fffd 06|"; reference: arachNIDS,IDS411;)
alert TCP any any -> any 21 (msg: "IDS287/ftp-wuftp260-venglin-linux"; \ flags: AP; content: "|31c031db 31c9b046 cd80 31c031db|"; \
reference: arachNIDS,IDS287; reference: bugtraq,1387; \ reference: cve,CAN-2000-1574; )
Figure 2.22: Reference Usage Examples
100-1,000,000 Rules included with the Snort distribution
>1,000,000 Used for local rules
The file sid-msg.map contains a mapping of msg tags to Snort rule ids. This will be used by post-processing output to map an id to an alert msg.
Format
sid: <snort rules id>;
alert tcp $EXTERNAL_NET any -> $HTTP_SERVERS 80 \
(msg:"WEB-IIS File permission canonicalization"; \ uricontent:"/scripts/..%c1%9c../"; \
flags: A+; nocase; sid:983; rev:1;)
Figure 2.23: Sid Usage Example
2.3.27
Rev
The rev keyword is used to identify rule revisions. Revisions, along with snort rule ids, allow signatures and descrip-tions to be refined and replaced with updated information. For a usage example, see Figure 2.23.
Format
rev: <revision integer>
2.3.28
Classtype
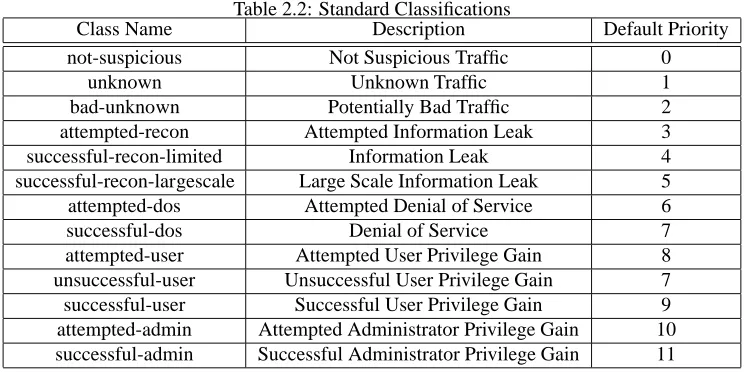
The classtype keyword categorizes alerts to be attack classes. By using the and prioritized. The user can specify what priority each type of rule classification has. Rules that have a classification will have a default priority set.
Format
classtype: <class name>;
Rule classifications are defined in theclassification.configfile. The config file uses the following syntax:
config classification: <class name>,<class description>,<default priority>
Table 2.2: Standard Classifications
Class Name Description Default Priority not-suspicious Not Suspicious Traffic 0
unknown Unknown Traffic 1
bad-unknown Potentially Bad Traffic 2 attempted-recon Attempted Information Leak 3 successful-recon-limited Information Leak 4 successful-recon-largescale Large Scale Information Leak 5 attempted-dos Attempted Denial of Service 6 successful-dos Denial of Service 7 attempted-user Attempted User Privilege Gain 8 unsuccessful-user Unsuccessful User Privilege Gain 7 successful-user Successful User Privilege Gain 9 attempted-admin Attempted Administrator Privilege Gain 10 successful-admin Successful Administrator Privilege Gain 11
alert TCP any any -> any 80 (msg: "EXPLOIT ntpdx overflow"; \ dsize: > 128; classtype:attempted-admin; priority:10 ); alert TCP any any -> any 25 (msg:"SMTP expn root"; flags:A+; \
content:"expn root"; nocase; classtype:attempted-recon;)
Figure 2.24: Example Classtype Rules
2.3.29
Priority
The priority tag assigns a severity level to rules. A classtype rule assigns a default priority that may be overridden with a priority rule. For an example in conjunction with a classification rule refer to Figure 2.24. For use by itself, see Figure 2.25
Format
priority: <priority integer>;
alert TCP any any -> any 80 (msg: "WEB-MISC phf attempt"; flags:A+; \ content: "/cgi-bin/bash"; priority:10;)
Figure 2.25: Example Priority Rule
2.3.30
Uricontent
The uricontent rule allows searches to be matched against only theURIportion of a request. This allows rules to search only the request portion of an attack without false alerts from server data files. For a description of the parameters to this function, see the content rule options in Section 2.3.9.
Format
2.3.31
Tag
The tag keyword allow rules to log more than just the single packet that triggered the rule. Once a rule is triggered, additional traffic involving the source host is “tagged”. Tagged traffic is logged to allow analysis of response codes and post-attack traffic. See Figure 2.26 for usage examples.
Format
tag: <type>, <count>, <metric>, [direction]
type
session log packets in the session that set off the rule
host log packets from the host that caused the tag to activate (uses [direction] modifier)
count Count is specified as a number of units. Units are specified in the <metric> field.
metric
packets tag the host/session for <count> packets seconds tag the host/session for <count> seconds
direction Only useful in the context of a "host" tag. Use "src" and "dst" to tell the tagger which IP address from the packet causing the alert to tag.
alert tcp !$HOME_NET any -> $HOME_NET 143 (flags: A+; \
content: "|e8 c0ff ffff|/bin/sh"; tag: host, 300, packets, src; \ msg: "IMAP Buffer overflow, tagging!";)
alert tcp !$HOME_NET any -> $HOME_NET 23 (flags: S; \
tag: session, 10, seconds; msg: "incoming telnet session";)
Figure 2.26: Tag Keyword Examples
2.3.32
IP proto
The ip_proto keyword allows checks against the IP protocol header. For a list of protocols that may be specified by name, see /etc/protocols. Note the use of the ip protocol specification in the rule.
Format
ip_proto: [!] <name or number>;
alert ip !$HOME_NET any -> $HOME_NET any (msg: "IGMP traffic detected"; \ ip_proto: igmp; )
2.3.33
Same IP
The sameip keyword allows rules to check if the source ip is equal to the destination ip.
Format
sameip;
alert ip $HOME_NET any -> $HOME_NET any (msg: "SRC IP == DST IP"; sameip;)
Figure 2.28: Same IP Usage Example
2.3.34
Stateless
Used in conjunction with the Stream4 preprocessor, the stateless keyword allows rules to match regardless of the state of the connection the packet is associated with.
Format
stateless;
alert tcp !$HOME_NET 0 -> $HOME_NET 0 (msg: "Port 0 TCP traffic"; stateless;)
Figure 2.29: Stateless Usage Example
2.3.35
Regex
The regex option allows content options to specify wildcard options. The wildcards behave more like shell globbing than Perl-type regular expressions. A ’*’ in the content string, along with the regex modifier is interpreted to mean "any character, any number of times." Additionally, the ’?’ character means "any single character".
At the time of writing (Snort 1.8.1), it could not be used in conjunction with the nocase option. This is a bug and is marked to be fixed.
Format
regex;
alert tcp any any -> $HOME_NET any \ (flags: A+;
content: "|c08f e4ff ffff|/bin/*sh"; regex;\ msg: "buffer overflow!"; sid: 2341239; rev: 1;)
2.4
Preprocessors
Preprocessors were introduced in version 1.5 of Snort. They allow the functionality of Snort to be extended by allowing users and programmers to drop modular "plugins" into Snort fairly easily. Preprocessor code is run before the detection engine is called, but after the packet has been decoded. The packet can be modified or analyzed in an "out of band" manner through this mechanism.
Preprocessors are loaded and configured using the preprocessor keyword. The format of the preprocessor directive in the Snort rules file is:
preprocessor <name>: <options>
preprocessor minfrag: 128
Figure 2.31: Preprocessor Directive Format Example
2.4.1
Minfrag
This documentation is for historical purposes. As of Snort 1.8, the use of minfrag is deprecated in favor of Stream4. The minfrag preprocessor examines fragmented packets for a specified size threshold. When packets are frag-mented, it is generally caused by routers between the source and destination. Generally speaking, there is no piece of commercial network equipment that fragments packets in sizes smaller than 512 bytes, so we can use this fact to enable traffic to be monitored for tiny fragments that are generally indicative of someone trying to hide their traffic behind fragmentation.
Format
minfrag: <threshold number>
2.4.2
HTTP Decode
HTTP Decode is used to process HTTP URI strings and convert their data to non-obfuscated ASCII strings. This is done to defeat evasive web URL scanners and hostile attackers that could otherwise elude the content analysis strings used to examine HTTP traffic for suspicious activity. The preprocessor module takes HTTP port numbers (separated by spaces) to be normalized as its arguments (typically 80 and 8080).
Alerts on unicode traffic and null bytes in CGI’s can be disabled via the -unicode and -cginull options.
Format
http_decode: <port list> [ -unicode ] [ -cginull ]
preprocessor http_decode: 80 8080 -unicode -cginull
2.4.3
Portscan Detector
The Snort Portscan Preprocessor is developed by Patrick Mullen and more information is available at his web page[2].
What the Snort Portscan Preprocessor does
Log the start and end of portscans from a single source IP to the standard logging facility.
If a log file is specified, logs the destination IPs and ports scanned as well as the type of scan.
A portscan is defined as TCP connection attempts to more than P ports in T seconds or UDP packets sent to more than P ports in T seconds. Ports can be spread across any number of destination IP addresses, and may all be the same port if spread across multiple IPs. This version does single->single and single->many portscans. The next full release will do distributed portscans (multiple->single or multiple->multiple). A portscan is also defined as a single "stealth scan" packet, such as NULL, FIN, SYNFIN, XMAS, etc. This means that from scan-lib in the standard distribution of snort you should comment out the section for stealth scan packets. The benefit is with the portscan module these alerts would only show once per scan, rather than once for each packet. If you use the external logging feature you can look at the technique and type in the log file.
The arguments to this module are:
network to monitor The network/CIDR block to monitor for portscans
number of ports number of ports accessed in the detection period
detection period number of seconds to count that the port access threshold is considered for
logdir/filename the directory/filename to place alerts in. Alerts are also written to the standard alert file
Format
portscan: <monitor network> <number of ports> <detection period> <file path>
preprocessor portscan: 192.168.1.0/24 5 7 /var/log/portscan.log
Figure 2.33: Portscan Preprocessor Configuration Example
2.4.4
Portscan Ignorehosts
Another module from Patrick Mullen that modifies the portscan detection system’s operation. If you have servers which tend to trip off the portscan detector (such as NTP, NFS, and DNS servers), you can tell portscan to ignore TCP SYN and UDP portscans from certain hosts. The arguments to this module are a list of IPs/CIDR blocks to be ignored.
Format
preprocessor portscan-ignorehosts: 192.168.1.5/32 192.168.3.0/24
Figure 2.34: Portscan Ignorehosts Module Configuration Example
2.4.5
Defrag
The defrag module (from Dragos Ruiu) allows Snort to perform full blown IP defragmentation, making it more difficult for hackers to simply circumvent the detection capabilities of the system. It is very simple in its usage, merely requiring the addition of a preprocessor directive to the configuration file with no arguments. This module generall supercedes the functionality of the minfrag module (i.e. you don’t need to use minfrag if you’re using defrag).
Format
defrag
preprocessor defrag
Figure 2.35: Defrag preprocessor configuration example
2.4.6
Frag2
Frag2, introduced in Snort 1.8, is a new IP defragmentation preprocessor. Frag2 is designed to replace the defrag preprocessor. This defragmenter is designed to memory efficient and use the same memory management routines that are in use in other parts of Snort.
Frag2 has configurable memory usage and fragment timeout options. Given no arguments, frag2 uses the default memory limit of 4194304 bytes (4MB) and a timeout period of 60 seconds.
Format
preprocessor frag2: [memcap <xxx>], [timeout <xx>] preprocessor frag2: 16777216, 30
Figure 2.36: Frag2 preprocessor configuration
2.4.7
Stream
This module is documented here only for historical reasons. New versions of snort should use Stream4.
The stream plugin provides TCP stream reassembly functionality to Snort. TCP streams on the configured ports with small segments will be reassembled into a stream of data that Snort can properly evaluate for suspicious activity. This plugin takes a number of arguments:
port - a server port to monitor. we don’t want to monitor all tcp streams (do we?)
maxbytes - maximum bytes in our reconstructed packets
Format
stream: timeout <timeout>, ports <ports>, maxbytes <maxbytes> preprocessor stream: timeout 5, ports 21 23 80 8080, maxbytes 16384
Figure 2.37: TCP stream reassembler configuration example
2.4.8
Stream4
The stream4 module provides TCP stream reassembly and stateful analysis capabilities to Snort. Robust stream re-assembly capabilities allow Snort to ignore ”stateless” attacks such as stick and snot produce. Stream4 also gives large scale users the ability to track more than 256 simultaneous TCP streams. Stream4 should be able to scale to handle 64,000 simultaneous TCP connections.
Stream4 contains two configurable modules, the stream4 preprocessor and the associated stream4 reassemble plugin. Their associated options listed below.
Stream4 Format
preprocessor stream4: [noinspect], [keepstats], [timeout <seconds>], \ [memcap <bytes>], [detect_scans], [detect state_problems]
noinspect disable stateful inspection
keepstats record session summary information in <logdir>/session.log
timeout <seconds> amount of time to keep an inactive stream in the state table, sessions that are flushed will automat-ically be picked up again if more activity is seen, default is 30 seconds
memcap <bytes> number of bytes to set the memory cap at, if this limit is exceeded stream4 will aggressively prune inactive sessions, default is 8MB
detect_scans turns on alerts for portscan events
detect_state_problems turns on alerts for stream events of note, such as evasive RST packets, data on the SYN packet, and out of window sequence numbers
Stream4_Reassemble Format
preprocessor stream4_reassemble: [clientonly], [serveronly], [noalerts], [ports <portlist>]
clientonly provide reassembly for the client side of a connection only
serveronly provide reassembly for the server side of a connection only
noalerts don’t alert on events that may be insertion or evasion attacks
Notes
Just setting the stream4 and stream4_reassemble directives without arguments in the snort.conf file will set them up in their default configurations shown in Table 2.3 and Table 2.4.
Stream4 introduces a new command line switch: "-z". The -z switch can take one of two arguments: "est" and "all". The "all" argument is the default if you don’t specify anything and tells Snort to alert normally. If the -z switch is specified with the "est" argument, Snort will only alert (for TCP traffic) on streams that have been established via a three way handshake or streams where cooperative bidirectional activity has been observed (i.e. where some traffic went one way and something other than a RST or FIN was seen going back to the originator). With "-z est" turned on, Snort completely ignores TCP-based stick/snot "attacks".
This is done as a mechanism to let people have control over a subsystem in Snort that can eat a lot of CPU cycles if you’re not careful. For example, in many networks today, packets with bad IP checksums never make it past the router or switch, and so IP checksum verification is a waste of time for Snort on these networks. Allowing people to turn that subsystem off (or tune it) lets them get better performance without having to make code tweaks.
Stream4 also adds another command line switch, "-k". The -k switch allows you to modify the checksum tests that Snort performs in the decoder stage. This mechanism allows users to control the CPU usage of a potential bottleneck in Snort. In many modern networks, packets with bad IP checksums never make it past the router or switch. This means that IP checksum verification is a waste of time for Snort on these networks. Allowing people to disable specific subsystems allows better performance without having to modify Snort’s source code.
The -k checksum option takes the following command line arguments:
noip turn off IP checksum verification
notcp turn off TCP checksum verification
noudp turn off UDP checksums
noicmp turn off ICMP checksums
none turn off all checksums
Table 2.3: Stream4 defaults Option Default Session Timeout 30 seconds Session Memory Cap 8388608 bytes
Stateful Inspection ACTIVE Stream Stats INACTIVE State Problem Alerts INACTIVE Portscan Alerts INACTIVE
Table 2.4: Stream4_reassemble Defaults Option Default Reassemble Client ACTIVE Reassemble Server INACTIVE
2.4.9
Spade: the Statistical Packet Anomaly Detection Engine
In the interest of timeliness and sanity, I’d suggest checking out the README.Spade in the Snort distribution as well as checking out the Silicon Defense website[7, 8].
This module allows Snort to be able to perform statistical anomaly detection on your network, and it’s essentially an entire new detection engine for Snort. If you’re interested in this kind of capability, you should definitely read the documentation in the Snort distribution as well as that on the Silicon Defense website.
2.5
Output Modules
Output modules are new as of version 1.6. They allow Snort to be much more flexible in the formatting and presentation of output to its users. The output modules are run when the alert or logging subsystems of Snort are called, after the preprocessors and detection engine. The format of the directives in the rules file is very similar to that of the preprocessors.
Multiple output plugins may be specified in the Snort configuration file. When multiple plugins of the same type (log, alert) are specified, they are "stacked" and called in sequence when an event occurs. As with the standard logging and alerting systems, output plugins send their data to /var/log/snort by default or to a user directed directory (using the "-l" command line switch).
Output modules are loaded at runtime by specifying the output keyword in the rules file:
output <name>: <options>
output alert_syslog: LOG_AUTH LOG_ALERT
Figure 2.38: Output Module Configuration Example
2.5.1
Alert_syslog
This module sends alerts to the syslog facility (much like the -s command line switch). This module also allows the user to specify the logging facility and priority within the Snort rules file, giving users greater flexibility in logging alerts.
Available keywords
Options
LOG_CONS
LOG_NDELAY
LOG_PERROR
Facilities
LOG_AUTH
LOG_AUTHPRIV
LOG_DAEMON
LOG_LOCAL0
LOG_LOCAL1
LOG_LOCAL2
LOG_LOCAL3
LOG_LOCAL4
LOG_LOCAL5
LOG_LOCAL6
LOG_LOCAL7
LOG_USER
Priorities
LOG_EMERG
LOG_ALERT
LOG_CRIT
LOG_ERR
LOG_WARNING
LOG_NOTICE
LOG_INFO
LOG_DEBUG
Format
alert_syslog: <facility> <priority> <options>
2.5.2
Alert_fast
This will print Snort alerts in a quick one line format to a specified output file. It is a faster alerting method than full alerts because it doesn’t need to print all of the packet headers to the output file
Format
output alert_fast: alert.fast
Figure 2.39: Fast alert configuration
2.5.3
Alert_full
Print Snort alert messages with full packet headers. This alerting facility is generall pretty slow because it requires that the program do a whole lot of data parsing to format the data to be printed. The alerts will be written in the default logging directory (/var/log/snort) or in the logging directory specified at the command line.
Format
alert_full: <output filename>
output alert_full: alert.full
Figure 2.40: Full alert configuration
2.5.4
Alert_smb
This plugin sends WinPopup alert messages to the NETBIOS named machines indicated within the file specified as an argument to this output plugin. It should be noted that use of this plugin is not encouraged as it executes an external executable binary (smbclient) at the same privilege level as Snort, commonly root. The format of the workstation file is a list of the NETBIOS names of the hosts that wish to receive alerts, one per line in the file.
Format
alert_smb: <alert workstation filename>
output alert_smb: workstation.list
Figure 2.41: SMB alert configuration
2.5.5
Alert_unixsock
Sets up a UNIX domain socket and sends alert reports to it. External programs/processes can listen in on this socket and receive Snort alert and packet data in real time. This is currently an experimental interface.
Format
output alert_unixsock
Figure 2.42: UnixSock alert configuration
2.5.6
Log_tcpdump
The log_tcpdump module logs packets to a tcpdump-formatted file. This is useful for performing post process analysis on collected traffic with the vast number of tools that are avialable for examining tcpdump formatted files. This module only takes a single argument, the name of the output file.
Format
log_tcpdump: <output filename>
output log_tcpdump: snort.log
Figure 2.43: Tcpdump Output Module Configuration Example
2.5.7
XML
The XML plug-in enables snort to log in SNML - simple network markup language aka (snort markup language) to a file or over a network. The DTD is available in the contrib directory of the snort distribution and at: http: //www.cert.org/DTD/snml-1.0.dtd. You can use this plug-in with on one or more snort sensors to log to a central database and create highly configurable intrusion detection infrastructures within your network. The plugin will also enable you to automatically report alerts to the CERT Coordination Center, your response team, or your managed IDS provider.
This plugin was developed by Jed Pickel and Roman Danyliw at the CERT Coordination Center as part of the AIRCERT project. Be aware that the SNML DTD is in its early phases of development and is likely to be modified as it undergoes public scrutiny. Seehttp://www.cert.org/DTD/snml-1.0.dtdfor the most up to date information and documentation about this plugin.
Format
output xml: [log | alert], [parameter list] Arguments
[log | alert] specify log or alert to connect the xml plugin to the log or alert facility
[parameter list] The parameter list consists of key value pairs. The proper format is a list of key=value pairs each separated a space.
file when this is the only parameter it will log to a file on the local machine. Otherwise, if http or https is employed (see protocol), this is the script which is to be executed on the remote host. protocol The possible values for this field are
https just like http but ssl encrypted and mutually authenticated. (required: a [file], [cert], [key] parameter)
tcp A simple tcp connection. You need to use some sort of listener (required: a [port] parameter)
iap - An implementation of the Intrusion Alert Protocol (This does not work yet) host remote host where the logs are to be sent port The port number to connect to (default ports
are)
http 80 https 443 tcp 9000 iap 9000
cert the client X.509 certificate to use with https (PEM formatted) key the client private key to use with https (PEM formatted) ca the CA certificate used to validate the https server’s certificate (PEM formatted) server the file containing a list of valid servers with which to communicate. It is used so that Snort canauthenticate the peer server. Each server is identified by a string formed by concatenating the subject of the server’s X.509 certificate.
This string can be created by:
% openssl x509 -subject -in <server certificate>
Typically only someone deploying the HTTPS will have to perform this task (since they have access to the server certificate). This entitity should publish this subject string for configu-ration inside each snort sensor. sanatize The argument is a a network/netmask combination for an IP range you wish to be sanitized. Any IP address within the range you specify will be represented as "xxx.xxx.xxx.xxx". Also, for sanitized alerts, no packet payload will be logged. You can use the sanitize parameter multiple times to represent multiple IP ranges. encoding Packet payload and option data is binary and there is not one standard way to rep-resent it as ASCII text. You can choose the binary encoding option that is best suited for your environment. Each has its own advantages and disadvantages:
hex (default) Represent binary data as a hex string. storage requirements - 2x the size of the binary searchability - very good
human readability - not readable unless you are a true geek, requires post processing base64 Represent binary data as a base64 string.
storage requirements - ~1.3x the size of the binary searchability - impossible without post processing human readability - not readable requires post processing
ascii Represent binary data as an ascii string. This is the only option where you will actually loose data. Non ascii data is represented as a ".". If you choose this option then data for ip and tcp options will still be represented as "hex" because it does not make any sense for that data to be ascii.
storage requirements - Slightly larger than the binary because some characters are escaped (&,<,>)
human readability - very good
detail How much detailed data do you want to store? The options are:
full: (default) log all details of a packet that caused an alert (including ip/tcp options and the payload)
fast: log only a minimum amount of data. You severely limit the potential of some analysis applications if you choose this option, but this is still the best choice for some applications. The following fields are logged:
timestamp, signature, source ip, destination ip, source port, destination port, tcp flags, protocol
Format:
xml: <output facility>
output xml: log, file=output output xml: log, protocol=https \ host=air.cert.org file=alert.snort cert=mycert.crt \ key=mykey.pem ca=ca.crt server=srv_list.lst
Figure 2.44: XML output plugin setup examples
2.5.8
Database
This module from Jed Pickel sends Snort data to a variety of SQL databases. More information on installing and configuring this module can be found on the [91]Incident.org web page. The arguments to this plugin are the name of the database to be logged to and a parameter list. Parameters are specified with the format parameter = argument. See Figure 2.45 for example usage.
Format
database: <log | alert>, <database type>, <parameter list>
The following parameters are available:
host Host to connect to. If a non-zero-length string is specified, TCP/IP communication is used. Without a host name, it will connect using a local Unix domain socket.
port Port number to connect to at the server host, or socket filename extension for Unix-domain connections.
dbname Database name user Database username for authentication
password Password used if the database demands password authentication
sensor_name Specify your own name for this snort sensor. If you do not specify a name one will be generated automatically encoding Because the packet payload and option data is binary, there is no one simple and portable way to store it in a database. BLOBS are not used because they are not portable across databases. So I leave the encoding option to you. You can choose from the following options. Each has its own advantages and disadvantages:
storage requirements - 2x the size of the binary searchability - very good
human readability - not readable unless you are a true geek, requires post processing base64 Represent binary data as a base64 string.
storage requirements - ~1.3x the size of the binary searchability - impossible without post processing human readability - not readable requires post processing
ascii Represent binary data as an ascii string. This is the only option where you will actually loose data. Non ascii data is represented as a ".". If you choose this option then data for ip and tcp options will still be represented as "hex" because it does not make any sense for that data to be ascii.
storage requirements - Slightly larger than the binary because some characters are escaped (&,<,>)
searchability - very good for searching for a text string impossible if you want to search for binary
human readability - very good
detail How much detailed data do you want to store? The options are:
full (default) log all details of a packet that caused an alert (including ip/tcp options and the payload)
fast log only a minimum amount of data. You severely limit the potential of some analysis ap-plications if you choose this option, but this is still the best choice for some apap-plications. The following fields are logged - (timestamp, signature, source ip, destination ip, source port, destination port, tcp flags, and protocol)
Furthermore, there is a logging method and database type that must be defined. There are two logging types available, log and alert. Setting the type to log attaches the database logging functionality to the log facility within the program. If you set the type to log, the plugin will be called on the log output chain. Setting the type to alert attaches the plugin to the alert output chain within the program.
There are four database types available in the current version of the plug