®
.
AT&T
MERLIN II
COMMUNICATIONS SYSTEM
Feature Module 2
Call Management System
Planning Guide
©1988 AT&T Issue 1
All Rights Reserved September, 1988
Printed in USA
NOTICE
The information in this document is subject to change without notice. AT&T assumes no responsibility for any errors that may appear in this document.
MERLIN is a registered trademark of AT&T.
Contents
Overview
1About This Guide 1
The Planning Forms 2
Other CMS Documents 2
Upgrade Information 3
Key Terms and Concepts
4Key Facts and Considerations
System Considerations
Supervisor’s Console and Agent Voice Terminals Line Assignments
Station Assignments
Line Group and Agent Split Considerations External Alerts Other Considerations 7 7 7 7 8 8 8 8
A Typical CMS Application
9CMS and Bon Voyage Travel 9
Bon Voyage Travel’s Other Call Traffic 10
CMS and Other Businesses 11
Planning Your MERLIN II System: Part One
MERLIN II System Planning Forms
Master Planning Form
Line Jacks
Line Assignments and the Voice Announcement Unit Station Jacks
System Configuration Form
System Size
Line Representation Attendant Stations Transfer Return Interval Line Type Line Pools 12 12 12 12 13 13 15 15 16 16 16 16 16
Planning Your Call Management System
18CMS Planning Forms 18
Line Button Planning Form 18
Line Groups Planning Form
Line Group (Letter/ID)
Button Number (1 through 32) Telephone Number
Line Type Priority
Agent Directory Planning Form Agent Splits Planning Form
Split (Number/ID)
Last Name, First Name, and ID Position
All-Ring
Transfer-to-Split
Shift Configuration Planning Form
Shift Configuration Number and Name Line Group, ID, and No. of Lines Main Split
Secondary Split
19 20 20 20 20 21
21
23 23 23 23 23 24
25 25 25 26 26
Planning Your MERLIN II System: Part Two
27Station Configuration Forms 27 CMS Supervisor’s MERLIN II System Display Console 27
Line Assignments to CMS Agents’ Voice Terminals 28
Feature Assignments to CMS Agents’ Voice Terminals 28
Ringing Options for CMS Agents’ Voice Terminals 30
Group Page Form 31
CMS Planning Forms
33Line Button Planning Form 34 Line Groups Planning Form 35 Agent Directory Planning Form 36
Agent Splits Planning Form 37
Overview
ABOUT THIS GUIDE
The efficient management of incoming call traffic is a key to the success of your business. That’s why you’ve chosen the Call Management System (CMS) for your MERLIN® II Communications System with Feature Module 2. For CMS, efficient management of incoming calls means:
● Answering and transferring calls to the right people (agents) quickly.
● Providing recorded messages and music to encourage callers who have
been put on hold to wait for service rather than hang up.
● Distinguishing between types of calls, and giving some calls (for example,
high-revenue-producing, or high-dollar, calls) priority over other calls.
● Distributing calls equitably among agents.
● Tracking performance and displaying current system activity on CMS
Status screens.
● Generating printed reports on call handling and agent performance, even
as CMS maintains operation.
● Storing data for analyzing long-term performance.
With some planning now, you can make sure that your system will begin performing these services on the day it’s installed. Then, as you observe the way CMS operates during its first few days of service, you can decide what changes and adjustments to make in order to meet the specific needs of your business.
This guide helps you plan your CMS in enough detail to have it managing calls the day it’s installed. This requires that you make some decisions about how you want CMS set up initially and that you record those decisions on the CMS planning forms at the end of this guide. You also have to plan certain aspects of MERLIN II system administration to make sure that CMS and the MERLIN II system will work in harmony. All document references are for the MERLIN II Communications System with Feature Module 2 only.
The information in the remainder of this guide is organized as follows:
● Key Terms and Concepts. This part of the guide offers a brief
introduction to. terms and concepts used throughout this guide and in other CMS documents.
● Key Facts and Considerations. This section is a checklist of CMS
fundamentals emphasized throughout the CMS documents. The list is to be used as a quick reference for the CMS installer or administrator.
● A Typical CMS Application. In this part of the guide you’ll be
introduced to Bon Voyage Travel, an imaginary travel agency. Bon Voyage Travel will provide examples of planning concepts throughout the guide.
● Planning Your MERLIN II System: Part One. This part of the guide tells you how to plan for the inclusion of CMS in your MERLIN II system by making the appropriate entries on two of the planning forms that come with the MERLIN II System Planning Guide. If you don’t have the planning guide, you can find the forms and instructions for completing them in Section 2, “Planning the System, “ in the MERLIN II System Installation and
Administration Manual.
THE PLANNING FORMS
OTHER CMS DOCUMENTS
● Planning Your Call Management System. In this part of the guide you decide how you want your CMS organized and record your decisions on the CMS planning forms at the end of this guide. Then you can use the completed planning forms to get your system up and running quickly on the day it’s installed.
● Planning Your MERLIN II System: Part Two. Finally, in this part of the guide, you’ll learn how to plan for the MERLIN II system features and options that can affect the way CMS operates. This planning requires entries on some additional MERLIN II system planning forms.
The planning forms you will need are listed below in the order they should be completed. The CMS planning forms are in this guide. The MERLIN II system forms (marked by an asterisk) are located in the MERLIN II System Planning Guide.
1 Master Planning Form *
2 System Configuration Form *
3 Line Button Planning Form
4 Line Groups Planning Form
5 Agent Directory Planning Form
6 Agent Splits Planning Form
7 Shift Configuration Planning Form
8 Station Configuration Form(s) *
9 Group Page Form *
The following documents come with your Call Management System:
MERLIN II Communications System Installation and Getting Started Guide for the Call Management System
-MERLIN II Communications System System Manual for the Call Management System
MERLIN II Communications System User’s Curd for the Call Management System
NOTE: Although an earlier version of the installation guide may come with the CMS expansion card, do not use the older guide. Use the
MERLIN II Communications System installation and Getting Started Guide for the Call Management System to install CMS.
The Installation and Getting Started Guide shows how to install the CMS expansion card in the PC and how to connect the PC to the MERLIN II system. It also tells you how to use the information on the CMS planning forms to get CMS up and running quickly. Once your CMS is running, you can use the CMS System Manual to fine-tune the system. It includes information on every aspect of system administration and call management. Finally, each CMS supervisor and agent should have a copy of the User’s Card. The card provides quick access to important information on using the MERLIN II system voice terminals with CMS.
UPGRADE INFORMATION You are making a new beginning when you install CMS to work with the MERLIN II Communications System with Feature Module 2. Earlier CMS versions are not designed to work with this latest MERLIN II system, nor can their configurations be transferred to the new CMS. The agent directories, line and station number assignments, thresholds, exceptions and other administered information must be entered into the new CMS from the keyboard.
As you read the planning form information in this guide, note the changes from your earlier CMS forms and decide how your new CMS will be administered. You may be able to simply transfer much of the information from your earlier forms onto the latest forms—especially if most of the line and station assignments will not change. Keep in mind that all your old CMS files must be removed from the CMSMGMT and CMSREPT directories before you can install the new CMS. The procedure for deleting old files and
installing the new files are in the Installation and Getting Started Guide for the
Call Management System.
You will also want to take advantage of the new CMS and MERLIN II system features to improve communications for your business. For example, you can now assign 28 agents into one split, assign external alerts to be activated when exceptions occur, utilize automatic after-call-work for agents, and generate reports while CMS is managing calls. You can also generate reports while CMS is not managing calls. Since you need to administer the new CMS anyway, take the time to plan your system, draw on your experience, and make the changes that will best benefit your business.
This version of CMS is designed to work with both the AT&T PC 6300 and AT&T 6300 WGS, but not the AT&T PC 6300 PLUS.
If you have been using an AT&T PC 6300 to manage CMS and you have the MERLIN II System Display Console for use as a CMS administrator attendant, you don’t require any more hardware. Be sure, however, that the PC 6300 has at least 512K RAM.
If you have been using a PC 6300 PLUS, you can remove the CMS expansion card and put it in the PC that you will use with the new system.
When you have finished planning your system, see the Installation and Getting
Started Guide for the Call Management System for more information on
installation procedures.
Since this is a fresh start with a new system, now is the time to make your communications system the best it can be.
Key Terms and Concepts
The terms listed below appear frequently in this guide and other CMS documents. The paragraphs that follow the list offer explanations of these key concepts.
Automatic call distributor (ACD)
Line groups
Agents
Agent splits
Shift configurations
Main and secondary splits
Intraflow
Intraflow threshold
Logged out state
Available state
After-call-work (ACW) state
Automatic ACW
Call management
Alerts
CMS is the automatic call distributor (ACD) for the MERLIN II system. It distributes calls that come in on the MERLIN II system telephone lines that have been assigned to CMS.
The MERLIN II system telephone lines assigned to CMS are organized into
line groups. You usually assign lines to line groups so that all calls coming in
on lines assigned to a particular line group are the same type. For instance, the lines for a particular type of high-revenue-producing sales call might be assigned to one line group, the lines for another type of low-revenue-producing sales call might be assigned to a second line group, and the lines for nonrevenue-producing service calls might be assigned to a third line group. You can assign up to 28 telephone lines to CMS, and you can divide the lines among a maximum of four line groups.
Incoming calls are answered by agents who are organized into agent splits. A split is a team of agents who handle the same type of call. Each split is assigned to answer calls for one or more line groups. You can have up to six splits handling CMS calls at the same time, and you can assign up to 28 agents to a split. However, no more than 28 agents can be active in CMS at any one time.
A shift configuration is an arrangement of line groups and agent splits for answering calls. You can store up to six shift configurations in the system’s memory, but only one shift configuration can be active at a time.
In a shift configuration, some agent splits are main splits and others are
seconday splits. A main split has primary responsibility for answering calls for
a line group. A secondary split acts as a backup to the main split for a line group. Agents in the secondary split answer calls that come in for the line group when agents in the main split are unavailable. Routing calls to the secondary split when no agents are available in the main split is called
intraflow. The number of seconds a call waits for an agent in the main split
before it is sent to the secondary split is called the intraflow threshold.
When call management begins for a shift, the agents in the shift configuration are in the logged out state. CMS neither sends calls to nor keeps statistics on agents who are logged out. Agents have to signal CMS that they are ready to receive calls by becoming available. They do so by touching the programmed button labeled Available on their voice terminals (MERLIN II system
telephones) to enter the available state.
When agents need time to complete work on their most recent CMS call (such as processing an order or updating a record), they can leave the available state and enter the after-call-work (ACW) state by pressing the programmed button labeled ACW on their voice terminals. CMS does not send calls to agents who are in the after-call-work state, but it does keep statistics on them. To return to the available state from the after-call-work state, agents simply touch their Available button.
The automatic after-call-work (Auto ACW) feature allows the CMS administrator to specify an amount of time for the after-call-work state. Auto ACW
automatically places agents into the after-call-work state upon completion of an ACD call. During that time, agents receive no calls as they complete their work. When the specified time elapses, agents are automatically made available. Agents can make themselves available before the specified time elapses by touching their Available button.
In addition to using the Available and ACW buttons on their phones to move from one work state to another, agents in an active shift configuration always know what state they’re in by the status of the lights next to the buttons.
Available light on = available state
ACW light on = after-call-work state
Both lights off = logged out state
(To have both lights on is not possible.)
When agents touch the Available button to enter the available state, the light next to the Available button goes on. When they touch the ACW button to move from the available state to the after-call-work state, the light next to the Available button goes off and the light next to the ACW button goes on. Agents who plan to be away from their phones for an extended period or who are doing work unrelated to CMS can also log themselves out of CMS. They move from the available state to the logged out state by touching the Available button and thus turning off its light. Likewise, they move from the after-call-work state to the logged out state by touching the ACW button and turning off its light. When both the ACW and Available button lights are off, the agent is logged out.
Call management is the automatic distribution of incoming calls within a shift
configuration. When a call comes into CMS, the system goes through this basic sequence of steps:
1 CMS looks for an available agent in the main split assigned to the line
group for the call.
2 If agents are available, CMS routes the call to the agent who has been
available for the longest period of time.
3 If no agent is available, CMS connects the call to the system’s voice
announcement unit for a delay message. If an agent becomes available while the delay message is playing, CMS immediately transfers the call to the agent; the caller does not hear the complete delay message.
4
5
6
If no agent has become available by the end of the delay message, CMS puts the call on hold. If the system has Music on Hold, the caller hears music.
As soon as an agent in the main split becomes available, CMS transfers to that agent the call that has waited the longest in any of the line groups covered by that split.
If the call has waited a predetermined amount of time (the intraflow threshold), it may be sent to an available agent in the secondary split, secondary split is active for that line group.
if a
The CMS supervisor or system administrator can modify this basic sequence by using either or both of the system’s line group delay options (answer delay, force delay, and even Auto ACW) and by designating one or more lines as priority lines.
Alerts are individual wall-mounted lamps attached to the MERLIN II system at
the line ports and administered for CMS call monitoring. A lamp that is assigned to an exception lights up when thresholds set by the administrator for that exception are met or exceeded. The lamp turns off when values for that exception are brought back below the exception threshold. The visual alerts provide immediate feedback on the system’s status to the CMS administrator and CMS agents. These, combined with the printed reports, guide the CMS administrator to adjust the system as necessary for the most efficient operation.
The CMS System Manual provides detailed information on priority lines, answer delay, force delay, and other options for fine-tuning the system.
Key Facts and Considerations
Key facts and considerations concerning proper CMS installation and operation are emphasized throughout this planning guide. For easy reference, they are listed below.
SYSTEM
CONSIDERATIONS
●
●
SUPERVISOR’S CONSOLE ●
AND AGENT VOICE TERMINALS
●
LINE ASSIGNMENTS ●
This version of CMS is designed to work solely with the MERLIN II Communications System with Feature Module 2.
CMS will work on either the AT&T PC 6300 or the AT&T 6300 WGS, operating under MS-DOS version 3.2 or later. (The PC 6300 can also use MS-DOS version 3.1). It is not designed to work on any other personal computer.
The PC must have at least 512K RAM.
The CU1 and CU2 ports on the CMS PC must be attached to two attendant ports on the same module on the MERLIN II system. This module must be either a 408 or 008 analog circuit pack module.
On both of these modules, the first attendant port is the bottom jack, the second attendant port is the fifth jack from the bottom. Both of these jacks must be designated as attendant jacks during MERLIN II system administration.
The CU1 and CU2 ports must have lines administered in the same order to insure proper operation of the Voice Announcement unit.
The MERLIN II system must always be set to “large” in order for CMS to work.
The MERLIN II system cannot be in behind-switch mode during CMS operation. (It can, however, operate behind a switch in standard mode).
Do not use the MERLIN II system flexible numbering feature with CMS.
The CMS supervisor can use only one type of administrator/attendant console: the MERLIN II System Display Console.
The CMS supervisor’s MERLIN II Display Console must be plugged into a station attendant port on a MERLIN II system analog circuit pack module.
Agents can use any of the MERLIN II system analog or digital voice terminals; they cannot use basic voice terminals.
You can assign up to 28 lines to CMS, using any block of line ports on the MERLIN 11 system from 1 to 56. If you want all of the lines to have line button appearances, use only lines 1 through 32.
Do not mix CMS line or line pool assignments with non-CMS line or line pool assignments.
The line assignments for the CMS PC and the order in which they are assigned at both CU1 and CU2 attendant ports, must be exactly the same.
Do not mix CMS lines covered by different splits in the same pool.
All CMS lines must have the MERLIN II system ringing option feature set . for No Ring (at the main attendant console).
Each line of a line group assigned to an agent must be assigned to the agent’s voice terminal.
STATION ASSIGNMENTS
LINE GROUP AND AGENT SPLIT CONSIDERATIONS
EXTERNAL ALERTS
●
●
●
●
●
●
●
●
●
●
CMS agent stations can be MERLIN II system from 10 stations can be operational
CMS uses only the default system (10 through 69).
assigned any block of stations on the through 69. Keep in mind that only 28 at one time.
intercom numbers assigned to the MERLIN II
CMS can have up to six shift configurations.
Each shift configuration can have up to four line groups and up to six agent splits.
Each line group may have one and only one main split assigned to it.
Line groups do not require secondary splits.
An agent split may be designated the main split for one, more than one, or all line groups.
An agent split may be designated the secondary split for one, more than one, or all line groups.
An agent split assigned as the main split to one or more line groups can also be assigned as the secondary split to one or more additional line groups.
Up to four wall-mounted alerts can be used with CMS. They are connected to line jacks on the MERLIN II system control unit, and administered to light up when thresholds set by the administrator are exceeded. The line jacks used for alerts are in addition to the maximum of 28 lines that can be assigned to CMS. (For example, if all 28 outside lines were assigned, the line button numbers for four alerts would be 29, 30, 31, and 32).
OTHER CONSIDERATIONS ● If you are going to use flexible numbering with non-CMS portions of your
MERLIN II system, do not press [InitSp] (initialize space) when
administering the MERLIN II system. Instead, use block or single renumbering. (For more information, see “Perform Flexible Numbering” in Section 4 of the MERLIN II System Installation and Administration
Manual. )
A Typical CMS Application
In this part of the guide you’ll learn about an imaginary travel agency, Bon Voyage Travel, which uses CMS to manage the revenue-producing incoming call traffic for its MERLIN II communications system. Examples based on Bon Voyage Travel are used to explain planning concepts and demonstrate
planning decisions in the remaining sections of this guide.
CMS AND BON VOYAGE Calls from repeat customers and potential new customers generate most of
TRAVEL Bon Voyage Travel’s business. CMS answers these calls and transfers them
to the appropriate agents for service.
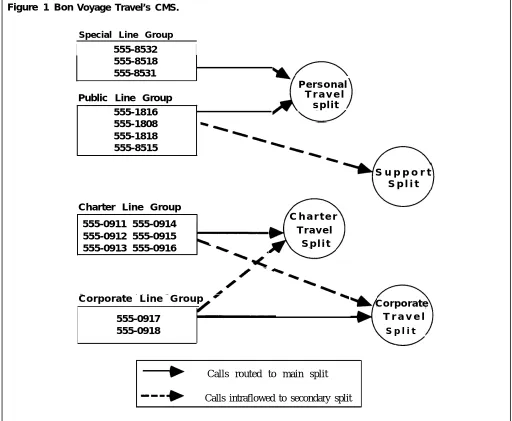
In order to handle three different types of customers and to manage the frequent overflow of calls, Bon Voyage’s CMS administrator has divided the telephone lines customers use into four line groups and organized the travel agents into four splits. Figure 1 shows a diagram of Bon Voyage Travel’s line grouping and split arrangement.
Figure 1 Bon Voyage Travel’s CMS.
Special Line Group
I
555-8532I
555-8518 555-8531
P e r s o n a l Public Line Group
555-1816 555-1808 555-1818 555-8515
S u p p o r t T r a v e l
s p l i t
S p l i t
Charter Line Group 555-0911 555-0914 555-0912 555-0915 555-0913 555-0916
C h a r t e r T r a v e l
S p l i t
Corporate Line Group
555-0917
Corporate T r a v e l
555-0918 S p l i t
Calls routed to main split Calls intraflowed to secondary split
● The Personal Travel split handles calls from customers wanting to plan and
book their personal vacations. There are seven agents in this split.
Calls come into this split on two line groups: the Public line group and the Special line group. In this example, the Public line group consists of four lines (555-1816, 555-1808, 555-1818, and 555-8515), which are advertised in the Yellow Pages, local newspapers, and national travel magazines.
The Special line group has three lines (555-8532, 555-8518, and 555-8531), which are reserved for valued repeat customers who may book several trips with Bon Voyage Travel each year.
● The agents in the Charter Travel split arrange trips for groups and
frequently book trips for local and national holiday clubs. There are seven agents in this split.
Calls to this split come in on one group of lines, the Charter line group, which consists of six numbers: 555-0911, 555-0912, 555-0913, 555-0914, 555-0915, and 555-0916. Occasionally a customer who has previously made travel arrangements through a holiday club will call one of these numbers to make personal travel arrangements. In such cases the agent in the Charter split who receives the call transfers it to an agent in the Personal Travel split. (This feature, called Transfer-to-Split, is explained in detail later in this guide and in the CMS System Manual.)
● The Corporate Travel split handles business trips for large corporations.
This split, consisting of two agents, is the main split for the Corporate line group. The telephone numbers for the Corporate line group are 555-0917 and 555-0918.
Since both the Charter Travel split and the Corporate Travel split handle group trips, the Corporate Travel split serves as a secondary split (a backup split) to handle call overflow from the Charter Travel split. Likewise, the Charter Travel split backs up the Corporate Travel split during peak calling hours.
● The number of agents available for CMS calls in Bon Voyage Travel’s
fourth split, the Support split, varies according to the incoming call traffic. The employees who staff this split have primary responsibilities that do not involve CMS—such as bookkeeping, advertising, and trip packaging. But since these people have some experience as travel agents, they are often asked to back up the Personal Travel split when call traffic is heavy on the lines in the Public line group. The Support split becomes a
secondary split covering the Public line group.
People assigned to the Support split are often away from their desks, so calls coming into the Support split on the Public lines ring at all phones in the split. Then the Support person who is free to answer the call can pick up the nearest ringing voice terminal. (This feature, called All-Ring operation, is explained in more detail later in this guide and in the CMS System Manual.)
BON VOYAGE TRAVEL’S All of Bon Voyage Travel’s phones and outside telephone lines are part of the
OTHER CALL TRAFFIC agency’s MERLIN II Communications System, but some phones and outside lines are not assigned to the Call Management System. They operate outside of CMS.
CMS AND OTHER BUSINESSES
Agents and nonagents use lines not assigned to CMS for all outgoing calls and nonrevenue producing incoming calls. This guide focuses on planning CMS and refers to non-CMS components, features, or activities only when they affect CMS planning and operation.
Bon Voyage Travel’s line groups and agent splits are typical for a travel agency. Other businesses would have other names for their line groups and splits. For example, a wholesale distributor might have line groups and splits for inside sales and customer service (such as order tracking), while a bank may have line groups and splits dedicated to specific types of loans and customer services. The characteristics of your business should dictate your decisions as you plan your CMS.
Planning Your MERLIN II System: Part One
MERLIN II SYSTEM CMS and your MERLIN II system have to work together as a single
PLANNING FORMS integrated system—you can’t effectively plan one without taking the needs of the other into consideration. This part of the guide helps you plan the
integration of CMS and the MERLIN II system. To do this, you need to make appropriate entries on two MERLIN II system planning forms:
● Master Planning Form
● System Configuration Form
For convenience, both forms are in the Planning Guide and the Installation and Administration Manual that came with the MERLIN II Communications System with Feature Module 2.
To complete the forms, read the MERLIN II System Planning Guide from the beginning. The information under the “Overview” and “Complete the Master Planning Form” headings is essential to complete the Master Planning Form.
When you come to the heading “Complete the Flexible Numbering Form, ”
stop, return to this guide, and continue with the “Master Planning Form, ”
below, before going on to complete the form.
CAUTION: CMS agents can only use the default intercom numbers 10 through 69; they cannot be assigned flexible numbers. Do not use the MERLIN 11 system flexible numbering feature with CMS.
Master Planning Form
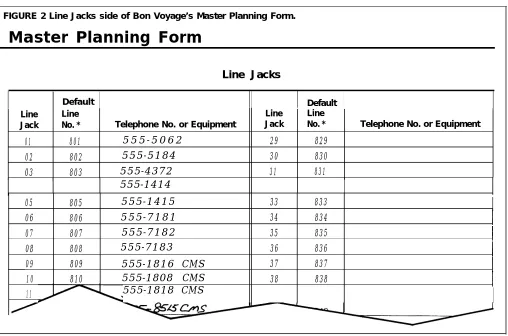
LINE JACKS As you fill in the “Line Jacks” side of the Master Planning Form, write “ CMS” in the “Telephone No. or Equipment” column next to the telephone numbers for the lines you plan to include in your Call Management System. Figure 2 shows a portion of the “Line Jacks” side for Bon Voyage Travel.
FIGURE 2 Line Jacks side of Bon Voyage’s Master Planning Form.
Master Planning Form
Line Jacks
Default Default
I
Line Line Line Line
Jack No. * Telephone No. or Equipment Jack No. * Telephone No. or Equipment
01 801 5 5 5 - 5 0 6 2 29 829
02 802 555-5184 30 830
03 803 555-4372 31 831
555-1414
05 805 555-1415 33 833
06 806 555-7181 34 834
07 807 555-7182 35 835
08 808 555-7183
555-1816 CMS
36 836
09 809 37 837
10 810 555-1808 CMS 38 838
11 555-1818 CMS
LINE ASSIGNMENTS AND When assigning lines to the MERLIN II system, the MERLIN II system
THE VOICE ANNOUNCEMENT
STATION JACKS
administrator also a assigns a certain number of lines, in a certain order, to
UNIT CMS. The CMS administrator assigns those outside lines to line buttons,
taking care to assign them in the exact order that they were assigned to the
MERLIN II system. —
The CMS Line Button Planning Form and the MERLIN II system Master Planning Form should reflect this correlation.
Once properly administered, the CMS line assignments should be the same for both the CU1 and CU2 attendant ports. When checking these attendant ports, the MERLIN II system administrator compares the CMS line
assignments for CU1 and CU2, represented as the lit lamps on the MERLIN II system console. If, for any reason, the line assignments do not match, the CMS voice announcement unit will not work correctly.
As you complete the “Station Jacks” side of the Master Planning Form, keep the following points relating to CMS in mind:
● You can assign any of the MERLIN II system’s 2-digit default intercom
numbers (10 through 69) to CMS. Keep in mind that intercom 10 is the administration point for the entire MERLIN II system. If the MERLIN II system has non-CMS uses, intercom 10 should not be devoted exclusively to CMS.
● The PC that runs the CMS program requires two attendant station jacks on
the same module— either a 4-Line/8-Analog Voice Terminal (408) Module or
an 8-Analog Voice Terminal (008) Module.
The first attendant station is the jack nearest the bottom of the module, and the second attendant station is the fifth jack from the bottom of the module. In slot 1, the attendant jacks, are numbered 10 and 14; in slot 2, the attendant jacks are numbered 18 and 22; in slot 3, 26 and 30, and so on.
If the MERLIN 11 system has non-CMS uses, we recommend that you assign intercom numbers 18 and 22 to CU1 and CU2 (for the PC), and either the next attendant jack, intercom number 26, or the previous attendant jack, intercom number 14, to the CMS administrator.
Also, CMS does not use the station jacks on either the 008D (digital station) or 012 (basic telephone) circuit pack modules. As with other modules, these modules are assigned station jack numbers according to their slot position on the control unit. Their station jack numbers must not be included in the CMS intercom numbering scheme.
Be sure that the intercom numbers you assign to CMS (including the attendant jacks) represent the station jacks on only analog modules (either 408 or 008). Also, be sure that the intercom numbers accurately reflect the station jack numbering as determined by the slot position of the analog modules on the control unit. (For example, if an 008D module occupies slot 2, its station jack numbers are 18 through 25. CMS could start its numbering scheme from an analog module in slot 3 at intercom number 26—making intercom 26 and 30 CU1 and CU2 attendant ports.)
As you identify potential attendant stations by writing “Att” next to appropriate station jack numbers in the “Default Icom No.” column, identify the two station jacks you intend to reserve for the CMS PC by writing “CMS PC” in the “Person, Location, or Function” column.
● The CMS supervisor’s station should also be assigned an attendant station
jack.
Write the CMS Supervisor’s name and “CMS Supervisor” in the “Person, Location, or Function” column next to a station jack number marked
" Att. "
● CMS is designed to use the MERLIN II system default intercom number.
These are 2-digit numbers. It cannot use flexible numbering or any other feature that uses three or more digits.
Identify the stations that will be CMS agent stations by writing “CMS” next to the appropriate numbers in the “Default Icom No.” column.
NOTE: The telephone at a CMS agent station can be a MERLIN II system analog or digital voice terminal. It cannot be a basic telephone.
Return to the section “Complete the Master Planning Form” in the MERLIN II
System Planning Guide and complete the form as instructed. Figure 3 shows a
portion of the “Station Jacks” side filled out for Bon Voyage Travel.
FIGURE 3 Station Jacks side of Bon Voyage’s Master Planning Form.
Master Planning Form
Station Jacks
Jack Default Person,
Station Type Icom Location, Station
Jack (A,D,B) No. Label FACE or Function Jack
,
01 A 10 31 A
02 A 11 32
03 A 12 33
A 40 41 42 A 04 05 A A 13 14 34 35
06 A 15 36
07 A 16 37
08 A 17 38
A
09 18 39
10 A _ 19 40
11 41
I I I
Jack Default Type Icom
(A,D,B) No. Label FACE
A 43 A 44 A 45 A 46 A 47 Person, Location, or Function A A A 48 49 50
When you’ve completed the Master Planning form, return to this guide and read “System Configuration Form, ” below, before going on to “Complete the System Configuration Form” in the MERLIN II System Planning Guide.
System Configuration Form
Complete the System Configuration Form according to the instructions under “Complete the System Configuration Form “ in the MERLIN II System Planning
Guide. The headings below correspond to areas of the form. As you move
from area to area on the form, check back here to the corresponding heading for information pertaining to CMS.
SYSTEM SIZE A MERLIN II system that includes CMS must be set to “Large.” Check the box next to “Large” under “System Size” regardless of how many lines and stations your system will have.
LINE REPRESENTATION As you complete this part of the form, keep these points in mind:
●
●
●
●
You (or the MERLIN II system administrator) must choose one of the following ways of configuring and gaining access to the system’s outside telephone lines:
Pooled lines with button access to line pools
Pooled lines with dial access to line pools
Pooled lines with access through Automatic Route Selection (ARS)
Standard square configuration with automatic line selection
Customized square configuration with automatic line selection
Each option is explained under the heading “System Type” in the
MERLIN II System Planning Guide.
Choosing one of these options should be a systemwide decision based largely on your business’s outgoing call traffic. CMS manages only
incoming call traffic and will work with any of the above options.
In a pooled system, CMS can transfer a call to an agent even if the agent’s voice terminal does not have a line appearance for that call’s line or line pool.
CAUTION: The MERLIN II System cannot be in behind-switch mode when CMS is operating.
ATTENDANT STATIONS As you fill in the intercom numbers for the MERLIN II system attendant stations, remember to include the intercom numbers for the CMS PC and the CMS supervisor(s) as shown on the Master Planning Form.
T R A N S F E R R E T U R N Every CMS call arrives at an agent’s voice terminal as a transferred call. If
INTERVAL the agent doesn’t answer the call within the transfer return interval you select, the call returns to CMS for rerouting.
The initial (default) setting for the transfer return interval is four rings. Wait until your system is up and running to determine whether you want to choose a different interval.
LINE TYPE
LINE POOLS
As you fill in the “Line Type If Other Than Local” column for your outside’ telephone lines, indicate which lines will be assigned to CMS by writing “CMS” along with the line type on the appropriate lines.
If you decide to have pooled lines, keep the following points in mind as you fill in the “Line Pool (9, 890-899)” column on the System Configuration Form.
● Do not mix CMS lines and other lines in the same pools. (The Master
Planning Form should indicate which lines will be assigned to CMS and which will not. )
● DO not mix CMS lines to be covered by different departments or different
agent splits in the same pool.
● Remember that all CMS agents’ lines should be set to No Ring (see
“Ringing Options “ in Section 6, “Handling CMS Calls, ” of the CMS System Manual).
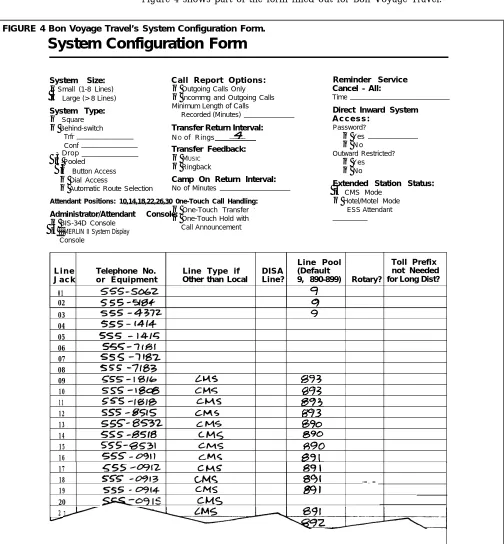
Figure 4 shows part of the form filled out for Bon Voyage Travel.
FIGURE 4 Bon Voyage Travel’s System Configuration Form.
System Configuration Form
System Size:
❑ Call Report Options:
❑Small (1-8 Lines)
❑ Outgoing Calls Only Large (> 8 Lines) ❑ Incommg and Outgoing Calls
✓
System Type: Minimum Length of Calls
❑ Square Recorded (Minutes)
❑ Behind-switch Transfer Return Interval:
Trfr NO of Rings
✓
Conf Transfer Feedback:
Drop ❑
MUSIC
❑ Pooled
✓❑ ❑ Ringback Button Access
❑ Dial Access Camp On Return Interval:
❑ Automatic Route Selection No of Minutes ✓
Attendant Positions: 10,14,18,22,26,30 0ne-Touch Call Handling:
Administrator/Attendant Console:❑ One-Touch Transfer
-❑ BIS-34D Console ❑ One-Touch Hold with
❑ MERLIN II System Display Call Announcement
✓
Console
Reminder Service Cancel - All:
Time
Direct Inward System A c c e s s :
Password?
❑ Yes
❑ N o Outward Restricted?
❑ Yes
❑ No
Extended Station Status:
❑ CMS Mode
❑ Hotel/Motel Mode ESS Attendant
Line Pool Toll Prefix
L i n e Telephone No. Line Type if DISA (Default not Needed
J a c k or Equipment Other than Local Line? 9, 890-899) Rotary? for Long Dist?
01 02 03 04 05 06 07 08 09 10 11 12 13 14 15 16 17
18 -—. —
19 20 2
“Complete the System Configuration Form” in the MERLIN II System Planning
Guide. Return to the instructions in “Complete the System Configuration
Form” in the MERLIN II System Planning Guide and complete the System Configuration Form. When you’ve completed it, return to this guide.
Planning Your Call Management System
You should now have enough information about CMS and your MERLIN II system to plan your CMS. You can finish planning your MERLIN II system after you’ve planned your CMS.
Calls come into CMS over outside telephone lines organized into line groups. CMS distributes these calls to agents organized into agent splits. This basic arrangement of agent splits assigned to cover line groups is called a shift
configuration. The purpose of this part of the guide is to have you plan at least one shift configuration. Then, as part of CMS administration procedure, you can create the shift configuration based on your plan.
CMS PLANNING FORMS Use the following forms to plan your shift configuration:
● Line Button Planning Form
● Line Groups Planning Form
● Agent Directory Planning Form
● Agent Splits Planning Form
● Shift Configuration Planning Form
You’ll find these forms at the end of this guide. Make photocopies of them and keep the originals in a safe place for possible future use.
Line Button Planning Form
You can assign up to 28 telephone lines to CMS.
As you look at the Line Button Planning Form, think of CMS as an automated attendant using a MERLIN II system display console to answer and distribute calls coming in only on those lines specifically assigned to line buttons on the
console. The form shows those line buttons as they would appear on our
imaginary CMS attendant console and assigns a number (1 through 32) to each line button. CMS uses the button numbers on the console (not the actual telephone numbers or MERLIN II system line jack numbers) to identify and keep track of the lines assigned to it, so complete this form carefully.
Using your MERLIN II system Master Planning Form or System Configuration
Form to identify CMS lines, complete the Line Button Planning Form by .
entering the telephone numbers for your CMS lines on the numbered buttons in the order in which you plan to assign them to CMS. Begin with line button number 1 on the form, and continue in an unbroken sequence until you have assigned all CMS lines to buttons.
CONSOLE BUTTON Notice that the numbering sequence on the console begins with 1 in the first
NUMBERING SEQUENCE column, third button from the bottom, and ends with 3 at the top of the first column. The second column begins with 4 at the bottom and ends with 8 at the top. Button 9 begins at the top of the third column and the column ends at the bottom with 20. The fourth column begins at the top with 21 and ends at the bottom with 32.
You will avoid many administration problems by keeping track of the button number positions as you assign lines in sequence.
IMPORTANT: Do not try to maintain a one-to-one correspondence
between the button numbers (1 through 32) on the Line Button
Planning Form and the line jack numbers (01 through 56) on the two MERLIN II system forms. The line jack numbers refer to the jacks’ sequential positions on the MERLIN II system’s control unit, not to the telephone numbers assigned to them.
You will be writing the actual telephone numbers for the lines onto the form for each button to be assigned. CMS will use the button numbers to keep track of and identify the lines.
Figure 5 shows a portion of the Line Button Planning Form for Bon Voyage Travel. Notice the numbering scheme.
FIGURE 5 Bon Voyage Travel’s Line Button Planning Form.
Line Button Planning Form
❑
❑
555-1818555-1808
❑
❑
I
555-0911❑
❑
❑
❑
555-8531❑
❑
❑
555-1816❑
❑
1❑
5 5 5 - 8 5 1 8❑
❑
I
❑
lntercom-❑
voiceI
❑
❑
555-8532 55 5 5 - 0 9 1 2 9
555-0913 10 555-0914 11 555-091512
❑
❑
❑
❑
IntercomRing❑
❑
555-8515I
❑
❑
555-0916555-0917 14
❑
❑
❑
❑
❑
❑
5 5 5 - 0 9 1 8 1 5
❑
❑
21❑
❑
22❑
❑
23❑
❑
24❑
❑
25Line Groups Planning Form
Remember, you can assign up to 28 lines to CMS. These lines may all be assigned to a single line group, or they may be divided among as many as four line groups.
Before you complete the Line Groups Planning Form, do the following.
● Determine how many departments or predefined groups of agents will
need CMS lines.
The number of line groups you need depends, in part, on the number of departments or groups of agents requiring CMS lines.
All lines whose telephone numbers are published for a particular department or product, or that are part of a hunt group, should belong to the same line group.
NOTE: For more information on hunt groups, see the Data
Communications Guide for the MERLIN II Communications System with
Feature Module 2.
● Decide how you want summary statistics organized.
If you want to keep statistics for certain lines together, assign those lines to their own line groups. For example, if the Sales Department handles four local lines and two WATS lines, you may want to place the local lines in one group and the WATS lines in another in order to get separate summary reports on each type of line.
Read the following information to help you complete the Line Groups Planning Form.
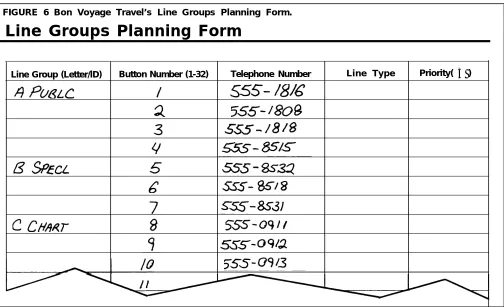
LINE GROUP (LETTER/lD) CMS uses the letters A through D to identify a maximum of four line groups. Assign letters to your line groups in alphabetical order so that you have a letter for each line group.
You may also want to identify a line group by name, that is, give it an ID. If so, include the ID on the line with the letter in this column. CMS allows a maximum of five characters in a line group ID, and the system displays it in all capital letters. For example, the ID for Bon Voyage Travel’s Line Group A, the Public line group, is recorded and displayed as PUBLC.
BUTTON NUMBER (1 THROUGH 32).
TELEPHONE NUMBER
LINE TYPE
Refer to the Line Button Planning Form for the button number for each of your CMS lines, and copy the numbers on the appropriate line in the button number column. Watch the numbering scheme carefully as you write in the numbers; remember that the button number refers to the button position on a MERLIN II System Display Console and the telephone number (below) must be assigned to the appropriate button number. (See the previous section,
“Line Button Planning Form. ” )
Refer to the Master Planning Form and the System Configuration Form for the telephone numbers for your CMS lines and copy the numbers on the appropriate line in the telephone number column.
Refer to the System Configuration Form for the line type for each of your CMS lines, and copy it on the appropriate line in the line type column.
PRIORITY Determine which lines should have priority status. If you have lines that should be answered before other lines in a line group, such as 800 numbers that you pay for or a line for special customers, you can assign priority status to those lines. Remember, though, that true priority decreases in proportion to the number of lines to which you assign it.
Figure 6 shows a portion of the Line Groups Planning Form for Bon Voyage Travel.
FIGURE 6 Bon Voyage Travel’s Line Groups Planning Form.
Line Groups Planning Form
Line Group (Letter/lD) Button Number (1-32) Telephone Number Line Type Priority( ✓ )
Agent Directory Planning Form
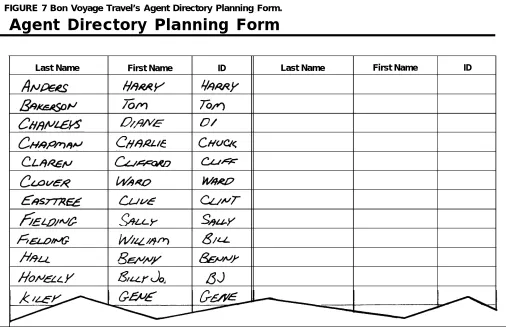
The Agent Directory contains the list of available CMS agents. The Agent Directory Planning Form should have all the names of the agents you plan to enter into the Agent Directory.
You can list your agents on the Agent Directory Planning Form in any order. When you enter the names in the Agent Directory, CMS will automatically arrange them in alphabetical order.
When placing names on the Agent Directory Planning form, use the following guidelines:
● You can have up to 60 agents in your Agent Directory, but no more than
28 agents can be assigned to an active shift configuration.
● A last name can have as many as 12 letters, numbers, and special
characters such as * and #.
● A first name can have up to eight letters, numbers, and special characters.
● An ID can have up to five letters, numbers, and special characters.
● You can use both capital letters and lowercase letters when you enter
agents’ names. For example, the system would store the names entered “anders harry, ” “Anders Harry, ” and “ANDERS HARRY” as three different agents and display the names exactly as entered.
● NO matter how you enter an agent’s ID, the system translates it into all
capital letters. For example, whether you enter agent Harry Ander’s ID as “ harry, ” “Harry,” or “HARRY,” the system will remember ‘and display it as HARRY. Therefore, you want to be sure that each agent’s ID is unique, capital or lowercase characters notwithstanding.
Keep these points in mind as you enter agents’ names and IDs on the Agent Directory Planning Form. Then you can enter them into the system exactly (character for character) as they appear on the planning form.
Enter the names and IDs of your CMS agents on the Agent Directory Planning Form. Figure 7 shows a portion of the Agent Directory Planning Form for Bon Voyage travel.
FIGURE 7 Bon Voyage Travel’s Agent Directory Planning Form.
Agent Directory Planning Form
Last Name First Name ID Last Name First Name ID
Agent Splits Planning Form
You can have up to six splits handling CMS calls at the same time, and you can assign up to 28 agents to a split. However, no more than 28 agents can be active in CMS at any one time.
You should have most of the information you need to complete your Agent Splits Planning Form. The following additional information about each of the columns should help you complete the form.
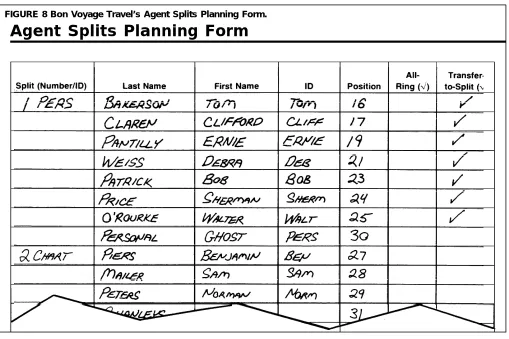
SPLIT (NUMBER/lD)
LAST NAME, AND ID
POSITION
ALL-RING
FIRST NAME,
CMS identifies agent splits by number (1 through 6). You must have at least one split, and you can have as many as six. You can also use a name, in addition to a number, to identify a split. The name you enter for a split can have up to five characters and will be displayed as all capital letters (for example, “PERS” for the Personal Travel split).
Copy agents’ names and IDs exactly as they appear on the Agent Directory Planning Form.
The “Station Jacks” side of the MERLIN II system Master Planning Form lists a station jack number (1 through 72) for each CMS agent. For each station jack there is also a corresponding default intercom number. The station jack number identifies the physical location of the jack on the MERLIN II system control unit. The intercom number is assigned by the system when the control unit is turned on.
Notice that the station jack numbers (1 through 72) do not have a one-to-one correspondence to MERLIN II system and CMS intercom numbers (10 through 69). For example, an agent shown at station jack 17 on the Master Planning Form would have the default MERLIN II system intercom number (and therefore the CMS agent position number) of 26. There is always a difference of 9 between the jack station number and the default intercom number.
For CMS, the position is the default intercom number.
All-Ring operation is useful for splits in which agents are frequently away from their desks (and phones) when CMS routes calls into the split. Each call rings at all the phones assigned to the split, so the agent closest to a phone can answer the call. (In normal CMS operation, a call rings at only one agent’s voice terminal. ) In a split with All-Ring operation, CMS sends calls to a “ghost” agent, and the “real” agents pick up the calls.
Ghost Agent
A ghost agent is a 2-digit MERLIN II system intercom number assigned to no one. It is a mechanism to allow all idle phones in a line group or split
administered for ALL-Ring operation to ring so that an agent in the vicinity can go to the nearest phone and answer the call.
TRANSFER-TO-SPLIT
The intercom number requirements:
● It must be a valid,
you assign to a ghost agent must meet the following
2-digit MERLIN II system intercom number (10 through 69). There does not have to be a corresponding station jack physically present on the MERLIN II system control unit. However, if there is a corresponding jack, it must be unoccupied.
● It must not be currently assigned to any person or voice terminal in the
MERLIN II system.
The MERLIN II system administrator can help you find intercom numbers that meet these requirements. To enter the ghost agent for a split on the
Agent Splits Planning Form, do the following:
-1 Next to the split’s number and ID, write the name of the split in Name” column (for example, “Support” for the Support Split).
2 Write “Ghost” in the “First Name” column.
3 Write the split’s ID in the “ID” column (for example, “SUPPT” ).
the “Last
4 Write the ghost’s 2-digit intercom number in the “Position” column.
5 Put a check in the “All-Ring” column.
Real Agents
When you enter an All-Ring split into the ghost agent as the only agent in the split.
system’s memory, you’ll enter the The other agents— the “real” ones—cover the calls using the MERLIN II system Call Coverage feature, but they do not appear on CMS screens or in reports as members of the split. To remind you of this during CMS administration, put parentheses around the entries for the “real” agents on the form.
Using this option, an agent in one split can transfer a call to another split, and the call will ring at the voice terminal of every available agent in the split. This option also requires a “ghost” agent and the MERLIN II system Call Coverage feature. (See “All-Ring,” above.)
On the form, include a “ghost” agent along with the “real” agents in each split that will have this option. Follow the procedure in “Ghost Agent!’ under the heading “All-Ring” above.
NOTE: An All-Ring split automatically has the Transfer-to-Split option. It does not require an additional “ghost” agent to receive calls transferred into it from other splits.
Now complete your Agent Splits Planning Form. Figure 8 shows a portion of the Agent Splits Planning Form for Bon Voyage Travel.
FIGURE 8 Bon Voyage Travel’s Agent Splits Planning Form.
Agent Splits Planning Form
Shift Configuration Planning Form
Use the Shift Configuration Planning Form to plan the shift configuration you want CMS to use to manage calls when the system is first installed. You have most of the information you need on your other CMS forms.
Although you can store up to six shift configurations in the system’s memory, only one shift configuration can be actively managing calls at any one time. You need only plan for one shift right now.
The following additional information should help you complete this form.
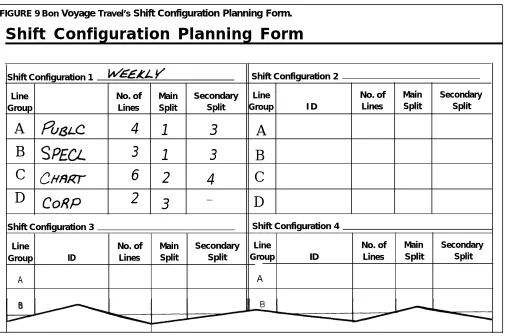
SHIFT CONFIGURATION CMS identifies shift configurations by number (1 through 6). On the line next
NUMBER AND NAME to “Shift Configuration 1” on the form, write the name you want to use to identify your first shift configuration (for example, “WEEKDAY” ). The name you enter can be up to 10 letters, numbers, and special characters.
LINE GROUP, ID, AND NO. OF LINES
Refer to your Line Groups Planning Form and copy the desired line group (letters A through D) and line group ID. Also specify the total number of lines shown for that group.
MAIN SPLIT Your Agent Splits Planning Form shows how you’ve organized your agents
SECONDARY SPLIT
into splits. As you assign main splits to line groups, remember that:
-● Each line group may have only one main split assigned to it.
● An agent split may be designated the main split for one, more than one,
or all line groups.
Keep these points in mind as you assign secondary splits to back up main splits already assigned to line groups:
Line groups do not require secondary splits. You don’t have to assign secondary splits to line groups.
An agent split may be designated the secondary split for as many line groups as you want. You could have the same secondary split for all line groups.
An agent split assigned as the main split to one or more line groups can also be assigned as
-the secondary spilt to one or more additional line groups.
Now complete your Shift Configuration Planning Form for at least one shift configuration. Figure 9 shows a portion of the Shift Configuration Planning Form for Bon Voyage Travel.
A
B
C
D
4
3
6
2
FIGURE 9 Bon Voyage Travel’s Shift Configuration Planning Form.
Shift Configuration Planning Form
Shift Configuration 1 Shift Configuration 2
Line No. of Main Secondary Line No. of Main Secondary
Group Lines Split Split Group I D Lines Split Split
1
3
A
1
3
B
2
4
C
3
—D
Shift Configuration 3 Shift Configuration 4
Line No. of Main Secondary Line No. of Main Secondary
Group ID Lines Split Split Group ID Lines Split Split
A A
B
Now you should have a complete set of CMS planning forms. Keep them at hand and go on to “Planning Your MERLIN II System: Part Two. ”
Planning Your MERLIN II System: Part Two
You can resume planning your MERLIN II system following the instructions in the MERLIN II System Planning Guide. As you come to each new section and planning form, refer back to this guide for information pertaining to CMS. The information in this part of the guide is organized under headings that are the same as or very similar to the corresponding headings in the
MERLIN II System Planning Guide. If you don’t find any remarks in this guide
regarding a MERLIN II system setting, you can assume the setting does not affect CMS operation.
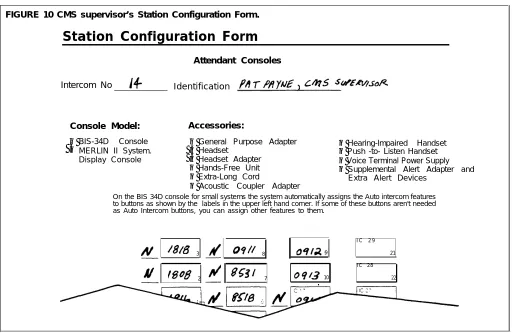
Station Configuration Forms
CMS SUPERVISOR’S MERLIN II SYSTEM DISPLAY CONSOLE
You’ll need a Station Configuration Form for the attendant console at the CMS supervisor’s station and one for each CMS agent’s voice terminal. Keep the following points in mind as you complete the forms.
The supervisor’s attendant console is the MERLIN II System Display Console.
Use the information under “Line Buttons” and “Auto Intercom Buttons” below to supplement the instructions in the MERLIN II System Planning Guide as you complete a Station Configuration Form for the CMS supervisor’s voice terminal.
Line Buttons
Each MERLIN II system telephone line assigned to CMS should appear at a line button (with lights) on the CMS supervisor’s console. Follow the order on your CMS Line Button Planning Form as you assign lines to buttons on the Station Configuration Form for the CMS supervisor’s console.
NOTE: The CMS supervisor’s attendant console can also have other lines or line pools assigned to it.
Auto Intercom Buttons
Each CMS agent station should be represented by a button with lights (an Auto Intercom button) on the CMS supervisor’s console. Use the information and illustrations in the MERLIN II System Planning Guide under the heading
“Line Assignments” to fill in the boxes representing line buttons on the supervisor’s Station Configuration Form. Also note the information under “Auto Intercom Buttons” which shows how to account
buttons on the supervisor’s form.
Figure 10 shows a portion of the Station Configuration Voyage Travel’s CMS supervisor.
for Auto Intercom
Form filled out for Bon
FIGURE 10 CMS supervisor’s Station Configuration Form.
Station Configuration Form
Attendant Consoles
Intercom No Identification
Console Model: Accessories:
✓❑ ❑BIS-34D Console
❑ General Purpose Adapter ❑ Hearing-lmpaired Handset MERLIN II System. ✓❑ Headset
Display Console ✓❑ Headset Adapter
❑ Push -to- Listen Handset
❑ Voice Terminal Power Supply
❑ Hands-Free Unit ❑ Supplemental Alert Adapter and
❑ Extra-Long Cord Extra Alert Devices
❑ Acoustic Coupler Adapter
On the BIS 34D console for small systems the system automatically assigns the Auto intercom features to buttons as shown by the labels in the upper left hand corner. If some of these buttons aren't needed as Auto Intercom buttons, you can assign other features to them.
I
I C 2 9
3 8 9 21
I C 2 8
2 7 10 22
LINE ASSIGNMENTS TO As you plan for the placement of line or line pool buttons on CMS agents’
CMS AGENTS’ VOICE Station Configuration Forms, keep the following points in mind.
-TERMINALS
Square Systems
If your MERLIN II system will be administered as a square system, each CMS line that an agent is responsible for answering must have its own line button on the agent’s voice terminal.
Pooled Systems
If your MERLIN II system will have pooled lines, a CMS agent’s voice terminal does not necessarily have to have a button for each pool of CMS lines that the agent is responsible for answering.
FEATURE ASSIGNMENTS As you plan MERLIN II system feature assignments for CMS agents’ voice
TO CMS AGENTS’ VOICE terminals, keep the following CMS requirements in mind.
TERMINALS
CMS Status Buttons
Each CMS agent’s voice terminal needs two buttons with lights to be programmed as CMS status buttons. On the agents’ Station Configuration Forms, label one button “Available” and the other “ACW” (for after-call-work
state). .
Signal Button
Each agent should have a button for signaling the CMS supervisor. The button can be either an Auto Intercom button or a Manual Signaling button. For more information, see the entries for Auto Intercom and Manual
Signaling in Section 2, “Reference, “ in the MERLIN II System Manual. Choose one and label a button on the agents’ Station Configuration Forms
accordingly.
Cover Buttons
Two CMS options that require Cover buttons are All-Ring operation and Transfer-to-Split.
All-Ring: Check your CMS Agent Splits Planning Form to see whether any
of your agent splits will have All-Ring operation. Agents in an All-Ring split need a Cover button to pick up calls CMS sends to the “ghost” agent in the split.
NOTE: No more than six agents in a split can have a Cover button for the ghost agent. If you have an All-Ring split with more than six agents, the remaining agents will have to use the MERLIN II system Call Pickup feature to pick up calls that come in to the ghost agent. See the entry for Call Pickup in Section 2, “Reference,” in the
MERLIN II System Manual for more information about this feature.
Label a Cover button on the Station Configuration Form for each agent in a split that will be set for All-Ring operation. The label might read “Cover” plus the name of the split. Also, write “R” on the line to the left of the button in order to indicate that you want CMS calls coming into the split to ring immediately.
Transfer-to-Split: Check your CMS Agent Splits Planning Form to see
whether any of your agent splits will be set to answer calls transferred into the split using the Transfer-to-Split feature. Calls transferred into a split with this feature are actually transferred to a “ghost” agent’s intercom number. The “real” agents in the split use a Cover button to answer the transferred calls .
Label a
NOTE: No more than six agents can have a Cover button for the ghost agent in a split. If you have a split with the Transfer-to-Split feature and more than six agents, the remaining agents will have to use the MERLIN II system Call Pickup feature to pick up calls that are transferred into the split. See the entry for Call Pickup in Section 2,
“Reference, “ in the MERLIN II System Manual for more information about this feature.
Cover button on the Station Configuration Form for each agent in a split that will receive transferred calls through Transfer-to-Split. The button might read “Personal Travel” for agents in Bon Voyage Travel’s Personal Travel split. Also, write “R” on the line to the left of the button in order to indicate that you want CMS calls transferred into the split by another agent to ring immediately.
RINGING OPTIONS FOR You can set any line appearing on a voice terminal to ring immediately, to
CMS AGENTS’ VOICE ring after a delay, or not to ring. Keep the following points in mind as you
TERMINALS decide on ringing options for the lines on your CMS agents’ voice terminals.
CMS Lines and Line Pools
All CMS lines and/or line pools that appear on an agent’s voice terminal should be set not to ring (that is, set to No Ring). Otherwise, every call that comes in on these lines will ring at the agent’s voice terminal before it is processed by CMS.
Setting these lines to No Ring eliminates a likely source of confusion for the agent, and it reduces the possibility of the agent interfering with CMS operation by answering calls before CMS can process them. Calls routed to the agent through CMS will still ring at the agent’s voice terminal because they arrive as transferred calls.
NOTE: Setting lines to No Ring during MERLIN II system administration has no relation to setting up splits for All-Ring
operation during CMS administration. You should set CMS lines and line pools on agents’ voice terminals to No Ring whether or not you have any All-Ring splits.
Other Lines and Line Pools
The ringing options you choose for other lines or line pools appearing on agents’ voice terminals will not affect CMS, but keep in mind that ringing calls that are not CMS calls may confuse agents. For that reason, you should consider setting all lines and line pools on agents’ voice terminals not to ring.
Follow the instructions under “Ringing Options” in the MERLIN II System
Planning Guide to indicate the ringing options you want on the agents’ Station
Configuration Forms.
Figure 11 shows a portion of a Station Configuration Form filled out for a Bon Voyage Travel agent.
FIGURE 11 An agent’s Station Configuration Form.
Station Configuration Form
Analog Stations and Basic Telephones* (Pooled Systems)
/ 6
Intercom No Identification
S t a t i o n M o d e l : A c c e s s o r i e s :
❑ 5-Button ❑ 34-Button (SP-34) ❑ General Purpose Adapter ❑ Hearing-lmpaired Handset
❑ 10-Button ❑ 34-Button (SP-34D) with Display ✓❑ Headset
❑ 10-Button HFAI ❑ 34-Button Deluxe ✓❑ Headset Adapter
✓❑ BIS-10 ❑ BIS-34 ❑ Hands-Free Unit
❑ BIS-22 ❑ BIS-34D with Display ❑ Extra-Long Cord
❑ 34-Button ❑ Base Telephone ❑ ACOUStiC Coupler
❑ Push-to-Listen Handset
❑ Voice Terminal Power Supply
❑ BTMI
❑ OPTI A d a p t e r ❑
3 4 - B u t t o n 2 2 - B u t t o n
1 0 - B u t t o n
5 - B u t t o n
1 6 7 19
Main Pool or
Pool Access 8 20
Main Pool or Pool Access
4 9 21
Group Page Form
The CMS supervisor and agents should find the MERLIN II system Group Page feature useful. Follow the instructions under “Complete the Group Page Form” in the MERLIN II System Planning Guide to assign CMS agents to paging groups. Figure 12 shows a portion of the Group Page Form for Bon Voyage Travel.
FIGURE 12 Bon Voyage Travel’s Group Page Form.
Group Page Form
Group Code (Default 881) Group Code
Group lD
(Default 882) Group ID
Icom No. Name or Location Icom No. Name or Location
1
16
12 8
2
17
229
3
19
34
21
45
23
56 6
7 8
Group Code (Default 883) Group Code (Default 884)
Group ID Group ID
lcom No. Name or Location Icom No. Name or Location
1
3 7
12
39
23 4
This completes CMS planning. When you finish planning your MERLIN II system, put all the CMS and MERLIN II system planning forms in a safe place. The information recorded on them will help you set up and administer a fully integrated MERLIN II system with CMS when the equipment is
installed.
CMS Planning Forms
Use the forms in this section to record your decisions about your CMS
system. You may want to make photocopies of them and keep the originals in a safe place for possible future use.