by Ellen Finkelstein and Gurdy Leete
Flash
®
CS3
FOR
DUMmIES
‰by Ellen Finkelstein and Gurdy Leete
Flash
®
CS3
FOR
DUMmIES
‰About the Authors
Ellen Finkelsteinhas written numerous bestselling computer books on AutoCAD, PowerPoint, and Flash. She also writes articles on these programs for Web sites, e-zines, and magazines. The seven editions of her AutoCAD Biblehave sold more than 80,000 copies in the United States and abroad. As an Adjunct Instructor of Management she teaches e-Business and Human Resource Management courses. She writes at home so that she can take the bread out of the oven on time.
Gurdy Leetehas been working as a computer animator, computer animation software engineer, and teacher of computer animation since 1981. He has been teaching Flash and other computer animation programs for 15 years at Maharishi University of Management, where he is an Assistant Professor of Art. You can see his art on the Web at www.infinityeverywhere.net.
Dedication
To MMY, for explaining that life is meant to be lived in happiness and teach-ing us how to realize that reality in daily life.
Authors’ Acknowledgments
This book was very much a group effort. First, I’d like to thank my co-author, Gurdy Leete, without whom I could not have completed this book nor even thought of writing it. Gurdy is always a pleasure to work with, always in a good mood and helpful. He’s a brilliant artist and something of a programmer, too, while I am neither. I’ve been quite impressed.
At Wiley, I’d like to thank Steve Hayes, our acquisitions editor, for trusting us with this book. Great kudos go to Susan Pink, our project editor, for doing such a tremendous job.
Personally, I’d like to thank my husband, Evan, and my kids, Yeshayah and Eliyah, who helped out and managed without me as I wrote every day, evening, and weekend. I love you all.
Thanks to Adobe, for supporting Flash authors during the beta period while we were learning the new features of Flash CS3, testing Flash, and writing, all at the same time.
Finally, I’d like to thank the Flash community and specifically all the Flash designers who contributed Flash movies to make this book and its compan-ion Web site more valuable. Most computer books use dummy files, and we made up a few of our own to illustrate the point, but the real-world files we received for this book will help open up new vistas for our readers. And now, a few comments from Gurdy:
I’d like to echo all of Ellen’s words and thank her for being such a great col-laborator. She has such a talent for explaining things with the simplicity, pre-cision, and humor that are so characteristic of the deeper workings of the cosmos. I’d also like to thank my brilliant students Alek Lisefski (www.blue sheepstudios.com) and Benek Lisefski (www.benekdesign.com), and my intrepid research assistants — Nutthawut Chandhaketh, of Thailand; Radim Schreiber, of the Czech Republic; Burcu Cenberci, of Turkey; and Praveen Mishra, of Nepal — whose research activities on the Internet were so helpful in writing this book. Thanks to my omnitalented M.A. in Animation student Mike Zak, for the wonderful collection of clip art drawings he created in Flash for the companion Web site. And thanks to my adorable wife, Mary, and my children, Porter and Jacqueline, for being so supportive during the many hours I spent working on this book.
Contents at a Glance
Introduction ...1
Part I: A Blast of Flash ...7
Chapter 1: Getting Acquainted with Flash CS3 ...9
Chapter 2: Your Basic Flash ...31
Part II: 1,000 Pictures and 1,000 Words ...45
Chapter 3: Getting Graphic ...47
Chapter 4: You Are the Object Editor ...83
Chapter 5: What’s Your Type?...119
Chapter 6: Layering It On ...135
Part III: Getting Symbolic ...149
Chapter 7: Heavy Symbolism ...151
Chapter 8: Pushing Buttons ...171
Part IV: Total Flash-o-Rama ...183
Chapter 9: Getting Animated...185
Chapter 10: Getting Interactive...217
Chapter 11: Extravagant Audio, High-Velocity Video...231
Part V: The Movie and the Web...251
Chapter 12: Putting It All Together...253
Chapter 13: Publishing Your Flash Files ...277
Part VI: The Part of Tens ...313
Chapter 14: Ten Frequently Asked Questions ...315
Chapter 15: Ten Best Flash Resources...331
Chapter 16: Ten Flash Designers to Watch...337
Part VII: Appendixes ...341
Appendix A: Installing Flash and Setting Your Preferences ...343
Appendix B: The Property Inspector and the Panels ...355
Appendix C: What’s on the Companion Web Site...367
Index ...369
Table of Contents
Introduction...1
About This Book...1
How to Use This Book ...1
Foolish Assumptions ...2
Conventions Used in This Book ...2
How This Book Is Organized...3
Part I: A Blast of Flash...3
Part II: 1,000 Pictures and 1,000 Words...3
Part III: Getting Symbolic...3
Part IV: Total Flash-o-Rama ...4
Part V: The Movie and the Web ...4
Part VI: The Part of Tens ...4
Part VII: Appendixes...5
Icons Used in This Book...5
Where to Go from Here...6
Part I: A Blast of Flash...7
Chapter 1: Getting Acquainted with Flash CS3 . . . .9
Discovering Flash ...10
Understanding What You Can Create with Flash CS3...11
Determining When Not to Use Flash CS3 ...12
Getting the Right Start...12
Starting Flash on a PC ...13
Starting Flash on a Mac ...13
Creating a new movie...13
Opening an existing movie ...14
Taking a Look Around...14
Tooling around the toolbars ...15
Using panels ...15
Discovering the Flash menus ...16
Customizing the workspace ...19
Staging your movies...19
Following a timeline ...20
Getting Help in a Flash...21
Help’s multiple manuals ...21
Finding more help on the Web...22
Part III: Getting Symbolic ...149
Chapter 7: Heavy Symbolism . . . .151
Understanding Symbol Types...151
Using graphic symbols ...152
Using movie clip symbols...152
Using button symbols ...153
Using font symbols...153
Creating Symbols ...153
Creating symbols from existing objects ...154
Creating empty symbols...155
Converting an animation to a movie clip symbol ...155
Creating a symbol by duplicating a symbol...156
Modifying Symbols...157
Changing the properties of a symbol...157
Editing symbols ...157
Using Symbols from Other Movies ...160
Using the Flash Library...161
Using the Flash For Dummies Library ...162
Working with Instances, for Instance ...162
Inserting instances ...162
Editing instances ...164
Chapter 8: Pushing Buttons . . . .171
Creating Simple Buttons...171
Understanding button states ...172
Making a basic button...173
Putting Buttons to the Test...174
Creating Complex Buttons ...175
Adding a sound to a button ...176
Adding a movie clip to a button ...177
Adding an action for a button...180
Part IV: Total Flash-o-Rama ...183
Chapter 9: Getting Animated . . . .185
Who Framed the Animation? ...185
Preparing to Animate...186
Master of the Timeline...187
Turtle or hare? ...189
xiii
Table of Contents
Using Publish Profiles...302
Creating a publish profile ...302
Duplicating or renaming a publish profile ...303
Modifying a publish profile ...303
Deleting a publish profile ...304
Exporting and importing publish profiles...304
Using Publish Preview ...305
Posting Your Movie to Your Web Site ...305
Exporting Movies and Images ...306
Creating Printable Movies...308
Preparing your movie for printing ...309
Specifying printable frames ...310
Specifying the print area ...310
Printing movies from the Flash Player ...311
Part VI: The Part of Tens ...313
Chapter 14: Ten Frequently Asked Questions . . . .315
How Do I Combine Two Flash Movies?...315
Why Is Motion Tweening Not Working? ...316
How Can I Sync Sound with Motion? ...317
What Is the Best Way to Import Bitmaps? ...318
How Do I Rescale My Movie’s Size? ...319
What Are the Best Tips for Creating Movies?...320
Can Flash Do 3-D?...321
How Do I Center a Flash Movie in a Web Page?...325
What Are the Size Limits for a Flash Movie?...327
How Do I Dynamically Load Music from the Web? ...328
Chapter 15: Ten Best Flash Resources . . . .331
Check Out Award-Winning Movies...331
Look on the Flash Web Pages ...332
Visit Our Site ...332
Take a Course ...332
Join a Flash Discussion Group...333
Check Out Flash Resource Sites...334
Check Out Sites That Use Flash...335
Attend a Flash Conference ...335
Collect Flash Movies ...335
Reuse Your Best Stuff...336
Chapter 16: Ten Flash Designers to Watch . . . .337
Hillman Curtis...337
Anthony Eden ...338
Flash CS3 For Dummies
xvi
Chris Georgenes ...338
Ben Hantoot ...338
Seb Lee-Delisle...338
Eric Natzke ...339
Keith Peters ...339
Micaël Reynaud ...339
Grant Skinner ...339
Jared Tarbell ...340
Part VII: Appendixes...341
Appendix A: Installing Flash and Setting Your Preferences . . . .343
Installing Flash...343
Installing Flash onto a PC from a DVD ...343
Installing Flash by downloading it to your PC ...344
Installing Flash onto a Mac from a DVD...345
Installing Flash by downloading it to your Mac ...345
Setting Your Preferences ...346
General category ...347
ActionScript category ...348
Auto Format category...349
Clipboard category ...349
Drawing category ...350
Text category ...350
Warnings category...351
PSD File Importer category ...351
AI File Importer category ...352
Customizing Keyboard Shortcuts ...352
Appendix B: The Property Inspector and the Panels . . . .355
The Tools Panel ...355
The Property Inspector Gadget...356
Property inspector with no selection ...356
Property inspector with a shape selected ...357
Property inspector with keyframe selected...357
Property inspector with a symbol instance selected ...357
The Align Panel...358
The Color Panel ...358
The Swatches Panel ...359
The Info Panel...359
The Scene Panel ...360
The Transform Panel ...360
xvii
Table of Contents
The Actions Panel ...361
The Movie Explorer Panel...362
The Output Panel ...362
The Accessibility Panel ...363
The Components Panel ...363
The Component Inspector Panel ...364
The History Panel ...364
The Strings Panel ...365
Appendix C: What’s on the Companion Web Site . . . .367
Your Own Personal Library of Vector Graphics...367
Flash Movies Galore...368
Bonus Chapter...368
Index...369
Flash CS3 For Dummies
xviii
Introduction
W
elcome toFlash CS3 For Dummies, your friendly Web animation com-panion. In this book, we explain in plain English how to make the most of Flash to create stunning, animated Web sites. We aim to give you all the information you need to start using Flash right away — with no hassle.About This Book
As though you hadn’t guessed, Adobe Flash CS3 For Dummiescovers the pow-erful animation product Flash CS3, from Adobe. (The preceding version was Macromedia Flash 8.) Flash CS3 is the latest version of the popular software used on some of the coolest Web sites on the Internet.
We comprehensively explain the Flash features, including
Working with the Flash screen, toolbars, and menus
Creating graphics and text in Flash
Adding sound and video
Using layers to organize your animation
Creating symbols,which are objects that you save for repeated use and for animation
Animating graphics (the key to Flash)
Creating interactive Web sites
Publishing Flash movies to your Web site
How to Use This Book
You don’t have to read this book from cover to cover. We provide just the information you need, when you need it. Start with the first three chapters. Then play around with graphics until you create what you need for your Web site. You might want to check out Chapter 6, on layers, to help you organize it all, and Chapter 7, which covers symbols. Then feel free to jump right to Chapter 9, on animation, to create your first real Flash movie. Chapter 13 tells you how to get your movie on your Web site. Then fire up your browser, sit back, and marvel.
You’ll want to check out other chapters when you need them so that you can create text and buttons, add sound and video, and build an interactive Web site. Chapter 12 provides some ideas for putting all the Flash features together for your best Web site ever.
Keep Adobe Flash CS3 For Dummiesby your computer while you work. You’ll find that it’s a loyal helper.
Foolish Assumptions
We assume that you’re not a master Flash developer. If you want to use Flash to create high-quality Web sites and you’re not an expert animator, you’ll find this book to be a great reference. Adobe Flash CS3 For Dummiesis ideal for beginners who are just starting to use Flash or for current Flash users who want to further hone their skills.
Because people usually add Flash movies to Web sites, we also assume that you know some of the basics of Web site creation. You should know what HyperText Markup Language (HTML) is and understand the process of creat-ing and structurcreat-ing HTML pages as well as uploadcreat-ing them to a Web site.
If you want some help on the topic of Web sites, you might want to take a look at Web Design For Dummies, 2nd Edition, by Lisa Lopuck (published by Wiley Publishing, Inc.).
Conventions Used in This Book
Sometimes it helps to know why some text is bold and other text is italic so that you can figure out what we’re talking about. (A typographic convention is nota convention of typographers meeting to discuss the latest typography techniques.)
New terms are in italicsto let you know that they’re new. When we suggest that you type something, we show you what we want you to type in bold.
Messages and other text that come from Flash, including programming code, are in a special typeface, like this.
When we say something like “Choose File➪Save As,” it means to click the File menu at the top of your screen and then choose Save As from the menu that opens. When we want you to use a toolbar or toolbox button (or tool), we tell you to click it.
2
Flash CS3 For Dummies
How This Book Is Organized
We start by presenting an overview of the Flash universe and then continue in the general order that you would use to create a Flash movie. More basic material is at the beginning of the book, and more advanced material (but not too advanced!) comes later.
To be more specific, this book is divided into seven parts (to represent the seven states of consciousness — okay, we don’t have to get too cosmic here). Each part contains two or more chapters that relate to that part. Each chap-ter thoroughly covers one topic so that you don’t have to go searching all over creation to get the information you need.
Part I: A Blast of Flash
Part I contains important introductory information about Flash. In Chapter 1, we tell you what Flash is all about, show you what the Flash screen looks like, and explain how to get help when you need it most. You also find instructions for starting a new movie and opening an existing movie, and we give you a list of steps for creating your first animation. Chapter 2 explains in more detail the steps for creating a Flash movie. We also explain some basic con-cepts that all Flash users need to know.
Part II: 1,000 Pictures and 1,000 Words
Part II explains all the tools available for creating graphics in Flash. Chapter 3 explains the unique drawing tools included in Flash. We also explain how to import graphics if you don’t feel like creating your own. Chapter 4 shows you how to edit and manipulate graphic objects, and Chapter 5 is all about creat-ing text. Chapter 6 explains layers,which help you organize your graphics so that they don’t interfere with each other.
Part III: Getting Symbolic
Symbolsare graphical objects that you save to use again and again. Whenever you want to place an object on a Web page more than once, you can save the object as a symbol. You can also group together many individual objects, making them useful when you want to manipulate, edit, or animate them all at one time. Chapter 7 explains creating and editing symbols. Chapter 8
3
Introduction
describes how to create buttons — not the kind that you sew, but rather the kind that you click with your mouse.
Part IV: Total Flash-o-Rama
Part IV explains how to put all your graphics together and make them move. Chapter 9 covers animation in detail — from frame-by-frame animation to
tweening,where Flash calculates the animation between your first and last frames. Tween movement to make your objects move or morph into new shapes. You can also tween color and transparency.
Chapter 10 shows how to create interactive Web sites that react to your view-ers. For example, when a viewer clicks a button, Flash can jump to a different part of a movie or go to a different Web page entirely. To create interactivity, you use ActionScript, Flash’s JavaScript-like programming language. We tell you how to put ActionScript to work.
Chapter 11 is about adding multimedia — sound, music, and video — to your Flash movies and buttons.
Part V: The Movie and the Web
This part helps you put all your animated graphics and cool buttons together and publish your work on the Web. Chapter 12 outlines the various techniques that you can use to create a great Web site by using only Flash.
Chapter 13 explains how to test your animation for speed and suitability for all browsers and systems. Then we cover the details of publishing movies as well as the other available formats, such as HTML and GIF. You can also create projectors— movies that play themselves.
Part VI: The Part of Tens
What’s a For Dummies book without The Part of Tens? Chapter 14 answers some frequently asked questions about Flash and introduces some fun techniques, such as simulating 3-D effects and dynamically loading music from the Web. Chapter 15 provides you with the ten best resources for Flash (besides this book, of course). Chapter 16 points you to the work of ten fabulous Flash Web designers.
4
Flash CS3 For Dummies
Part VII: Appendixes
Last but not least, we come to the appendixes. They add valuable information to the end of this book. Appendix A adds instructions on installing Flash and setting preferences and options. In Appendix B, we show you what’s what in the Property inspector and on the various panels.
Appendix C tells you what’s on the companion Web site (www.dummies.com/ go/flashcs3). We provide Flash movies that we illustrate in the book and others that you can just play with to see how they work. We also add our own library of graphics that you can add to your own movies.
Icons Used in This Book
Icons help point out special information. For example, sometimes they tell you that you don’t care about this information and can skip over it without fear.
This icon flags new features in Flash CS3. If you have been using Flash 8 or even an earlier version, you may want to skim through this book and look for this icon to help you quickly get up to speed in the new version.
Look for this icon to find all the goodies on the companion Web site, at
www.dummies.com/go/flashcs3.
This icon alerts you to information that you need to keep in mind to avoid wasting time or falling on your face.
Flash has some advanced features you might want to know about — or skip entirely. This icon lets you know when we throw the heavier stuff at you.
Tips help you finish your work more easily, quickly, or effectively. Don’t miss out on these.
Uh-oh! “Watch out here!” is what this icon is telling you. If you skip this icon, you never know what might happen.
5
Introduction
Where to Go from Here
If you haven’t already installed Flash, check out the complete instructions for installing Flash in Appendix A. Then open Flash, open this book, and plunge in.
We would love to hear your comments about this book. You can contact Gurdy Leete at [email protected] Ellen Finkelstein at ellenfinkl@bigfoot. com. Please note that we can’t provide technical support on Flash. (If you need technical support, check out the resources we list in Chapter 15.)
Enough of all this talk. It’s time to move into the real part of this book and start creating cool Flash movies! Enjoy!
6
Flash CS3 For Dummies
Part I
A Blast of Flash
In this part . . .
I
n this part, you discover what Flash can and can’t do and start to make your way around the Flash world. In Chapter 1, we introduce you to Flash, show you what it looks like, and explain how to use its toolbars and menus. You find out about the Stage and the Timeline, two central Flash concepts. Play your way through your first anima-tion to get firsthand experience in the power of Flash.In Chapter 2, you get an overview of the entire process of creating a Flash animated movie, from developing your concept to publishing your movie in the format a browser can display. We explain how to set properties that affect your movie as a whole and how Flash works with various kinds of graphics. We close with the steps for printing your movie on paper. This part provides the foundation for future success.
Chapter 1
Getting Acquainted
with Flash CS3
In This Chapter
Introducing Flash
Figuring out what you can create with Flash CS3
Knowing when not to use Flash CS3
Starting Flash
Perusing the screen
Using Help
Creating your first animation
Closing Flash
O
nce upon a time in a galaxy that seems far, far away by now, there was the Internet, which contained only plain, unformatted text. Then came the Web, and we gained text formatting and graphics. Then the Web grew up a little, and Web page graphics got fancier with things such as small anima-tions in banner ads. But people, being used to movies and TV, wanted an even more animated and interactive Web experience. Along came Flash.Flash,once from Macromedia but now from Adobe Systems, is the software that runs some of the coolest Web sites around. When you surf the Web and see sites that contain animation across the entire page or buttons that do spectacular stunts when you click them, you’re probably seeing some Flash magic. If you create a Web site, you can use Flash to rev up the basics and actively respond to users’ choices so that your viewers will say, “Wow!”
In this chapter, you find out what Flash is all about, what the Flash screen looks like, and how to use Help. Then you create your first, simple animation so that all the rest of this book makes sense.
Discovering Flash
Flash offers a powerful system for creating animation for the Web. In a nut-shell, here’s an overview of how you use the system:
1. Create a Flash movie by creating graphics and animating them over the duration of the movie.
Besides animated graphics, you can add navigational buttons, check boxes, and other user interface elements. You can add a few Flash com-ponents to a Web site or create an entire Web site.
2. Use the Publish command in Flash to publish the movie into a Flash Player file that a browser can display.
At the same time, Flash creates the appropriate HyperText Markup Language (HTML) code that you need for your Web page.
3. Insert HTML code into your HTML document that references the Flash Player file.
It’s similar to adding a graphic to a Web page. Or you can use the HTML code alone as a new Web page for a fully Flashed page.
4. Upload the new or edited HTML document and the Flash Player file to the location where you keep other files for your Web pages.
5. Open your browser, navigate to your Web page, and presto! — there’s your cool animation, navigation, or other Flash element on your Web page.
You need the Flash Player to see the effects that Flash creates. These days, the Flash Player comes installed with most computer systems and browsers, so most people can view Flash-driven Web sites immediately without any special download or preparation. When you display a Web site that contains Flash effects, your system uses the Flash Player to play the animation. Users who don’t have a Flash Player can download it for free from Adobe at www. adobe.com.
Web sites are getting more and more sophisticated. By using animation, spe-cial effects, and interactive techniques, you can distinguish your Web site from the also-rans. Creating animation isn’t hard, and you don’t have to be a professional graphic artist, either. Anyone can create simple animations to enhance a Web site; it just takes a little time.
To find Web sites that have successfully used Flash, check out the Adobe site at
www.adobe.com/products/flash/flashpro/productinfo/customers/
and look at some of the examples. Don’t get discouraged by seeing some of the truly sophisticated results at these sites. You can start with a simple, ani-mated site and go from there. (Chapter 16 lists ten great Flash designers and where you can find their work.)
10
Part I: A Blast of Flash
Understanding What You Can
Create with Flash CS3
You can use Flash CS3 to create simple animation to add to your Web page. Or you can create an entire Web page or site with Flash and incorporate text, graphics, interactive buttons, user interface components, and animation. You can even program applications in Flash.
This book helps you use Flash to create a simple or complex Web site. The following list describes some ways that you can manipulate text, graphics, and sound by using Flash CS3:
Create still or animated text on your Web page.You can choose to stop the animation after a few seconds or repeat it while your viewers view the page.
Use Flash tools to create your own graphics for your Web page or to import graphics.You can lay out an entire Web page graphically or add graphics to only a part of a Web page.
Animate graphics and make objects appear and disappear by using the transparency feature. Objects can move, get bigger or smaller, or rotate. Flash also lets you morph — that is, transform — shapes into new shapes.
Fill shapes and text with gradients, which are colors that gradually change into new colors.You can even fill shapes and text with bitmap images that you import into Flash. For example, you could fill the letters of your name with dozens of flowers. (You aren’t a flower child any more?)
Create Web page buttons that not only lead your viewers wherever you want them to go but also change shape or color at the same time.
You can make buttons change when you pass your mouse over them. People who view your page can click a button to display a movie (animation) or start a small application.
Add sound or video to your movie.It’s easy to add sound effects in Flash. You can control how long the sound or music plays and whether it loops to play continuously. You can play video files as well.
Create menus that viewers can use to navigate your site. You can create navigation tools as well as forms, check boxes, and other inter-face elements that look a lot more stylish than plain HTML ones.
As you can see, you can go far with Flash if you want. And why not? It’s great fun!
11
Chapter 1: Getting Acquainted with Flash CS3
Determining When Not to Use Flash CS3
If Flash CS3 is so wonderful, why doesn’t every Web site designer use it? Why aren’t most Web sites created completely with Flash?
Here’s the other side of the story.
Although the vector graphics and animation of Flash load quickly, they don’t load as quickly as plain text and simple graphics. Adding a movie to your Web page creates some overhead. There’s no point in using Flash if you want simple pages consisting of mostly text and a few graphics that you want to stay put and not move.
You can create certain graphic effects more easily by using bitmap graphics. Painted brush stroke and textured effects are examples. Artists create these types of graphics by using graphics editing software, and the results are bitmaps. Similarly, to add photographs to your Web page, you need to scan the photographs as bitmaps. Flash creates vector graphics(defined mathe-matically), which are different from bitmap graphics(defined by lots of dots). However, you can import bitmap graphics into Flash. Find out more about bitmap and vector graphics in Chapter 2.
If you want simple animation, such as a few blinking dots or a marquee effect, animated GIFs(the animated bitmap graphics that you often see on the Web) might be smaller than Flash movies, so they load faster. You can create ani-mated GIFs by using aniani-mated GIF editing software.
Some sites don’t lend themselves to animation. Animation can distract from your content, and overdoing animation can make a serious site seem silly. Animation is great, but it has its place. Also, although Flash has some fea-tures that allow accessibility for people with disabilities, it still isn’t as acces-sible as plain HTML. You need to determine whether animation is right for your Web site.
Flash provides little in the way of 3-D graphics or animation. For those, you need to use more sophisticated software, such as Poser or 3D Studio Max. (See Chapter 14 for some 3-D possibilities in Flash.)
Getting the Right Start
Well begun is half done, as the saying goes. The easiest way to begin using Flash CS3 is with a shortcut or alias right on your desktop. Double-click the
12
Part I: A Blast of Flash
Flash icon, and you’re on your way. (See Appendix A for information on installing Flash.)
Starting Flash on a PC
Whether you installed Flash from the CD or by downloading it from the Adobe Web site onto your PC, you might or might not have a shortcut on your desktop. To create one, choose Start➪All Programs ➪Adobe Flash CS3. Right-click the Adobe Flash CS3 item and choose Create Shortcut from the pop-up menu that appears. The new shortcut appears on the menu. Drag that shortcut to your desktop.
To rename the shortcut, click the shortcut on your desktop. Then click the text beneath the icon. Type Flash CS3 (or whatever you want) and press Enter. Just double-click the icon to open Flash.
Starting Flash on a Mac
You might find it handy to add the Flash CS3 icon to your Dock for easy launch-ing. To do this, click the Finder icon on the extreme left of the Dock to bring up a new Finder window. Navigate in the Finder window to the Applications folder, and in the Applications folder, double-click the Adobe Flash CS3 folder to open it. Click and drag the Flash CS3 application icon to the Dock. A copy of the Flash CS3 application icon appears on the Dock.
Creating a new movie
Files that you create by using Flash are commonly called movies.When you start Flash, the startup screen appears (by default). In the Create New sec-tion, click one of two options to immediately open a new movie file:
Flash File (ActionScript 3.0)takes advantage of the latest version of ActionScript, Flash’s programming language.
Flash File (ActionScript 2.0)creates a Flash movie compatible with ActionScript from previous versions of Flash.
If you have already opened a movie and have the menus available, choose File➪New. In the New Document dialog box, select Flash File (ActionScript 3.0) or Flash File (ActionScript 2.0) on the General tab and then click OK. You usually start by creating or importing some graphics. (To find out more about working with graphics, see Chapter 3.)
13
Chapter 1: Getting Acquainted with Flash CS3
Opening an existing movie
If you want to work on a movie you’ve already created, do the following. When you first open Flash, choose the movie in the Open a Recent Item section or click Open to find the file. If you’ve already opened a movie and have the menus available, press Ctrl+O (Windows) or Ô+O (Mac) or choose File➪Open; then double-click the movie to open it. The first frame appears on your screen, and you can edit the movie any way that you want.
When you open more than one movie, you see a tab at the top for each movie. You can click the tabs to move from movie to movie. The tabs appear in the order you created or opened the movies.
Taking a Look Around
The Flash screen is different from screens in other programs that you might be used to, so take the time to get to know it. You can also customize the Flash screen. Figure 1-1 shows one possible display.
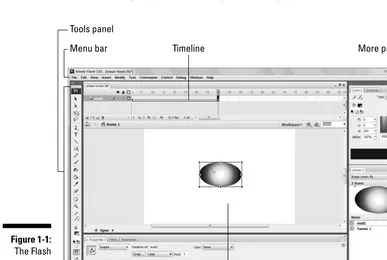
Tools panel
Timeline
Menu bar More panels
Stage Property inspector
Figure 1-1: The Flash screen.
14
Part I: A Blast of Flash
If your screen opens with several rectangular panels strewn about or docked on various sides, don’t worry about them now. We explain how to open and use these panels throughout this book, but you don’t need them for this chapter. If they drive you crazy, right-click (Windows) or Control+click (Mac) each panel’s title bar and choose Close Group in the menu that appears.
See Appendix B for a full layout of each panel and toolbar.
Tooling around the toolbars
Flash contains two toolbars in the Mac version: the Edit bar and the
Controller. In Windows, Flash also offers the Main toolbar. To display or hide these toolbars, choose Window➪Toolbars and click the toolbar that you want to display or hide. Here is a description of the toolbars:
Main toolbar (Windows only):Contains commonly used commands. Many of these are familiar from the Standard toolbar in other Windows programs. By default, Flash does notdisplay the Main toolbar.
Controller:Lets you control the playback of movies. For more informa-tion, see Chapter 9.
Edit bar:Helps you work with the Timeline. The bar appears at the bottom of the Timeline. It includes a toggle to display and hide the Timeline, a button for editing scenes, a drop-down list to manage work-spaces, and a zoom control. We discuss the workspaces and the Timeline later in the chapter. For detailed information about the Timeline and scenes, see Chapter 9.
Using panels
Panels give you access to the many Flash tools and settings. You access the panels from the Window menu. We discuss the specific panels throughout this book. In this section, we explain how to keep control over your panels.
Most panels are dockable,which means they can sit at the side or bottom of your Flash window without covering up your work and they fit together in a group with other panels. You can also stack undocked panels on top of each other. You control panels by doing the following:
To dock a panel:Drag it by its title bar to the side or bottom of your screen. When you see a grey bar with a blue edge, release the mouse button.
To undock a panel:Drag it by its title bar.
15
Chapter 1: Getting Acquainted with Flash CS3
To open or close a panel:Choose it from the Window menu.
To close an undocked panel:Click its Close button.
To close a docked panel:Right-click (Windows) or Control+click (Mac) its title bar and choose Close Panel.
To collapse a group of panels to icons:Click the double right arrow at the top of the group of docked panels.
You can also stack panels. Drag a panel (by its title bar) to another panel to stack it below the first one. You can also collapse or expand panels: A col-lapsedpanel displays only its title bar, so it doesn’t take up much space. Just click its title bar. Repeat the process to expand the panel again.
The Tools panel contains all the tools you need to draw and edit objects. At the bottom of the Tools panel are options that modify how the tools function. (See Chapters 3 and 4 for a complete description of the Tools panel.)
The Property inspector is another important panel. This panel displays infor-mation about selected objects, such as size, name, and location. You can modify objects in the Property inspector as well. It is context sensitive,which means that its contents change according to what you’re doing. For example, if you select a graphic object, the Property inspector provides settings relat-ing to that object, and you can use the Property inspector to edit that object.
The Property inspector has several controls for changing its configuration:
Title bar: Click the title bar to switch between collapsing the Property inspector completely (you just see the title bar) and displaying its previ-ous state.
Tab button:Click the tiny button to the left of the word Propertiesat the top of the Property inspector to switch between three states: fully expanded, half expanded, and collapsed (to the title bar).
Minimize/Maximize button: Click the minus sign or box (depending on the current state) to switch between collapsing the Property inspector completely and displaying its previous state.
Resize grabber: If the Property inspector is not docked, you can resize it by dragging the grabber at its lower-right corner.
Discovering the Flash menus
Most drawing functions are available only in the Tools panel. You often use the Timeline for creating animation, as we discuss in the “Following a time-line” section, later in this chapter. Almost every other function in Flash is on
16
Part I: A Blast of Flash
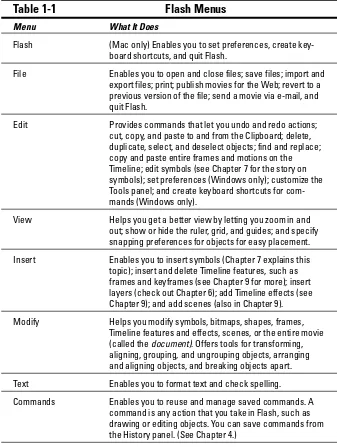
a menu somewhere. You just need to find it. In general, we discuss the specific menu functions where appropriate throughout this book. Table 1-1 offers an overview of the menus.
Table 1-1
Flash Menus
Menu What It Does
Flash (Mac only) Enables you to set preferences, create
key-board shortcuts, and quit Flash.
File Enables you to open and close files; save files; import and
export files; print; publish movies for the Web; revert to a previous version of the file; send a movie via e-mail, and quit Flash.
Edit Provides commands that let you undo and redo actions;
cut, copy, and paste to and from the Clipboard; delete, duplicate, select, and deselect objects; find and replace; copy and paste entire frames and motions on the Timeline; edit symbols (see Chapter 7 for the story on symbols); set preferences (Windows only); customize the Tools panel; and create keyboard shortcuts for com-mands (Windows only).
View Helps you get a better view by letting you zoom in and
out; show or hide the ruler, grid, and guides; and specify snapping preferences for objects for easy placement.
Insert Enables you to insert symbols (Chapter 7 explains this
topic); insert and delete Timeline features, such as frames and keyframes (see Chapter 9 for more); insert layers (check out Chapter 6); add Timeline effects (see Chapter 9); and add scenes (also in Chapter 9).
Modify Helps you modify symbols, bitmaps, shapes, frames,
Timeline features and effects, scenes, or the entire movie (called the document). Offers tools for transforming, aligning, grouping, and ungrouping objects, arranging and aligning objects, and breaking objects apart.
Text Enables you to format text and check spelling.
Commands Enables you to reuse and manage saved commands. A
command is any action that you take in Flash, such as drawing or editing objects. You can save commands from the History panel. (See Chapter 4.)
(continued)
17
Chapter 1: Getting Acquainted with Flash CS3
Table 1-1 (continued)
Menu What It Does
Control Provides options that let you control the playing of
movies; test movies and scenes; engage certain interac-tive functions; and mute sounds.
Debug Provides tools for debugging ActionScript code. (See
Chapter 10 for more on ActionScript.)
Window Enables you to open lots of things, including a duplicate
window, panels that help you control objects, the Library (more on the Library in Chapter 2), windows for creating interactive controls (which we explain in Chapter 10), workspaces, and the Movie Explorer (to help manage your movie — see Chapter 12).
Help Comes to the rescue when you need help. You can find a
wide variety of resources in this new version, including Adobe online forums.
Many menu commands offer keyboard shortcuts. You can also create your own keyboard shortcuts. (See Appendix A for instructions.)
The shortcuts are displayed on the menus, next to the command name. Here are some of the most commonly used keyboard shortcuts (for more short-cuts, see the tear-out Cheat Sheet at the front of this book):
Ctrl+N (Windows) or Ô+N (Mac):Open the New Document dialog box so you can start a new movie.
Ctrl+O (Windows) or Ô+O (Mac):Open an existing movie.
Ctrl+S (Windows) or Ô+S (Mac):Save your movie. Use this shortcut often!
Ctrl+X (Windows) or Ô+X (Mac):Cut to the Clipboard. Chapter 4 explains more about using the Clipboard.
Ctrl+C (Windows) or Ô+C (Mac):Copy to the Clipboard.
Ctrl+V (Windows) or Ô+V (Mac):Paste from the Clipboard.
Ctrl+Z (Windows) or Ô+Z (Mac):Undo. Would you believe that by default Flash remembers your last 100 actions and can undo them? What a relief! And if you choose Window➪Other Panels➪History, the History panel lists each action so you know what the next Undo will undo. Think of it as a journey into the long-forgotten past. (See Chapter 4 for more on the History panel, and see Appendix A for details on customizing the number of Undos that Flash remembers.)
Ctrl+Y (Windows) or Ô+Y (Mac):Redo. This redoes actions that you undid by using the Undo button. (Got that?) This button remembers just
18
Part I: A Blast of Flash
as many actions as the Undo button. If you undo more actions than you want, click Redo (or press Ctrl+Y or Ô+Y) until you’re back where you want to be. Using the Undo and Redo buttons is like traveling through Flash time — and it gives you lots of slack while you’re working.
Ctrl+Q (Windows) or Ô+Q (Mac):Exit Flash.
We mention other keyboard shortcuts throughout this book when we discuss their corresponding commands.
You should note, although it’s not a shortcut, that you can find the Zoom Control box in the upper-right corner of the Stage — when the Edit bar is open (choose Window➪Toolbars➪Edit Bar if necessary). Click the arrow and choose a zoom factor to zoom in and out. Zooming doesn’t change the actual size of objects — it just makes them look bigger or smaller.
You aren’t limited to the choices on the Zoom drop-down list. Type a number in the Zoom Control box and press Enter (Windows) or Return (Mac) to set your own zoom factor. For example, type 85to set the zoom factor to 85 percent.
Customizing the workspace
For the best in customization, you can save any layout of panels you like. Set up the panels and choose Window➪Workspace ➪Save Current. In the Save Workspace Layout dialog box that opens, give the layout a name and click OK. To restore that layout at any time, choose Window➪Workspace Layout and choose your very own layout. Choose Window➪Workspace ➪Manage if you need to rename or delete a workspace.
You can access the same workspace features on the Edit bar. It’s easy to choose a new workspace by just clicking the Workspace drop-down list.
Staging your movies
The white box in the center of your screen is the Stage.Think of the Stage as a movie screen where you place objects. You can place graphics and text there and then animate them. Flash also plays back movies on the Stage.
Around the edge of the Stage is a gray area called the Pasteboard. You can use the Pasteboard to store graphics that you plan to use soon but don’t want on the Stage just yet. (For more permanent storage, use the Library, as we explain in Chapter 2.) You can also store data and other nongraphical content on the Pasteboard. Content that you put on the Pasteboard doesn’t appear in your Flash movie.
19
Chapter 1: Getting Acquainted with Flash CS3
Following a timeline
The Timeline window divides your movie into frames.Each frame represents a tiny stretch of time, such as 1⁄
12of a second. Creating a movie is simply a
matter of assembling frames, which are then quickly played in order.
Chapter 9 explains in detail how to make using the Timeline completely pain-less. For now, you should just understand the essentials. See Figure 1-2 for the basic Timeline.
On the left side of the Timeline is the layer list. When you open a new movie, you see only one layer, unimaginatively named Layer 1. A layeris like a sheet of transparent acetate on which you draw objects. Layers help you keep objects from running into each other, causing unfortunate, messy results. You organize your entire movie by using layers. For example, if you want to keep some text constant throughout the movie but animate a bouncing dot, you would give the dot its own layer and animate it on that layer. The layer list has room for more layers, and you can add as many layers as you want. (Chapter 6 gives you the lowdown on layers.)
You can lower the bottom edge of the Timeline to make room for more layers. Hover the mouse cursor over the bottom line until you see the two-headed arrow and drag downward.
To the right of Layer 1, you see a bunch of rectangles, each representing a frame. (Actually, before you start using the Timeline, they’re just potential frames, like unexposed frames on a roll of film.) By default, each frame lasts
1⁄
12of a second. Each layer has its own row of frames because you can have
different animations or objects on each layer.
A keyframeis a frame that defines some change in your animation. In some animations, every frame is a keyframe. Other animations need keyframes for only the first and last frames.
You don’t use the Timeline until you’re ready to animate. While you work, however, you should organize your objects on separate layers. Don’t worry — you can always move an object from one layer to another.
Figure 1-2: The Timeline is your key to managing animation.
20
Part I: A Blast of Flash
Getting Help in a Flash
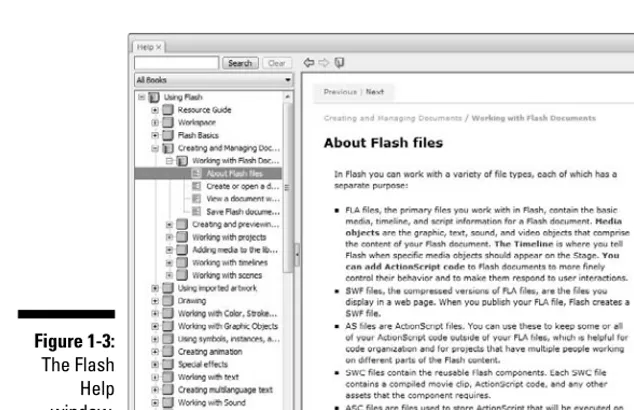
This book is all that you need to start creating great animations, but we would be remiss if we didn’t tell you about the Flash Help system. To use Flash Help, choose Help➪Flash Help. You see a window like the one shown in Figure 1-3.
Help’s multiple manuals
Flash Help contains several sections:
Using Flashis the main Help manual.
Programming ActionScript 3.0 is a manual on the latest version of ActionScript, Flash’s programming language. (See Chapter 10 to find out more.)
You don’t need to program Flash to use it, if you are interested only in graphics and animation.
Learning ActionScript 2.0 in Flashis a user’s guide for ActionScript 2.0, Flash’s previous programming language. You can still use this language. Several other Help sections offer more information on ActionScript 2.0.
Getting Started with Flash Lite 2.xand related help content explains how to use Flash CS3 to develop Flash movies for mobile phones.
Getting Started with Flash Lite 1.x and related content explains how to create Flash movies for the previous version of Flash Lite.
Figure 1-3: The Flash Help window.
21
Chapter 1: Getting Acquainted with Flash CS3
To search for a term, click the Search button. Then type the term and click Search. You can then choose from the list of topics.
Finding more help on the Web
Adobe offers support on its Web site. Choose Help➪Flash Support Center, which takes you to www.adobe.com/support/flash. There you can search the knowledge base and tutorials for answers to your questions.
Try It; You’ll Like It
Perhaps by now you’re getting impatient to try out Flash. Getting started is easy. You collect a few ideas, put together some art, add animation, save your movie, and publish it. Then you view it in a browser either online or offline. That’s the gratifying part. In the following sections, you get to try out Flash by working through a basic animation. The rest of the book explains these concepts in more detail.
Conceiving your first animation
Suppose that you want to add an animated logo to a home page that you’ve already set up. You want the animation to run when the page loads and then stop. Figure 1-4 shows the Rainbow Resources company logo — unanimated, of course — that you can find on this book’s Web site, at www.dummies. com/go/flashcs3.
Suppose that you want the word Rainbowto fly into your page from the right and the word Resourcesto fly in from the left. At the same time, you want the graphic to rotate 180 degrees. The following section shows you how to create this animation.
Figure 1-4: A company logo that could stand some animation.
22
Part I: A Blast of Flash
Creating flashy drawings
You can use Flash to create a company logo, but importing one from this book’s Web site is simpler. Often, you import existing graphics (such as a company logo) from a file rather than create them from scratch. (Chapter 3 explains how to import and manipulate graphics.)
If you’re going through the steps and make a mistake, choose Edit➪Undo (or press Ctrl+Z or Ô+Z) and try again. You can use Undo repeatedly to undo sev-eral steps, if necessary.
To import the Rainbow Resources logo into Flash, follow these steps. (The steps might vary if you’re importing some other graphic in a different format.)
1. Start Flash.
See the instructions in the section “Starting Flash on a PC” or “Starting Flash on a Mac,” earlier in this chapter, if you need help.
2. In the Create New section of the Startup screen, choose Flash File (ActionScript 3.0).
You see a spanking-new movie on your screen.
3. Go to www.dummies.com/go/flashcs3and download the rainbow. gifimage file.
You’ll need to unzip the file and extract the image file. Extract this image file to the location where you plan to save your Flash movie.
4. Choose File➪Import➪Import to Stage.
The Import dialog box opens.
5. Browse the dialog box until you find rainbow.gifin the location where you saved it, and then double-click the file to open it.
You see the logo on your screen. You need to break the logo into pieces and make it a vector graphic so that you can animate sections of it separately.
6. Choose Modify➪Bitmap➪Trace Bitmap.
The Trace Bitmap dialog box appears.
7. In the Trace Bitmap dialog box, set the color threshold to 100, the minimum area to 1, the curve fit to Pixels, and the corner threshold to Many Corners. Click OK.
In our example, we chose to use settings that reproduce the bitmap as faith-fully as possible. Flash creates a vector graphic and breaks up the graphic into individual components. The entire graphic, however, is selected.
8. Click anywhere outside the graphic to deselect it.
You’ve got your logo! Now you need to set it up for animation.
23
Chapter 1: Getting Acquainted with Flash CS3
Turning your objects into symbols
In the logo that you imported in the preceding section, each letter is a sepa-rate object, which can get pretty confusing. Each line in the logo’s design is also separate. But you want your words — and the little design — to stay together. So you must combine each word and the logo into a symbol. A symbol
helps keep objects together and is required for some kinds of animation. (See Chapter 7 for the scoop on symbols.)
To turn the words and the logo into symbols, follow these steps:
1. To get a better view of your image, click the Zoom Control drop-down list (at the upper-right corner of the Stage area) and choose 400%.
If you don’t see the Zoom Control drop-down list, choose Window➪
Toolbars➪Edit Bar to display it.
Use the scroll bar to scroll the words of the logo into view, if necessary.
2. Click the Selection tool on the Tools panel if it’s not already selected.
3. Click the upper-right corner of the word Rainbow (just above and to the right of the w) and drag to the lower-left corner of the first letter, R.
Dragging from right to left makes it easier to avoid selecting the logo at the same time. The entire word should be selected. If it isn’t, click out-side the word and try again.
4. Choose Modify➪Convert to Symbol. In the Convert to Symbol dialog box, click Graphic for the Type and then click OK.
It’s usually good practice to name the symbol, but doing so is not neces-sary for this exercise. When you click OK, Flash places a box around the word so you can see that it’s one object.
5. Repeat the procedure outlined in Steps 3 and 4 with the word Resources.
In this case, you might want to start clicking and dragging from the upper-left area of the word; then choose Modify➪Convert to Symbol again and click OK. Now all the letters of the word Resourcesare a single object.
6. Click the Zoom Control drop-down list and choose 100% so that you can see the entire logo.
7. Click above and to the left of the logo and drag to the lower right to select the entire logo.
8. Hold down the Shift key and click each word to remove both words from the selection.
Now the design portion of the logo is selected.
9. Press F8 (the keyboard shortcut to create a symbol) and then click OK in the Convert to Symbol dialog box.
Flash creates a symbol from the lines of the logo’s design.
24
Part I: A Blast of Flash
See Chapter 7 to find out more about what symbols are and how to use them. Symbols are important building blocks in Flash movies.
Putting your graphics on layers
You need to place different pieces on different layers when you’re animating. You use layers to organize your movie and keep shapes separate so that they don’t interfere with each other. (See Chapter 6 for the complete story on layers.)
To split your three symbols onto three separate layers, you can use a conve-nient feature of Flash CS3: distribute to layers. Follow these steps:
1. Click the Selection tool on the Tools panel if it’s not already selected.
2. Drag diagonally across the entire logo, including the two words, to select it.
You should see two rectangles inside one bigger rectangle. All three objects in the logo are selected.
3. Choose Modify➪Timeline➪Distribute to Layers.
You now have three new layers, named Symbol 1, Symbol 2, and Symbol 3. The three objects of the logo have been distributed to Symbol 1 through 3 and removed from Layer 1.
4. Click outside the Stage to deselect any objects.
You’re now ready for the animation process.
Making graphics move
We explain earlier in this chapter that your goal is to have the word Rainbow
fly in from the right and the word Resourcesfly in from the left. You also want the graphic to rotate 180 degrees at the same time. What you see now is how the animation will end — the last frame of the movie.
Follow these steps to create the last frame of the movie and save the file:
1. For each of the three symbol layers, click frame 30 of the Timeline and choose Insert➪Timeline➪Keyframe.
You may have to scroll down to access frame 30 on the lowest layer. You can find out more about keyframes in Chapter 9.
2. Choose File➪Save and choose the same location you used for the rainbow.gifimage file.
We don’t recommend saving the file in the Flash CS3 program folder — it might get lost among your Flash program files.
25
Chapter 1: Getting Acquainted with Flash CS3
3. Give your movie a name, such as Movie of the Year, and click Save.
Flash creates a file named Movie of the Year.fla. Flash adds .fla
for you because that’s the filename extension for Flash movies.
Go back and create the beginning of your movie. Flash can fill in all the blanks in between. Follow these steps to create the beginning of the movie and the animation:
1. If the Property inspector isn’t already open, choose Window➪ Properties➪Properties to open it.
If the Property inspector is open but collapsed, click its title bar to expand the panel.
2. Select the word Rainbow. Click the first frame of the Timeline in the highlighted row.
When you select the word Rainbow, you can tell which layer it is on by looking at the highlighted layer.
3. Press and hold down the Shift key while you drag the word Rainbow to the right, just off the Stage into the gray area.
You might need to use the horizontal scroll bar or choose a lower zoom percentage in the Zoom drop-down list to see the gray area. Pressing Shift keeps the object from moving up or down while you drag to the right. By clicking the first frame and moving the word, you set its posi-tion at the beginning of the animaposi-tion.
4. Click the word Rainbow’s layer, anywhere between the 1st and the 30th frame.
5. On the Tween drop-down list of the Property inspector, choose Motion.
You now see a solid arrow on the Timeline between the 1st and 30th frames. Choosing Motion in the Tween drop-down list creates animation that moves the symbol from the position in the first frame to its position in the next keyframe, which is frame 30 in this movie.
6. Repeat Steps 2 through 5 for the word Resources. However, in Step 3, drag the word Resources to the left, just off the Stage.
7. Select the logo design and click the first frame of the Timeline in the highlighted row.
8. Choose Modify➪Transform➪Rotate 90° CW to rotate the design 90 degrees clockwise.
9. Repeat the Modify➪Transform➪Rotate 90° CW command to rotate the design a total of 180 degrees.
10. Click the logo’s highlighted layer, anywhere between the 1st and 30th frames, and choose Motion in the Tween drop-down list of the Property inspector.
26
Part I: A Blast of Flash
11. If necessary, drag the horizontal scroll box until the Stage is in the center of your screen.
Otherwise, you won’t be able to see the entire animation — and you don’t want to miss this one!
12. Click the first frame of any layer.
This takes you to the start of your movie. Your screen should look like the one shown in Figure 1-5.
13. Press Enter (Return) and watch the animation. (Start writing your Academy Award acceptance speech.)
14. Save your movie again by choosing File➪Save.
Publishing your first animation
for posterity
You can’t watch the animation in a Web browser until you publish it and insert it into an HTML document. To do so, follow these steps:
1. Click the Stage to change the display of the Property inspector.
You should see the Settings button next to the Publish label.
Figure 1-5: Before you run the animation, Rainbow appears to the right and Resources to the left, and the line logo is rotated.
27
Chapter 1: Getting Acquainted with Flash CS3
2. Click the Settings button in the Property inspector.
The Publish Settings dialog box opens.
3. Click the HTML tab.
4. Deselect the Loop check box in the Playback section.
We want the animation to play only once.
5. Click the Publish button, and then click OK to close the dialog box.
With scarcely a blip, Flash publishes your movie and creates two files, named Movie of the Year.swf(assuming you used that name) and
Movie of the Year.html. They’re in the same folder as your .fla
movie file. Movie of the Year.swfis the file your browser reads to play the animation. Movie of the Year.htmlcontains the HTML code required to display your movie on a Web page.
6. Open your Web browser.
7. Choose File➪Open (or Open File) and find Movie of the Year.html (or whatever you named your movie file).
You might need to click Browse and navigate to the file.
8. Double-click the file.
Your browser opens the HTML document and reads its instructions to play the Flash movie.
9. Sit back and watch it roll.
Don’t blink or you’ll miss it. (If you do miss it, click the Refresh or Reload Current Page button in your browser.) You can see the movie in Figure 1-6.
10. When you finish watching the movie, close your browser.
You can find the Movie of the Year files (.fla, .html, and .swf) on this book’s Web site, www.dummies.com/go/flashcs3.
Exiting Flash
When you finish creating something in Flash, choose File➪Exit (Windows) or Flash➪Quit (Mac).
28
Part I: A Blast of Flash
2
1
3
4
5
6
7
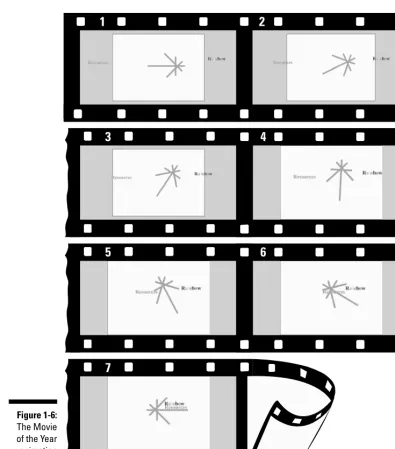
Figure 1-6: The Movie of the Year animation
in detail.
29
Chapter 1: Getting Acquainted with Flash CS3
30
Part I: A Blast of Flash
Chapter 2
Your Basic Flash
In This Chapter
Examining the big picture
Setting movie properties
Getting and managing graphics
Using templates
Printing your movie
T
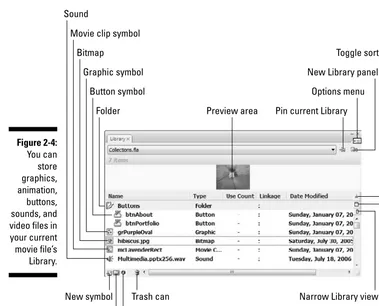
his chapter starts with an overview of the process of creating animation in Flash. We then discuss some tools and features that are fundamental to using Flash efficiently.As you find out in this chapter, you can set the screen size and color, frame rate, and measurement units for the Flash movie as a whole. We also discuss the Library and how it’s a storehouse for images, symbols, and sound. Templates enable you to create great movies without much work. Finally, near the end of this chapter, we explain how you can print a Flash movie.
Looking at the Big Picture
When you use Flash to create animation for your Web site, you generally go through several steps of construction. The steps might vary in their order, depending on your situation. After you know the basics, you can start getting creative and make your Web site rock. Here’s a typical path to add animation to an existing Web page:
1. Think about it.Noodle around, maybe make some doodles on a napkin, collect a few ideas, and choose one or all of them.
2. Set up your movie.Flash lets you choose the size and color of the Stage, the speed of animation (number of frames per second), and other general
12. Publish your magnum opus.Flash makes getting your movie to your Web site easy by creating both the Flash Player (.swf) file and the HyperText Markup Language (HTML) code for your Web page. Flash has other options, too, so you can publish to other formats if you want. (Chapter 12 explains how to put all the elements together, and Chapter 13 shows you how to publish your animation.)
Congratulations! You’ve completed your first Flash Web animation — in fantasy, at least. The following sections cover some details about how to get started.
Setting the Stage
Before you create graphics and animate them — all that fun stuff — you need to make some decisions about the structure of your entire movie. You should make these decisions before you start because changing midway can create problems.
The first step is to decide on the size and color of your Stage and other fun-damental settings. Make sure that the Property inspector is open (choose Window➪Properties➪Properties). When the Stage is active (just click the Stage), the Property inspector looks like Figure 2-1.
Choosing the Stage color
You can set the color of the Stage to create a colored background for your entire movie. As with other settings, you need to consider the context of the Web page that will contain the Flash movie. For example, you might want to match the color of your Web page’s background. If your Flash movie will con-stitute the entire Web page, set the Stage color to the color you want for the Web page background.
To set the Stage color, click the Background Color swatch in the Property inspector. Flash opens the Color palette. Click the color you want.
Figure 2-1: You can change movie properties in the Property inspector.
33
Chapter 2: Your Basic Flash
Specifying the frame rate
In the Frame Rate text box, specify how many frames that a Flash movie plays each second, and then press Enter (Windows) or Return (Mac). A faster rate allows for smoother animation but might present a performance problem on slower computers. Chapter 9 explains more about this setting. The Flash default is 12 fps (frames per second), which is a good starting point. Beware that chang-ing the frame rate midstream in the creation process changes the rate of all the animation in your movie, which might not give you the results you want.
Setting the Stage size
and adding metadata
The Size button displays the current size of the Stage. By default, Flash uses a Stage size of 550 pixels wide by 400 pixels high. To determine the proper setting, you need to know how your Flash movie will fit into your Web page or site. The default fits on almost everyone’s browser screen. However, you might want to fit your movie into a small corner of a Web page — for example, into an animated logo in a top corner of a page. In that case, make the Stage smaller.
To change the Stage size, click the Size button to open the Document Properties dialog box, as shown in Figure 2-2. Type the dimensions that you want in the Width and Height text boxes.
Flash offers two shortcuts for setting the Stage size in the Document Properties dialog box:
Match Printer: Click this option to set the Stage size according to the paper size set in the Page Setup dialog box (choose File➪Page Setup). (For the Mac, the Print Margins dialog box, which you access by choosing
Figure 2-2: The Document Properties dialog box sets the movie’s overall parameters.
34
Part I: A Blast of Flash
File➪Print Margins, also affects the paper size.) Flash sets the size of the Stage to the maximum possible area of the paper minus the margins. Later in this chapter, in the section “Printing Your Movie,” we cover this dialog box in more detail.
Match Contents:Click this option to set the Stage size to the contents of the Stage. Of course, for this to work, you need some objects on the Stage. Flash creates a Stage size by placing equal space around all sides of the entire contents of the Stage. If you want to create the smallest possible Stage, place your objects in the upper-left corner and then click Match Contents.
To change the units used for measuring the screen and objects, choose a unit in the Ruler Units drop-down list.
You can add metadata to your movies. Metadatais information embedded in the movie that search engines can find. In the Title text field, you can include a title that describes your movie. In the Description text field, add keywords and descriptions of your movie’s content that you would like to be available when people search in a browser. For more information, see the section on adding Web search information to your Flash movie in Chapter 12.
Click the Make Default button to make your settings the default for all your new Flash movies. However, the Title and Description fields don’t become defaults; you need to specify them individually for each movie.
When you’ve finished setting document properties, click OK to close the dialog box.
Grabbing a Graphic
The first step when creating animation for your Web site is usually to create or import graphics. Before you do that, however, you should know a little about the different kinds of graphics you can use in a Flash movie.
Understanding vectors and bitmaps
If you know enough about graphics to understand the difference between bitmap and vector graphics, feel free to skip this section. (We hope you always feel free.)
Bitmapsare created with lots of dots. Put them all together, and you get a picture. On-screen, they’re displayed as pixels. As you can imagine, it can take a large file to store the information about all the dots in a bitmap. Another problem with bitmaps is that they don’t scale up well. If you try to enlarge a
35
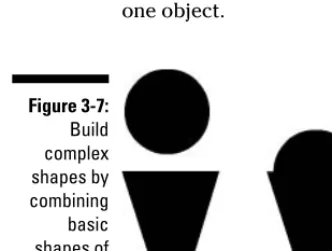
Chapter 2: Your Basic Flash
bitmap, it starts to look grainy because you see all those dots (as in the left example shown in Figure 2-3).
Vector graphicsare defined with equations that specify lines, shapes, and locations. Blank space doesn’t have to be recorded, and the equations are particularly efficient at storing information. As a result, file sizes are usually smaller than bitmap file sizes.
Vector graphics are infinitely scalable, either up or down. No matter how big you