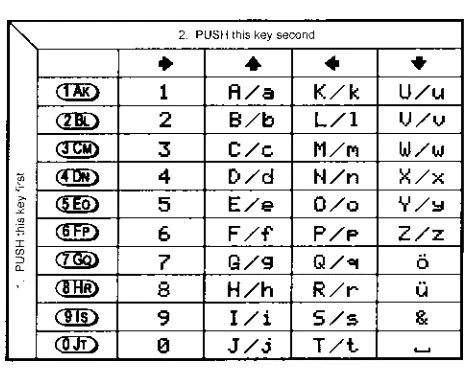
13-3 Short cut text entry, keypad with
ïðñò
keys
Text may also be entered using a combination of the keypad and ïðñò keys.
While in a text input menu, for flashing “FUNC” legend then refer to the following table. Look for the required character in the table then PUSH the key shown to the horizontal-left followed by the ïðñò key shown above the required character (do not push both keys together). The first key push will produce a character on the screen which will be replaced with the required character when the second key is pushed, the cursor with then move one place to the right.
&
Note: The CASE SHIFT key is used to access lower case letters.Section 13-3
Example: To select the letter “N” until the flashing “FUNC” is displayed.
, the number “4” will be displayed,
ï
, the desired “N” character will be displayed and the cursor will move one position to the right. The flashing “FUNC” legend will continue to flash, if it is not required further for it to be removed from the LCD.Example: To select the letter “e” until the flashing “FUNC” is displayed.
, the number “5” will be displayed, to instruct the CPU that a lower
case letter is required (CASE SHIFT)
ñ
, the desired “e” character will be displayed and the cursor will move one position to the right. The flashing “FUNC” legend will continue to flash, if it is not(14) Configuration menu
The configuration (CONFIG) menu is used to set fundamental operating parameters and other variables which do not appear in any other menu heading.
BEEP Confirmation & error tone
LAMP LCD & keypad illumination
CONTRAST LCD contrast adjustment
AUTO PWR-OFF Auto inactivity power off
REMOTE BPS RS232 baud rate
RMT-ID Computer control address
FREQ DISP Frequency readout on/off
WRITE PROT Global write protect
OPENING MESSAGE Change the power-up message
14-1 CONFIG BEEP
The AR8600 emits confirmation ‘beeps’ while the keypad is used. A ‘HIGH’ pitched beep indicates correct operation while a ‘LOW’ pitched beep indicates that an error or unexpected entry has taken place. The volume of the beep is independent of the main volume control and can be separately defined. It is recommended that the beep facility be enabled, especially in the early days while gaining familiarity of the receiver.
Beep is setup in the CONFIG menu. To access the config menu .
The first item in the config menu is “BEEP”, the default is beep on with a volume level of 09. Use the main dial or ïð keys to vary beep level between the range of OFF and 01 to 09 with 09 being the loudest. The key may be used as a short cut to 05.
to accept the data and return to a standard display. Alternatively
to abort entry or
ò
to move to the next item on the config menu (LAMP).14-2 CONFIG LAMP
The AR8600 is equipped with high intensity green LEDs to illuminate the LCD and keypad when operating in areas of low level lighting.
While the AR8600 is switched on and connected to an external power source such as a power supply, the lamp will be default PERMANENTLY ON. The lamp will go out when the AR8600 is
switched off. The lamp may be configured in three ways:
CONT
This setting is default setting when operating from an external power supply. The lamp will CONTinuously illuminate the LCD and keypad. The lamp will only extinguish when the AR8600 is
placed in standby or is switched off. If the optional BP8600 is fitted, continuous operation of the lamp will drain the internal batteries more quickly reducing lifespan between charge cycles.
AUTO
The lamp will automatically illuminate when the keypad or main dial are used. The lamp will remain illuminated for a further five second after the last key push and will then switch off. This is a good compromise setting for best visibility and battery life if the optional BP8600 battery is being used.
OFF
This setting is most useful when operating from the optional BP8600 internal battery to reduce power consumption and increase battery life. The lamp remains permanently extinguished, this is useful when used in areas of high light levels.
The LAMP is setup in the CONFIG menu. To access the config menu
.
ò
to move the cursor to the “LAMP” selection point. Use the main dial or ïð keys to toggle the lamp between AUTO, CONT and OFF. The key may be used as a short cut to AUTO.to accept the data and return to a standard display. Alternatively
to abort entry or
ò
to move to the next item on the config menu (CONTRAST).14-3 CONFIG CONTRAST
The AR8600 is equipped with variable LCD contrast which is adjustable in 32 steps to provide best visibility under different viewing angles, extremes of ambient light & temperature (and between sets due to variation).
The default setting for contrast is 14. The display generally becomes too dark to read around 20 and too feint around 02, the key may be used as a short cut to 14. Best results are usually achieved within the range of 09 - 15.
The CONTRAST is setup in the CONFIG menu. To access the config menu
.
ò
twice to move the cursor to the “CONTRAST” selection point. Use the main dial or ïð keys to vary the contrast level to achieve best visibility.to accept the data and return to a standard display. Alternatively
to abort entry or
ò
to move to the next item on the config menu (auto power off).14-4 CONFIG Auto power off
An auto power off facility is available to switch the AR8600 off automatically after a programmable period of squelch inactivity, this prevents the batteries from becoming flat when monitoring a completely inactive frequency.
&
Note: Be careful how you use auto power off as it might catch you out one day(if a short auto-power-off period has been set), auto power off setting is not cancelled with power off / on… if the AR8600 appears to switch itself off for no reason, check to make sure that you haven’t enabled auto power off (there is no associated LCD legend).
AUTO POWER OFF is setup in the CONFIG menu.
To access the config menu .
ò
three times to move the cursor to the“AUTO PWR-OFF” selection point. Use the main dial or ïð keys to vary the time between 0.5 hours to 9.5 hours in 0.5 hr
increments, the key may be used as a short cut to OFF.
When the AR8600 squelch closes, the CPU will wait the length of
time programmed in auto-power-off before automatically switching the AR8600 off. If the squelch opens again before auto switch off time has elapsed, the radio will not power down and the counter will be reset (i.e. an open squelch defeats auto power off).
to accept the data and return to a standard display. Alternatively
to abort entry or
ò
to move to the next item on the config menu (REMOTE BPS).14-5 CONFIG REMOTE RS232
The REMOTE BPS menu is used to configure the RS232 computer control settings as it is important that they exactly match those of an associated computer connection or another AR8600 (connected via a male 9-pin to male 9-pin straight lead).
The REMOTE BPS parameters are setup in the CONFIG menu.
To access the config menu .
ò
four times to move the cursor to the “REMOTE BPS” selection point. Use the main dial or ïð keys to vary the RS232 baud rate between 4800bps, 9600bps and 19200bps. Thekey may be used as a short cut to the default of 9600bps.
ò
to move the cursor to the “RMT-ID” selection point. Use the main dial or ïð keys change the AR8600 RS232 IDENTIFICATION ADDRESS when multiple units are connected to the same port. It is possible to connect up to 99 units at once, each radio being assigned a different address. The value is adjustable between 00 and 99, the default is 00. The key may be used as a short cut 00.&
Important note: It is extremely important to set the RMT-ID to 00 for normal operationof the RS232 connection and clone of data between radios.
to accept the data and return to a standard display. Alternatively
to abort entry or
ò
to move to the next item on the config menu (FREQ DISP).14-6 CONFIG FREQ DISP
It is possible to instruct the AR8600 NOT to display frequencies while in memory read, search and scan modes (should you wish for prying eyes not to see specifically what you are listening to). Liberal use of ‘text comments’ is recommended if you disable frequency display (turned it off) unless you choose to have really anonymous operation!
&
Note: Frequency display will be provided in VFOand VFO search and VFO scan even with the frequency display disabled.
The FREQUENCY DISPLAY parameters are setup in the CONFIG menu. To access the config menu
.
ò
eight times to move the cursor to the“FREQ DISP” selection point. Use the main dial or ïð keys to toggle between ON and OFF. The key may be used as a short cut to ON (which is default).
to accept the data and return to a standard display. Alternatively
to abort entry or
ò
to move to the next item on the config menu (WRITE PROT).14-7 CONFIG GLOBAL write protect
It is possible to globally write protect the entire AR8600 data storage, this prevents memory entry, search bank programming, loading of data via the option socket, loading of data from the optional EM8200 etc. Use this feature carefully.
Should you wish to leave your AR8600 safe in the knowledge that no-one will ‘mess it up’ (well maybe!)… toggle global write protect on.
The global “WRITE PROTECT” status is setup in the CONFIG menu. To access the config menu .
ò
seven times to move the cursor to the “WRITEPROT” selection point.
Use the main dial or ïð keys or key to toggle between ON and OFF (the default is off).
to accept the data and return to a standard display. Alternatively
to abort entry or
ò
to move to the next item on the config menu (OPENING MESSAGE).14-8 CONFIG Opening message
It is possible to display a welcome message while the AR8600 is powering up and collating its ‘boot-up’ information. There are three options for opening message:
NORM
Normal message is displayed at switch-on: WELCOME TO THE NEW WORLD OF AR8600.
QUICK
Blank screen at switch-on.
USER
Four lines of 12 characters may be entered for display at switch-on. Initially they are configured for you to enter OWNERS name and PHONE NUMBER but all lines may be over-written.
The “OPENING MESSAGE” is setup in the CONFIG menu.
To access the config menu .
ò
eight times to move the cursor to the“OPENING MESSAGE” selection point. Use the main dial or ïð keys to toggle between NORM / QUICK / USER. The key may used as a short cut to NORM (which is the default).
to accept the data and return to a standard display or to abort entry.
Alternatively if you have selected USER and wish to change the text comment
ò
to access the text input menu for the opening menu.You may change all four lines of text in the usual manner. Please refer to section 12-1 of this manual
for further information regarding text input.
to accept the data and return to a
standard display or to abort entry.
When the AR8600 is switched off and back on again, the new opening message will be displayed.
(15) Band scope
The AR8600 is equipped with a flexible band scope function which is capable of graphically displaying band activity. The maximum frequency span width is 10 MHz, you may zoom in on activity to a span width of 100 kHz. Centre frequency is displayed and a marker may be manipulated to ascertain the frequency of activity using the graphical display. One trace may be saved to memory for recall at a later time and may be overwritten at will. The trace may also be saved and loaded from the optional EM8200 external memory slot card.
&
Note: Priority operation is disabled when the band scope is in operation. Audio is muted.The optional RU8200 is inoperative when the band scope is in operation.
It is suggested that the band scope facility is ‘experimented with’ on a constantly active band such as VHF Band-II broadcast.
15-1 Starting the band scope
To start the band scope . The frequency span width will be set to 10 MHz with the last frequency displayed in 2VFO, search, scan or memory read mode being used as the centre frequency. AUDIO IS MUTED.
The centre frequency is displayed in the top left of the LCD, one pixel will be missing from the centre of the graphical base line indicating centre frequency position.
A progress cursor which comprises of a single pixel on the graphical base line travels from left to right updating the band scope display… this confirms that the band scope is IN OPERATION (especially useful when a trace is simply being updated or no signals have been located).
The frequency span width is displayed in the upper right corner of the LCD, at default this is 10 MHz.
The frequency marker legend “MKR” is displayed on the second line of the LCD, the marker is also represented graphically by an upturned triangle (initially placed above-centre of the graphical trace). When first activated, the centre and marker frequencies are the same (but may be altered).
The graphical trace is built-up from left to right. If no transmissions are encountered the display will simply form a horizontal line around two pixels in height. When activity is located, vertical lines are produced on the LCD, the stronger the signal the higher the line.
&
Important: To monitor the transmission of the marker frequency and hold thekey. The progress of the scope is halted when the key is held. Squelch setting has no effect on the band scope trace.
15-2 Exit from band scope
To exit the band scope or or .
15-3 Setting frequency span width (waveform enlargement)
The frequency span width may be adjusted between the limits of 10 MHz (default) to 100 kHz using the
ñ
ò
keys. The span widths available are:10 MHz 35s for full trace approx.
5 MHz 20s for full trace approx.
2 MHz 10s for full trace approx.
1 MHz 6s for full trace approx.
500 kHz 3s for full trace approx. 200 kHz 6s for full trace approx. 100 kHz. 3s for full trace approx.
Section 15-1, 15-2, 15-3
Resolution is 10 kHz with a 12 kHz IF filter selected (NFM or AM) so that one pixel represents 140 kHz at maximum signal strength
When the frequency span width is altered, the trace restarts. to refresh the trace from the start.
15-4 Moving the marker
To move the marker position use the
ï
ð
keys, the channel step will be dependant upon the span width resolution. To monitor the marker frequency and hold the key. The progressof the scope is halted when the key is held.
15-5 Marker to strongest signal (peak search)
To simplify operation, it is possible to ‘jump the marker’ to the strongest signal of the current graphical trace (peak search). and hold the key until the “
«
” legend is displayed indicating that the marker is set to the strongest graphical signal. and hold the key to monitor the selected frequency. The ïð keys may be used to hop between the strongest few transmissions.to disable peak search, the “
«
” will be removed from the LCD.&
Note: If no signal is found above the background level (or if there hasn’t been time allowedfor a trace to form), peak search will not operate and an error beep will be emitted (if beep is enabled). This facility cannot be used with a span width of 100 kHz.
15-6 Entering a new centre frequency
To enter a new centre frequency, simply tap the wanted frequency into the keypad. The legend “CENTRE FREQ” will be displayed on the top line of the LCD with entry taking place on the second line. To complete entry in MHz format . The marker will be automatically set to the centre frequency but the frequency span width will be unchanged.
15-7 Transfer of marker frequency to VFO
There are two ways in which the marker frequency may be transferred to VFO for long term monitoring.
Transfer to 2VFO retaining VFO data
to move marker frequency to 2VFO, receive mode and step are those of the VFO.
Transfer to single VFO with 10 kHz tuning step
Hold the key then to transfer marker frequency to single VFO, receive will be that used in VFO mode but the tuning step will always be 10 kHz to allow sensible re-tuning in VFO mode for best reception of the transferred marker frequency
15-8 Peak hold
The PEAK HOLD facility is used to build up an image of band activity over a period of time, the display is not totally cleared each time a trace is made, only strong signals are added.
To toggle PEAK HOLD on/off
, the “HLD” legend confirms when peak hold is active.
The ïð keys may be used to move the marker position and key may be held to monitor activity on the marker frequency.
15-9 Saving active trace to memory
To save the current trace to internal memory (for later retrieval) . It is suggested that the peak hold facility be employed before saving a trace so that it provides more meaningful information.
If the optional EM8200 is used, it possible to save four further traces to external memory. Refer to section 18-7-7 of this manual
for further information regarding this feature.
15-10 Loading stored band scope traces from memory
Providing a trace has been previously stored to memory, it is possible to recall it to display using the key
sequence . The legend “RCV” (in the place of “MKR”) indicates
that a stored trace is currently being displayed.
The AR8600 will no longer sweep the frequency range but the key may still be used to monitor the marker frequency. Key in a new centre frequency to return to a real time band scope.
It is possible to move the marker across the graphical trace using the ïð keys. Waveform enlarge-ment is available by changing the frequency sweep width using the ñò keys.
If the optional EM8200 is used, it possible to load any one of four further traces from external memory. Refer to section 18-7-7 of
this manual for further information regarding this feature.
It is also possible to connect the AR8600 to an external Spectrum
Display Unit, the AOR SDU5500 has been designed specifically
for this purpose. Please refer to section 1-7 of this operating
manual. The 10.7MHz i.f. output BNC socket on the rear of the AR8600 will need to be activated in a workshop prior to operation with the SDU5500.
(16) Sleep
¹
It is possible to instruct the AR8600 to automatically switch to standby after a predetermined time, this is particularly useful if you know that you may be called away from the receiver or listen to it while in bed and don’t want the batteries to become completely flat.
Use the key sequence to accesses the SLEEP menu.
Use the main dial, ïð keys or key to toggle sleep on/off. For convenience SLEEP is default ON when this menu is accessed so that you have simply to access and exit the menu for sleep to be activated.
Either to save the changes and exit the menu
or
ò
to move the cursor to the sleep TIME menu. Use the main dial to set sleep time in 1s increments or ïð keys to increment in 10 seconds, the range is between 1 and 120 minutes,is a short cut to 60 minutes (default).
The AR8600 will automatically switch to standby after the programmed time has elapsed.
To accept the data and activate sleep . The display will return to standard format and the circular CLOCK legend
¹
will be displayed to remind you that automatic power off will take place.The next time that the AR8600 is powered on, the sleep facility will be automatically cancelled.
(17) Computer control
Connect the AR8600 to the serial port of a computer using an RS232 lead terminated in a 9-pin male plug, refer to section 1-5 (page 8) of this manual for connection details.
The RS232 parameters may be defined using the CONFIG menu. Baud rates (transfer speed) may be set to 4800, 9600 or 19200bps. It is also possible to set an ‘address’ to facilitate connection of up to 99 AR8600 to a single port for custom operation, the addresses may be set between the limits of 01 to 99 with 00 representing single radio operation.
When operating from external RS232, the legend ¤ will be displayed on the LCD. Please refer to
section 14-5 of this manual for information on the CONFIG menu settings.
17-1 How to send an RS232 command
Each command comprises of two upper case letters (header) along with options as required. All commands use ASCII code which MUST BE IN UPPER CASE (except for the ñòïð arrow keys and remote ID command (^A) which are non-printable and use the control codes of ASCII). A terminal program running on a computer should be set to: 4800, 9600 or 19200bps to match the AR8600, DATA 8-bit, STOP 2-bits, PARITY none, XFLOW on.
Please check the AOR web sites for suitable software which may be made available.
A multiple command entry is only valid where specified. Where a multiple command entry is allowed, each command MUST be separated with a space “h20” (HEX DECIMAL). Each command is completed with a [CR] or [CR] [LF]. Although there is no local echo, either [CR] or specified response should come back from the receiver after confirming the correct command. If no response has been gained after a short while, the receiver has failed to receive the command properly. Send a [CR] then re-send the command. Should problems persist, check your connections and try reducing the RS232 baud rate.
AR8600 remote indication: When the AR8600 has received a command via the RS232C port the
receiver’s LCD will display the ¤ symbol. The AR8600 will appear frozen while RS232 operation is in progress. To return operation to the radio keyboard, on the AR8600.
Section 17-1, 17-2
17-2 Brief command index (RS232)
^A Remote ID
AF Automatic Frequency Control AM Bandscope analyser AP Auto power off AS Search auto store AT Attenuator AU Auto mode BM Scan bank linking BP Search bank protect BS Search bank linking CF Bandscope centre frequency CN CTCSS operation DA Dial (VFO) audio squelch DB Dial (VFO) level squelch DC Bandscope date centre frequency DD Dial (VFO) delay
DP Dial (VFO) pause DS Bandscope **** DT Display frequency (on/off) EX Exit RS232
GA Select scan
GD Release select scan channels GM Scan parameter selection GR Select scan recall GS Search parameter selection GV VFO status list
LB LCD contrast LC Frequency & level status LM Signal meter reading LS Tone eliminator frequency
(requires optional TE8200 slot card) MA List a block of memory channels MC Monitor control (forced squelch) MD Receive mode
MF Bandscope set marker frequency MP Set memory channel pass MQ Delete memory channel or bank MR Memory recall
MS Scan mode MW Memory bank resizing MX Memory write NL Noise limiter OF Frequency offset OL Set and list frequency offset OM Opening message PC Protect memory channel PD Delete pass frequency PH Bandscope peak hold PP Priority channel PQ Wait time for LC2 PR List pass frequencies PW Write search pass frequency QM Quick memory
QP Power off QS Delete search bank RF Set receive frequency RX Respond with current data SA Search audio squelch SB Search level squelch SC Voice invertor frequency
(requires the optional VI8200 slot card) SD Search hold / delay time
SE Set search data SH Set offset step SI Voice invertor on/off
(requires the optional VI8200 slot card) SL Lower search frequency limit SM Start select scan SP Search pause time SR Recall search parameters SS Start search
ST Tuning step size SU Upper search frequency limit SW Bandscope span width TB Set text description for bank TI Set priority interval TM Memory text TS Text search TT Search bank text VA Set VFO A VB Set VFO B VF Select 1-VFO mode VL Beep volume VR Firmware version VS VFO search VT VFO auto-store VV VFO scan WM Write protect bank WP Write protect enable XA Scan audio squelch XB Scan level squelch XD Memory scan delay time XM Mode scan
17-3 Detailed RS232 command listing for the AR8600
Section 17-3
To set: BS nnn...n<CR>
Where n is a bank indicator in the range A-T or a-t BS%%<CR> clears all link settings
BS%%nnn...n<CR> clears all link settings except those listed
Examples:
BSABRabcmp<CR> toggles the link state for the banks shown
BS%% BFT<CR> clears all links except for the banks B, F & T
Note: As defined by GS. CF Bandscope centre frequency
To read: CF<CR> Responds with CFnnnnnnnnnn To set: CFnnnnnnnnnn<CR> or CFnn.nnn Set the bandscope centre frequency to the specified frequency
(expressed in Hz or MHz depending on format) Note: Maximum resolution is 10kHz for spans 10MHz - 500kHz; maximum resolution is 2kHz for spans 200kHz-100kHz. Frequencies below 2kHz are not accepted.
CN CTCSS Requires CT8200 option To read: CN<CR>
Responds with CNnn nn=0 (off), nn=01 (auto), nn=06-37 (a frequency from the following table)
nn freq nn freq nn freq nnfreq
00 off 10 136.5 20 241.8 30 177.3 01 auto 11 141.3 21 250.3 31 183.5 12 146.2 22 67.0 32 189.9 13 151.4 23 71.9 33 196.6 14 156.7 24 74.4 34 199.5 15 162.2 25 77.0 35 206.5 06 94.8 16 167.9 26 79.7 36 229.1 07 100.0 17 173.8 27 82.5 37 254.1 08 103.5 18 179.9 28 85.4
09 107.2 19 186.2 29 88.5 0A 110.9 1A 192.8 2A 91.5 0B 114.8 1B 203.5 2B 97.4 0C 118.8 1C 210.7 2C 69.4 0D 123.0 1D 218.1 2D 159.8 0E 127.3 1E 225.7 2E 165.5 0F 131.8 1F 233.6 2F 171.3
To set: CNnn<CR>, where nn is a two digit value from the table
DA Dial (VFO) audio squelch
To set: DAnnn<CR> nnn=000 - 255 (where 000=audio squelch off) To read: DA<CR>
Responds with DA nnn or DA+nnn (+ = current audio squelch level >= nnn)
DB Dial (VFO) level squelch
To set: DBnnn<CR> nnn=000 - 255 (where 000=level squelch off) To read: DB<CR>
Responds with DB nnn or DB+nnn (+ = current level >= nnn)
DC Data centre Frequency
To read: DC<CR> Responds with DC nnn Example: DC000
Note: Valid only when bandscope is on Note: Refer to the LM command DD Dial (VFO) delay To set: DDnn<CR>
Where nn = 00 - 99 or FF (indicating 0.0 - 99 seconds or FF=hold) To read: DD<CR>
Responds with DDn.n ^A Remote ID Hex value 0x01
Accepts a value nn in the range 01-99
AF AFC To set: AFn<CR> n=0 (off), n=1 (on) To read: AF<CR> Response is AFn
Note: Not valid in WFM, USB, LSB or CW
AM Bandscope Analyser Mode
AM<CR> starts bandscope mode AM<CR> repeated when in bandscope mode generates a report in the following format: AM PH0 CF0091000000 MF0091000000 SW1
AP Auto Pwr off APn.n<CR> n.n=0.0 (off)
nn=0.5-9.5 (sets 0.5 - 9.5 hours to power off following last active transmission) To read: AP<CR>
Responds with APn.n (where n.n is the delay time in hours or 0.0 = off)
Note: n.n must be in multiples of 0.5 hours
AS Search auto-store on/off To set: ASn<CR> n=0 (off),
n=1 (on - write frequency into bank J), n=2 (on - same as 1 but erase previous channels to create space for new entries),
To read: AS<CR>
Response is either n=0 (off) or n=1 (on) Note: Stores into the search group nominated by GS
AT Attenuator To set: ATn<CR> n=0 (off), n=1 (on) To read: AT<CR>
Response is ATn, where n=0 (off) or 1 (on)
AU Auto mode To set: AUn<CR> n=0 (off), n=1 (on) To read: AU<CR> Response is AUn MDm
BM Scan bank link setting To read: BM<CR>
Responds with: BM nnnnnnnnnnnnnnnnnnnn, where n = character corresponding to linked bank (A - J or a - j), or - (not linked)
Example: BM-BCD--- indicates that banks B, C & D are linked
To set: BM nnnnnnnnnnnnnnnnnnnn<CR> Where n is a character which specifies a bank which will have its link status toggled (A - J or a - j). There is no need to enter a “-” to avoid changing a bank link
BM%%<CR> clears all link settings BM%% nnnnnnnnnnnnnnnnnnnn<CR> clears all links except those specified
Examples: BM abc toggles the link status for banks a, b & c
BM%% bc clears the link status for all banks except b & c
Note: As defined by GM.
BP Search Bank Protect To set: BPn n=0 (off), n=1 (on) To read: BP<CR> Response is BNn
BS Bank link search
To read: BS<CR>
Responds with: BS nnn...n, where n = character corresponding to linked bank,
or - (not linked). The search bank indicators range from A - T and a - t (40 search banks in all) Example:
Section 17-3
DD Dial (VFO) delay To set: DDnn<CR>
Where nn = 00 - 99 or FF (indicating 0.0 - 99 seconds or FF=hold)
To read: DD<CR> Responds with DDn.n
DP Dial (VFO) pause To set: DPnn<CR> Where nn = 00 or 01 - 60 (indicating 1 - 60 seconds or off) To read: DP<CR> Responds with DDnn
DS Data analysis (bandscope) DS<CR>
Responds with wave form data from the bandscope. This is valid only when the bandscope is functioning. Data is output on completion of each sweep over the span, data is not continuous so response will not be instantaneous.
Each datum is assigned a number totalling 1024 with 16HEX.
The minimum value of each datum is [2] and maximum [F] by 16HEX.
[0] = not measuring, out of span (not 10MHz or 200kHz span).
[1] = out of specification of receive frequency. Note: When the span has been narrowed while measuring takes place, only the newly selected span range will be renewed with fresh data. Care must be taken when the marker frequency is replaced with the centre frequency. Example of data analysis response:
DS<CR>
DS1023 : 2222222222222222 2222222222222222 DS0991 : 2223344433222222 2233322334432233 DS0959 : 2223AFB722223322 2222354222222233 DS0927 : 22222222248A9632 2222222498532222 DS0895 : 2232222456522222 2389A64223344322 DS0863 : 2222222233343222 2222442222333222 ~ ~ ~ ~ ~ ~ ~ ~ ~ DS0095 : C862222552224652 2222235422222222 DS0063 : 2238B96322255222 2233322233223332 DS0031 : 23345F9654222222 3334334332222222
Note: Data is always sent 32 lines at a time.
Frequency is obtained from the data of the centre frequency. Even if the span is selected as 5MHz, 500kHz or 100kHz, the response is always based on 10MHz or 20kHz.
When the marker is moved, the data between the centre frequency and the new marker frequency will be renewed.
Frequency data is still obtainable from the centre frequency.
Note: When a centre frequency is entered, all figures (numbers) except the sweep range (upper and lower frequencies) will be void.
ò centre frequency
DS1023 : 2222222222222483 224535AD83332142
ñ centre frequency There are 1000 pieces of data over a 10MHz span in 10kHz steps, plus 24 pieces in reserve. Note: Data is sent continuously, either buffer memory is required or high speed processing is required in order not to miss data.
DS0543 : 345354339AFD9633 59564323433379AD DS0511 : 8634345443369642 2532423333458423
ò -10MHz
DS0031 : 233459A654222222 3334334332222222
All figures are data number (marker frequency = centre frequency) Span 10MHz 5MHz 2MHz 1MHz 50kHz Upper frequency 1023 800 620 572 545 Centre frequency 512 512 512 512 512 Lower frequency 12 260 410 442 482 Each one represents 10kHz
Span 200kHz 100kHz
Upper frequency 118 92 Centre frequency 64 64 Lower frequency 00 29 Each one represents 2kHz
DT Display frequency text To set: DTn n=0 (off), n=1 (on)
Note: Frequency display is blank when n=1 To read: DT<CR>
Response is DTn
EX Exit RS-232 EX<CR>
Terminates remote operation via the RS-232 and restores normal operation from the radio’s front panel.
GA Select Scan on/off To set: GAn<CR> n=0 (off), n=1 (on)
GD Release select scan channel To set: GDnn<CR> nn = channel (00-49)
To clear all memory select scan settings, use GD%%<CR>
To read: GD<CR> Response is GDnn
Note: A select scan channel number will be incremented each time select scan channel has been released. Confirmation is via the GR command
GM Scan parameter selection/status To set: GMn<CR>
Tags the current memory with label n = 0 (fixed presets only) - 9 (user definable) To read: GM<CR>
Example: GM
GM0 XD2.0 XB 000 XA 000 XP00 XMF BM
---Note: Refer to individual commands for details of each field.
GR Recall tagged channels for select scan GR<CR>
Lists selected channels from those available for select scan.
Response is of the form:
GRnn MXmnn RFnnnnnnnnnn STnnnnnn AUn MDn ATn TMxxxxxxxxxxx Note: Refer to individual commands for details of each field.
GS Search parameter selection/status To set: GSn<CR>
Where n=0 (fixed presets only) - 9 (user definable) To read: GS<CR>
Example: GS
GS0 SD2.0 SB 000 SA 000 SP00 AS0 BS ---Note: Refer to individual commands for details of each field.
GV VFO set list To read: GV<CR>
Reads current status of the VFO as a list of parameters
Example: GV
GV DD0.0 DB 000 DA 000 DP00 VT0 Note: Refer to individual commands for details of each field.
LB LCD contrast To set: LBnn<CR> nn=00 - 31 To read: LB<CR> Responds with LBnn
LC Respond with frequency and level when squelch opens To set: LCn<CR>
n=0 (off), n=1 (on), n=2 (special mode) To read: LC<CR>
Section 17-3
When active, data in the following format is returned when the squelch opens: LCnnn Vx RFnnn...n or
LCnnn SRx RFnnn...n or
LCnnn Mnxx RFnnn...n
When inactive, the radio returns LC data indicating the end of the transmission as follows: LC%nnn Vx or LC%nnn Vx or LC%nnn Vx Notes:
1. Receive frequency and S-meter level are output when squelch opens (range of nnn reported by LC is 000-255 approx but varies from set to set)
2. Response is made automatically every time squelch opens or closes and is affected by squelch parameters such as level and voice scan 3. Special mode (LC2) enables a continuous stream of frequency data to be output when squelch is open. This allows shift to next frequency after a pre-defined delay specified by PQ in search/scan. This also allows for high resolution spectrum analysis.
4. Signal level values may be specified 000-255. The AGC voltage is processed in 256 steps internally.
Note: Refer to individual commands for details of each field.
LM Respond with S-meter reading To read: LM<CR>
Responds with a 256-level s-meter sample in hexadecimal, LMnnm,
where nn = 00-FF and m is either “ “ (squelch open) or “%” (squelch closed)
LS Tone eliminate frequency Requires TE8200 option To set: LSnnn (000-255) (000=off) The following mapping is used between nnn and tone frequency:
Tone Freq nnn Tone Freq nnn 0.4 (kHz) 0-60 2.6 (kHz) 230-235 0.6 70-110 3.0 237-240 1.0 160-170 3.4 240-245 1.4 190-200 3.8 245-248 1.8 210-220 4.2 248-250 2.2 220-230
To read: LS<CR>
Responds with LS nnn or LS+nnn (for mute on)
MA List a block of ten memory channels
To read: MA<CR> or MAn<CR> (n= bank A-J or a-j) Example: MA
MXA00 MP0 RF0101100000 ST100000 AU0 MD0 AT0 TM MXA01 MP0 RF0460900000 ST010000 AU0 MD1 AT0 TMTest 2 MXA02 MP0 RF0085900000 ST100000 AU0 MD0 AT0 TMTest 3 MXA03 MP0 RF0085900000 ST020000 AU0 MD1 AT0 TMTest 4 MXA04 MP0 RF0085900000 ST020000 AU0 MD6 AT0 TMTest 5 MXA05 MP0 RF0085900000 ST020000 AU0 MD7 AT0 TMTest 6 MXA06 MP0 RF0085900000 ST010000 AU0 MD2 AT0 TMTest 7 MXA07 MP0 RF0085900000 ST001000 AU0 MD8 AT0 TMTest 8 MXA08 MP0 RF0085900000 ST000050 AU0 MD4 AT0 TMTest 9 MXA09 MP0 RF0085900000 ST000050 AU0 MD3 AT0 TMTest 10 Note: Refer to individual commands for details of each field.
MC Monitor Control To set: MCn<CR> 0 normal squelch operation 1 squelch forced closed 2 squelch forced open
MD Receive mode To set: MDn<CR> 0 WFM 1 NFM
2 AM 3 USB 4 LSB 5 CW 6 SFM 7 WAM 8 NAM
To read: MD<CR>
Responds with mode value as above
MF Set Marker Frequency To read: MF<CR> Responds with MFnnnnnnnnnn To set: MFnnnnnnnnnn<CR> or MFnn.nnn
Set the bandscope marker frequency to the specified frequency (expressed in Hz or MHz depending on format)
Note: Maximum resolution is 10kHz for spans 10MHz - 500kHz; maximum resolution is 2kHz for spans 200kHz-100kHz
MP Set memory channel as pass To set: MPn<CR> n = 0 (pass off), n = 1 (pass on) To read: MP<CR> (when in memory read mode) Note: Setting pass on a memory channel excludes it from scans Note: “?” is returned when not in M.RD mode
MQ Delete bank or memory channel MQ<CR>
Deletes the current memory channel (when in memory recall mode) MQnn<CR>
Deletes memory channel nn MQx%%<CR>
Deletes all memory channels from bank x.
Note: Responds with “?” when a memory channel is protected. Refer to PC, WM and WP commands
MR Recall memory channel MRxnn<CR> recalls memory channel nn from bank x (A-J or a-j) To read the current memory channel: MR<CR> Note: Responds with “?” if the channel is blank
MS Scan mode MS<CR>
Starts scan using the current memory bank
MSx<CR>
Starts scan using memory bank x (A-J or a-j)
Note: to scan and report active frequencies, see LC command Note: Responds with “?” if the channel is blank
MW Memory Bank resizing MWxnn<CR>
Sets number of channels in bank x to nn (where nn=10-90)
MWx<CR> Responds with the current allocation for bank x: MW x:nn y:mm Example: MWA MW A:50 a:50 MW%%<CR> or MW<CR> Responds with a list of 10 allocations
Example: MW%%
MW d:50 TBdaer band MW E:50 TBEMARINEch MW e:50 TBeair band Notes:
1. This feature allows the size of memory banks to be changed in size from 10 to 90 channels. Note, the total number of channels allocated to each bank pair (upper and lower case) remains 100 channels (ie size of A + size of a = 100).
2. It takes a significant amount of time to execute this command. Do not attempt to send another command until the radio responds with a <CR>.
3. When the size of a bank is changed, any channels that are allocated from the smaller bank to the larger are erased (ie setting bank B to 80 channels and b to 20 channels, then resetting B to 30 channels will cause the last 50 channels of B to be erased)
MX Write data to memory MXxnn RFnnnnnnnnnn AUn STnnnnnn MDn ATn TMxxxxxxxx<CR> Writes data of the format shown into memory channel nn in bank x Fields are separated by a space. TM permits a 12-character alphanumeric ASCII comment Automode will be selected if any fields are skipped but MX, RF & TM cannot be skipped. (MX cannot be sent on its own).
Note: Refer to the individual commands for further details Note: Do not use while scanning or searching.
NL Noise Limiter To set: NLn<CR> n = 0 (off), n = 1 (on) To read: NL<CR> Response is NLn
OF Select offset frequency OFnnx<CR>
Selects offset frequency at index nn (00-47, 00=off) and defines offset to be x (+/-)
OF<CR>
Returns with the current offset frequency data as follows: OFmmx RF0nnnnnnn00 (where mm is the offset index value and x is + or -)
Notes:
1. OF can be used on its own or with MX and SE
2. Allows access to a table of offset frequencies defined by OL 3. Automode operation is switched off when an offset frequency is entered
4. The offset frequency range is 0.1 -999.99 MHz
5. Index 00 specifies offset operation off
6. Indexes 20-47 are reserved for automode and cannot be altered
OL Set and list offset frequencies OL<CR>
Lists ten offset frequencies from the table
OLmm<CR>
Lists ten offset frequencies starting from index mm (00-47) Format of listing is: OLmm RF0nnnnnnn00<CR> OLmm 0nnnnnnn00<CR> Specifies the stated offset frequency for offset mm
Note: See notes for OF
Section 17-3
OM Opening message To set: OMn<CR> Where: n=0 display the standard default message
n=1 display no opening message n=2 display a custom 48-character message defined as follows: OM2 xxx...x
PC Protect memory channel To set: PCn<CR> n = 0 (off), n = 1 (on) PC%%<CR>
Turns off protection on all channels in the current bank.
To read: PC<CR> Response is PCn
Note: Use WM command to protect a bank
PD Delete pass frequency PDxnn<CR>
Deletes pass frequency nn (00-49) in search bank x (A-T or a-t) PDx%%<CR>
Deletes all pass channels in bank x (A-T or a-t)
Note: The list of pass frequencies is shifted down each time a channel is deleted
PH Bandscope Peak Hold To set: PHn<CR> n = 0 (off), n = 1 (on) To read: PH<CR> Response is PHn
PP Set priority channel To set: PPxnn<CR> Selects channel xnn as the priority channel, where x is a bank A-J or a-j and nn is a channel number To read: PP<CR> Responds with PPxnn
PQ Wait time for LC2 To set: PQnn<CR>
Sets time nn (00-99 corresponding to 000-990 mS in steps of 10 mS) To read: PQ<CR>
Responds with PQnnn (000-999 mS) Note: This wait time is used as a buffer.
PR List pass frequencies PRxnn<CR>
Lists the pass frequency stored in pass channel nn of bank x (A-T, a-t or V) PRx<CR>
Lists all pass frequencies for bank x (A-T, or a-t, V = VFO) PR<CR>
Lists all pass frequencies in the current bank (or the VFO)??? Responds with: PRxnn ffffffffff
Where x = bank, nn = channel, ffffffffff = frequency (in Hz) Example:
PR
PRV00 0147455000 PRV01
---PW Write search pass frequency PW<CR>
Write the current frequency to the next available pass channel PWx<CR>
Write the current frequency to the next available channel in bank x (A-T, a-t or V=VFO) PWnnnnnnnnnn<CR> or PSnnnn.nn<CR>
QM Quick Memo To Read: QM<CR> Responds with ten quick memory frequencies stored within the radio in for the format:
QM QM0 RF0086450000 QM1 RF0087310000 QM2 RF0087310000 QM3 RF0000950000 QM4 RF0000750000 QM5 RF0087320000 QM6 RF0087320000 QM7 RF0087320000 QM8 RF0087320000 QM9 RF0087320000 Note: This command is read only
QP Power Off QP<CR>
Switches the AR8600 to standby mode.
QS Delete search bank QSx<CR>
Delete search bank x=A-T or a-t
RF Set frequency RFnnnnnnnnm0<CR> Tune to the specified frequency (expressed in Hz) RFnnnn.nnnnm<CR> Tune to the specified frequency (expressed in MHz)
m must either be ‘5’ (for 50Hz) or ‘0’. Any other digit is ignored. Note: Frequencies below 3.0MHz are specified in kHz
RX Respond with current data RX<CR>
Recalls current operating parameters in the following formats
VFO mode
VF RFnnnnnnnnnn STnnnnnn AUn MDn ATn
2-VFO mode
Vx RFnnnnnnnnnn STnnnnnn AUn MDn ATn
VFO search mode VS Vx RFnnnnnnnnnn STnnnnnn AUn MDn ATn
VFO scan mode
VV Vx RFnnnnnnnnnn STnnnnnn AUn MDn ATn
Memory manual mode
MR MXxnn MPn RFnnnnnnnnnn STnnnnnn AUn MDn ATn TMxxx...x
Scan mode
MS MXxnn MPn RFnnnnnnnnnn STnnnnnn AUn MDn ATn TMxxx...x
Select scan mode
SM MXxnn MPn RFnnnnnnnnnn STnnnnnn AUn MDn ATn TMxxx...x
Search mode
SRx RFnnnnnnnnnn STnnnnnn AUn MDn ATn TTxxx...x
Note: Refer to individual commands for details of each field.
SA Search Audio To set: SAnnn<CR> nnn = 0 (audio search off), nnn = 001-255 (level value) To read: SA<CR>
Responds with SA nnn or SA+nnn (current voice level >= nnn) Note: Applies to search group specified by GS
Note: Search will resume when signal strength drops below pre-set level and delay time set by SD has elapsed.
SB Search level squelch To set: SBnnn<CR> nnn = 0 (level search off), nnn = 001-255 (audio search value) To read: SB<CR>
Responds with SB nnn or SB+nnn (current level >= nnn)
Section 17-3
SC Change voice invert
or frequency Note: Requires VI8200 To Set: SCnnn<CR> Where nnn (000-156) defines the voice inversion frequency from the following conversion table:
nnn Freq nnn Freq nnn Freq 0 2.4k 37 2.8k 64 3.2k 86 3.6k 102 4.0k 116 4.4k 128 4.8k 138 5.2k 146 5.6k 154 6.0k 156 6.15k
To Read: SC<CR> Responds with: SCnnn
SD Set hold/delay time
in search mode To set: SDnn<CR> where
01-99 Delay in 1/10ths of a second FF hold
00 delay off To read: SD<CR> Responds with SDn.n, as above
Note: Writes to the search group as specified by ‘GS’, you cannot write to search group 0.
SE Set search data
SEx SLnnnnnnnnnn SUnnnnnnnnnn AUn STnnnnnn MDn ATn TTxxx...x Sets search parameters for search bank x=A-T or a-t
TT permits a 12-character alphanumeric ASCII comment to be specified
Parameters ST, MD, AT, TT are all optional and need only be specifies if required. Note: Refer to the individual commands for further details
SH Set offset step To set: SHnnnnm0<CR> Set the tuning step size in Hz To set: SHnnn.nm<CR> Set the tuning step size in kHz SH+nnnnm0, SH+nnn.nm or SH+ turns on step adjust
m is either 0 or 5 To read: SH<CR> Responds with value, format: SHnnnnm0x (x=+ step adjust on)
SI Voice Invertor on/off Note: Requires VI8200 To Set: SIn<CR> n=0 (off), n=1 (on) To read: SI<CR> Responds with SIn SCnnn Example:
SI1w SC051 when the invertor value is 051 Note: Refer to individual commands for details of each field.
SL Lower search frequency limit
See RF command for format of frequency
SM Start select scan SM<CR>
Starts select scan using the parameters selected Note: Up to 100 select scan channels
SP Search pause
time setting To set: SPnn<CR> where, nn = 01 - 99 seconds free search time, nn = 00 pause off To read: SP<CR> Returns with SPnn (as above) Note: Applies to the search group set by ‘GS’.
SR Recall search
parameters SR<CR>
Recalls the currently selected search bank
where x = A-T or a-t Recalls search bank x SR%%<CR>
Responds with a listing of all search banks A-J
Responds with:
SRx SLnnnnnnnnnn SUnnnnnnnnnn STnnnnnn AUn MDn TTxxx...x or
SRR ---for a blank bank
Note: Refer to the individual commands for further details
SS Start search SS<CR>
Start searching using the current search bank
SSx<CR>
Start searching using the parameters stored in search bank x (A-T or a-t)
ST Tuning step size To set: STnnnnm0<CR> Set the tuning step size in Hz To set: STnnn.nm<CR> Set the tuning step size in kHz ST+nnnnm0, ST+nnn.nm or ST+ turns on step adjust To read: ST<CR> Responds with value, format: STnnnnm0x (x=+ step adjust on)
SU Upper search
frequency limit See RF command for format of frequency
SW Bandscope
Span Width To set: SWn<CR> Where n = 1 - 7 as follows: 1 10.0MHz 2 5.0MHz 3 2.0MHz 4 1.0MHz 5 500kHz 6 200kHz 7 100kHz To read: SW<CR>
Responds with SWn (where n has a value as above)
TB Set Text Description
for Bank To set: TBnxxxxxxxx<CR> Sets the text for bank n (A-J or a-j) to be the 8-character ASCII comment specified TB<CR> or TB%%<CR>
Responds with a complete listing of the comments for each bank in the following form:
TB
MW A:50 TBAAOR Test MW a:50 TBa MW B:50 TBBAOR MW b:50 TBb MW C:10 TBCAOR Test MW c:90 TBc MW D:50 TBDAOR Test MW d:50 TBd MW E:50 TBE MW e:50 TBe TBx<CR>
Responds with the text for bank x in the following format:
TBA TBAAOR Test
TI Set priority
interval To set: TInn<CR>
Sets priority interval nn (01-19) in seconds To read: TI<CR>
Responds with TDnn (nn is current priority interval value expressed in seconds)
TM Memory Text To write: TMxxx...x<CR>
Where xxx...x is a 12-character ASCII text comment
Note: See TT command.
Section 17-3
TS Text Search TSxxx...x<CR>
Searches for the specified text in a memory channel
Where xxx...x is a minimum of 2 characters and a maximum of 11 characters of ASCII text comment Note: The more characters specified the faster the search
Note: When the text search has completed, <CR> is returned Note: When the RX<CR> command is issued with TS, the relative bank and channel number will be shown
TT Search Bank Text To set: TTxxx...x<CR> Where xxx...x is a 12-character ASCII text comment Note: See SE command
VA/VB Set VFO A - B
To set: Vxnnnnnnnnm0<CR> (in Hz) or Vxnnnn.nnnnm<CR> (in MHz) Where: x is A or B for VFO A or B, frequency data is expressed in the format used by the RF command Vx<CR>
Selects VFO x (A or B), there is no data returned from the radio
VF Select 1-VFO To set: VF<CR>
VL Beep volume level To set: VLn<CR> Where, n = 0 - 9 (0=off) To read: VL<CR> Responds with VLn as above
VR Firmware Version To read: VR<CR> Responds with data of the form: VR
VR0101
VS VFO search VS<CR>
Starts a VFO based search with limits defined by the frequencies in VFO A & B
VT VFO auto-store To set: VTn<CR> Where n is defined as follows: 0 Off
1 On, Auto-store to bank J 2 On, erase bank J To read: VT<CR> Responds with VTn as above Note: VT2 response is equivalent to VT1
VV VFO Scan To set: VVn<CR>
Where n=0 (2-VFO mode) or n=1 (VFO scan mode)
WM Write Protect Bank To set: WMxn<CR>
Where x is bank (A-J or a-j) and n=0 (protect off), n=1 (protect on) To read:
WM<CR> or WM%%<CR> Responds with a listing of 10 banks starting from the last queried bank. Example: WM WM F0 WM f0 WM G0 WM g0 WM H0 WM h0 WM I0 WM i0 WM J0 WM j0
WP Write protect
XA Audio scan setting To set: XAnnn<CR> Where, nnn = 000 (audio scan off), nnn = 001-255 (audio scan value) To read: XA<CR>
Responds with XA nnn or XA+nnn (if current voice level >= nnn) Note: Applies to the scan group set by ‘GM’.
XB Level scan setting To set: XBnnn<CR> Where, nnn = 0 (level scan off), nnn = 001-255 (level scan value) To read: XB<CR>
Responds with XB nnn or XB+nnn (if current level >= nnn)
Note: Applies to the scan group set by ‘GM’.
XD Memory scan
delay time To set: XDnn<CR> nn=00 (off) or nn = 01 - 99 representing 100ms increments (0.1 - 9.9s)
To read: XD<CR> Responds with XDn.n as above
XM Mode scan To set: XMn<CR> 0 WFM 1 NFM 2 AM 3 USB 4 LSB 5 CW 6 SFM 7 WFM 8 NAM F All mode
To read: XM<CR> Responds with XMn as above
XP Free scan
pause setting To set: XPnn<CR> 00 pause off
01-99 pause time in seconds To read: XP<CR> Responds with XPnn as above
Up/Down Increment n<CR>
where n is a binary byte value as follows
ð 0x1c
ï 0x1d
ñ 0x1e
ò 0x1f
Section 17-3, 17-4
&
Note: As clone of data takes a while, it issuggested that the receivers are connected to external power or at least that the BP8600 optional internal NiCad is FULLY charged while cloning data. Do not prematurely terminate the clone of data in any way or data corruption may occur… do not switch either AR8600 off, disconnect the clone lead or disconnect power. Data can be copied in either direction but the EM8200 is not supported, only INTERNAL data can be copied between radios.
Connect each radio to the 9-pin to 9-pin lead and switch them on. The following table indicates the facilities available:
ALL DATA All data is transferred from one radio to the other (approx. 8 minutes 30 seconds)
SEARCH BANK A specific search bank is copied to the same or different bank number of the second radio (approx. 3 seconds)
ALL SEARCH All search banks are copied from one radio to the other keeping bank numbers the same (approx. 1 minute 30 seconds)
MEM BANK A specific memory bank is copied to the same or different bank number of the second radio. Ensure that the memory banks have the same sizes allocated (dynamic memory bank resizing) or data may be lost (approx. 30 seconds)
ALL MEM All memory banks are copied from one radio to the other keeping bank numbers the same. Memory banks are handled as a ‘pair’ (A/a, B,b etc). If memory banks are not the same size (dynamic memory bank resizing), some data will be lost. (approx. 5 minutes)
17-4 CLONE of data via the
RS232 socket
It is possible to copy data (clone) between two AR8600 receivers using a 9-pin male to 9-pin male lead, no computer is required. The pin connections should be as follows:
9-pin female plug 9-pin female plug of the first AR8600 of the second AR8600
2 3
3 2
5 GND 5 GND
17-4-1 How to clone data
Ensure that the RS232 baud rate is set to the same speed for both radios and that the address is set to 00 on both units (refer to section 14-5 of this manual for information on the
CONFIG menu settings).
a) Pick the radio which you wish to copy TO (target)
First decide which unit will be used to receive (LOAD) the data. to access the “COPY
RS232C” menu.
The key acts as a toggle between “LOAD” and “SAVE” (the default is LOAD), alternatively use the main dial or ïð keys to select LOAD.
b) Decide WHAT you want to copy
the
ò
key to move down the COPY RS232C menu, the cursor will be flashing to the left of the item “ALL-DATA”. If you want to loadALL DATA , alternatively use the main dial or ïð keys to select the type of data you wish to load (copy) from the other radio.
.
The bottom two rows of the LCD will display the legends “LOADING !!” and a number. The number will start counting downward when the copy process starts (when the other radio has been instructed to SAVE), the more data you have selected, the higher the number… for ALL-DATA the number will typically be 448.
c) Configure the radio used to SAVE
On the second radio, to access the “COPY RS232C” menu.
The key acts as a toggle between “LOAD” and “SAVE” (the default is LOAD), alternatively use the main dial or ïð keys to select SAVE.
the
ò
key to move down the COPY RS232C menu, the cursor will be flashing to the left of the item “ALL-DATA”. If youwant to load ALL DATA , alternatively use the
main dial or ïð keys to select the type of data you wish to save (send) to the other radio. It is
most important that the type of data selected is
IDENTICAL on both radios. .
The bottom two rows of the LCD will display the legends “SAVING !!” and a number which will start counting downward to indicate that the copy process (clone of data) has started. When the number reaches zero the copy process will have completed, both radios will revert to standard displays.
&
Note: If you make a mistake during programming, it is possible to the key to exit the menu. However, be careful and get it right in the first place… this is the best way of avoiding the possibility of data corruption.Write protect
Individual memory channel protect and search bank protect status is ignored, however global protect will prevent data being cloned between radios.
(18) Slot card sockets
The AR8600 has the provision to accept up to five optional slot cards into special socket on the rear of the cabinet. Avoid dust or objects (particularly conductive material and liquid) from entering the sockets when slot cards are not in use otherwise the receiver may be damaged by short circuits.
&
Note: Although the cards are also compatible with the AOR AR8200 and AR8200 SERIES-2 receivers, the EM8200 card cannot be used to transfer data between the AR8200 / AR8200 SERIES-2 and AR8600 receiver, the data format is NOT directly compatible.18-1 Optional slot cards
All five of the optional SLOT CARDS may be simultaneously fitted to the AR8600, there are separate marked slot sockets for each card, it is possible to select and use a maximum of two slot cards at any time. The slot cards are divided into two groups (1 and 2), any card from group 1 may be selected along with any card from group 2 for simultaneously operation, you cannot use more than one card from each group simultaneously . Do not use anything other than the ‘genuine’ AOR slot cards.
TE8200 Tone eliminator in 256 steps
CT8200 CTCSS squelch & search
VI8200 Voice inverter (analogue) in 157 steps
RU8200 Chip based recording and playback, 20 seconds approx, may also be configured as a 20 second ‘continuous loop’.
EM8200 External extended memory, backup 4,000 memories, 160 search banks (can hold as much data as 4 x AR8600)
Section 17-4-1, 18, 18-1
Signal types depend upon the slot card fitted, these include:
l 4.2V PSU
l GROUND
l CARD RECOGNITION
l AUDIO IN l AUDIO OUT
l CARD CONTROL IN
l CARD CONTROL OUT
18-1-1 Fitting the slot cards
Always switch the AR8600 off when inserting a slot card.
The slot cards are fitted into the rear panel of the AR8600, look for the labels embossed into the rear panel underneath the appropriate slot socket; care should be taken not to insert the wrong card into each socket as each socket is identical. Hold the slot card so that its label also faces upward. An arrow printed on the slot card indicates the direction of entry into the AR8600, insert the connector end of the slot card into the AR8600 (the end you will be left holding has groves to help grip). Without using excessive force, use a thumb to push the slot card into the body of the AR8600 until only the grooved section is left protruding.
&
Note: Care should be taken not to insert the wrong card into each socket as every socketis identical apart from the label. The AR8600 will automatically recognise each optional slot card. Refer to section 18-2 of this manual.
When slot cards are fitted, the AR8600 menu system dynamically changes to reflect the slot card currently fitted. If however the AR8600 ‘thinks’ that a slot card option is fitted when it isn’t, access the slot card menu and disable the option. You may wish to leave certain items selected if they are not affecting current operation in order to minimise reprogramming when slot cards are removed and refitted at a later time.
18-1-2 Removing the slot card
Always switch the AR8600 off when removing a slot card. Use the thumb and forefinger to
firmly grip the desired card and pull in a straight line remove, do not wriggle the card as this places unnecessary stress on the slot card connector. The stiffness of the cards varies and may be tighter when used for the first few times, don’t use excessive force or tools!
18-2 Slot card OPTION menu - registering a slot card
Once the slot cards have been fitted, they must be registered for use via the slot card menu.
This is because only one slot card from GROUP 1 and one slot card from GROUP 2 can be used simultaneously, registering the slot cards is a way of managing their use.
The optional slot cards must be REGISTERED via the SLOT CARD OPTION MENU before they can be manipulated via their own control menus. To access the slot card registration menu option menu
The menu is presented in two sections (pages), the first covers the slot cards in GROUP 1 (TE8200, CT8200, VI8200) and the second page covers the slot cards in GROUP 2 (EM8200, RU8200).
The
ñò
arrow keys are used to move between lines representing the slot card fitted, if you do not have the listed card fitted, you will not be able to move to the displayed line, it will be skipped.For example, if you have the TE8200 and VI8200 slot cards fitted, pressing the
ò
key will skip over the CT8200 selection line, the second page containing the EM8200 and RU8200 entries will also be inaccessible. Theñ
key may be used to move backward through the menu items. Ignore the “AUT” legend if displayed on the LCD.When the cursor is flashing on the desired line for the required option, use
ïð
oror MAIN DIAL to REGISTER or DE-REGISTER the option as a toggle. When registered, the lagend
“
«
” will be displayed on the LCD next to the slot card description. Remember, you may register one slot card from GROUP 1 and one card from GROUP 2 for simultaneous operation if desired. To complete the selection,18-3 TE8200 optional tone eliminator slot card
The TE8200 enables the AR8600 to ignore certain transmission tones which would otherwise stop the scan and search processes. Pilot tones are often transmitted by public utility services and railways making their transmissions troublesome and fatiguing to monitor without the use of the TE8200. The TE8200 may also be programmed to re-start scanning when an ‘engaged tone’ is encountered, such a ‘bleep’ is often featured by semi-duplex public service repeaters. There are 256 values for the tone eliminator ranging from 0 to 255 representing a frequency range of 0.4 kHz to 4.2 kHz.
Insert the TE8200 slot card and switch the AR8600 on, select VFO mode.
Register the TE8200 slot card
to access the slot card registration menu “OPTION SEL”. The AR8600 will have recognised that the TE8200 has been fitted so will present the first group of slot card options and the selection line for the tone eliminator “TONE ELMT”. The tone eliminator is the first item of the whole menu so you do not need to use the
ñò
keys unless scrolling back from another slot card entry. When the cursor is flashing to the left of the “TONE ELMT” legend, useïð
or or main dial to REGISTER (or de-register as a toggle) the tone eliminator option. When registered, the lagend “«
” will be displayed on the LCD next to the slot card menu description. (Remember, you may select one slot card from GROUP 1 and one card from GROUP 2 for simultaneous operation if desired). To complete the registration of the TE8200To use the TE8200
Once the TE8200 has been registered, toggling on/off of the tone eliminator and selection of tone is
accomplished from the TE8200 menu. to access the TE8200
menu. the key to toggle the tone eliminator on and off (default off). Use the main dial to make selection of tone in 256 steps from 0 to 255, the ïð keys are used to increment selection of tone in increments of 10.
When selecting the value, the legend “
«
” will be displayed to the left of the numeric value to indicate that the displayed tone value is contained in the current receive frequency, this greatly eases location of the offending tone frequency to allow scan and search to continue.To accept the data input , alternatively to abort entry . When
active, the LCD legend “T.EL” will be displayed in the bottom left corner of the LCD.
Refer to the table to reconcile value with frequency:
Frequency (kHz) 0.4 0.6 1.0 1.4 1.8 2.2 2.6 3.0 3.4 3.8 4.2 Tone value 0 70 160 190 210 220 230 237 240 245 248 60 110 170 200 220 230 235 240 245 248 250
Tone eliminator setting and value may be held separately in each VFO, search bank and memory channel.
The squelch should be set to threshold in the usual manner. Operation continues as normal with the tone eliminator active, however if a transmission is encountered which contains a ‘pilot tone’ which matches the current setting of the tone eliminator, the squelch will close allowing the scan and search processes to continue… i.e. the AR8600 will NOT think that it has found an active receive frequency or blank carrier.
&
Note: The tone eliminator does not remove whistles from the loudspeaker, it purely allowsscan & squelch to continue unhindered.
18-4 CT8200 optional CTCSS slot card
The CT8200 enables the AR8600 to search for 50 CTCSS tones which may be in use on the current receive frequency and to save a specific CTCSS tone (from the 50 tones available) into each VFO, each search bank and every memory channel individually. CTCSS is used by many amateur band repeaters, public utilities and private mobile radio services where shared resources are used, CTCSS ensures that operators only hear traffic intended for them.
Register the CT8200 slot card
Insert the CT8200 slot card and switch the AR8600 on and REGISTER the CT8200 card via the OPTION SELECT registration menu. Refer to section 18-2 and the example for the TE8200 shown in section 18-3.
To use the CT8200
Select VFO mode by pressing to place the AR8600 in to a known condition. Once the CT8200 has been registered, toggling on/off of the CTCSS and selection of CTCSS tone is accomplished from
the CT8200 menu. to access the CT8200 menu.
the key to toggle the CTCSS facility between OFF / ON / SRCH (default is off).
To abort entry and exit the menu .
&
Note: You won’t be able to audibly hear a CTCSS tone due to the low frequenciesemployed and audio characteristics of the AR8600 (and other receivers).
18-4-1 CTCSS tone squelch
While in the CTCSS menu, to activate the CTCSS facility (the LCD legend “ON” is displayed in reverse highlight).
Use the main dial or ïð keys to make selection of CTCSS tone from the 50 available, the value cannot be adjusted when the menu is set to “OFF”. The current CTCSS tone is displayed on the last-but-one line of the LCD, the legend “
«
” is displayed to the left of the CTCSS frequency when the current receive frequency is using the displayed CTCSS tone, this assists manual selection of the correct tone.To accept the data input , alternatively to abort entry . The selected
CTCSS tone may be used in VFO (separate CTCSS tones may be held in each VFO) and independent CTCSS tones saved in each search bank and memory channel.
While in VFO, the legend “CTC” is displayed in the lower left corner of the LCD to indicate that CTCSS is active. The audio will be completely muted until a transmission occurs which contains the specified CTCSS tone even when the squelch is set fully anti-clockwise (open), it is normal for the occasional ‘splutter’ to be produced as ‘CTCSS type fingerprints’ naturally occur in everyday transmissions and background noise.
Scan & search banks: It is even possible to scan & search with
the squelch open when CTCSS is active but scan/search rates will be reduced significantly. To achieve the best speeds, set the squelch until the “S” legend is extinguished in the usual manner.
Refer to the CTCSS table of available tones:
94.8 100.0 103.5 107.2 110.9
114.8 118.8 123.0 127.3 131.8
136.5 141.3 146.2 151.4 156.7
162.2 167.9 173.8 179.9 186.2
192.8 203.5 210.7 218.1 225.7
233.6 241.8 250.3 67.0 71.9
74.7 77.0 79.7 82.5 85.4
88.5 91.5 97.4 69.4 159.8
165.5 171.3 177.3 183.5 189.9
196.6 199.5 206.5 229.1 254.1
To switch CTCSS off, access the CTCSS menu
to highlight the legend “OFF”
then .