Copyright © 2009
ZyXEL Communications Corporation
DEFAULT LOGIN DETAILS
IP Addresshttp://192.168.100.1
Password
1234
Firmware Version 1.0
Edition 1, 10/2011
MWR102
About This User's Guide
Intended Audience
This manual is intended for people who want to configure the MWR102 using the Web-Based Management Interface. You should have at least a basic knowledge of TCP/IP networking concepts and topology.
Related Documentation
• Quick Start Guide
The Quick Start Guide is designed to help you get up and running right away. It contains information on setting up your network and configuring for Internet access.
• Supporting Disc
Refer to the included CD for support documents. • ZyXEL Web Site
Please refer to www.us.zyxel.com for additional support documentation and product certifications.
User Guide Feedback
Help us to help you. Send all User Guide-related comments, questions or suggestions for improvement to the following e-mail address. Thank you!
SUPPORT E-MAIL WEB SITE
Customer Support
Please have the following information ready when you contact Customer Support:
• Product model and serial number• Warranty information
• Date that you received or purchased your device
• Brief description of the problem including any steps that you have taken before contacting the ZyXEL Customer Support representative
Support Email
[email protected]
Toll-Free
1-800-978-7222
Website
www.us.zyxel.com
Postal mail
ZyXEL Communications Inc.
1130 N. Miller Street,
Anaheim, CA 92806-2001
U.S.A.
Document Conventions
Warnings and Notes
These are how warnings and notes are shown in this User’s Guide.
Warnings tell you about things that could harm you or your device.
Note: Notes tell you other important information (for example, other things you may need
to configure or helpful tips) or recommendations.
Syntax Conventions
• The MWR102 may be referred to as the “MWR102”, the “device”, the “product” or the “system” in this User’s Guide.
• Product labels, screen names, field labels and field choices are all in bold font.
• A key stroke is denoted by square brackets and uppercase text, for example, [ENTER] means the “enter” or “return” key on your keyboard.
• “Enter” means for you to type one or more characters and then press the [ENTER] key. “Select” or “choose” means for you to use one of the predefined choices.
• A right angle bracket ( > ) within a screen name denotes a mouse click. For example,
Maintenance > Log > Log Setting means you first click Maintenance in the navigation panel, then the Log sub menu and finally the Log Setting tab to get to that screen.
• Units of measurement may denote the “metric” value or the “scientific” value. For example, “k” for kilo may denote “1000” or “1024”, “M” for mega may denote “1000000” or “1048576” and so on.
Icons Used in Figures
Figures in this User’s Guide may use the following generic icons. The MWR102 icon is not an exact representation of your device.
MWR102 Computer Notebook computer Server Modem Firewall
Safety Warnings
• Do NOT use this product near water, for example, in a wet basement or near a swimming pool. • Do not leave the device exposed to a heat source or in a high-temperature location such as in
the sun or in an unattended vehicle. To prevent damage, remove the device from the vehicle or store it out of direct sunlight
• When storing the device for an extended time, store within the following temperature range: from 32° to 77°F
• Do not operate the device beyond the range of 32° to 104° F
• Do not operate or store the device outside of the above temperature range
• Contact your local waste disposal department to dispose of the device/battery in accordance with applicable local laws and regulations.
• Do NOT expose your device to dampness, dust or corrosive liquids.
• Do Not keep the unit power on while putting it into suite case, closed box, luggage, computer bag and any closed storage, do turn the device power off before storage.
• Do NOT store things on the device.
• Do NOT install, use, or service this device during a thunderstorm. There is a remote risk of electric shock from lightning.
• Connect ONLY suitable accessories to the device.
• Do NOT open the device or unit. Opening or removing covers can expose you to dangerous high voltage points or other risks. ONLY qualified service personnel should service or disassemble this device. Please contact your vendor for further information.
• Make sure to connect the cables to the correct ports.
• Place connecting cables carefully so that no one will step on them or stumble over them. • Always disconnect all cables from this device before servicing or disassembling.
• Use ONLY power adaptor or cord provided by the manufacturer for your device.
• Connect the power adaptor or cord to the right supply voltage (for example, 110V AC in North America or 230V AC in Europe).
• Do NOT allow anything to rest on the power adaptor or cord and do NOT place the product where anyone can walk on the power adaptor or cord.
• Do NOT use the device if the power adaptor or cord is damaged as it might cause electrocution.
• If the power adaptor or cord is damaged, remove it from the power outlet.
• Do NOT attempt to repair the power adaptor or cord. Contact your local vendor to order a new one.
• Do not use the device outside, and make sure all the connections are indoors. There is a remote risk of electric shock from lightning.
• Do NOT obstruct the device ventilation slots, as insufficient airflow may harm your device. • Antenna Warning! This device meets ETSI and FCC certification requirements when using the
included antenna(s). Only use the included antenna(s).
• If you wall mount your device, make sure that no electrical lines, gas or water pipes will be damaged.
Battery Warnings
Please follow the safety guidelines described in the safety warning and battery warning. Failing to do so may shorten the lifespan of the internal lithium ion battery or may present a risk of damage to the unit, fire, chemical burn, electrolyte leak and/or injury.
• Do not leave unit exposed to a heat source or in a location that may become hot, such as a parked vehicle or in direct sunlight. Do not leave in a glove box, trunk or other location that may become hot.
• Do not puncture or incinerate the device or battery.
• When/if you dispose of the battery, be certain to follow ordinances from local waste disposal agencies.
• Keep the battery away from small children or pets
• Never use a knife, screwdriver or other sharp object to remove the battery. • Do not attempt to open the battery.
• Use only the provided recharger to recharge the battery.
• Only replace the battery with the correct replacement battery. Failure to do so may result in fire or explosion. Contac ZyXEL to obtain the correct replacement battery.
Your product is marked with this symbol, which is known as the WEEE mark. WEEE stands for Waste Electronics and Electrical Equipment. It means that used electrical and electronic products should not be mixed with general waste. Used electrical and electronic equipment should be
Table of Contents
About This User's Guide ... 3
Document Conventions ... 5
Safety Warnings ... 7
Part I:
Introduction
... 13
1
Getting to Know Your MWR102 ... 14
1.1
Overview ... 14
1.2
Applications ... 14
1.3
Good Habits for Managing the MWR102 ... 15
1.4
The Front Panel ... 15
1.5
The Rear Panel ... 16
2
Web-Based Management ... 17
2.1
Overview ... 17
2.2
Accessing the Web-Based Management Interface ... 17
2.3
Resetting the MWR102 ... 18
3
MWR102 Modes ... 19
3.1
Overview ... 19
4
Router Mode ... 20
4.1
Overview ... 20
4.2
What You Can Do ... 20
5
Access Point Mode ... 23
5.1
Overview ... 23
5.2
What You Can Do ... 23
5.3
AP Mode Status Screen ... 24
6.1
Overview ... 29
6.2
Connecting to Internet from an Access Point ... 30
6.3 Configuring Wireless Security Using WPS ... 30
6.4
Enabling and Configuring Wireless Security (No WPS) ... 32
Part II:
Wireless ... 35
7
Wireless ... 36
7.1
Overview ... 36
7.2
What You Can Do ... 36
7.3
What You Should Know ... 36
7.4
General Wireless LAN Screen ... 39
7.5
Wireless LAN Advanced Settings ... 40
7.6
Security ... 42
7.7
Access Control ... 45
7.8
WPS Screen ... 47
7.9
Wireless Site Survey (AP Mode Only) ... 48
8
Network Settings ... 50
8.1
Overview ... 50
8.2
What You Can Do ... 50
8.3
What You Need To Know... 51
8.4
LAN Interface ... 52
8.5
WAN Interface ... 54
Part III: Security ... 56
9
MAC Filtering ... 57
9.1
Overview ... 57
9.2
What You Can Do ... 57
9.3
What You Need To Know... 57
9.4
MAC Filtering ... 58
10
Status ... 60
10.1
Overview ... 60
10.2
What You Can Do ... 60
10.3
Status Screen ... 60
11
Statistics ... 63
11.1
Overview ... 63
11.2
Statistics Screen ... 63
12
Log ... 65
12.1
Overview ... 65
12.2
Log Screen ... 65
13
Upgrade Firmware ... 67
13.1
Overview ... 67
13.2
Upgrade Firmware Screen ... 67
14.1
Overview ... 69
14.2
What You Can Do ... 69
14.3
Save/Reload Settings Screen ... 69
15
Password ... 72
15.1
Overview ... 72
15.2
Password Screen ... 72
Part V:
Troubleshooting ... 74
16
Troubleshooting ... 75
16.1
Overview ... 75
16.2
Power, Hardware Connections, and LEDs ... 75
16.3
MWR102 Access and Login ... 76
16.4
Internet Access ... 77
16.5
Resetting MWR102 to Factory Defaults ... 79
16.6
Wireless Router/AP Troubleshooting ... 79
Appendix A: Pop-up Windows, JavaScripts and Java Permissions ... 85
Appendix B: IP Addresses and Subnetting ... 93
Appendix C: Setting up Your Computer’s IP Address ... 105
Appendix D: Wireless LANs ... 127
Appendix E: Common Services ... 141
Appendix F: Legal Information ... 146
1 Getting to Know Your
MWR102
1.1 Overview
The MWR102 is a mobile wireless router with 1T1R MIMO technology. It complies with
IEEE 802.11n standards, with Wireless N data rates of up to 150 Mbps, and IEEE
802.11b/g with Wireless B/G data rates of 54 Mbps. It is also backward compatable with
all 11/54 Mbps wireless (802.11b/g) products.
The router allows multiple users to share one broadband connection, as well as secures
your private network. LAN users can share files, printers, or play network games all at
high speeds over the same network.
The MWR102 supports advanced security encryption: WPA, WPA2, open shared key,
and pair-wise key authentication services, giving you vital network security. Moreover,
this router supports energy efficient Ethernet and saves power.
1.2 Applications
You can create the following networks using the MWR102:
• Wired. You can connect a network device via the Ethernet port of the MWR102 so that they can communicate with each other and access the Internet.
• Wireless. Wireless clients can connect to the MWR102 to access network resources. • Land line WAN. Connect to a broadband modem/router for Internet access.
1.3 Good Habits for Managing the MWR102
Do the following things regularly to make the MWR102 more secure and to manage the MWR102 more effectively.• Change the password. Use a password that’s not easy to guess and that consists of different types of characters, such as numbers and letters.
• Write down the password and put it in a safe place.
• Back up the configuration (and make sure you know how to restore it). Restoring an earlier working configuration may be useful if the device becomes unstable or even crashes. If you forget your password, you will have to reset the MWR102 to its factory default settings. If you backed up an earlier configuration file, you would not have to totally re-configure the MWR102. You could simply restore your last configuration.
1.4 The Front Panel
Figure 1
The front panel of the Wireless Router
Table 1
Front Panel LEDs
Name
Status
Indication
PWR
Green
Power on
Dark
Power off
WPS
Blink green one time
System reboot
Blink green
WPS connecting
Dark
System stable
WLAN
Off
The wireless function is disabled.
Flashing
The wireless function is enabled.
Flashing fast
Sending or receiving data over wireless.
WAN /
LAN
Off
There is no device linked to the corresponding port or
the connection is dropping off.
On
There are devices linked to the corresponding ports but
no data transmitted or received.
1.5 The Rear Panel
Figure 2
The rear panel of the Wireless Router.
LAN:
Through this port, you can connect the router to your PCs and the other
Ethernet network devices.
WAN:
This WAN port is where you will connect the cable/DSL Modem, or Ethernet.
DC IN:
Plug the end of the cable firmly into the rear panel of the router, and plug
the other end into a USB outlet to power the system.
WPS/Reset Button:
Located on the underside of the device. Click this button to
start PBC configuration method for easy WPS setup.Hold the reset button for 5
seconds or more to reset the system to factory defaults. The system will then
reboot, and approximately 60 seconds later will be ready for further use. The reboot
process cannot be interrupted by powering off the device, or the unit will fail. Before
performing the reset process, ensure the system will be able to finish rebooting!
Warning:
Incomplete factory setting recovery procedure will cause the Wireless
Router to malfunction! If you are in this situation, do not try to repair it by
yourself. Consult your local distributor for help!
2 Web-Based Management
2.1 Overview
This chapter describes how to access the MWR102 Web-Based Management Interface and provides an overview of its screens.
The Web-Based Management Interface is an HTML-based management interface that allows easy setup and management of the MWR102 via Internet browser. Use Internet Explorer 7.0 and later or Firefox 3.0 and later versions or Safari 4.0 or later versions. The recommended screen resolution is 1024 by 768 pixels or higher. In order to use the Web-Based Management Interface you need to allow:
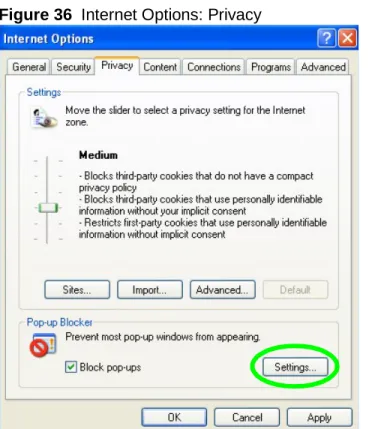
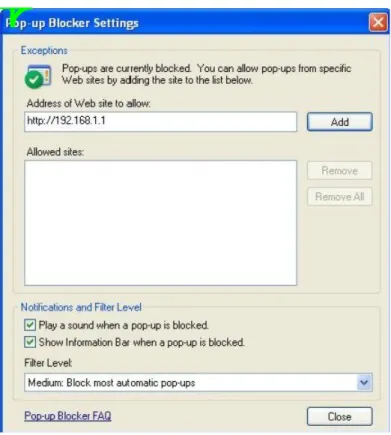
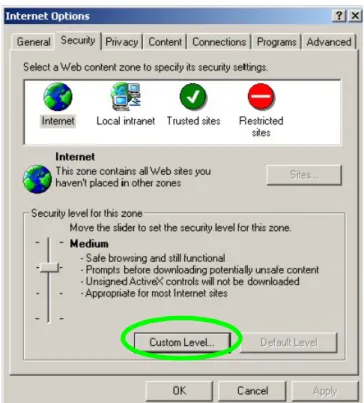
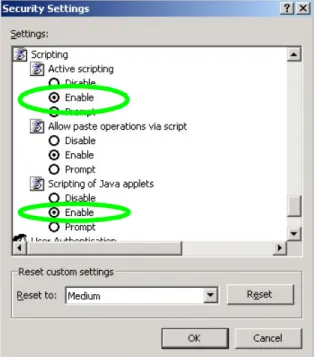
• Web browser pop-up windows from your device. Web pop-up blocking is enabled by default in Windows XP SP (Service Pack) 2.
• JavaScripts (enabled by default). • Java permissions (enabled by default).
Refer to the Troubleshooting chapter (Chapter 16) to see how to make sure these functions are allowed in Internet Explorer.
2.2 Accessing the Web-Based Management
Interface
1 Make sure your MWR102 hardware is properly connected and prepare your computer or computer network to connect to the MWR102 (refer to the Quick Start Guide).
2 Launch your web browser.
3 Type "http://192.168.100.1" as the website address. Your computer must be in the same subnet in order to access this website address.
2.2.1 Login Screen
Figure 3
Login Screen
The following table describes the labels in this screen.
LABEL DESCRIPTION
User Name Type “admin” (default) as the User name. Password Type “1234” (default) as the password.
2.3 Resetting the MWR102
If you forget your password or IP address, or you cannot access the Web-Based Management Interface, you will need to use the RESET button at the back of the MWR102 to reload the factory-default configuration file. This means that you will lose all configurations that you had previously saved, the password will be reset to “1234” and the IP address will be reset to “192.168.100.1”.
2.3.1 Procedure to Use the Reset Button
1 Make sure the power LED is on.
2 Press the RESET button for longer than one second to restart/reboot the MWR102.
3 Press the RESET button for longer than five seconds to set the MWR102 back to its factory-default configurations. The Power LED will start to blink to indicate that the factory-default configuration is being loaded.
3 MWR102 Modes
3.1 Overview
This chapter introduces the different modes available on your MWR102.
3.1.1 Device Modes
This refers to the operating mode of the MWR102, which can act as a:
• Router. This is the default device mode of the MWR102. Use this mode to connect the local network to another network, like the Internet.
• Access Point. Use this mode if you want to extend your network by allowing network devices to connect to the MWR102 wirelessly. Go to AP view the Status screen in this mode.
4 Router Mode
4.1 Overview
The MWR102 is set to router mode by default. Routers are used to connect the local
network to another network (for example, the Internet).
4.2 What You Can Do
Use the Status screen to view read-only information about your MWR102.
4.2.1 Navigation Panel
Use the sub-menus on the navigation panel to configure MWR102 features.
The following table describes the sub-menus.
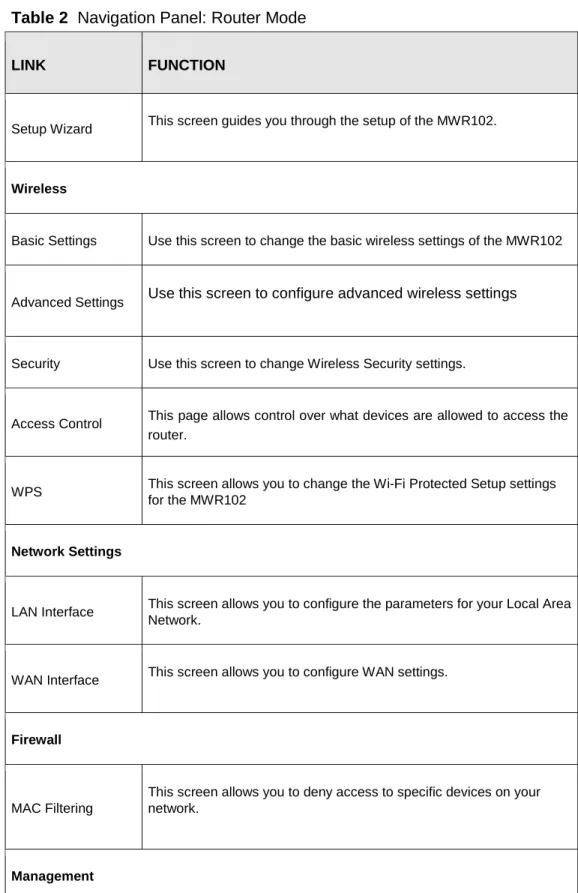
Table 2
Navigation Panel: Router Mode
LINK FUNCTION
Setup Wizard This screen guides you through the setup of the MWR102.
Wireless
Basic Settings Use this screen to change the basic wireless settings of the MWR102 Advanced Settings Use this screen to configure advanced wireless settings Security Use this screen to change Wireless Security settings.
Access Control This page allows control over what devices are allowed to access the router.
WPS This screen allows you to change the Wi-Fi Protected Setup settings for the MWR102
Network Settings
LAN Interface This screen allows you to configure the parameters for your Local Area Network.
WAN Interface This screen allows you to configure WAN settings.
Firewall
MAC Filtering
This screen allows you to deny access to specific devices on your network.
Status Shows the current status and basic settings of the travel router Statistics Shows packet counts for wired and wireless Ethernet connections. Log Set remote log server parameters and view the system log. Upgrade Firmware
Upgrade the travel router firmware. Save/Reload
Settings Save the current settings to a backup file, or reload the setting from a previously saved file.
Password
Set or change the travel router ADMINISTRATOR user name and password.
5 Access Point Mode
5.1 Overview
Use your MWR102 as an access point (AP) if you already have a router or gateway on your network. In this mode your MWR102 bridges a wired network (LAN) and wireless LAN (WLAN) in the same subnet.
5.2 What You Can Do
• Use the Status screen to view read-only information about your MWR102.
• Use the LAN screen to set the IP address for your MWR102 acting as an access point.
5.2.1 Setting your MWR102 to AP Mode
1 Flip the switch on the side of the device from “Router” to “AP.”
5.2.2 Accessing the Web-Based Management Interface
in Access Point Mode
Log in to the Web-Based Management Interface in Access Point mode, do the following:
1 Connect your computer to the LAN port of the MWR102.
2 The default IP address of the MWR102 is “192.168.100.1”. In this case, your computer must have an IP address in the range between “192.168.100.2” and “192.168.100.254”.
3 Click Start > Run on your computer in Windows. Type “cmd” in the dialog box. Enter “ipconfig” to show your computer’s IP address. If your computer’s IP address is not in the correct range then see Appendix C for information on changing your computer’s IP address.
4 After you’ve set your computer’s IP address, open a web browser such as Internet Explorer and type “192.168.100.1” as the web address in your web browser.
5.2.3 Configuring your WLAN and Maintenance
Settings
The configuration of wireless and maintenance settings in Access Point mode is the same as for
Router Mode.
• See Chapter 7 for information on the configuring your wireless network.
5.3 AP Mode Status Screen
Click Management > Status to open the Status screenTable 3
Status Screen: Router Mode
LABEL DESCRIPTION
System Information
Uptime This is the total time the MWR102 has been on. Firmware Version This is current firmware version.
Firmware Build Time This is the date/time the current version of the firmware was released. Operation Mode This is the device mode to which the MWR102 is set – AP Mode.
Wireless Local Network Network Band
We provide six modes for your selection: 2.4GHz (B), 2.4 GHz
(G), 2.4 GHz (N), 2.4GHz (B+G), 2.4 GHz (G+N), 2.4 GHz
(B+G+N).
You may select one type of network band from the dropdown menu. SSID (Name) Shows the current name of your wireless network.
Encryption This shows the level of wireless security the MWR102 is currently using. BSSID This displays the MAC address of the wireless device.
Associated Clients Displays the number of clients currently associated to the MWR102 Local Network
Router IP Address Displays the IP address designated to the MWR102 by your router. Subnet Mask Shows what subnet mask the MWR102 is on.
DHCP This shows the LAN port’s DHCP role - Server or None. Auto IP Address
Diversion
Click the drop down list, you may select “Enabled” to divert the IP Address automatically or select “Disabled” to ban it. When Enabled e, the system will automatically detect conflicts in the WAN and LAN IP. If there are conflicts, the LAN IP and LAN DHCP Range will automatically jump to next subnet to avoid conflicts. Local MAC Address This is the MAC address of your MWR102
5.3.1
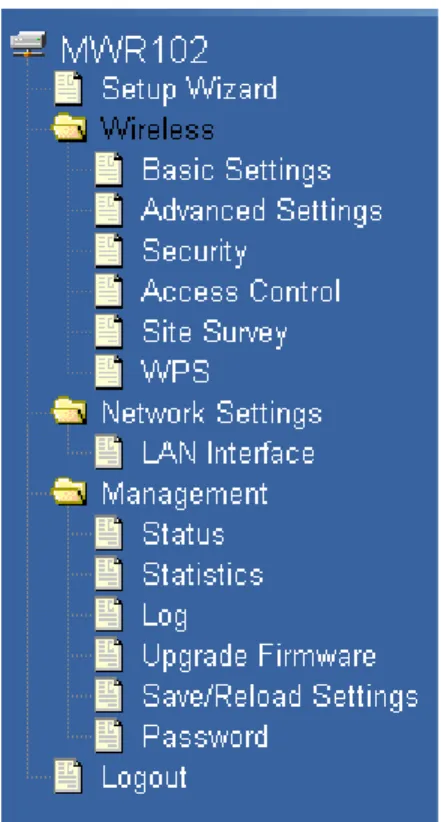
Navigation Panel
Use the menu in the navigation panel to configure MWR102 features in Access Point mode.
Figure 5
Navigation Panel
The following table describes the sub-menus.
Table 4
Navigation Panel: Router Mode
LINK FUNCTION
Setup Wizard This screen guides you through the setup of the MWR102.
Wireless
Basic Settings Use this screen to change the basic wireless settings of the MWR102 Advanced Settings Use this screen to configure advanced wireless settings Security Use this screen to change Wireless Security settings.
router.
Site Survey
This page provides a tool to scan the wireless network for
nearby routers and APs.
WPS This screen allows you to change the Wi-Fi Protected Setup settings for the MWR102
Network Settings
LAN Interface This screen allows you to configure the parameters for your Local Area Network.
Management
Status Shows the current status and basic settings of the travel router Statistics Shows packet counts for wired and wireless Ethernet connections. Log Set remote log server parameters and view the system log. Upgrade Firmware
Upgrade the travel router firmware. Save/Reload
Settings Save the current settings to a backup file, or reload the setting from a previously saved file.
Password
Set or change the travel router ADMINISTRATOR user name and password.
Logout
5.4 LAN Screen
Use this section to configure your LAN settings while in Access Point mode. Click Network Settings > LAN Interface to see the screen below.
Note: If you change the IP address of the MWR102 in the screen below, you will need to
log into the MWR102 again using the new IP address.
Figure 6
Network Settings > LAN Interface
The table below describes the labels in the screen.
Table 5
Network Settings > LAN Interface
LABEL DESCRIPTION
Router IP Address
Type the IP address in dotted decimal notation. The default setting is
192.168.100.2. If you change the IP address you will have to log in again with the new IP address.
Subnet Mask
The subnet mask specifies the network number portion of an IP address. Your MWR102 will automatically calculate the subnet mask based on the IP address that you assign. Unless you are implementing subnetting, use the subnet mask
computed by the MWR102.
DHCP DHCP stands for Dynamic Host Configuration Protocol. It is a protocol for assigning dynamic IP addresses “automatically”.
DHCP Client Range
This field asks you to specify the DHCP Client IP address range (default 100~200). You can also click the “Show Client” button to list those connected DHCP clients.
Note: In Router mode, the DHCP Server is enabled by default. However, in AP mode, the DHCP Server disabled by default.
Auto IP
Diversion automatically detect conflicts in the WAN and LAN IP. If there are conflicts, the LAN IP and LAN DHCP Range will automatically jump to next subnet to avoid conflicts.
6 Tutorials
6.1 Overview
This chapter provides tutorials for your MWR102 as follows: • Connecting to the Internet from an Access Point
• Configuring Wireless Security Using WPS • Enabling and configuring wireless security
6.1.1 DSL Modem
If your internet connection comes from a DSL modem you will want to follow these steps to best prepare your modem to connect with the MWR102.
1) Contact your ISP (Internet Service Provider) and ask them to help you “bridge” your DSL modem.
2) Find out from your ISP what the “PPPoE Username and Password” are for your Internet connection.
3) Once the DSL modem has been bridged, connect it (by Ethernet cord) to the WAN port of the MWR102.
4) Open your browser and log into the MWR102. Click on Network Settings > WAN Interface, for the WAN Access Type select “PPPoE” and enter your PPPoE “Username and Password.”
6.1.2 Cable Modem
• Connect the cable modem to your MWR102 on the WAN port. Unplug the power to your cable modem. Depending on your cable modem, it may also have a backup battery inside. Remove this battery and completely power down the cable modem. Let it sit from 2 to 3 minutes and then reconnect the battery and power to the cable modem.
6.2 Connecting to Internet from an Access
Point
This section gives you an example of how to set up an access point (AP) and wireless client (a notebook (B), in this example) for wireless communication. B can access the Internet through the access point wirelessly. When the MWR is configured in AP mode, it has to connect to a
broadband gateway (wired or wireless router with broadband connection). Local computer(s) can get IP via wireless connection passed by MWR from the broadband gateway, then gain Internet access.
Figure 7
Wireless Access Point mode
6.3 Configuring Wireless Security Using
WPS
This section gives you an example of how to set up wireless network using WPS. This example uses the MWR102 as the AP and NWD210N as the wireless client which connects to a notebook.
Note: The wireless client must be a WPS-aware device (for example, a WPS USB
adapter or PCI card).
There are two WPS methods for creating a secure connection. This tutorial shows you how to do both.
• Push Button Configuration (PBC) - create a secure wireless network simply by pressing a button. This is the easier method.
• PIN Configuration - create a secure wireless network simply by entering a wireless client's PIN (Personal Identification Number) in the MWR102’s interface. This is the more secure method, since one device can authenticate the other.
6.3.1 Push Button Configuration (PBC)
1 Make sure that your MWR102 is turned on and that it is within range of your computer.
2 Make sure that you have installed the wireless client (this example uses the NWD210N) driver and utility in your notebook.
3 In the wireless client utility, find the WPS settings. Enable WPS and press the WPS button (Start or WPS button)
4 Log into MWR102’s Web-Based Management Interface and press the Start PBC button in the Wireless > WPS screen.
Note: Your MWR102 has a WPS button located on its bottom panel, as well as a WPS
button in its configuration utility. Both buttons have exactly the same function; you can
use one or the other.
Note: It doesn’t matter which button is pressed first. You must press the second button
within two minutes of pressing the first one.
The MWR102 sends the proper configuration settings to the wireless client. This may take up to two minutes. Then the wireless client is able to communicate with the MWR102 securely.
6.3.2 PIN Configuration
When you use the PIN configuration method, you need to use both MWR102’s configuration interface and the client’s utilities.
1 Launch your wireless client’s configuration utility. Go to the WPS settings and select the PIN method to get a PIN number.
2 Enter the PIN number to the PIN field in the Wireless > WPS screen on the MWR102.
3 Click Start buttons (or button next to the PIN field) on both the wireless client utility screen and the MWR102’s WPS Station screen within two minutes.
The MWR102 authenticates the wireless client and sends the proper configuration settings to the wireless client. This may take up to two minutes. Then the wireless client is able to communicate with the MWR102 securely.
6.4 Enabling and Configuring Wireless
Security (No WPS)
Follow the steps below to configure the wireless settings on your MWR102.
The instructions require that your hardware is connected (see the Quick Start Guide) and you are logged into the Web-Based Management Interface through your LAN connection.
1 Open the Wireless > Security screen in the AP’s Web-Based Management Interface. 2 Choose a Pre-Shared Key format. (Passphrase or Hex)
3 Enter your desired key, then click the Apply Changes button.
Figure 8
Tutorial: Wireless > Security
6.5 Configure Your Notebook
Note: We use the ZyXEL M-302 wireless adapter utility screens as an example for the
wireless client. The screens may vary for different models.
1. The MWR102 supports IEEE 802.11b, IEEE 802.11g and IEEE 802.11n wireless clients. Make sure that your notebook or computer’s wireless adapter supports one of these standards.
2. Wireless adapters come with software sometimes called a “utility” that you install on your computer. See your wireless adapter’s User’s Guide for information on how to do that.
3. After you’ve installed the utility, open it. If you cannot see your utility’s icon on your screen, go to Start > Programs and click on your utility in the list of programs that appears. The utility displays a list of APs within range, as shown in the example screen below.
4. Select the MWR102’s SSID and click Connect.
Figure 9 Connecting a Wireless Client to a Wireless Network
5. Select WPA-PSK and type the security key in the following screen. Click Next.
Figure 10
Security Settings
Figure 11
Confirm Save
7. Check the status of your wireless connection in the screen below. If your wireless connection is weak or you have no connection, see the Troubleshooting section of this User’s Guide.
Figure 12
Link Status
If your connection is successful, open your Internet browser and enter http://us.zyxel.com or the URL of any other web site in the address bar. If you are able to access the web site, your wireless connection is successfully configured.
7 Wireless
7.1 Overview
This chapter discusses how to configure the wireless network settings in your MWR102. See the appendices for more detailed information about wireless networks.
7.2 What You Can Do
• Use the Basic Settings screento enable the Wireless LAN, enter the SSID and select the channel width.
• Use the Advanced Settings screen to set RF output power and set the RTS Threshold. • Use the Security screen to set encryption type and passphrase.
• Use the Access Control screen to whitelist and blacklist devices on your network.
• Use the WPS screen to quickly set up a wireless network with strong security, without having to configure security settings manually.
7.3 What You Should Know
Every wireless network must follow these basic guidelines.• Every wireless client in the same wireless network must use the same SSID. The SSID is the name of the wireless network. It stands for Service Set IDentity. • If two wireless networks overlap, they should use different channels.
Like radio stations or television channels, each wireless network uses a specific channel, or frequency, to send and receive information.
• Every wireless client in the same wireless network must use security compatible with the AP. Security stops unauthorized devices from using the wireless network. It can also protect the information that is sent in the wireless network.
7.3.1 Wireless Security Overview
The following sections introduce different types of wireless security you can set up in the wireless network.
7.3.1.1
SSID
Normally, the AP acts like a beacon and regularly broadcasts the SSID in the area. You can hide the SSID instead, in which case the AP does not broadcast the SSID. In addition, you should change the default SSID to something that is difficult to guess.
This type of security is fairly weak, however, because there are ways for unauthorized devices to get the SSID. In addition, unauthorized devices can still see the information that is sent in the wireless network.
7.3.1.2
MAC Address Filter
Every wireless client has a unique identification number, called a MAC address.1 A MAC address is usually written using twelve hexadecimal characters2; for example, 00A0C5000002 or
00:A0:C5:00:00:02. To get the MAC address for each wireless client, see the appropriate User’s Guide or other documentation.
You can use the MAC address filter to tell the AP which wireless clients are allowed or not allowed to use the wireless network. If a wireless client is allowed to use the wireless network, it still has to have the correct settings (SSID, channel, and security). If a wireless client is not allowed to use the wireless network, it does not matter if it has the correct settings.
This type of security does not protect the information that is sent in the wireless network. Furthermore, there are ways for unauthorized devices to get the MAC address of an authorized wireless client. Then, they can use that MAC address to use the wireless network.
7.3.1.3
Encryption
Wireless networks can use encryption to protect the information that is sent in the wireless network. Encryption is like a secret code. If you do not know the secret code, you cannot understand the message.
The types of encryption you can choose depend on the type of user authentication.
1
Some wireless devices, such as scanners, can detect wireless networks but cannot use wireless networks. These kinds of wireless devices might not have MAC addresses.
2
Table 6
Types of Encryption for
Each Type of Authentication
NO AUTHENTICATION
Weakest No Security WEP
WPA-Personal (TKIP) WPA-Enterprise
Strongest WPA2-Personal (AES) WPA2-Enterprise
Usually, you should set up the strongest encryption that every wireless client in the wireless network supports. Suppose the wireless network has two wireless clients. Device A only supports WEP, and device B supports WEP and WPA-PSK. Therefore, you should set up WEP in the wireless network.
Note: It is recommended that wireless networks use
WPA-Personal/Enterprise
or
stronger encryption. IEEE 802.1x and WEP encryption are better than none at all, but it
is still possible for unauthorized devices to figure out the original information pretty
quickly.
Many types of encryption use a key to protect the information in the wireless network. The longer the key, the stronger the encryption. Every wireless client in the wireless network must have the same key.
7.3.1.4
WPS
Wi-Fi Protected Setup (WPS) is an industry standard specification, defined by the Wi-Fi Alliance. WPS allows you to quickly set up a wireless network with strong security, without having to configure security settings manually. Depending on the devices in your network, you can either press a button (on the device itself or in its configuration utility) or enter a PIN (Personal Identification Number) in the devices. Then, they connect and set up a secure network by themselves.
7.4 General Wireless LAN Screen
Use this screen to enable the Wireless LAN, enter the SSID and select the channel.
Note: If you are configuring the MWR102 from a computer connected to the wireless LAN
and you change the MWR102’s SSID, channel or security settings, you will lose your
wireless connection when you press
Apply
to confirm. You must then change the
wireless settings of your computer to match the MWR102’s new settings.
Click Wireless > Basic Settings to open.
Figure 13
Wireless > Basic Settings
The following table describes the general wireless LAN labels in this screen.
Table 7
Wireless > Basic Settings
LABEL DESCRIPTION
Network Band
Allows you to choose between Wireless B/G/N functionality. Channel Width
Allows you to choose between the 20MHz and 40MHz channel. Channel
Number
This displays the channel the MWR102 is currently using. Country Allows you to set your country.
Broadcast SSID
Set whether or not the MWR102 is discoverable. Associated
Clients
The Show Clients button shows all clients associated with the MWR102.
7.5 Wireless LAN Advanced Settings
Use this screen to allow wireless advanced features, such as setting output power and the RTS Threshold
Figure 14
Wireless > Advanced Settings
The following table describes the labels in this screen.
Table 8
Wireless > Advanced Settings
LABEL DESCRIPTION
Fragmentation Threshold
The threshold (number of bytes) for the fragmentation boundary for directed messages. It is the maximum data fragment size that can be sent. Enter an even number between 256 and 2346.
RTS Threshold
Data with its frame size larger than this value will perform the RTS (Request To Send)/CTS (Clear To Send) handshake.
Enter a value between 0 and 2347. Beacon
Interval
Beacons are packets sent by an access point to synchronize a
wireless network. Specify a beacon interval value. Default (100ms) is
recommended.
Preamble Type
The length of CRC blocks in the frames during the wireless
communication.
Output Power Set the output power of the MWR102 in this field. If there is a high density of APs in an area, decrease the output power of the MWR102 to reduce interference with other APs. Select one of the following 100%, 70%, 50%, 35%, or 15%. See the product specifications for more information on your MWR102’s output power. Apply
Changes
Click Apply Changes to save your changes back to the MWR102. Reset Click Reset to reload the previous configuration for this screen.
7.6 Security
7.6.1 Disabling Security
Select Disable to allow wireless stations to communicate with the access points without any data encryption.
Note: If you do not enable any wireless security on your MWR102, your network is
accessible to any wireless networking device that is within range.
7.6.2 WEP Encryption
WEP encryption scrambles the data transmitted between the wireless stations and the access points to keep network communications private. It encrypts unicast and multicast communications in a network. Both the wireless stations and the access points must use the same WEP key.
In order to configure and enable WEP encryption, click Wireless > Security to display the
Security screen. Select WEP from the Encryption list.
Figure 16
Wireless > Security: WEP
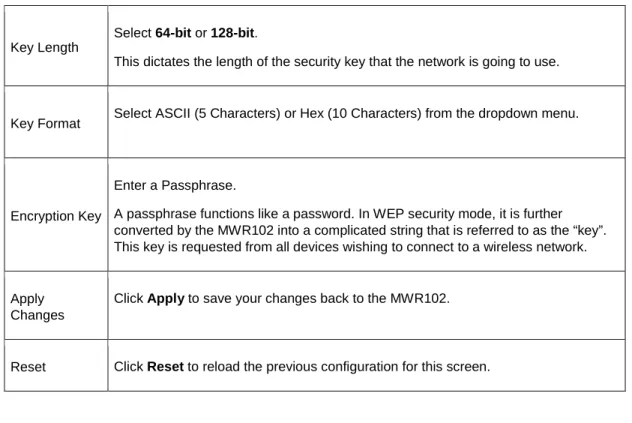
The following table describes the wireless LAN security labels in this screen.
Table 9
Wireless > Security: WEP
LABEL DESCRIPTION
Encryption Select Static WEP to enable data encryption. Authentication
Method
Select Open System,Auto, or Shared Key.
This field specifies whether the wireless clients have to provide the WEP key to login to the wireless client. Keep this setting at Auto unless you want to force a key verification before communication between the wireless client and the ZyXEL Device occurs.
Select Shared Key to force the clients to provide the WEP key prior to communication.
Key Length
Select 64-bit or 128-bit.
This dictates the length of the security key that the network is going to use. Key Format Select ASCII (5 Characters) or Hex (10 Characters) from the dropdown menu. Encryption Key
Enter a Passphrase.
A passphrase functions like a password. In WEP security mode, it is further converted by the MWR102 into a complicated string that is referred to as the “key”. This key is requested from all devices wishing to connect to a wireless network. Apply
Changes
Click Apply to save your changes back to the MWR102. Reset Click Reset to reload the previous configuration for this screen.
7.6.3 WPA-PSK/WPA2-PSK/WPA2-Mixed
Click Wireless > Security to display the Security screen. Select WPA-PSK, WPA2-PSK, or
WPA2-Mixed from the Security Mode list.
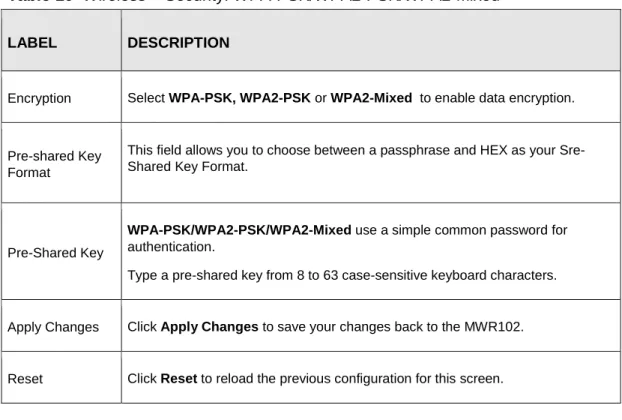
The following table describes the labels in this screen.
Table 10
Wireless > Security: WPA-PSK/WPA2-PSK/WPA2-Mixed
LABEL DESCRIPTION
Encryption Select WPA-PSK, WPA2-PSK or WPA2-Mixed to enable data encryption. Pre-shared Key
Format
This field allows you to choose between a passphrase and HEX as your Sre-Shared Key Format.
Pre-Shared Key
WPA-PSK/WPA2-PSK/WPA2-Mixed use a simple common password for authentication.
Type a pre-shared key from 8 to 63 case-sensitive keyboard characters. Apply Changes Click Apply Changes to save your changes back to the MWR102. Reset Click Reset to reload the previous configuration for this screen.
7.7 Access Control
The Access Control screen allows you to configure the MWR102 to give exclusive access to devices (Allow) or exclude devices from accessing the MWR102 (Deny). Every Ethernet device has a unique MAC (Media Access Control) address. The MAC address is assigned at the factory and consists of six pairs of hexadecimal characters, for example, 00:A0:C5:00:00:02. You need to know the MAC address of the devices to configure this screen.
To change your MWR102’s MAC filter settings, click Wireless > Access Control. The screen appears as shown.
Figure 18
Wireless > Access Control
The following table describes the labels in this menu.
Table 11
Wireless > Access Control
LABEL DESCRIPTION
Wireless Access Control Mode
Define whether entered MAC addresses will be whitelisted or blacklisted. MAC
Address
Enter the MAC addresses of the wireless station that are allowed or denied access to the MWR102 in this field. Enter the MAC addresses in a valid MAC address format, that is, six hexadecimal character pairs, for example, 12:34:56:78:9a:bc. Click Apply Changes.
Comment Enter any notes about the device being black/whitelisted in this field. Delete
Selected
Delete single MAC addresses from the list. Delete All Delete all MAC addresses from the list.
Apply Changes
Click Apply to save your changes back to the MWR102. Reset Click Reset to reload the previous configuration for this screen.
7.8 WPS Screen
Use this screen to enable/disable WPS, view or generate a new PIN number and check current WPS status. To open this screen, click Wireless > WPS.
Figure 19
Wireless > WPS
The following table describes the labels in this screen.
Table 12
Network > Wireless LAN > WPS
LABEL DESCRIPTION
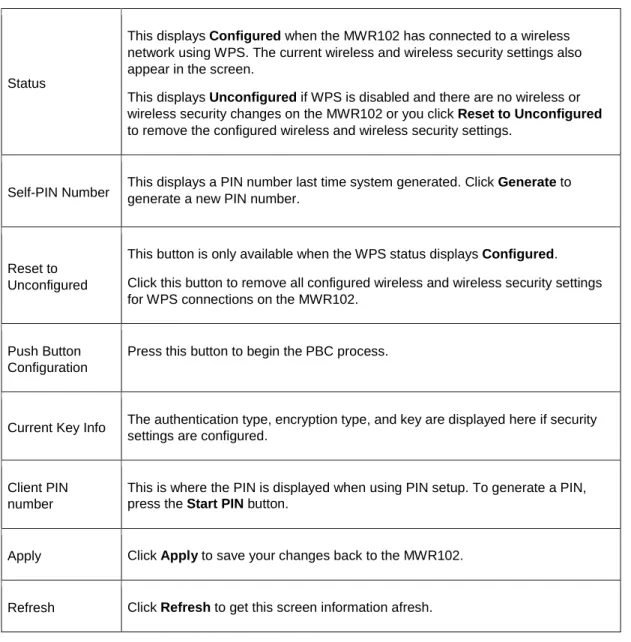
Wi-Fi Protected Setup
Status
This displays Configured when the MWR102 has connected to a wireless network using WPS. The current wireless and wireless security settings also appear in the screen.
This displays Unconfigured if WPS is disabled and there are no wireless or wireless security changes on the MWR102 or you click Reset to Unconfigured
to remove the configured wireless and wireless security settings.
Self-PIN Number This displays a PIN number last time system generated. Click generate a new PIN number. Generate to Reset to
Unconfigured
This button is only available when the WPS status displays Configured. Click this button to remove all configured wireless and wireless security settings for WPS connections on the MWR102.
Push Button Configuration
Press this button to begin the PBC process.
Current Key Info The authentication type, encryption type, and key are displayed here if security settings are configured.
Client PIN number
This is where the PIN is displayed when using PIN setup. To generate a PIN, press the Start PIN button.
Apply Click Apply to save your changes back to the MWR102. Refresh Click Refresh to get this screen information afresh.
7.9 Wireless Site Survey (AP Mode Only)
Use this screen to view nearby wireless networks. Go to Wireless > Site Survey to open the following screen.
The following table describes the labels in this screen.
Table 13
Wireless > Site Survey
LABEL DESCRIPTION
Wireless Site Survey
SSID This displays the Network Name (SSID) of the wireless networks close to you. BSSID
This displays the MAC address of the wireless device listed. Channel This displays the wireless channel used by the wireless network. Type This displays the network type being used by the wireless network. Encrypt This displays the encryption type used by the wireless network. Signal This displays the strength of the wireless network signal.
8 Network Settings
8.1 Overview
This chapter discusses the MWR102’s Network Settings screens. Use these screens to configure your LAN and WAN settings.
A Local Area Network (LAN) is a shared communication system to which many computers are attached. A LAN is a computer network limited to the immediate area, usually the same building or floor of a building.
A WAN (Wide Area Network) connection is an outside connection to another network or the Internet. It connects your private networks such as a LAN (Local Area Network) and other networks, so that a computer in one location can communicate with computers in other locations.
Figure 21
LAN and WAN
8.2 What You Can Do
• Use the LAN Interface Setup screen to modify your router’s IP address, DHCP Settings, and Subnet Mask
• Use the WAN Interface Setup screen to modify your DHCP access type (DHCP client, Static IP, or PPoE), MTU Size, DNS Settings, and MAC address.
8.3 What You Need To Know
The information in this section can help you configure the screens for your WAN and LAN connections.
8.3.1 Configuring Your Internet Connection
The actual physical connection determines whether the MWR102 ports are LAN or WAN ports. There are two separate IP networks, one inside the LAN network and the other outside the WAN network as shown next.
Figure 22
LAN and WAN IP Addresses (implies wired WAN connection)
The LAN parameters of the MWR102 are preset in the factory with the following values: • IP address of 192.168.100.1 with subnet mask of 255.255.255.0 (24 bits)
• DHCP server enabled with 32 client IP addresses starting from 192.168.100.33.
These parameters should work for the majority of installations. If your ISP gives you explicit DNS server address(es), read the embedded Web-Based Management Interface help regarding what fields need to be configured.
8.3.2 WAN MAC Address
The MAC address screen allows users to configure the WAN port's MAC address by either using the factory default or cloning the MAC address from a computer on your LAN. Choose Factory Default to select the factory assigned default MAC Address.
Otherwise,click Clone the computer's MAC address - IP Address and enter the IP address of the computer on the LAN whose MAC you are cloning. Once it is successfully configured, the address will be copied to configuration file. It is recommended that you clone the MAC address prior to hooking up the WAN Port.
8.4 LAN Interface
The LAN Interface Setup screen allows you to set up your LAN interface, the private IP
of your router’s LAN port, and the subnet mask of your LAN segment. Go to
Network >
LAN Interface
to access the following screen.
Figure 23
Network > LAN Interface
The following table describes the labels in this screen.
Table 14
Network > LAN Interface
Items
Information
Router IP
Address
The IP of your Router LAN port (default 192.168.100.1).
Subnet Mask
Subnet Mask of you LAN (default 255.255.255.0). All devices
on the network must have the same subnet mask to
communicate on the network.
DHCP
DHCP stands for Dynamic Host Configuration Protocol. It is a
protocol for assigning dynamic IP addresses “automatically”.
DHCP Client
Range
This field asks you to specify the DHCP Client IP address
range (default 100~200). You can also click the “Show Client”
button to list those connected DHCP clients.
Note
: In Router mode, the DHCP Server is enabled by
default. However, in AP mode, the DHCP Server disabled by
default.
Auto IP Address
Diversion
Click the drop down list, you may select “Enabled” to divert
the IP Address automatically or select “Disabled” to ban it.
When Enabled, the system will automatically detect conflicts
in the WAN and LAN IP. If there are conflicts, the LAN IP and
LAN DHCP Range will automatically jump to next subnet to
avoid conflicts.
8.4.1 Active DHCP Client List
This window pops up after clicking the
Show Client
button.
Figure 24
Network > LAN Interface > Show Client
The following table describes the labels in this screen.
Table 15
Network > LAN Interface > Show Client
Items
Information
IP Address
The IP of the connected client.
MAC Address
The MAC Address of the connected client.
Time Expired
The amount of seconds the client has been connected.
Refresh
This button refreshes the list with the most recent
information.
8.5 WAN Interface
This page allows users to configure WAN settings. You may select the Internet
connection type from the drop down list next to “WAN Access Type” and configure the
parameters for each mode. Go to
Network Settings > WAN Interface
to open the
following screen.
Figure 25
Network > WAN Interface
The following table describes the labels in this screen.
Table 16
Network > WAN Interface
Items
Information
WAN Access Type
Select to access the WAN as Static, DHCP Client or PPPoE.
Internet IP Address
The IP address provided by your Internet Service Provider
(ISP).
Subnet Mask
The Subnet Mask provided by your Internet Service Provider
(ISP).
Default Gateway
The Default Gateway provided by your Internet Service
Provider (ISP).
MTU Size
The Maximum packet size the router will transmit. Any
packet over the specified size will be chopped into a smaller
size before sending. Larger packet size will enhance
performance.
Enter the MTU number in the blank to set the limitation.
Clone MAC Address
There are two ways to clone a MAC address.
One way is to directly input a MAC address into the text
box. To store a MAC address, click the 'Manual Add' button
and add it to the “History MAC Table.” The second way is to
click the 'MAC Clone' button. This will copy the MAC
address from your network card.
Note: The 'History MAC Table' can save a maximum of three
MAC Addresses.
History MAC Table
To Delete MAC Addresses you have added before, mark the
check box on the right hand and click “Delete Selected.” If you
want to delete all saved MAC Addresses, click “Delete All.”
Part III:
Security
9 MAC Filtering
9.1 Overview
This chapter shows you how to enable and configure MAC address filtering that allows your MWR102 to permit and deny access to specific devices on your network.
Enable MAC Filtering to restrict the passage of certain types of data packets from your local network to the Internet through the travel router. Use of such filters can be helpful in securing or restricting your local network.
By default the firewall allows all traffic that originates from your LAN computers to go to all networks.
9.2 What You Can Do
• Use the MAC Filtering screen to enable or disable MAC Filtering, and modify what devices are restricted to the local network.
9.3 What You Need To Know
The MWR102’s MAC Filtering feature physically separates the LAN and the WAN of selected devices, and acts as a secure gateway to keep selected devices from having access to the WAN.
The MWR102 is installed between the LAN and a broadband modem connecting to the Internet. This allows it to act as a gateway for all data passing between the Internet and the LAN.
The MWR102 has one Ethernet WAN port and one Ethernet LAN port, which are used to physically separate the network into two areas. The WAN (Wide Area Network) port attaches to the broadband (cable or DSL) modem to the Internet.
The LAN (Local Area Network) port attaches to a network of computers. These computers will have access to Internet services such as e-mail, FTP and the World Wide Web unless their MAC address is blocked by the MWR102.
9.4 MAC Filtering
This page allows users to restrict data from passing onto the internet from certain
devices. Go to
Firewall > MAC Filtering
to open the following screen.
Figure 26
Firewall > MAC Filtering
Table 17
Firewall > MAC Filtering
Items
Information
Enable MAC
Filtering
Mark to enable MAC Filtering, and clear to disable.
MAC Address
Fill in the MAC address of wireless stations you want to forbid
Internet access to.
Comment
Input any text to describe the name of the device, reason for
filtering, etc.
Current Filter Table
Lists MAC Filter Settings you have added before. To delete
settings on the list, click the check box next to the item and
click “Delete Selected.” If you want to delete all saved MAC
addresses, click “Delete All.”
Enable MAC
Filtering
Mark to enable MAC Filtering, and clear to disable.
MAC Address
Fill in the MAC address of wireless stations you want to forbid
Internet access to.
Comment
Input any text to describe the name of the device, reason for
Part IV:
Management
Status Statistics Log
Upgrade Firmware Save/Reload Settings Password
10
Status
10.1
Overview
This chapter discusses how to access and interpret information about the MWR102.
10.2
What You Can Do
• Use the Status screento view the current status and basic settings of the device.
10.3
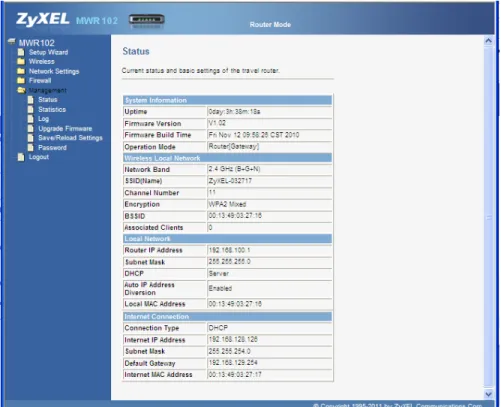
Status Screen
This information page shows the current status and basic settings of this device.
Click
Management
>
Status
to open the Status screen.
Table 18
Management > Status
LABEL DESCRIPTION
System Information
Uptime This is the total time the MWR102 has been on.
Firmware Build Time This is the date/time the current version of the firmware was released. Operation Mode This is the device mode to which the MWR102 is set – Router Mode.
Wireless Local Network Network Band
We provide six modes for your selection: 2.4GHz (B), 2.4 GHz (G), 2.4 GHz (N), 2.4GHz (B+G), 2.4 GHz (G+N), 2.4 GHz (B+G+N).
You may select one type of network band from the dropdown menu. SSID (Name) Shows the current name of your wireless network.
Channel Number This shows the channel number the MWR102 is currently using over Wireless LAN. Encryption This shows the level of wireless security the MWR102 is currently using.
BSSID This displays the MAC address of the wireless device.
Associated Clients Displays the number of clients currently associated to the MWR102 Local Network
Router IP Address Displays the IP address designated to the MWR102 by your router. Subnet Mask Shows what subnet mask the MWR102 is on.
DHCP This shows the LAN port’s DHCP role - Server or None. Internet Connection
Internet IP Address The IP address provided by your Internet Service Provider (ISP). Subnet Mask The Subnet Mask provided by your Internet Service Provider (ISP). Default Gateway The Default Gateway provided by your Internet Service Provider (ISP). Internet MAC Address MAC Address of the device on the internet.
11 Statistics
11.1
Overview
This page shows users data transfer information, and monitors packets sent and
received
11.2
Statistics Screen
. Click
Management > Statistics
to access the Statistics screen.
Figure 28
Management > Statistics
The following table describes the labels in this screen.
Table 19
Management > Statistics
LABEL DESCRIPTION
Wireless LAN
This table shows the number of packets sent over the Wireless LAN. This table shows the number of packets received over the Wireless LAN.
This table shows the number of packets received over Ethernet LAN. Ethernet WAN
This table shows the number of packets sent over the Ethernet WAN. This table shows the number of packets received over the Ethernet WAN. Refresh This button updates the Statistics screen to show the current number of packets
sent and received.
12 Log
12.1
Overview
This page shows current activity on the router, and allows you to set what information
the router logs.
12.2
Log Screen
Click
Management > Log
to access the Log screen.
Figure 29
Management > Log
LABEL DESCRIPTION
Enable Log Checking this box enables system log functionality.
System All Checking this box shows all logged information passing through the device.
Wireless Checking this box shows only the information passing through the wireless network. Apply Changes This button applies the changes made above. The MWR102 must reboot in order
for these changes to take affect.
Refresh This button updates the System Log to show the most recent information to pass through the device.
13 Upgrade Firmware
13.1
Overview
Occasionally, a firmware upgrade may be issued to address bugs or add functionality. This chapter discusses how to upgrade to the MWR102’s most recent firmware.
Find firmware at http://us.zyxel.com/Support/Download-Library.aspx. The upload process uses HTTP (Hypertext Transfer Protocol) and may take up to two minutes. After a successful upload, the system will reboot.
13.2
Upgrade Firmware Screen
Click Management > Upgrade Firmware. Follow the instructions in this screen to upload firmware to your MWR102.
Figure 30
Management > Upgrade Firmware
Table 21
Management > Upgrade Firmware
LABEL DESCRIPTION
Select File Type in the location of the file you want to upload in this field or click Browse... to find it.
Browse... Click Browse... to find the .bin file you want to upload. Remember that you must decompress compressed (.zip) files before you can upload them.
Upload Click Upload to begin the upload process. This process may take up to two minutes.
Note: Do not turn off the MWR102 while firmware upload is in progress!
After you see the Firmware Upload In Process screen, wait two minutes before logging into the MWR102 again.
The MWR102 automatically restarts in this time causing a temporary network disconnect. In some operating systems, you may see the following icon on your desktop.
Figure 31
Network Temporarily Disconnected
After two minutes, log in again and check your new firmware version in the Status screen. If the upload was not successful, an error message appears. Click Return to go back to the